reset FIAT STILO 2006 1.G User Guide
[x] Cancel search | Manufacturer: FIAT, Model Year: 2006, Model line: STILO, Model: FIAT STILO 2006 1.GPages: 274, PDF Size: 4.76 MB
Page 83 of 274
82
SAFETY
DEVICES
CORRECT USE
OF THE CAR
WARNING
LIGHTS AND
MESSAGES
IN AN
EMERGENCY
CAR
MAINTENANCE
TECHNICAL
SPECIFICATIONS
INDEX
DASHBOARD
AND CONTROLS
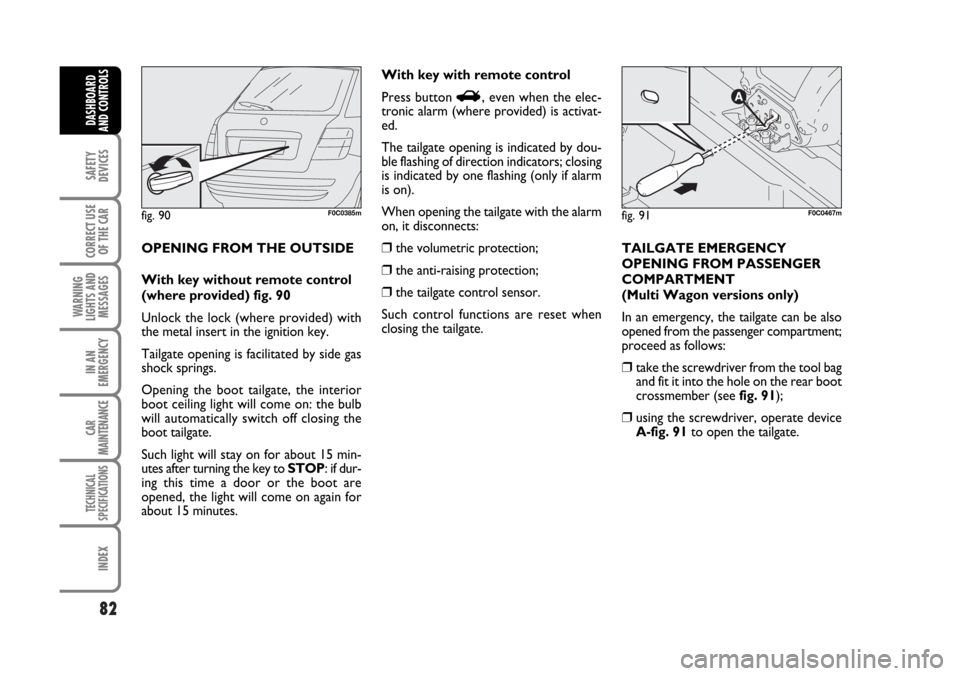
OPENING FROM THE OUTSIDE
With key without remote control
(where provided) fig. 90
Unlock the lock (where provided) with
the metal insert in the ignition key.
Tailgate opening is facilitated by side gas
shock springs.
Opening the boot tailgate, the interior
boot ceiling light will come on: the bulb
will automatically switch off closing the
boot tailgate.
Such light will stay on for about 15 min-
utes after turning the key to STOP: if dur-
ing this time a door or the boot are
opened, the light will come on again for
about 15 minutes.With key with remote control
Press button
R, even when the elec-
tronic alarm (where provided) is activat-
ed.
The tailgate opening is indicated by dou-
ble flashing of direction indicators; closing
is indicated by one flashing (only if alarm
is on).
When opening the tailgate with the alarm
on, it disconnects:
❒the volumetric protection;
❒the anti-raising protection;
❒the tailgate control sensor.
Such control functions are reset when
closing the tailgate.TAILGATE EMERGENCY
OPENING FROM PASSENGER
COMPARTMENT
(Multi Wagon versions only)
In an emergency, the tailgate can be also
opened from the passenger compartment;
proceed as follows:
❒take the screwdriver from the tool bag
and fit it into the hole on the rear boot
crossmember (see fig. 91);
❒using the screwdriver, operate device
A-fig. 91to open the tailgate.
fig. 90F0C0385mfig. 91F0C0467m
Page 110 of 274
109
CORRECT USE
OF THE CAR
WARNING
LIGHTS AND
MESSAGES
IN AN
EMERGENCY
CAR
MAINTENANCE
TECHNICAL
SPECIFICATIONS
INDEX
DASHBOARD
AND CONTROLS
SAFETY
DEVICES
SEAT BELTS ............................................................................ 110
PRETENSIONERS ................................................................... 113
CARRYING CHILDREN SAFELY....................................... 116
PRESETTING FOR MOUNTING THE
“ISOFIX TYPE” CHILD RESTRAINT SYSTEM ............... 121
PRESETTING FOR MOUNTING THE
“UNIVERSAL ISOFIX” CHILD RESTRAINT SYSTEM .. 124
FRONT AIR BAGS ................................................................. 126
SIDE AIR BAGS (Side bag - Window bag) ...................... 130
S S
A A
F F
E E
T T
Y Y
D D
E E
V V
I I
C C
E E
S S
Page 112 of 274
111
CORRECT USE
OF THE CAR
WARNING
LIGHTS AND
MESSAGES
IN AN
EMERGENCY
CAR
MAINTENANCE
TECHNICAL
SPECIFICATIONS
INDEX
DASHBOARD
AND CONTROLS
SAFETY
DEVICES
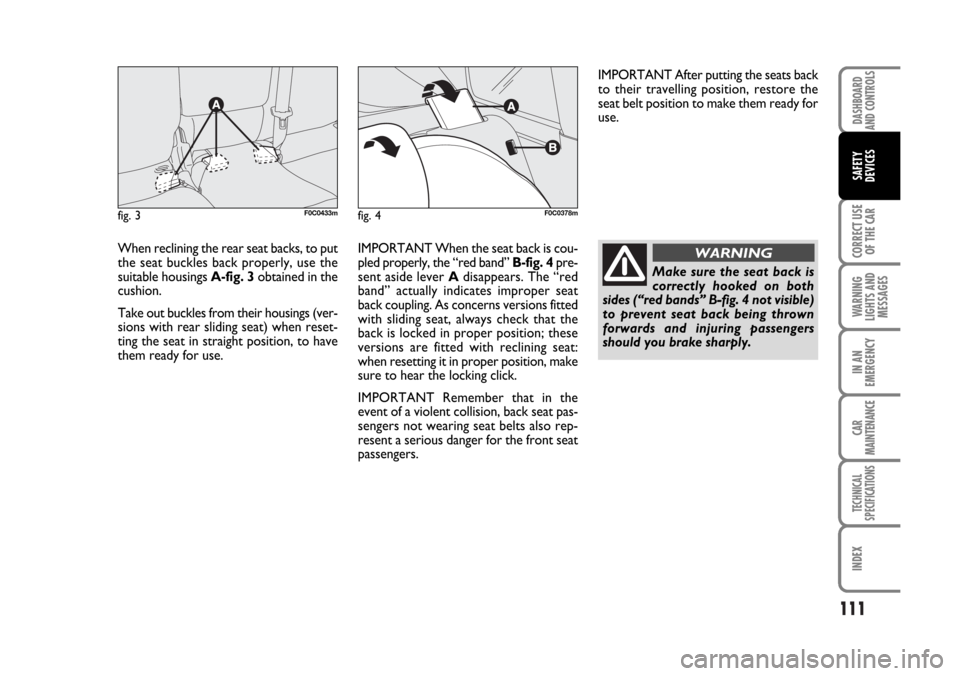
When reclining the rear seat backs, to put
the seat buckles back properly, use the
suitable housings A-fig. 3obtained in the
cushion.
Take out buckles from their housings (ver-
sions with rear sliding seat) when reset-
ting the seat in straight position, to have
them ready for use.IMPORTANT When the seat back is cou-
pled properly, the “red band” B-fig. 4pre-
sent aside lever Adisappears. The “red
band” actually indicates improper seat
back coupling. As concerns versions fitted
with sliding seat, always check that the
back is locked in proper position; these
versions are fitted with reclining seat:
when resetting it in proper position, make
sure to hear the locking click.
IMPORTANT Remember that in the
event of a violent collision, back seat pas-
sengers not wearing seat belts also rep-
resent a serious danger for the front seat
passengers.
fig. 3F0C0433mfig. 4F0C0378m
Make sure the seat back is
correctly hooked on both
sides (“red bands” B-fig. 4 not visible)
to prevent seat back being thrown
forwards and injuring passengers
should you brake sharply.
WARNING
IMPORTANT After putting the seats back
to their travelling position, restore the
seat belt position to make them ready for
use.
Page 113 of 274
112
CORRECT USE
OF THE CAR
WARNING
LIGHTS AND
MESSAGES
IN AN
EMERGENCY
CAR
MAINTENANCE
TECHNICAL
SPECIFICATIONS
IINDEX
DASHBOARD
AND CONTROLS
SAFETY
DEVICES
S.B.R. SYSTEM
The car is fitted with the S.B.R. system
(Seat Belt Reminder), consisting of a
buzzer which, together with the blinking
of warning light
The buzzer can be deactivated temporar-
ily (until next engine stop) by the follow-
ing procedure, to be carried out within
1 minute from turning the ignition key to
MAR:
❒fasten the driver’s seat belt.
❒wait for over 20 seconds and then re-
lease the driver’s seat belt.
For permanent deactivation, contact Fiat
Dealership.
The S.B.R. system can only be reset
through the set-up menu (see section
“Warning lights and messages” at para-
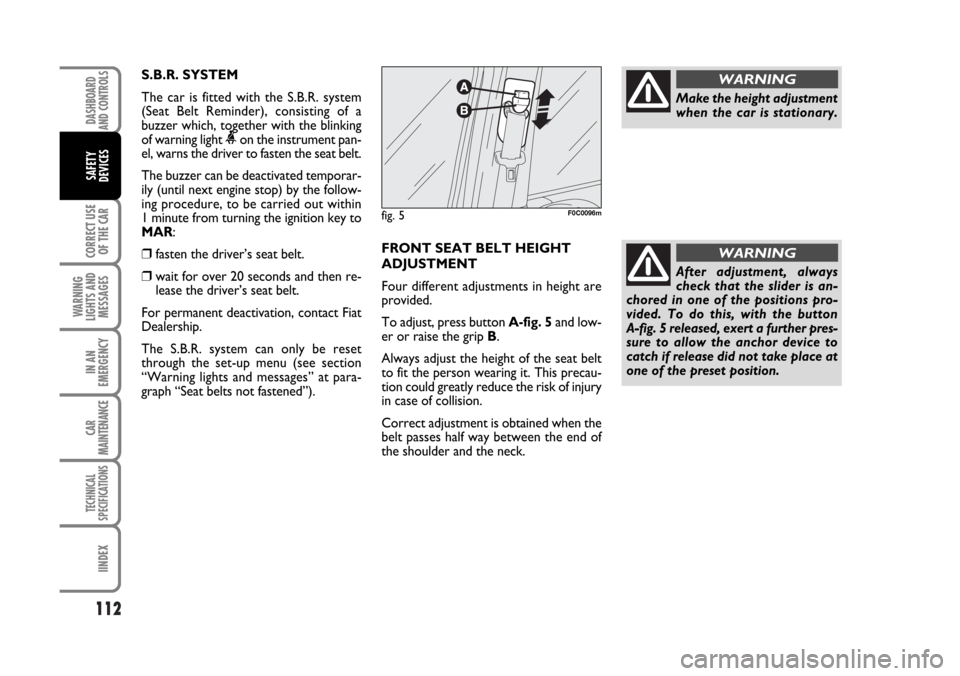
graph “Seat belts not fastened”).FRONT SEAT BELT HEIGHT
ADJUSTMENT
Four different adjustments in height are
provided.
To adjust, press button A-fig. 5and low-
er or raise the grip B.
Always adjust the height of the seat belt
to fit the person wearing it. This precau-
tion could greatly reduce the risk of injury
in case of collision.
Correct adjustment is obtained when the
belt passes half way between the end of
the shoulder and the neck.
fig. 5F0C0096m
Make the height adjustment
when the car is stationary.
WARNING
After adjustment, always
check that the slider is an-
chored in one of the positions pro-
vided. To do this, with the button
A-fig. 5 released, exert a further pres-
sure to allow the anchor device to
catch if release did not take place at
one of the preset position.
WARNING
Page 122 of 274
121
CORRECT USE
OF THE CAR
WARNING
LIGHTS AND
MESSAGES
IN AN
EMERGENCY
CAR
MAINTENANCE
TECHNICAL
SPECIFICATIONS
INDEX
DASHBOARD
AND CONTROLS
SAFETY
DEVICES
PRESETTING FOR
MOUNTING THE
“ISOFIX TYPE”
CHILD RESTRAINT
SYSTEM
This car is preset for mounting the Isofix
type child restraint system, a new Euro-
pean standardised system for carrying chil-
dren safely. Isofix child restraint system
is an additional option that does not pre-
vent from using traditional child restraint
systems. Isofix type child restraint system
covers three groups: 0, 0+ and 1.
Due to its different anchoring system, the
Isofix type child restraint system shall be
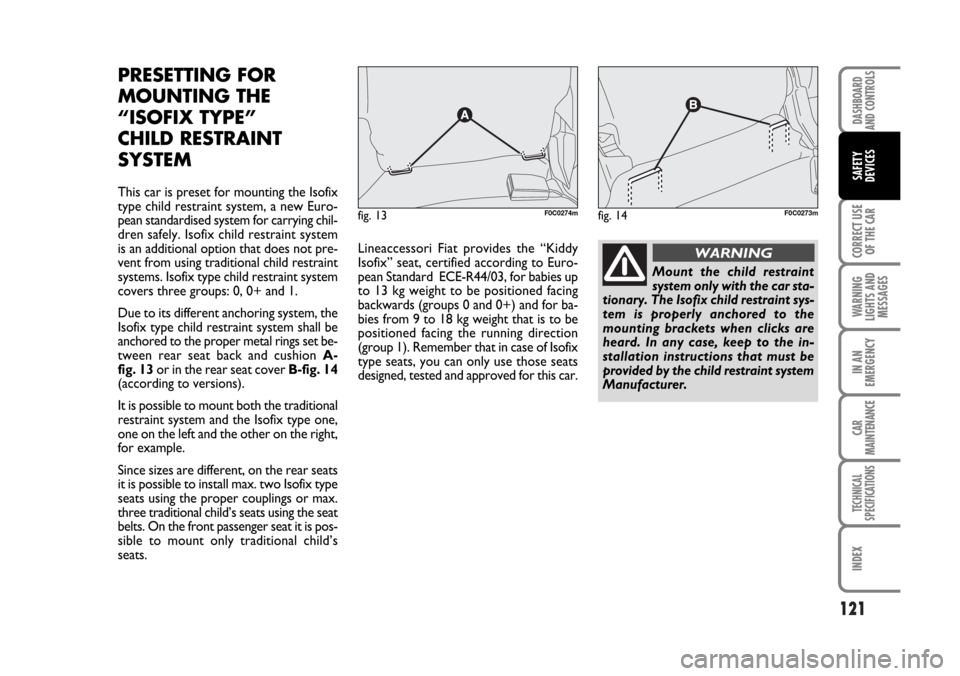
anchored to the proper metal rings set be-
tween rear seat back and cushion A-
fig. 13or in the rear seat cover B-fig. 14
(according to versions).
It is possible to mount both the traditional
restraint system and the Isofix type one,
one on the left and the other on the right,
for example.
Since sizes are different, on the rear seats
it is possible to install max. two Isofix type
seats using the proper couplings or max.
three traditional child’s seats using the seat
belts. On the front passenger seat it is pos-
sible to mount only traditional child’s
seats.Lineaccessori Fiat provides the “Kiddy
Isofix” seat, certified according to Euro-
pean Standard ECE-R44/03, for babies up
to 13 kg weight to be positioned facing
backwards (groups 0 and 0+) and for ba-
bies from 9 to 18 kg weight that is to be
positioned facing the running direction
(group 1). Remember that in case of Isofix
type seats, you can only use those seats
designed, tested and approved for this car.
fig. 13F0C0274mfig. 14F0C0273m
Mount the child restraint
system only with the car sta-
tionary. The Isofix child restraint sys-
tem is properly anchored to the
mounting brackets when clicks are
heard. In any case, keep to the in-
stallation instructions that must be
provided by the child restraint system
Manufacturer.
WARNING
Page 123 of 274
122
CORRECT USE
OF THE CAR
WARNING
LIGHTS AND
MESSAGES
IN AN
EMERGENCY
CAR
MAINTENANCE
TECHNICAL
SPECIFICATIONS
IINDEX
DASHBOARD
AND CONTROLS
SAFETY
DEVICES
FITTING THE ISOFIX TYPE SEAT
Groups 0 and 0+
For children of the 0, 0+ weight group (ba-
bies up to 13 kg), the child’s seat is facing
backwards and the child is restrained by
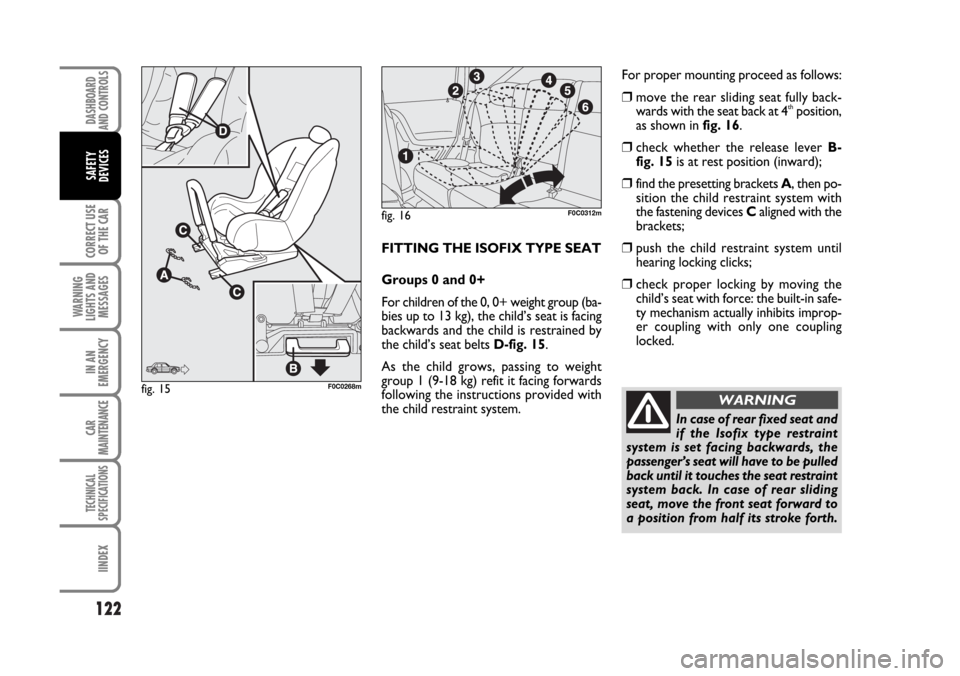
the child’s seat belts D-fig. 15.
As the child grows, passing to weight
group 1 (9-18 kg) refit it facing forwards
following the instructions provided with
the child restraint system.For proper mounting proceed as follows:
❒move the rear sliding seat fully back-
wards with the seat back at 4thposition,
as shown in fig. 16.
❒check whether the release lever B-
fig. 15is at rest position (inward);
❒find the presetting brackets A, then po-
sition the child restraint system with
the fastening devices Caligned with the
brackets;
❒push the child restraint system until
hearing locking clicks;
❒check proper locking by moving the
child’s seat with force: the built-in safe-
ty mechanism actually inhibits improp-
er coupling with only one coupling
locked.
fig. 16F0C0312m
fig. 15F0C0268m
In case of rear fixed seat and
if the Isofix type restraint
system is set facing backwards, the
passenger’s seat will have to be pulled
back until it touches the seat restraint
system back. In case of rear sliding
seat, move the front seat forward to
a position from half its stroke forth.
WARNING
Page 124 of 274
123
CORRECT USE
OF THE CAR
WARNING
LIGHTS AND
MESSAGES
IN AN
EMERGENCY
CAR
MAINTENANCE
TECHNICAL
SPECIFICATIONS
INDEX
DASHBOARD
AND CONTROLS
SAFETY
DEVICES
Group 1
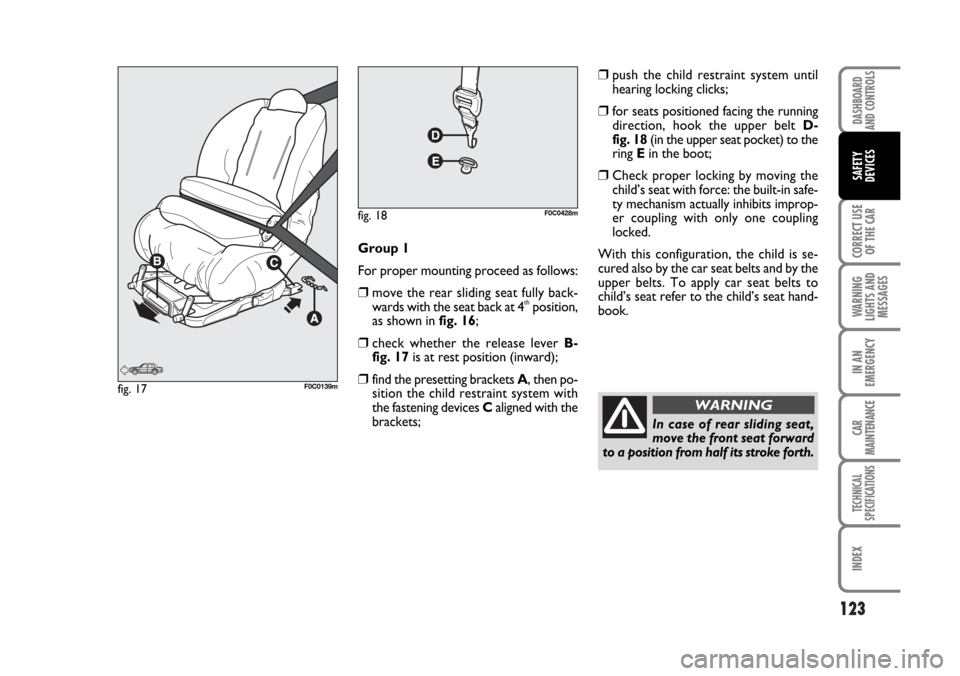
For proper mounting proceed as follows:
❒move the rear sliding seat fully back-
wards with the seat back at 4thposition,
as shown in fig. 16;
❒check whether the release lever B-
fig. 17is at rest position (inward);
❒find the presetting brackets A, then po-
sition the child restraint system with
the fastening devices Caligned with the
brackets;
❒push the child restraint system until
hearing locking clicks;
❒for seats positioned facing the running
direction, hook the upper belt D-
fig. 18(in the upper seat pocket) to the
ring E in the boot;
❒Check proper locking by moving the
child’s seat with force: the built-in safe-
ty mechanism actually inhibits improp-
er coupling with only one coupling
locked.
With this configuration, the child is se-
cured also by the car seat belts and by the
upper belts. To apply car seat belts to
child’s seat refer to the child’s seat hand-
book.
fig. 17F0C0139m
fig. 18F0C0428m
In case of rear sliding seat,
move the front seat forward
to a position from half its stroke forth.
WARNING
Page 125 of 274
124
CORRECT USE
OF THE CAR
WARNING
LIGHTS AND
MESSAGES
IN AN
EMERGENCY
CAR
MAINTENANCE
TECHNICAL
SPECIFICATIONS
IINDEX
DASHBOARD
AND CONTROLS
SAFETY
DEVICES
PRESETTING FOR
MOUNTING THE
“UNIVERSAL ISOFIX”
CHILD RESTRAINT
SYSTEM
This car is preset for mounting the “Uni-
versal Isofix” child restraint system, a new
European standardised system for carry-
ing children safely.
The “Universal Isofix” child’s seat covers
weight group: 1.
Due to its different anchoring system, the
Universal Isofix child’s seat shall be an-
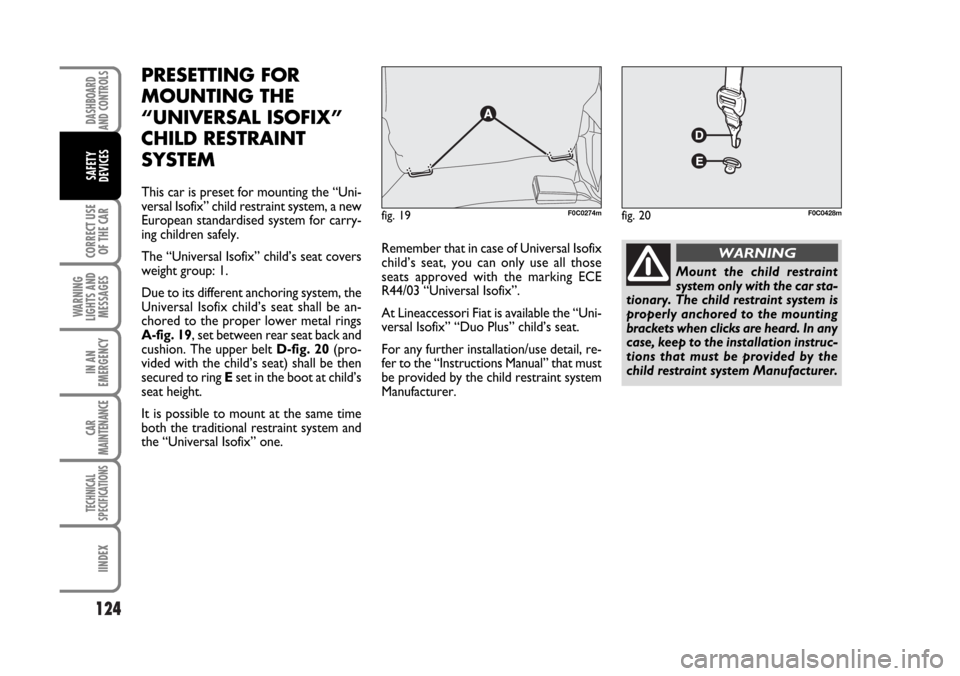
chored to the proper lower metal rings
A-fig. 19, set between rear seat back and
cushion. The upper belt D-fig. 20(pro-
vided with the child’s seat) shall be then
secured to ring Eset in the boot at child’s
seat height.
It is possible to mount at the same time
both the traditional restraint system and
the “Universal Isofix” one.Remember that in case of Universal Isofix
child’s seat, you can only use all those
seats approved with the marking ECE
R44/03 “Universal Isofix”.
At Lineaccessori Fiat is available the “Uni-
versal Isofix” “Duo Plus” child’s seat.
For any further installation/use detail, re-
fer to the “Instructions Manual” that must
be provided by the child restraint system
Manufacturer.
fig. 19F0C0274mfig. 20F0C0428m
Mount the child restraint
system only with the car sta-
tionary. The child restraint system is
properly anchored to the mounting
brackets when clicks are heard. In any
case, keep to the installation instruc-
tions that must be provided by the
child restraint system Manufacturer.
WARNING
Page 166 of 274
165
IN AN
EMERGENCY
CAR
MAINTENANCE
TECHNICAL
SPECIFICATIONS
INDEX
DASHBOARD
AND CONTROLS
SAFETY
DEVICES
CORRECT USE
OF THE CAR
WARNING
LIGHTS AND
MESSAGES
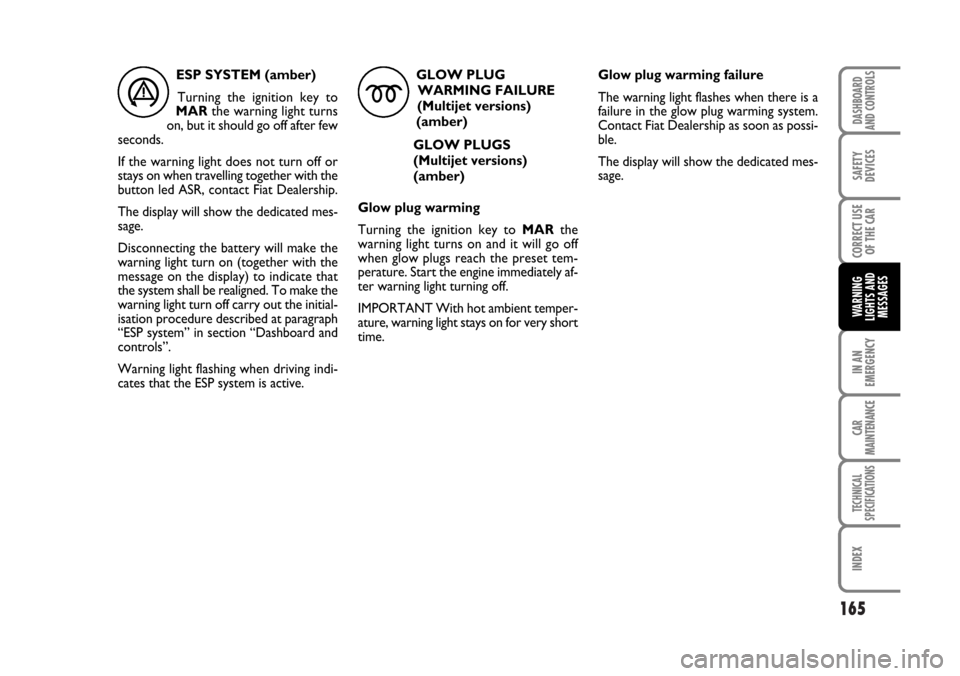
ESP SYSTEM (amber)
Turning the ignition key to
MARthe warning light turns
on, but it should go off after few
seconds.
If the warning light does not turn off or
stays on when travelling together with the
button led ASR, contact Fiat Dealership.
The display will show the dedicated mes-
sage.
Disconnecting the battery will make the
warning light turn on (together with the
message on the display) to indicate that
the system shall be realigned. To make the
warning light turn off carry out the initial-
isation procedure described at paragraph
“ESP system” in section “Dashboard and
controls”.
Warning light flashing when driving indi-
cates that the ESP system is active.GLOW PLUG
WARMING FAILURE
(Multijet versions)
(amber)
GLOW PLUGS
(Multijet versions)
(amber)
Glow plug warming
Turning the ignition key to MARthe
warning light turns on and it will go off
when glow plugs reach the preset tem-
perature. Start the engine immediately af-
ter warning light turning off.
IMPORTANT With hot ambient temper-
ature, warning light stays on for very short
time.
ám
Glow plug warming failure
The warning light flashes when there is a
failure in the glow plug warming system.
Contact Fiat Dealership as soon as possi-
ble.
The display will show the dedicated mes-
sage.
Page 266 of 274
265
WARNING
LIGHTS AND
MESSAGES
DASHBOARD
AND CONTROLS
SAFETY
DEVICES
CORRECT USE
OF THE CAR
IN AN
EMERGENCY
CAR
MAINTENANCE
TECHNICAL
SPECIFICATIONS
INDEX
Gearbox
– using manual gearbox .................. 140
– using Selespeed gearbox ............. 141
Glass holder .......................................... 73
Glove box light
(bulb replacement) ............................ 194
Glove box/oddment
compartments ................................... 71
Handbrake ........................................... 139
Hazard lights ......................................... 68
Head restraints ..................................... 41
Headlight washer .................................. 65
Headlights ............................................... 94
Heating and ventilation system ..44-46
Identification data ............................... 238
If an exterior light burns out ............. 184
If an interior light burns out .............. 192
Ignition switch ...................................... 20
In an emergency............................. 169
Independent additional heater ......... 56
Installation of electric/
electronic devices .............................. 101
Instrument panel ................................. 6
Instruments ........................................... 21
Interior fittings ..................................... 70
Interiors ................................................. 235Isofix (child restraint system) ........... 121
Jacking the car ..................................... 206
Keys ....................................................... 10
Load limiters ....................................... 113
Main beam headlights......................... 59
MSR (system) ....................................... 99
Multifunction display ........................... 23
Number plate lights
(bulb replacement) ............................ 191
OCS
(Occupant Classification System) .. 129
Oddment compartments .................. 73
Paint ...................................................... 233
Parking ................................................... 139
Parking lights ......................................... 69
Parking sensors .................................... 103
Performance ......................................... 253
Pollen filter ............................................ 225
Power windows ................................... 80
Presetting for mounting the
“Isofix ” child restraint system ...... 121 Electric power steering “Dualdrive” .. 102
Electronic alarm ................................... 17
Engine
– identification code ........................ 240
– technical data ......................... 241-242
Engine compartment
– washing ............................................ 234
Engine oil
– consumption .................................. 220
Environment protection .................... 108
EOBD (system) .................................... 99
ESP (system) ......................................... 97
External lights ....................................... 59
Fiat CODE (system) .......................... 8
Fire extinguisher .................................. 208
Fix&Go automatic ............................... 177
Flashing the headlights ........................ 59
Fluid level checks ................................. 216
Fluids and lubricants ........................... 259
Follow me home (device) ................. 60
Front fog lights ............................... 68-69
– (bulb replacement)......................... 186
Fuel consumption ................................. 261
Fuel feed/ignition ................................. 241
Fuel filler cap ........................................ 106
Fuses (replacement) ........................... 196