display FIAT STILO 2006 1.G Owner's Manual
[x] Cancel search | Manufacturer: FIAT, Model Year: 2006, Model line: STILO, Model: FIAT STILO 2006 1.GPages: 274, PDF Size: 4.76 MB
Page 54 of 274

53
SAFETY
DEVICES
CORRECT USE
OF THE CAR
WARNING
LIGHTS AND
MESSAGES
IN AN
EMERGENCY
CAR
MAINTENANCE
TECHNICAL
SPECIFICATIONS
INDEX
DASHBOARD
AND CONTROLS
FAN SPEED ADJUSTMENT
To adjust the fan speed, press button
p.
The 12 selectable speeds are shown by the
lighting up of the bars on the climate con-
trol system display:
❒max fan speed = all bars lit
❒min fan speed = one bar lit.
The fan can be cut off (all bars off) only if
the climate control compressor has been
switched off pressing button
❄.
To restore automatic fan speed control,
after a manual adjustment, press button
AUTO.FAST FRONT WINDOW
DEMISTING/DEFROSTING
(MAX-DEF function)
Pressing button
-the climate control
automatically activates timed operation of
all the functions required to quicken
demisting/defrosting of the windscreen
and front side windows.
Functions are:
❒switches on climate control compres-
sor (if outside temperature exceeds
4°C);
❒switches off inside air recirculation, if
on (button led
Toff);
❒switches on heated rear window (but-
ton led
-on) and door mirror coils;
❒sets max air temperature;
❒activates proper air flow.HEATED REAR WINDOW
AND DOOR MIRROR
DEMISTING/DEFROSTING
Pressing button
(activates this function.
When this function is on, the button led
is on.
This function is timed.
IMPORTANT Press button
Tto ob-
tain outside air inlet into passenger com-
partment.
Page 55 of 274

54
SAFETY
DEVICES
CORRECT USE
OF THE CAR
WARNING
LIGHTS AND
MESSAGES
IN AN
EMERGENCY
CAR
MAINTENANCE
TECHNICAL
SPECIFICATIONS
INDEX
DASHBOARD
AND CONTROLS
AQS (Air Quality System)
function activation
The AQS function, (message AQS on the
display), turns on air recirculation auto-
matically when it detects the presence of
outside polluted air (for example when
driving in the city, queues and tunnels).
IMPORTANT When the AQS function is
active, after 15 minutes of consecutive in-
ternal air recirculation, the climate con-
trol system enables outside air inlet (re-
gardless of air pollution level) for approx.
1 minute to change air inside the passen-
ger compartment. INSIDE AIR RECIRCULATION
ON/OFF AND AQS FUNCTION
(Air Quality System)
Press button
T.
Inside air recirculation is controlled by
three operating logics:
❒automatic control, indicated by message
AQS on the display and button led
Toff;
❒forced switching off (inside air recircu-
lation always off with air inlet from out-
side), button led
Toff;
❒forced switching on (inside air recircu-
lation always on with air inlet from out-
side), button led
Ton.Pressing button OFF, the climate control
system turns on automatically the inside
air recirculation function (button led
Ton). In these conditions it is how-
ever possible to take air from the outside
(and vice versa) pressing button
T(button led off).
With button OFF pressed (button led on),
the AQS (Air Quality System) function
cannot be activated.
IMPORTANT The inside air recirculation
system makes it possible to reach the re-
quired “heating” or “cooling” conditions
faster. It is however inadvisable to use it
on rainy/cold days as it would consider-
ably increase the possibility of the win-
dows misting inside, especially if the cli-
mate control system is off. It is advisable
to turn on the inside air recirculation sys-
tem in queues or tunnels to avoid admit-
ting polluted air from outside. The pro-
longed use of this function should how-
ever be avoided, especially with several
persons on board, to avoid the possibili-
ty of the windows misting inside.
Page 56 of 274

55
SAFETY
DEVICES
CORRECT USE
OF THE CAR
WARNING
LIGHTS AND
MESSAGES
IN AN
EMERGENCY
CAR
MAINTENANCE
TECHNICAL
SPECIFICATIONS
INDEX
DASHBOARD
AND CONTROLS
ALIGNMENT OF SET
TEMPERATURES
(MONO function)
Pressing button MONO automatically
aligns the temperature on the passenger’s
side with that on the driver’s side.
Turn the knob AUTO or MONO to
raise/reduce the temperature between the
two zones by the same value.
Press again button MONO to disable the
function.CLIMATE CONTROL
COMPRESSOR ON/OFF
Press button
❄to switch on the climate
control compressor.
Compressor on
❒button led ❄on;
❒symbol ❄on the display, lit.
Compressor off
❒button led ❄off;
❒symbol ❄on the display, off;
❒inside air recirculation off;
❒AQS function disabled.
With the climate control compressor off,
it is not possible to admit air to the pas-
senger compartment with a temperature
below the outside temperature; in this
case symbol ò flashes on the display.
The switching off of the climate control
compressor remains in storage even when
the engine has been stopped. To restore
automatic control for switching on the cli-
mate control compressor, press button
❄or AUTO, in which case, the other man-
ual settings set will be cancelled.AIR DISTRIBUTION SELECTION
Pressing one or more buttons
Q/E/Zit is possible to choose manually 7 of the
possible air distributions to the passenger
compartment:
QAir flow to the windscreen and
front side window vents to demist
or defrost them.
ZAir flow towards the front and
rear lower parts of the passenger
compartment. This type of distri-
bution allows heating of the pas-
senger compartment in the short-
est time.
Q
ZESplitting of the air flow between
front and rear vents, centre and
side dashboard outlets, rear out-
let, windscreen and front side win-
dow demisting vents.
EAir flow to the dashboard centre
and side outlets (passenger’s
body).
Page 57 of 274

56
SAFETY
DEVICES
CORRECT USE
OF THE CAR
WARNING
LIGHTS AND
MESSAGES
IN AN
EMERGENCY
CAR
MAINTENANCE
TECHNICAL
SPECIFICATIONS
INDEX
DASHBOARD
AND CONTROLS
QSplitting of the air flow between
Zfeet vents and windscreen and
front side window demisting/de-
frosting vents. This type of air
distribution allows satisfactory
heating of the passenger com-
partment while preventing pos-
sible misting of the windows.
ZE
Splitting of the air flow between
feet vents (warmest air) and the
dashboard centre and side outlets
and the rear outlet (coolest air).
E QSplitting of the air flow between
centre and side dashboard outlets,
rear outlet and windscreen and
side window demisting/defrosting
vents. This type of air distribution
allows satisfactory ventilation of
the passenger compartment while
preventing possible misting of the
windows.IMPORTANT For operation of the cli-
mate control system, at least one of but-
tons
Q/E/Zshall be activated. Deacti-
vation of all buttons
Q/E/Zis therefore
not enabled by the system.
IMPORTANT To switch the system on
again, press button OFF; this operation re-
sets all operating conditions stored before
switching off.
To restore automatic air distribution con-
trol after a manual selection, press button
AUTO.SWITCHING THE CLIMATE
CONTROL SYSTEM OFF
Press button OFF.
The following information is displayed:
❒writing OFF;
❒outside temperature;
❒inside air recirculation on (button led
Ton).
Page 59 of 274
58
SAFETY
DEVICES
CORRECT USE
OF THE CAR
WARNING
LIGHTS AND
MESSAGES
IN AN
EMERGENCY
CAR
MAINTENANCE
TECHNICAL
SPECIFICATIONS
INDEX
DASHBOARD
AND CONTROLS
Direction indicators are switched off au-
tomatically when the steering wheel is
straightened.
If you want the indicator to flash briefly to
show that you are about to change lane,
move the stalk up or down without click-
ing into position (unstable position). When
released the stalk will return to its home
position.
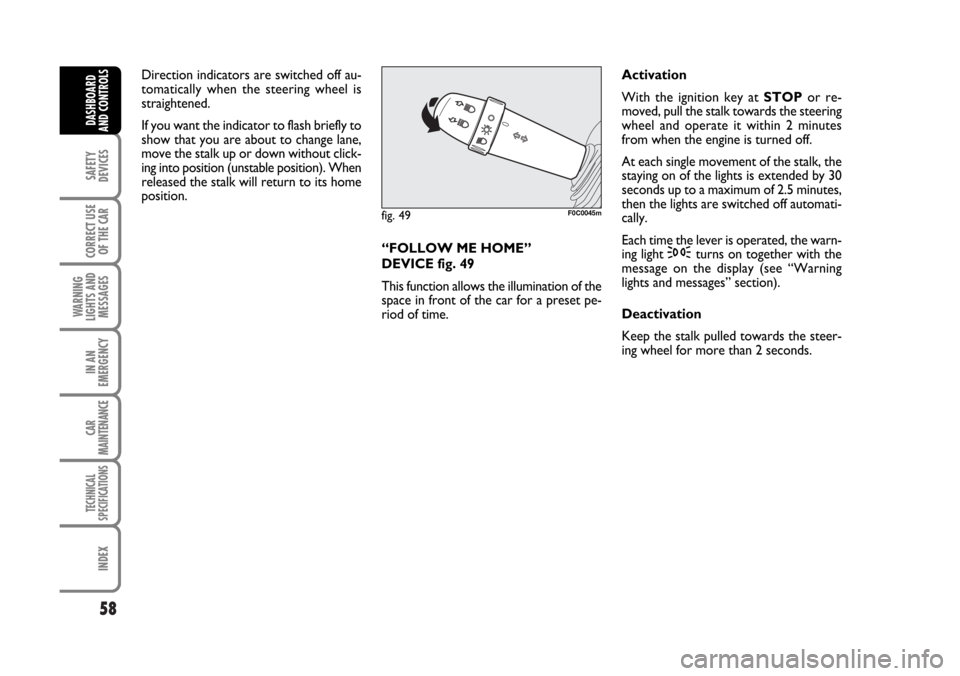
“FOLLOW ME HOME”
DEVICE fig. 49
This function allows the illumination of the
space in front of the car for a preset pe-
riod of time.Activation
With the ignition key at STOPor re-
moved, pull the stalk towards the steering
wheel and operate it within 2 minutes
from when the engine is turned off.
At each single movement of the stalk, the
staying on of the lights is extended by 30
seconds up to a maximum of 2.5 minutes,
then the lights are switched off automati-
cally.
Each time the lever is operated, the warn-
ing light
3turns on together with the
message on the display (see “Warning
lights and messages” section).
Deactivation
Keep the stalk pulled towards the steer-
ing wheel for more than 2 seconds.
fig. 49F0C0045m
Page 60 of 274
59
SAFETY
DEVICES
CORRECT USE
OF THE CAR
WARNING
LIGHTS AND
MESSAGES
IN AN
EMERGENCY
CAR
MAINTENANCE
TECHNICAL
SPECIFICATIONS
INDEX
DASHBOARD
AND CONTROLS
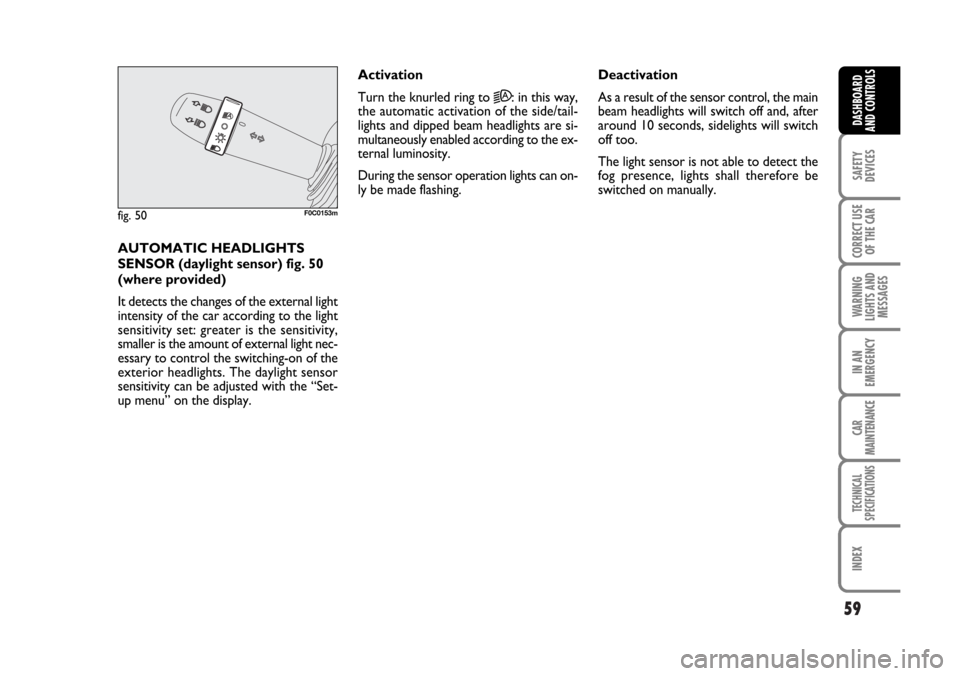
AUTOMATIC HEADLIGHTS
SENSOR (daylight sensor) fig. 50
(where provided)
It detects the changes of the external light
intensity of the car according to the light
sensitivity set: greater is the sensitivity,
smaller is the amount of external light nec-
essary to control the switching-on of the
exterior headlights. The daylight sensor
sensitivity can be adjusted with the “Set-
up menu” on the display.Activation
Turn the knurled ring to
2A: in this way,
the automatic activation of the side/tail-
lights and dipped beam headlights are si-
multaneously enabled according to the ex-
ternal luminosity.
During the sensor operation lights can on-
ly be made flashing. Deactivation
As a result of the sensor control, the main
beam headlights will switch off and, after
around 10 seconds, sidelights will switch
off too.
The light sensor is not able to detect the
fog presence, lights shall therefore be
switched on manually.
fig. 50F0C0153m
Page 65 of 274
64
SAFETY
DEVICES
CORRECT USE
OF THE CAR
WARNING
LIGHTS AND
MESSAGES
IN AN
EMERGENCY
CAR
MAINTENANCE
TECHNICAL
SPECIFICATIONS
INDEX
DASHBOARD
AND CONTROLS
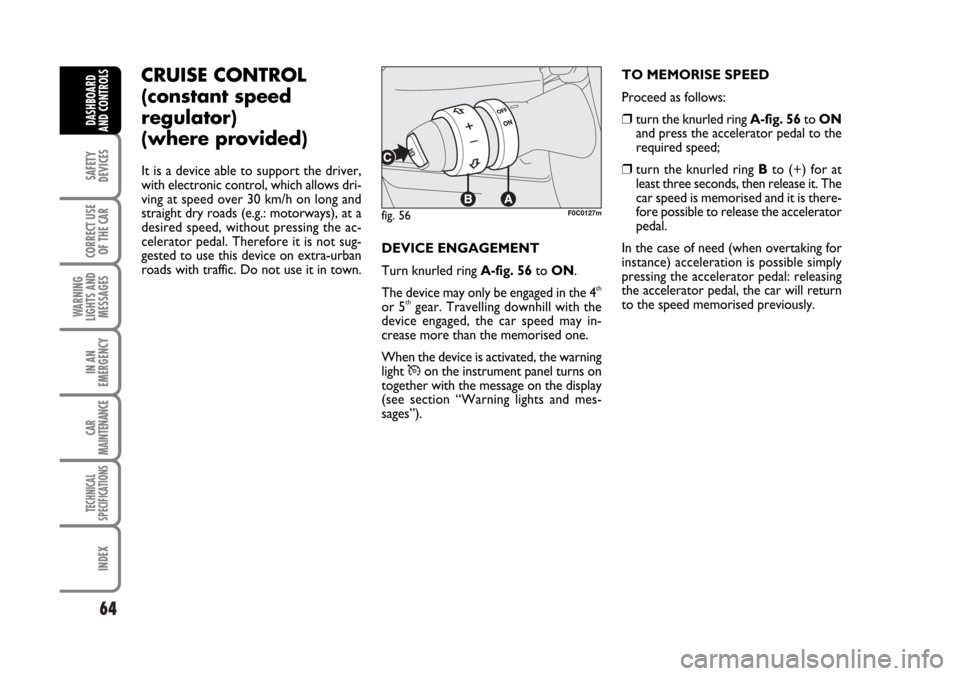
DEVICE ENGAGEMENT
Turn knurled ring A-fig. 56to ON.
The device may only be engaged in the 4
th
or 5thgear. Travelling downhill with the
device engaged, the car speed may in-
crease more than the memorised one.
When the device is activated, the warning
light
Üon the instrument panel turns on
together with the message on the display
(see section “Warning lights and mes-
sages”).TO MEMORISE SPEED
Proceed as follows:
❒turn the knurled ring A-fig. 56to ON
and press the accelerator pedal to the
required speed;
❒turn the knurled ring Bto (+) for at
least three seconds, then release it. The
car speed is memorised and it is there-
fore possible to release the accelerator
pedal.
In the case of need (when overtaking for
instance) acceleration is possible simply
pressing the accelerator pedal: releasing
the accelerator pedal, the car will return
to the speed memorised previously.
fig. 56F0C0127m
CRUISE CONTROL
(constant speed
regulator)
(where provided)
It is a device able to support the driver,
with electronic control, which allows dri-
ving at speed over 30 km/h on long and
straight dry roads (e.g.: motorways), at a
desired speed, without pressing the ac-
celerator pedal. Therefore it is not sug-
gested to use this device on extra-urban
roads with traffic. Do not use it in town.
Page 70 of 274
69
SAFETY
DEVICES
CORRECT USE
OF THE CAR
WARNING
LIGHTS AND
MESSAGES
IN AN
EMERGENCY
CAR
MAINTENANCE
TECHNICAL
SPECIFICATIONS
INDEX
DASHBOARD
AND CONTROLS
PARKING LIGHTS
These lights can only be turned on with ig-
nition key at STOPor removed, by
pressing button B-fig. 61for about 1 sec-
ond.
Press the button again to turn the light off.
REAR FOG LIGHTS
To turn rear fog lights on, press button C-
fig. 61, to activate these lights it is nec-
essary to have the dipped beams or front
fog lights switched on.
Press the button again to turn the lights
off. Carefully inspect the car to find fuel leaks,
e.g. in the engine compartment, under the
car or near the tank.
If no fuel leaks are found and the car can
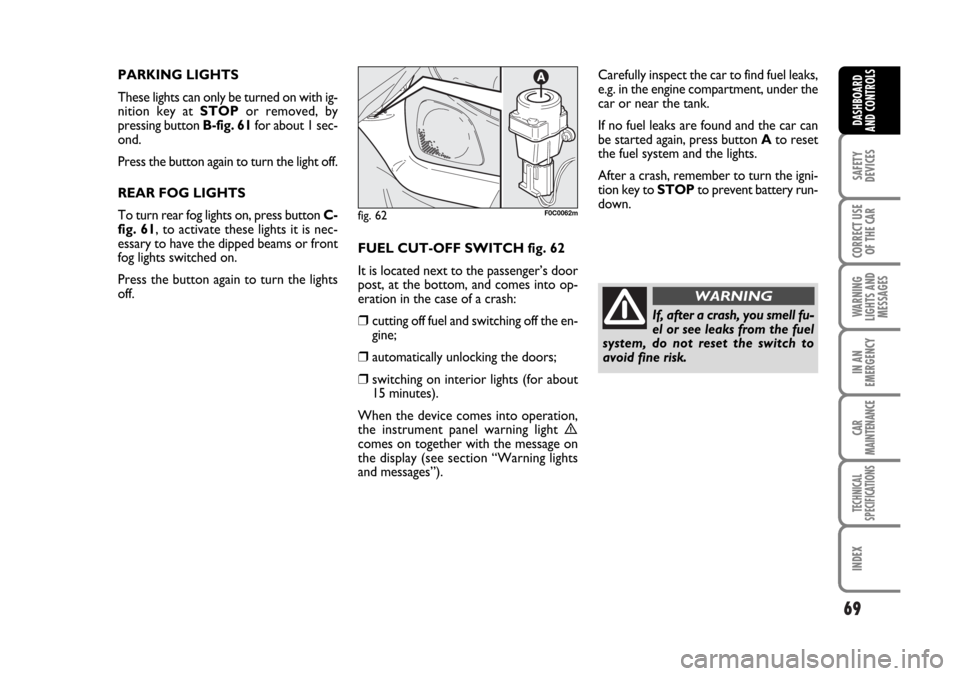
be started again, press button Ato reset
the fuel system and the lights.
After a crash, remember to turn the igni-
tion key to STOPto prevent battery run-
down.
FUEL CUT-OFF SWITCH fig. 62
It is located next to the passenger’s door
post, at the bottom, and comes into op-
eration in the case of a crash:
❒cutting off fuel and switching off the en-
gine;
❒automatically unlocking the doors;
❒switching on interior lights (for about
15 minutes).
When the device comes into operation,
the instrument panel warning light
ècomes on together with the message on
the display (see section “Warning lights
and messages”).
fig. 62F0C0062m
If, after a crash, you smell fu-
el or see leaks from the fuel
system, do not reset the switch to
avoid fine risk.
WARNING
Page 82 of 274
81
SAFETY
DEVICES
CORRECT USE
OF THE CAR
WARNING
LIGHTS AND
MESSAGES
IN AN
EMERGENCY
CAR
MAINTENANCE
TECHNICAL
SPECIFICATIONS
INDEX
DASHBOARD
AND CONTROLS
Press buttons Aor Bto open/close the
required window.
Pressing briefly one of the two buttons,
the window “jerks” , whereas a prolonged
pressing makes the window opening or
closing in “automatic continuous” mode.
When pressing again button Aor Bthe
window stops in the required position.BOOT
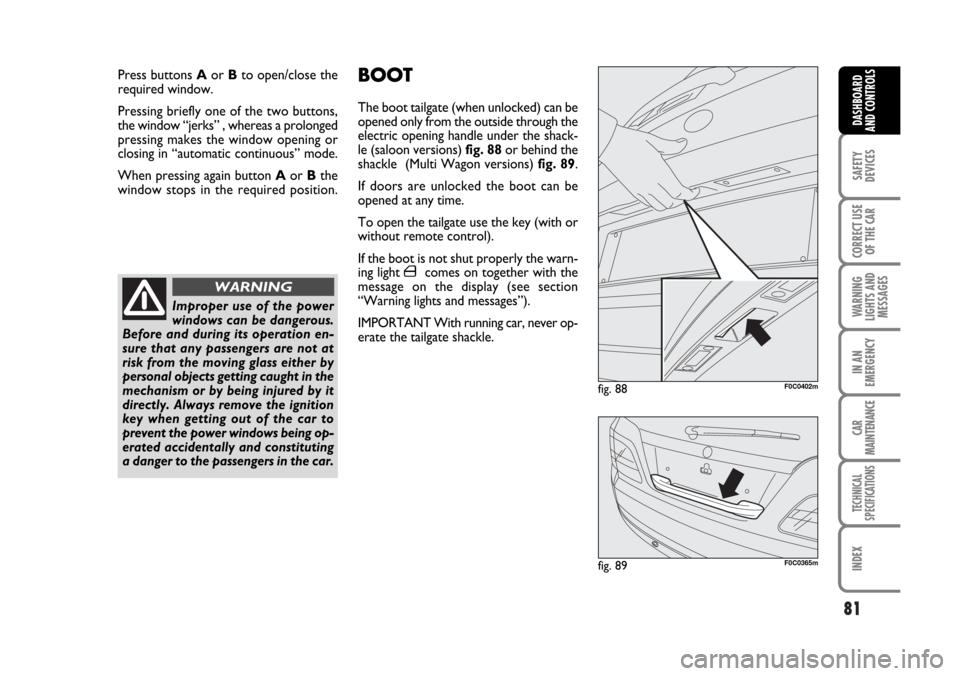
The boot tailgate (when unlocked) can be
opened only from the outside through the
electric opening handle under the shack-
le (saloon versions) fig. 88or behind the
shackle (Multi Wagon versions) fig. 89.
If doors are unlocked the boot can be
opened at any time.
To open the tailgate use the key (with or
without remote control).
If the boot is not shut properly the warn-
ing light
´comes on together with the
message on the display (see section
“Warning lights and messages”).
IMPORTANT With running car, never op-
erate the tailgate shackle.
Improper use of the power
windows can be dangerous.
Before and during its operation en-
sure that any passengers are not at
risk from the moving glass either by
personal objects getting caught in the
mechanism or by being injured by it
directly. Always remove the ignition
key when getting out of the car to
prevent the power windows being op-
erated accidentally and constituting
a danger to the passengers in the car.
WARNING
fig. 88F0C0402m
fig. 89F0C0365m
Page 93 of 274
92
SAFETY
DEVICES
CORRECT USE
OF THE CAR
WARNING
LIGHTS AND
MESSAGES
IN AN
EMERGENCY
CAR
MAINTENANCE
TECHNICAL
SPECIFICATIONS
INDEX
DASHBOARD
AND CONTROLS
BONNET
TO OPEN THE BONNET
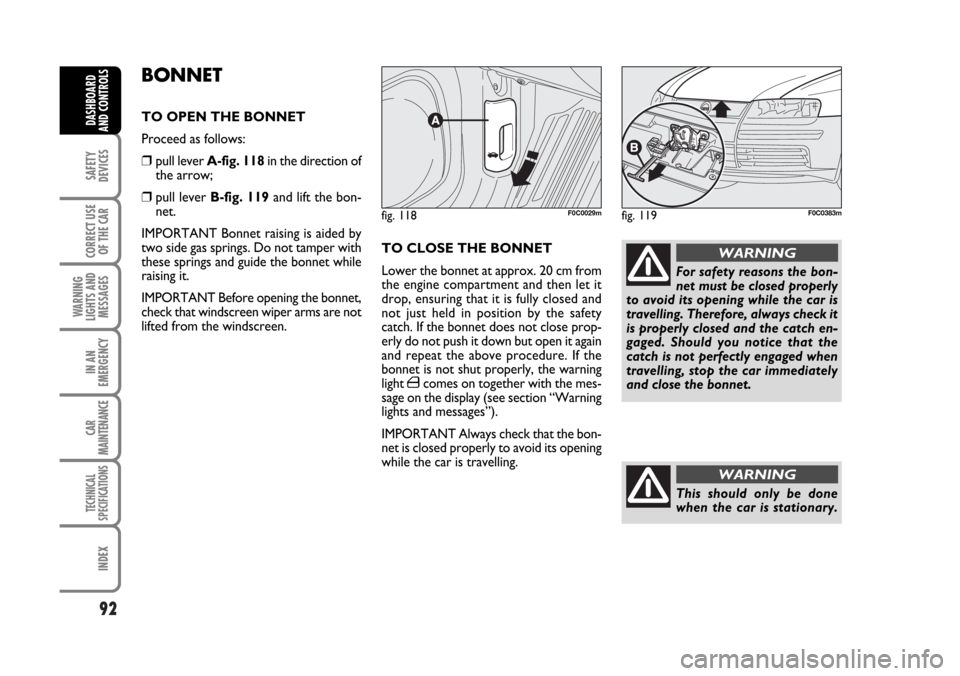
Proceed as follows:
❒pull lever A-fig. 118in the direction of
the arrow;
❒pull lever B-fig. 119and lift the bon-
net.
IMPORTANT Bonnet raising is aided by
two side gas springs. Do not tamper with
these springs and guide the bonnet while
raising it.
IMPORTANT Before opening the bonnet,
check that windscreen wiper arms are not
lifted from the windscreen.TO CLOSE THE BONNET
Lower the bonnet at approx. 20 cm from
the engine compartment and then let it
drop, ensuring that it is fully closed and
not just held in position by the safety
catch. If the bonnet does not close prop-
erly do not push it down but open it again
and repeat the above procedure. If the
bonnet is not shut properly, the warning
light
´comes on together with the mes-
sage on the display (see section “Warning
lights and messages”).
IMPORTANT Always check that the bon-
net is closed properly to avoid its opening
while the car is travelling.
fig. 118F0C0029mfig. 119F0C0383m
For safety reasons the bon-
net must be closed properly
to avoid its opening while the car is
travelling. Therefore, always check it
is properly closed and the catch en-
gaged. Should you notice that the
catch is not perfectly engaged when
travelling, stop the car immediately
and close the bonnet.
WARNING
This should only be done
when the car is stationary.
WARNING