FIAT STRADA 2012 Owner handbook (in English)
Manufacturer: FIAT, Model Year: 2012, Model line: STRADA, Model: FIAT STRADA 2012Pages: 187, PDF Size: 8.06 MB
Page 111 of 187
109
If alloy wheels are
purchased to replace
the steel wheels, we
suggest that you retain 4
original bolts for use only with
the spare wheel. There is a risk
of damaging the wheel hubs.
Indicate the presence
of the stationary
vehicle in accordance with
current regulations: hazard
warning lights, warning triangle
etc. Passengers should get out
of the vehicle and wait until
replacement is concluded,
avoiding the risk of traffic. If
you are on a slope or uneven
surface, place wedges or other
suitable objects under the
wheels to secure the vehicle.
WARNINGCHANGING A WHEEL
Bear in mind that:
– the mass of the jack is 2.9 kg;
– the jack requires no adjustment;
– the jack cannot be repaired. It
must be replaced with an original
part if damaged;
– no tool other than the cranking
device illustrated in this section
may be fitted on the jack.
Never start the engine
when the vehicle is
jacked up.If a trailer is used,
detach the trailer before
raising the vehicle.
WARNING
107-132 STRADA LUM GB 1ed 9-01-2012 14:52 Pagina 109
Page 112 of 187
110
ACCESSING TOOLS, JACK
AND SPARE WHEEL
Fiat Strada, Short or
Extended Cab
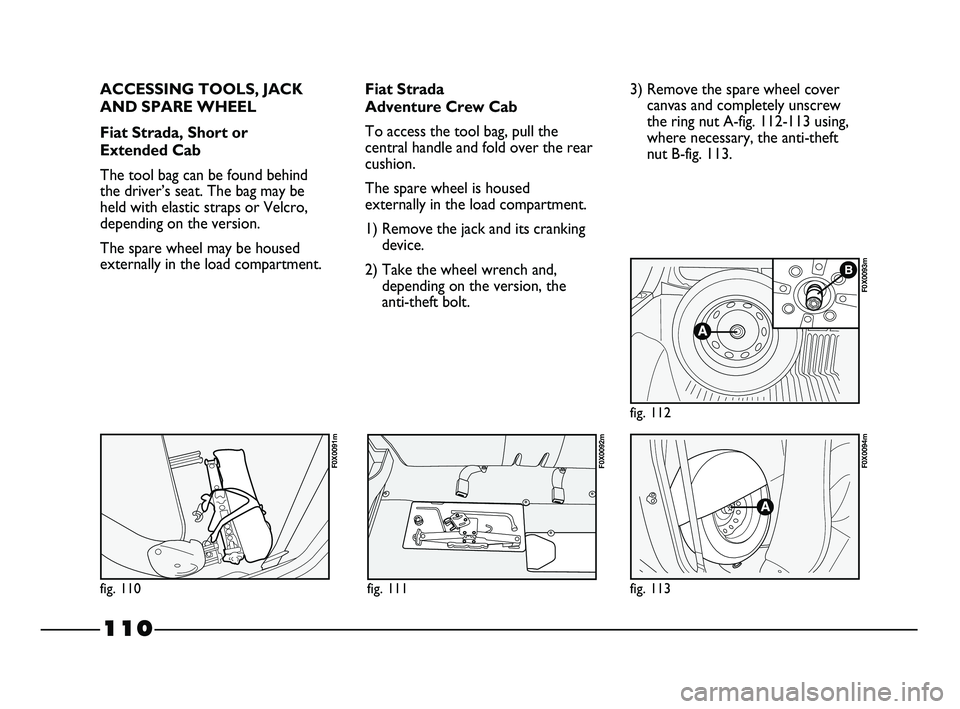
The tool bag can be found behind
the driver’s seat. The bag may be
held with elastic straps or Velcro,
depending on the version.
The spare wheel may be housed
externally in the load compartment.Fiat Strada
Adventure Crew Cab
To access the tool bag, pull the
central handle and fold over the rear
cushion.
The spare wheel is housed
externally in the load compartment.
1) Remove the jack and its cranking
device.
2) Take the wheel wrench and,
depending on the version, the
anti-theft bolt.3) Remove the spare wheel cover
canvas and completely unscrew
the ring nut A-fig. 112-113 using,
where necessary, the anti-theft
nut B-fig. 113.
fig. 113
F0X0094m
fig. 112
F0X0093m
fig. 110
F0X0091m
fig. 111
F0X0092m
107-132 STRADA LUM GB 1ed 9-01-2012 14:52 Pagina 110
Page 113 of 187
111
CHANGING THE WHEEL
1) Loosen the fixing bolts of the
wheel to be replaced by about
one turn.
2) With alloy wheels, shake the
vehicle to detach the rim from
the wheel hub more easily.
3) Turn the jack’s cranking device in
order to open it partially.
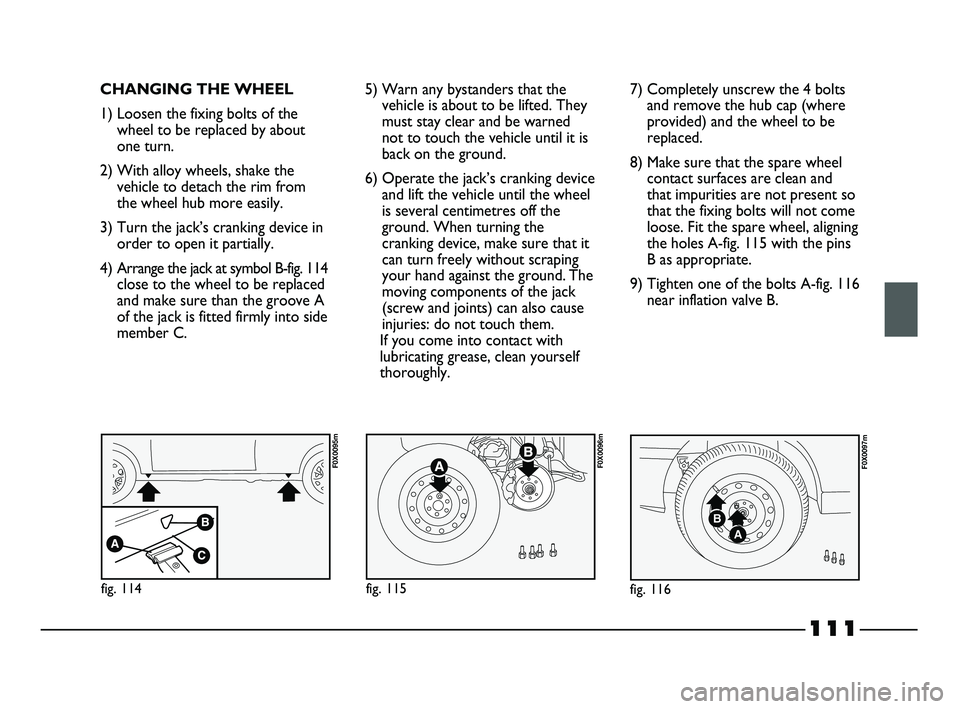
4) Arrange the jack at symbol B-fig. 114
close to the wheel to be replaced
and make sure than the groove A
of the jack is fitted firmly into side
member C.5) Warn any bystanders that the
vehicle is about to be lifted. They
must stay clear and be warned
not to touch the vehicle until it is
back on the ground.
6) Operate the jack’s cranking device
and lift the vehicle until the wheel
is several centimetres off the
ground. When turning the
cranking device, make sure that it
can turn freely without scraping
your hand against the ground. The
moving components of the jack
(screw and joints) can also cause
injuries: do not touch them.
If you come into contact with
lubricating grease, clean yourself
thoroughly.7) Completely unscrew the 4 bolts
and remove the hub cap (where
provided) and the wheel to be
replaced.
8) Make sure that the spare wheel
contact surfaces are clean and
that impurities are not present so
that the fixing bolts will not come
loose. Fit the spare wheel, aligning
the holes A-fig. 115 with the pins
B as appropriate.
9) Tighten one of the bolts A-fig. 116
near inflation valve B.
A
B
fig. 116
F0X0097m
fig. 114
F0X0095m
fig. 115
F0X0096m
107-132 STRADA LUM GB 1ed 9-01-2012 14:52 Pagina 111
Page 114 of 187
112
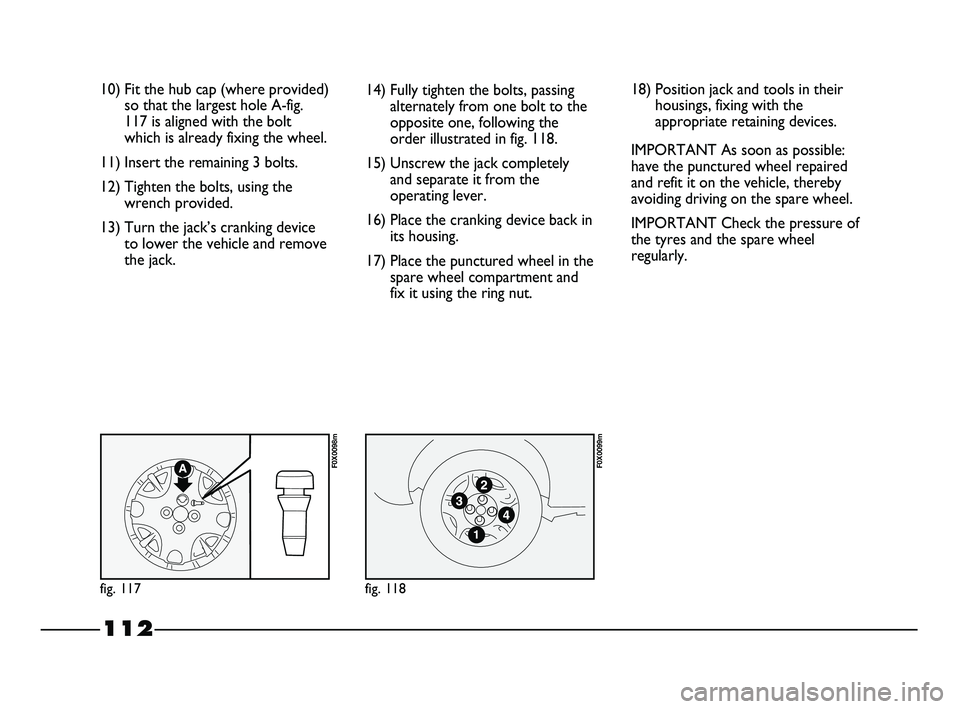
10) Fit the hub cap (where provided)
so that the largest hole A-fig.
117 is aligned with the bolt
which is already fixing the wheel.
11) Insert the remaining 3 bolts.
12) Tighten the bolts, using the
wrench provided.
13) Turn the jack’s cranking device
to lower the vehicle and remove
the jack.14) Fully tighten the bolts, passing
alternately from one bolt to the
opposite one, following the
order illustrated in fig. 118.
15) Unscrew the jack completely
and separate it from the
operating lever.
16) Place the cranking device back in
its housing.
17) Place the punctured wheel in the
spare wheel compartment and
fix it using the ring nut.
fig. 117
F0X0098m
fig. 118
F0X0099m
18) Position jack and tools in their
housings, fixing with the
appropriate retaining devices.
IMPORTANT As soon as possible:
have the punctured wheel repaired
and refit it on the vehicle, thereby
avoiding driving on the spare wheel.
IMPORTANT Check the pressure of
the tyres and the spare wheel
regularly.
107-132 STRADA LUM GB 1ed 9-01-2012 14:52 Pagina 112
Page 115 of 187
113
Modifications or repairs
to the electrical system
that are not carried out
correctly or do not take the
system’s technical
specifications into account can
cause malfunctions leading to
the risk of fire.
WARNING
Halogen bulbs contain
pressurised gas. Glass
shards may be projected if a
bulb breaks.
WARNING
Halogen bulbs must be
handled by holding the
metal part only. If the
transparent bulb is touched with
the fingers, its lighting intensity
is reduced and life of the bulb
may be compromised. In the
event of accidental contact,
wipe the bulb with a cloth
moistened with alcohol and let
the bulb dry.
Where possible, it is
advisable to have bulbs
changed at a Fiat
Dealership. The correct
operation and direction of the
exterior lights are absolutely
essential for the driving in safety
and compliance with law.
– Burnt bulbs must be replaced by
others of the same type and
power.
– Always check the direction of the
beam after changing a headlight
bulb, for reasons of safety.
TYPES OF BULBS
Various types of bulbs are fitted on
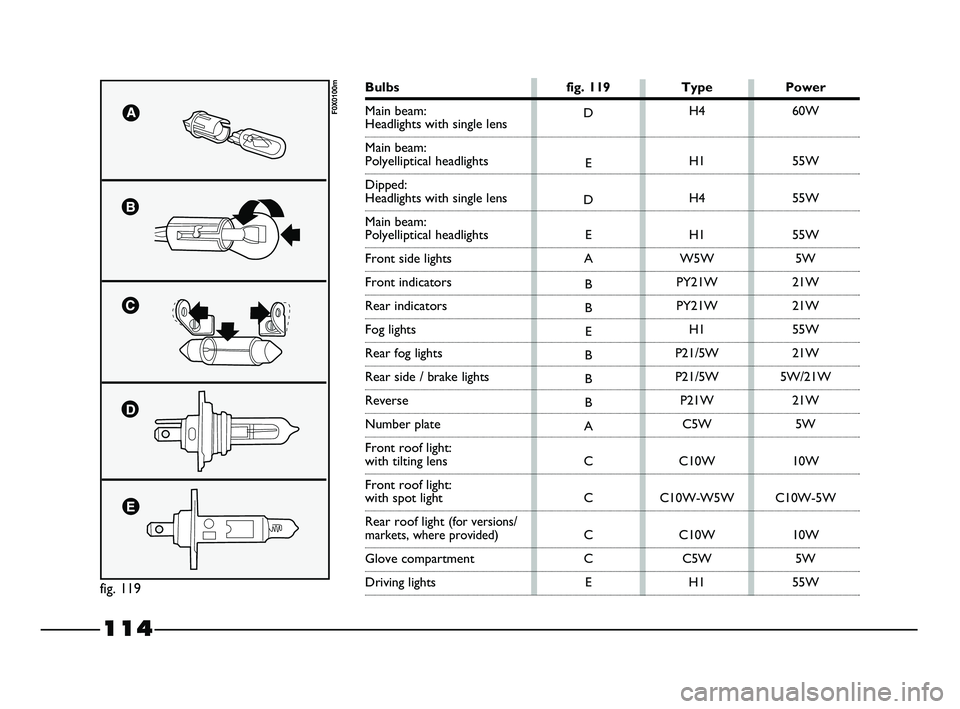
your vehicle fig. 119:
A. All-glass bulbs
These are press-fitted.
Pull to remove them.
B. Bayonet bulbs
To remove this type of bulb from
the holder, press the bulb and turn it
anticlockwise.
C. Cylindrical bulbs
Release from the contacts to
remove.
D-E. Halogen bulbs
Detach the locking spring from its
housing to remove the bulb.IF YOU NEED TO
REPLACE A BULB
GENERAL INSTRUCTIONS
– When a light is not working,
check that the corresponding fuse
is intact before replacing the bulb.
– For the location of fuses, refer to
the paragraph “If you blow a fuse”
in this section.
– Before changing a burnt bulb,
check the contacts for oxidation.
107-132 STRADA LUM GB 1ed 9-01-2012 14:52 Pagina 113
Page 116 of 187
114
fig. 119
F0X0100mD
E
D
E
A
B
B
E
B
B
B
A
C
C
C
C
EH4
H1
H4
H1
W5W
PY21W
PY21W
H1
P21/5W
P21/5W
P21W
C5W
C10W
C10W-W5W
C10W
C5W
H160W
55W
55W
55W
5W
21W
21W
55W
21W
5W/21W
21W
5W
10W
C10W-5W
10W
5W
55W
Bulbs fig. 119 Type Power
Main beam:
Headlights with single lens
Main beam:
Polyelliptical headlights
Dipped:
Headlights with single lens
Main beam:
Polyelliptical headlights
Front side lights
Front indicators
Rear indicators
Fog lights
Rear fog lights
Rear side / brake lights
Reverse
Number plate
Front roof light:
with tilting lens
Front roof light:
with spot light
Rear roof light (
for versions/markets, where provided)
Glove compartment
Driving lights
107-132 STRADA LUM GB 1ed 9-01-2012 14:52 Pagina 114
Page 117 of 187
115
IF AN EXTERIOR LIGHT
STOPS WORKING
MAIN BEAM AND
DIPPED HEADLIGHTS
To replace the halogen bulbs of main
beam or dipped headlights, proceed
as follows:
Single-lens headlights
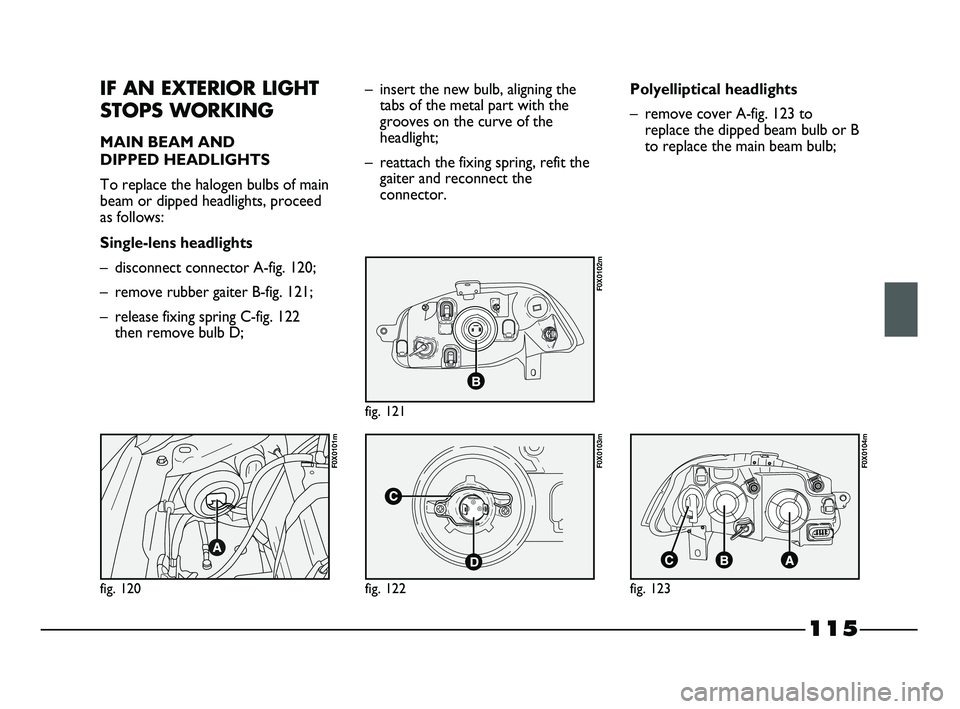
– disconnect connector A-fig. 120;
– remove rubber gaiter B-fig. 121;
– release fixing spring C-fig. 122
then remove bulb D;– insert the new bulb, aligning the
tabs of the metal part with the
grooves on the curve of the
headlight;
– reattach the fixing spring, refit the
gaiter and reconnect the
connector.Polyelliptical headlights
– remove cover A-fig. 123 to
replace the dipped beam bulb or B
to replace the main beam bulb;
fig. 123
F0X0104m
fig. 122
F0X0103m
fig. 120
F0X0101m
fig. 121
F0X0102m
107-132 STRADA LUM GB 1ed 9-01-2012 14:52 Pagina 115
Page 118 of 187
116
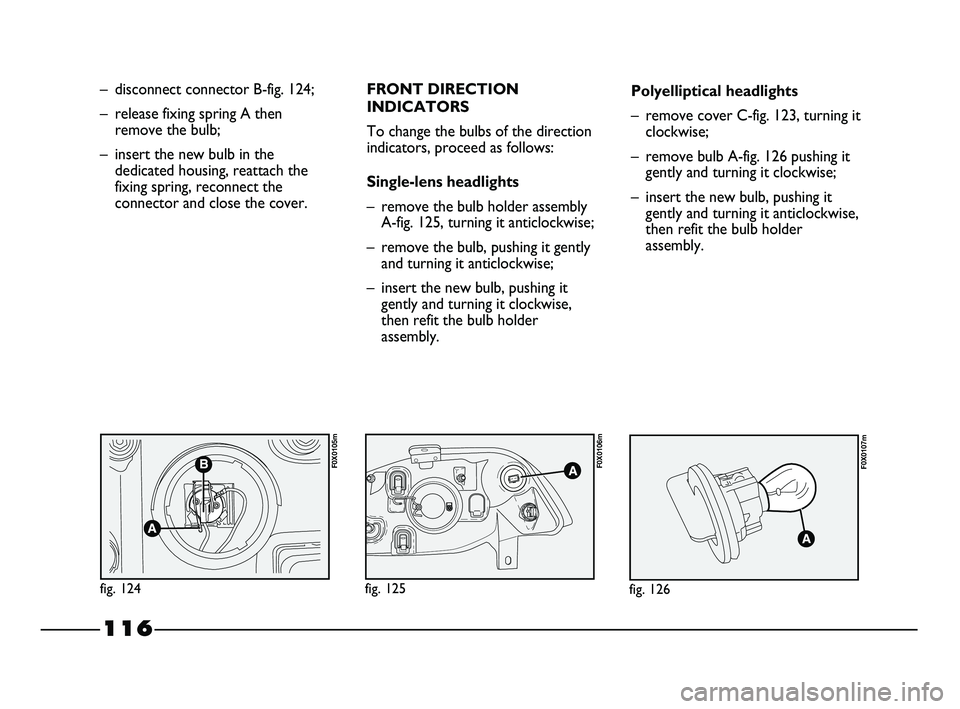
– disconnect connector B-fig. 124;
– release fixing spring A then
remove the bulb;
– insert the new bulb in the
dedicated housing, reattach the
fixing spring, reconnect the
connector and close the cover.FRONT DIRECTION
INDICATORS
To change the bulbs of the direction
indicators, proceed as follows:
Single-lens headlights
– remove the bulb holder assembly
A-fig. 125, turning it anticlockwise;
– remove the bulb, pushing it gently
and turning it anticlockwise;
– insert the new bulb, pushing it
gently and turning it clockwise,
then refit the bulb holder
assembly.Polyelliptical headlights
– remove cover C-fig. 123, turning it
clockwise;
– remove bulb A-fig. 126 pushing it
gently and turning it clockwise;
– insert the new bulb, pushing it
gently and turning it anticlockwise,
then refit the bulb holder
assembly.
fig. 126
F0X0107m
fig. 124
F0X0105m
fig. 125
F0X0106m
107-132 STRADA LUM GB 1ed 9-01-2012 14:52 Pagina 116
Page 119 of 187
117
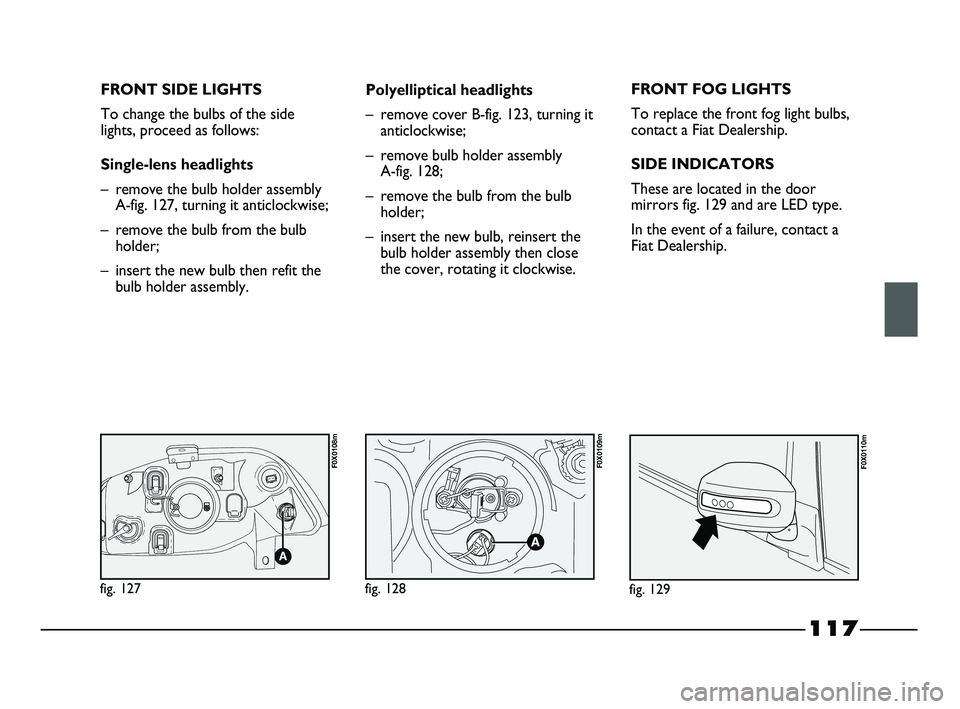
FRONT SIDE LIGHTS
To change the bulbs of the side
lights, proceed as follows:
Single-lens headlights
– remove the bulb holder assembly
A-fig. 127, turning it anticlockwise;
– remove the bulb from the bulb
holder;
– insert the new bulb then refit the
bulb holder assembly.Polyelliptical headlights
– remove cover B-fig. 123, turning it
anticlockwise;
– remove bulb holder assembly
A-fig. 128;
– remove the bulb from the bulb
holder;
– insert the new bulb, reinsert the
bulb holder assembly then close
the cover, rotating it clockwise.FRONT FOG LIGHTS
To replace the front fog light bulbs,
contact a Fiat Dealership.
SIDE INDICATORS
These are located in the door
mirrors fig. 129 and are LED type.
In the event of a failure, contact a
Fiat Dealership.
fig. 129
F0X0110m
fig. 127
F0X0108m
fig. 128
F0X0109m
107-132 STRADA LUM GB 1ed 9-01-2012 14:52 Pagina 117
Page 120 of 187
118
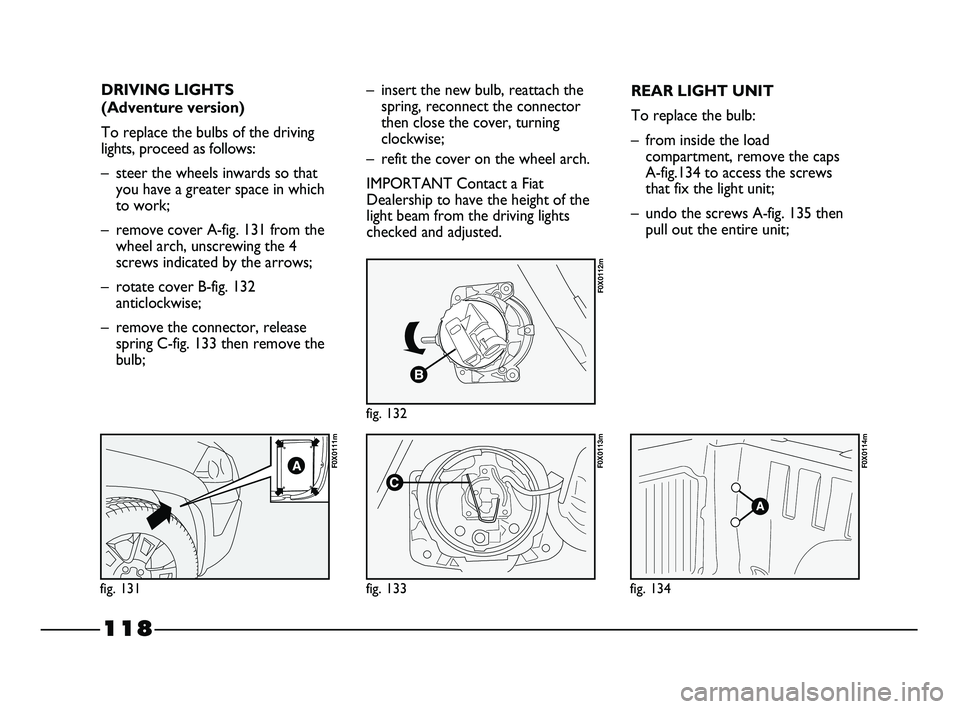
DRIVING LIGHTS
(Adventure version)
To replace the bulbs of the driving
lights, proceed as follows:
– steer the wheels inwards so that
you have a greater space in which
to work;
– remove cover A-fig. 131 from the
wheel arch, unscrewing the 4
screws indicated by the arrows;
– rotate cover B-fig. 132
anticlockwise;
– remove the connector, release
spring C-fig. 133 then remove the
bulb;
fig. 131
F0X0111m
fig. 132
F0X0112m
fig. 133
F0X0113m
fig. 134
F0X0114m
– insert the new bulb, reattach the
spring, reconnect the connector
then close the cover, turning
clockwise;
– refit the cover on the wheel arch.
IMPORTANT Contact a Fiat
Dealership to have the height of the
light beam from the driving lights
checked and adjusted.REAR LIGHT UNIT
To replace the bulb:
– from inside the load
compartment, remove the caps
A-fig.134 to access the screws
that fix the light unit;
– undo the screws A-fig. 135 then
pull out the entire unit;
107-132 STRADA LUM GB 1ed 9-01-2012 14:52 Pagina 118