FIAT STRADA 2012 Owner handbook (in English)
Manufacturer: FIAT, Model Year: 2012, Model line: STRADA, Model: FIAT STRADA 2012Pages: 187, PDF Size: 8.06 MB
Page 11 of 187
9
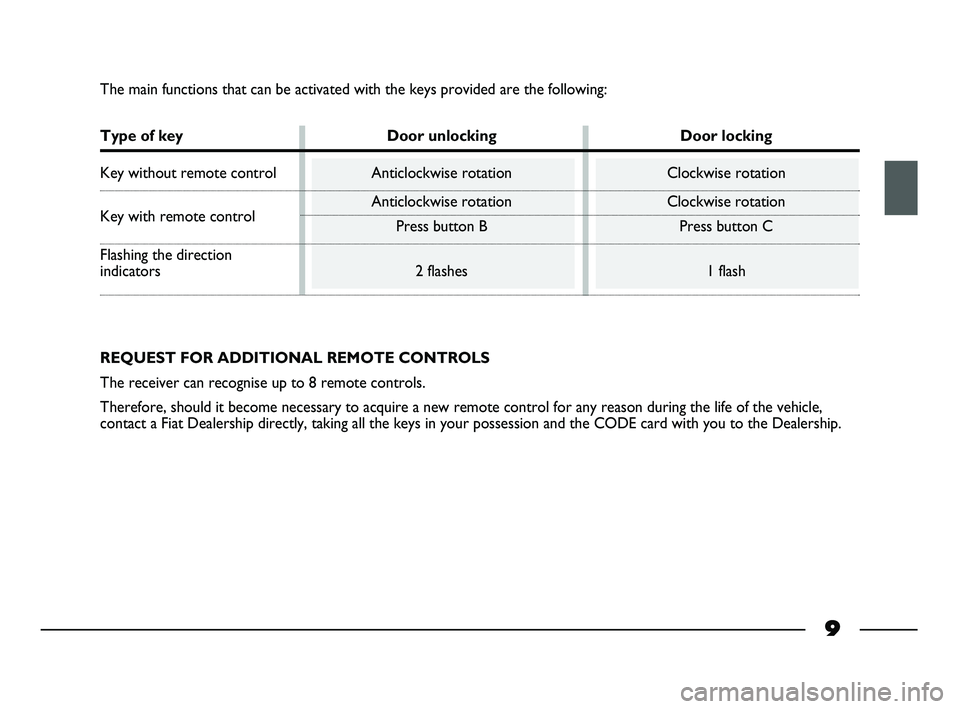
The main functions that can be activated with the keys provided are the following:
Type of key Door unlocking Door locking
Key without remote control Anticlockwise rotation Clockwise rotation
Key with remote controlAnticlockwise rotation Clockwise rotationPress button B Press button C
Flashing the direction
indicators 2 flashes 1 flash
REQUEST FOR ADDITIONAL REMOTE CONTROLS
The receiver can recognise up to 8 remote controls.
Therefore, should it become necessary to acquire a new remote control for any reason during the life of the vehicle,
contact a Fiat Dealership directly, taking all the keys in your possession and the CODE card with you to the Dealership.
007-044 STRADA LUM GB 1ed 9-01-2012 14:49 Pagina 9
Page 12 of 187
10
DUPLICATING KEYS
Customers who require additional
keys must contact a Fiat Dealership,
taking all available keys and CODE
card with them to the Dealership.
The Fiat Dealership will store (up to
a maximum of 8 keys) all keys, both
new and already owned, in the
system.
The Fiat Dealership may require the
Customer to demonstrate that they
are the owner of the vehicle.Codes
for the keys which are not
presented for the new storing
procedure are deleted from the
memory, to ensure that any keys
which may be mislaid cannot be used
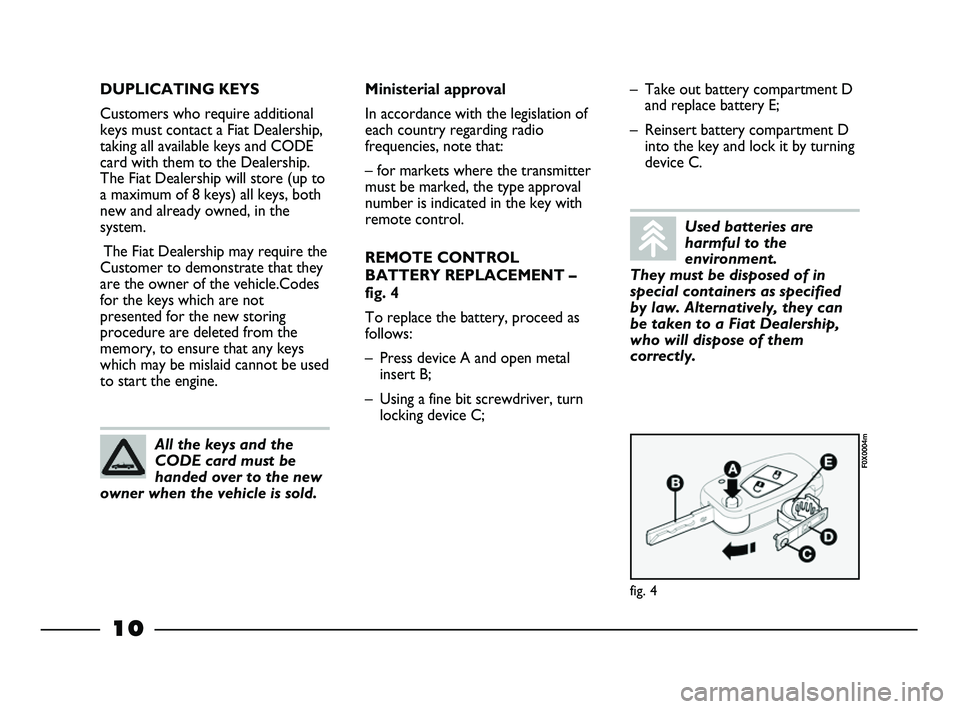
to start the engine.– Take out battery compartment D
and replace battery E;
– Reinsert battery compartment D
into the key and lock it by turning
device C.
fig. 4
F0X0004m
All the keys and the
CODE card must be
handed over to the new
owner when the vehicle is sold.
Ministerial approval
In accordance with the legislation of
each country regarding radio
frequencies, note that:
– for markets where the transmitter
must be marked, the type approval
number is indicated in the key with
remote control.
REMOTE CONTROL
BATTERY REPLACEMENT –
fig. 4
To replace the battery, proceed as
follows:
– Press device A and open metal
insert B;
– Using a fine bit screwdriver, turn
locking device C;
Used batteries are
harmful to the
environment.
They must be disposed of in
special containers as specified
by law. Alternatively, they can
be taken to a Fiat Dealership,
who will dispose of them
correctly.
007-044 STRADA LUM GB 1ed 9-01-2012 14:49 Pagina 10
Page 13 of 187
11
STEERING LOCK
Engagement: with ignition at
STOP, or PARK, remove the key
and turn the steering wheel until it
locks.IGNITION
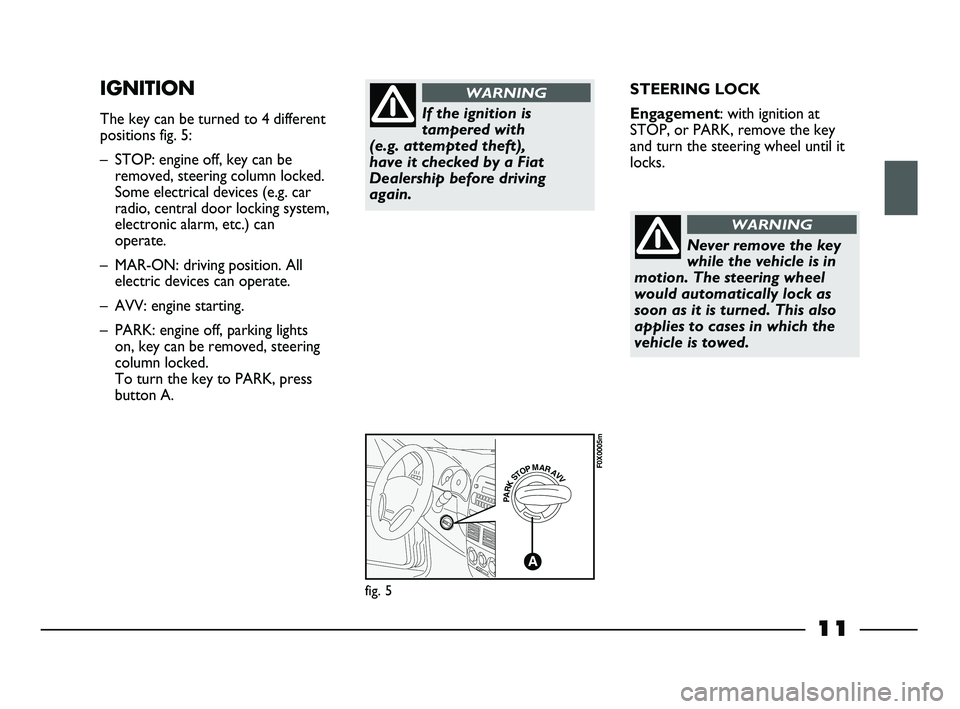
The key can be turned to 4 different
positions fig. 5:
– STOP: engine off, key can be
removed, steering column locked.
Some electrical devices (e.g. car
radio, central door locking system,
electronic alarm, etc.) can
operate.
– MAR-ON: driving position. All
electric devices can operate.
– AVV: engine starting.
– PARK: engine off, parking lights
on, key can be removed, steering
column locked.
To turn the key to PARK, press
button A.
PARKSTOPMARAVV
A
fig. 5
F0X0005m
If the ignition is
tampered with
(e.g. attempted theft),
have it checked by a Fiat
Dealership before driving
again.
WARNING
Never remove the key
while the vehicle is in
motion. The steering wheel
would automatically lock as
soon as it is turned. This also
applies to cases in which the
vehicle is towed.
WARNING
007-044 STRADA LUM GB 1ed 9-01-2012 14:49 Pagina 11
Page 14 of 187
12
INSTRUMENT PANEL
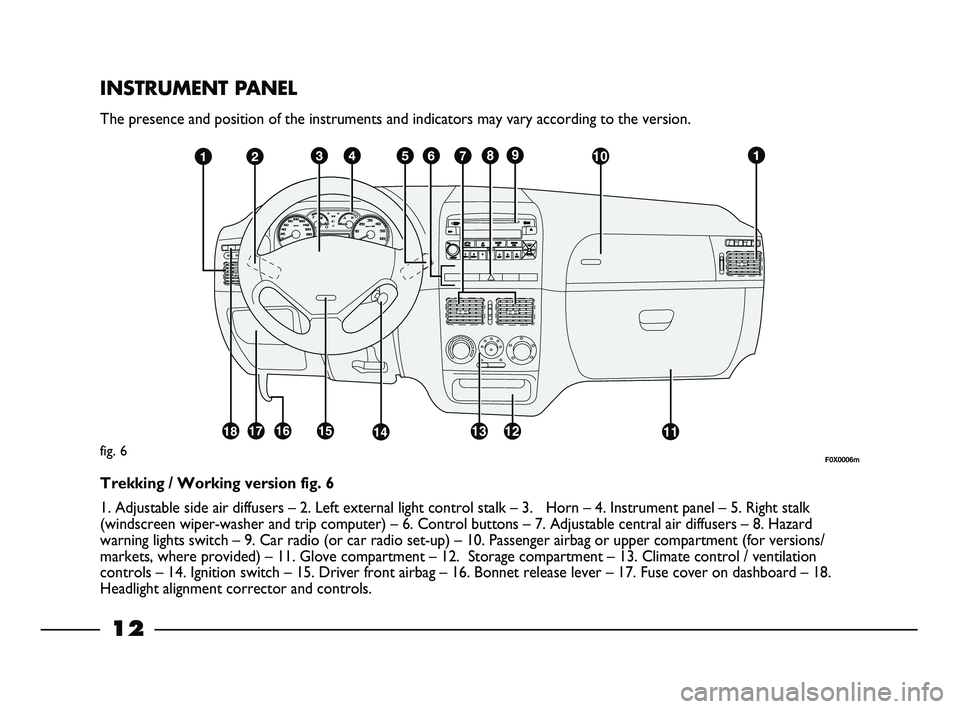
The presence and position of the instruments and indicators may vary according to the version.
fig. 6
Trekking / Working version fig. 6
1. Adjustable side air diffusers – 2. Left external light control stalk – 3. Horn – 4. Instrument panel – 5. Right stalk
(windscreen wiper-washer and trip computer) – 6. Control buttons – 7. Adjustable central air diffusers – 8. Hazard
warning lights switch – 9. Car radio (or car radio set-up) – 10. Passenger airbag or upper compartment (for versions/
markets, where provided) – 11. Glove compartment – 12. Storage compartment – 13. Climate control / ventilation
controls – 14. Ignition switch – 15. Driver front airbag – 16. Bonnet release lever – 17. Fuse cover on dashboard – 18.
Headlight alignment corrector and controls.
F0X0006m
007-044 STRADA LUM GB 1ed 9-01-2012 14:49 Pagina 12
Page 15 of 187
13
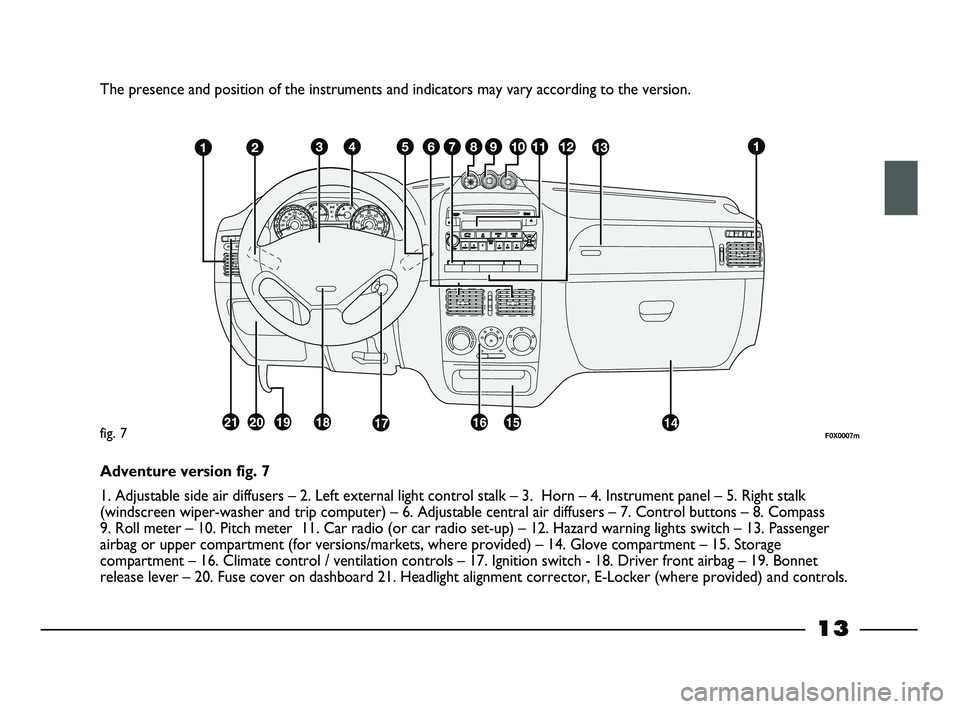
The presence and position of the instruments and indicators may vary according to the version.
F0X0007mfig. 7
Adventure version fig. 7
1. Adjustable side air diffusers – 2. Left external light control stalk – 3. Horn – 4. Instrument panel – 5. Right stalk
(windscreen wiper-washer and trip computer) – 6. Adjustable central air diffusers – 7. Control buttons – 8. Compass
9. Roll meter – 10. Pitch meter 11. Car radio (or car radio set-up) – 12. Hazard warning lights switch – 13. Passenger
airbag or upper compartment (for versions/markets, where provided) – 14. Glove compartment – 15. Storage
compartment – 16. Climate control / ventilation controls – 17. Ignition switch - 18. Driver front airbag – 19. Bonnet
release lever – 20. Fuse cover on dashboard 21. Headlight alignment corrector, E-Locker (where provided) and controls.
007-044 STRADA LUM GB 1ed 9-01-2012 14:49 Pagina 13
Page 16 of 187
14
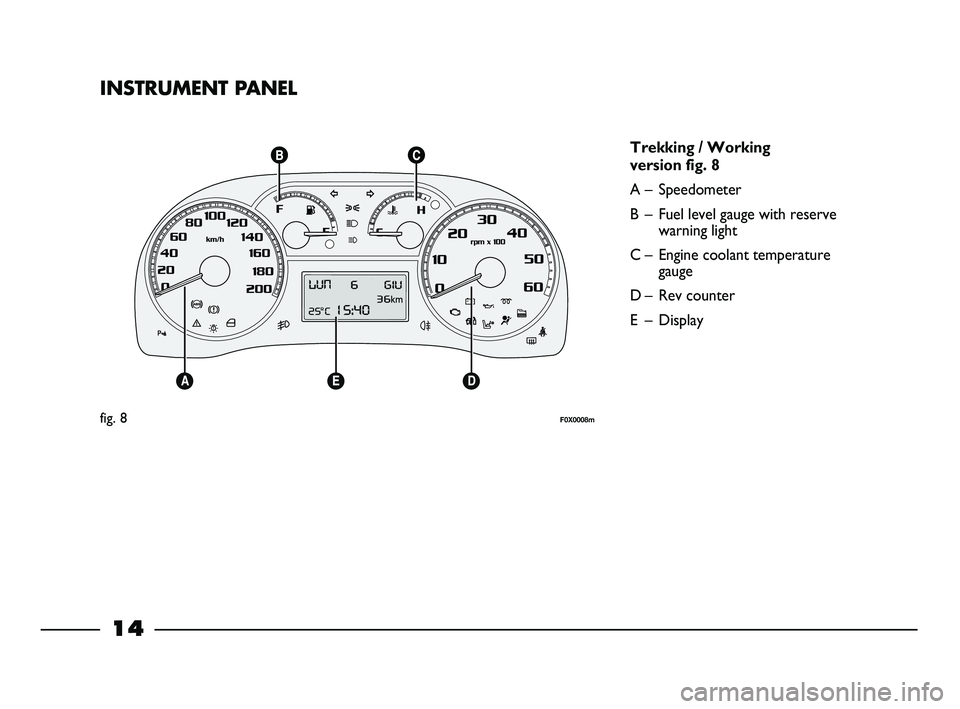
INSTRUMENT PANEL
Trekking / Working
version fig. 8
A – Speedometer
B – Fuel level gauge with reserve
warning light
C – Engine coolant temperature
gauge
D – Rev counter
E – Display
fig. 8F0X0008m
007-044 STRADA LUM GB 1ed 9-01-2012 14:49 Pagina 14
Page 17 of 187
15
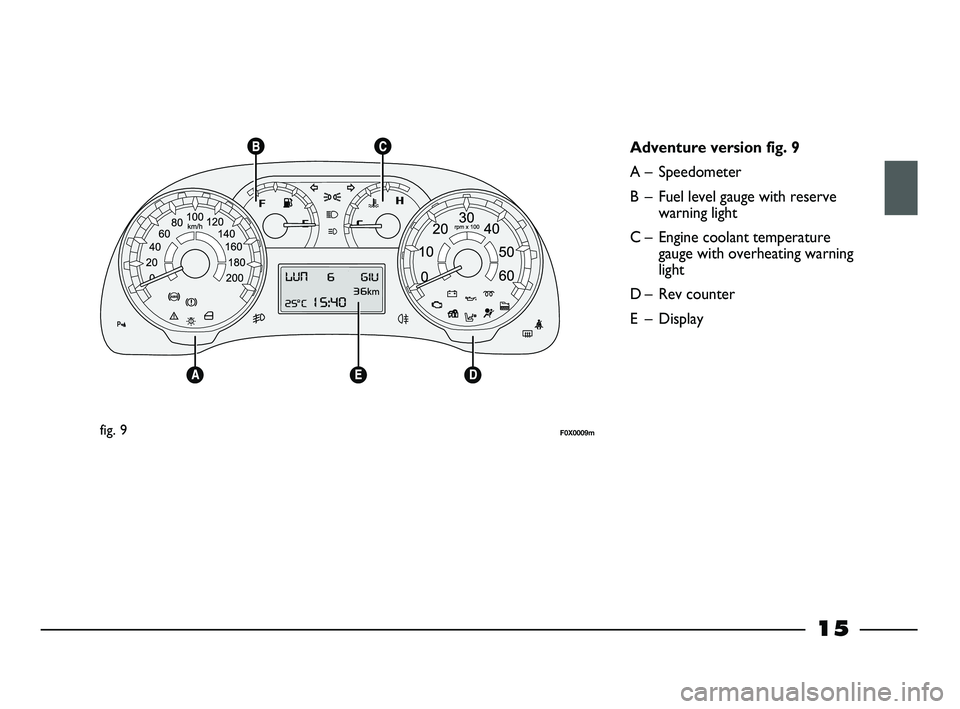
fig. 9F0X0009m
Adventure version fig. 9
A – Speedometer
B – Fuel level gauge with reserve
warning light
C – Engine coolant temperature
gauge with overheating warning
light
D – Rev counter
E – Display
007-044 STRADA LUM GB 1ed 9-01-2012 14:49 Pagina 15
Page 18 of 187
16
PERSONAL
ADJUSTMENTS
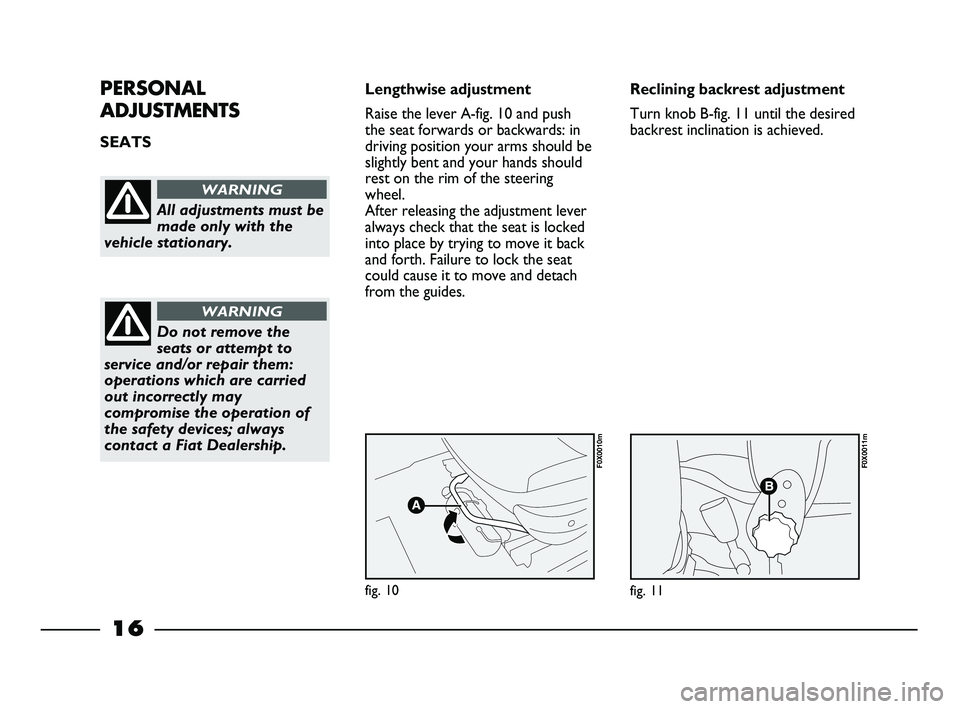
SEATS Lengthwise adjustment
Raise the lever A-fig. 10 and push
the seat forwards or backwards: in
driving position your arms should be
slightly bent and your hands should
rest on the rim of the steering
wheel.
After releasing the adjustment lever
always check that the seat is locked
into place by trying to move it back
and forth. Failure to lock the seat
could cause it to move and detach
from the guides.
All adjustments must be
made only with the
vehicle stationary.
WARNING
Do not remove the
seats or attempt to
service and/or repair them:
operations which are carried
out incorrectly may
compromise the operation of
the safety devices; always
contact a Fiat Dealership.
WARNING
fig. 10
F0X0010m
fig. 11
F0X0011m
Reclining backrest adjustment
Turn knob B-fig. 11 until the desired
backrest inclination is achieved.
007-044 STRADA LUM GB 1ed 9-01-2012 14:49 Pagina 16
Page 19 of 187
17
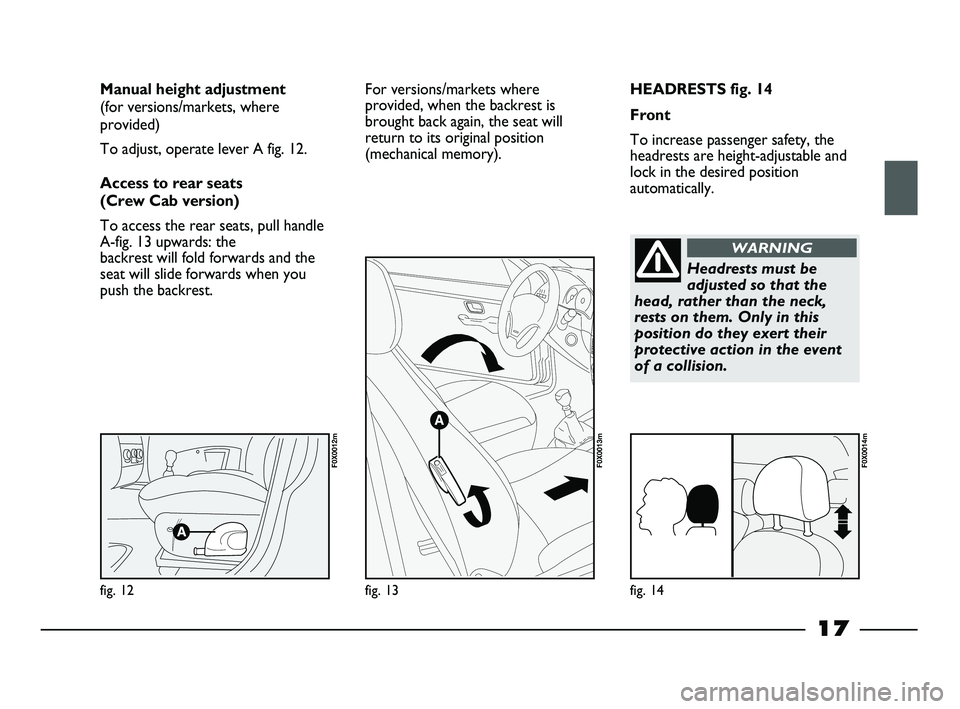
HEADRESTS fig. 14
Front
To increase passenger safety, the
headrests are height-adjustable and
lock in the desired position
automatically. Manual height adjustment
(for versions/markets, where
provided)
To adjust, operate lever A fig. 12.
Access to rear seats
(Crew Cab version)
To access the rear seats, pull handle
A-fig. 13 upwards: the
backrest will fold forwards and the
seat will slide forwards when you
push the backrest.
fig. 12
F0X0012m
fig. 13
F0X0013m
fig. 14
F0X0014m
For versions/markets where
provided, when the backrest is
brought back again, the seat will
return to its original position
(mechanical memory).
Headrests must be
adjusted so that the
head, rather than the neck,
rests on them. Only in this
position do they exert their
protective action in the event
of a collision.
WARNING
007-044 STRADA LUM GB 1ed 9-01-2012 14:49 Pagina 17
Page 20 of 187
18
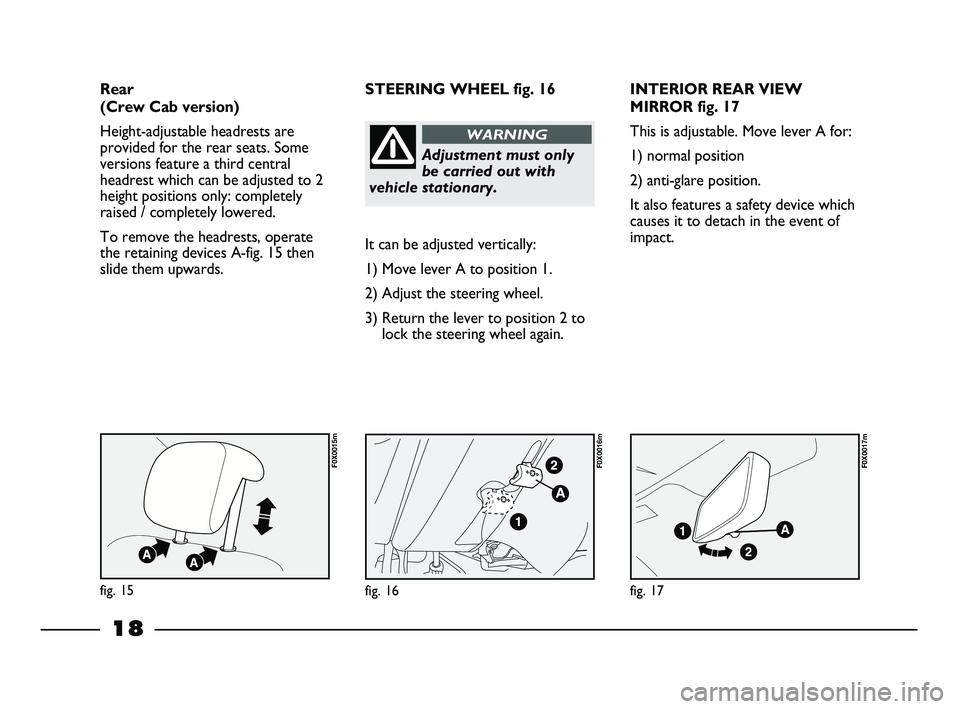
INTERIOR REAR VIEW
MIRROR fig. 17
This is adjustable. Move lever A for:
1) normal position
2) anti-glare position.
It also features a safety device which
causes it to detach in the event of
impact.
It can be adjusted vertically:
1) Move lever A to position 1.
2) Adjust the steering wheel.
3) Return the lever to position 2 to
lock the steering wheel again. STEERING WHEEL fig. 16
fig. 17
F0X0017m
fig. 16
F0X0016m
fig. 15
F0X0015m
Rear
(Crew Cab version)
Height-adjustable headrests are
provided for the rear seats. Some
versions feature a third central
headrest which can be adjusted to 2
height positions only: completely
raised / completely lowered.
To remove the headrests, operate
the retaining devices A-fig. 15 then
slide them upwards.
Adjustment must only
be carried out with
vehicle stationary.
WARNING
007-044 STRADA LUM GB 1ed 9-01-2012 14:49 Pagina 18