light FIAT STRADA 2012 Owner handbook (in English)
[x] Cancel search | Manufacturer: FIAT, Model Year: 2012, Model line: STRADA, Model: FIAT STRADA 2012Pages: 187, PDF Size: 8.06 MB
Page 102 of 187
100
To engage reverse (R), wait for the
vehicle to stop and, from neutral,
move the lever to the right and then
backwards, lifting ring A of the
reverse inhibitor device.
Fully depress the clutch
pedal to change gears
correctly. Therefore, the floor
area underneath the clutch
pedal must not be obstructed
in any way. Ensure that the
floor mat is always laid flat
and does not interfere with use
of the pedals.
WARNING
Do not drive with your
hand resting on the gear
lever as the force
exerted, even if slight, could
lead over time to premature
wear of the internal gearbox
components.
The clutch pedal must be used
only for gear changes. Do not
drive with your foot resting on
the clutch pedal, however
lightly.
For versions/markets where
provided, the electronic clutch
control could intervene,
interpreting the incorrect driving
style as a fault.LOADING ADVICE
The vehicle has been designed and
type approved on the basis of
certain maximum weights (see
“Weights” table in the “Technical
Specifications” section):
– kerb weight
– payload
– maximum weight on front axle
– maximum weight on rear axle
– towable weight.
Each of these limits
must be kept firmly in
mind and, in any event, never
exceeded.
WARNING
095-106 STRADA LUM GB 1ed 9-01-2012 14:51 Pagina 100
Page 104 of 187
102
FUEL SAVING
Here are some useful tips to save
fuel and minimise harmful emissions
of CO
2and other pollutants (nitric
oxides, unburnt hydrocarbons,
particulate matter etc.).
GENERAL CONSIDERATIONS
The general factors that affect fuel
consumption are listed below.
Vehicle maintenance
Have checks and adjustments carried
out on the vehicle in accordance
with the “Scheduled Servicing Plan”.Tyres
Check the pressure of the tyres
routinely at an interval of no more
than 4 weeks: if the pressure is too
low, consumption levels increase as
resistance to rolling is higher.
Unnecessary loads
Do not travel with excess load.
The weight of the vehicle (especially
when driving in town), and its trim
greatly affect consumption and
stability.
Roof rack/ski rack
Remove the roof rack or the ski
rack from the roof after use.
These accessories reduce the
vehicle’s aerodynamic penetration
and have a negative effect on
consumption. When transporting
particularly large objects, use a
trailer if possible.Electrical devices
Use electrical devices only for the
amount of time necessary. The
additional headlights, windscreen
wipers and heater fan consume a
considerable amount of energy,
thereby increasing fuel consumption
(by up to 25% in the urban cycle).
Climate control
Climate control leads to higher fuel
consumption (on average by up to
20%): if the temperature outside
permits, try and use the ventilation
only.
Devices for aerodynamic
control
The use of non-certified devices for
aerodynamic control may adversely
affect air drag and consumption
levels.
DRIVING STYLE
The main driving styles that affect
fuel consumption are listed below.
095-106 STRADA LUM GB 1ed 9-01-2012 14:51 Pagina 102
Page 105 of 187
103
Starting
Do not warm up the engine at low
or high revs when the vehicle is
stationary; this causes the engine to
warm up more slowly, thereby
increasing fuel consumption and
emissions. It is advisable to move off
immediately and slowly, avoiding
high speeds: in this way the engine
will warm up more quickly.
Unnecessary actions
Avoid accelerating when stopped at
traffic lights or before stopping the
engine.
This, as well as double declutching, is
absolutely unnecessary and increases
consumption and pollution.
Gear selection
As soon as the conditions of the
traffic and road permit, use a higher
gear.
Using a low gear for faster
acceleration will increase
consumption.Improper use of a high gear
increases consumption, emissions
and engine wear.
Maximum speed
Fuel consumption increases
considerably with speed. Maintain a
constant speed, avoiding
unnecessary braking and
acceleration, which cost in terms of
both fuel and emissions.
Acceleration
Accelerating violently will greatly
affect consumption and emissions:
acceleration should be gradual.
CONDITIONS OF USE
The main usage conditions that
negatively affect fuel consumption
are listed below.Cold starting
Short journeys and frequent cold
starts do not allow the engine to
reach optimum operating
temperature.
This results in a significant increase
in consumption levels (by 15–30% in
the urban cycle) and emissions.
Traffic and road conditions
Rather high consumption levels are
linked to situations with heavy
traffic, for instance when travelling in
queues with frequent use of the
lower gears or in cities with many
traffic lights. Winding mountain
roads and rough road surfaces also
adversely affect consumption.
Stopping in traffic
During prolonged hold-ups
(e.g. at level crossings) the engine
should be switched off.
095-106 STRADA LUM GB 1ed 9-01-2012 14:51 Pagina 103
Page 107 of 187
105
LONG VEHICLE
INACTIVITY
If the vehicle needs to be off the
road for longer than a month, the
following precautions should be
taken:
– Park the vehicle indoors in a dry
and, if possible, well-ventilated
place.
– Engage a gear.
– Check that the handbrake is not
engaged.
– Disconnect the negative battery
terminal and check the state of
charge (see “Battery” in the
“Vehicle maintenance” section).
– Clean and protect the painted
parts using protective waxes.– Clean and protect the shiny metal
parts using specific commercially
available compounds.
– Sprinkle talcum powder on the
rubber windscreen wiper blades
and lift them off the glass.
– Slightly open the windows.
– Cover the vehicle with a piece of
fabric or perforated plastic sheet.
Do not use compact plastic
tarpaulins, which prevent humidity
from evaporating from the surface
of the vehicle.– Inflate tyres to +0.5 bar above the
standard prescribed pressure and
check it at intervals.
– Do not drain the engine cooling
system.
095-106 STRADA LUM GB 1ed 9-01-2012 14:51 Pagina 105
Page 111 of 187
109
If alloy wheels are
purchased to replace
the steel wheels, we
suggest that you retain 4
original bolts for use only with
the spare wheel. There is a risk
of damaging the wheel hubs.
Indicate the presence
of the stationary
vehicle in accordance with
current regulations: hazard
warning lights, warning triangle
etc. Passengers should get out
of the vehicle and wait until
replacement is concluded,
avoiding the risk of traffic. If
you are on a slope or uneven
surface, place wedges or other
suitable objects under the
wheels to secure the vehicle.
WARNINGCHANGING A WHEEL
Bear in mind that:
– the mass of the jack is 2.9 kg;
– the jack requires no adjustment;
– the jack cannot be repaired. It
must be replaced with an original
part if damaged;
– no tool other than the cranking
device illustrated in this section
may be fitted on the jack.
Never start the engine
when the vehicle is
jacked up.If a trailer is used,
detach the trailer before
raising the vehicle.
WARNING
107-132 STRADA LUM GB 1ed 9-01-2012 14:52 Pagina 109
Page 115 of 187
113
Modifications or repairs
to the electrical system
that are not carried out
correctly or do not take the
system’s technical
specifications into account can
cause malfunctions leading to
the risk of fire.
WARNING
Halogen bulbs contain
pressurised gas. Glass
shards may be projected if a
bulb breaks.
WARNING
Halogen bulbs must be
handled by holding the
metal part only. If the
transparent bulb is touched with
the fingers, its lighting intensity
is reduced and life of the bulb
may be compromised. In the
event of accidental contact,
wipe the bulb with a cloth
moistened with alcohol and let
the bulb dry.
Where possible, it is
advisable to have bulbs
changed at a Fiat
Dealership. The correct
operation and direction of the
exterior lights are absolutely
essential for the driving in safety
and compliance with law.
– Burnt bulbs must be replaced by
others of the same type and
power.
– Always check the direction of the
beam after changing a headlight
bulb, for reasons of safety.
TYPES OF BULBS
Various types of bulbs are fitted on
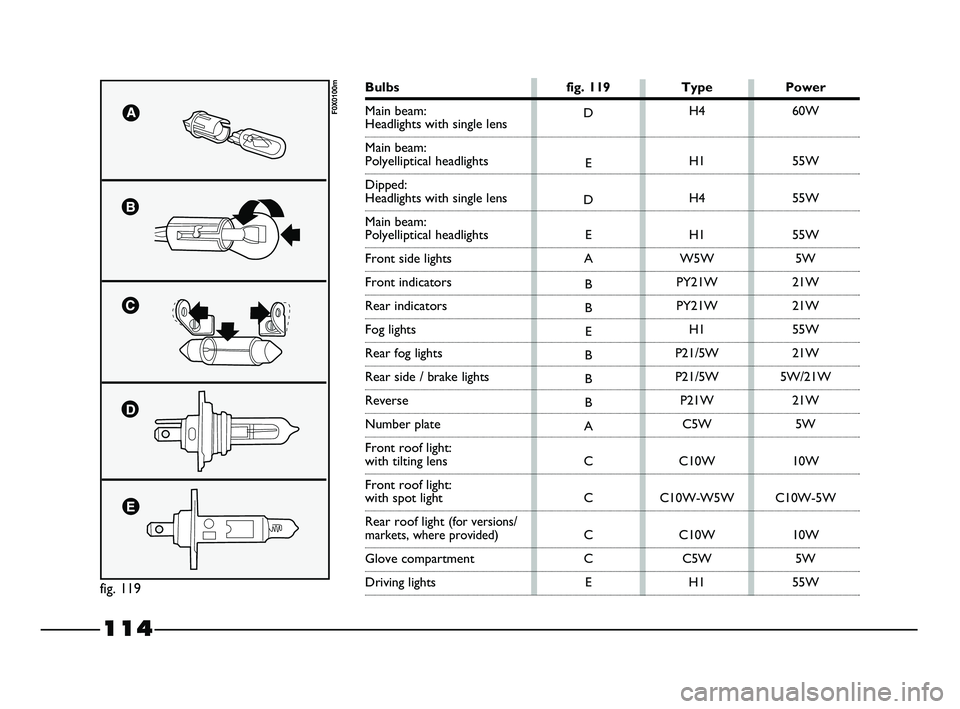
your vehicle fig. 119:
A. All-glass bulbs
These are press-fitted.
Pull to remove them.
B. Bayonet bulbs
To remove this type of bulb from
the holder, press the bulb and turn it
anticlockwise.
C. Cylindrical bulbs
Release from the contacts to
remove.
D-E. Halogen bulbs
Detach the locking spring from its
housing to remove the bulb.IF YOU NEED TO
REPLACE A BULB
GENERAL INSTRUCTIONS
– When a light is not working,
check that the corresponding fuse
is intact before replacing the bulb.
– For the location of fuses, refer to
the paragraph “If you blow a fuse”
in this section.
– Before changing a burnt bulb,
check the contacts for oxidation.
107-132 STRADA LUM GB 1ed 9-01-2012 14:52 Pagina 113
Page 116 of 187
114
fig. 119
F0X0100mD
E
D
E
A
B
B
E
B
B
B
A
C
C
C
C
EH4
H1
H4
H1
W5W
PY21W
PY21W
H1
P21/5W
P21/5W
P21W
C5W
C10W
C10W-W5W
C10W
C5W
H160W
55W
55W
55W
5W
21W
21W
55W
21W
5W/21W
21W
5W
10W
C10W-5W
10W
5W
55W
Bulbs fig. 119 Type Power
Main beam:
Headlights with single lens
Main beam:
Polyelliptical headlights
Dipped:
Headlights with single lens
Main beam:
Polyelliptical headlights
Front side lights
Front indicators
Rear indicators
Fog lights
Rear fog lights
Rear side / brake lights
Reverse
Number plate
Front roof light:
with tilting lens
Front roof light:
with spot light
Rear roof light (
for versions/markets, where provided)
Glove compartment
Driving lights
107-132 STRADA LUM GB 1ed 9-01-2012 14:52 Pagina 114
Page 117 of 187
115
IF AN EXTERIOR LIGHT
STOPS WORKING
MAIN BEAM AND
DIPPED HEADLIGHTS
To replace the halogen bulbs of main
beam or dipped headlights, proceed
as follows:
Single-lens headlights
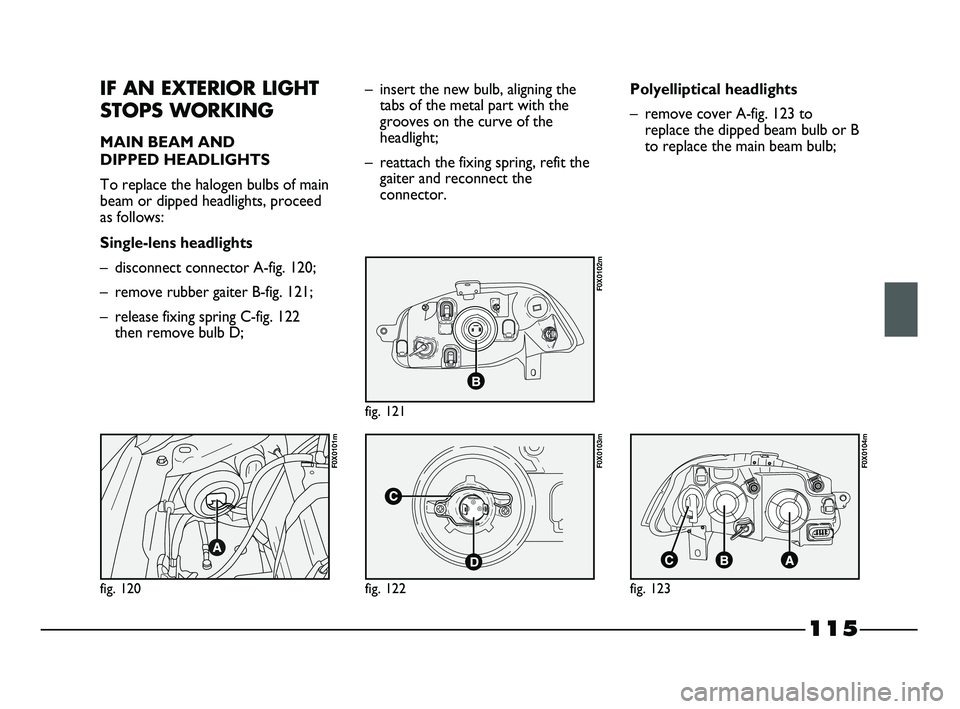
– disconnect connector A-fig. 120;
– remove rubber gaiter B-fig. 121;
– release fixing spring C-fig. 122
then remove bulb D;– insert the new bulb, aligning the
tabs of the metal part with the
grooves on the curve of the
headlight;
– reattach the fixing spring, refit the
gaiter and reconnect the
connector.Polyelliptical headlights
– remove cover A-fig. 123 to
replace the dipped beam bulb or B
to replace the main beam bulb;
fig. 123
F0X0104m
fig. 122
F0X0103m
fig. 120
F0X0101m
fig. 121
F0X0102m
107-132 STRADA LUM GB 1ed 9-01-2012 14:52 Pagina 115
Page 118 of 187
116
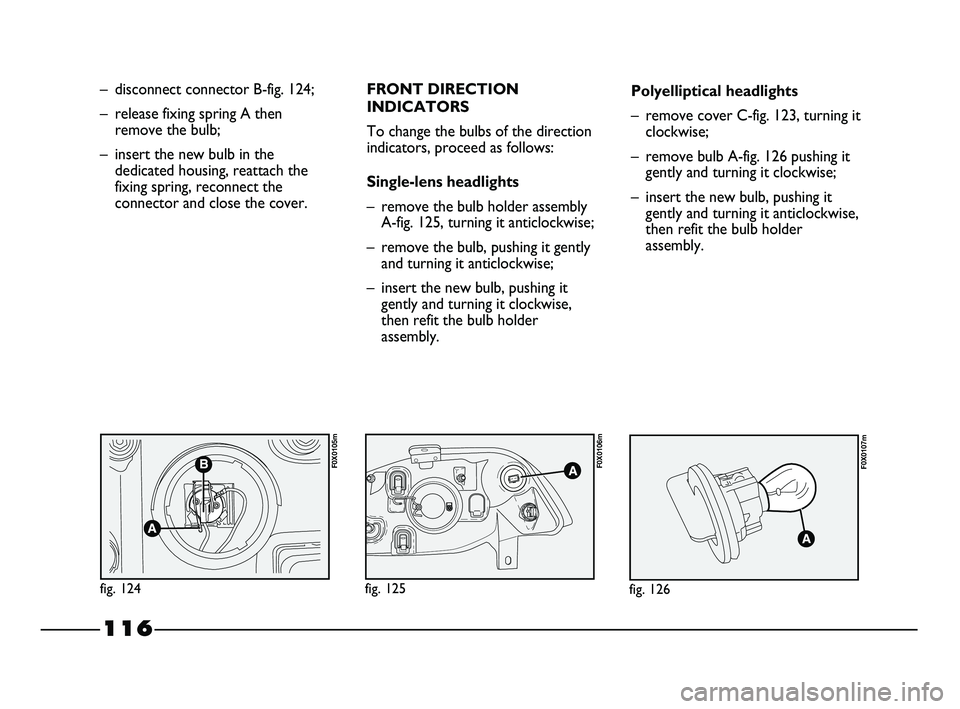
– disconnect connector B-fig. 124;
– release fixing spring A then
remove the bulb;
– insert the new bulb in the
dedicated housing, reattach the
fixing spring, reconnect the
connector and close the cover.FRONT DIRECTION
INDICATORS
To change the bulbs of the direction
indicators, proceed as follows:
Single-lens headlights
– remove the bulb holder assembly
A-fig. 125, turning it anticlockwise;
– remove the bulb, pushing it gently
and turning it anticlockwise;
– insert the new bulb, pushing it
gently and turning it clockwise,
then refit the bulb holder
assembly.Polyelliptical headlights
– remove cover C-fig. 123, turning it
clockwise;
– remove bulb A-fig. 126 pushing it
gently and turning it clockwise;
– insert the new bulb, pushing it
gently and turning it anticlockwise,
then refit the bulb holder
assembly.
fig. 126
F0X0107m
fig. 124
F0X0105m
fig. 125
F0X0106m
107-132 STRADA LUM GB 1ed 9-01-2012 14:52 Pagina 116
Page 119 of 187
117
FRONT SIDE LIGHTS
To change the bulbs of the side
lights, proceed as follows:
Single-lens headlights
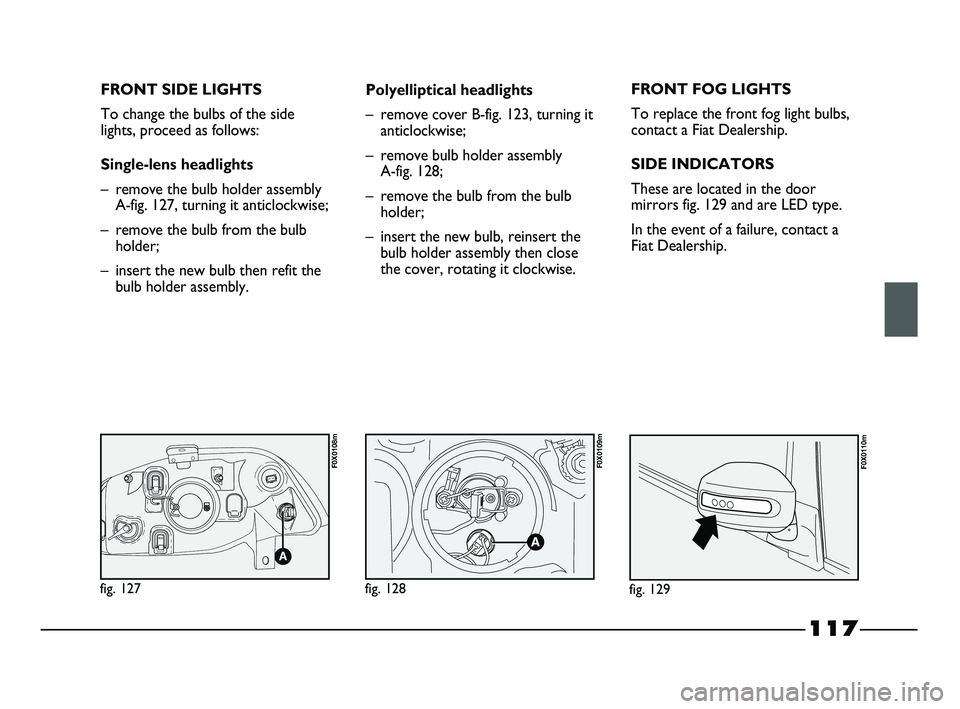
– remove the bulb holder assembly
A-fig. 127, turning it anticlockwise;
– remove the bulb from the bulb
holder;
– insert the new bulb then refit the
bulb holder assembly.Polyelliptical headlights
– remove cover B-fig. 123, turning it
anticlockwise;
– remove bulb holder assembly
A-fig. 128;
– remove the bulb from the bulb
holder;
– insert the new bulb, reinsert the
bulb holder assembly then close
the cover, rotating it clockwise.FRONT FOG LIGHTS
To replace the front fog light bulbs,
contact a Fiat Dealership.
SIDE INDICATORS
These are located in the door
mirrors fig. 129 and are LED type.
In the event of a failure, contact a
Fiat Dealership.
fig. 129
F0X0110m
fig. 127
F0X0108m
fig. 128
F0X0109m
107-132 STRADA LUM GB 1ed 9-01-2012 14:52 Pagina 117