radio FIAT STRADA 2014 Owner handbook (in English)
[x] Cancel search | Manufacturer: FIAT, Model Year: 2014, Model line: STRADA, Model: FIAT STRADA 2014Pages: 187, PDF Size: 8.06 MB
Page 9 of 187
7
KNOW YOUR VEHICLE
SYMBOLS
Special coloured plates have been
attached near or on some of the
components of your Fiat Strada.
These plates bear symbols that draw
your attention to the precautions
required when handling the
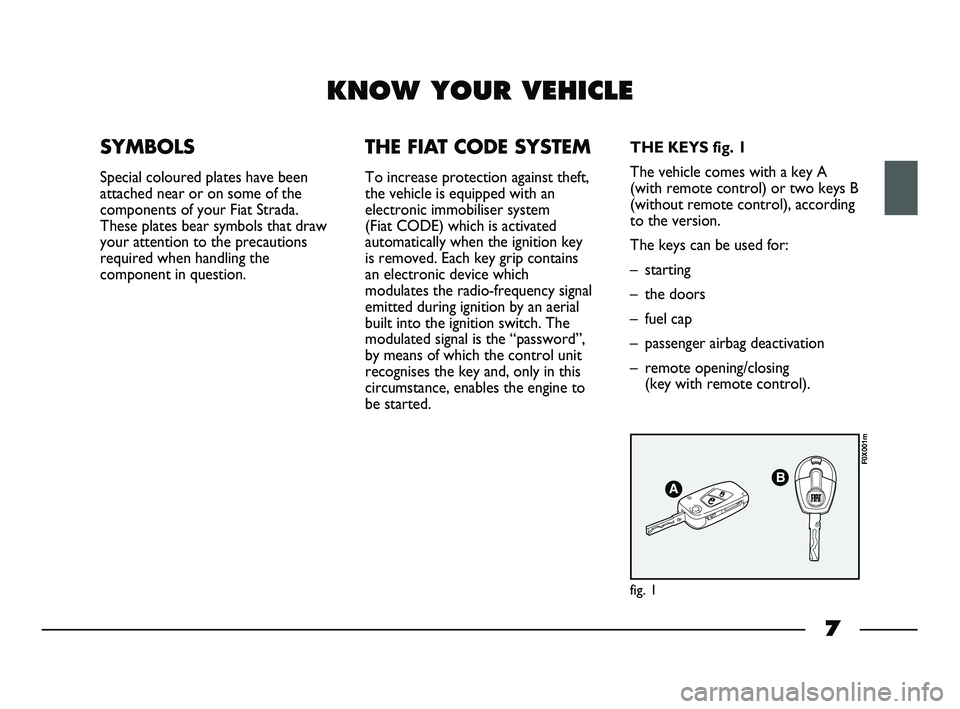
component in question.THE KEYS fig. 1
The vehicle comes with a key A
(with remote control) or two keys B
(without remote control), according
to the version.
The keys can be used for:
– starting
– the doors
– fuel cap
– passenger airbag deactivation
– remote opening/closing
(key with remote control).
AB
fig. 1
F0X001m
THE FIAT CODE SYSTEM
To increase protection against theft,
the vehicle is equipped with an
electronic immobiliser system
(Fiat CODE) which is activated
automatically when the ignition key
is removed. Each key grip contains
an electronic device which
modulates the radio-frequency signal
emitted during ignition by an aerial
built into the ignition switch. The
modulated signal is the “password”,
by means of which the control unit
recognises the key and, only in this
circumstance, enables the engine to
be started.
007-044 STRADA LUM GB 1ed 9-01-2012 14:49 Pagina 7
Page 12 of 187
10
DUPLICATING KEYS
Customers who require additional
keys must contact a Fiat Dealership,
taking all available keys and CODE
card with them to the Dealership.
The Fiat Dealership will store (up to
a maximum of 8 keys) all keys, both
new and already owned, in the
system.
The Fiat Dealership may require the
Customer to demonstrate that they
are the owner of the vehicle.Codes
for the keys which are not
presented for the new storing
procedure are deleted from the
memory, to ensure that any keys
which may be mislaid cannot be used
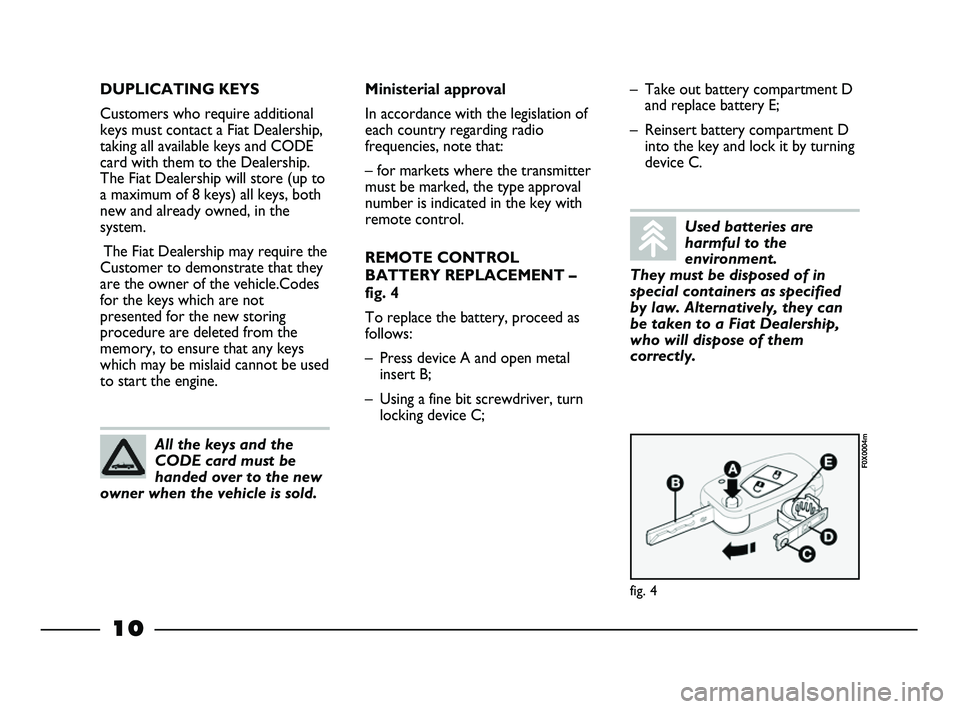
to start the engine.– Take out battery compartment D
and replace battery E;
– Reinsert battery compartment D
into the key and lock it by turning
device C.
fig. 4
F0X0004m
All the keys and the
CODE card must be
handed over to the new
owner when the vehicle is sold.
Ministerial approval
In accordance with the legislation of
each country regarding radio
frequencies, note that:
– for markets where the transmitter
must be marked, the type approval
number is indicated in the key with
remote control.
REMOTE CONTROL
BATTERY REPLACEMENT –
fig. 4
To replace the battery, proceed as
follows:
– Press device A and open metal
insert B;
– Using a fine bit screwdriver, turn
locking device C;
Used batteries are
harmful to the
environment.
They must be disposed of in
special containers as specified
by law. Alternatively, they can
be taken to a Fiat Dealership,
who will dispose of them
correctly.
007-044 STRADA LUM GB 1ed 9-01-2012 14:49 Pagina 10
Page 13 of 187
11
STEERING LOCK
Engagement: with ignition at
STOP, or PARK, remove the key
and turn the steering wheel until it
locks.IGNITION
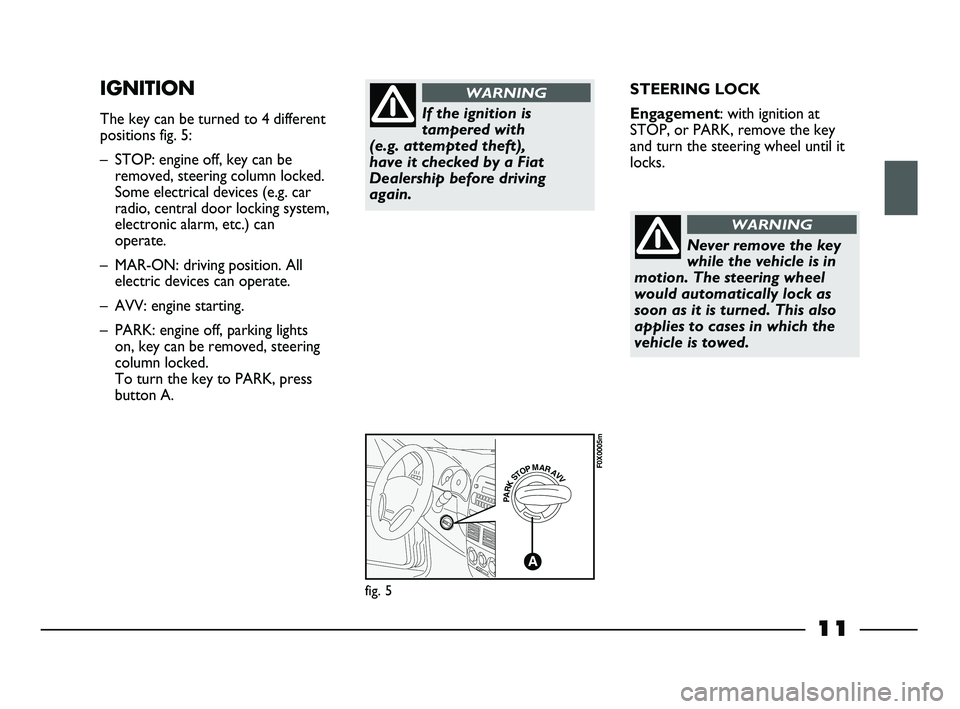
The key can be turned to 4 different
positions fig. 5:
– STOP: engine off, key can be
removed, steering column locked.
Some electrical devices (e.g. car
radio, central door locking system,
electronic alarm, etc.) can
operate.
– MAR-ON: driving position. All
electric devices can operate.
– AVV: engine starting.
– PARK: engine off, parking lights
on, key can be removed, steering
column locked.
To turn the key to PARK, press
button A.
PARKSTOPMARAVV
A
fig. 5
F0X0005m
If the ignition is
tampered with
(e.g. attempted theft),
have it checked by a Fiat
Dealership before driving
again.
WARNING
Never remove the key
while the vehicle is in
motion. The steering wheel
would automatically lock as
soon as it is turned. This also
applies to cases in which the
vehicle is towed.
WARNING
007-044 STRADA LUM GB 1ed 9-01-2012 14:49 Pagina 11
Page 14 of 187
12
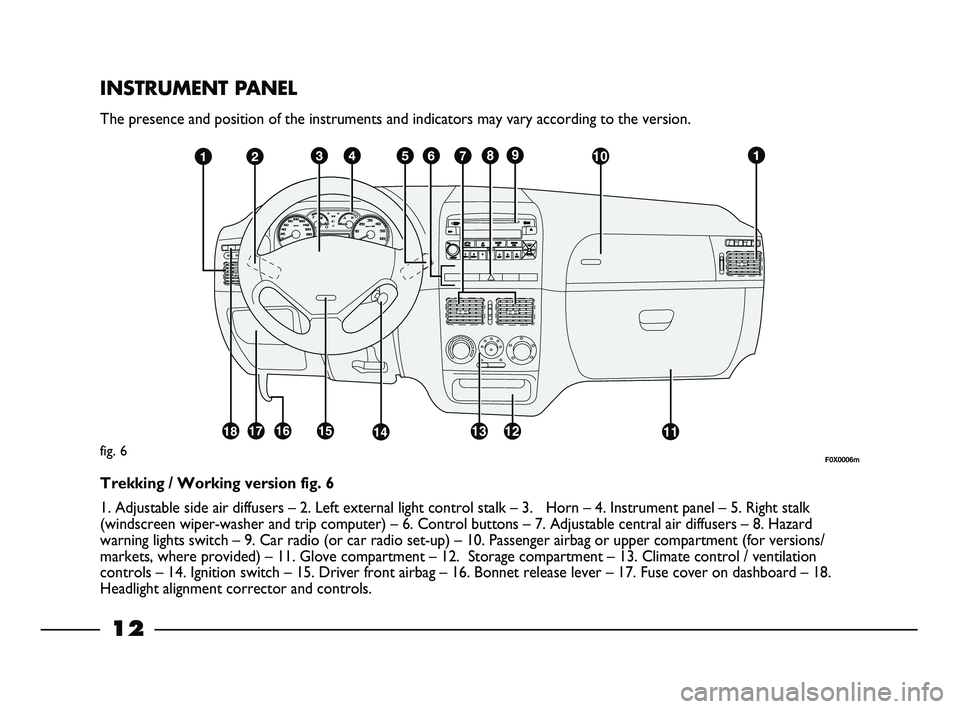
INSTRUMENT PANEL
The presence and position of the instruments and indicators may vary according to the version.
fig. 6
Trekking / Working version fig. 6
1. Adjustable side air diffusers – 2. Left external light control stalk – 3. Horn – 4. Instrument panel – 5. Right stalk
(windscreen wiper-washer and trip computer) – 6. Control buttons – 7. Adjustable central air diffusers – 8. Hazard
warning lights switch – 9. Car radio (or car radio set-up) – 10. Passenger airbag or upper compartment (for versions/
markets, where provided) – 11. Glove compartment – 12. Storage compartment – 13. Climate control / ventilation
controls – 14. Ignition switch – 15. Driver front airbag – 16. Bonnet release lever – 17. Fuse cover on dashboard – 18.
Headlight alignment corrector and controls.
F0X0006m
007-044 STRADA LUM GB 1ed 9-01-2012 14:49 Pagina 12
Page 15 of 187
13
The presence and position of the instruments and indicators may vary according to the version.
F0X0007mfig. 7
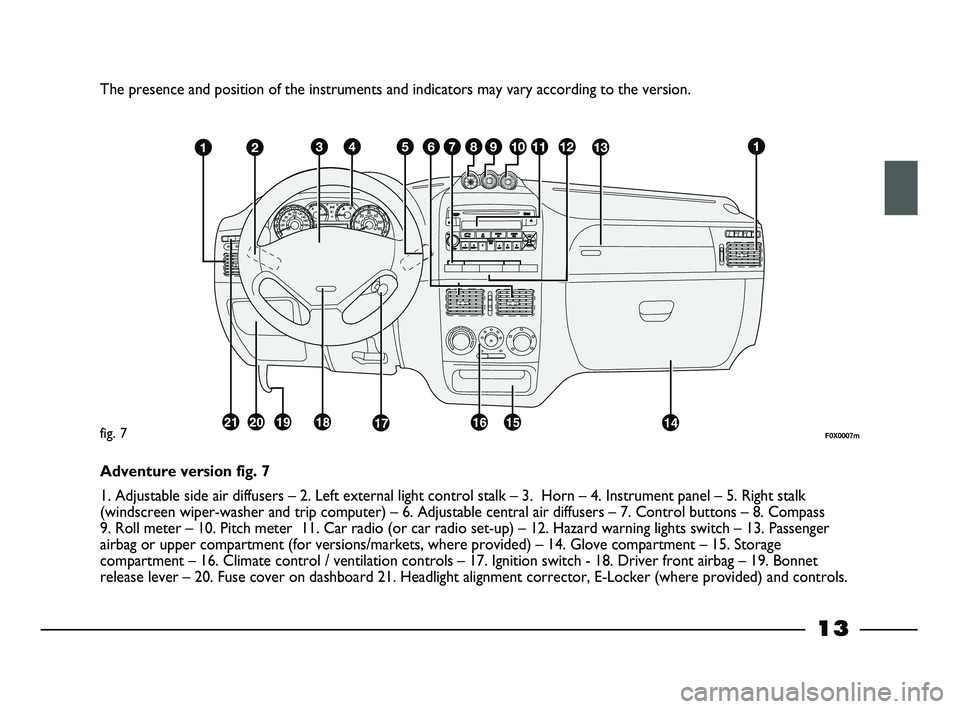
Adventure version fig. 7
1. Adjustable side air diffusers – 2. Left external light control stalk – 3. Horn – 4. Instrument panel – 5. Right stalk
(windscreen wiper-washer and trip computer) – 6. Adjustable central air diffusers – 7. Control buttons – 8. Compass
9. Roll meter – 10. Pitch meter 11. Car radio (or car radio set-up) – 12. Hazard warning lights switch – 13. Passenger
airbag or upper compartment (for versions/markets, where provided) – 14. Glove compartment – 15. Storage
compartment – 16. Climate control / ventilation controls – 17. Ignition switch - 18. Driver front airbag – 19. Bonnet
release lever – 20. Fuse cover on dashboard 21. Headlight alignment corrector, E-Locker (where provided) and controls.
007-044 STRADA LUM GB 1ed 9-01-2012 14:49 Pagina 13
Page 32 of 187
30
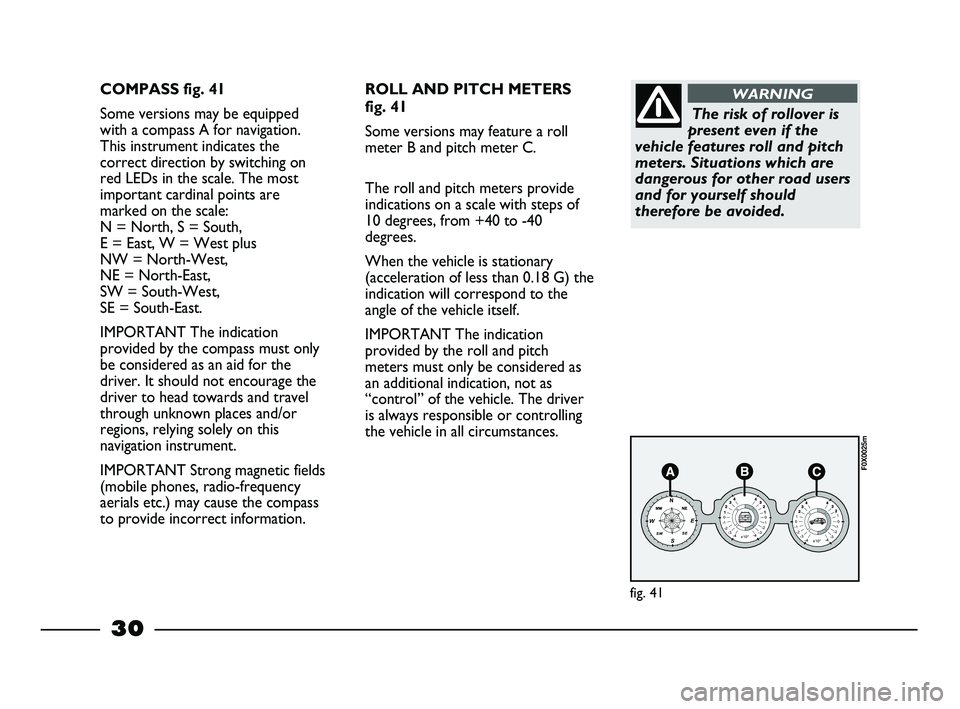
COMPASS fig. 41
Some versions may be equipped
with a compass A for navigation.
This instrument indicates the
correct direction by switching on
red LEDs in the scale. The most
important cardinal points are
marked on the scale:
N = North, S = South,
E = East, W = West plus
NW = North-West,
NE = North-East,
SW = South-West,
SE = South-East.
IMPORTANT The indication
provided by the compass must only
be considered as an aid for the
driver. It should not encourage the
driver to head towards and travel
through unknown places and/or
regions, relying solely on this
navigation instrument.
IMPORTANT Strong magnetic fields
(mobile phones, radio-frequency
aerials etc.) may cause the compass
to provide incorrect information.
S WESWSE-1-2
-3
-4
x10°-1
-2
-3
-40 01
-1
-2
-3
-4
x10°-1
-2
-3
-40
0
1
fig. 41
F0X0025m
ROLL AND PITCH METERS
fig. 41
Some versions may feature a roll
meter B and pitch meter C.
The roll and pitch meters provide
indications on a scale with steps of
10 degrees, from +40 to -40
degrees.
When the vehicle is stationary
(acceleration of less than 0.18 G) the
indication will correspond to the
angle of the vehicle itself.
IMPORTANT The indication
provided by the roll and pitch
meters must only be considered as
an additional indication, not as
“control” of the vehicle. The driver
is always responsible or controlling
the vehicle in all circumstances.
The risk of rollover is
present even if the
vehicle features roll and pitch
meters. Situations which are
dangerous for other road users
and for yourself should
therefore be avoided.
WARNING
007-044 STRADA LUM GB 1ed 9-01-2012 14:49 Pagina 30
Page 39 of 187
37
Clock Mode (12h or 24h)
To choose the time display format
(12h or 24h), proceed as follows:
– press the MODE button briefly:the mode set previously flashes on
the display;
– press the ▼or ▲button to select
12h or 24h;
– press the MODE button briefly to confirm;
– hold down the MODE button to return to the standard display.
Set Date
This function is used to set the date
(day – month – year). To set,
proceed as follows:
– press the MODE button briefly: the year flashes on the display;
– press the ▼or ▲button to
adjust; – press the MODE button briefly:
the month flashes on the display;
– press the ▼or ▲button to
adjust;
– press the MODE button briefly: the day flashes on the display;
– press the ▼or ▲button to
adjust;
– press the MODE button briefly to confirm;
– hold down the MODE button to return to the standard display.
Every time the ▼or ▲buttons are
pressed, the value is
decreased/increased by 1 unit
respectively When the buttons are
held down, the value decreases or
increases rapidly, as appropriate. It is
advisable to release the button as
you approach the desired value, then
complete the adjustment with single
presses. Audio Rpt.
(radio info repetition
for versions/markets,
where provided)
This function, present only on some
versions/markets where provided,
allows the frequency band or the
RDS messages from the current
station to be displayed.
To activate (ON) or deactivate
(OFF) radio info repetition, proceed
as follows:
– press the MODE button briefly:
ON or OFF (depending on the
previous setting) flashes on the
display;
– press the ▼or ▲button to
select;
– press the MODE button briefly to confirm;
– hold down the MODE button to return to the standard display.
007-044 STRADA LUM GB 2ed 4-04-2012 9:08 Pagina 37
Page 43 of 187
41
Exit menu
This is the last option concluding the
menu function cycle.
– Press the MODE button briefly:
the display returns to the standard
screen.
– Pressing the ▼button returns to
the first menu option: Spd. Lim.Doors open warning
On some versions, the display
indicates which door has
inadvertently been left open.
On others, the “doors open”
warning light on the instrument
panel switches on in the same
circumstances. On some versions,
the system informs the driver that a
speed of 4 km/h has been exceeded
through an acoustic signal.
Exterior lighting check
The
Wwarning light switches on to
indicate a failure in one of the
external lights. On some versions,
the display can indicate the electrical
circuit where the fault is present.Interior lighting adjustment
(dimmer)
This function permits a decrease
and/or increase in light intensity for
the instrument panel, car radio
display and control button
serigraphy.
To adjust to the desired level, simply
press the ▼or ▲buttons; after a
few seconds, the display returns to
the previous screen automatically.
007-044 STRADA LUM GB 1ed 9-01-2012 14:49 Pagina 41
Page 92 of 187
CAR RADIO
For radio operation, consult the
CAR RADIO Supplement attached
to this Owner Handbook.
SYSTEM SET-UPS
According to the version, the Fiat
Strada may be equipped with
different car radio system set-ups.
The car radio purchased by the user
must be installed in the central
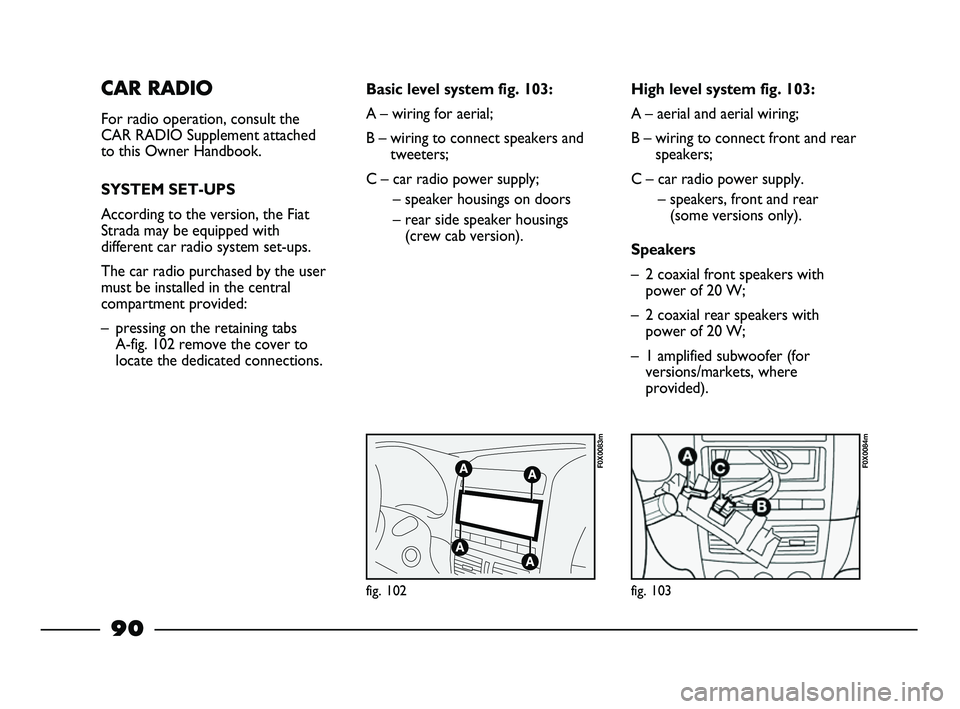
compartment provided:
– pressing on the retaining tabs
A-fig. 102 remove the cover to
locate the dedicated connections.
fig. 102
F0X0083m
fig. 103
F0X0084m
Basic level system fig. 103:
A – wiring for aerial;
B – wiring to connect speakers and
tweeters;
C – car radio power supply;
– speaker housings on doors
– rear side speaker housings
(crew cab version).High level system fig. 103:
A – aerial and aerial wiring;
B – wiring to connect front and rear
speakers;
C – car radio power supply.
– speakers, front and rear
(some versions only).
Speakers
– 2 coaxial front speakers with
power of 20 W;
– 2 coaxial rear speakers with
power of 20 W;
– 1 amplified subwoofer (for
versions/markets, where
provided).
90
045-094 STRADA LUM GB 1ed 23-01-2012 9:10 Pagina 90
Page 94 of 187
RADIO TRANSMITTERS AND
MOBILE PHONES
Radio transmitters (car phones, CB
radios etc.) cannot be used inside
the vehicle unless a separate aerial is
mounted externally.
IMPORTANT The use of such
devices inside the passenger
compartment (without an external
aerial) may, in addition to potential
damage to the health of the
passengers, cause malfunctions in the
vehicle’s electronic systems,
compromising the safety of the
vehicle.
In addition, transmission and
reception of these devices may be
adversely affected by the shielding
effect of the vehicle’s body.
As far as the use of EC-approved
mobile phones is concerned (GSM,
GPRS, UMTS), follow the usage
instructions provided by the mobile
phone manufacturer.REFUELLING
Never introduce even a
minimal quantity of
petrol to the tank, even
in an emergency; the catalytic
converter would be damaged,
irreparably compromising its
operation.
An inefficient catalytic
converter leads to
harmful exhaust
emissions, thus contributing to
environmental pollution.
The vehicle must be
refuelled exclusively
with diesel for motor
vehicles in compliance with
European specification EN590.
The use of other products or
mixtures may damage the
engine beyond repair and
consequently invalidate the
warranty, due to the damage
caused. If you accidentally
refuel with another type of fuel,
do not start the engine, and
drain the tank. If the engine has
run, even for a very short time,
with other fuels, the whole fuel
circuit must be drained in
addition to the tank.
92
045-094 STRADA LUM GB 1ed 23-01-2012 9:10 Pagina 92