automat FIAT TALENTO 2016 2.G Owners Manual
[x] Cancel search | Manufacturer: FIAT, Model Year: 2016, Model line: TALENTO, Model: FIAT TALENTO 2016 2.GPages: 232, PDF Size: 5.01 MB
Page 13 of 232
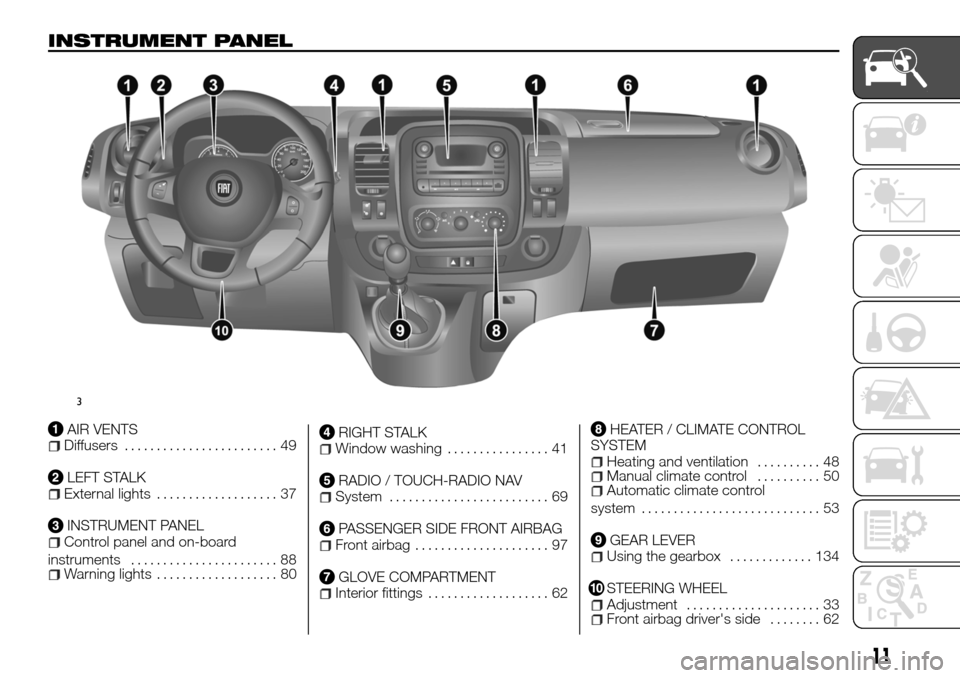
INSTRUMENT PANEL
AIR VENTSDiffusers........................ 49
LEFT STALKExternal lights................... 37
INSTRUMENT PANELControl panel and on-board
instruments....................... 88
Warning lights................... 80
RIGHT STALKWindow washing................ 41
RADIO / TOUCH-RADIO NAVSystem......................... 69
PASSENGER SIDE FRONT AIRBAGFront airbag..................... 97
GLOVE COMPARTMENTInterior fittings................... 62
HEATER / CLIMATE CONTROL
SYSTEM
Heating and ventilation.......... 48Manual climate control.......... 50Automatic climate control
system............................ 53
GEAR LEVERUsing the gearbox............. 134
STEERING WHEELAdjustment..................... 33Front airbag driver's side........ 62
3
11
Page 16 of 232
THE KEYS
KEY WITH REMOTE
CONTROL
1)
Radio frequency remote control
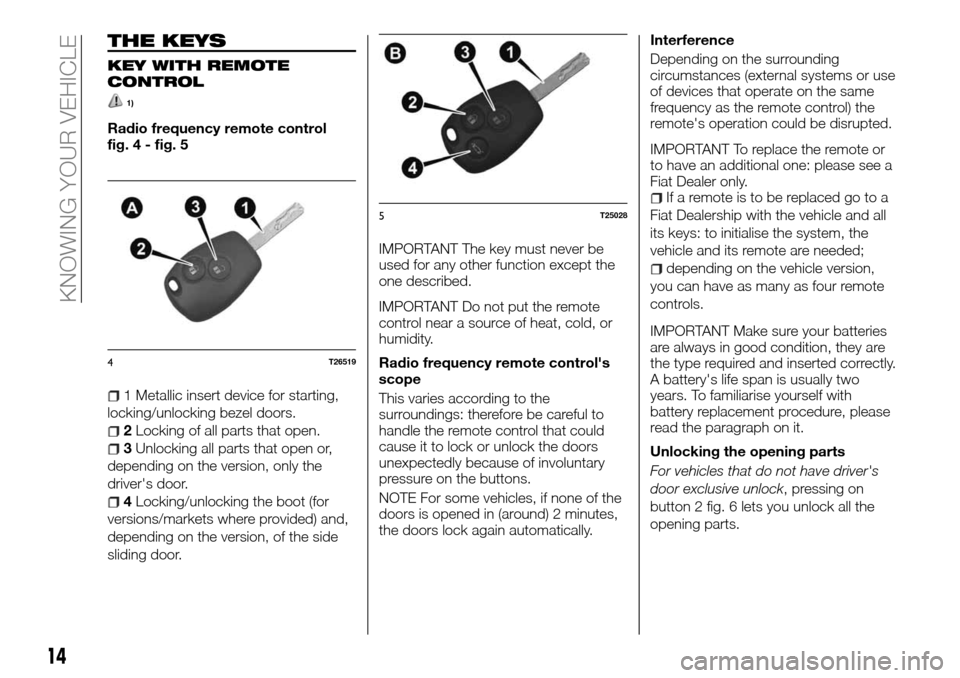
fig. 4 - fig. 5
1 Metallic insert device for starting,
locking/unlocking bezel doors.
2Locking of all parts that open.
3Unlocking all parts that open or,
depending on the version, only the
driver's door.
4Locking/unlocking the boot (for
versions/markets where provided) and,
depending on the version, of the side
sliding door.IMPORTANT The key must never be
used for any other function except the
one described.
IMPORTANT Do not put the remote
control near a source of heat, cold, or
humidity.
Radio frequency remote control's
scope
This varies according to the
surroundings: therefore be careful to
handle the remote control that could
cause it to lock or unlock the doors
unexpectedly because of involuntary
pressure on the buttons.
NOTE For some vehicles, if none of the
doors is opened in (around) 2 minutes,
the doors lock again automatically.Interference
Depending on the surrounding
circumstances (external systems or use
of devices that operate on the same
frequency as the remote control) the
remote's operation could be disrupted.
IMPORTANT To replace the remote or
to have an additional one: please see a
Fiat Dealer only.
If a remote is to be replaced go to a
Fiat Dealership with the vehicle and all
its keys: to initialise the system, the
vehicle and its remote are needed;
depending on the vehicle version,
you can have as many as four remote
controls.
IMPORTANT Make sure your batteries
are always in good condition, they are
the type required and inserted correctly.
A battery's life span is usually two
years. To familiarise yourself with
battery replacement procedure, please
read the paragraph on it.
Unlocking the opening parts
For vehicles that do not have driver's
door exclusive unlock, pressing on
button 2 fig. 6 lets you unlock all the
opening parts.
4T26519
5T25028
14
KNOWING YOUR VEHICLE
Page 17 of 232
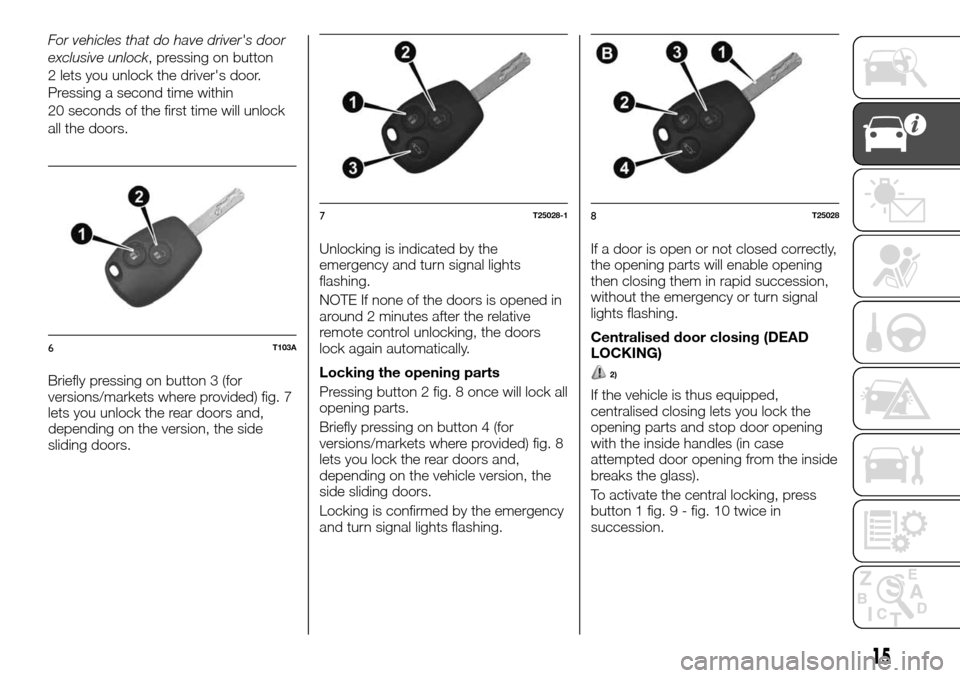
For vehicles that do have driver's door
exclusive unlock, pressing on button
2 lets you unlock the driver's door.
Pressing a second time within
20 seconds of the first time will unlock
all the doors.
Briefly pressing on button 3 (for
versions/markets where provided) fig. 7
lets you unlock the rear doors and,
depending on the version, the side
sliding doors.Unlocking is indicated by the
emergency and turn signal lights
flashing.
NOTE If none of the doors is opened in
around 2 minutes after the relative
remote control unlocking, the doors
lock again automatically.
Locking the opening parts
Pressing button 2 fig. 8 once will lock all
opening parts.
Briefly pressing on button 4 (for
versions/markets where provided) fig. 8
lets you lock the rear doors and,
depending on the vehicle version, the
side sliding doors.
Locking is confirmed by the emergency
and turn signal lights flashing.If a door is open or not closed correctly,
the opening parts will enable opening
then closing them in rapid succession,
without the emergency or turn signal
lights flashing.
Centralised door closing (DEAD
LOCKING)
2)
If the vehicle is thus equipped,
centralised closing lets you lock the
opening parts and stop door opening
with the inside handles (in case
attempted door opening from the inside
breaks the glass).
To activate the central locking, press
button 1 fig. 9 - fig. 10 twice in
succession.
6T103A
7T25028-18T25028
15
Page 28 of 232
MANUAL DOOR
LOCKING/UNLOCKING
4) 5)
Locking from the outside
This can be done with either the remote
control or electronic key: refer to the
"Key with remote control" or "Electronic
key" paragraphs in the "Knowing your
vehicle” chapter.
In some cases, the radio frequency
remote control or the electronic key
might not function:
the remote or electronic key might
have dead batteries, etc.
use of devices on the same
electronic key frequency (cell phone,
etc.);
the vehicle is located in an area
known for a high presence of
electro-magnetic waves.So you can:
use the key integrated in the remote
or electronic key, or the emergency key
integrated in the left front door unlock
card, or, depending on the vehicle, the
rear swing door
manually lock each door
to enable the door lock/unlock
control from the inside (see paragraph
"Centralised locking/unlocking of
opening parts" in the chapter "Knowing
your vehicle").
Using the key
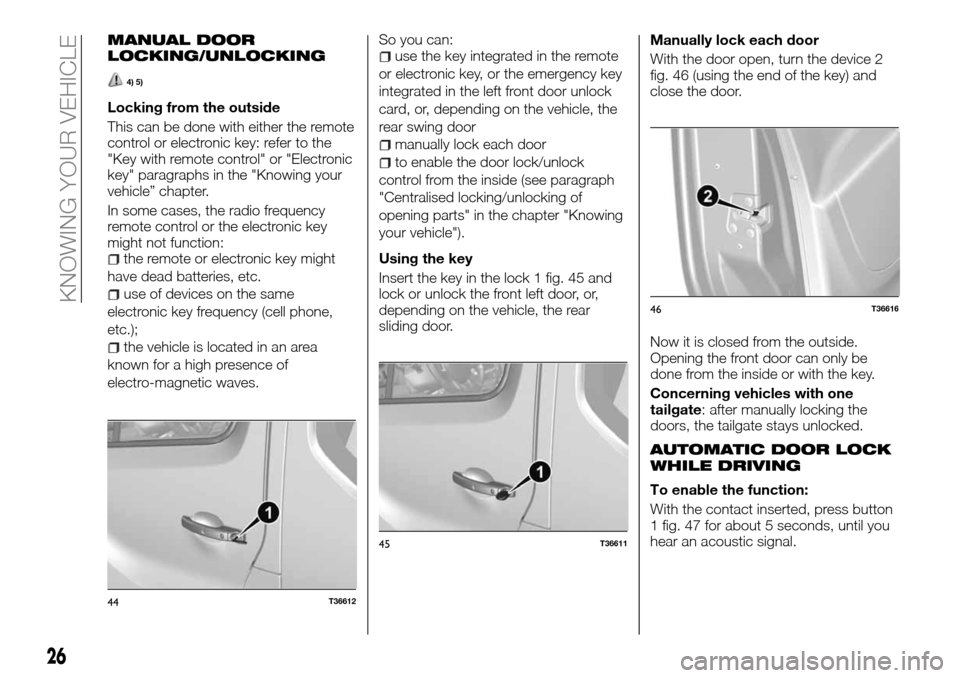
Insert the key in the lock 1 fig. 45 and
lock or unlock the front left door, or,
depending on the vehicle, the rear
sliding door.Manually lock each door
With the door open, turn the device 2
fig. 46 (using the end of the key) and
close the door.
Now it is closed from the outside.
Opening the front door can only be
done from the inside or with the key.
Concerning vehicles with one
tailgate: after manually locking the
doors, the tailgate stays unlocked.
AUTOMATIC DOOR LOCK
WHILE DRIVING
To enable the function:
With the contact inserted, press button
1 fig. 47 for about 5 seconds, until you
hear an acoustic signal.
44T36612
45T36611
46T36616
26
KNOWING YOUR VEHICLE
Page 29 of 232
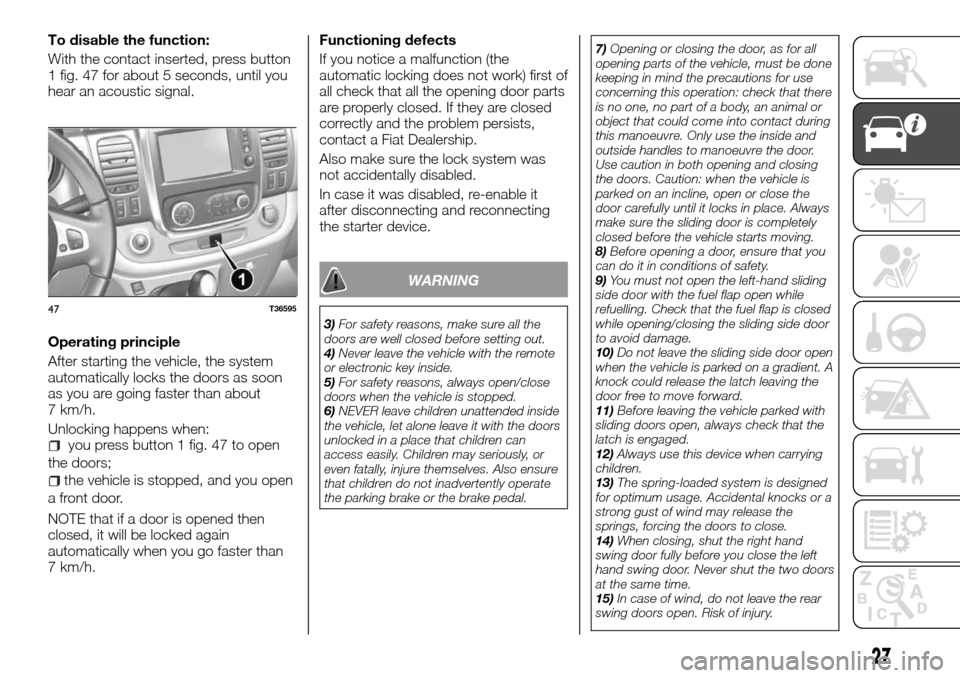
To disable the function:
With the contact inserted, press button
1 fig. 47 for about 5 seconds, until you
hear an acoustic signal.
Operating principle
After starting the vehicle, the system
automatically locks the doors as soon
as you are going faster than about
7 km/h.
Unlocking happens when:
you press button 1 fig. 47 to open
the doors;
the vehicle is stopped, and you open
a front door.
NOTE that if a door is opened then
closed, it will be locked again
automatically when you go faster than
7 km/h.Functioning defects
If you notice a malfunction (the
automatic locking does not work) first of
all check that all the opening door parts
are properly closed. If they are closed
correctly and the problem persists,
contact a Fiat Dealership.
Also make sure the lock system was
not accidentally disabled.
In case it was disabled, re-enable it
after disconnecting and reconnecting
the starter device.
WARNING
3)For safety reasons, make sure all the
doors are well closed before setting out.
4)Never leave the vehicle with the remote
or electronic key inside.
5)For safety reasons, always open/close
doors when the vehicle is stopped.
6)NEVER leave children unattended inside
the vehicle, let alone leave it with the doors
unlocked in a place that children can
access easily. Children may seriously, or
even fatally, injure themselves. Also ensure
that children do not inadvertently operate
the parking brake or the brake pedal.7)Opening or closing the door, as for all
opening parts of the vehicle, must be done
keeping in mind the precautions for use
concerning this operation: check that there
is no one, no part of a body, an animal or
object that could come into contact during
this manoeuvre. Only use the inside and
outside handles to manoeuvre the door.
Use caution in both opening and closing
the doors. Caution: when the vehicle is
parked on an incline, open or close the
door carefully until it locks in place. Always
make sure the sliding door is completely
closed before the vehicle starts moving.
8)Before opening a door, ensure that you
can do it in conditions of safety.
9)You must not open the left-hand sliding
side door with the fuel flap open while
refuelling. Check that the fuel flap is closed
while opening/closing the sliding side door
to avoid damage.
10)Do not leave the sliding side door open
when the vehicle is parked on a gradient. A
knock could release the latch leaving the
door free to move forward.
11)Before leaving the vehicle parked with
sliding doors open, always check that the
latch is engaged.
12)Always use this device when carrying
children.
13)The spring-loaded system is designed
for optimum usage. Accidental knocks or a
strong gust of wind may release the
springs, forcing the doors to close.
14)When closing, shut the right hand
swing door fully before you close the left
hand swing door. Never shut the two doors
at the same time.
15)In case of wind, do not leave the rear
swing doors open. Risk of injury.47T36595
27
Page 36 of 232
START&STOP
SYSTEM
29)
This system lets you reduce fuel
consumption and harmful gas
emissions. When you start the vehicle,
the system is automatically activated.
When driving, the system stops the
engine (in stand-by) while the vehicle is
not moving (traffic jam, stop for a traffic
light, etc.).
OPERATING MODE
The engine is put in stand-by if:the vehicle was driven since its last
stop;
the gear is in neutral;
the clutch pedal is released;
the vehicle speed is lower than
3 km/h.
2) 3) 4)
The instrument panel warning lightturns on to indicate the engine is in
standby.
The vehicle's equipment remains
functioning for the entire time the
engine is off.
The engine is automatically restarted
when the clutch pedal is pressed and
the vehicle is put in gear.
ACTIVATION AND
DEACTIVATION OF THE
SYSTEM
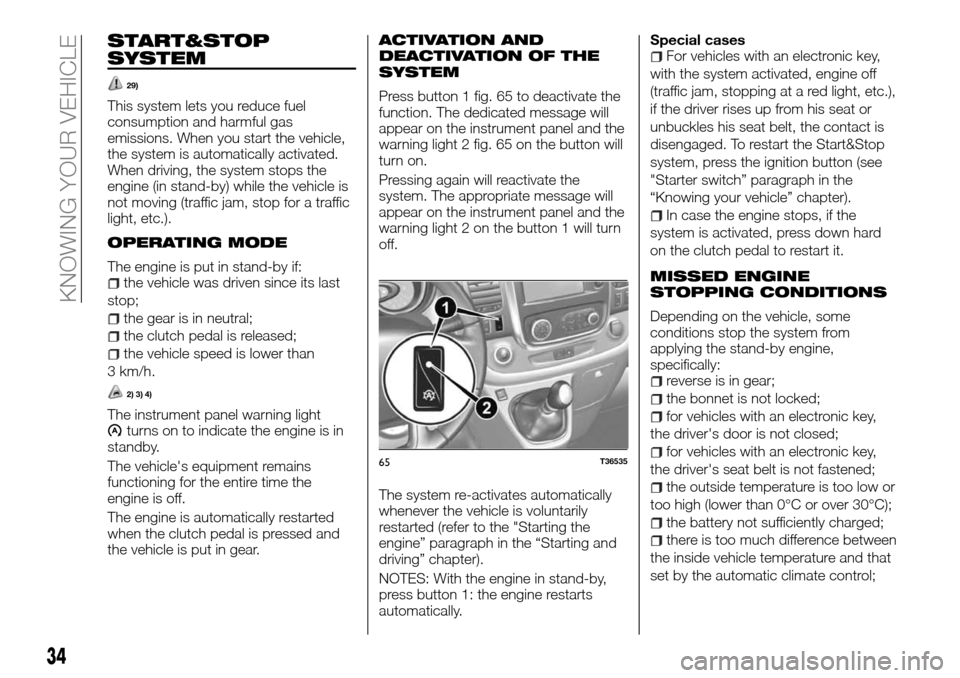
Press button 1 fig. 65 to deactivate the
function. The dedicated message will
appear on the instrument panel and the
warning light 2 fig. 65 on the button will
turn on.
Pressing again will reactivate the
system. The appropriate message will
appear on the instrument panel and the
warning light 2 on the button 1 will turn
off.
The system re-activates automatically
whenever the vehicle is voluntarily
restarted (refer to the "Starting the
engine” paragraph in the “Starting and
driving” chapter).
NOTES: With the engine in stand-by,
press button 1: the engine restarts
automatically.Special cases
For vehicles with an electronic key,
with the system activated, engine off
(traffic jam, stopping at a red light, etc.),
if the driver rises up from his seat or
unbuckles his seat belt, the contact is
disengaged. To restart the Start&Stop
system, press the ignition button (see
"Starter switch” paragraph in the
“Knowing your vehicle” chapter).
In case the engine stops, if the
system is activated, press down hard
on the clutch pedal to restart it.
MISSED ENGINE
STOPPING CONDITIONS
Depending on the vehicle, some
conditions stop the system from
applying the stand-by engine,
specifically:
reverse is in gear;
the bonnet is not locked;
for vehicles with an electronic key,
the driver's door is not closed;
for vehicles with an electronic key,
the driver's seat belt is not fastened;
the outside temperature is too low or
too high (lower than 0°C or over 30°C);
the battery not sufficiently charged;
there is too much difference between
the inside vehicle temperature and that
set by the automatic climate control;
65T36535
34
KNOWING YOUR VEHICLE
Page 37 of 232
paragraph in the "Knowing your vehicle”
chapter);
the engine coolant liquid temperature
is not sufficient;
the anti-particulate filter automatic
regeneration is underway;
Or:
the instrument panel warning light
turns on to indicate that the engine
cannot be put in standby.
NOTES:To refuel, the engine must be
turned off (and not in stand-by): you
must stop the engine (refer to the
"Starting the engine” paragraph in the
“Starting and driving” chapter):
RESTARTING
CONDITIONS
In some cases, the engine can restart
without any intervention to guarantee
safety and ideal comfort. This can be
confirmed when:
the outside temperature is too low or
too high (lower than 0°C or over 30°C);
the MAX DEF function is activated
(refer to the "Air conditioning"
paragraph in the "Knowing your vehicle”
chapter);
the battery not sufficiently charged;
the vehicle speed is higher than
5 km/h (going downhill, etc.);
repeated pressure on the brake
pedal or need to use the braking
system;
Vehicles with remote control
Some of these conditions prevent
automatic engine restart when opening:
one of the doors (for vehicles with a
key);
the passenger door (for vehicles with
an electronic key).
IRREGULAR OPERATION
When the appropriate message
appears on the instrument panel, along
with the integrated light 2 in button 1
fig. 65, the system is deactivated.
Contact a Fiat Dealership.
WARNING
29)In case of an emergency stop, the
engine could restart by pressing the clutch
pedal if the Start&Stop function is
activated.
IMPORTANT
2)Do not drive when the engine is in
standby (the warning lighton the
instrument panel turns on).
3)When the engine in stand-by, the power
steering is deactivated.4)If you leave the vehicle, there is an
acoustic warning that the engine is in
stand-by mode (it is not off). Before getting
out of the vehicle, you must disengage the
starter device (refer to the "Starter switch”
paragraph in the “Knowing your vehicle”
chapter).
35
the MAX DEF function is activated
(refer to the "Air conditioning"
Page 38 of 232
REAR VIEW
MIRRORS
DOOR MIRRORS
30) 31) 32)
Power Mirrors
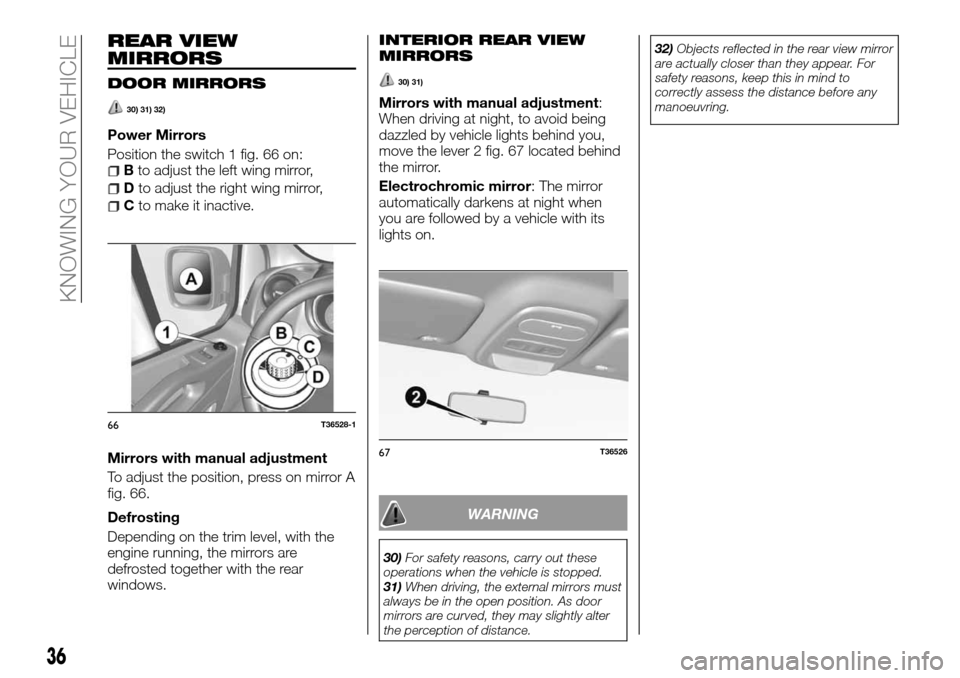
Position the switch 1 fig. 66 on:
Bto adjust the left wing mirror,
Dto adjust the right wing mirror,
Cto make it inactive.
Mirrors with manual adjustment
To adjust the position, press on mirror A
fig. 66.
Defrosting
Depending on the trim level, with the
engine running, the mirrors are
defrosted together with the rear
windows.
INTERIOR REAR VIEW
MIRRORS
30) 31)
Mirrors with manual adjustment:
When driving at night, to avoid being
dazzled by vehicle lights behind you,
move the lever 2 fig. 67 located behind
the mirror.
Electrochromic mirror: The mirror
automatically darkens at night when
you are followed by a vehicle with its
lights on.
WARNING
30)For safety reasons, carry out these
operations when the vehicle is stopped.
31)When driving, the external mirrors must
always be in the open position. As door
mirrors are curved, they may slightly alter
the perception of distance.32)Objects reflected in the rear view mirror
are actually closer than they appear. For
safety reasons, keep this in mind to
correctly assess the distance before any
manoeuvring.
66T36528-1
67T36526
36
KNOWING YOUR VEHICLE
Page 39 of 232
EXTERNAL LIGHTS
SIDE LIGHTS
33) 34) 35) 36)
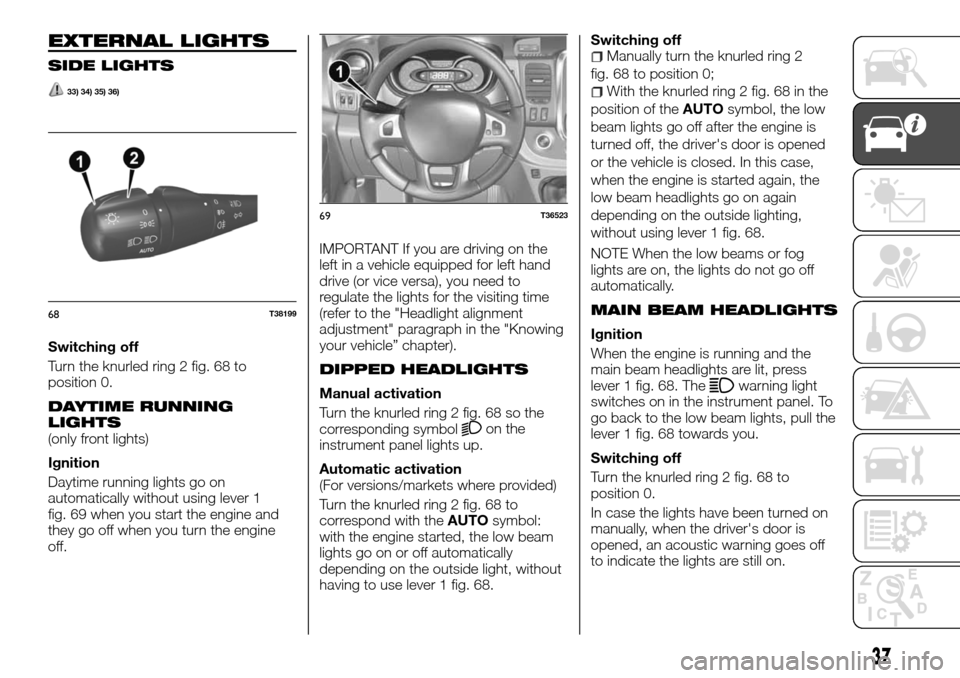
Switching off
Turn the knurled ring 2 fig. 68 to
position 0.
DAYTIME RUNNING
LIGHTS
(only front lights)
Ignition
Daytime running lights go on
automatically without using lever 1
fig. 69 when you start the engine and
they go off when you turn the engine
off.IMPORTANT If you are driving on the
left in a vehicle equipped for left hand
drive (or vice versa), you need to
regulate the lights for the visiting time
(refer to the "Headlight alignment
adjustment" paragraph in the "Knowing
your vehicle” chapter).
DIPPED HEADLIGHTS
Manual activation
Turn the knurled ring 2 fig. 68 so the
corresponding symbol
on the
instrument panel lights up.
Automatic activation
(For versions/markets where provided)
Turn the knurled ring 2 fig. 68 to
correspond with theAUTOsymbol:
with the engine started, the low beam
lights go on or off automatically
depending on the outside light, without
having to use lever 1 fig. 68.Switching off
Manually turn the knurled ring 2
fig. 68 to position 0;
With the knurled ring 2 fig. 68 in the
position of theAUTOsymbol, the low
beam lights go off after the engine is
turned off, the driver's door is opened
or the vehicle is closed. In this case,
when the engine is started again, the
low beam headlights go on again
depending on the outside lighting,
without using lever 1 fig. 68.
NOTE When the low beams or fog
lights are on, the lights do not go off
automatically.
MAIN BEAM HEADLIGHTS
Ignition
When the engine is running and the
main beam headlights are lit, press
lever 1 fig. 68. The
warning light
switches on in the instrument panel. To
go back to the low beam lights, pull the
lever 1 fig. 68 towards you.
Switching off
Turn the knurled ring 2 fig. 68 to
position 0.
In case the lights have been turned on
manually, when the driver's door is
opened, an acoustic warning goes off
to indicate the lights are still on.
68T38199
69T36523
37
Page 40 of 232
FRONT FOG LIGHTS
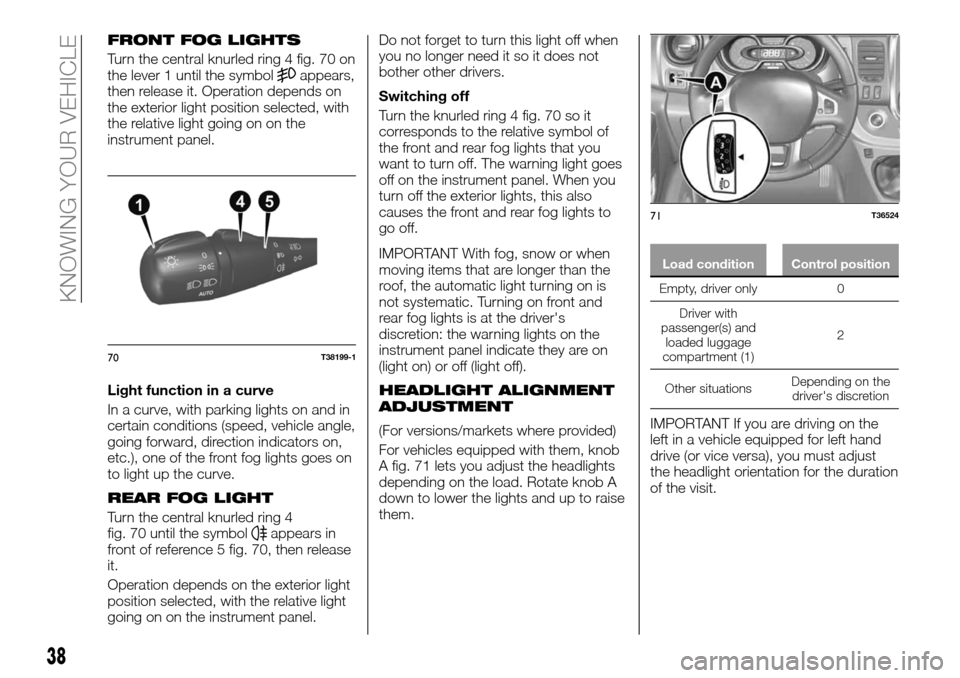
Turn the central knurled ring 4 fig. 70 on
the lever 1 until the symbolappears,
then release it. Operation depends on
the exterior light position selected, with
the relative light going on on the
instrument panel.
Light function in a curve
In a curve, with parking lights on and in
certain conditions (speed, vehicle angle,
going forward, direction indicators on,
etc.), one of the front fog lights goes on
to light up the curve.
REAR FOG LIGHT
Turn the central knurled ring 4
fig. 70 until the symbolappears in
front of reference 5 fig. 70, then release
it.
Operation depends on the exterior light
position selected, with the relative light
going on on the instrument panel.Do not forget to turn this light off when
you no longer need it so it does not
bother other drivers.
Switching off
Turn the knurled ring 4 fig. 70 so it
corresponds to the relative symbol of
the front and rear fog lights that you
want to turn off. The warning light goes
off on the instrument panel. When you
turn off the exterior lights, this also
causes the front and rear fog lights to
go off.
IMPORTANT With fog, snow or when
moving items that are longer than the
roof, the automatic light turning on is
not systematic. Turning on front and
rear fog lights is at the driver's
discretion: the warning lights on the
instrument panel indicate they are on
(light on) or off (light off).
HEADLIGHT ALIGNMENT
ADJUSTMENT
(For versions/markets where provided)
For vehicles equipped with them, knob
A fig. 71 lets you adjust the headlights
depending on the load. Rotate knob A
down to lower the lights and up to raise
them.
Load condition Control position
Empty, driver only 0
Driver with
passenger(s) and
loaded luggage
compartment (1)2
Other situationsDepending on the
driver's discretion
IMPORTANT If you are driving on the
left in a vehicle equipped for left hand
drive (or vice versa), you must adjust
the headlight orientation for the duration
of the visit.
70T38199-1
71T36524
38
KNOWING YOUR VEHICLE