Knowing FIAT TALENTO 2017 Owner handbook (in English)
[x] Cancel search | Manufacturer: FIAT, Model Year: 2017, Model line: TALENTO, Model: FIAT TALENTO 2017Pages: 228, PDF Size: 4.47 MB
Page 106 of 228
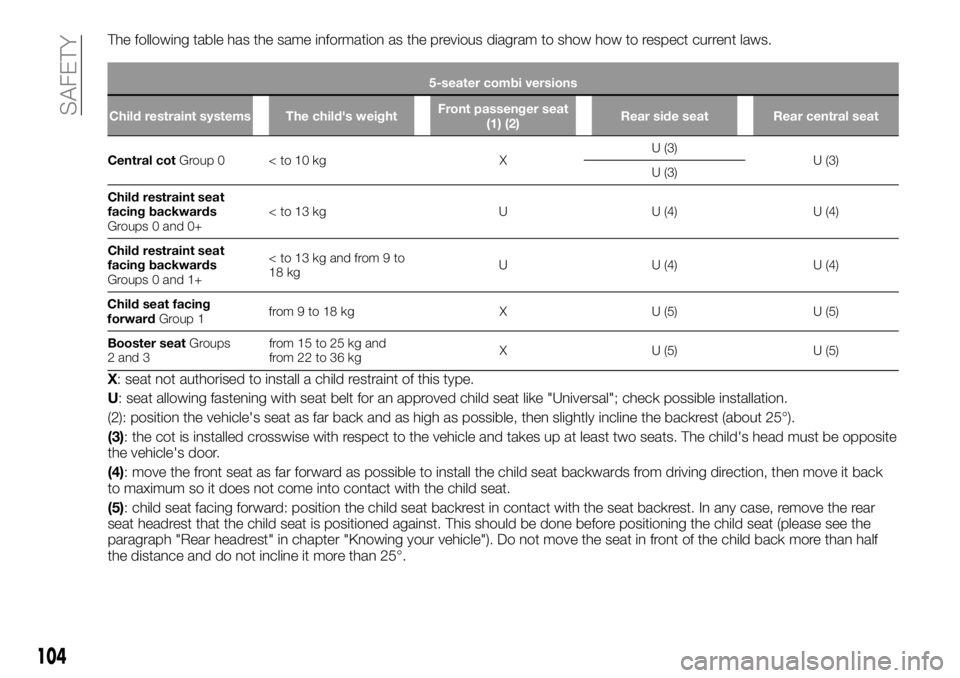
The following table has the same information as the previous diagram to show how to respect current laws.
5-seater combi versions
Child restraint systems The child's weightFront passenger seat
(1) (2)Rear side seat Rear central seat
Central cotGroup 0 < to 10 kg XU (3)
U (3)
U (3)
Child restraint seat
facing backwards
Groups 0 and 0+
facing backwards
Groups 0 and 1+
Child seat facing
forwardGroup 1from9to18kg X U(5) U(5)
Booster seatGroups
2 and 3from 15 to 25 kg and
from 22 to 36 kgX U (5) U (5)
X: seat not authorised to install a child restraint of this type.
U: seat allowing fastening with seat belt for an approved child seat like "Universal"; check possible installation.
(2): position the vehicle's seat as far back and as high as possible, then slightly incline the backrest (about 25°).
(3): the cot is installed crosswise with respect to the vehicle and takes up at least two seats. The child's head must be opposite
the vehicle's door.
(4): move the front seat as far forward as possible to install the child seat backwards from driving direction, then move it back
to maximum so it does not come into contact with the child seat.
(5): child seat facing forward: position the child seat backrest in contact with the seat backrest. In any case, remove the rear
seat headrest that the child seat is positioned against. This should be done before positioning the child seat (please see the
paragraph "Rear headrest" in chapter "Knowing your vehicle"). Do not move the seat in front of the child back more than half
the distance and do not incline it more than 25°.
104
SAFETY
Page 108 of 228
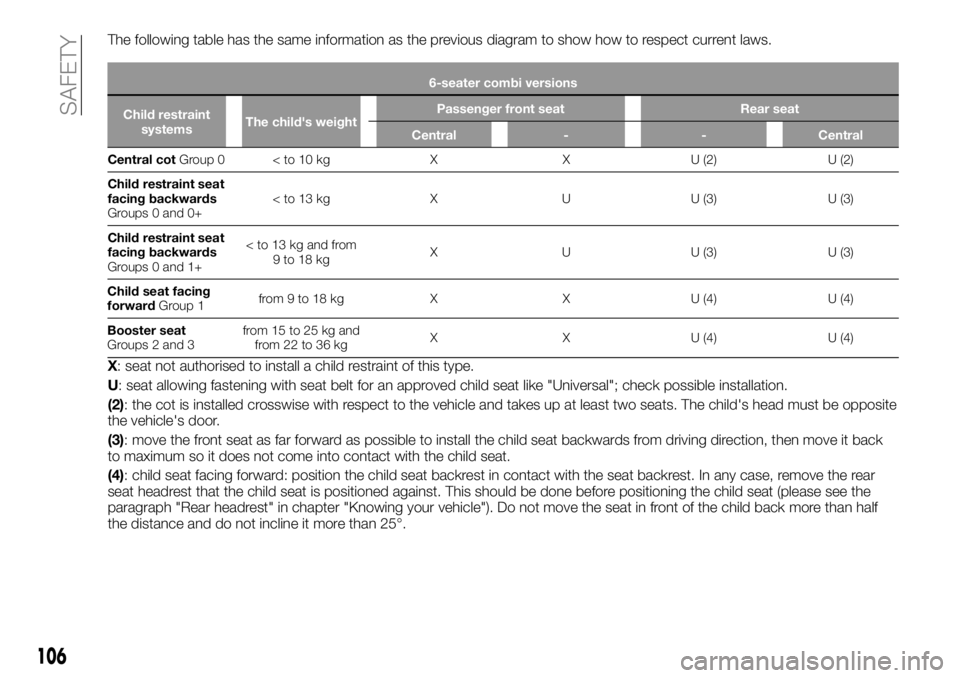
The following table has the same information as the previous diagram to show how to respect current laws.
6-seater combi versions
Child restraint
systemsThe child's weightPassenger front seat Rear seat
Central - - Central
Central cotGr
oup 0 < to 10 kg X X U (2) U (2)
Child restraint seat
facing backwards
Groups 0 and 0+
facing backwards
Groups 0 and 1+
Child seat facing
forwardGroup 1from 9 to 18 kg X X U (4) U (4)
Booster seat
Groups 2 and 3from 15 to 25 kg and
from 22 to 36 kgX X U (4) U (4)
X: seat not authorised to install a child restraint of this type.
U: seat allowing fastening with seat belt for an approved child seat like "Universal"; check possible installation.
(2): the cot is installed crosswise with respect to the vehicle and takes up at least two seats. The child's head must be opposite
the vehicle's door.
(3): move the front seat as far forward as possible to install the child seat backwards from driving direction, then move it back
to maximum so it does not come into contact with the child seat.
(4): child seat facing forward: position the child seat backrest in contact with the seat backrest. In any case, remove the rear
seat headrest that the child seat is positioned against. This should be done before positioning the child seat (please see the
paragraph "Rear headrest" in chapter "Knowing your vehicle"). Do not move the seat in front of the child back more than half
the distance and do not incline it more than 25°.
106
SAFETY
Page 110 of 228
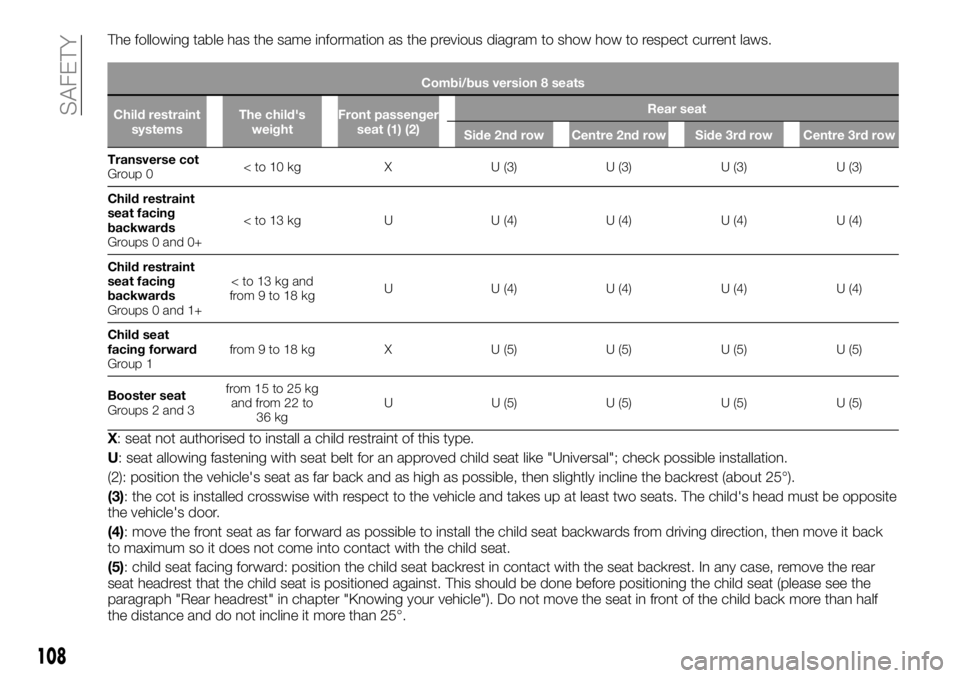
The following table has the same information as the previous diagram to show how to respect current laws.
Combi/bus version 8 seats
Child restraint
systemsThe child's
weightFront passenger
seat (1) (2)Rear seat
Side 2nd row Centre 2nd row Side 3rd row Centre 3rd row
Transverse cot
Gr
oup 0< to 10 kg X U (3) U (3) U (3) U (3)
Child restraint
seat facing
backwards
Groups 0 and 0+< to 13 kg U U (4) U (4) U (4) U (4)
Child restraint
seat facing
backwards
Groups 0 and 1+
Child seat
facing forward
Group 1from 9 to 18 kg X U (5) U (5) U (5) U (5)
Booster seat
Groups 2 and 3from 15 to 25 kg
and from 22 to
36 kgU U (5) U (5) U (5) U (5)
X: seat not authorised to install a child restraint of this type.
U: seat allowing fastening with seat belt for an approved child seat like "Universal"; check possible installation.
(2): position the vehicle's seat as far back and as high as possible, then slightly incline the backrest (about 25°).
(3): the cot is installed crosswise with respect to the vehicle and takes up at least two seats. The child's head must be opposite
the vehicle's door.
(4): move the front seat as far forward as possible to install the child seat backwards from driving direction, then move it back
to maximum so it does not come into contact with the child seat.
(5): child seat facing forward: position the child seat backrest in contact with the seat backrest. In any case, remove the rear
seat headrest that the child seat is positioned against. This should be done before positioning the child seat (please see the
paragraph "Rear headrest" in chapter "Knowing your vehicle"). Do not move the seat in front of the child back more than half
the distance and do not incline it more than 25°.
108
SAFETY
Page 113 of 228

(3): move the front seat as far forward as possible to install the child seat backwards from driving direction, then move it back
to maximum so it does not come into contact with the child seat.
(4): child seat facing forward: position the child seat backrest in contact with the seat backrest. In any case, remove the rear
seat headrest that the child seat is positioned against. This should be done before positioning the child seat (please see the
paragraph "Rear headrest" in chapter "Knowing your vehicle"). Do not move the seat in front of the child back more than half
the distance and do not incline it more than 25°.
111
Page 116 of 228
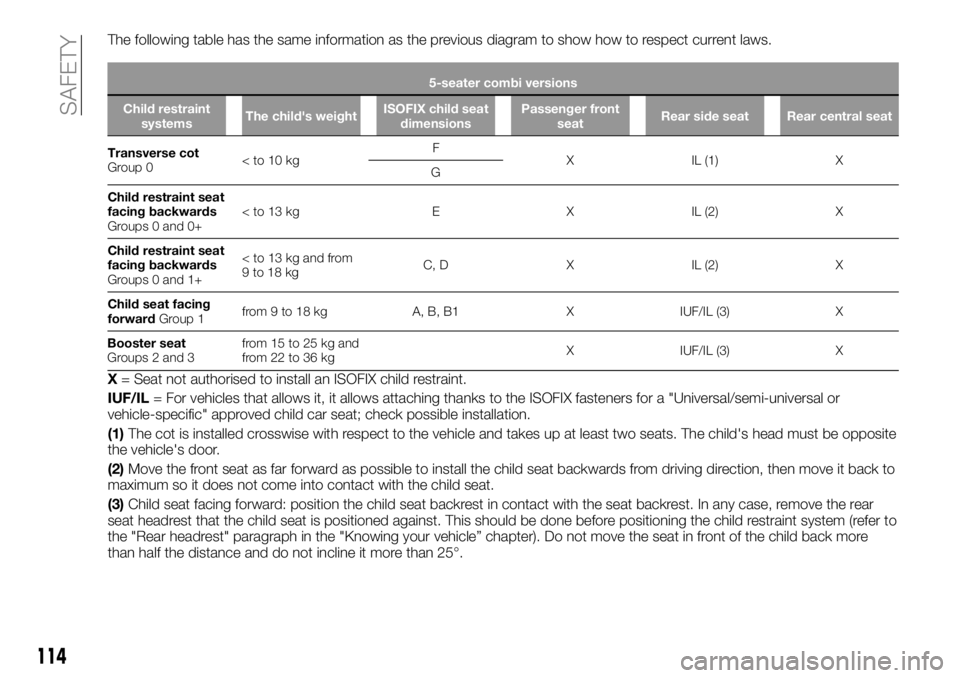
The following table has the same information as the previous diagram to show how to respect current laws.
5-seater combi versions
Child restraint
systemsThe child's weightISOFIX child seat
dimensionsPassenger front
seatRear side seat Rear central seat
Transverse cot
Group 0
G
Child restraint seat
facing backwards
Groups 0 and 0+
facing backwards
Groups 0 and 1+
Child seat facing
forwardGroup 1from 9 to 18 kg A, B, B1 X IUF/IL (3) X
Booster seat
Groups 2 and 3from 15 to 25 kg and
from 22 to 36 kgX IUF/IL (3) X
X= Seat not authorised to install an ISOFIX child restraint.
IUF/IL= For vehicles that allows it, it allows attaching thanks to the ISOFIX fasteners for a "Universal/semi-universal or
vehicle-specific" approved child car seat; check possible installation.
(1)The cot is installed crosswise with respect to the vehicle and takes up at least two seats. The child's head must be opposite
the vehicle's door.
(2)Move the front seat as far forward as possible to install the child seat backwards from driving direction, then move it back to
maximum so it does not come into contact with the child seat.
(3)Child seat facing forward: position the child seat backrest in contact with the seat backrest. In any case, remove the rear
seat headrest that the child seat is positioned against. This should be done before positioning the child restraint system (refer to
the "Rear headrest" paragraph in the "Knowing your vehicle” chapter). Do not move the seat in front of the child back more
than half the distance and do not incline it more than 25°.
114
SAFETY
Page 118 of 228
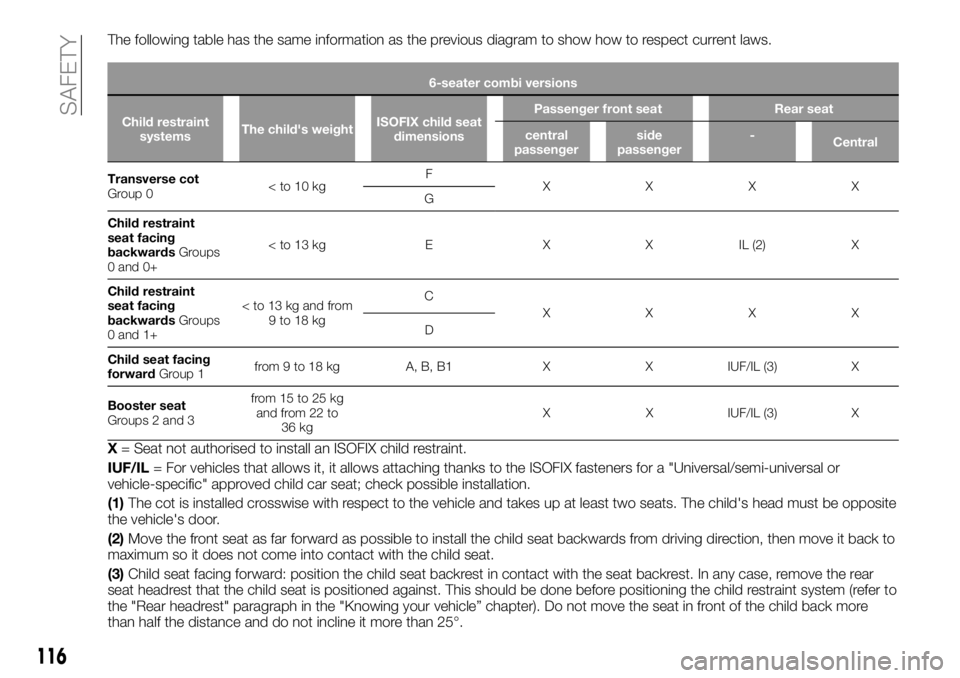
The following table has the same information as the previous diagram to show how to respect current laws.
6-seater combi versions
Child restraint
systemsThe child's weightISOFIX child seat
dimensionsPassenger front seat Rear seat
central
passengerside
passenger-
Central
Transverse cot
Gr
oup 0
G
Child restraint
seat facing
backwardsGroups
0 and 0+
seat facing
backwardsGroups
0 and 1+
XXXX
D
Child seat facing
forwardGroup 1from 9 to 18 kg A, B, B1 X X IUF/IL (3) X
Booster seat
Groups 2 and 3from 15 to 25 kg
and from 22 to
36 kgX X IUF/IL (3) X
X= Seat not authorised to install an ISOFIX child restraint.
IUF/IL= For vehicles that allows it, it allows attaching thanks to the ISOFIX fasteners for a "Universal/semi-universal or
vehicle-specific" approved child car seat; check possible installation.
(1)The cot is installed crosswise with respect to the vehicle and takes up at least two seats. The child's head must be opposite
the vehicle's door.
(2)Move the front seat as far forward as possible to install the child seat backwards from driving direction, then move it back to
maximum so it does not come into contact with the child seat.
(3)Child seat facing forward: position the child seat backrest in contact with the seat backrest. In any case, remove the rear
seat headrest that the child seat is positioned against. This should be done before positioning the child restraint system (refer to
the "Rear headrest" paragraph in the "Knowing your vehicle” chapter). Do not move the seat in front of the child back more
than half the distance and do not incline it more than 25°.
116
SAFETY
Page 120 of 228
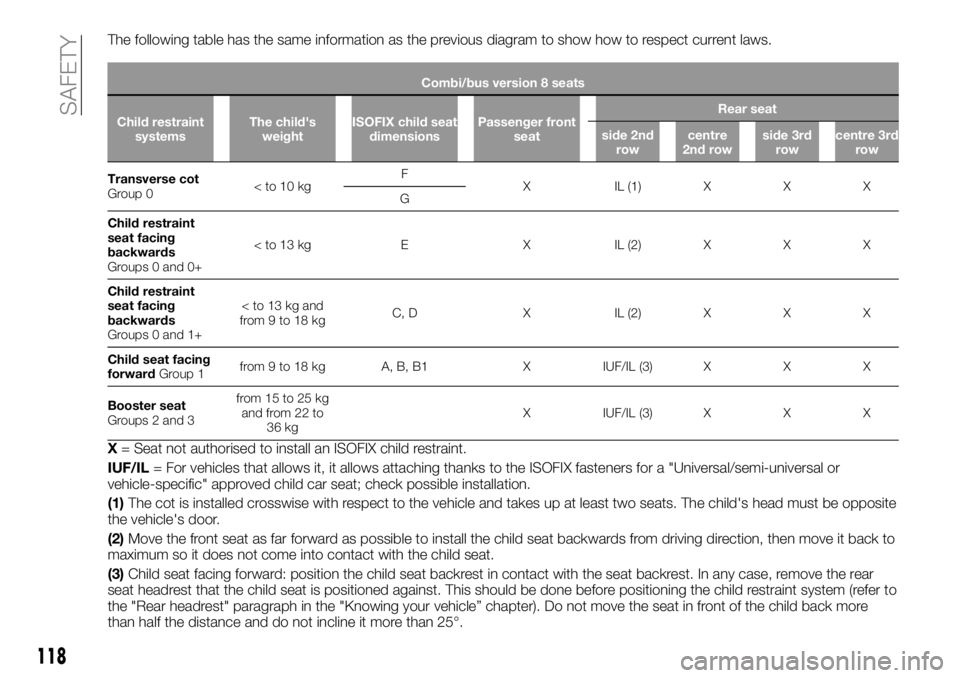
The following table has the same information as the previous diagram to show how to respect current laws.
Combi/bus version 8 seats
Child restraint
systemsThe child's
weightISOFIX child seat
dimensionsPassenger front
seatRear seat
side 2nd
rowcentre
2nd rowside 3rd
rowcentre 3rd
row
Transverse cot
Gr
oup 0
G
Child restraint
seat facing
backwards
Groups 0 and 0+
seat facing
backwards
Groups 0 and 1+
Child seat facing
forwardGroup 1from 9 to 18 kg A, B, B1 X IUF/IL (3) X X X
Booster seat
Groups 2 and 3from 15 to 25 kg
and from 22 to
36 kgX IUF/IL (3) X X X
X= Seat not authorised to install an ISOFIX child restraint.
IUF/IL= For vehicles that allows it, it allows attaching thanks to the ISOFIX fasteners for a "Universal/semi-universal or
vehicle-specific" approved child car seat; check possible installation.
(1)The cot is installed crosswise with respect to the vehicle and takes up at least two seats. The child's head must be opposite
the vehicle's door.
(2)Move the front seat as far forward as possible to install the child seat backwards from driving direction, then move it back to
maximum so it does not come into contact with the child seat.
(3)Child seat facing forward: position the child seat backrest in contact with the seat backrest. In any case, remove the rear
seat headrest that the child seat is positioned against. This should be done before positioning the child restraint system (refer to
the "Rear headrest" paragraph in the "Knowing your vehicle” chapter). Do not move the seat in front of the child back more
than half the distance and do not incline it more than 25°.
118
SAFETY
Page 123 of 228
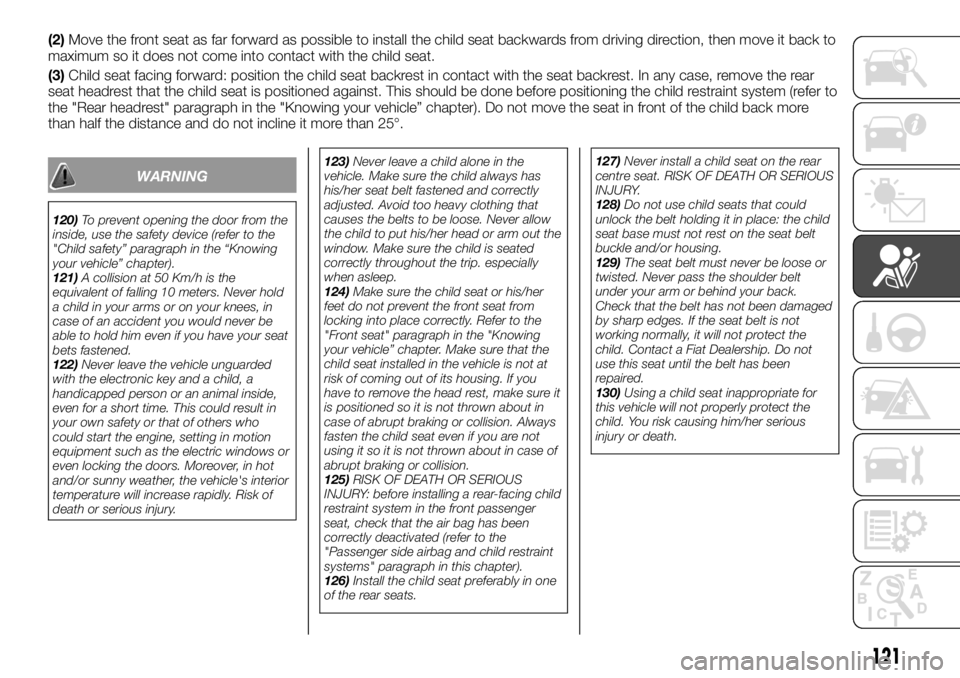
(2)Move the front seat as far forward as possible to install the child seat backwards from driving direction, then move it back to
maximum so it does not come into contact with the child seat.
(3)Child seat facing forward: position the child seat backrest in contact with the seat backrest. In any case, remove the rear
seat headrest that the child seat is positioned against. This should be done before positioning the child restraint system (refer to
the "Rear headrest" paragraph in the "Knowing your vehicle” chapter). Do not move the seat in front of the child back more
than half the distance and do not incline it more than 25°.
WARNING
120)To prevent opening the door from the
inside, use the safety device (refer to the
"Child safety” paragraph in the “Knowing
your vehicle” chapter).
121)A collision at 50 Km/h is the
equivalent of falling 10 meters. Never hold
a child in your arms or on your knees, in
case of an accident you would never be
able to hold him even if you have your seat
bets fastened.
122)Never leave the vehicle unguarded
with the electronic key and a child, a
handicapped person or an animal inside,
even for a short time. This could result in
your own safety or that of others who
could start the engine, setting in motion
equipment such as the electric windows or
even locking the doors. Moreover, in hot
and/or sunny weather, the vehicle's interior
temperature will increase rapidly. Risk of
death or serious injury.123)Never leave a child alone in the
vehicle. Make sure the child always has
his/her seat belt fastened and correctly
adjusted. Avoid too heavy clothing that
causes the belts to be loose. Never allow
the child to put his/her head or arm out the
window. Make sure the child is seated
correctly throughout the trip. especially
when asleep.
124)Make sure the child seat or his/her
feet do not prevent the front seat from
locking into place correctly. Refer to the
"Front seat" paragraph in the "Knowing
your vehicle” chapter. Make sure that the
child seat installed in the vehicle is not at
risk of coming out of its housing. If you
have to remove the head rest, make sure it
is positioned so it is not thrown about in
case of abrupt braking or collision. Always
fasten the child seat even if you are not
using it so it is not thrown about in case of
abrupt braking or collision.
125)RISK OF DEATH OR SERIOUS
INJURY: before installing a rear-facing child
restraint system in the front passenger
seat, check that the air bag has been
correctly deactivated (refer to the
"Passenger side airbag and child restraint
systems" paragraph in this chapter).
126)Install the child seat preferably in one
of the rear seats.127)Never install a child seat on the rear
centre seat. RISK OF DEATH OR SERIOUS
INJURY.
128)Do not use child seats that could
unlock the belt holding it in place: the child
seat base must not rest on the seat belt
buckle and/or housing.
129)The seat belt must never be loose or
twisted. Never pass the shoulder belt
under your arm or behind your back.
Check that the belt has not been damaged
by sharp edges. If the seat belt is not
working normally, it will not protect the
child. Contact a Fiat Dealership. Do not
use this seat until the belt has been
repaired.
130)Using a child seat inappropriate for
this vehicle will not properly protect the
child. You risk causing him/her serious
injury or death.
121
Page 149 of 228
IN THE EVENT OF A
PUNCTURE
Depending on the vehicle, there may be
a tyre inflating kit or a spare tyre (see
the following page).
CHANGING A WHEEL
166) 167) 168) 169) 170) 171)
Tools
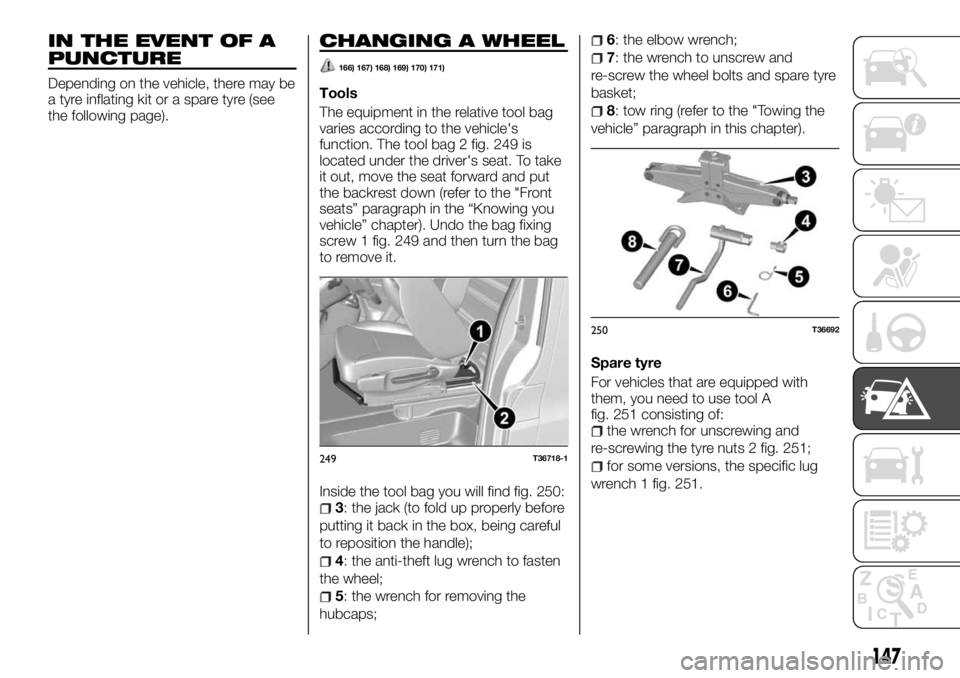
The equipment in the relative tool bag
varies according to the vehicle's
function. The tool bag 2 fig. 249 is
located under the driver's seat. To take
it out, move the seat forward and put
the backrest down (refer to the "Front
seats” paragraph in the “Knowing you
vehicle” chapter). Undo the bag fixing
screw 1 fig. 249 and then turn the bag
to remove it.
Inside the tool bag you will find fig. 250:
3: the jack (to fold up properly before
putting it back in the box, being careful
to reposition the handle);
4: the anti-theft lug wrench to fasten
the wheel;
5: the wrench for removing the
hubcaps;
6: the elbow wrench;
7: the wrench to unscrew and
re-screw the wheel bolts and spare tyre
basket;
8: tow ring (refer to the "Towing the
vehicle” paragraph in this chapter).
Spare tyre
For vehicles that are equipped with
them, you need to use tool A
fig. 251 consisting of:
the wrench for unscrewing and
re-screwing the tyre nuts 2 fig. 251;
for some versions, the specific lug
wrench 1 fig. 251.249T36718-1
250T36692
147
Page 215 of 228

WHATTODOIF...
The advice given below lets you quickly and temporarily fix various problems: for safety, contact a Fiat Dealership as soon as
possible.
PROBLEM POSSIBLE CAUSES WHAT TO DO
Using the electronic key
The
electronic key cannot lock or unlock the
doors.Dead key battery.Replace the battery. You can still lock/unlock
and start your vehicle (refer to the
"Locking/unlocking the doors" and "Starting
the engine” paragraphs).
Use of devices on the same frequency as the
card (cell phone, etc.).Stop using these devices or use the
integrated key (refer to the "Electronic key”
paragraph).
The vehicle is located in an area known for a
high presence of electro-magnetic waves.
Vehicle battery run down.Use the key integrated in the key (refer to the
"Electronic key” paragraph in the “Knowing
you vehicle” chapter)
The vehicle has been started.With the engine started, locking/unlocking
the doors with the key is not possible.
Disengage the starter device.
Using the remote control
The remote control does not lock or unlock
the doors.Remote control battery run down. Use the key.
Use of devices on the same frequency as the
remote control (cell phone, etc.).Stop using the other devices or use the key.
The vehicle is located in an area known for a
high presence of electro-magnetic waves.
Battery flat.Replace the battery. You can still lock/unlock
and start your vehicle (refer to the
"Locking/unlocking the doors" and "Starting
the engine” paragraphs).
The vehicle has been started.With the engine started, locking/unlocking
the doors with the key is not possible.
Disengage the starter device.
Using the starter motor
213