remove seats FIAT TALENTO 2020 Owner handbook (in English)
[x] Cancel search | Manufacturer: FIAT, Model Year: 2020, Model line: TALENTO, Model: FIAT TALENTO 2020Pages: 236, PDF Size: 4.86 MB
Page 116 of 236
ISOFIX FASTENING
SYSTEM
Authorised child seats are approved
according to the ECE-R44 law in one of
the three following cases:
universal ISOFIX with 3 couplings
facing forward;
semi-universal ISOFIX with
2 couplings;
specific.
For the last two, check that your child
restraint system can be installed by
referring to the list of compatible
vehicles.
Fit the child restraint system with the
ISOFIX anchors, where provided. The
ISOFIX system ensures simple, fast and
safe installation.
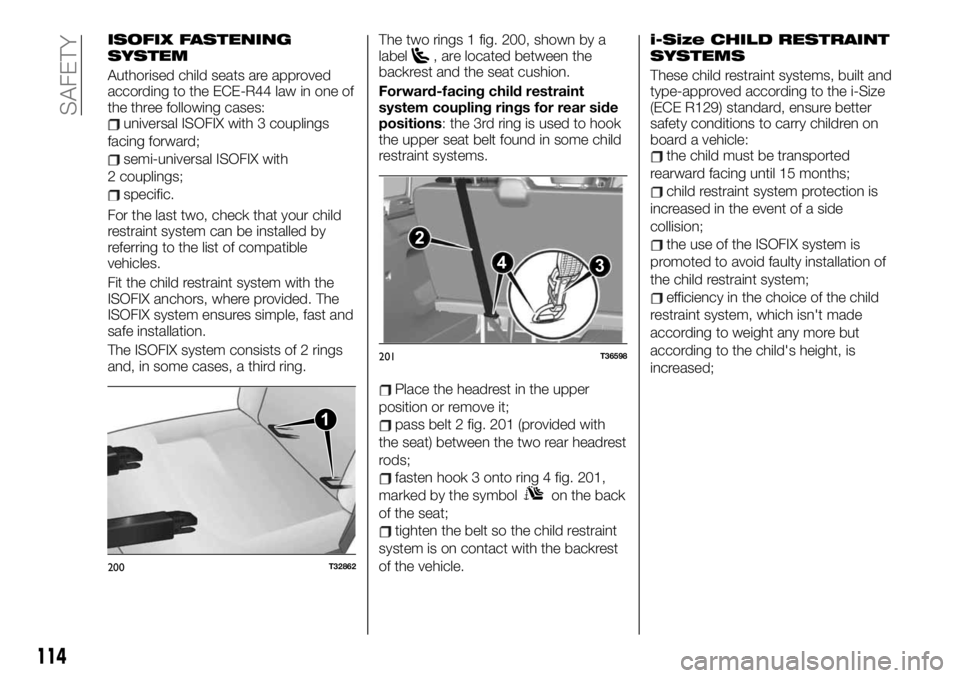
The ISOFIX system consists of 2 rings
and, in some cases, a third ring.The two rings 1 fig. 200, shown by a
label
, are located between the
backrest and the seat cushion.
Forward-facing child restraint
system coupling rings for rear side
positions: the 3rd ring is used to hook
the upper seat belt found in some child
restraint systems.
Place the headrest in the upper
position or remove it;
pass belt 2 fig. 201 (provided with
the seat) between the two rear headrest
rods;
fasten hook 3 onto ring 4 fig. 201,
marked by the symbol
on the back
of the seat;
tighten the belt so the child restraint
system is on contact with the backrest
of the vehicle.
i-Size CHILD RESTRAINT
SYSTEMS
These child restraint systems, built and
type-approved according to the i-Size
(ECE R129) standard, ensure better
safety conditions to carry children on
board a vehicle:
the child must be transported
rearward facing until 15 months;
child restraint system protection is
increased in the event of a side
collision;
the use of the ISOFIX system is
promoted to avoid faulty installation of
the child restraint system;
efficiency in the choice of the child
restraint system, which isn't made
according to weight any more but
according to the child's height, is
increased;
1
200T32862
2
3 4
201T36598
114
SAFETY
Page 120 of 236
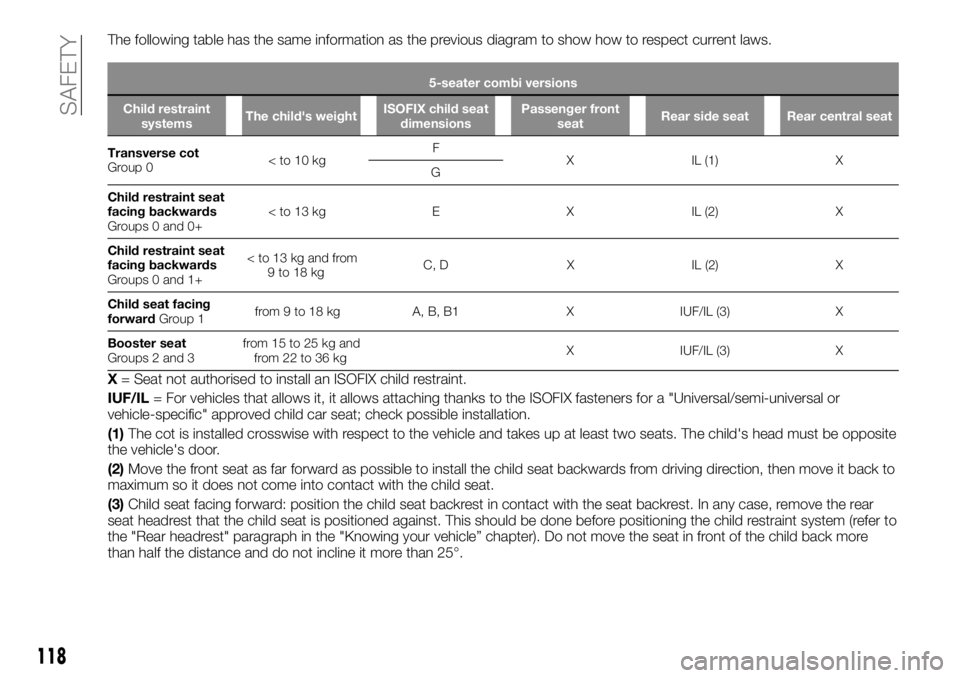
The following table has the same information as the previous diagram to show how to respect current laws.
5-seater combi versions
Child restraint
systemsThe child's weightISOFIX child seat
dimensionsPassenger front
seatRear side seat Rear central seat
Transverse cot
Group 0
G
Child restraint seat
facing backwards
Groups 0 and 0+
facing backwards
Groups 0 and 1+
Child seat facing
forwardGroup 1from 9 to 18 kg A, B, B1 X IUF/IL (3) X
Booster seat
Groups 2 and 3from 15 to 25 kg and
from 22 to 36 kgX IUF/IL (3) X
X= Seat not authorised to install an ISOFIX child restraint.
IUF/IL= For vehicles that allows it, it allows attaching thanks to the ISOFIX fasteners for a "Universal/semi-universal or
vehicle-specific" approved child car seat; check possible installation.
(1)The cot is installed crosswise with respect to the vehicle and takes up at least two seats. The child's head must be opposite
the vehicle's door.
(2)Move the front seat as far forward as possible to install the child seat backwards from driving direction, then move it back to
maximum so it does not come into contact with the child seat.
(3)Child seat facing forward: position the child seat backrest in contact with the seat backrest. In any case, remove the rear
seat headrest that the child seat is positioned against. This should be done before positioning the child restraint system (refer to
the "Rear headrest" paragraph in the "Knowing your vehicle” chapter). Do not move the seat in front of the child back more
than half the distance and do not incline it more than 25°.
118
SAFETY
Page 122 of 236
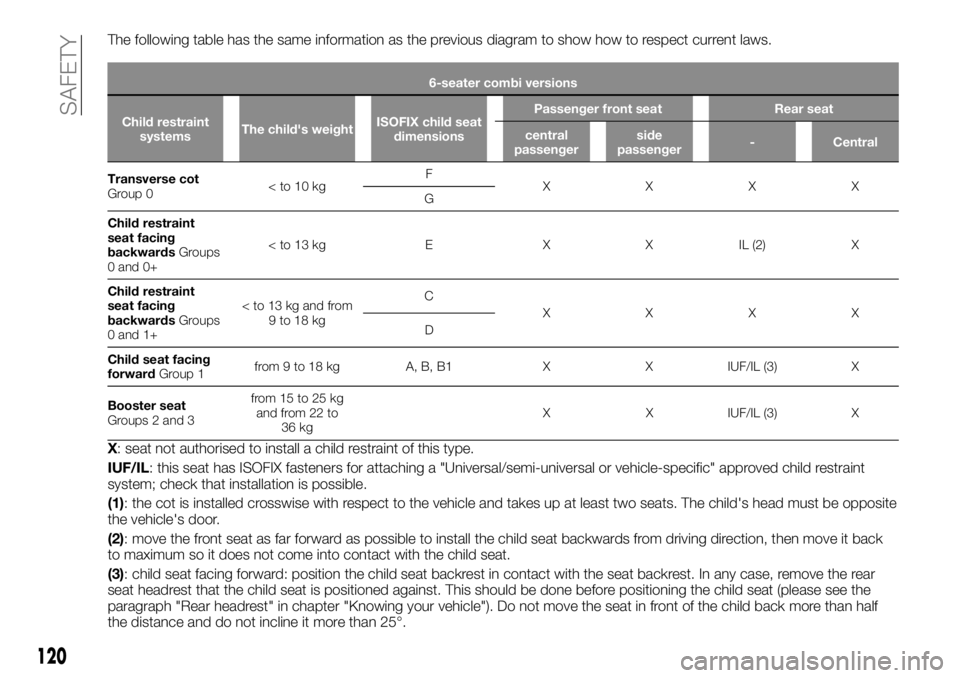
The following table has the same information as the previous diagram to show how to respect current laws.
6-seater combi versions
Child restraint
systemsThe child's weightISOFIX child seat
dimensionsPassenger front seat Rear seat
central
passengerside
passenger- Central
Transverse cot
Group 0
XXXX
G
Child restraint
seat facing
backwardsGroups
0 and 0+
seat facing
backwardsGroups
0 and 1+
XXXX
D
Child seat facing
forwardGroup 1from 9 to 18 kg A, B, B1 X X IUF/IL (3) X
Booster seat
Groups 2 and 3from 15 to 25 kg
and from 22 to
36 kgX X IUF/IL (3) X
X: seat not authorised to install a child restraint of this type.
IUF/IL: this seat has ISOFIX fasteners for attaching a "Universal/semi-universal or vehicle-specific" approved child restraint
system; check that installation is possible.
(1): the cot is installed crosswise with respect to the vehicle and takes up at least two seats. The child's head must be opposite
the vehicle's door.
(2): move the front seat as far forward as possible to install the child seat backwards from driving direction, then move it back
to maximum so it does not come into contact with the child seat.
(3): child seat facing forward: position the child seat backrest in contact with the seat backrest. In any case, remove the rear
seat headrest that the child seat is positioned against. This should be done before positioning the child seat (please see the
paragraph "Rear headrest" in chapter "Knowing your vehicle"). Do not move the seat in front of the child back more than half
the distance and do not incline it more than 25°.
120
SAFETY
Page 124 of 236
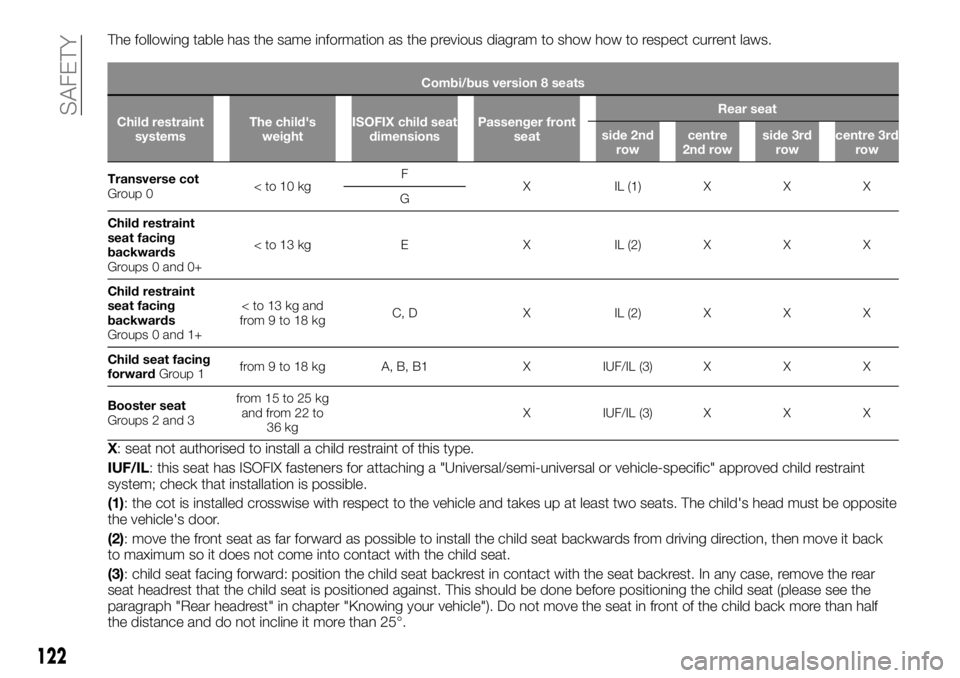
The following table has the same information as the previous diagram to show how to respect current laws.
Combi/bus version 8 seats
Child restraint
systemsThe child's
weightISOFIX child seat
dimensionsPassenger front
seatRear seat
side 2nd
rowcentre
2nd rowside 3rd
rowcentre 3rd
row
Transverse cot
Group 0
X IL (1) X X X
G
Child restraint
seat facing
backwards
Groups 0 and 0+
seat facing
backwards
Groups 0 and 1+
Child seat facing
forwardGroup 1from 9 to 18 kg A, B, B1 X IUF/IL (3) X X X
Booster seat
Groups 2 and 3from 15 to 25 kg
and from 22 to
36 kgX IUF/IL (3) X X X
X: seat not authorised to install a child restraint of this type.
IUF/IL: this seat has ISOFIX fasteners for attaching a "Universal/semi-universal or vehicle-specific" approved child restraint
system; check that installation is possible.
(1): the cot is installed crosswise with respect to the vehicle and takes up at least two seats. The child's head must be opposite
the vehicle's door.
(2): move the front seat as far forward as possible to install the child seat backwards from driving direction, then move it back
to maximum so it does not come into contact with the child seat.
(3): child seat facing forward: position the child seat backrest in contact with the seat backrest. In any case, remove the rear
seat headrest that the child seat is positioned against. This should be done before positioning the child seat (please see the
paragraph "Rear headrest" in chapter "Knowing your vehicle"). Do not move the seat in front of the child back more than half
the distance and do not incline it more than 25°.
122
SAFETY
Page 126 of 236
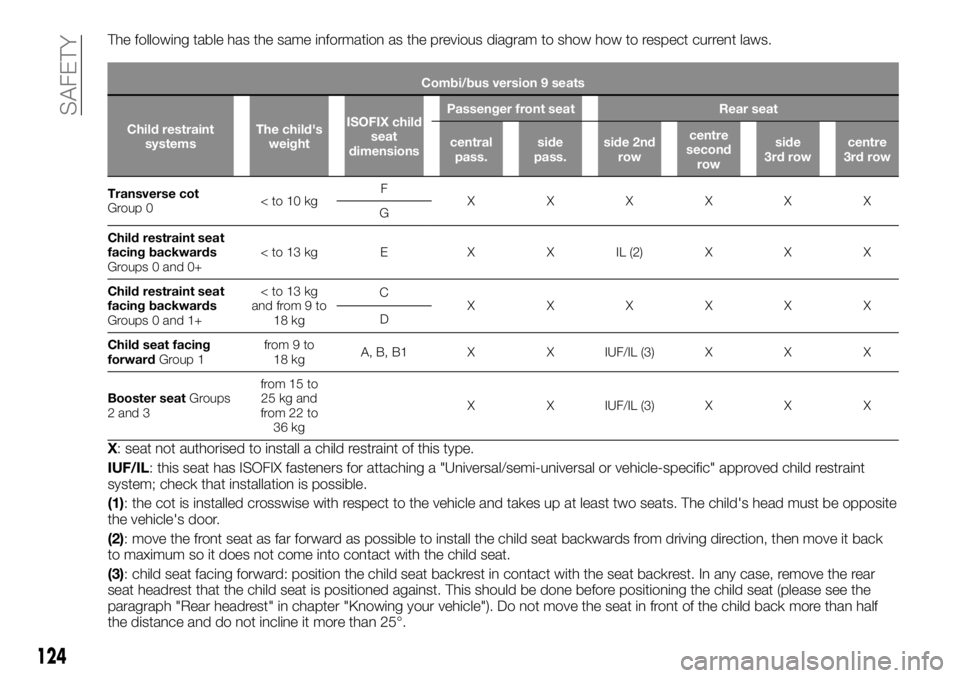
The following table has the same information as the previous diagram to show how to respect current laws.
Combi/bus version 9 seats
Child restraint
systemsThe child's
weightISOFIX child
seat
dimensionsPassenger front seat Rear seat
central
pass.side
pass.side 2nd
rowcentre
second
rowside
3rd rowcentre
3rd row
Transverse cot
Group 0
XXXXXX
G
Child restraint seat
facing backwards
Groups 0 and 0+
facing backwards
Groups 0 and 1+
18 kgC
XXXXXX
D
Child seat facing
forwardGroup 1from 9 to
18 kgA, B, B1 X X IUF/IL (3) X X X
Booster seatGroups
2 and 3from 15 to
25 kg and
from 22 to
36 kgX X IUF/IL (3) X X X
X: seat not authorised to install a child restraint of this type.
IUF/IL: this seat has ISOFIX fasteners for attaching a "Universal/semi-universal or vehicle-specific" approved child restraint
system; check that installation is possible.
(1): the cot is installed crosswise with respect to the vehicle and takes up at least two seats. The child's head must be opposite
the vehicle's door.
(2): move the front seat as far forward as possible to install the child seat backwards from driving direction, then move it back
to maximum so it does not come into contact with the child seat.
(3): child seat facing forward: position the child seat backrest in contact with the seat backrest. In any case, remove the rear
seat headrest that the child seat is positioned against. This should be done before positioning the child seat (please see the
paragraph "Rear headrest" in chapter "Knowing your vehicle"). Do not move the seat in front of the child back more than half
the distance and do not incline it more than 25°.
124
SAFETY
Page 127 of 236
WARNING
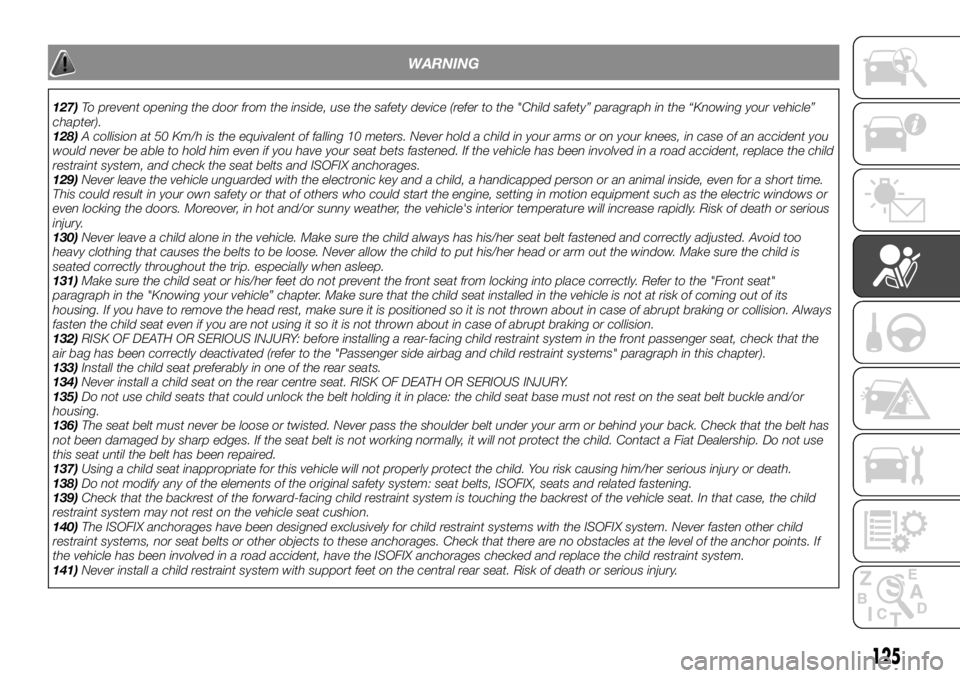
127)To prevent opening the door from the inside, use the safety device (refer to the "Child safety” paragraph in the “Knowing your vehicle”
chapter).
128)A collision at 50 Km/h is the equivalent of falling 10 meters. Never hold a child in your arms or on your knees, in case of an accident you
would never be able to hold him even if you have your seat bets fastened. If the vehicle has been involved in a road accident, replace the child
restraint system, and check the seat belts and ISOFIX anchorages.
129)Never leave the vehicle unguarded with the electronic key and a child, a handicapped person or an animal inside, even for a short time.
This could result in your own safety or that of others who could start the engine, setting in motion equipment such as the electric windows or
even locking the doors. Moreover, in hot and/or sunny weather, the vehicle's interior temperature will increase rapidly. Risk of death or serious
injury.
130)Never leave a child alone in the vehicle. Make sure the child always has his/her seat belt fastened and correctly adjusted. Avoid too
heavy clothing that causes the belts to be loose. Never allow the child to put his/her head or arm out the window. Make sure the child is
seated correctly throughout the trip. especially when asleep.
131)Make sure the child seat or his/her feet do not prevent the front seat from locking into place correctly. Refer to the "Front seat"
paragraph in the "Knowing your vehicle” chapter. Make sure that the child seat installed in the vehicle is not at risk of coming out of its
housing. If you have to remove the head rest, make sure it is positioned so it is not thrown about in case of abrupt braking or collision. Always
fasten the child seat even if you are not using it so it is not thrown about in case of abrupt braking or collision.
132)RISK OF DEATH OR SERIOUS INJURY: before installing a rear-facing child restraint system in the front passenger seat, check that the
air bag has been correctly deactivated (refer to the "Passenger side airbag and child restraint systems" paragraph in this chapter).
133)Install the child seat preferably in one of the rear seats.
134)Never install a child seat on the rear centre seat. RISK OF DEATH OR SERIOUS INJURY.
135)Do not use child seats that could unlock the belt holding it in place: the child seat base must not rest on the seat belt buckle and/or
housing.
136)The seat belt must never be loose or twisted. Never pass the shoulder belt under your arm or behind your back. Check that the belt has
not been damaged by sharp edges. If the seat belt is not working normally, it will not protect the child. Contact a Fiat Dealership. Do not use
this seat until the belt has been repaired.
137)Using a child seat inappropriate for this vehicle will not properly protect the child. You risk causing him/her serious injury or death.
138)Do not modify any of the elements of the original safety system: seat belts, ISOFIX, seats and related fastening.
139)Check that the backrest of the forward-facing child restraint system is touching the backrest of the vehicle seat. In that case, the child
restraint system may not rest on the vehicle seat cushion.
140)The ISOFIX anchorages have been designed exclusively for child restraint systems with the ISOFIX system. Never fasten other child
restraint systems, nor seat belts or other objects to these anchorages. Check that there are no obstacles at the level of the anchor points. If
the vehicle has been involved in a road accident, have the ISOFIX anchorages checked and replace the child restraint system.
141)Never install a child restraint system with support feet on the central rear seat. Risk of death or serious injury.
125
Page 154 of 236
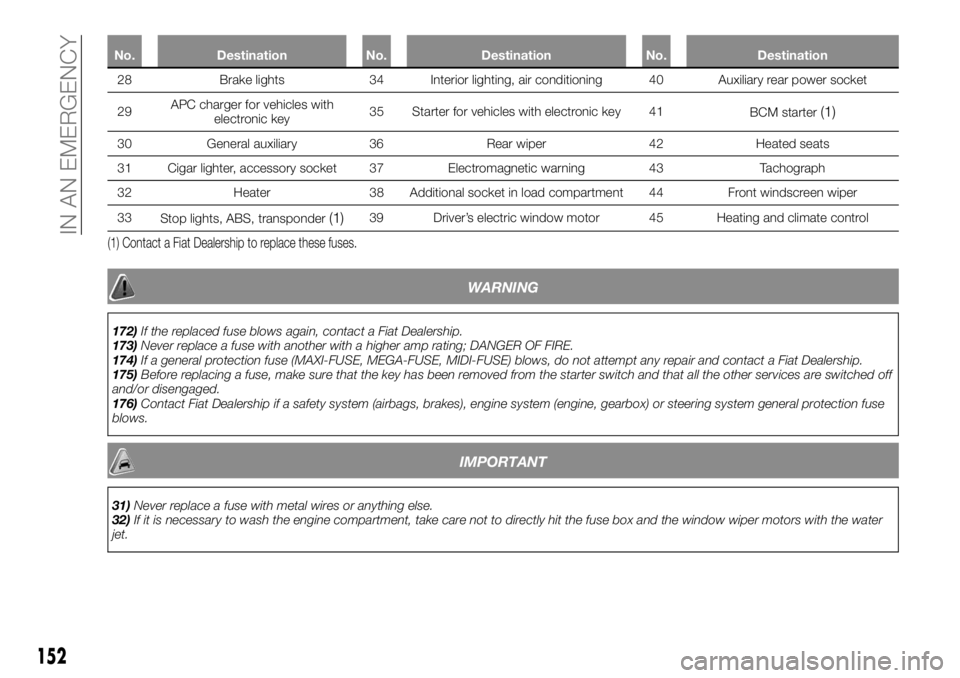
No. Destination No. Destination No. Destination
28 Brake lights 34 Interior lighting, air conditioning 40 Auxiliary rear power socket
29APCcharger for
vehicles with
electronic key35 Starter for vehicles with electronic key 41
BCM starter
(1)
30 General auxiliary 36 Rear wiper 42 Heated seats
31 Cigar lighter, accessory socket 37 Electromagnetic warning 43 Tachograph
32 Heater 38 Additional socket in load compartment 44 Front windscreen wiper
33
Stop lights, ABS, transponder
(1)39 Driver’s electric window motor 45 Heating and climate control
(1) Contact a Fiat Dealership to replace these fuses.
WARNING
172)If the replaced fuse blows again, contact a Fiat Dealership.
173)Never replace a fuse with another with a higher amp rating; DANGER OF FIRE.
174)If a general protection fuse (MAXI-FUSE, MEGA-FUSE, MIDI-FUSE) blows, do not attempt any repair and contact a Fiat Dealership.
175)Before replacing a fuse, make sure that the key has been removed from the starter switch and that all the other services are switched off
and/or disengaged.
176)Contact Fiat Dealership if a safety system (airbags, brakes), engine system (engine, gearbox) or steering system general protection fuse
blows.
IMPORTANT
31)Never replace a fuse with metal wires or anything else.
32)If it is necessary to wash the engine compartment, take care not to directly hit the fuse box and the window wiper motors with the water
jet.
152
IN AN EMERGENCY
Page 155 of 236
IN THE EVENT OF A
PUNCTURE
Depending on the vehicle, there may be
a tyre inflating kit or a spare tyre (see
the following page).
177)
WARNING
177)In case you are stopped by the
carriageway, warn other motorists that your
vehicle is there by placing the warning
triangle or other device allowed by law in
the country you are driving in.
REPLACING A
WHEEL
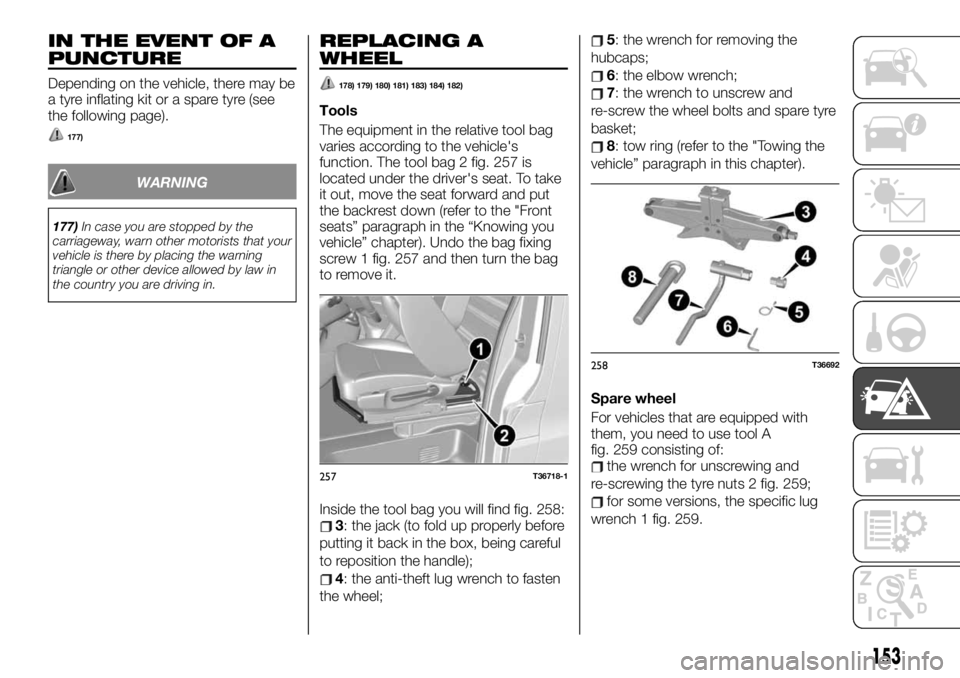
178) 179) 180) 181) 183) 184) 182)
Tools
The equipment in the relative tool bag
varies according to the vehicle's
function. The tool bag 2 fig. 257 is
located under the driver's seat. To take
it out, move the seat forward and put
the backrest down (refer to the "Front
seats” paragraph in the “Knowing you
vehicle” chapter). Undo the bag fixing
screw 1 fig. 257 and then turn the bag
to remove it.
Inside the tool bag you will find fig. 258:
3: the jack (to fold up properly before
putting it back in the box, being careful
to reposition the handle);
4: the anti-theft lug wrench to fasten
the wheel;
5: the wrench for removing the
hubcaps;
6: the elbow wrench;
7: the wrench to unscrew and
re-screw the wheel bolts and spare tyre
basket;
8: tow ring (refer to the "Towing the
vehicle” paragraph in this chapter).
Spare wheel
For vehicles that are equipped with
them, you need to use tool A
fig. 259 consisting of:
the wrench for unscrewing and
re-screwing the tyre nuts 2 fig. 259;
for some versions, the specific lug
wrench 1 fig. 259.
257T36718-1
258T36692
153
Page 182 of 236
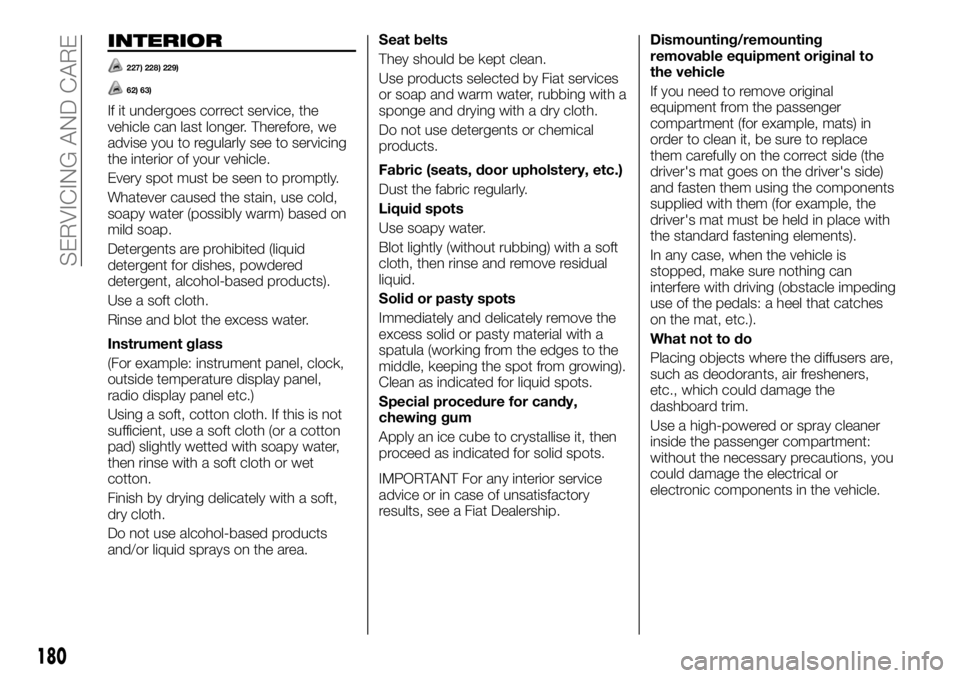
INTERIOR
227) 228) 229)
62) 63)
If it undergoes correct service, the
vehicle can last longer. Therefore, we
advise you to regularly see to servicing
the interior of your vehicle.
Every spot must be seen to promptly.
Whatever caused the stain, use cold,
soapy water (possibly warm) based on
mild soap.
Detergents are prohibited (liquid
detergent for dishes, powdered
detergent, alcohol-based products).
Use a soft cloth.
Rinse and blot the excess water.
Instrument glass
(For example: instrument panel, clock,
outside temperature display panel,
radio display panel etc.)
Using a soft, cotton cloth. If this is not
sufficient, use a soft cloth (or a cotton
pad) slightly wetted with soapy water,
then rinse with a soft cloth or wet
cotton.
Finish by drying delicately with a soft,
dry cloth.
Do not use alcohol-based products
and/or liquid sprays on the area.Seat belts
They should be kept clean.
Use products selected by Fiat services
or soap and warm water, rubbing with a
sponge and drying with a dry cloth.
Do not use detergents or chemical
products.
Fabric (seats, door upholstery, etc.)
Dust the fabric regularly.
Liquid spots
Use soapy water.
Blot lightly (without rubbing) with a soft
cloth, then rinse and remove residual
liquid.
Solid or pasty spots
Immediately and delicately remove the
excess solid or pasty material with a
spatula (working from the edges to the
middle, keeping the spot from growing).
Clean as indicated for liquid spots.
Special procedure for candy,
chewing gum
Apply an ice cube to crystallise it, then
proceed as indicated for solid spots.
IMPORTANT For any interior service
advice or in case of unsatisfactory
results, see a Fiat Dealership.Dismounting/remounting
removable equipment original to
the vehicle
If you need to remove original
equipment from the passenger
compartment (for example, mats) in
order to clean it, be sure to replace
them carefully on the correct side (the
driver's mat goes on the driver's side)
and fasten them using the components
supplied with them (for example, the
driver's mat must be held in place with
the standard fastening elements).
In any case, when the vehicle is
stopped, make sure nothing can
interfere with driving (obstacle impeding
use of the pedals: a heel that catches
on the mat, etc.).
What not to do
Placing objects where the diffusers are,
such as deodorants, air fresheners,
etc., which could damage the
dashboard trim.
Use a high-powered or spray cleaner
inside the passenger compartment:
without the necessary precautions, you
could damage the electrical or
electronic components in the vehicle.
180
SERVICING AND CARE
Page 226 of 236
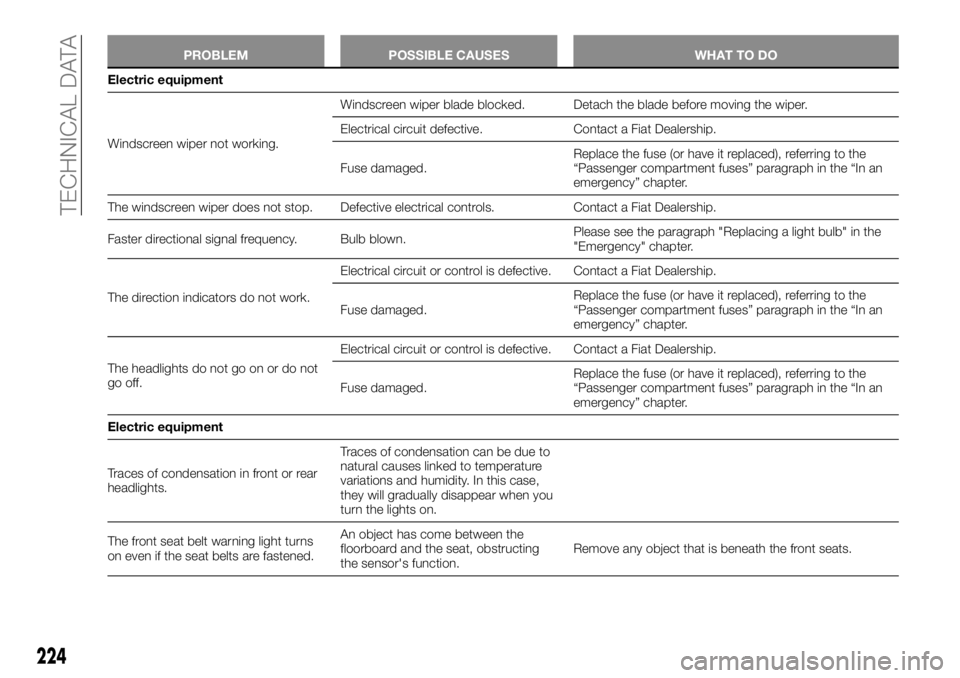
PROBLEM POSSIBLE CAUSES WHAT TO DO
Electric equipment
Windscreen
wiper not working.Windscreen wiper blade blocked. Detach the blade before moving the wiper.
Electrical circuit defective. Contact a Fiat Dealership.
Fuse damaged.Replace the fuse (or have it replaced), referring to the
“Passenger compartment fuses” paragraph in the “In an
emergency” chapter.
The windscreen wiper does not stop. Defective electrical controls. Contact a Fiat Dealership.
Faster directional signal frequency. Bulb blown.Please see the paragraph "Replacing a light bulb" in the
"Emergency" chapter.
The direction indicators do not work.Electrical circuit or control is defective. Contact a Fiat Dealership.
Fuse damaged.Replace the fuse (or have it replaced), referring to the
“Passenger compartment fuses” paragraph in the “In an
emergency” chapter.
The headlights do not go on or do not
go off.Electrical circuit or control is defective. Contact a Fiat Dealership.
Fuse damaged.Replace the fuse (or have it replaced), referring to the
“Passenger compartment fuses” paragraph in the “In an
emergency” chapter.
Electric equipment
Traces of condensation in front or rear
headlights.Traces of condensation can be due to
natural causes linked to temperature
variations and humidity. In this case,
they will gradually disappear when you
turn the lights on.
The front seat belt warning light turns
on even if the seat belts are fastened.An object has come between the
floorboard and the seat, obstructing
the sensor's function.Remove any object that is beneath the front seats.
224
TECHNICAL DATA