window FIAT TALENTO 2020 Owner handbook (in English)
[x] Cancel search | Manufacturer: FIAT, Model Year: 2020, Model line: TALENTO, Model: FIAT TALENTO 2020Pages: 236, PDF Size: 4.86 MB
Page 53 of 236
Heated rear window demisting/
defrosting
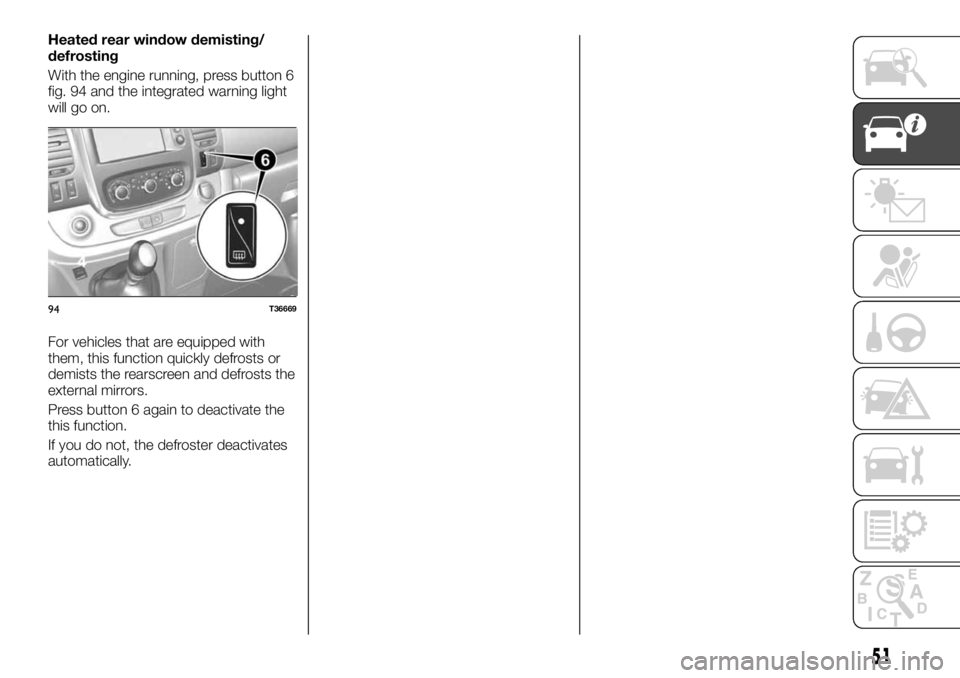
With the engine running, press button 6
fig. 94 and the integrated warning light
will go on.
For vehicles that are equipped with
them, this function quickly defrosts or
demists the rearscreen and defrosts the
external mirrors.
Press button 6 again to deactivate the
this function.
If you do not, the defroster deactivates
automatically.
94T36669
51
Page 54 of 236
AUTOMATIC AIR CONDITIONING
54) 55)
2)
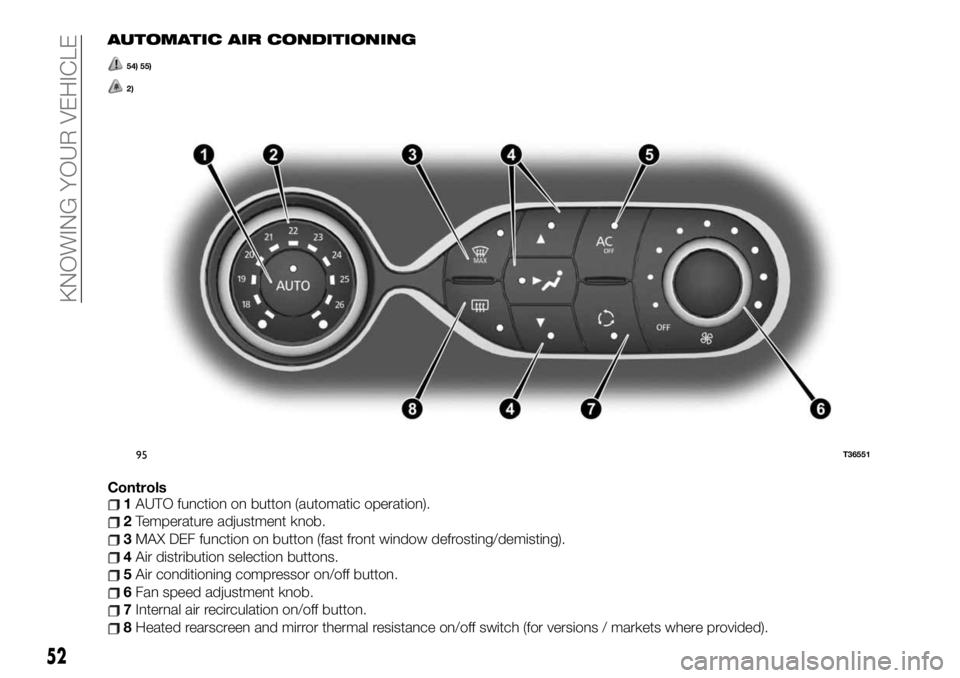
Controls1AUTO function on button (automatic operation).
2Temperature adjustment knob.
3MAX DEF function on button (fast front window defrosting/demisting).
4Air distribution selection buttons.
5Air conditioning compressor on/off button.
6Fan speed adjustment knob.
7Internal air recirculation on/off button.
8Heated rearscreen and mirror thermal resistance on/off switch (for versions / markets where provided).
95T36551
52
KNOWING YOUR VEHICLE
Page 55 of 236
AUTO function (automatic
operation)
Automatic air conditioning is a system
that guarantees (except when using it in
extreme conditions) interior comfort and
a good level of visibility, optimising
consumption. The system uses
ventilation speed, air distribution, air
recycling, activating or turning off the air
conditioner and air temperature.
AUTO: optimising the selected comfort
level reached according to exterior
conditions. Press button 1 fig. 95.
Ventilation speed variation
In automatic mode, the system
oversees the best ventilation speed to
reach and maintain comfort.
You can always adjust the ventilation
speed by turning control 6 fig. 95 to
increase or reduce it.
Air temperature adjustment
Use control 2 fig. 95 depending on the
desired temperature.
The farther to the right you turn it, the
higher the air temperature.
NOTE The farthest adjustments allow
the system to produce the coldest or
hottest air ("18°C" and "26°C").
MAX DEF function
Press button 3 fig. 95 and the
integrated warning light will go on.This function lets you quickly defrost
and de-mist the windscreen and rear
windows, the side front windows and
exterior rear view mirrors (depending on
the vehicle version). Set the automatic
air condition and rear window defrost
activation.
Press button 8 fig. 95 to disconnect the
rear window heat function, the
integrated warning light goes off.
To turn the function off, press button 3
fig. 95 or 1 fig. 95.
IMPORTANT Some of the buttons have
an in use light that indicates the
function status.
Passenger compartment air
distribution
Press one of the buttons 4 fig. 95. The
warning light in the selected button
goes on.
You can select two positions at a time
by pressing two of the buttons 4 fig. 95.
The airflow is distributed mainly
among all the vents, the side front
window demisting vents and the
windscreen demisting vents.
The airflow is directed mainly to the
dashboard vents.
The airflow is directed mainly to the
rear seat lower vents.Heated rearscreen and door mirror
thermal resistance switch
(For versions/markets where provided)
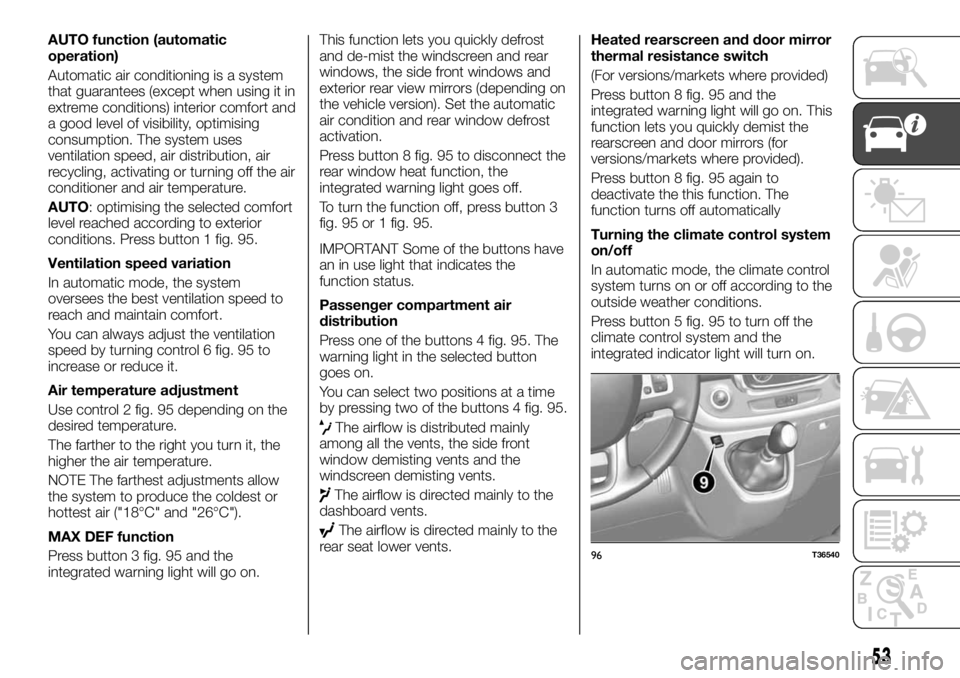
Press button 8 fig. 95 and the
integrated warning light will go on. This
function lets you quickly demist the
rearscreen and door mirrors (for
versions/markets where provided).
Press button 8 fig. 95 again to
deactivate the this function. The
function turns off automatically
Turning the climate control system
on/off
In automatic mode, the climate control
system turns on or off according to the
outside weather conditions.
Press button 5 fig. 95 to turn off the
climate control system and the
integrated indicator light will turn on.
96T36540
53
Page 56 of 236
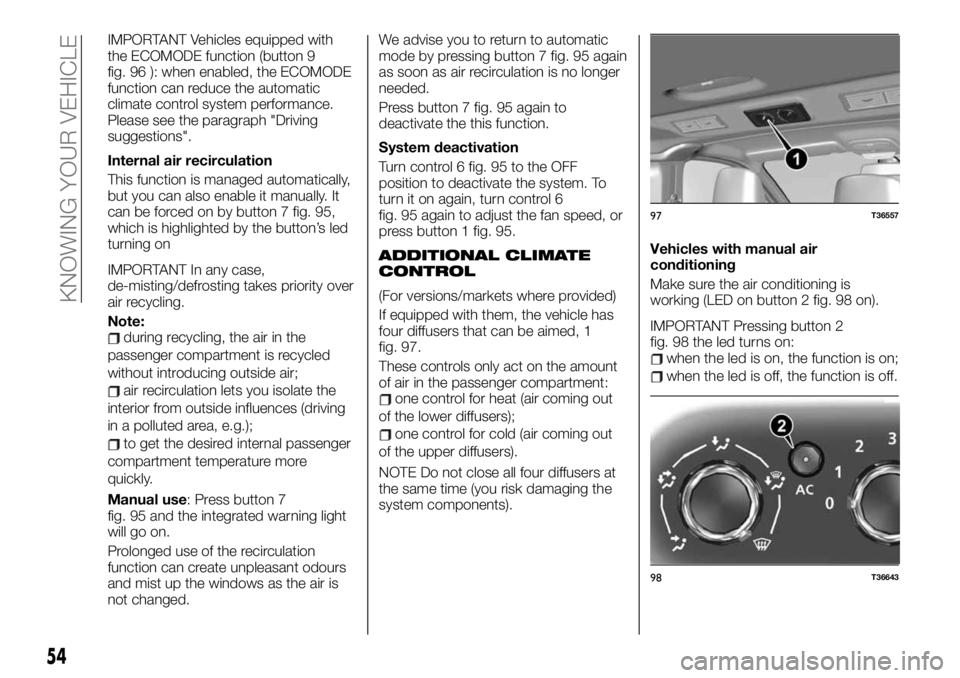
IMPORTANT Vehicles equipped with
the ECOMODE function (button 9
fig. 96 ): when enabled, the ECOMODE
function can reduce the automatic
climate control system performance.
Please see the paragraph "Driving
suggestions".
Internal air recirculation
This function is managed automatically,
but you can also enable it manually. It
can be forced on by button 7 fig. 95,
which is highlighted by the button’s led
turning on
IMPORTANT In any case,
de-misting/defrosting takes priority over
air recycling.
Note:
during recycling, the air in the
passenger compartment is recycled
without introducing outside air;
air recirculation lets you isolate the
interior from outside influences (driving
in a polluted area, e.g.);
to get the desired internal passenger
compartment temperature more
quickly.
Manual use: Press button 7
fig. 95 and the integrated warning light
will go on.
Prolonged use of the recirculation
function can create unpleasant odours
and mist up the windows as the air is
not changed.We advise you to return to automatic
mode by pressing button 7 fig. 95 again
as soon as air recirculation is no longer
needed.
Press button 7 fig. 95 again to
deactivate the this function.
System deactivation
Turn control 6 fig. 95 to the OFF
position to deactivate the system. To
turn it on again, turn control 6
fig. 95 again to adjust the fan speed, or
press button 1 fig. 95.
ADDITIONAL CLIMATE
CONTROL
(For versions/markets where provided)
If equipped with them, the vehicle has
four diffusers that can be aimed, 1
fig. 97.
These controls only act on the amount
of air in the passenger compartment:
one control for heat (air coming out
of the lower diffusers);
one control for cold (air coming out
of the upper diffusers).
NOTE Do not close all four diffusers at
the same time (you risk damaging the
system components).Vehicles with manual air
conditioning
Make sure the air conditioning is
working (LED on button 2 fig. 98 on).
IMPORTANT Pressing button 2
fig. 98 the led turns on:
when the led is on, the function is on;
when the led is off, the function is off.
97T36557
98T36643
54
KNOWING YOUR VEHICLE
Page 61 of 236
IMPORTANT
16)It is vital, for correct operation, that the
camera is always kept clean and free from
any mud, dirt, snow or ice. Be careful not
to scratch or damage the camera while
cleaning it. Avoid using dry, rough or hard
cloths. The camera must be washed using
clean water, with the addition of car
shampoo if necessary. In washing stations
which use steam or high-pressure jets,
clean the camera quickly, keeping the
nozzle more than 10 cm away from the
sensors. Also, do not apply stickers to the
camera.
ELECTRIC WINDOWS
ELECTRIC WINDOWS
59) 60)
With the starter device inserted:press the button of the window
concerned to lower it to the desired
position;
lift the button of the window
concerned to raise it to the desired
position.
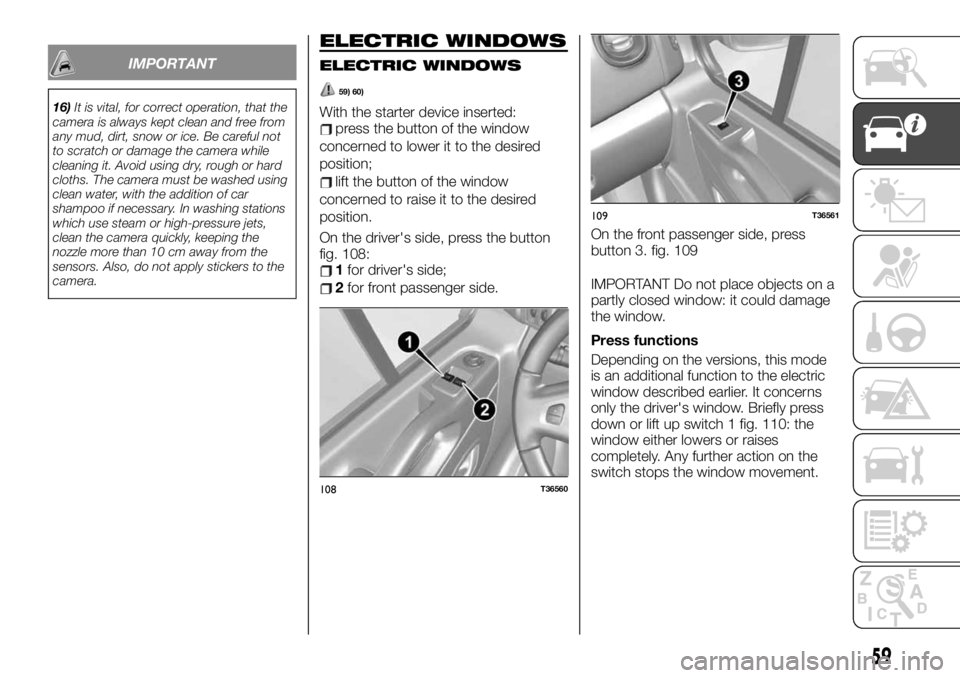
On the driver's side, press the button
fig. 108:
1for driver's side;
2for front passenger side.IMPORTANT Do not place objects on a
partly closed window: it could damage
the window.
Press functions
Depending on the versions, this mode
is an additional function to the electric
window described earlier. It concerns
only the driver's window. Briefly press
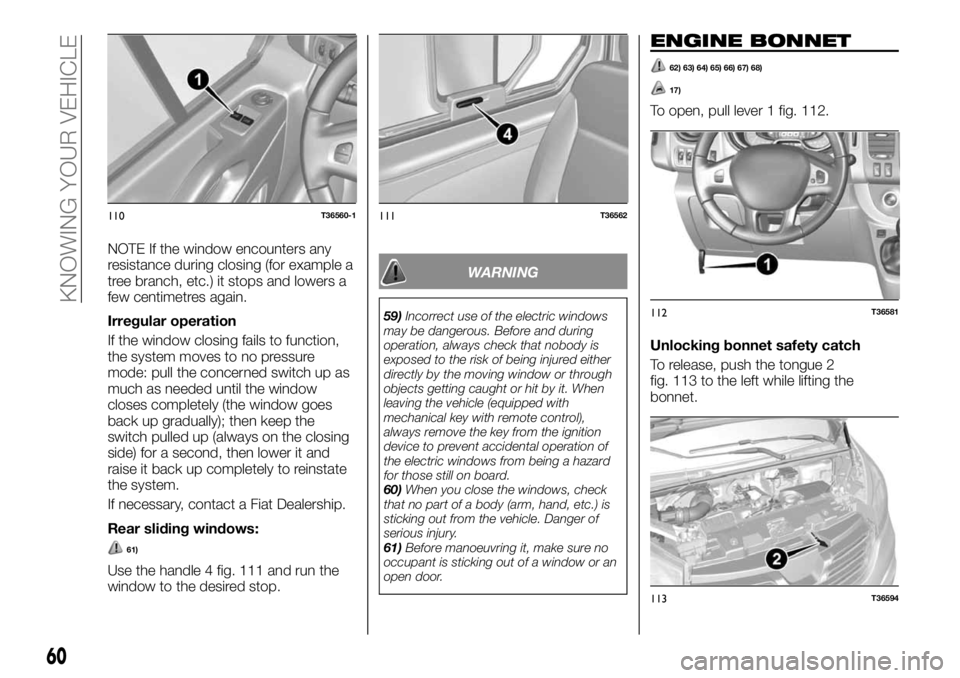
down or lift up switch 1 fig. 110: the
window either lowers or raises
completely. Any further action on the
switch stops the window movement.
108T36560
109T36561
On the front passenger side, press
button 3. fig. 109
59
Page 62 of 236
NOTE If the window encounters any
resistance during closing (for example a
tree branch, etc.) it stops and lowers a
few centimetres again.
Irregular operation
If the window closing fails to function,
the system moves to no pressure
mode: pull the concerned switch up as
much as needed until the window
closes completely (the window goes
back up gradually); then keep the
switch pulled up (always on the closing
side) for a second, then lower it and
raise it back up completely to reinstate
the system.
If necessary, contact a Fiat Dealership.
Rear sliding windows:
61)
Use the handle 4 fig. 111 and run the
window to the desired stop.
WARNING
59)Incorrect use of the electric windows
may be dangerous. Before and during
operation, always check that nobody is
exposed to the risk of being injured either
directly by the moving window or through
objects getting caught or hit by it. When
leaving the vehicle (equipped with
mechanical key with remote control),
always remove the key from the ignition
device to prevent accidental operation of
the electric windows from being a hazard
for those still on board.
60)When you close the windows, check
that no part of a body (arm, hand, etc.) is
sticking out from the vehicle. Danger of
serious injury.
61)Before manoeuvring it, make sure no
occupant is sticking out of a window or an
open door.
ENGINE BONNET
62) 63) 64) 65) 66) 67) 68)
17)
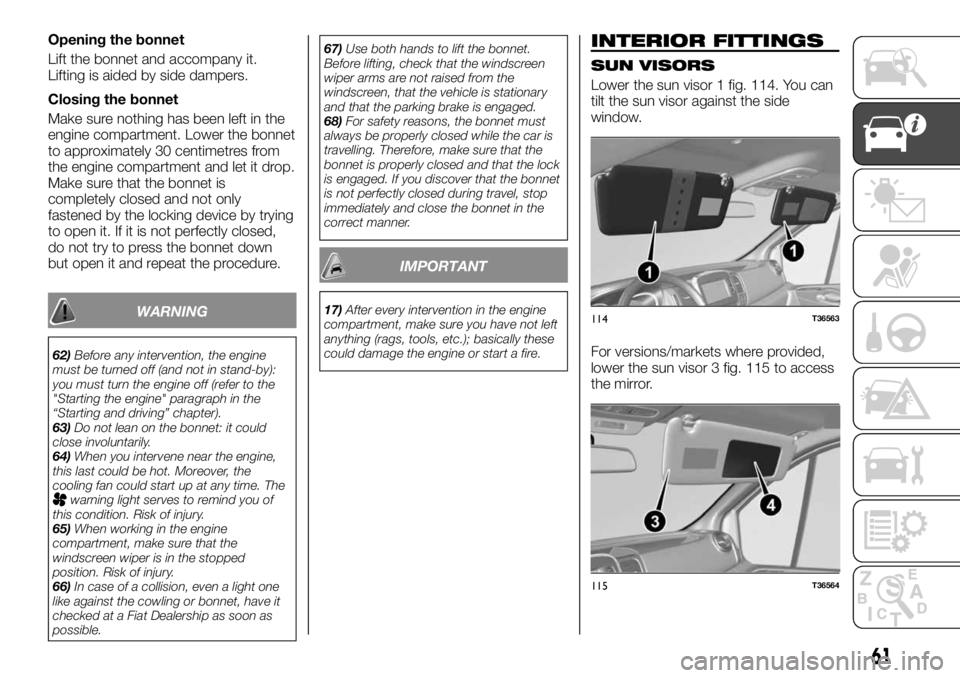
To open, pull lever 1 fig. 112.
Unlocking bonnet safety catch
To release, push the tongue 2
fig. 113 to the left while lifting the
bonnet.
110T36560-1111T36562
112T36581
113T36594
60
KNOWING YOUR VEHICLE
Page 63 of 236
Opening the bonnet
Lift the bonnet and accompany it.
Lifting is aided by side dampers.
Closing the bonnet
Make sure nothing has been left in the
engine compartment. Lower the bonnet
to approximately 30 centimetres from
the engine compartment and let it drop.
Make sure that the bonnet is
completely closed and not only
fastened by the locking device by trying
to open it. If it is not perfectly closed,
do not try to press the bonnet down
but open it and repeat the procedure.
WARNING
62)Before any intervention, the engine
must be turned off (and not in stand-by):
you must turn the engine off (refer to the
"Starting the engine" paragraph in the
“Starting and driving” chapter).
63)Do not lean on the bonnet: it could
close involuntarily.
64)When you intervene near the engine,
this last could be hot. Moreover, the
cooling fan could start up at any time. The
warning light serves to remind you of
this condition. Risk of injury.
65)When working in the engine
compartment, make sure that the
windscreen wiper is in the stopped
position. Risk of injury.
66)In case of a collision, even a light one
like against the cowling or bonnet, have it
checked at a Fiat Dealership as soon as
possible.67)Use both hands to lift the bonnet.
Before lifting, check that the windscreen
wiper arms are not raised from the
windscreen, that the vehicle is stationary
and that the parking brake is engaged.
68)For safety reasons, the bonnet must
always be properly closed while the car is
travelling. Therefore, make sure that the
bonnet is properly closed and that the lock
is engaged. If you discover that the bonnet
is not perfectly closed during travel, stop
immediately and close the bonnet in the
correct manner.
IMPORTANT
17)After every intervention in the engine
compartment, make sure you have not left
anything (rags, tools, etc.); basically these
could damage the engine or start a fire.
INTERIOR FITTINGS
SUN VISORS
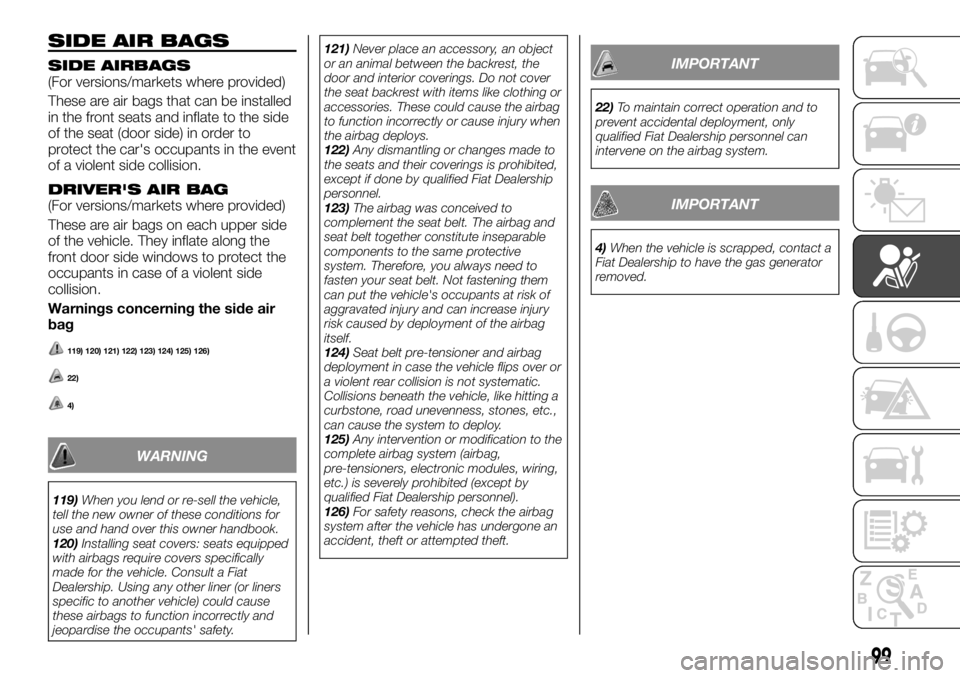
Lower the sun visor 1 fig. 114. You can
tilt the sun visor against the side
window.
For versions/markets where provided,
lower the sun visor 3 fig. 115 to access
the mirror.
114T36563
115T36564
61
Page 101 of 236
SIDE AIR BAGS
SIDE AIRBAGS(For versions/markets where provided)
These are air bags that can be installed
in the front seats and inflate to the side
of the seat (door side) in order to
protect the car's occupants in the event
of a violent side collision.
DRIVER'S AIR BAG(For versions/markets where provided)
These are air bags on each upper side
of the vehicle. They inflate along the
front door side windows to protect the
occupants in case of a violent side
collision.
Warnings concerning the side air
bag
119) 120) 121) 122) 123) 124) 125) 126)
22)
4)
WARNING
119)When you lend or re-sell the vehicle,
tell the new owner of these conditions for
use and hand over this owner handbook.
120)Installing seat covers: seats equipped
with airbags require covers specifically
made for the vehicle. Consult a Fiat
Dealership. Using any other liner (or liners
specific to another vehicle) could cause
these airbags to function incorrectly and
jeopardise the occupants' safety.121)Never place an accessory, an object
or an animal between the backrest, the
door and interior coverings. Do not cover
the seat backrest with items like clothing or
accessories. These could cause the airbag
to function incorrectly or cause injury when
the airbag deploys.
122)Any dismantling or changes made to
the seats and their coverings is prohibited,
except if done by qualified Fiat Dealership
personnel.
123)The airbag was conceived to
complement the seat belt. The airbag and
seat belt together constitute inseparable
components to the same protective
system. Therefore, you always need to
fasten your seat belt. Not fastening them
can put the vehicle's occupants at risk of
aggravated injury and can increase injury
risk caused by deployment of the airbag
itself.
124)Seat belt pre-tensioner and airbag
deployment in case the vehicle flips over or
a violent rear collision is not systematic.
Collisions beneath the vehicle, like hitting a
curbstone, road unevenness, stones, etc.,
can cause the system to deploy.
125)Any intervention or modification to the
complete airbag system (airbag,
pre-tensioners, electronic modules, wiring,
etc.) is severely prohibited (except by
qualified Fiat Dealership personnel).
126)For safety reasons, check the airbag
system after the vehicle has undergone an
accident, theft or attempted theft.
IMPORTANT
22)To maintain correct operation and to
prevent accidental deployment, only
qualified Fiat Dealership personnel can
intervene on the airbag system.
IMPORTANT
4)When the vehicle is scrapped, contact a
Fiat Dealership to have the gas generator
removed.
99
Page 104 of 236
FITTING A CHILD
RESTRAINT SYSTEM
WITH SEAT BELTS
135) 136)
The seat belt must be adjusted to
ensure it works in case of abrupt
braking or collision. Comply with the
belt direction indicated by the child
restraint system manufacturer.
Check that the seat belt is fastened
correctly.
Check that the child seat is correctly
locked in place by moving it left/right
and forwards/backwards: the seat
should remain firmly in place. Make sure
that the child restraint system is not
installed crosswise and is not resting
against a window.
102
SAFETY
Page 127 of 236
WARNING
127)To prevent opening the door from the inside, use the safety device (refer to the "Child safety” paragraph in the “Knowing your vehicle”
chapter).
128)A collision at 50 Km/h is the equivalent of falling 10 meters. Never hold a child in your arms or on your knees, in case of an accident you
would never be able to hold him even if you have your seat bets fastened. If the vehicle has been involved in a road accident, replace the child
restraint system, and check the seat belts and ISOFIX anchorages.
129)Never leave the vehicle unguarded with the electronic key and a child, a handicapped person or an animal inside, even for a short time.
This could result in your own safety or that of others who could start the engine, setting in motion equipment such as the electric windows or
even locking the doors. Moreover, in hot and/or sunny weather, the vehicle's interior temperature will increase rapidly. Risk of death or serious
injury.
130)Never leave a child alone in the vehicle. Make sure the child always has his/her seat belt fastened and correctly adjusted. Avoid too
heavy clothing that causes the belts to be loose. Never allow the child to put his/her head or arm out the window. Make sure the child is
seated correctly throughout the trip. especially when asleep.
131)Make sure the child seat or his/her feet do not prevent the front seat from locking into place correctly. Refer to the "Front seat"
paragraph in the "Knowing your vehicle” chapter. Make sure that the child seat installed in the vehicle is not at risk of coming out of its
housing. If you have to remove the head rest, make sure it is positioned so it is not thrown about in case of abrupt braking or collision. Always
fasten the child seat even if you are not using it so it is not thrown about in case of abrupt braking or collision.
132)RISK OF DEATH OR SERIOUS INJURY: before installing a rear-facing child restraint system in the front passenger seat, check that the
air bag has been correctly deactivated (refer to the "Passenger side airbag and child restraint systems" paragraph in this chapter).
133)Install the child seat preferably in one of the rear seats.
134)Never install a child seat on the rear centre seat. RISK OF DEATH OR SERIOUS INJURY.
135)Do not use child seats that could unlock the belt holding it in place: the child seat base must not rest on the seat belt buckle and/or
housing.
136)The seat belt must never be loose or twisted. Never pass the shoulder belt under your arm or behind your back. Check that the belt has
not been damaged by sharp edges. If the seat belt is not working normally, it will not protect the child. Contact a Fiat Dealership. Do not use
this seat until the belt has been repaired.
137)Using a child seat inappropriate for this vehicle will not properly protect the child. You risk causing him/her serious injury or death.
138)Do not modify any of the elements of the original safety system: seat belts, ISOFIX, seats and related fastening.
139)Check that the backrest of the forward-facing child restraint system is touching the backrest of the vehicle seat. In that case, the child
restraint system may not rest on the vehicle seat cushion.
140)The ISOFIX anchorages have been designed exclusively for child restraint systems with the ISOFIX system. Never fasten other child
restraint systems, nor seat belts or other objects to these anchorages. Check that there are no obstacles at the level of the anchor points. If
the vehicle has been involved in a road accident, have the ISOFIX anchorages checked and replace the child restraint system.
141)Never install a child restraint system with support feet on the central rear seat. Risk of death or serious injury.
125