window FIAT TALENTO 2020 Owner handbook (in English)
[x] Cancel search | Manufacturer: FIAT, Model Year: 2020, Model line: TALENTO, Model: FIAT TALENTO 2020Pages: 236, PDF Size: 4.86 MB
Page 13 of 236
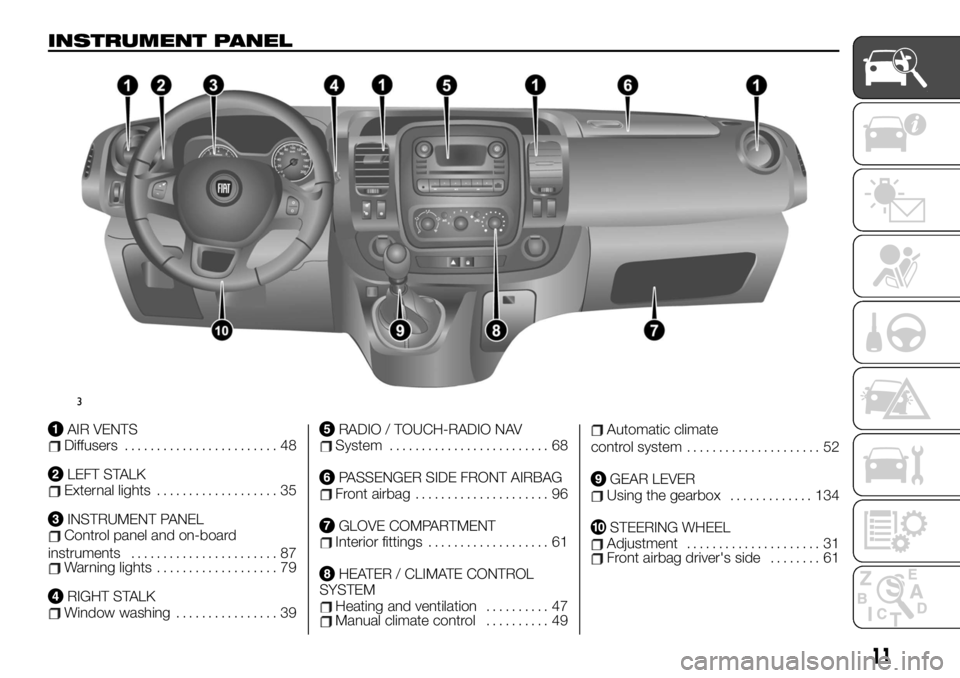
INSTRUMENT PANEL
AIR VENTSDiffusers........................ 48
LEFT STALKExternal lights................... 35
INSTRUMENT PANELControl panel and on-board
instruments....................... 87
Warning lights................... 79
RIGHT STALKWindow washing................ 39
RADIO / TOUCH-RADIO NAVSystem......................... 68
PASSENGER SIDE FRONT AIRBAGFront airbag..................... 96
GLOVE COMPARTMENTInterior fittings................... 61
HEATER / CLIMATE CONTROL
SYSTEM
Heating and ventilation.......... 47Manual climate control.......... 49
Automatic climate
control system..................... 52
GEAR LEVERUsing the gearbox............. 134
STEERING WHEELAdjustment..................... 31Front airbag driver's side........ 61
3
11
Page 14 of 236
KNOWING YOUR VEHICLE
In-depth knowledge of your new vehicle
starts here.
The handbook that you are reading
simply and directly explains how it is
made and how it works.
That’s why we advise you to read it
seated comfortably on board, so that
you can see what is described here for
yourself.THE KEYS.................13
DOORS...................20
HEADRESTS................26
SEATS....................27
STEERING WHEEL/POWER
STEERING.................31
START&STOP SYSTEM.........32
REAR VIEW MIRRORS.........34
EXTERNAL LIGHTS...........35
INTERIOR LIGHTS............38
WINDSCREEN / REAR WINDOW
WIPERS..................39
REFUELLING THE VEHICLE......42
AdBlue (Urea) ADDITIVE TANK....43
IGNITION DEVICE............45
CLIMATE CONTROL...........45
RADAR PARKING.............56
REAR CAMERA..............57
ELECTRIC WINDOWS..........59
ENGINE BONNET............60
INTERIOR FITTINGS...........61
MULTIMEDIA EQUIPMENT.......68
RADIO....................68
BAGGAGE COVER............69
CRUISE CONTROL
(constant speed regulator).......69
SPEED LIMITER..............72
PROTECTING THE
ENVIRONMENT..............73DIESEL VERSION
PARTICULARITIES............74
12
KNOWING YOUR VEHICLE
Page 21 of 236
In both cases, the emergency lights will
flash five times to indicate the door is
locked.
To disable centralised closing:
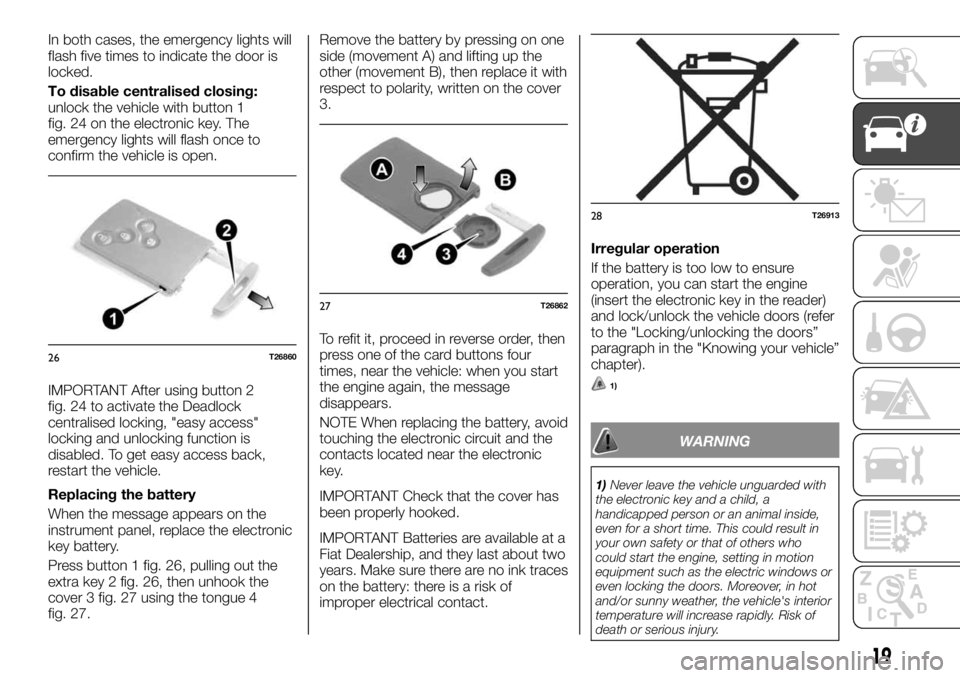
unlock the vehicle with button 1
fig. 24 on the electronic key. The
emergency lights will flash once to
confirm the vehicle is open.
IMPORTANT After using button 2
fig. 24 to activate the Deadlock
centralised locking, "easy access"
locking and unlocking function is
disabled. To get easy access back,
restart the vehicle.
Replacing the battery
When the message appears on the
instrument panel, replace the electronic
key battery.
Press button 1 fig. 26, pulling out the
extra key 2 fig. 26, then unhook the
cover 3 fig. 27 using the tongue 4
fig. 27.Remove the battery by pressing on one
side (movement A) and lifting up the
other (movement B), then replace it with
respect to polarity, written on the cover
3.
To refit it, proceed in reverse order, then
press one of the card buttons four
times, near the vehicle: when you start
the engine again, the message
disappears.
NOTE When replacing the battery, avoid
touching the electronic circuit and the
contacts located near the electronic
key.
IMPORTANT Check that the cover has
been properly hooked.
IMPORTANT Batteries are available at a
Fiat Dealership, and they last about two
years. Make sure there are no ink traces
on the battery: there is a risk of
improper electrical contact.Irregular operation
If the battery is too low to ensure
operation, you can start the engine
(insert the electronic key in the reader)
and lock/unlock the vehicle doors (refer
to the "Locking/unlocking the doors”
paragraph in the "Knowing your vehicle”
chapter).
1)
WARNING
1)Never leave the vehicle unguarded with
the electronic key and a child, a
handicapped person or an animal inside,
even for a short time. This could result in
your own safety or that of others who
could start the engine, setting in motion
equipment such as the electric windows or
even locking the doors. Moreover, in hot
and/or sunny weather, the vehicle's interior
temperature will increase rapidly. Risk of
death or serious injury.
26T26860
27T26862
28T26913
19
Page 36 of 236
REAR VIEW
MIRRORS
DOOR MIRRORS
31) 32) 33)
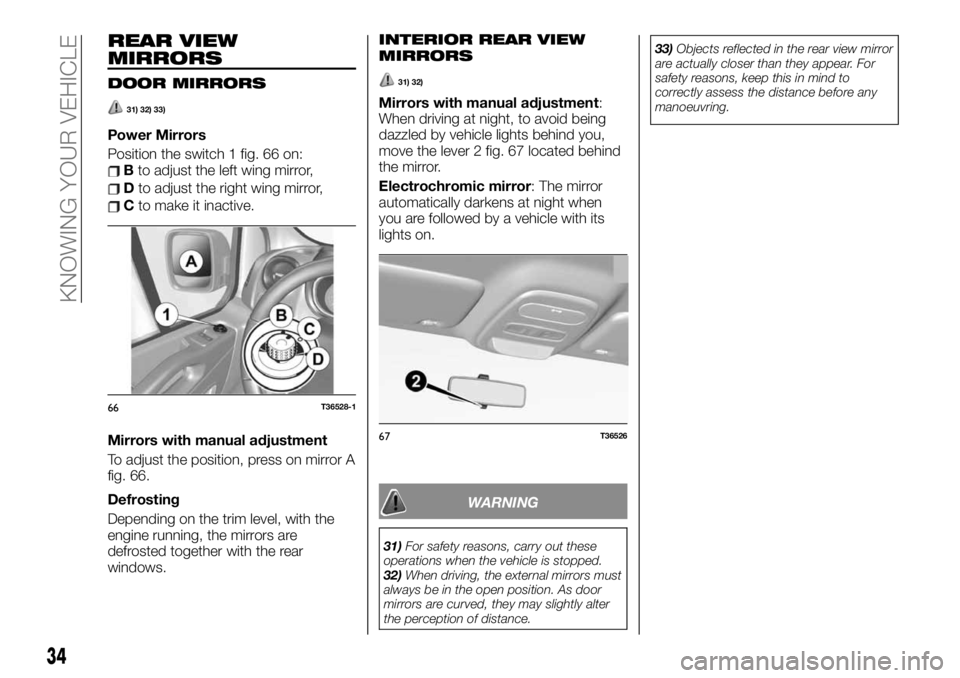
Power Mirrors
Position the switch 1 fig. 66 on:
Bto adjust the left wing mirror,
Dto adjust the right wing mirror,
Cto make it inactive.
Mirrors with manual adjustment
To adjust the position, press on mirror A
fig. 66.
Defrosting
Depending on the trim level, with the
engine running, the mirrors are
defrosted together with the rear
windows.
INTERIOR REAR VIEW
MIRRORS
31) 32)
Mirrors with manual adjustment:
When driving at night, to avoid being
dazzled by vehicle lights behind you,
move the lever 2 fig. 67 located behind
the mirror.
Electrochromic mirror: The mirror
automatically darkens at night when
you are followed by a vehicle with its
lights on.
WARNING
31)For safety reasons, carry out these
operations when the vehicle is stopped.
32)When driving, the external mirrors must
always be in the open position. As door
mirrors are curved, they may slightly alter
the perception of distance.33)Objects reflected in the rear view mirror
are actually closer than they appear. For
safety reasons, keep this in mind to
correctly assess the distance before any
manoeuvring.
66T36528-1
67T36526
34
KNOWING YOUR VEHICLE
Page 41 of 236
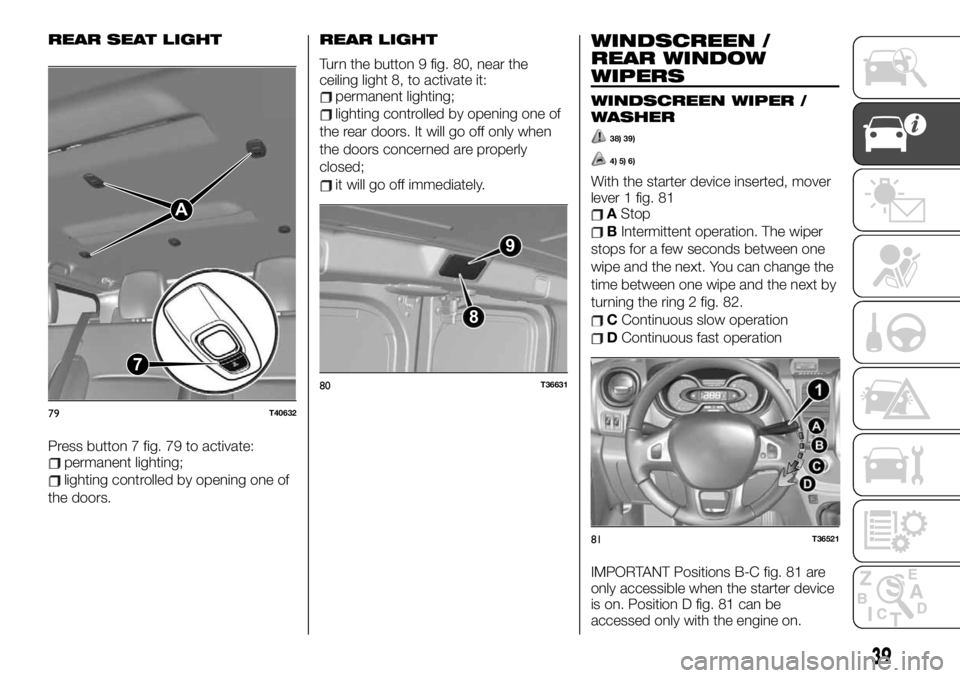
REAR SEAT LIGHT
Press button 7 fig. 79 to activate:permanent lighting;
lighting controlled by opening one of
the doors.
REAR LIGHT
Turn the button 9 fig. 80, near the
ceiling light 8, to activate it:
permanent lighting;
lighting controlled by opening one of
the rear doors. It will go off only when
the doors concerned are properly
closed;
it will go off immediately.
WINDSCREEN /
REAR WINDOW
WIPERS
WINDSCREEN WIPER /
WASHER
38) 39)
4) 5) 6)
With the starter device inserted, mover
lever 1 fig. 81
AStop
BIntermittent operation. The wiper
stops for a few seconds between one
wipe and the next. You can change the
time between one wipe and the next by
turning the ring 2 fig. 82.
CContinuous slow operation
DContinuous fast operation
IMPORTANT Positions B-C fig. 81 are
only accessible when the starter device
is on. Position D fig. 81 can be
accessed only with the engine on.
7A
79T40632
89
80T36631
81T36521
39
Page 42 of 236
NOTE When driving, each time the
vehicle stops, the windscreen wipers
slow down: from fast to slow
continuous operation. As soon as the
vehicle moves again, the wipers return
to the initially selected speed. Any
operation of lever 1 fig. 81 takes
precedence and annuls any
automatism.
Cars with automatic windscreen
wipers
(For versions/markets where provided)
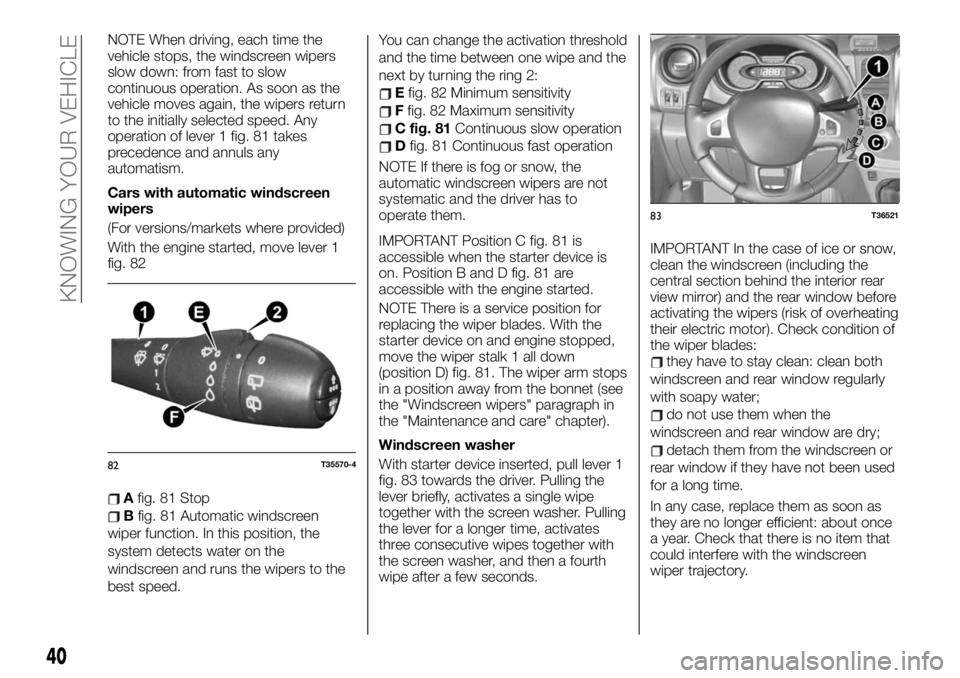
With the engine started, move lever 1
fig. 82
Afig. 81 Stop
Bfig. 81 Automatic windscreen
wiper function. In this position, the
system detects water on the
windscreen and runs the wipers to the
best speed.You can change the activation threshold
and the time between one wipe and the
next by turning the ring 2:
Efig. 82 Minimum sensitivity
Ffig. 82 Maximum sensitivity
C fig. 81Continuous slow operation
Dfig. 81 Continuous fast operation
NOTE If there is fog or snow, the
automatic windscreen wipers are not
systematic and the driver has to
operate them.
IMPORTANT Position C fig. 81 is
accessible when the starter device is
on. Position B and D fig. 81 are
accessible with the engine started.
NOTE There is a service position for
replacing the wiper blades. With the
starter device on and engine stopped,
move the wiper stalk 1 all down
(position D) fig. 81. The wiper arm stops
in a position away from the bonnet (see
the "Windscreen wipers" paragraph in
the "Maintenance and care" chapter).
Windscreen washer
With starter device inserted, pull lever 1
fig. 83 towards the driver. Pulling the
lever briefly, activates a single wipe
together with the screen washer. Pulling
the lever for a longer time, activates
three consecutive wipes together with
the screen washer, and then a fourth
wipe after a few seconds.IMPORTANT In the case of ice or snow,
clean the windscreen (including the
central section behind the interior rear
view mirror) and the rear window before
activating the wipers (risk of overheating
their electric motor). Check condition of
the wiper blades:
they have to stay clean: clean both
windscreen and rear window regularly
with soapy water;
do not use them when the
windscreen and rear window are dry;
detach them from the windscreen or
rear window if they have not been used
for a long time.
In any case, replace them as soon as
they are no longer efficient: about once
a year. Check that there is no item that
could interfere with the windscreen
wiper trajectory.
82T35570-4
83T36521
40
KNOWING YOUR VEHICLE
Page 43 of 236
REAR WINDOW WIPER /
WASHER
38) 39)
4) 5) 6)
Rear intermittent window wiper
according to speed
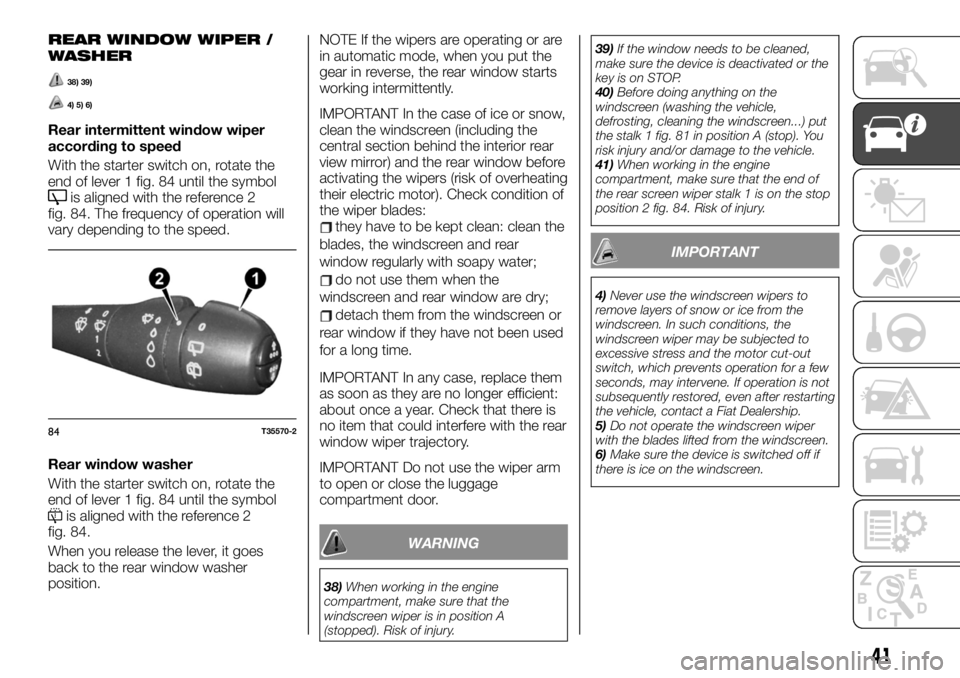
With the starter switch on, rotate the
end of lever 1 fig. 84 until the symbol
is aligned with the reference 2
fig. 84. The frequency of operation will
vary depending to the speed.
Rear window washer
With the starter switch on, rotate the
end of lever 1 fig. 84 until the symbol
is aligned with the reference 2
fig. 84.
When you release the lever, it goes
back to the rear window washer
position.NOTE If the wipers are operating or are
in automatic mode, when you put the
gear in reverse, the rear window starts
working intermittently.
IMPORTANT In the case of ice or snow,
clean the windscreen (including the
central section behind the interior rear
view mirror) and the rear window before
activating the wipers (risk of overheating
their electric motor). Check condition of
the wiper blades:
they have to be kept clean: clean the
blades, the windscreen and rear
window regularly with soapy water;
do not use them when the
windscreen and rear window are dry;
detach them from the windscreen or
rear window if they have not been used
for a long time.
IMPORTANT In any case, replace them
as soon as they are no longer efficient:
about once a year. Check that there is
no item that could interfere with the rear
window wiper trajectory.
IMPORTANT Do not use the wiper arm
to open or close the luggage
compartment door.
WARNING
38)When working in the engine
compartment, make sure that the
windscreen wiper is in position A
(stopped). Risk of injury.39)If the window needs to be cleaned,
make sure the device is deactivated or the
key is on STOP.
40)Before doing anything on the
windscreen (washing the vehicle,
defrosting, cleaning the windscreen...) put
the stalk 1 fig. 81 in position A (stop). You
risk injury and/or damage to the vehicle.
41)When working in the engine
compartment, make sure that the end of
the rear screen wiper stalk 1 is on the stop
position 2 fig. 84. Risk of injury.
IMPORTANT
4)Never use the windscreen wipers to
remove layers of snow or ice from the
windscreen. In such conditions, the
windscreen wiper may be subjected to
excessive stress and the motor cut-out
switch, which prevents operation for a few
seconds, may intervene. If operation is not
subsequently restored, even after restarting
the vehicle, contact a Fiat Dealership.
5)Do not operate the windscreen wiper
with the blades lifted from the windscreen.
6)Make sure the device is switched off if
there is ice on the windscreen.
84T35570-2
41
Page 47 of 236
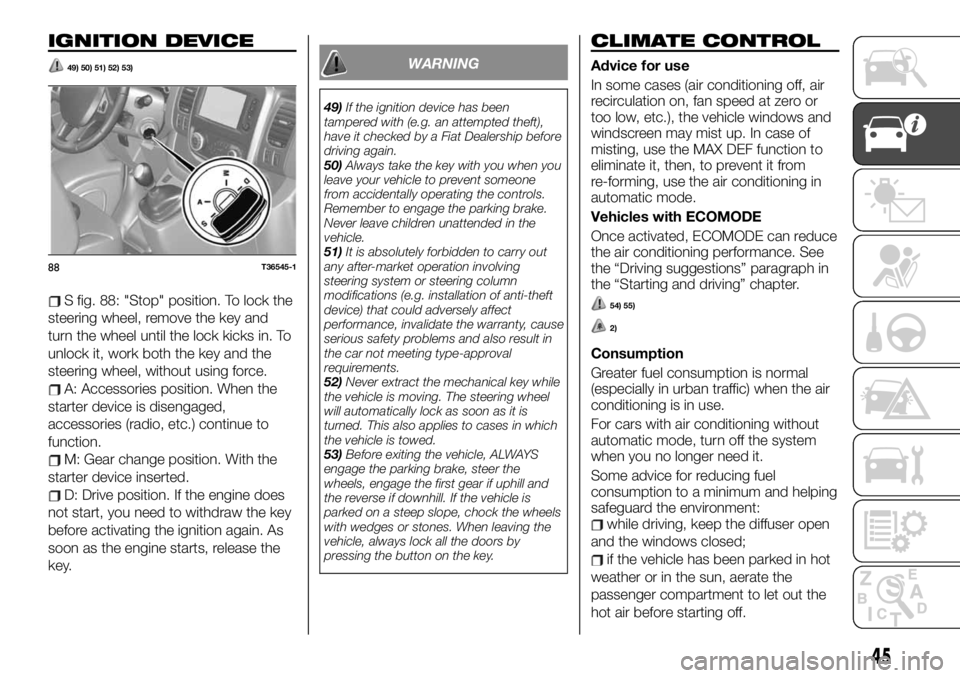
IGNITION DEVICE
49) 50) 51) 52) 53)
S fig. 88: "Stop" position. To lock the
steering wheel, remove the key and
turn the wheel until the lock kicks in. To
unlock it, work both the key and the
steering wheel, without using force.
A: Accessories position. When the
starter device is disengaged,
accessories (radio, etc.) continue to
function.
M: Gear change position. With the
starter device inserted.
D: Drive position. If the engine does
not start, you need to withdraw the key
before activating the ignition again. As
soon as the engine starts, release the
key.
WARNING
49)If the ignition device has been
tampered with (e.g. an attempted theft),
have it checked by a Fiat Dealership before
driving again.
50)Always take the key with you when you
leave your vehicle to prevent someone
from accidentally operating the controls.
Remember to engage the parking brake.
Never leave children unattended in the
vehicle.
51)It is absolutely forbidden to carry out
any after-market operation involving
steering system or steering column
modifications (e.g. installation of anti-theft
device) that could adversely affect
performance, invalidate the warranty, cause
serious safety problems and also result in
the car not meeting type-approval
requirements.
52)Never extract the mechanical key while
the vehicle is moving. The steering wheel
will automatically lock as soon as it is
turned. This also applies to cases in which
the vehicle is towed.
53)Before exiting the vehicle, ALWAYS
engage the parking brake, steer the
wheels, engage the first gear if uphill and
the reverse if downhill. If the vehicle is
parked on a steep slope, chock the wheels
with wedges or stones. When leaving the
vehicle, always lock all the doors by
pressing the button on the key.
CLIMATE CONTROL
Advice for use
In some cases (air conditioning off, air
recirculation on, fan speed at zero or
too low, etc.), the vehicle windows and
windscreen may mist up. In case of
misting, use the MAX DEF function to
eliminate it, then, to prevent it from
re-forming, use the air conditioning in
automatic mode.
Vehicles with ECOMODE
Once activated, ECOMODE can reduce
the air conditioning performance. See
the “Driving suggestions” paragraph in
the “Starting and driving” chapter.
54) 55)
2)
Consumption
Greater fuel consumption is normal
(especially in urban traffic) when the air
conditioning is in use.
For cars with air conditioning without
automatic mode, turn off the system
when you no longer need it.
Some advice for reducing fuel
consumption to a minimum and helping
safeguard the environment:
while driving, keep the diffuser open
and the windows closed;
if the vehicle has been parked in hot
weather or in the sun, aerate the
passenger compartment to let out the
hot air before starting off.
88T36545-1
45
Page 49 of 236
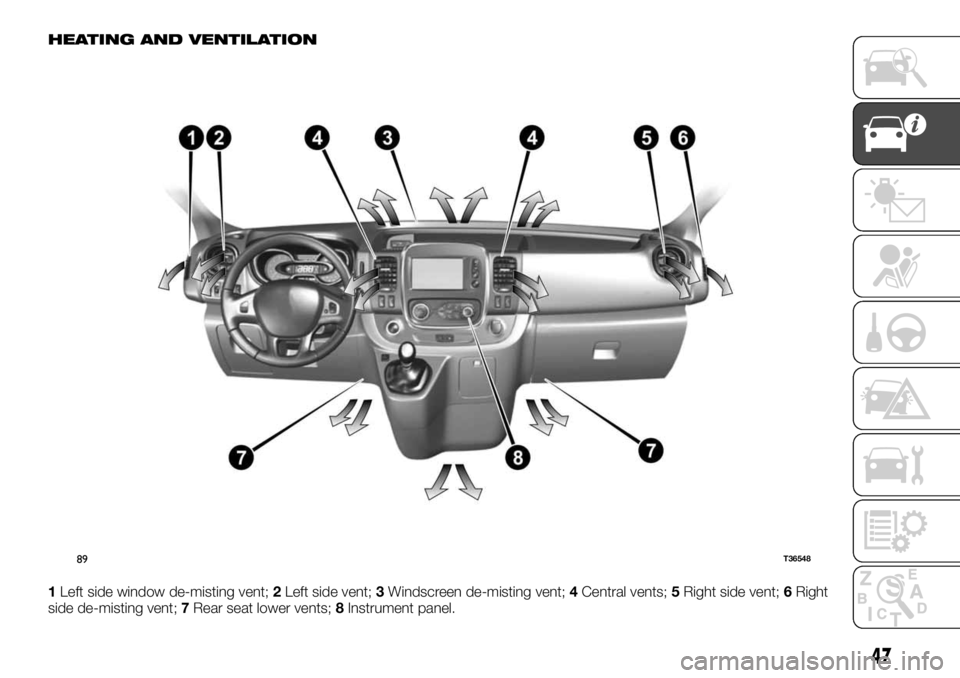
HEATING AND VENTILATION
1Left side window de-misting vent;2Left side vent;3Windscreen de-misting vent;4Central vents;5Right side vent;6Right
side de-misting vent;7Rear seat lower vents;8Instrument panel.
89T36548
47
Page 52 of 236
Air temperature adjustment
Use control 5 fig. 92 depending on the
desired temperature. The farther the
indicator is in the red zone, the higher
the temperature.
Ventilation speed adjustment
Use control 3 fig. 92 from 0 to 4 fig. 92.
The farther to the right you turn it, the
more air is diffused. If you want to stop
air entry, place control 3 fig. 92 at 0.
The system is deactivated: ventilation
speed in the passenger compartment is
nil (vehicle stopped), you can still notice
a slight air flow when the vehicle is
moving.
NOTE Prolonged use of this control in
position 0 can make the side windows
and windscreen mist up even though
the air inside the passenger
compartment is not stuffy.
Quick de-misting: Passenger
compartment isolation/air recycling
deactivated (warning light on button 4
fig. 92 is off), turn controls 1 fig. 92 and
3 fig. 92 to the positions
. Air
conditioning activation lets you speed
up de-misting.
Activating the passenger
compartment isolation/air
recycling.
Press button 4 fig. 92 (the warning light
will go on).
In this position, the air in the passenger
compartment is recycled without
introducing outside air.Air recirculation allows you:
to isolate the outside environment
(when driving in polluted areas, etc.);
to get the desired internal passenger
compartment temperature more
quickly.
IMPORTANT Prolonged use of air
recycling can make the side windows
and windscreen mist up even though
the air inside the passenger
compartment is not stuffy. We advise
you to return to normal function
(outside air) by pressing button 4
fig. 92 again as soon as air recycling is
no longer needed.
Passenger compartment air
distribution
Turn the knob 1 fig. 92 to select the
distribution type.
The airflow is directed to the
dashboard vents.
The airflow is directed to the
dashboard vents and to the rear seat
lower vents.
The airflow is mainly directed
towards the front seat lower vents and
the dashboard vents. To direct the air
downwards only, close the dashboard
vents.
The airflow is distributed among all
the vents, the front side window vents,
the windscreen demisting vents and the
lower vents.
. The airflow is directed towards the
windscreen demisting vents and the
front side window demisting vents.
Turning the climate control system
on/off
The button 2 fig. 92 lets you turn on
(indicator light on) or off (indicator light
off) the air conditioning.
It cannot be turned on if control 3
fig. 92 is set at 0.
Using air conditioning lets you:
lower the interior car temperature;
de-mist the windows more quickly.
Air conditioning does not work when
the outside temperature is low.
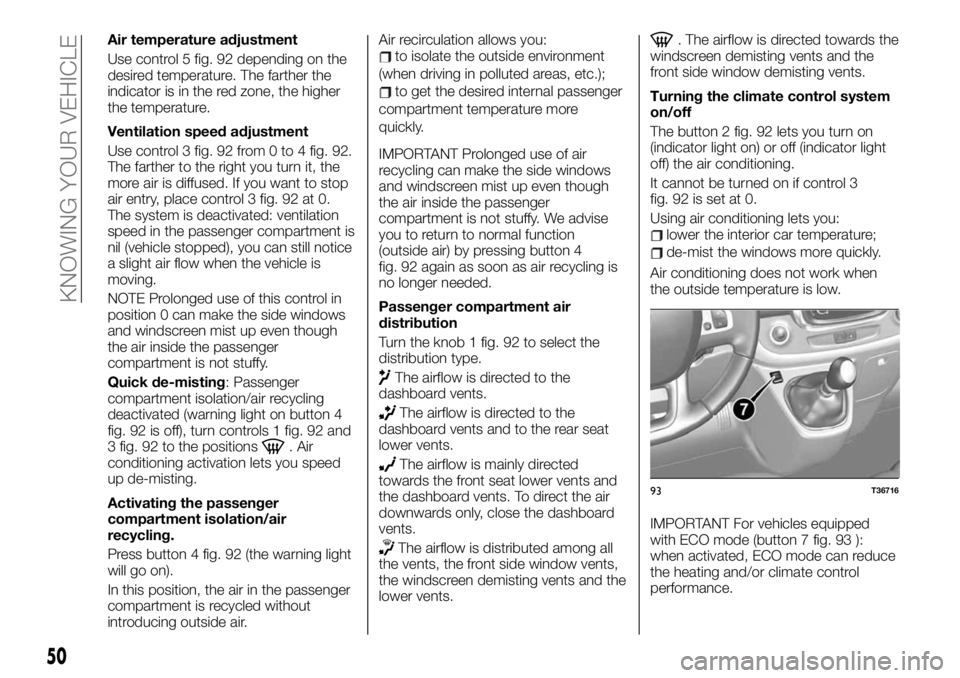
IMPORTANT For vehicles equipped
with ECO mode (button 7 fig. 93 ):
when activated, ECO mode can reduce
the heating and/or climate control
performance.
93T36716
50
KNOWING YOUR VEHICLE