Door FIAT TALENTO 2020 Owner handbook (in English)
[x] Cancel search | Manufacturer: FIAT, Model Year: 2020, Model line: TALENTO, Model: FIAT TALENTO 2020Pages: 236, PDF Size: 4.86 MB
Page 115 of 236
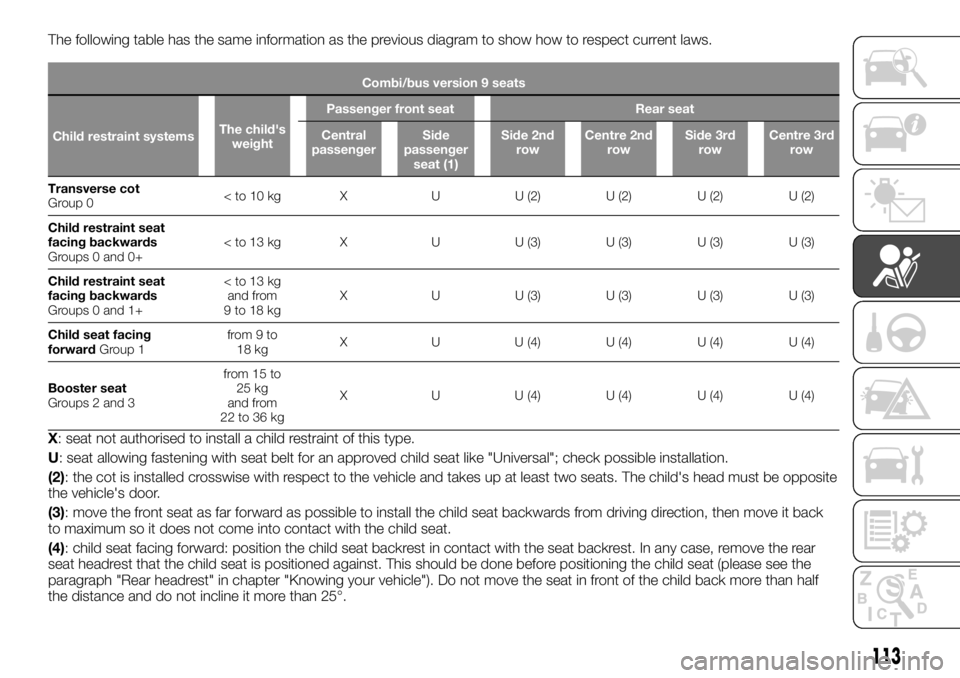
The following table has the same information as the previous diagram to show how to respect current laws.
Combi/bus version 9 seats
Child restraint systemsThe child's
weightPassenger front seat Rear seat
Central
passengerSide
passenger
seat (1)Side 2nd
rowCentre 2nd
rowSide 3rd
rowCentre 3rd
row
Transverse cot
Group 0
facing backwards
Groups 0 and 0+< to 13 kg X U U (3) U (3) U (3) U (3)
Child restraint seat
facing backwards
Groups 0 and 1+
9to18kgX U U (3) U (3) U (3) U (3)
Child seat facing
forwardGroup 1from 9 to
18 kgX U U (4) U (4) U (4) U (4)
Booster seat
Groups 2 and 3from 15 to
25 kg
and from
22 to 36 kgX U U (4) U (4) U (4) U (4)
X: seat not authorised to install a child restraint of this type.
U: seat allowing fastening with seat belt for an approved child seat like "Universal"; check possible installation.
(2): the cot is installed crosswise with respect to the vehicle and takes up at least two seats. The child's head must be opposite
the vehicle's door.
(3): move the front seat as far forward as possible to install the child seat backwards from driving direction, then move it back
to maximum so it does not come into contact with the child seat.
(4): child seat facing forward: position the child seat backrest in contact with the seat backrest. In any case, remove the rear
seat headrest that the child seat is positioned against. This should be done before positioning the child seat (please see the
paragraph "Rear headrest" in chapter "Knowing your vehicle"). Do not move the seat in front of the child back more than half
the distance and do not incline it more than 25°.
113
Page 120 of 236
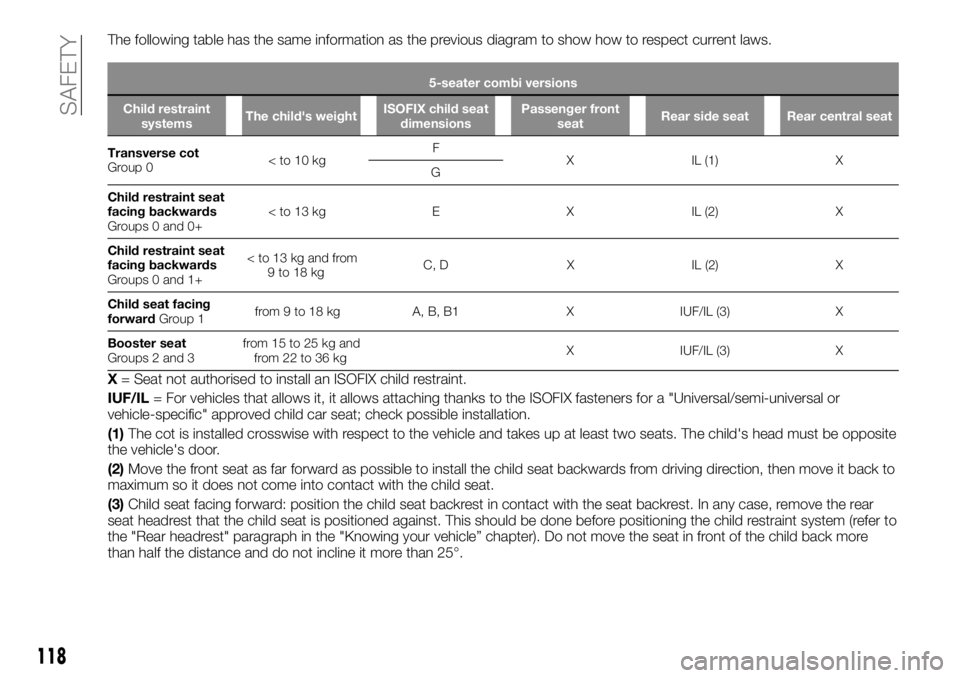
The following table has the same information as the previous diagram to show how to respect current laws.
5-seater combi versions
Child restraint
systemsThe child's weightISOFIX child seat
dimensionsPassenger front
seatRear side seat Rear central seat
Transverse cot
Group 0
G
Child restraint seat
facing backwards
Groups 0 and 0+
facing backwards
Groups 0 and 1+
Child seat facing
forwardGroup 1from 9 to 18 kg A, B, B1 X IUF/IL (3) X
Booster seat
Groups 2 and 3from 15 to 25 kg and
from 22 to 36 kgX IUF/IL (3) X
X= Seat not authorised to install an ISOFIX child restraint.
IUF/IL= For vehicles that allows it, it allows attaching thanks to the ISOFIX fasteners for a "Universal/semi-universal or
vehicle-specific" approved child car seat; check possible installation.
(1)The cot is installed crosswise with respect to the vehicle and takes up at least two seats. The child's head must be opposite
the vehicle's door.
(2)Move the front seat as far forward as possible to install the child seat backwards from driving direction, then move it back to
maximum so it does not come into contact with the child seat.
(3)Child seat facing forward: position the child seat backrest in contact with the seat backrest. In any case, remove the rear
seat headrest that the child seat is positioned against. This should be done before positioning the child restraint system (refer to
the "Rear headrest" paragraph in the "Knowing your vehicle” chapter). Do not move the seat in front of the child back more
than half the distance and do not incline it more than 25°.
118
SAFETY
Page 122 of 236
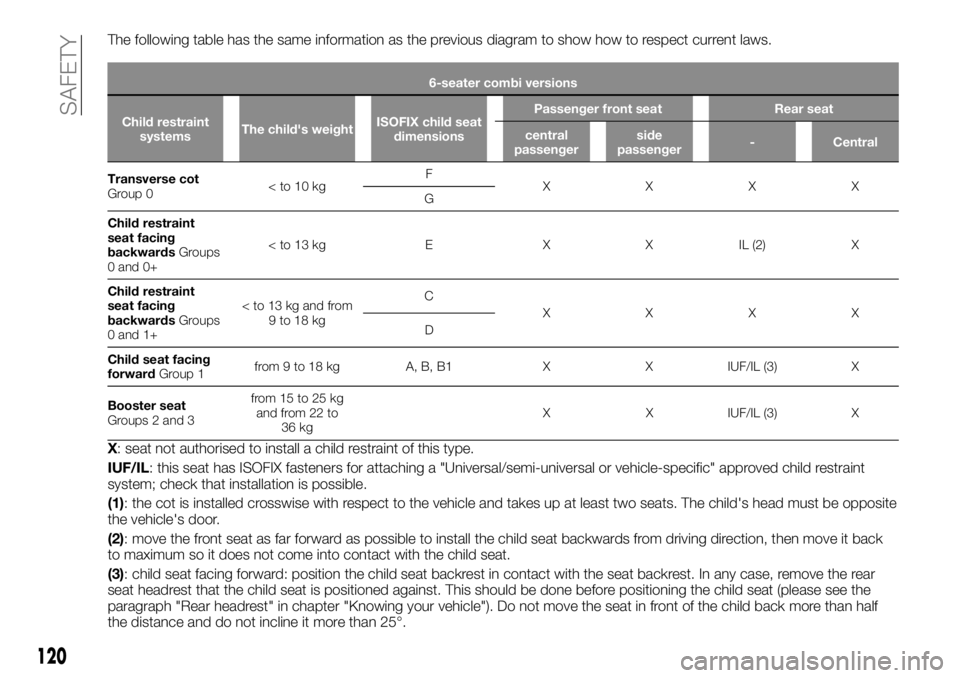
The following table has the same information as the previous diagram to show how to respect current laws.
6-seater combi versions
Child restraint
systemsThe child's weightISOFIX child seat
dimensionsPassenger front seat Rear seat
central
passengerside
passenger- Central
Transverse cot
Group 0
XXXX
G
Child restraint
seat facing
backwardsGroups
0 and 0+
seat facing
backwardsGroups
0 and 1+
XXXX
D
Child seat facing
forwardGroup 1from 9 to 18 kg A, B, B1 X X IUF/IL (3) X
Booster seat
Groups 2 and 3from 15 to 25 kg
and from 22 to
36 kgX X IUF/IL (3) X
X: seat not authorised to install a child restraint of this type.
IUF/IL: this seat has ISOFIX fasteners for attaching a "Universal/semi-universal or vehicle-specific" approved child restraint
system; check that installation is possible.
(1): the cot is installed crosswise with respect to the vehicle and takes up at least two seats. The child's head must be opposite
the vehicle's door.
(2): move the front seat as far forward as possible to install the child seat backwards from driving direction, then move it back
to maximum so it does not come into contact with the child seat.
(3): child seat facing forward: position the child seat backrest in contact with the seat backrest. In any case, remove the rear
seat headrest that the child seat is positioned against. This should be done before positioning the child seat (please see the
paragraph "Rear headrest" in chapter "Knowing your vehicle"). Do not move the seat in front of the child back more than half
the distance and do not incline it more than 25°.
120
SAFETY
Page 124 of 236
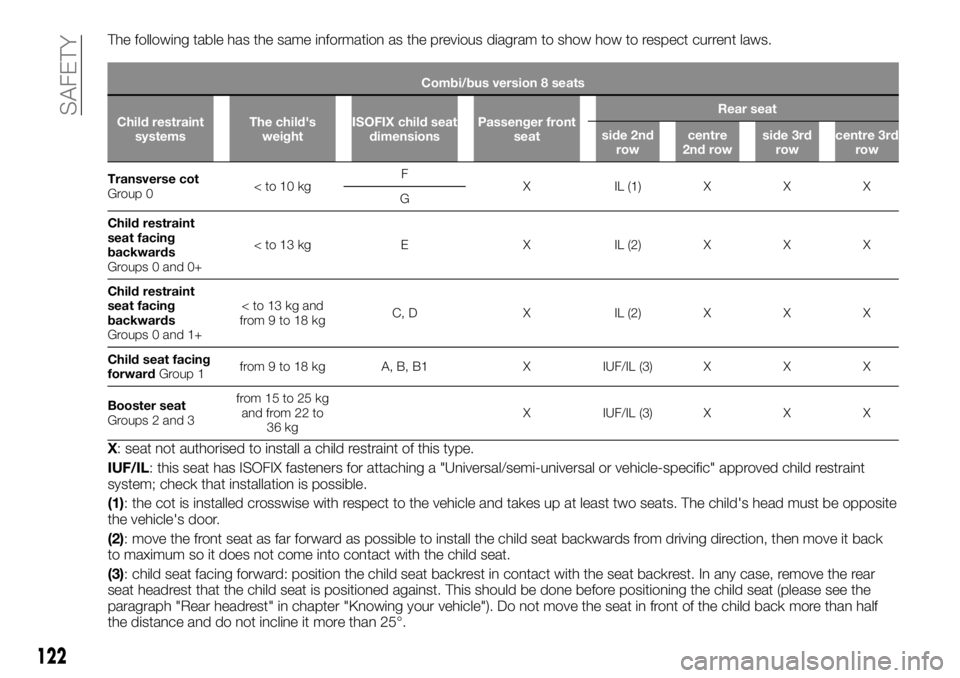
The following table has the same information as the previous diagram to show how to respect current laws.
Combi/bus version 8 seats
Child restraint
systemsThe child's
weightISOFIX child seat
dimensionsPassenger front
seatRear seat
side 2nd
rowcentre
2nd rowside 3rd
rowcentre 3rd
row
Transverse cot
Group 0
X IL (1) X X X
G
Child restraint
seat facing
backwards
Groups 0 and 0+
seat facing
backwards
Groups 0 and 1+
Child seat facing
forwardGroup 1from 9 to 18 kg A, B, B1 X IUF/IL (3) X X X
Booster seat
Groups 2 and 3from 15 to 25 kg
and from 22 to
36 kgX IUF/IL (3) X X X
X: seat not authorised to install a child restraint of this type.
IUF/IL: this seat has ISOFIX fasteners for attaching a "Universal/semi-universal or vehicle-specific" approved child restraint
system; check that installation is possible.
(1): the cot is installed crosswise with respect to the vehicle and takes up at least two seats. The child's head must be opposite
the vehicle's door.
(2): move the front seat as far forward as possible to install the child seat backwards from driving direction, then move it back
to maximum so it does not come into contact with the child seat.
(3): child seat facing forward: position the child seat backrest in contact with the seat backrest. In any case, remove the rear
seat headrest that the child seat is positioned against. This should be done before positioning the child seat (please see the
paragraph "Rear headrest" in chapter "Knowing your vehicle"). Do not move the seat in front of the child back more than half
the distance and do not incline it more than 25°.
122
SAFETY
Page 126 of 236
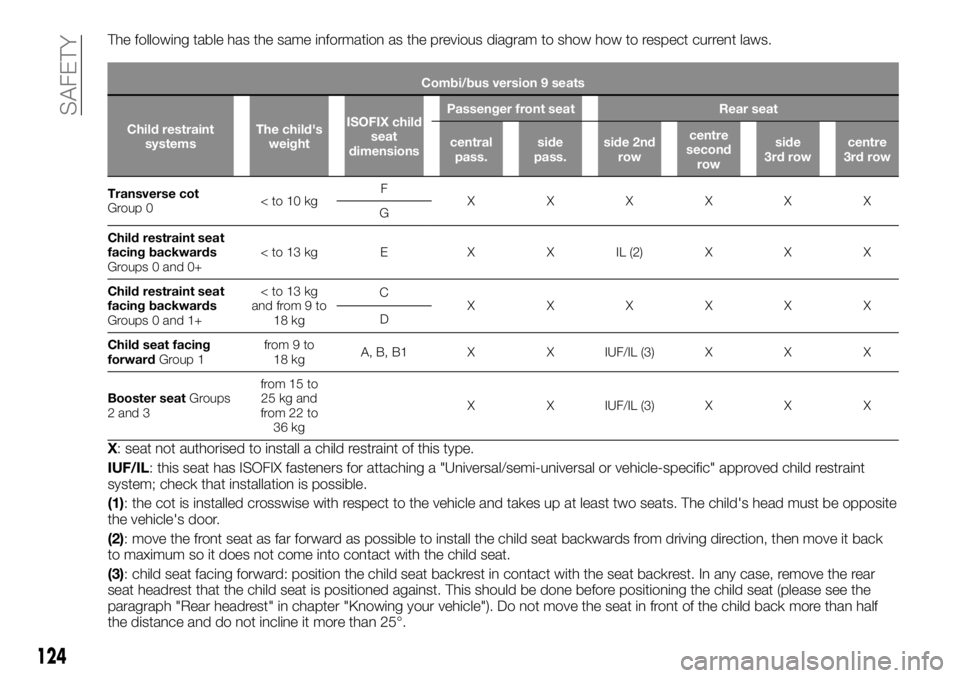
The following table has the same information as the previous diagram to show how to respect current laws.
Combi/bus version 9 seats
Child restraint
systemsThe child's
weightISOFIX child
seat
dimensionsPassenger front seat Rear seat
central
pass.side
pass.side 2nd
rowcentre
second
rowside
3rd rowcentre
3rd row
Transverse cot
Group 0
XXXXXX
G
Child restraint seat
facing backwards
Groups 0 and 0+
facing backwards
Groups 0 and 1+
18 kgC
XXXXXX
D
Child seat facing
forwardGroup 1from 9 to
18 kgA, B, B1 X X IUF/IL (3) X X X
Booster seatGroups
2 and 3from 15 to
25 kg and
from 22 to
36 kgX X IUF/IL (3) X X X
X: seat not authorised to install a child restraint of this type.
IUF/IL: this seat has ISOFIX fasteners for attaching a "Universal/semi-universal or vehicle-specific" approved child restraint
system; check that installation is possible.
(1): the cot is installed crosswise with respect to the vehicle and takes up at least two seats. The child's head must be opposite
the vehicle's door.
(2): move the front seat as far forward as possible to install the child seat backwards from driving direction, then move it back
to maximum so it does not come into contact with the child seat.
(3): child seat facing forward: position the child seat backrest in contact with the seat backrest. In any case, remove the rear
seat headrest that the child seat is positioned against. This should be done before positioning the child seat (please see the
paragraph "Rear headrest" in chapter "Knowing your vehicle"). Do not move the seat in front of the child back more than half
the distance and do not incline it more than 25°.
124
SAFETY
Page 127 of 236
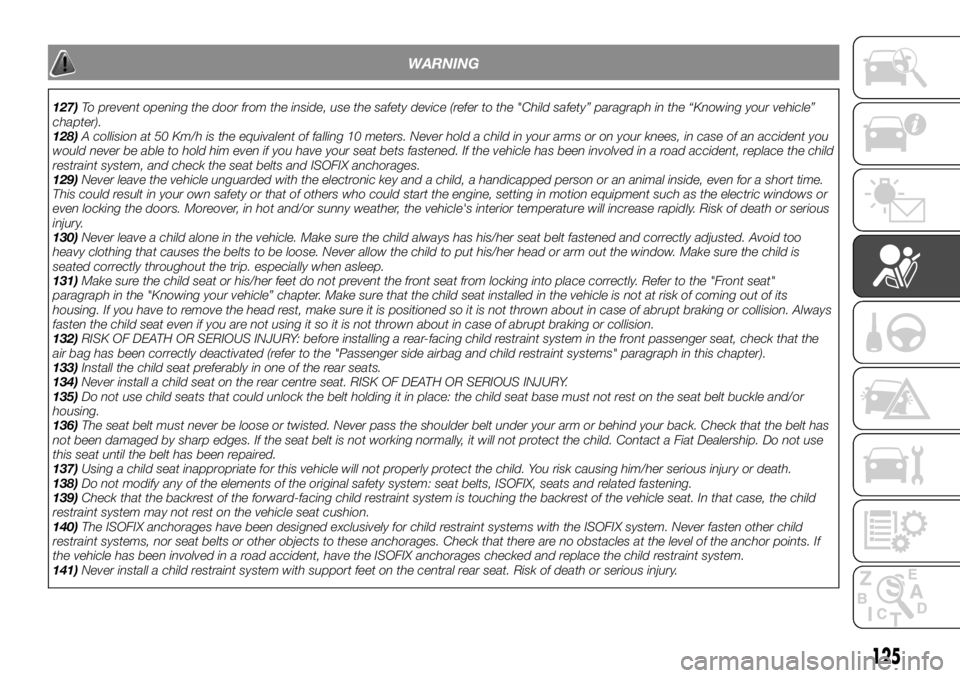
WARNING
127)To prevent opening the door from the inside, use the safety device (refer to the "Child safety” paragraph in the “Knowing your vehicle”
chapter).
128)A collision at 50 Km/h is the equivalent of falling 10 meters. Never hold a child in your arms or on your knees, in case of an accident you
would never be able to hold him even if you have your seat bets fastened. If the vehicle has been involved in a road accident, replace the child
restraint system, and check the seat belts and ISOFIX anchorages.
129)Never leave the vehicle unguarded with the electronic key and a child, a handicapped person or an animal inside, even for a short time.
This could result in your own safety or that of others who could start the engine, setting in motion equipment such as the electric windows or
even locking the doors. Moreover, in hot and/or sunny weather, the vehicle's interior temperature will increase rapidly. Risk of death or serious
injury.
130)Never leave a child alone in the vehicle. Make sure the child always has his/her seat belt fastened and correctly adjusted. Avoid too
heavy clothing that causes the belts to be loose. Never allow the child to put his/her head or arm out the window. Make sure the child is
seated correctly throughout the trip. especially when asleep.
131)Make sure the child seat or his/her feet do not prevent the front seat from locking into place correctly. Refer to the "Front seat"
paragraph in the "Knowing your vehicle” chapter. Make sure that the child seat installed in the vehicle is not at risk of coming out of its
housing. If you have to remove the head rest, make sure it is positioned so it is not thrown about in case of abrupt braking or collision. Always
fasten the child seat even if you are not using it so it is not thrown about in case of abrupt braking or collision.
132)RISK OF DEATH OR SERIOUS INJURY: before installing a rear-facing child restraint system in the front passenger seat, check that the
air bag has been correctly deactivated (refer to the "Passenger side airbag and child restraint systems" paragraph in this chapter).
133)Install the child seat preferably in one of the rear seats.
134)Never install a child seat on the rear centre seat. RISK OF DEATH OR SERIOUS INJURY.
135)Do not use child seats that could unlock the belt holding it in place: the child seat base must not rest on the seat belt buckle and/or
housing.
136)The seat belt must never be loose or twisted. Never pass the shoulder belt under your arm or behind your back. Check that the belt has
not been damaged by sharp edges. If the seat belt is not working normally, it will not protect the child. Contact a Fiat Dealership. Do not use
this seat until the belt has been repaired.
137)Using a child seat inappropriate for this vehicle will not properly protect the child. You risk causing him/her serious injury or death.
138)Do not modify any of the elements of the original safety system: seat belts, ISOFIX, seats and related fastening.
139)Check that the backrest of the forward-facing child restraint system is touching the backrest of the vehicle seat. In that case, the child
restraint system may not rest on the vehicle seat cushion.
140)The ISOFIX anchorages have been designed exclusively for child restraint systems with the ISOFIX system. Never fasten other child
restraint systems, nor seat belts or other objects to these anchorages. Check that there are no obstacles at the level of the anchor points. If
the vehicle has been involved in a road accident, have the ISOFIX anchorages checked and replace the child restraint system.
141)Never install a child restraint system with support feet on the central rear seat. Risk of death or serious injury.
125
Page 131 of 236
TPMS –
Tyre Pressure
Monitoring System
(For versions/markets where provided)
Tyre pressure loss warning
This system warns the driver of any
pressure loss in one or more of the
tyres.
Operating principle
Each wheel (except the spare) has a
built-in sensor in the inflation valve that
measures tyre pressure at regular
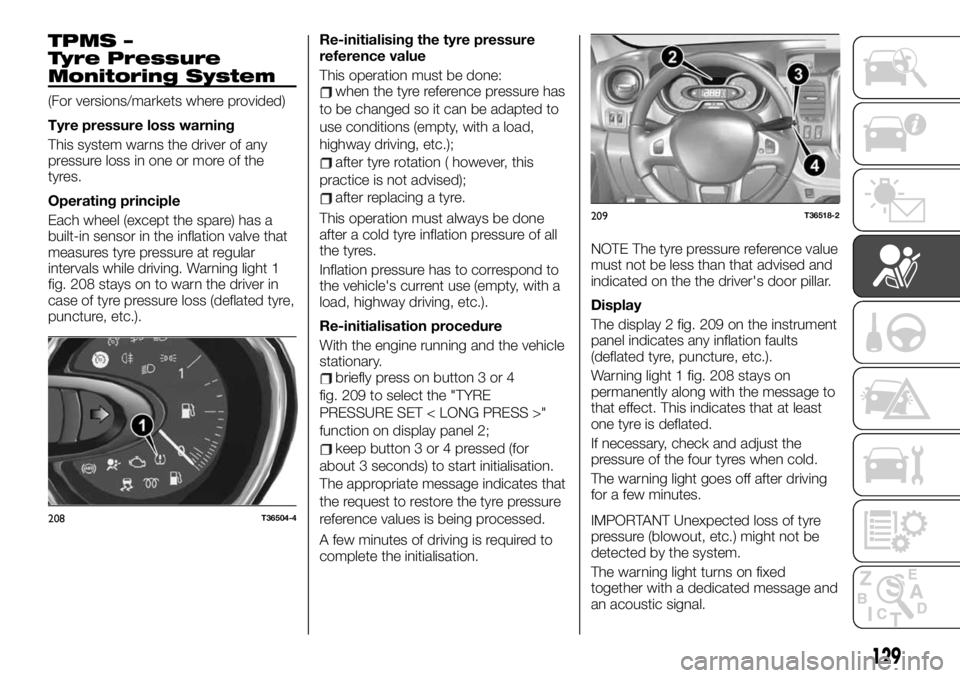
intervals while driving. Warning light 1
fig. 208 stays on to warn the driver in
case of tyre pressure loss (deflated tyre,
puncture, etc.).Re-initialising the tyre pressure
reference value
This operation must be done:when the tyre reference pressure has
to be changed so it can be adapted to
use conditions (empty, with a load,
highway driving, etc.);
after tyre rotation ( however, this
practice is not advised);
after replacing a tyre.
This operation must always be done
after a cold tyre inflation pressure of all
the tyres.
Inflation pressure has to correspond to
the vehicle's current use (empty, with a
load, highway driving, etc.).
Re-initialisation procedure
With the engine running and the vehicle
stationary.
briefly press on button 3 or 4
fig. 209 to select the "TYRE
PRESSURE SET < LONG PRESS >"
function on display panel 2;
keep button 3 or 4 pressed (for
about 3 seconds) to start initialisation.
The appropriate message indicates that
the request to restore the tyre pressure
reference values is being processed.
A few minutes of driving is required to
complete the initialisation.NOTE The tyre pressure reference value
must not be less than that advised and
indicated on the the driver's door pillar.
Display
The display 2 fig. 209 on the instrument
panel indicates any inflation faults
(deflated tyre, puncture, etc.).
Warning light 1 fig. 208 stays on
permanently along with the message to
that effect. This indicates that at least
one tyre is deflated.
If necessary, check and adjust the
pressure of the four tyres when cold.
The warning light goes off after driving
for a few minutes.
IMPORTANT Unexpected loss of tyre
pressure (blowout, etc.) might not be
detected by the system.
The warning light turns on fixed
together with a dedicated message and
an acoustic signal.
208T36504-4
209T36518-2
129
Page 132 of 236
This message is accompanied by the
STOPwarning light.
This means that at least one of the tyres
is punctured or is very deflated.
Replace it or contact a Fiat Dealership if
it is punctured. Re-inflate the tyre if it is
deflated.
Warning light 1 fig. 208 flashes for a few
seconds before remaining permanent
along with the message to that effect.
This message is accompanied by the
light.
They indicate that one of the tyres has
no sensors (for example the spare). In
all other cases, contact a Fiat
Dealership.
New regulations concerning tyre
pressure
The tyre pressure must be checked
when cold(see the label located on
the driver's door pillar). If tyre pressure
checking cannot be donecold,
increase the pressure 0.2-0.3 bar
(3 PSI).
Never deflate a hot tyre.
Vehicle equipped with TPMS
In the event of a flat tyre (puncture,
insufficient inflation, etc.), the
warning light on the instrument
panel will turn on. Refer to the “TPMS –
TYRE PRESSURE MONITORING
SYSTEM” paragraph.Spare wheel
If the vehicle has one, the spare tyre
has no sensors. When this is mounted
on the vehicle, warning light 1
fig. 208 flashes for a few seconds
before staying on together with the
warning light, while a dedicated
message is displayed on the instrument
panel.
Spray can to repair the tyres and
inflation kit
According to the valve specifics, only
use equipment approved by a Fiat
Dealership. Please see the paragraph
"Tyre kit" in the "Emergency" chapter.
IMPORTANT This function provides an
additional aid to the driver; however, it
cannot replace him. It does not exempt
you from ordinary driving safety or from
responsibility in case of an accident.
Check tyre pressure, including the
spare tyre, once a month.
IMPORTANT For the safety of the driver
and anyone else on board, you must
stop as soon as traffic conditions allow
when theSTOPwarning light turns on.
130
SAFETY
Page 135 of 236
RemarksIf the vehicle does not start, a
dedicated message appears on the
instrument panel;
In some cases, you will need to
move the steering wheel while pressing
the ignition button 1 to unlock the
steering wheel column; You will be
warned with message to this effect;
When starting the engine in very cold
weather (less than -10°C): keep the
clutch pressed until the engine starts.
Accessory function
When the engine starts, you can
access a few functions (radio,
navigation system, windscreen wipers,
etc.).
To make the other functions available,
with the key in the passenger
compartment or inserted in the key
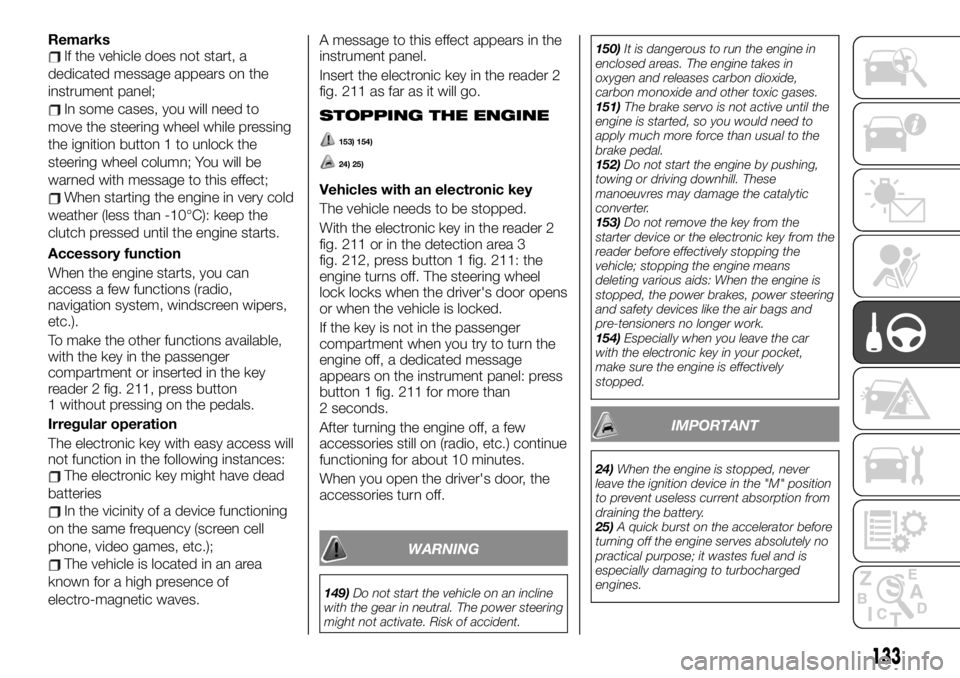
reader 2 fig. 211, press button
1 without pressing on the pedals.
Irregular operation
The electronic key with easy access will
not function in the following instances:
The electronic key might have dead
batteries
In the vicinity of a device functioning
on the same frequency (screen cell
phone, video games, etc.);
The vehicle is located in an area
known for a high presence of
electro-magnetic waves.A message to this effect appears in the
instrument panel.
Insert the electronic key in the reader 2
fig. 211 as far as it will go.
STOPPING THE ENGINE
153) 154)
24) 25)
Vehicles with an electronic key
The vehicle needs to be stopped.
With the electronic key in the reader 2
fig. 211 or in the detection area 3
fig. 212, press button 1 fig. 211: the
engine turns off. The steering wheel
lock locks when the driver's door opens
or when the vehicle is locked.
If the key is not in the passenger
compartment when you try to turn the
engine off, a dedicated message
appears on the instrument panel: press
button 1 fig. 211 for more than
2 seconds.
After turning the engine off, a few
accessories still on (radio, etc.) continue
functioning for about 10 minutes.
When you open the driver's door, the
accessories turn off.
WARNING
149)Do not start the vehicle on an incline
with the gear in neutral. The power steering
might not activate. Risk of accident.150)It is dangerous to run the engine in
enclosed areas. The engine takes in
oxygen and releases carbon dioxide,
carbon monoxide and other toxic gases.
151)The brake servo is not active until the
engine is started, so you would need to
apply much more force than usual to the
brake pedal.
152)Do not start the engine by pushing,
towing or driving downhill. These
manoeuvres may damage the catalytic
converter.
153)Do not remove the key from the
starter device or the electronic key from the
reader before effectively stopping the
vehicle; stopping the engine means
deleting various aids: When the engine is
stopped, the power brakes, power steering
and safety devices like the air bags and
pre-tensioners no longer work.
154)Especially when you leave the car
with the electronic key in your pocket,
make sure the engine is effectively
stopped.
IMPORTANT
24)When the engine is stopped, never
leave the ignition device in the "M" position
to prevent useless current absorption from
draining the battery.
25)A quick burst on the accelerator before
turning off the engine serves absolutely no
practical purpose; it wastes fuel and is
especially damaging to turbocharged
engines.
133
Page 139 of 236
160) 161)
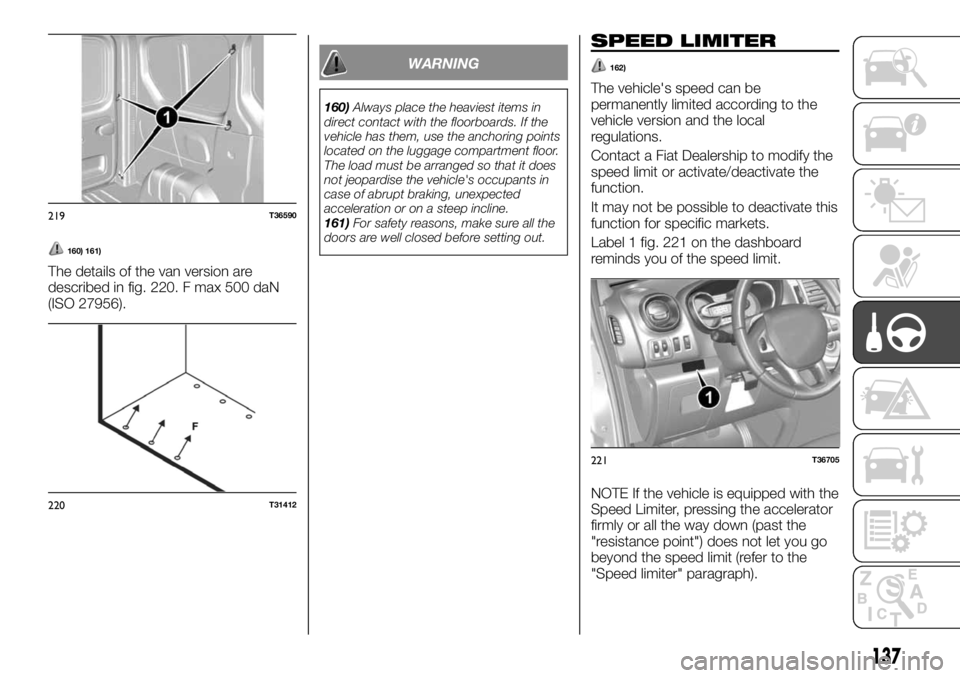
The details of the van version are
described in fig. 220. F max 500 daN
(ISO 27956).
WARNING
160)Always place the heaviest items in
direct contact with the floorboards. If the
vehicle has them, use the anchoring points
located on the luggage compartment floor.
The load must be arranged so that it does
not jeopardise the vehicle's occupants in
case of abrupt braking, unexpected
acceleration or on a steep incline.
161)For safety reasons, make sure all the
doors are well closed before setting out.
SPEED LIMITER
162)
The vehicle's speed can be
permanently limited according to the
vehicle version and the local
regulations.
Contact a Fiat Dealership to modify the
speed limit or activate/deactivate the
function.
It may not be possible to deactivate this
function for specific markets.
Label 1 fig. 221 on the dashboard
reminds you of the speed limit.
NOTE If the vehicle is equipped with the
Speed Limiter, pressing the accelerator
firmly or all the way down (past the
"resistance point") does not let you go
beyond the speed limit (refer to the
"Speed limiter" paragraph).
219T36590
220T31412
221T36705
137