turn signal FIAT TALENTO 2020 Owner handbook (in English)
[x] Cancel search | Manufacturer: FIAT, Model Year: 2020, Model line: TALENTO, Model: FIAT TALENTO 2020Pages: 236, PDF Size: 4.86 MB
Page 16 of 236
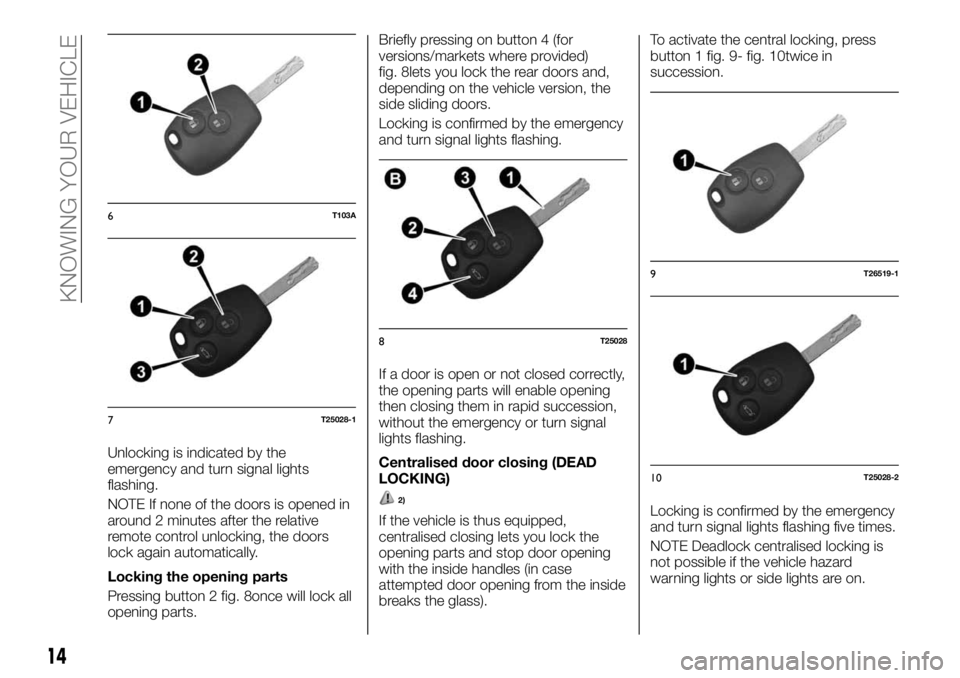
Unlocking is indicated by the
emergency and turn signal lights
flashing.
NOTE If none of the doors is opened in
around 2 minutes after the relative
remote control unlocking, the doors
lock again automatically.
Locking the opening parts
Pressing button 2 fig. 8once will lock all
opening parts.Briefly pressing on button 4 (for
versions/markets where provided)
fig. 8lets you lock the rear doors and,
depending on the vehicle version, the
side sliding doors.
Locking is confirmed by the emergency
and turn signal lights flashing.
If a door is open or not closed correctly,
the opening parts will enable opening
then closing them in rapid succession,
without the emergency or turn signal
lights flashing.
Centralised door closing (DEAD
LOCKING)
2)
If the vehicle is thus equipped,
centralised closing lets you lock the
opening parts and stop door opening
with the inside handles (in case
attempted door opening from the inside
breaks the glass).To activate the central locking, press
button 1 fig. 9- fig. 10twice in
succession.
Locking is confirmed by the emergency
and turn signal lights flashing five times.
NOTE Deadlock centralised locking is
not possible if the vehicle hazard
warning lights or side lights are on.
6T103A
7T25028-1
8T25028
9T26519-1
10T25028-2
14
KNOWING YOUR VEHICLE
Page 27 of 236
to enable the door lock/unlock
control from the inside (see paragraph
"Centralised locking/unlocking of
opening parts" in the chapter "Knowing
your vehicle").
Using the key
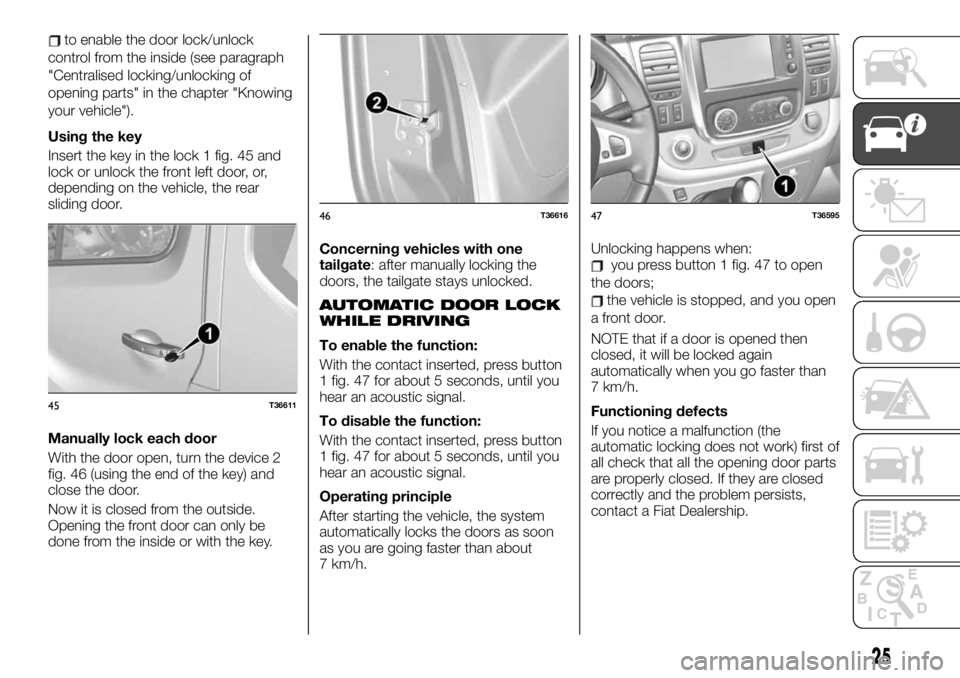
Insert the key in the lock 1 fig. 45 and
lock or unlock the front left door, or,
depending on the vehicle, the rear
sliding door.
Manually lock each door
With the door open, turn the device 2
fig. 46 (using the end of the key) and
close the door.
Now it is closed from the outside.
Opening the front door can only be
done from the inside or with the key.Concerning vehicles with one
tailgate: after manually locking the
doors, the tailgate stays unlocked.
AUTOMATIC DOOR LOCK
WHILE DRIVING
To enable the function:
With the contact inserted, press button
1 fig. 47 for about 5 seconds, until you
hear an acoustic signal.
To disable the function:
With the contact inserted, press button
1 fig. 47 for about 5 seconds, until you
hear an acoustic signal.
Operating principle
After starting the vehicle, the system
automatically locks the doors as soon
as you are going faster than about
7 km/h.Unlocking happens when:
you press button 1 fig. 47 to open
the doors;
the vehicle is stopped, and you open
a front door.
NOTE that if a door is opened then
closed, it will be locked again
automatically when you go faster than
7 km/h.
Functioning defects
If you notice a malfunction (the
automatic locking does not work) first of
all check that all the opening door parts
are properly closed. If they are closed
correctly and the problem persists,
contact a Fiat Dealership.
45T36611
46T3661647T36595
25
Page 38 of 236
MAIN BEAM HEADLIGHTS
Ignition
When the engine is running and the
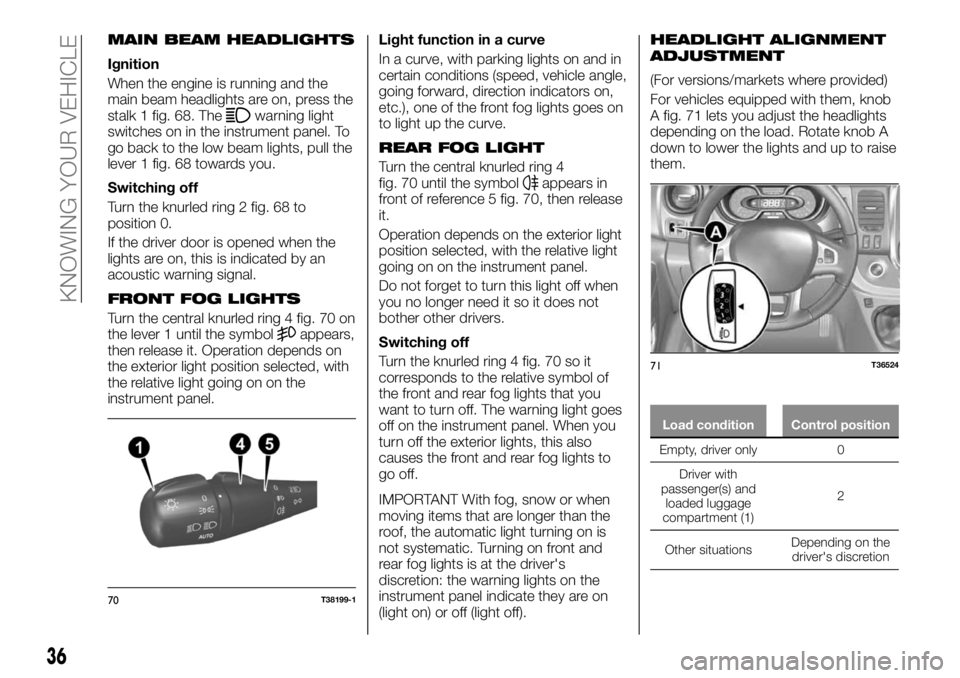
main beam headlights are on, press the
stalk 1 fig. 68. The
warning light
switches on in the instrument panel. To
go back to the low beam lights, pull the
lever 1 fig. 68 towards you.
Switching off
Turn the knurled ring 2 fig. 68 to
position 0.
If the driver door is opened when the
lights are on, this is indicated by an
acoustic warning signal.
FRONT FOG LIGHTS
Turn the central knurled ring 4 fig. 70 on
the lever 1 until the symbolappears,
then release it. Operation depends on
the exterior light position selected, with
the relative light going on on the
instrument panel.Light function in a curve
In a curve, with parking lights on and in
certain conditions (speed, vehicle angle,
going forward, direction indicators on,
etc.), one of the front fog lights goes on
to light up the curve.
REAR FOG LIGHT
Turn the central knurled ring 4
fig. 70 until the symbolappears in
front of reference 5 fig. 70, then release
it.
Operation depends on the exterior light
position selected, with the relative light
going on on the instrument panel.
Do not forget to turn this light off when
you no longer need it so it does not
bother other drivers.
Switching off
Turn the knurled ring 4 fig. 70 so it
corresponds to the relative symbol of
the front and rear fog lights that you
want to turn off. The warning light goes
off on the instrument panel. When you
turn off the exterior lights, this also
causes the front and rear fog lights to
go off.
IMPORTANT With fog, snow or when
moving items that are longer than the
roof, the automatic light turning on is
not systematic. Turning on front and
rear fog lights is at the driver's
discretion: the warning lights on the
instrument panel indicate they are on
(light on) or off (light off).
HEADLIGHT ALIGNMENT
ADJUSTMENT
(For versions/markets where provided)
For vehicles equipped with them, knob
A fig. 71 lets you adjust the headlights
depending on the load. Rotate knob A
down to lower the lights and up to raise
them.
Load condition Control position
Empty, driver only 0
Driver with
passenger(s) and
loaded
luggage
compartment (1)2
Other situationsDepending on the
driver's discretion
70T38199-1
71T36524
36
KNOWING YOUR VEHICLE
Page 39 of 236
IMPORTANT The table above contains
several examples. In all cases, adjust
the control A according to the vehicle
load to illuminate the road without
dazzling other drivers.
IMPORTANT If you are driving on the
left in a vehicle equipped for left hand
drive (or vice versa), you must adjust
the headlight orientation for the duration
of the visit.
Adjusting the headlights externally
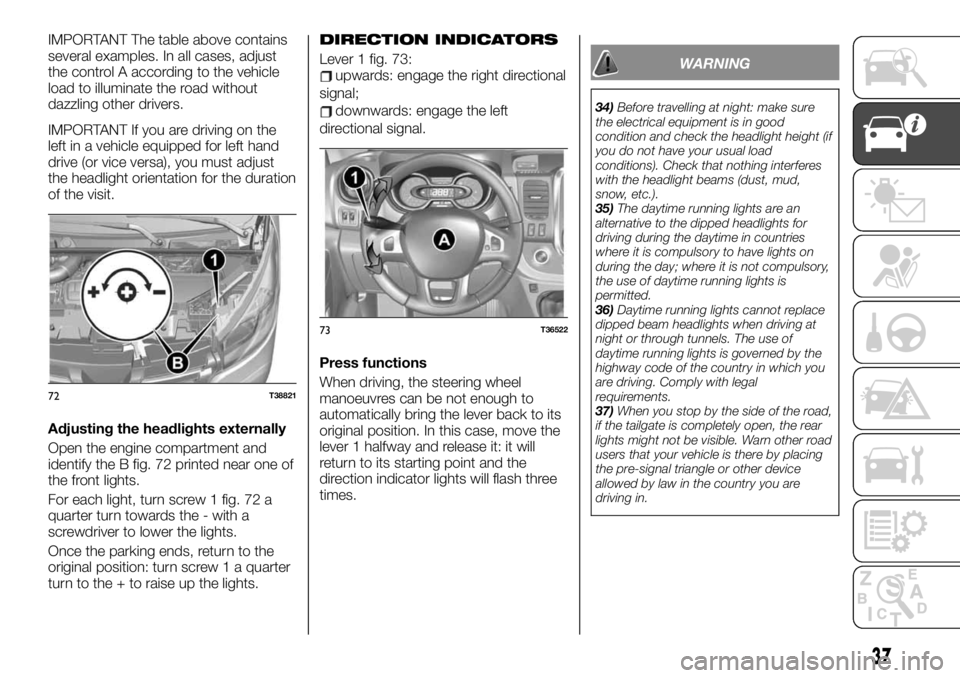
Open the engine compartment and
identify the B fig. 72 printed near one of
the front lights.
For each light, turn screw 1 fig. 72 a
quarter turn towards the - with a
screwdriver to lower the lights.
Once the parking ends, return to the
original position: turn screw 1 a quarter
turn to the + to raise up the lights.DIRECTION INDICATORS
Lever 1 fig. 73:upwards: engage the right directional
signal;
downwards: engage the left
directional signal.
Press functions
When driving, the steering wheel
manoeuvres can be not enough to
automatically bring the lever back to its
original position. In this case, move the
lever 1 halfway and release it: it will
return to its starting point and the
direction indicator lights will flash three
times.
WARNING
34)Before travelling at night: make sure
the electrical equipment is in good
condition and check the headlight height (if
you do not have your usual load
conditions). Check that nothing interferes
with the headlight beams (dust, mud,
snow, etc.).
35)The daytime running lights are an
alternative to the dipped headlights for
driving during the daytime in countries
where it is compulsory to have lights on
during the day; where it is not compulsory,
the use of daytime running lights is
permitted.
36)Daytime running lights cannot replace
dipped beam headlights when driving at
night or through tunnels. The use of
daytime running lights is governed by the
highway code of the country in which you
are driving. Comply with legal
requirements.
37)When you stop by the side of the road,
if the tailgate is completely open, the rear
lights might not be visible. Warn other road
users that your vehicle is there by placing
the pre-signal triangle or other device
allowed by law in the country you are
driving in.
72T38821
73T36522
37
Page 58 of 236
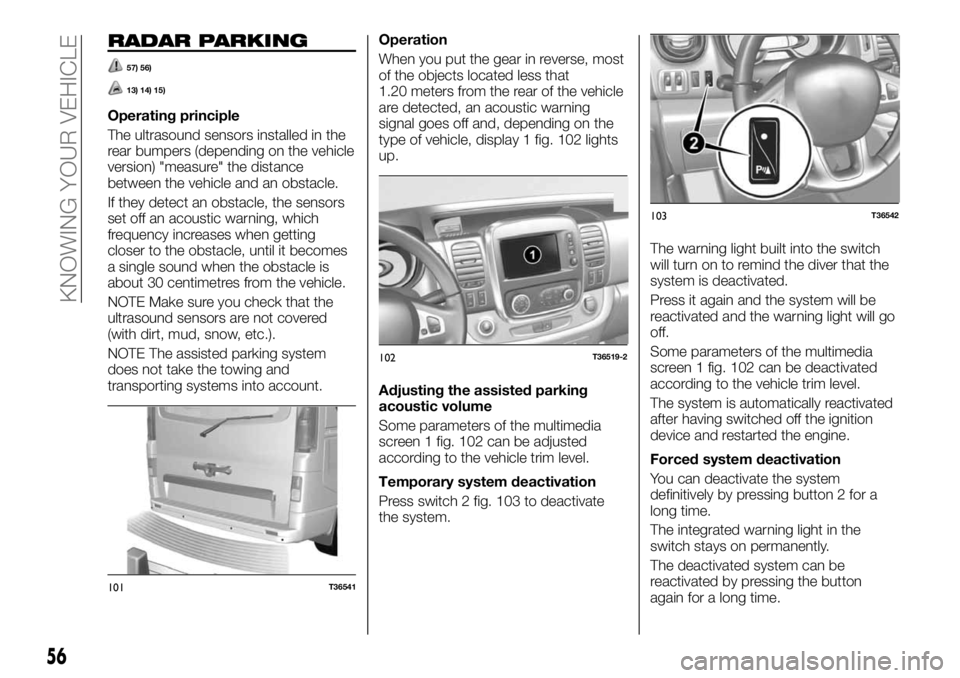
RADAR PARKING
57) 56)
13) 14) 15)
Operating principle
The ultrasound sensors installed in the
rear bumpers (depending on the vehicle
version) "measure" the distance
between the vehicle and an obstacle.
If they detect an obstacle, the sensors
set off an acoustic warning, which
frequency increases when getting
closer to the obstacle, until it becomes
a single sound when the obstacle is
about 30 centimetres from the vehicle.
NOTE Make sure you check that the
ultrasound sensors are not covered
(with dirt, mud, snow, etc.).
NOTE The assisted parking system
does not take the towing and
transporting systems into account.Operation
When you put the gear in reverse, most
of the objects located less that
1.20 meters from the rear of the vehicle
are detected, an acoustic warning
signal goes off and, depending on the
type of vehicle, display 1 fig. 102 lights
up.
Adjusting the assisted parking
acoustic volume
Some parameters of the multimedia
screen 1 fig. 102 can be adjusted
according to the vehicle trim level.
Temporary system deactivation
Press switch 2 fig. 103 to deactivate
the system.The warning light built into the switch
will turn on to remind the diver that the
system is deactivated.
Press it again and the system will be
reactivated and the warning light will go
off.
Some parameters of the multimedia
screen 1 fig. 102 can be deactivated
according to the vehicle trim level.
The system is automatically reactivated
after having switched off the ignition
device and restarted the engine.
Forced system deactivation
You can deactivate the system
definitively by pressing button 2 for a
long time.
The integrated warning light in the
switch stays on permanently.
The deactivated system can be
reactivated by pressing the button
again for a long time.
101T36541
102T36519-2
103T36542
56
KNOWING YOUR VEHICLE
Page 75 of 236
While exceeding the set speed, the set
speed flashes on the instrument panel,
along with an acoustic signal.
Afterwards, release the accelerator: the
cruise control function will reactivate
when you reduce the speed to lower
than the stored one.
In the event of a steep slope, the cruise
control cannot maintain the set speed:
the stored speed will flash on the
instrument panel along with an
intermittent acoustic warning.
Impossible to maintain the set
speed limit
In the event of a steep slope, the cruise
control cannot maintain the speed: the
stored speed will flash on the
instrument panel along with an
intermittent acoustic warning.
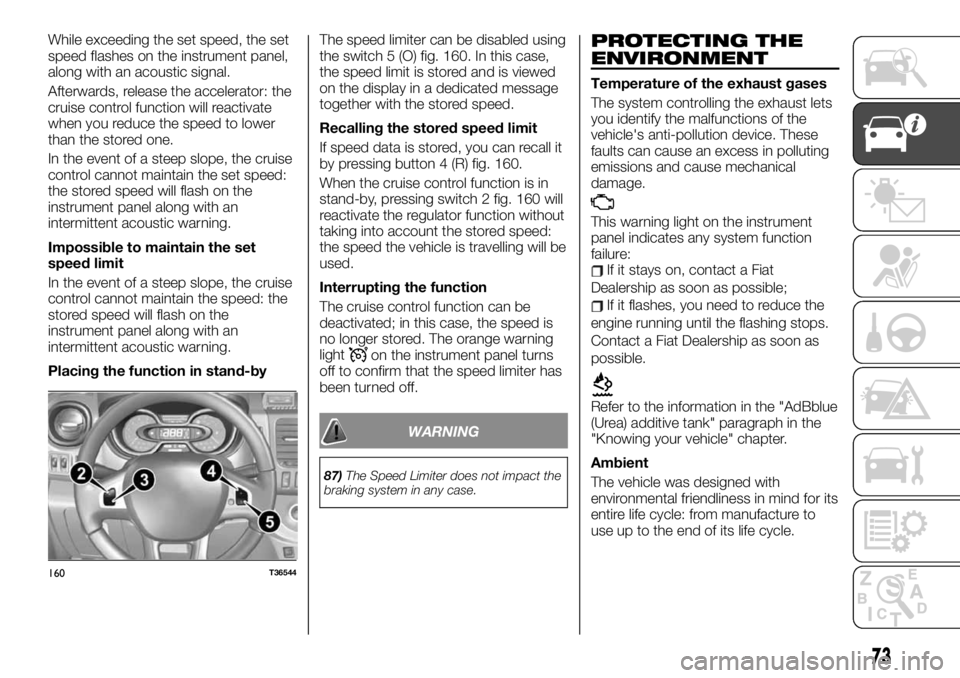
Placing the function in stand-byThe speed limiter can be disabled using
the switch 5 (O) fig. 160. In this case,
the speed limit is stored and is viewed
on the display in a dedicated message
together with the stored speed.
Recalling the stored speed limit
If speed data is stored, you can recall it
by pressing button 4 (R) fig. 160.
When the cruise control function is in
stand-by, pressing switch 2 fig. 160 will
reactivate the regulator function without
taking into account the stored speed:
the speed the vehicle is travelling will be
used.
Interrupting the function
The cruise control function can be
deactivated; in this case, the speed is
no longer stored. The orange warning
light
on the instrument panel turns
off to confirm that the speed limiter has
been turned off.
WARNING
87)The Speed Limiter does not impact the
braking system in any case.
PROTECTING THE
ENVIRONMENT
Temperature of the exhaust gases
The system controlling the exhaust lets
you identify the malfunctions of the
vehicle's anti-pollution device. These
faults can cause an excess in polluting
emissions and cause mechanical
damage.
This warning light on the instrument
panel indicates any system function
failure:
If it stays on, contact a Fiat
Dealership as soon as possible;
If it flashes, you need to reduce the
engine running until the flashing stops.
Contact a Fiat Dealership as soon as
possible.
Refer to the information in the "AdBblue
(Urea) additive tank" paragraph in the
"Knowing your vehicle" chapter.
Ambient
The vehicle was designed with
environmental friendliness in mind for its
entire life cycle: from manufacture to
use up to the end of its life cycle.
160T36544
73
Page 83 of 236
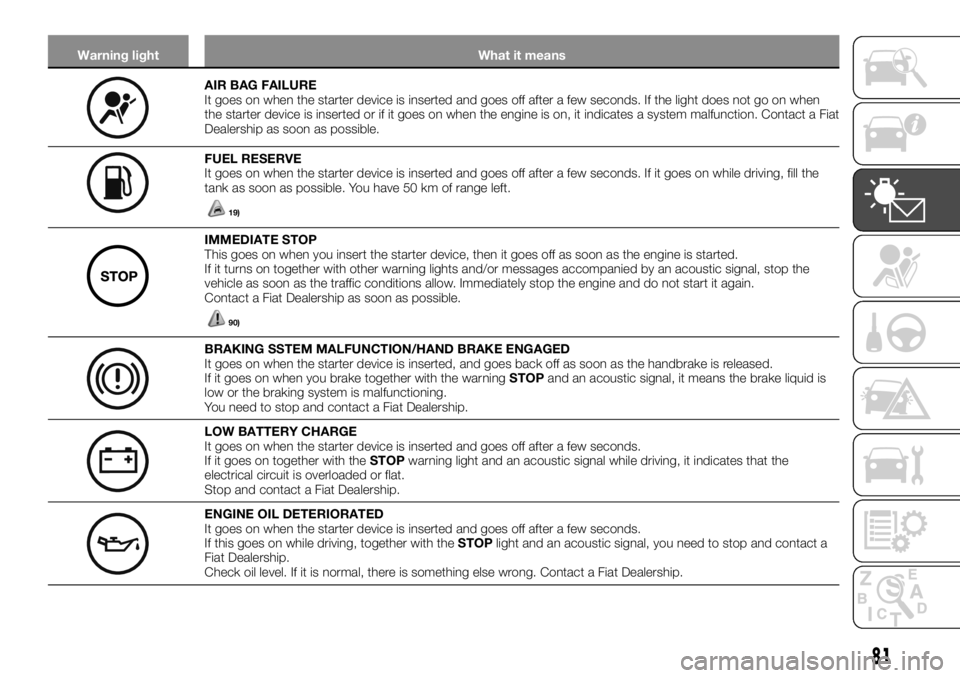
Warning light What it means
AIR BAG FAILURE
It goes on when the starter device is inserted and goes off after a few seconds. If the light does not go on when
the starter device is inserted or if it goes on when the engine is on, it indicates a system malfunction. Contact a Fiat
Dealership as soon as possible.
FUEL RESERVE
It goes on when the starter device is inserted and goes off after a few seconds. If it goes on while driving, fill the
tank as soon as possible. You have 50 km of range left.
19)
IMMEDIATE STOP
This goes on when you insert the starter device, then it goes off as soon as the engine is started.
If it turns on together with other warning lights and/or messages accompanied by an acoustic signal, stop the
vehicle as soon as the traffic conditions allow. Immediately stop the engine and do not start it again.
Contact a Fiat Dealership as soon as possible.
90)
BRAKING SSTEM MALFUNCTION/HAND BRAKE ENGAGED
It goes on when the starter device is inserted, and goes back off as soon as the handbrake is released.
If it goes on when you brake together with the warningSTOPand an acoustic signal, it means the brake liquid is
low or the braking system is malfunctioning.
You need to stop and contact a Fiat Dealership.
LOW BATTERY CHARGE
It goes on when the starter device is inserted and goes off after a few seconds.
If it goes on together with theSTOPwarning light and an acoustic signal while driving, it indicates that the
electrical circuit is overloaded or flat.
Stop and contact a Fiat Dealership.
ENGINE OIL DETERIORATED
It goes on when the starter device is inserted and goes off after a few seconds.
If this goes on while driving, together with theSTOPlight and an acoustic signal, you need to stop and contact a
Fiat Dealership.
Check oil level. If it is normal, there is something else wrong. Contact a Fiat Dealership.
81
Page 88 of 236
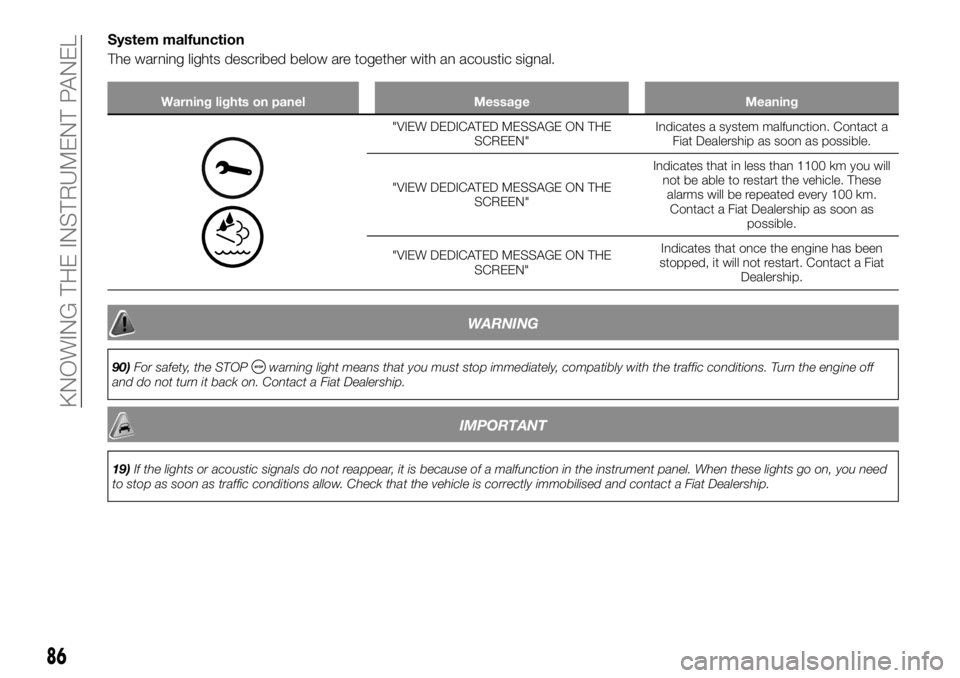
System malfunction
The warning lights described below are together with an acoustic signal.
Warning lights on panel Message Meaning
"VIEW DEDICATED MESSAGE ON THE
SCREEN"Indicates a system malfunction. Contact a
Fiat Dealership as soon as possible.
"VIEW DEDICATED MESSAGE ON THE
SCREEN"Indicates that in less than 1100 km you will
not be able to restart the vehicle. These
alarms will be repeated every 100 km.
Contact a Fiat Dealership as soon as
possible.
"VIEW DEDICATED MESSAGE ON THE
SCREEN"Indicates that once the engine has been
stopped, it will not restart. Contact a Fiat
Dealership.
WARNING
90)For safety, the STOPwarning light means that you must stop immediately, compatibly with the traffic conditions. Turn the engine off
and do not turn it back on. Contact a Fiat Dealership.
IMPORTANT
19)If the lights or acoustic signals do not reappear, it is because of a malfunction in the instrument panel. When these lights go on, you need
to stop as soon as traffic conditions allow. Check that the vehicle is correctly immobilised and contact a Fiat Dealership.
86
KNOWING THE INSTRUMENT PANEL
Page 131 of 236
TPMS –
Tyre Pressure
Monitoring System
(For versions/markets where provided)
Tyre pressure loss warning
This system warns the driver of any
pressure loss in one or more of the
tyres.
Operating principle
Each wheel (except the spare) has a
built-in sensor in the inflation valve that
measures tyre pressure at regular
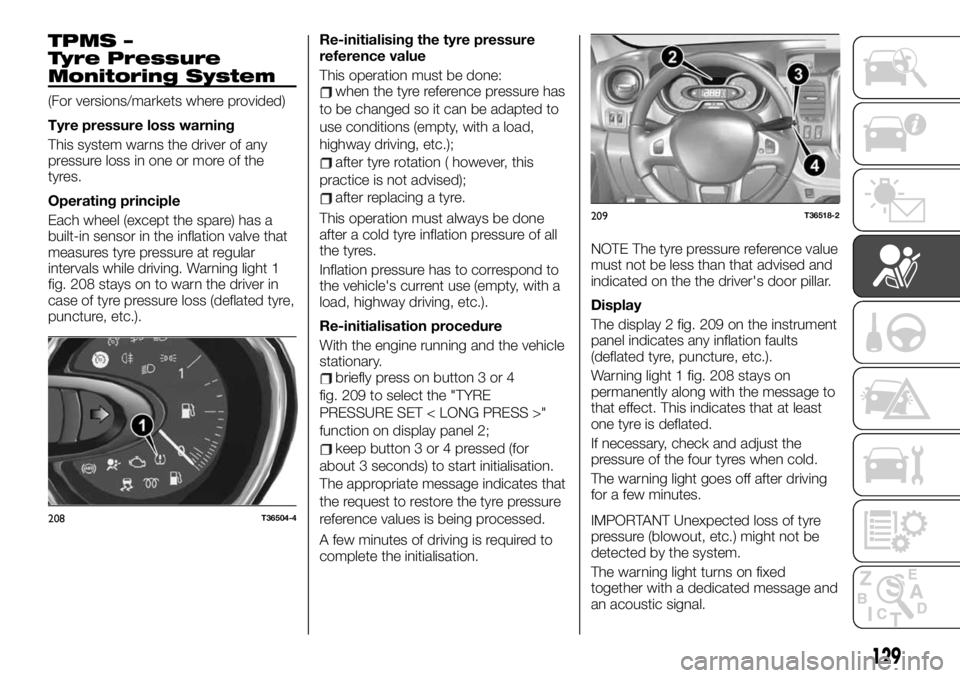
intervals while driving. Warning light 1
fig. 208 stays on to warn the driver in
case of tyre pressure loss (deflated tyre,
puncture, etc.).Re-initialising the tyre pressure
reference value
This operation must be done:when the tyre reference pressure has
to be changed so it can be adapted to
use conditions (empty, with a load,
highway driving, etc.);
after tyre rotation ( however, this
practice is not advised);
after replacing a tyre.
This operation must always be done
after a cold tyre inflation pressure of all
the tyres.
Inflation pressure has to correspond to
the vehicle's current use (empty, with a
load, highway driving, etc.).
Re-initialisation procedure
With the engine running and the vehicle
stationary.
briefly press on button 3 or 4
fig. 209 to select the "TYRE
PRESSURE SET < LONG PRESS >"
function on display panel 2;
keep button 3 or 4 pressed (for
about 3 seconds) to start initialisation.
The appropriate message indicates that
the request to restore the tyre pressure
reference values is being processed.
A few minutes of driving is required to
complete the initialisation.NOTE The tyre pressure reference value
must not be less than that advised and
indicated on the the driver's door pillar.
Display
The display 2 fig. 209 on the instrument
panel indicates any inflation faults
(deflated tyre, puncture, etc.).
Warning light 1 fig. 208 stays on
permanently along with the message to
that effect. This indicates that at least
one tyre is deflated.
If necessary, check and adjust the
pressure of the four tyres when cold.
The warning light goes off after driving
for a few minutes.
IMPORTANT Unexpected loss of tyre
pressure (blowout, etc.) might not be
detected by the system.
The warning light turns on fixed
together with a dedicated message and
an acoustic signal.
208T36504-4
209T36518-2
129
Page 148 of 236
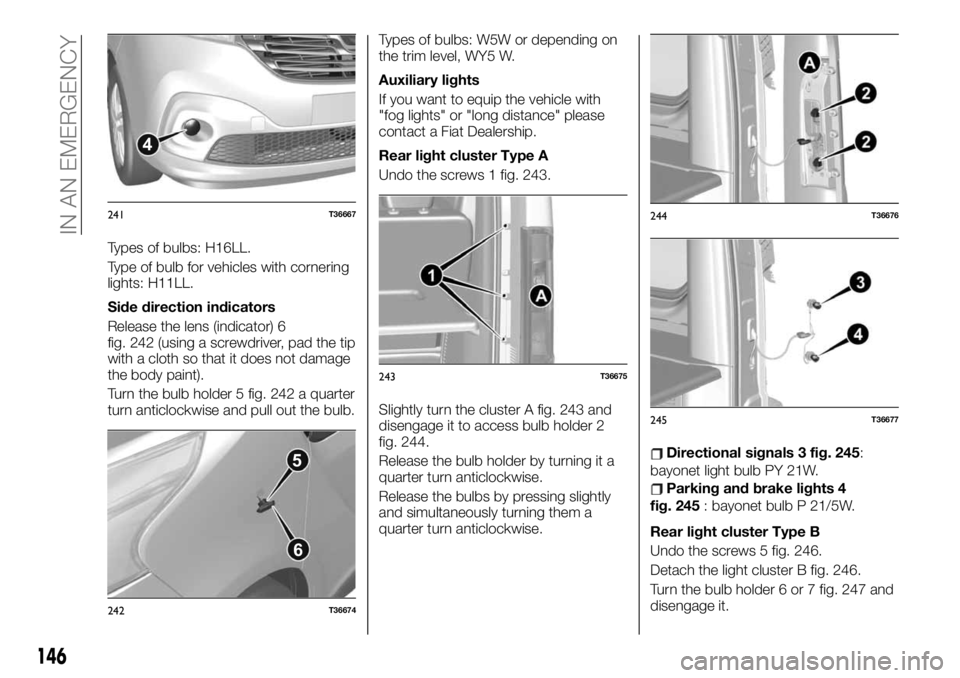
Types of bulbs: H16LL.
Type of bulb for vehicles with cornering
lights: H11LL.
Side direction indicators
Release the lens (indicator) 6
fig. 242 (using a screwdriver, pad the tip
with a cloth so that it does not damage
the body paint).
Turn the bulb holder 5 fig. 242 a quarter
turn anticlockwise and pull out the bulb.Types of bulbs: W5W or depending on
the trim level, WY5 W.
Auxiliary lights
If you want to equip the vehicle with
"fog lights" or "long distance" please
contact a Fiat Dealership.
Rear light cluster Type A
Undo the screws 1 fig. 243.
Slightly turn the cluster A fig. 243 and
disengage it to access bulb holder 2
fig. 244.
Release the bulb holder by turning it a
quarter turn anticlockwise.
Release the bulbs by pressing slightly
and simultaneously turning them a
quarter turn anticlockwise.
Directional signals 3 fig. 245:
bayonet light bulb PY 21W.
Parking and brake lights 4
fig. 245: bayonet bulb P 21/5W.
Rear light cluster Type B
Undo the screws 5 fig. 246.
Detach the light cluster B fig. 246.
Turn the bulb holder 6 or 7 fig. 247 and
disengage it.
4
241T36667
5
6
242T36674
243T36675
244T36676
245T36677
146
IN AN EMERGENCY