buttons FIAT TALENTO 2020 Owner handbook (in English)
[x] Cancel search | Manufacturer: FIAT, Model Year: 2020, Model line: TALENTO, Model: FIAT TALENTO 2020Pages: 236, PDF Size: 4.86 MB
Page 15 of 236
THE KEYS
KEY WITH REMOTE
CONTROL
1)
Radio frequency remote control
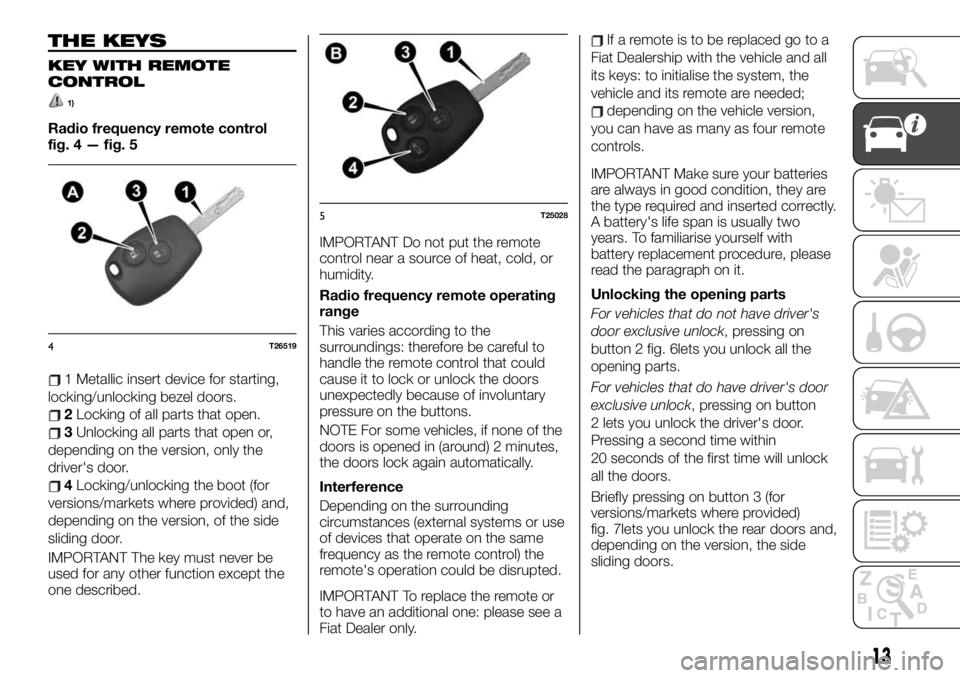
fig. 4 — fig. 5
1 Metallic insert device for starting,
locking/unlocking bezel doors.
2Locking of all parts that open.
3Unlocking all parts that open or,
depending on the version, only the
driver's door.
4Locking/unlocking the boot (for
versions/markets where provided) and,
depending on the version, of the side
sliding door.
IMPORTANT The key must never be
used for any other function except the
one described.IMPORTANT Do not put the remote
control near a source of heat, cold, or
humidity.
Radio frequency remote operating
range
This varies according to the
surroundings: therefore be careful to
handle the remote control that could
cause it to lock or unlock the doors
unexpectedly because of involuntary
pressure on the buttons.
NOTE For some vehicles, if none of the
doors is opened in (around) 2 minutes,
the doors lock again automatically.
Interference
Depending on the surrounding
circumstances (external systems or use
of devices that operate on the same
frequency as the remote control) the
remote's operation could be disrupted.
IMPORTANT To replace the remote or
to have an additional one: please see a
Fiat Dealer only.
If a remote is to be replaced go to a
Fiat Dealership with the vehicle and all
its keys: to initialise the system, the
vehicle and its remote are needed;
depending on the vehicle version,
you can have as many as four remote
controls.
IMPORTANT Make sure your batteries
are always in good condition, they are
the type required and inserted correctly.
A battery's life span is usually two
years. To familiarise yourself with
battery replacement procedure, please
read the paragraph on it.
Unlocking the opening parts
For vehicles that do not have driver's
door exclusive unlock, pressing on
button 2 fig. 6lets you unlock all the
opening parts.
For vehicles that do have driver's door
exclusive unlock, pressing on button
2 lets you unlock the driver's door.
Pressing a second time within
20 seconds of the first time will unlock
all the doors.
Briefly pressing on button 3 (for
versions/markets where provided)
fig. 7lets you unlock the rear doors and,
depending on the version, the side
sliding doors.
4T26519
5T25028
13
Page 17 of 236
Replacing the remote control
battery
1)
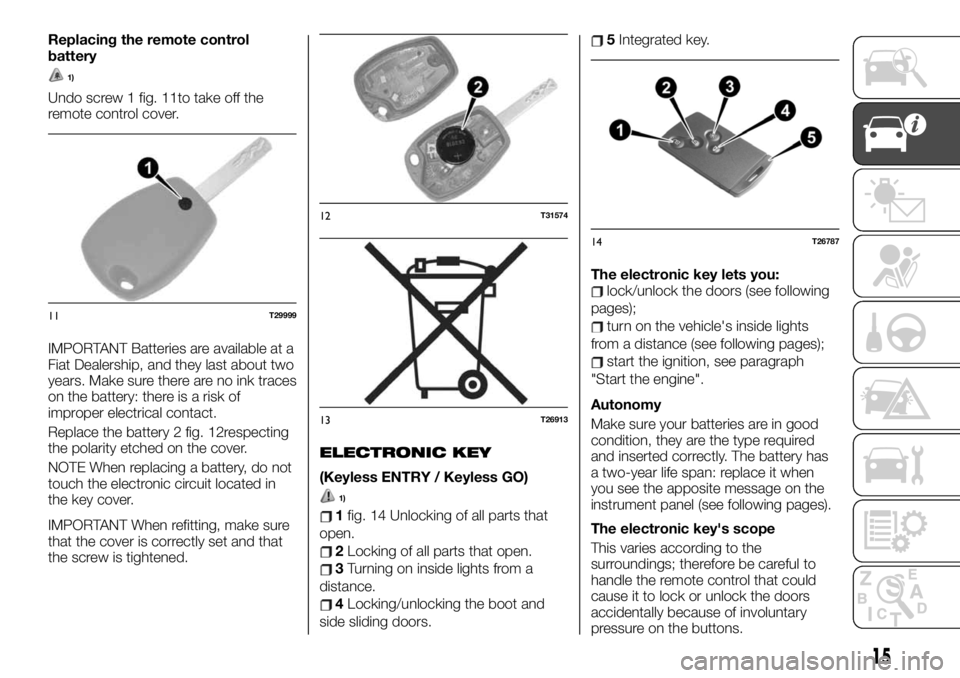
Undo screw 1 fig. 11to take off the
remote control cover.
IMPORTANT Batteries are available at a
Fiat Dealership, and they last about two
years. Make sure there are no ink traces
on the battery: there is a risk of
improper electrical contact.
Replace the battery 2 fig. 12respecting
the polarity etched on the cover.
NOTE When replacing a battery, do not
touch the electronic circuit located in
the key cover.
IMPORTANT When refitting, make sure
that the cover is correctly set and that
the screw is tightened.
ELECTRONIC KEY
(Keyless ENTRY / Keyless GO)
1)
1fig. 14 Unlocking of all parts that
open.
2Locking of all parts that open.
3Turning on inside lights from a
distance.
4Locking/unlocking the boot and
side sliding doors.
5Integrated key.
The electronic key lets you:
lock/unlock the doors (see following
pages);
turn on the vehicle's inside lights
from a distance (see following pages);
start the ignition, see paragraph
"Start the engine".
Autonomy
Make sure your batteries are in good
condition, they are the type required
and inserted correctly. The battery has
a two-year life span: replace it when
you see the apposite message on the
instrument panel (see following pages).
The electronic key's scope
This varies according to the
surroundings; therefore be careful to
handle the remote control that could
cause it to lock or unlock the doors
accidentally because of involuntary
pressure on the buttons.
11T29999
12T31574
13T26913
14T26787
15
Page 19 of 236
The danger warning lights will flash to
let you know the vehicle's status:
two flashes indicate that the vehicle
is locked;
one flash means the vehicle is
unlocked.Details relative to locking the
vehicle
When closing, if a door is open or
not properly closed, a rapid vehicle
lock/unlock without emergency lights
flashing will occur;
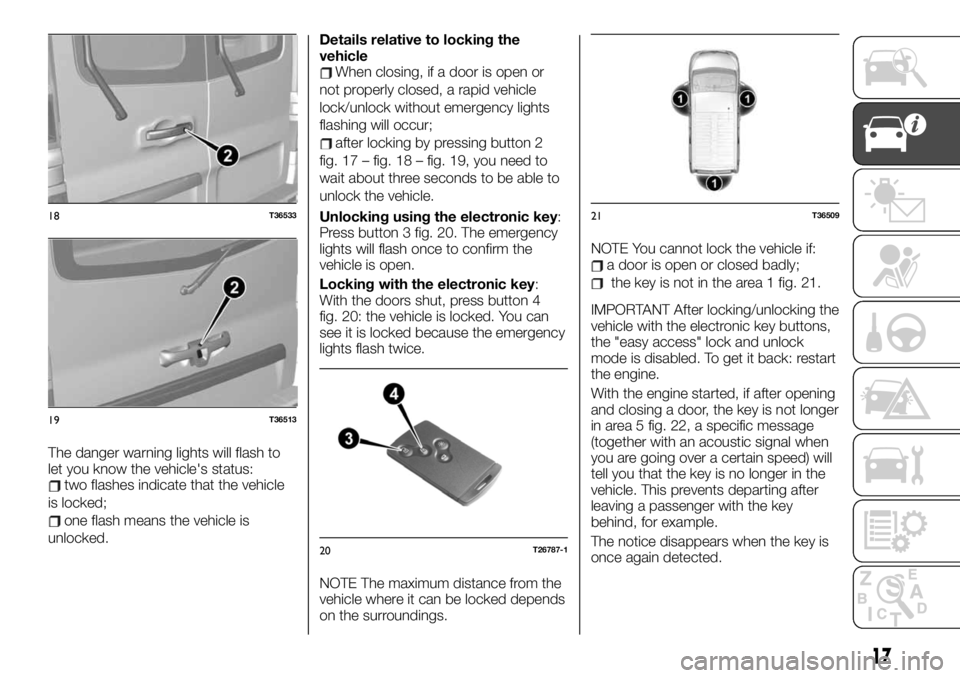
after locking by pressing button 2
fig. 17 – fig. 18 – fig. 19, you need to
wait about three seconds to be able to
unlock the vehicle.
Unlocking using the electronic key:
Press button 3 fig. 20. The emergency
lights will flash once to confirm the
vehicle is open.
Locking with the electronic key:
With the doors shut, press button 4
fig. 20: the vehicle is locked. You can
see it is locked because the emergency
lights flash twice.
NOTE The maximum distance from the
vehicle where it can be locked depends
on the surroundings.NOTE You cannot lock the vehicle if:
a door is open or closed badly;
the key is not in the area 1 fig. 21.
IMPORTANT After locking/unlocking the
vehicle with the electronic key buttons,
the "easy access" lock and unlock
mode is disabled. To get it back: restart
the engine.
With the engine started, if after opening
and closing a door, the key is not longer
in area 5 fig. 22, a specific message
(together with an acoustic signal when
you are going over a certain speed) will
tell you that the key is no longer in the
vehicle. This prevents departing after
leaving a passenger with the key
behind, for example.
The notice disappears when the key is
once again detected.
18T36533
19T36513
20T26787-1
21T36509
17
Page 20 of 236
"Remote lighting" function
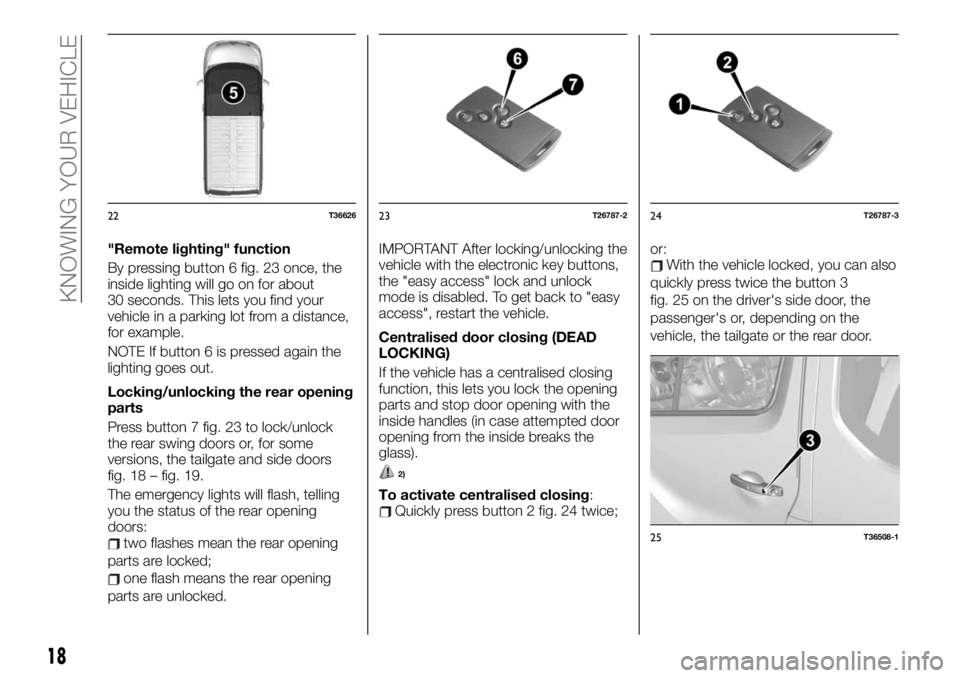
By pressing button 6 fig. 23 once, the
inside lighting will go on for about
30 seconds. This lets you find your
vehicle in a parking lot from a distance,
for example.
NOTE If button 6 is pressed again the
lighting goes out.
Locking/unlocking the rear opening
parts
Press button 7 fig. 23 to lock/unlock
the rear swing doors or, for some
versions, the tailgate and side doors
fig. 18 – fig. 19.
The emergency lights will flash, telling
you the status of the rear opening
doors:
two flashes mean the rear opening
parts are locked;
one flash means the rear opening
parts are unlocked.IMPORTANT After locking/unlocking the
vehicle with the electronic key buttons,
the "easy access" lock and unlock
mode is disabled. To get back to "easy
access", restart the vehicle.
Centralised door closing (DEAD
LOCKING)
If the vehicle has a centralised closing
function, this lets you lock the opening
parts and stop door opening with the
inside handles (in case attempted door
opening from the inside breaks the
glass).
2)
To activate centralised closing:Quickly press button 2 fig. 24 twice;or:
With the vehicle locked, you can also
quickly press twice the button 3
fig. 25 on the driver's side door, the
passenger's or, depending on the
vehicle, the tailgate or the rear door.
22T3662623T26787-224T26787-3
25T36508-1
18
KNOWING YOUR VEHICLE
Page 21 of 236
In both cases, the emergency lights will
flash five times to indicate the door is
locked.
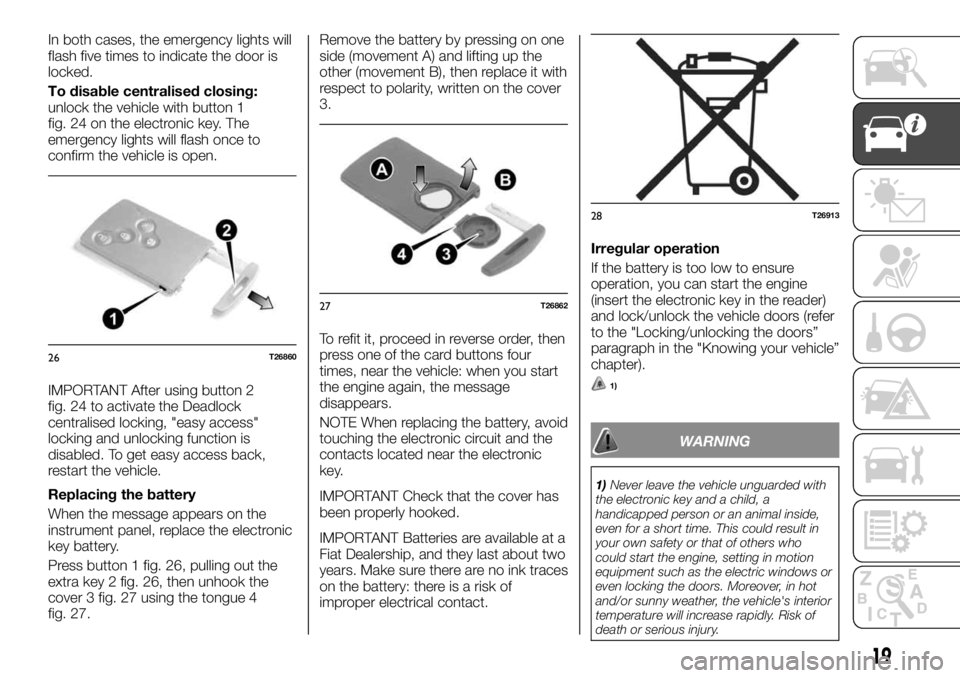
To disable centralised closing:
unlock the vehicle with button 1
fig. 24 on the electronic key. The
emergency lights will flash once to
confirm the vehicle is open.
IMPORTANT After using button 2
fig. 24 to activate the Deadlock
centralised locking, "easy access"
locking and unlocking function is
disabled. To get easy access back,
restart the vehicle.
Replacing the battery
When the message appears on the
instrument panel, replace the electronic
key battery.
Press button 1 fig. 26, pulling out the
extra key 2 fig. 26, then unhook the
cover 3 fig. 27 using the tongue 4
fig. 27.Remove the battery by pressing on one
side (movement A) and lifting up the
other (movement B), then replace it with
respect to polarity, written on the cover
3.
To refit it, proceed in reverse order, then
press one of the card buttons four
times, near the vehicle: when you start
the engine again, the message
disappears.
NOTE When replacing the battery, avoid
touching the electronic circuit and the
contacts located near the electronic
key.
IMPORTANT Check that the cover has
been properly hooked.
IMPORTANT Batteries are available at a
Fiat Dealership, and they last about two
years. Make sure there are no ink traces
on the battery: there is a risk of
improper electrical contact.Irregular operation
If the battery is too low to ensure
operation, you can start the engine
(insert the electronic key in the reader)
and lock/unlock the vehicle doors (refer
to the "Locking/unlocking the doors”
paragraph in the "Knowing your vehicle”
chapter).
1)
WARNING
1)Never leave the vehicle unguarded with
the electronic key and a child, a
handicapped person or an animal inside,
even for a short time. This could result in
your own safety or that of others who
could start the engine, setting in motion
equipment such as the electric windows or
even locking the doors. Moreover, in hot
and/or sunny weather, the vehicle's interior
temperature will increase rapidly. Risk of
death or serious injury.
26T26860
27T26862
28T26913
19
Page 26 of 236
Locking the openable parts without
using the key or electronic key
If, for example, a battery is dead, the
electronic key or the remote control key
is momentarily not working, etc.
Proceed as follows:
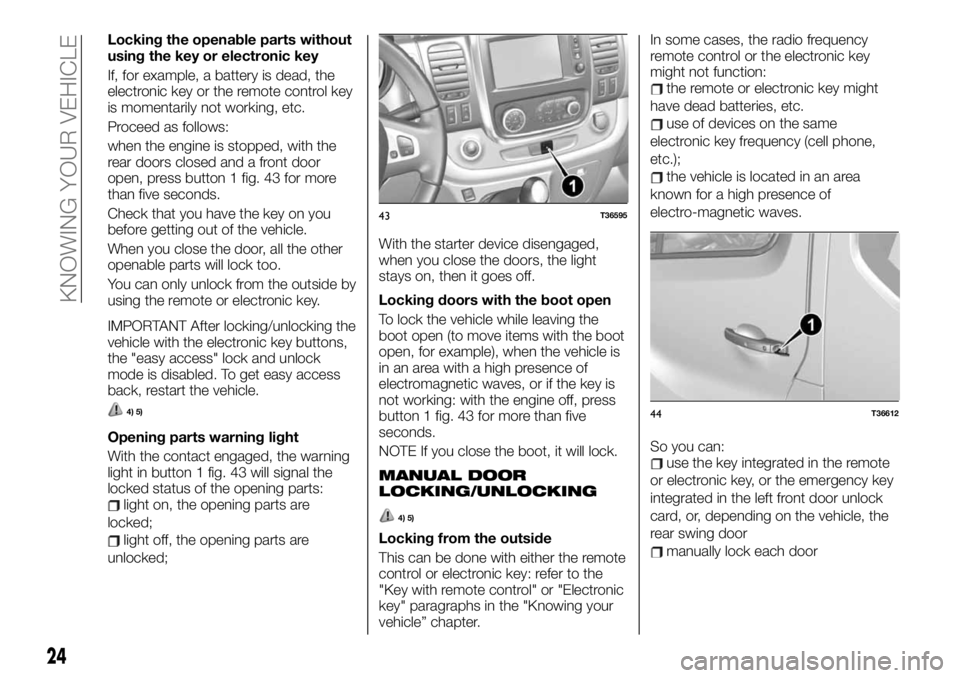
when the engine is stopped, with the
rear doors closed and a front door
open, press button 1 fig. 43 for more
than five seconds.
Check that you have the key on you
before getting out of the vehicle.
When you close the door, all the other
openable parts will lock too.
You can only unlock from the outside by
using the remote or electronic key.
IMPORTANT After locking/unlocking the
vehicle with the electronic key buttons,
the "easy access" lock and unlock
mode is disabled. To get easy access
back, restart the vehicle.
4) 5)
Opening parts warning light
With the contact engaged, the warning
light in button 1 fig. 43 will signal the
locked status of the opening parts:
light on, the opening parts are
locked;
light off, the opening parts are
unlocked;With the starter device disengaged,
when you close the doors, the light
stays on, then it goes off.
Locking doors with the boot open
To lock the vehicle while leaving the
boot open (to move items with the boot
open, for example), when the vehicle is
in an area with a high presence of
electromagnetic waves, or if the key is
not working: with the engine off, press
button 1 fig. 43 for more than five
seconds.
NOTE If you close the boot, it will lock.
MANUAL DOOR
LOCKING/UNLOCKING
4) 5)
Locking from the outside
This can be done with either the remote
control or electronic key: refer to the
"Key with remote control" or "Electronic
key" paragraphs in the "Knowing your
vehicle” chapter.In some cases, the radio frequency
remote control or the electronic key
might not function:
the remote or electronic key might
have dead batteries, etc.
use of devices on the same
electronic key frequency (cell phone,
etc.);
the vehicle is located in an area
known for a high presence of
electro-magnetic waves.
So you can:
use the key integrated in the remote
or electronic key, or the emergency key
integrated in the left front door unlock
card, or, depending on the vehicle, the
rear swing door
manually lock each door
43T36595
44T36612
24
KNOWING YOUR VEHICLE
Page 40 of 236
INTERIOR LIGHTS
CEILING LIGHTS
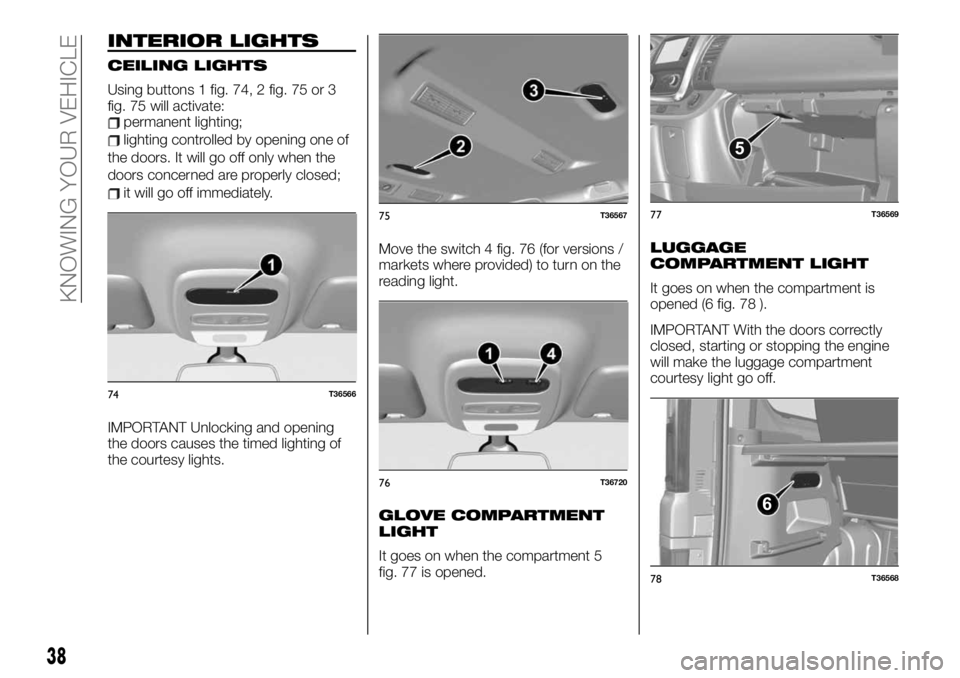
Using buttons 1 fig. 74, 2 fig. 75 or 3
fig. 75 will activate:
permanent lighting;
lighting controlled by opening one of
the doors. It will go off only when the
doors concerned are properly closed;
it will go off immediately.
IMPORTANT Unlocking and opening
the doors causes the timed lighting of
the courtesy lights.Move the switch 4 fig. 76 (for versions /
markets where provided) to turn on the
reading light.
GLOVE COMPARTMENT
LIGHT
It goes on when the compartment 5
fig. 77 is opened.
LUGGAGE
COMPARTMENT LIGHT
It goes on when the compartment is
opened (6 fig. 78 ).
IMPORTANT With the doors correctly
closed, starting or stopping the engine
will make the luggage compartment
courtesy light go off.
74T36566
75T36567
76T36720
5
77T36569
6
78T36568
38
KNOWING YOUR VEHICLE
Page 54 of 236
AUTOMATIC AIR CONDITIONING
54) 55)
2)
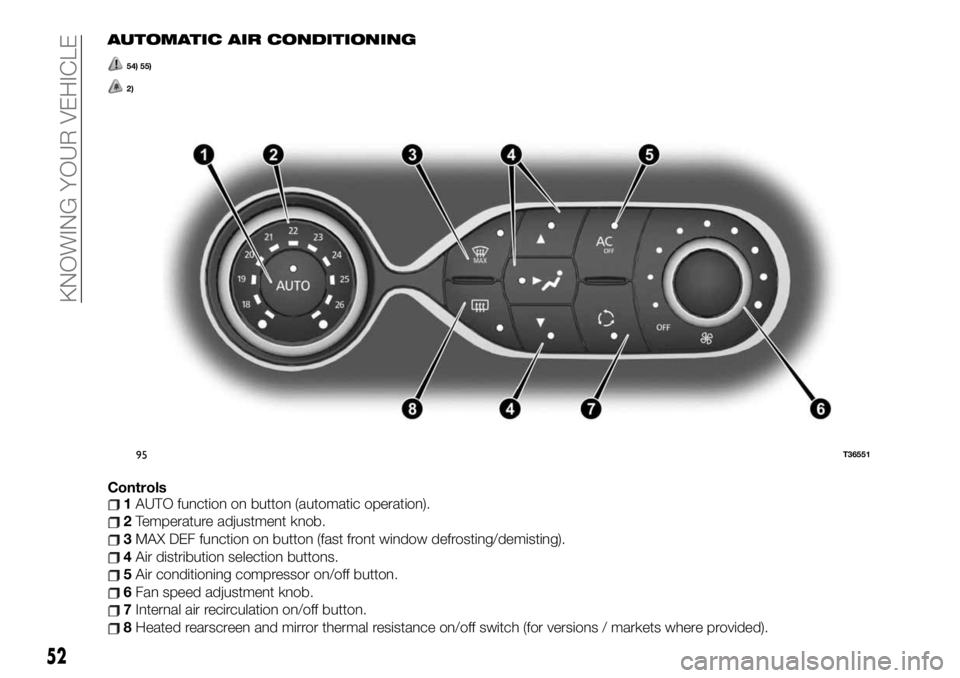
Controls1AUTO function on button (automatic operation).
2Temperature adjustment knob.
3MAX DEF function on button (fast front window defrosting/demisting).
4Air distribution selection buttons.
5Air conditioning compressor on/off button.
6Fan speed adjustment knob.
7Internal air recirculation on/off button.
8Heated rearscreen and mirror thermal resistance on/off switch (for versions / markets where provided).
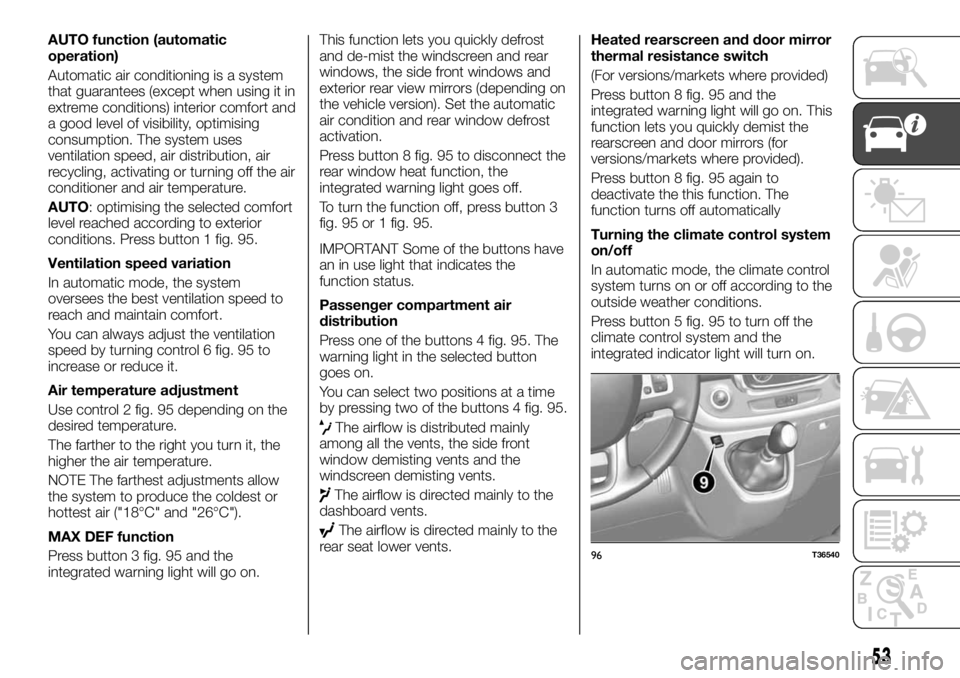
95T36551
52
KNOWING YOUR VEHICLE
Page 55 of 236
AUTO function (automatic
operation)
Automatic air conditioning is a system
that guarantees (except when using it in
extreme conditions) interior comfort and
a good level of visibility, optimising
consumption. The system uses
ventilation speed, air distribution, air
recycling, activating or turning off the air
conditioner and air temperature.
AUTO: optimising the selected comfort
level reached according to exterior
conditions. Press button 1 fig. 95.
Ventilation speed variation
In automatic mode, the system
oversees the best ventilation speed to
reach and maintain comfort.
You can always adjust the ventilation
speed by turning control 6 fig. 95 to
increase or reduce it.
Air temperature adjustment
Use control 2 fig. 95 depending on the
desired temperature.
The farther to the right you turn it, the
higher the air temperature.
NOTE The farthest adjustments allow
the system to produce the coldest or
hottest air ("18°C" and "26°C").
MAX DEF function
Press button 3 fig. 95 and the
integrated warning light will go on.This function lets you quickly defrost
and de-mist the windscreen and rear
windows, the side front windows and
exterior rear view mirrors (depending on
the vehicle version). Set the automatic
air condition and rear window defrost
activation.
Press button 8 fig. 95 to disconnect the
rear window heat function, the
integrated warning light goes off.
To turn the function off, press button 3
fig. 95 or 1 fig. 95.
IMPORTANT Some of the buttons have
an in use light that indicates the
function status.
Passenger compartment air
distribution
Press one of the buttons 4 fig. 95. The
warning light in the selected button
goes on.
You can select two positions at a time
by pressing two of the buttons 4 fig. 95.
The airflow is distributed mainly
among all the vents, the side front
window demisting vents and the
windscreen demisting vents.
The airflow is directed mainly to the
dashboard vents.
The airflow is directed mainly to the
rear seat lower vents.Heated rearscreen and door mirror
thermal resistance switch
(For versions/markets where provided)
Press button 8 fig. 95 and the
integrated warning light will go on. This
function lets you quickly demist the
rearscreen and door mirrors (for
versions/markets where provided).
Press button 8 fig. 95 again to
deactivate the this function. The
function turns off automatically
Turning the climate control system
on/off
In automatic mode, the climate control
system turns on or off according to the
outside weather conditions.
Press button 5 fig. 95 to turn off the
climate control system and the
integrated indicator light will turn on.
96T36540
53
Page 89 of 236
CONTROL PANEL
AND ON-BOARD
INSTRUMENTS
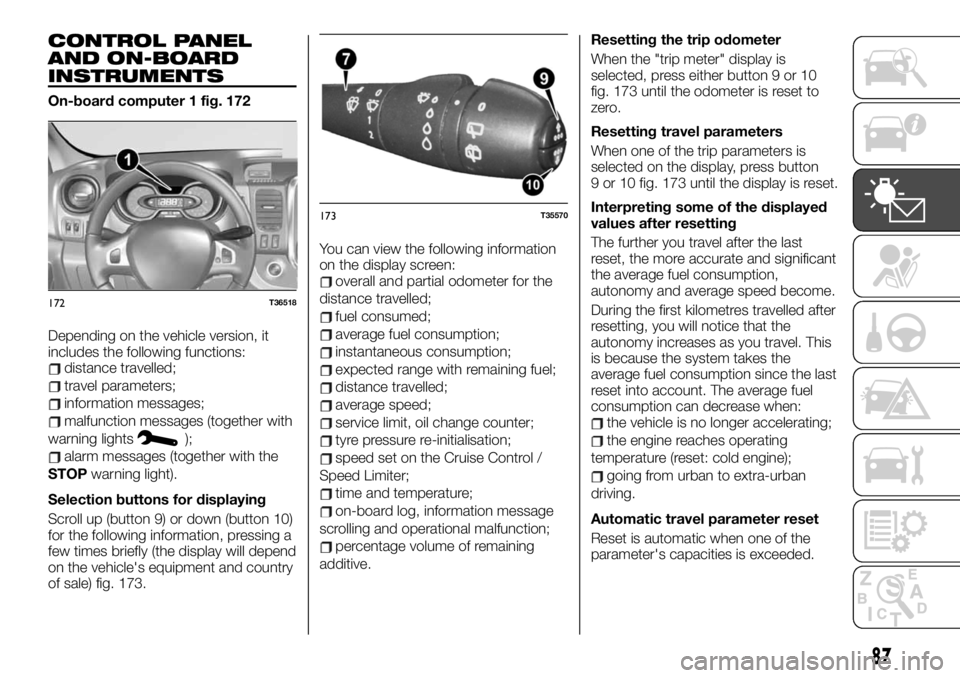
On-board computer 1 fig. 172
Depending on the vehicle version, it
includes the following functions:
distance travelled;
travel parameters;
information messages;
malfunction messages (together with
warning lights
);
alarm messages (together with the
STOPwarning light).
Selection buttons for displaying
Scroll up (button 9) or down (button 10)
for the following information, pressing a
few times briefly (the display will depend
on the vehicle's equipment and country
of sale) fig. 173.You can view the following information
on the display screen:
overall and partial odometer for the
distance travelled;
fuel consumed;
average fuel consumption;
instantaneous consumption;
expected range with remaining fuel;
distance travelled;
average speed;
service limit, oil change counter;
tyre pressure re-initialisation;
speed set on the Cruise Control /
Speed Limiter;
time and temperature;
on-board log, information message
scrolling and operational malfunction;
percentage volume of remaining
additive.Resetting the trip odometer
When the "trip meter" display is
selected, press either button 9 or 10
fig. 173 until the odometer is reset to
zero.
Resetting travel parameters
When one of the trip parameters is
selected on the display, press button
9 or 10 fig. 173 until the display is reset.
Interpreting some of the displayed
values after resetting
The further you travel after the last
reset, the more accurate and significant
the average fuel consumption,
autonomy and average speed become.
During the first kilometres travelled after
resetting, you will notice that the
autonomy increases as you travel. This
is because the system takes the
average fuel consumption since the last
reset into account. The average fuel
consumption can decrease when:
the vehicle is no longer accelerating;
the engine reaches operating
temperature (reset: cold engine);
going from urban to extra-urban
driving.
Automatic travel parameter reset
Reset is automatic when one of the
parameter's capacities is exceeded.
172T36518
173T35570
87