clock FIAT TALENTO 2020 Owner handbook (in English)
[x] Cancel search | Manufacturer: FIAT, Model Year: 2020, Model line: TALENTO, Model: FIAT TALENTO 2020Pages: 236, PDF Size: 4.86 MB
Page 24 of 236
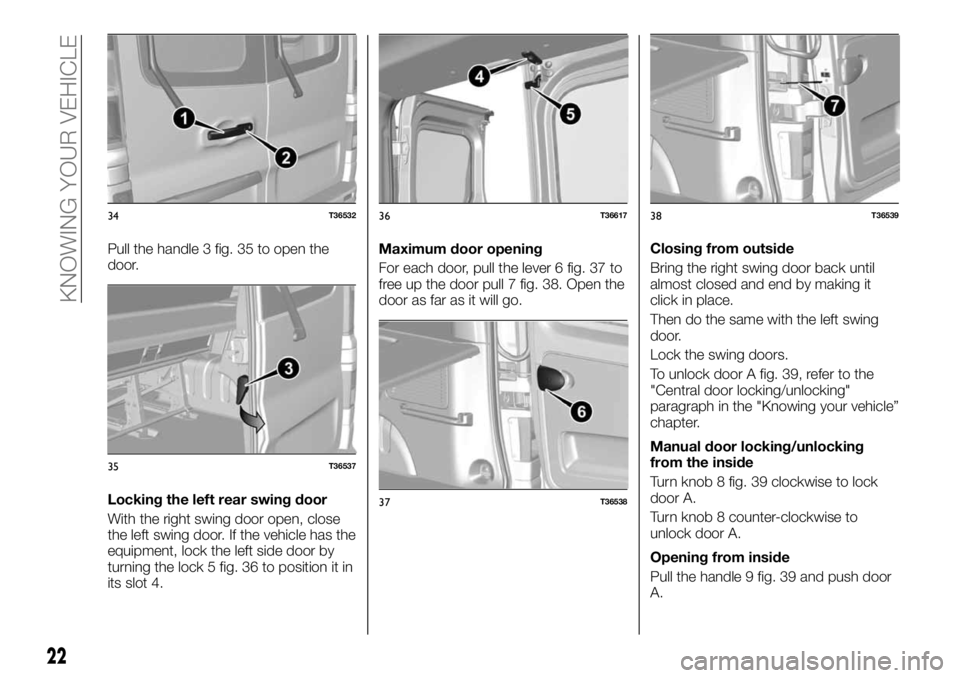
Pull the handle 3 fig. 35 to open the
door.
Locking the left rear swing door
With the right swing door open, close
the left swing door. If the vehicle has the
equipment, lock the left side door by
turning the lock 5 fig. 36 to position it in
its slot 4.Maximum door opening
For each door, pull the lever 6 fig. 37 to
free up the door pull 7 fig. 38. Open the
door as far as it will go.Closing from outside
Bring the right swing door back until
almost closed and end by making it
click in place.
Then do the same with the left swing
door.
Lock the swing doors.
To unlock door A fig. 39, refer to the
"Central door locking/unlocking"
paragraph in the "Knowing your vehicle”
chapter.
Manual door locking/unlocking
from the inside
Turn knob 8 fig. 39 clockwise to lock
door A.
Turn knob 8 counter-clockwise to
unlock door A.
Opening from inside
Pull the handle 9 fig. 39 and push door
A.
34T36532
35T36537
36T36617
37T36538
38T36539
22
KNOWING YOUR VEHICLE
Page 80 of 236
To go back to the preceding mode,
repeat the same operation.
NOTE After disconnecting the battery,
the on-board computer automatically
returns to the original unit of measure.
Time and outside temperature
Display A (depending on the vehicle
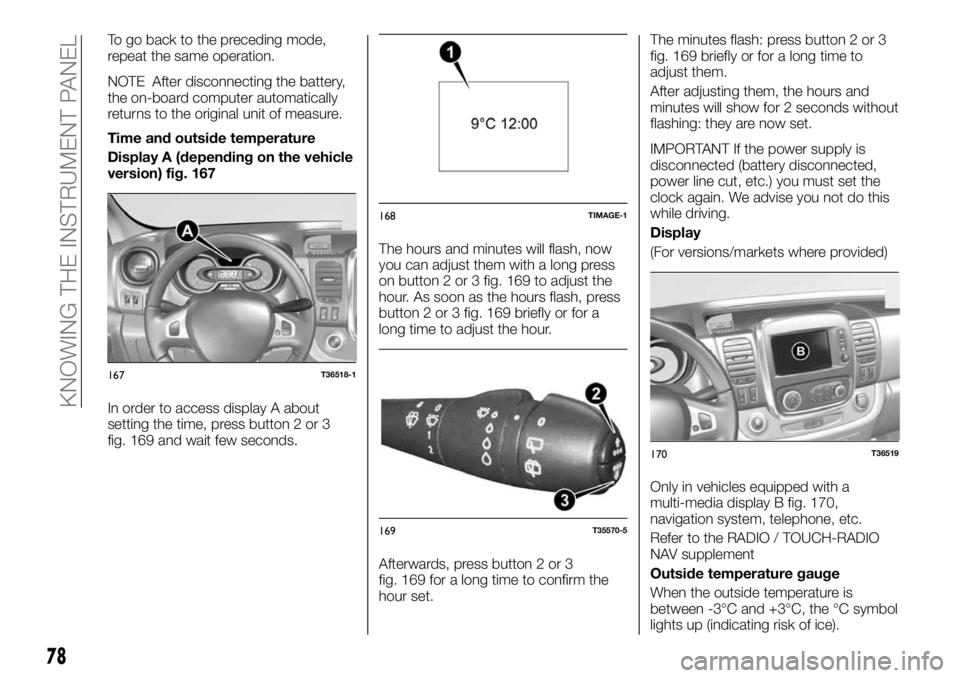
version) fig. 167
In order to access display A about
setting the time, press button 2 or 3
fig. 169 and wait few seconds.The hours and minutes will flash, now
you can adjust them with a long press
on button 2 or 3 fig. 169 to adjust the
hour. As soon as the hours flash, press
button 2 or 3 fig. 169 briefly or for a
long time to adjust the hour.
Afterwards, press button 2 or 3
fig. 169 for a long time to confirm the
hour set.The minutes flash: press button 2 or 3
fig. 169 briefly or for a long time to
adjust them.
After adjusting them, the hours and
minutes will show for 2 seconds without
flashing: they are now set.
IMPORTANT If the power supply is
disconnected (battery disconnected,
power line cut, etc.) you must set the
clock again. We advise you not do this
while driving.
Display
(For versions/markets where provided)
Only in vehicles equipped with a
multi-media display B fig. 170,
navigation system, telephone, etc.
Refer to the RADIO / TOUCH-RADIO
NAV supplement
Outside temperature gauge
When the outside temperature is
between -3°C and +3°C, the °C symbol
lights up (indicating risk of ice).
167T36518-1
168TIMAGE-1
169T35570-5
170T36519
78
KNOWING THE INSTRUMENT PANEL
Page 147 of 236
REPLACING AN
EXTERNAL BULB
167) 168) 169) 170) 171)
30)
LED daytime running lights (1
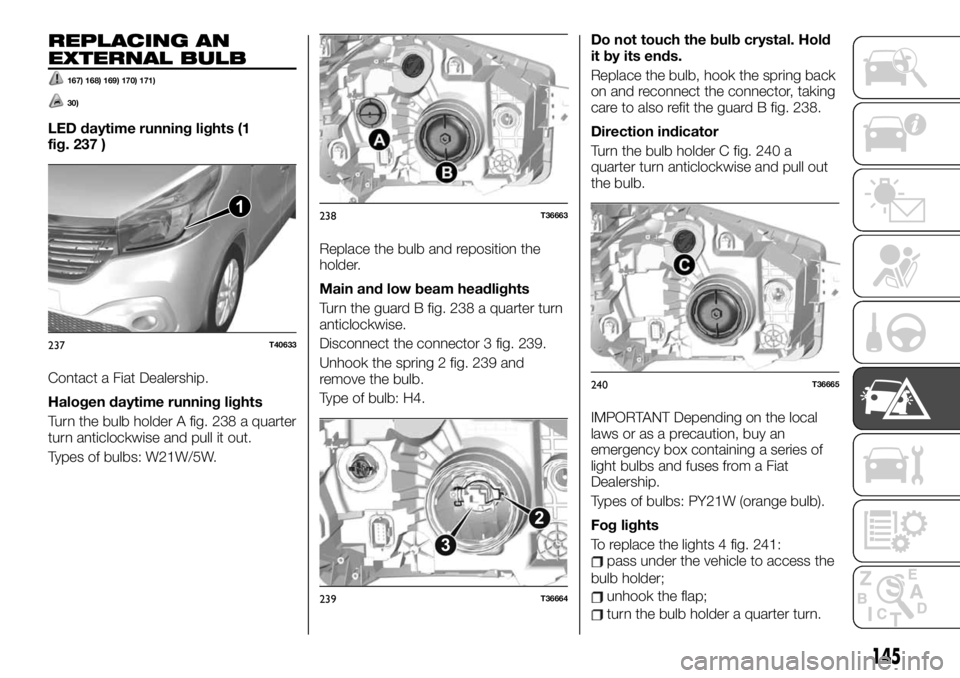
fig. 237 )
Contact a Fiat Dealership.
Halogen daytime running lights
Turn the bulb holder A fig. 238 a quarter
turn anticlockwise and pull it out.
Types of bulbs: W21W/5W.Replace the bulb and reposition the
holder.
Main and low beam headlights
Turn the guard B fig. 238 a quarter turn
anticlockwise.
Disconnect the connector 3 fig. 239.
Unhook the spring 2 fig. 239 and
remove the bulb.
Type of bulb: H4.Do not touch the bulb crystal. Hold
it by its ends.
Replace the bulb, hook the spring back
on and reconnect the connector, taking
care to also refit the guard B fig. 238.
Direction indicator
Turn the bulb holder C fig. 240 a
quarter turn anticlockwise and pull out
the bulb.
IMPORTANT Depending on the local
laws or as a precaution, buy an
emergency box containing a series of
light bulbs and fuses from a Fiat
Dealership.
Types of bulbs: PY21W (orange bulb).
Fog lights
To replace the lights 4 fig. 241:
pass under the vehicle to access the
bulb holder;
unhook the flap;
turn the bulb holder a quarter turn.
1
237T40633
238T36663
2
3
239T36664
240T36665
145
Page 148 of 236
Types of bulbs: H16LL.
Type of bulb for vehicles with cornering
lights: H11LL.
Side direction indicators
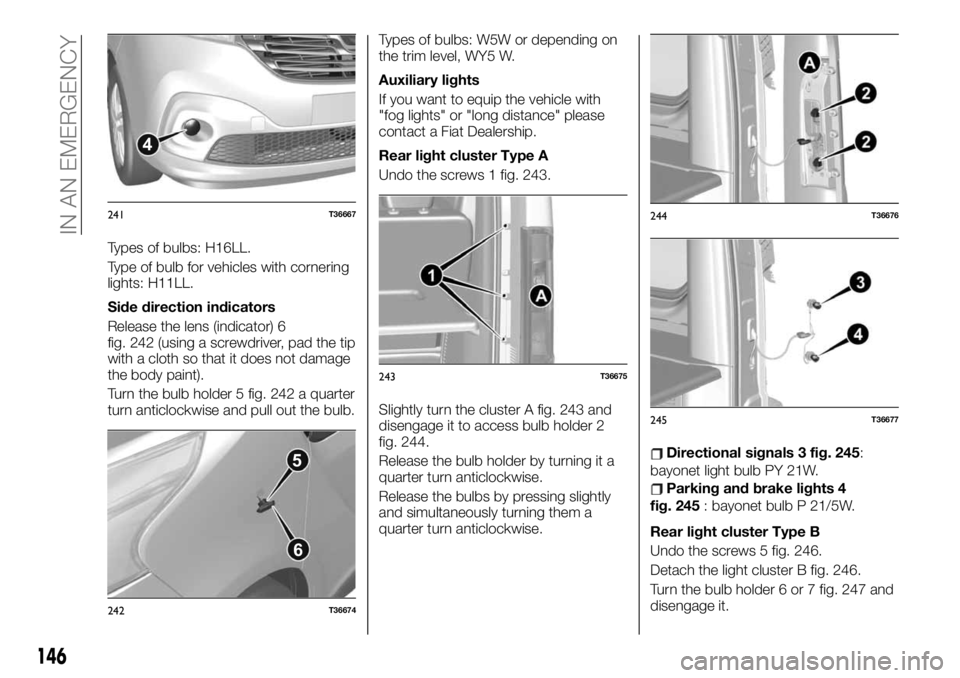
Release the lens (indicator) 6
fig. 242 (using a screwdriver, pad the tip
with a cloth so that it does not damage
the body paint).
Turn the bulb holder 5 fig. 242 a quarter
turn anticlockwise and pull out the bulb.Types of bulbs: W5W or depending on
the trim level, WY5 W.
Auxiliary lights
If you want to equip the vehicle with
"fog lights" or "long distance" please
contact a Fiat Dealership.
Rear light cluster Type A
Undo the screws 1 fig. 243.
Slightly turn the cluster A fig. 243 and
disengage it to access bulb holder 2
fig. 244.
Release the bulb holder by turning it a
quarter turn anticlockwise.
Release the bulbs by pressing slightly
and simultaneously turning them a
quarter turn anticlockwise.
Directional signals 3 fig. 245:
bayonet light bulb PY 21W.
Parking and brake lights 4
fig. 245: bayonet bulb P 21/5W.
Rear light cluster Type B
Undo the screws 5 fig. 246.
Detach the light cluster B fig. 246.
Turn the bulb holder 6 or 7 fig. 247 and
disengage it.
4
241T36667
5
6
242T36674
243T36675
244T36676
245T36677
146
IN AN EMERGENCY
Page 181 of 236
wash the vehicle with high pressure
cleaners;
apply stickers to the painted surfaces
(they might leave traces).
What to do
Wash the vehicle by hand, with lots of
water, using a soft cloth or sponge.
Going through an automatic car
wash
Bring the windscreen wiper to the stop
position (refer to the "Windscreen /
Rearscreen wiper” paragraph in the
"Getting to know your vehicle” chapter).
Check that external equipment is fixed
properly (additional lamps, rearview
mirrors) and remove the radio aerial (for
versions/markets where provided).
Headlight cleaning
Since the headlights are equipped with
plastic materials, use a soft cloth or
cotton pad. If this is not sufficient, wet it
slightly with soapy water, then rinse with
a soft cloth or cotton. Finish by drying
delicately with a soft, dry cloth. Do not
use alcohol based detergents or tools
(e.g. a scraper).
Windows
(e.g.: the instrument panel, clock,
outside temperature display panel,
radio display panel, multi-media or
multi-function display panel, etc.)Use a soft, cotton cloth. If this is not
sufficient, use a soft cloth (or a cotton
pad) slightly wetted with soapy water,
then rinse with a soft cloth or wet
cotton.
Finish by drying delicately with a soft,
dry cloth.
Do not use alcohol-based products
and/or atomisers on the area.
WARNING
225)In order to preserve the aesthetic
appearance of the paint, abrasive products
and/or polishes should not be used for
cleaning the vehicle.
226)Avoid washing with rollers and/or
brushes in washing stations. Wash the
vehicle only by hand using neutral pH
detergents; dry it with a dampened
chamois leather. Abrasive products and/or
polishes should not be used for cleaning
the vehicle. Bird droppings must be
washed off immediately and thoroughly as
the acid they contain is particularly
aggressive. Avoid (if at all possible) parking
the vehicle under trees; remove vegetable
resins immediately as, when dried, it may
only be possible to remove them with
abrasive products and/or polishes, which is
highly inadvisable as they could alter the
typical opaqueness of the paint. Do not
use pure windscreen washer fluid for
cleaning the front windscreen and rear
window; dilute it min. 50% with water. Only
use pure screen washer fluid when strictly
necessary due to outside temperature
conditions.
IMPORTANT
7)Detergents pollute the environment. The
vehicle should be washed in areas
equipped for collecting and purifying the
liquid used in the washing process.
179
Page 182 of 236
INTERIOR
227) 228) 229)
62) 63)
If it undergoes correct service, the
vehicle can last longer. Therefore, we
advise you to regularly see to servicing
the interior of your vehicle.
Every spot must be seen to promptly.
Whatever caused the stain, use cold,
soapy water (possibly warm) based on
mild soap.
Detergents are prohibited (liquid
detergent for dishes, powdered
detergent, alcohol-based products).
Use a soft cloth.
Rinse and blot the excess water.
Instrument glass
(For example: instrument panel, clock,
outside temperature display panel,
radio display panel etc.)
Using a soft, cotton cloth. If this is not
sufficient, use a soft cloth (or a cotton
pad) slightly wetted with soapy water,
then rinse with a soft cloth or wet
cotton.
Finish by drying delicately with a soft,
dry cloth.
Do not use alcohol-based products
and/or liquid sprays on the area.Seat belts
They should be kept clean.
Use products selected by Fiat services
or soap and warm water, rubbing with a
sponge and drying with a dry cloth.
Do not use detergents or chemical
products.
Fabric (seats, door upholstery, etc.)
Dust the fabric regularly.
Liquid spots
Use soapy water.
Blot lightly (without rubbing) with a soft
cloth, then rinse and remove residual
liquid.
Solid or pasty spots
Immediately and delicately remove the
excess solid or pasty material with a
spatula (working from the edges to the
middle, keeping the spot from growing).
Clean as indicated for liquid spots.
Special procedure for candy,
chewing gum
Apply an ice cube to crystallise it, then
proceed as indicated for solid spots.
IMPORTANT For any interior service
advice or in case of unsatisfactory
results, see a Fiat Dealership.Dismounting/remounting
removable equipment original to
the vehicle
If you need to remove original
equipment from the passenger
compartment (for example, mats) in
order to clean it, be sure to replace
them carefully on the correct side (the
driver's mat goes on the driver's side)
and fasten them using the components
supplied with them (for example, the
driver's mat must be held in place with
the standard fastening elements).
In any case, when the vehicle is
stopped, make sure nothing can
interfere with driving (obstacle impeding
use of the pedals: a heel that catches
on the mat, etc.).
What not to do
Placing objects where the diffusers are,
such as deodorants, air fresheners,
etc., which could damage the
dashboard trim.
Use a high-powered or spray cleaner
inside the passenger compartment:
without the necessary precautions, you
could damage the electrical or
electronic components in the vehicle.
180
SERVICING AND CARE