tailgate FIAT TALENTO 2021 Owner handbook (in English)
[x] Cancel search | Manufacturer: FIAT, Model Year: 2021, Model line: TALENTO, Model: FIAT TALENTO 2021Pages: 236, PDF Size: 4.86 MB
Page 18 of 236
Integrated key
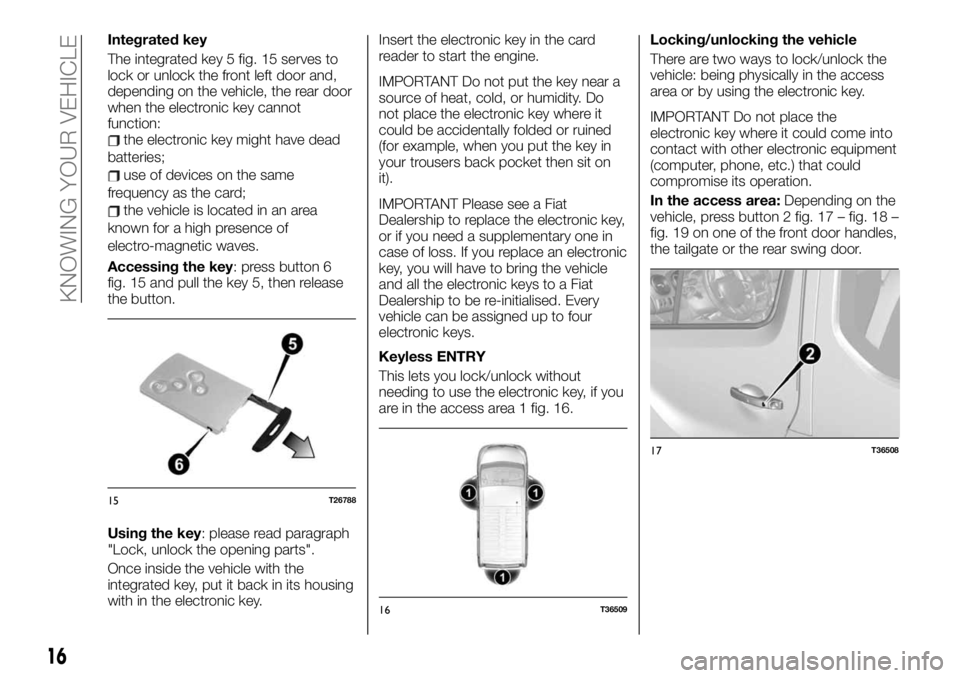
The integrated key 5 fig. 15 serves to
lock or unlock the front left door and,
depending on the vehicle, the rear door
when the electronic key cannot
function:
the electronic key might have dead
batteries;
use of devices on the same
frequency as the card;
the vehicle is located in an area
known for a high presence of
electro-magnetic waves.
Accessing the key: press button 6
fig. 15 and pull the key 5, then release
the button.
Using the key: please read paragraph
"Lock, unlock the opening parts".
Once inside the vehicle with the
integrated key, put it back in its housing
with in the electronic key.Insert the electronic key in the card
reader to start the engine.
IMPORTANT Do not put the key near a
source of heat, cold, or humidity. Do
not place the electronic key where it
could be accidentally folded or ruined
(for example, when you put the key in
your trousers back pocket then sit on
it).
IMPORTANT Please see a Fiat
Dealership to replace the electronic key,
or if you need a supplementary one in
case of loss. If you replace an electronic
key, you will have to bring the vehicle
and all the electronic keys to a Fiat
Dealership to be re-initialised. Every
vehicle can be assigned up to four
electronic keys.
Keyless ENTRY
This lets you lock/unlock without
needing to use the electronic key, if you
are in the access area 1 fig. 16.Locking/unlocking the vehicle
There are two ways to lock/unlock the
vehicle: being physically in the access
area or by using the electronic key.
IMPORTANT Do not place the
electronic key where it could come into
contact with other electronic equipment
(computer, phone, etc.) that could
compromise its operation.
In the access area:Depending on the
vehicle, press button 2 fig. 17 – fig. 18 –
fig. 19 on one of the front door handles,
the tailgate or the rear swing door.
15T26788
16T36509
17T36508
16
KNOWING YOUR VEHICLE
Page 20 of 236
"Remote lighting" function
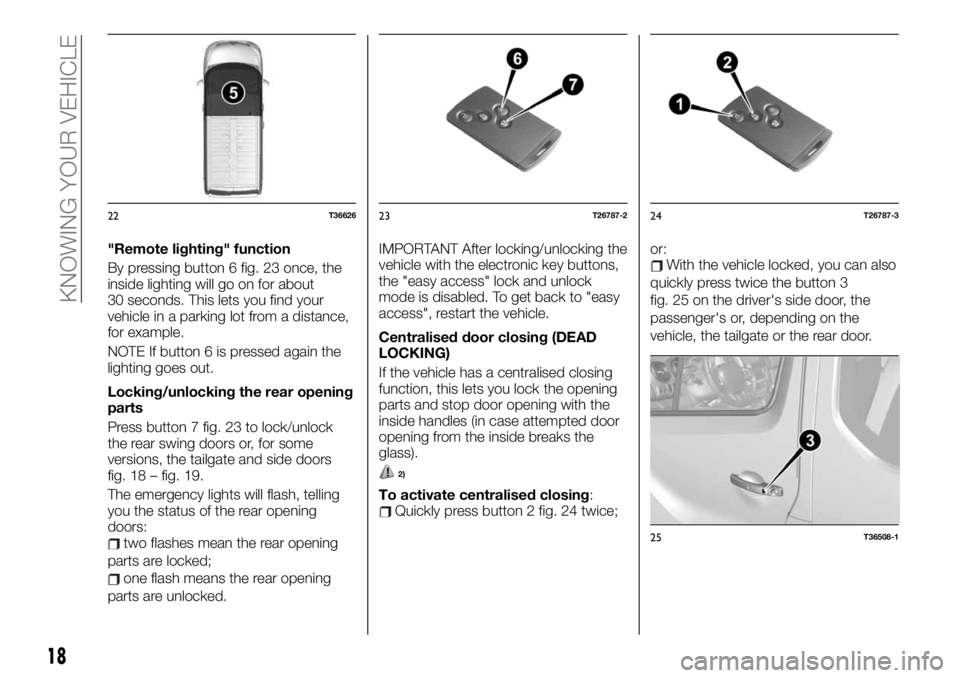
By pressing button 6 fig. 23 once, the
inside lighting will go on for about
30 seconds. This lets you find your
vehicle in a parking lot from a distance,
for example.
NOTE If button 6 is pressed again the
lighting goes out.
Locking/unlocking the rear opening
parts
Press button 7 fig. 23 to lock/unlock
the rear swing doors or, for some
versions, the tailgate and side doors
fig. 18 – fig. 19.
The emergency lights will flash, telling
you the status of the rear opening
doors:
two flashes mean the rear opening
parts are locked;
one flash means the rear opening
parts are unlocked.IMPORTANT After locking/unlocking the
vehicle with the electronic key buttons,
the "easy access" lock and unlock
mode is disabled. To get back to "easy
access", restart the vehicle.
Centralised door closing (DEAD
LOCKING)
If the vehicle has a centralised closing
function, this lets you lock the opening
parts and stop door opening with the
inside handles (in case attempted door
opening from the inside breaks the
glass).
2)
To activate centralised closing:Quickly press button 2 fig. 24 twice;or:
With the vehicle locked, you can also
quickly press twice the button 3
fig. 25 on the driver's side door, the
passenger's or, depending on the
vehicle, the tailgate or the rear door.
22T3662623T26787-224T26787-3
25T36508-1
18
KNOWING YOUR VEHICLE
Page 23 of 236
Forgotten open door warning:ifa
door is open or not properly closed, as
soon as the vehicle has gone over
about 20 km/h, a message to this effect
will appear on the instrument panel
together with a warning light.
NOTE depending on the vehicle, the
accessories (radio, etc.) turn off when
the engine is stopped, on opening the
driver door or on closing the doors.
SLIDING SIDE DOOR
9) 10) 11)
Vehicles with remote control
The sliding side door locks and unlocks
by pressing the remote control button.
Vehicles with electronic key
The sliding side door locks and
unlocks:
by pressing the button on the
electronic key;
in easy access mode by
locking/unlocking the front doors or
tailgate.
Opening from outside
When the vehicle is locked, pull the
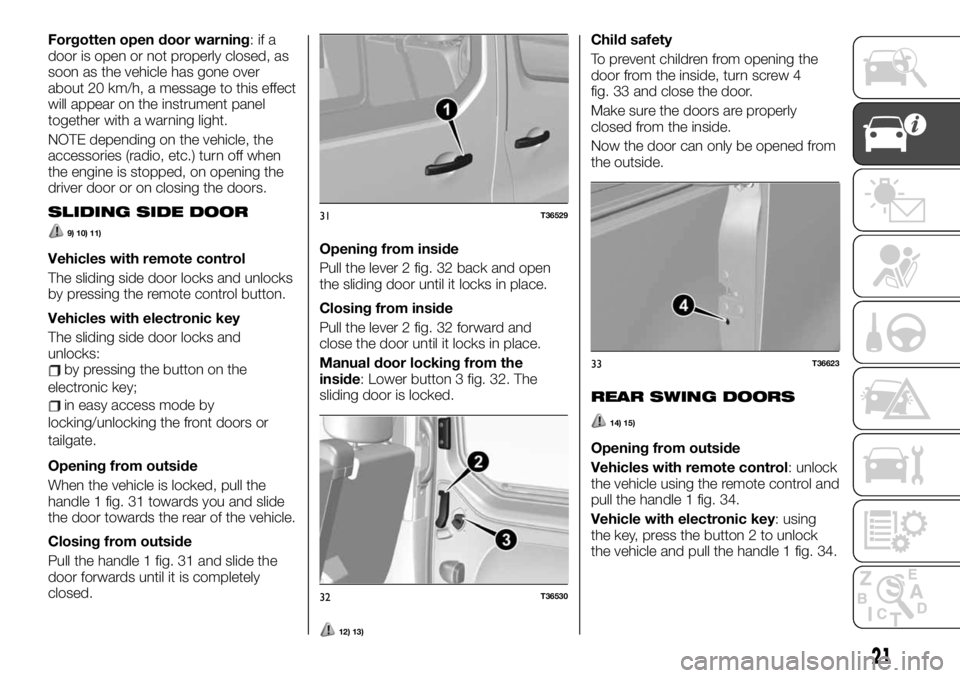
handle 1 fig. 31 towards you and slide
the door towards the rear of the vehicle.
Closing from outside
Pull the handle 1 fig. 31 and slide the
door forwards until it is completely
closed.Opening from inside
Pull the lever 2 fig. 32 back and open
the sliding door until it locks in place.
Closing from inside
Pull the lever 2 fig. 32 forward and
close the door until it locks in place.
Manual door locking from the
inside: Lower button 3 fig. 32. The
sliding door is locked.
12) 13)
Child safety
To prevent children from opening the
door from the inside, turn screw 4
fig. 33 and close the door.
Make sure the doors are properly
closed from the inside.
Now the door can only be opened from
the outside.
REAR SWING DOORS
14) 15)
Opening from outside
Vehicles with remote control: unlock
the vehicle using the remote control and
pull the handle 1 fig. 34.
Vehicle with electronic key: using
the key, press the button 2 to unlock
the vehicle and pull the handle 1 fig. 34.
31T36529
32T36530
33T36623
21
Page 25 of 236
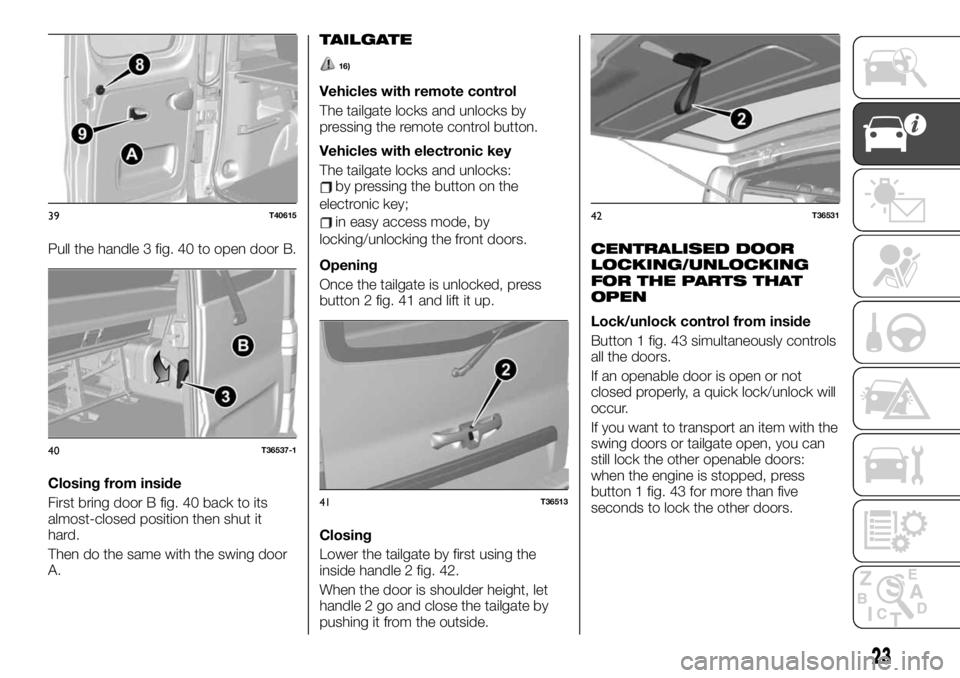
Pull the handle 3 fig. 40 to open door B.
Closing from inside
First bring door B fig. 40 back to its
almost-closed position then shut it
hard.
Then do the same with the swing door
A.
TAILGATE
16)
Vehicles with remote control
The tailgate locks and unlocks by
pressing the remote control button.
Vehicles with electronic key
The tailgate locks and unlocks:
by pressing the button on the
electronic key;
in easy access mode, by
locking/unlocking the front doors.
Opening
Once the tailgate is unlocked, press
button 2 fig. 41 and lift it up.
Closing
Lower the tailgate by first using the
inside handle 2 fig. 42.
When the door is shoulder height, let
handle 2 go and close the tailgate by
pushing it from the outside.
CENTRALISED DOOR
LOCKING/UNLOCKING
FOR THE PARTS THAT
OPEN
Lock/unlock control from inside
Button 1 fig. 43 simultaneously controls
all the doors.
If an openable door is open or not
closed properly, a quick lock/unlock will
occur.
If you want to transport an item with the
swing doors or tailgate open, you can
still lock the other openable doors:
when the engine is stopped, press
button 1 fig. 43 for more than five
seconds to lock the other doors.
39T40615
40T36537-1
41T36513
42T36531
23
Page 27 of 236
to enable the door lock/unlock
control from the inside (see paragraph
"Centralised locking/unlocking of
opening parts" in the chapter "Knowing
your vehicle").
Using the key
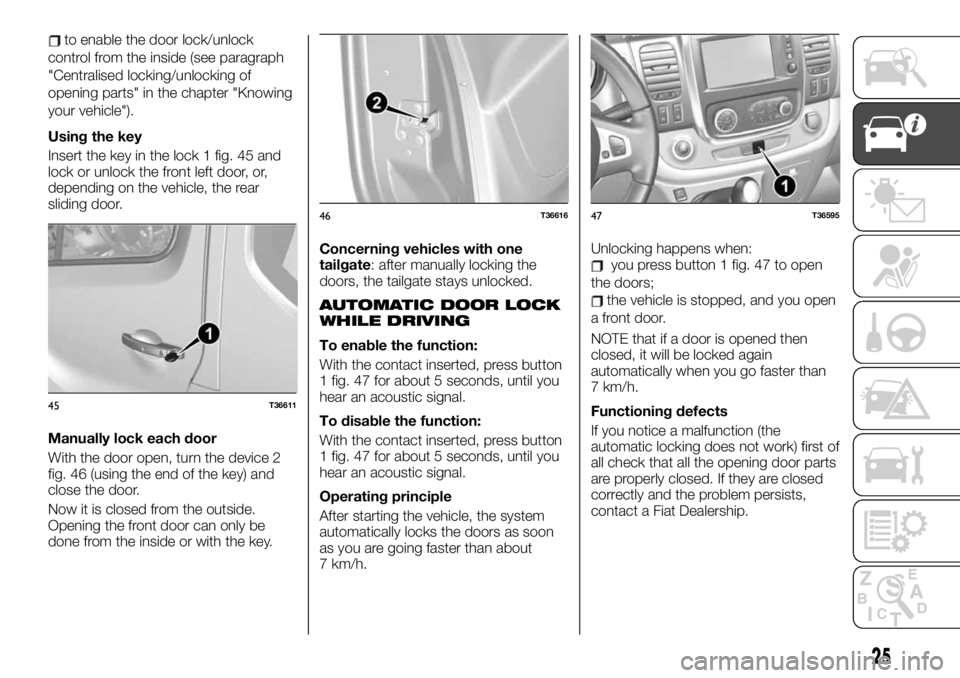
Insert the key in the lock 1 fig. 45 and
lock or unlock the front left door, or,
depending on the vehicle, the rear
sliding door.
Manually lock each door
With the door open, turn the device 2
fig. 46 (using the end of the key) and
close the door.
Now it is closed from the outside.
Opening the front door can only be
done from the inside or with the key.Concerning vehicles with one
tailgate: after manually locking the
doors, the tailgate stays unlocked.
AUTOMATIC DOOR LOCK
WHILE DRIVING
To enable the function:
With the contact inserted, press button
1 fig. 47 for about 5 seconds, until you
hear an acoustic signal.
To disable the function:
With the contact inserted, press button
1 fig. 47 for about 5 seconds, until you
hear an acoustic signal.
Operating principle
After starting the vehicle, the system
automatically locks the doors as soon
as you are going faster than about
7 km/h.Unlocking happens when:
you press button 1 fig. 47 to open
the doors;
the vehicle is stopped, and you open
a front door.
NOTE that if a door is opened then
closed, it will be locked again
automatically when you go faster than
7 km/h.
Functioning defects
If you notice a malfunction (the
automatic locking does not work) first of
all check that all the opening door parts
are properly closed. If they are closed
correctly and the problem persists,
contact a Fiat Dealership.
45T36611
46T3661647T36595
25
Page 28 of 236
Also make sure the lock system was
not accidentally disabled.
In case it was disabled, re-enable it
after disconnecting and reconnecting
the starter device.
WARNING
3)For safety reasons, make sure all the
doors are well closed before setting out.
4)Never leave the vehicle with the remote
or electronic key inside.
5)For safety reasons, always open/close
doors when the vehicle is stopped.
6)NEVER leave children unattended inside
the vehicle, let alone leave it with the doors
unlocked in a place that children can
access easily. Children may seriously, or
even fatally, injure themselves. Also ensure
that children do not inadvertently operate
the parking brake or the brake pedal.
7)Opening or closing the door, as for all
opening parts of the vehicle, must be done
keeping in mind the precautions for use
concerning this operation: check that there
is no one, no part of a body, an animal or
object that could come into contact during
this manoeuvre. Only use the inside and
outside handles to manoeuvre the door.
Use caution in both opening and closing
the doors. Caution: when the vehicle is
parked on an incline, open or close the
door carefully until it locks in place. Always
make sure the sliding door is completely
closed before the vehicle starts moving.
8)Before opening a door, ensure that you
can do it in conditions of safety.9)You must not open the left-hand sliding
side door with the fuel flap open while
refuelling. Check that the fuel flap is closed
while opening/closing the sliding side door
to avoid damage.
10)Do not leave the sliding side door open
when the vehicle is parked on a gradient. A
knock could release the latch leaving the
door free to move forward.
11)Before leaving the vehicle parked with
sliding doors open, always check that the
latch is engaged.
12)Always use this device when carrying
children.
13)The spring-loaded system is designed
for optimum usage. Accidental knocks or a
strong gust of wind may release the
springs, forcing the doors to close.
14)When closing, shut the right hand
swing door fully before you close the left
hand swing door. Never shut the two doors
at the same time.
15)In case of wind, do not leave the rear
swing doors open. Risk of injury.
16)When you stop by the side of the road,
if the tailgate is completely open, the rear
lights might not be visible. Warn other road
users that your vehicle is there by placing
the pre-signal triangle or other device
allowed by law in the country you are
driving in.
HEADRESTS
FRONT HEADREST
17)
Adjustment
Pull the head restraint up to the desired
height. Make sure it locks into place
correctly.
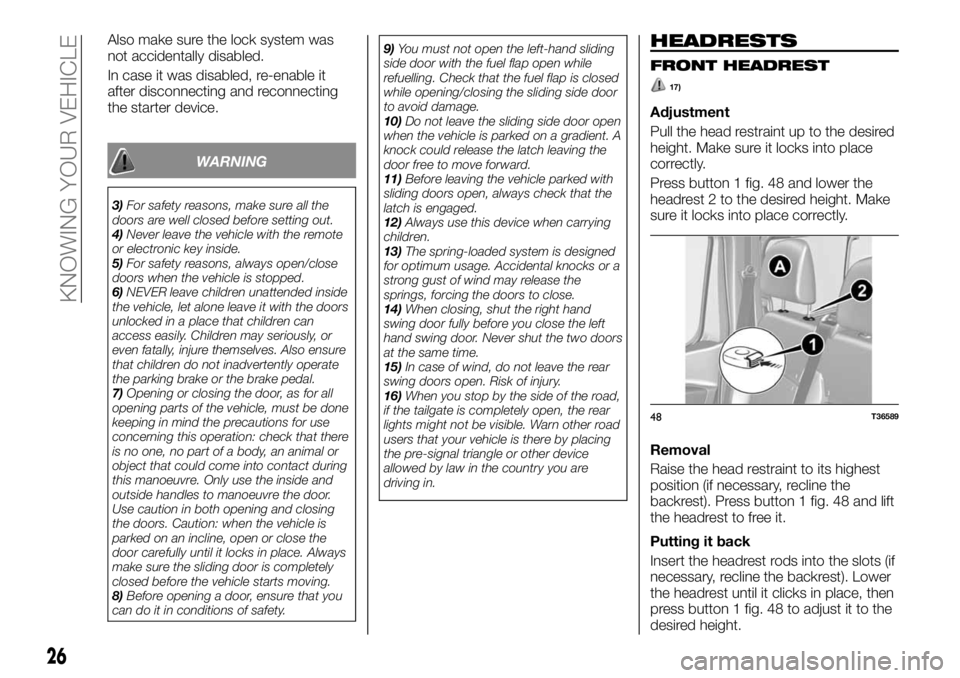
Press button 1 fig. 48 and lower the
headrest 2 to the desired height. Make
sure it locks into place correctly.
Removal
Raise the head restraint to its highest
position (if necessary, recline the
backrest). Press button 1 fig. 48 and lift
the headrest to free it.
Putting it back
Insert the headrest rods into the slots (if
necessary, recline the backrest). Lower
the headrest until it clicks in place, then
press button 1 fig. 48 to adjust it to the
desired height.
48T36589
26
KNOWING YOUR VEHICLE
Page 39 of 236
IMPORTANT The table above contains
several examples. In all cases, adjust
the control A according to the vehicle
load to illuminate the road without
dazzling other drivers.
IMPORTANT If you are driving on the
left in a vehicle equipped for left hand
drive (or vice versa), you must adjust
the headlight orientation for the duration
of the visit.
Adjusting the headlights externally
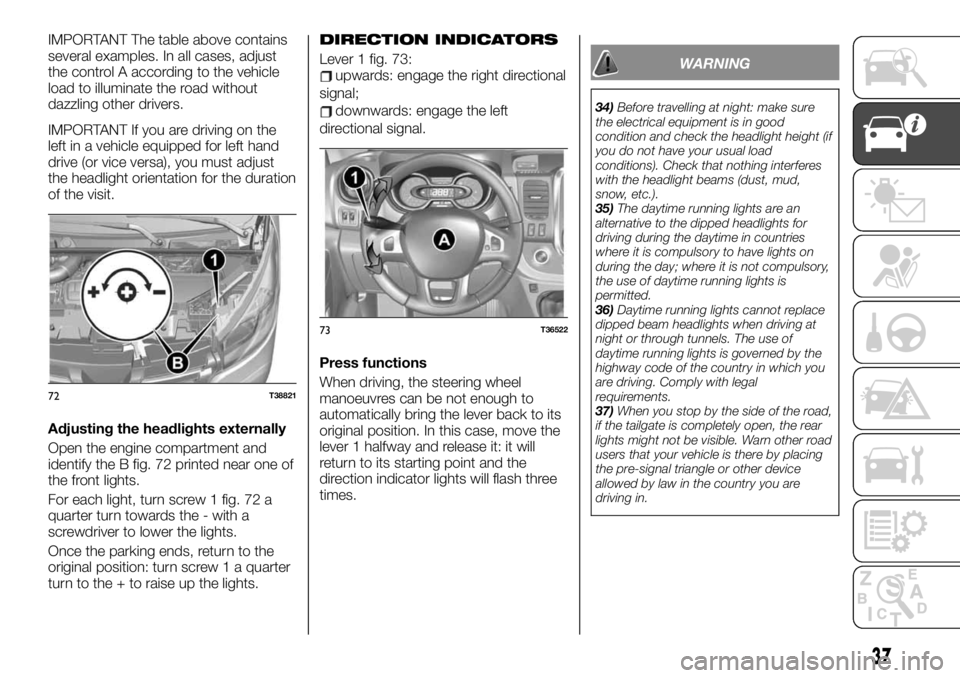
Open the engine compartment and
identify the B fig. 72 printed near one of
the front lights.
For each light, turn screw 1 fig. 72 a
quarter turn towards the - with a
screwdriver to lower the lights.
Once the parking ends, return to the
original position: turn screw 1 a quarter
turn to the + to raise up the lights.DIRECTION INDICATORS
Lever 1 fig. 73:upwards: engage the right directional
signal;
downwards: engage the left
directional signal.
Press functions
When driving, the steering wheel
manoeuvres can be not enough to
automatically bring the lever back to its
original position. In this case, move the
lever 1 halfway and release it: it will
return to its starting point and the
direction indicator lights will flash three
times.
WARNING
34)Before travelling at night: make sure
the electrical equipment is in good
condition and check the headlight height (if
you do not have your usual load
conditions). Check that nothing interferes
with the headlight beams (dust, mud,
snow, etc.).
35)The daytime running lights are an
alternative to the dipped headlights for
driving during the daytime in countries
where it is compulsory to have lights on
during the day; where it is not compulsory,
the use of daytime running lights is
permitted.
36)Daytime running lights cannot replace
dipped beam headlights when driving at
night or through tunnels. The use of
daytime running lights is governed by the
highway code of the country in which you
are driving. Comply with legal
requirements.
37)When you stop by the side of the road,
if the tailgate is completely open, the rear
lights might not be visible. Warn other road
users that your vehicle is there by placing
the pre-signal triangle or other device
allowed by law in the country you are
driving in.
72T38821
73T36522
37
Page 59 of 236
Irregular operation
Depending on the versions, when the
system detects irregular operation, an
appropriate message will appear on the
instrument panel along with the alarm
warning light
and an acoustic
signal going off every 5 seconds.
Contact a Fiat Dealership.
WARNING
56)This function is an auxiliary driving aid
with acoustic signals to indicate that you
are approaching an obstacle while
manoeuvring. However, this does exempt
the driver from normal driving alertness nor
from liability in the event of an accident
while manoeuvring. The driver must always
be ready to face any unexpected situations
that could occur when driving. Before
starting a manoeuvre, specifically check for
any moving obstacles (such as a child,
animal, bicycle, stone, pole, etc.) or
obstacles in the blind spot that are too
small to be detected.
57)Parking and other potentially
dangerous manoeuvres are, however,
always the driver’s responsibility. When
performing these operations, always make
sure that there are no other people
(especially children) or animals on the route
you want to take. The parking sensors are
an aid for the driver, but the driver must
never allow their attention to lapse during
potentially dangerous manoeuvres, even
those executed at low speeds.
IMPORTANT
13)In the event of a collision while
manoeuvring the vehicle (e.g. hitting a
bollard, raised pavement or any other street
furniture), the vehicle could be damaged
(e.g. deformed axle). To prevent any risk of
accident, have the vehicle checked at a Fiat
Dealership.
14)The sensors must be clean of mud,
dirt, snow or ice in order for the system to
operate correctly. Be careful not to scratch
or damage the sensors while cleaning
them. Avoid using dry, rough or hard
cloths. The sensors should be washed
using clean water with the addition of car
shampoo if necessary. When using special
washing equipment such as high pressure
jets or steam cleaning, clean the sensors
very quickly keeping the jet more than
10 cm away.
15)Only have the bumpers repainted or
any retouches to the paintwork in the area
of the sensors carried out by a Fiat
Dealership. Incorrect paint application
could affect the Radar parking operation.
REAR CAMERA
Operation
58)
16)
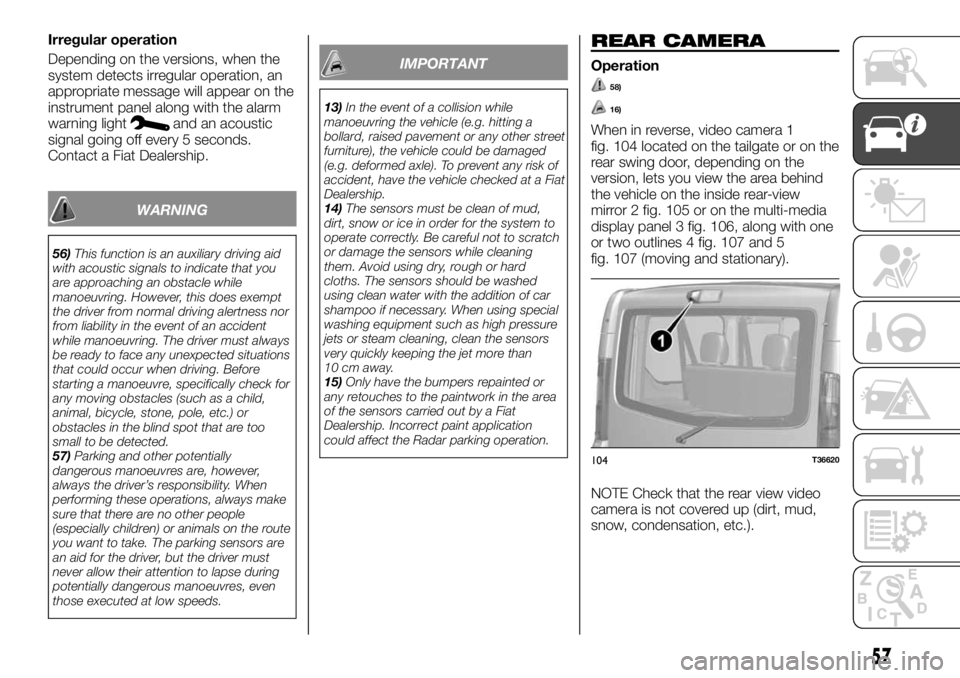
When in reverse, video camera 1
fig. 104 located on the tailgate or on the
rear swing door, depending on the
version, lets you view the area behind
the vehicle on the inside rear-view
mirror 2 fig. 105 or on the multi-media
display panel 3 fig. 106, along with one
or two outlines 4 fig. 107 and 5
fig. 107 (moving and stationary).
NOTE Check that the rear view video
camera is not covered up (dirt, mud,
snow, condensation, etc.).
104T36620
57
Page 149 of 236
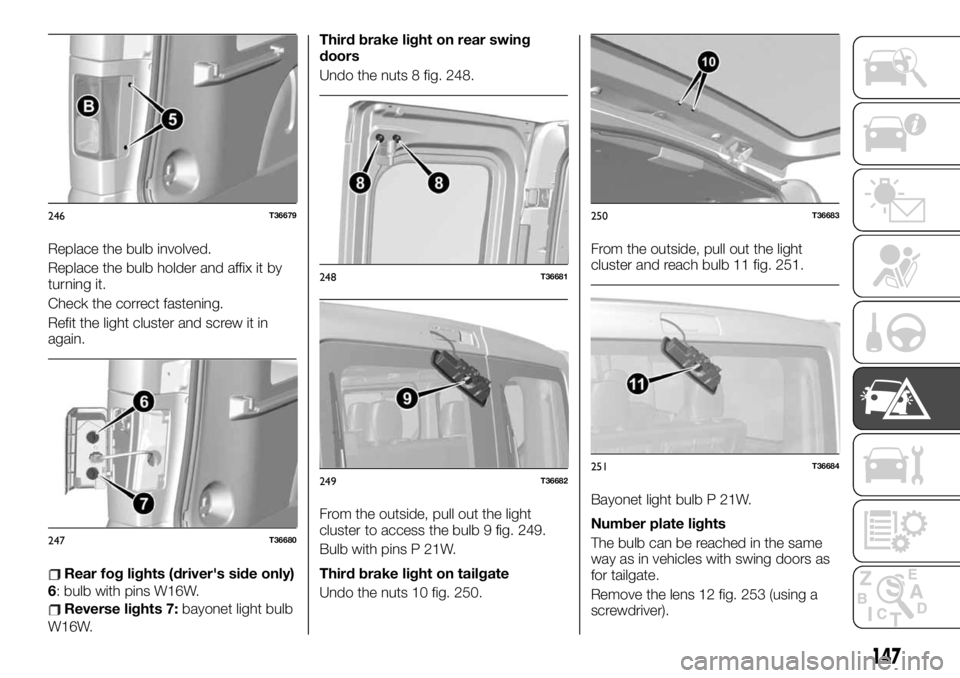
Replace the bulb involved.
Replace the bulb holder and affix it by
turning it.
Check the correct fastening.
Refit the light cluster and screw it in
again.
Rear fog lights (driver's side only)
6: bulb with pins W16W.
Reverse lights 7:bayonet light bulb
W16W.Third brake light on rear swing
doors
Undo the nuts 8 fig. 248.
From the outside, pull out the light
cluster to access the bulb 9 fig. 249.
Bulb with pins P 21W.
Third brake light on tailgate
Undo the nuts 10 fig. 250.From the outside, pull out the light
cluster and reach bulb 11 fig. 251.
Bayonet light bulb P 21W.
Number plate lights
The bulb can be reached in the same
way as in vehicles with swing doors as
for tailgate.
Remove the lens 12 fig. 253 (using a
screwdriver).
246T36679
247T36680
248T36681
249T36682
250T36683
251T36684
147
Page 179 of 236
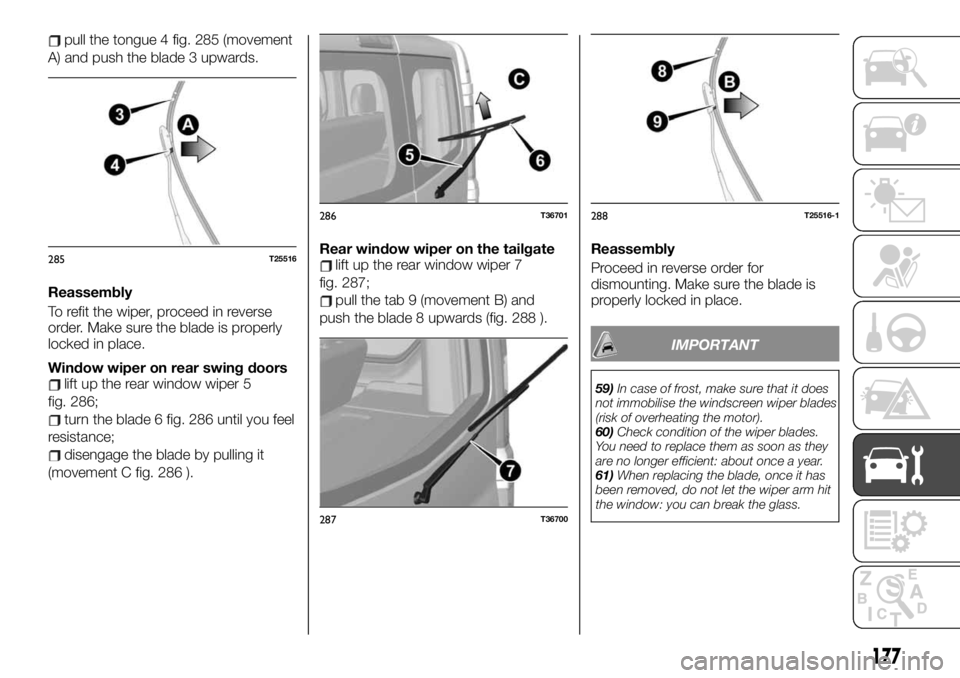
pull the tongue 4 fig. 285 (movement
A) and push the blade 3 upwards.
Reassembly
To refit the wiper, proceed in reverse
order. Make sure the blade is properly
locked in place.
Window wiper on rear swing doors
lift up the rear window wiper 5
fig. 286;
turn the blade 6 fig. 286 until you feel
resistance;
disengage the blade by pulling it
(movement C fig. 286 ).Rear window wiper on the tailgate
lift up the rear window wiper 7
fig. 287;
pull the tab 9 (movement B) and
push the blade 8 upwards (fig. 288 ).Reassembly
Proceed in reverse order for
dismounting. Make sure the blade is
properly locked in place.
IMPORTANT
59)In case of frost, make sure that it does
not immobilise the windscreen wiper blades
(risk of overheating the motor).
60)Check condition of the wiper blades.
You need to replace them as soon as they
are no longer efficient: about once a year.
61)When replacing the blade, once it has
been removed, do not let the wiper arm hit
the window: you can break the glass.
285T25516
286T36701
287T36700
288T25516-1
177