width FIAT TEMPRA 1988 Service And Repair Manual
[x] Cancel search | Manufacturer: FIAT, Model Year: 1988, Model line: TEMPRA, Model: FIAT TEMPRA 1988Pages: 171, PDF Size: 18.05 MB
Page 15 of 171

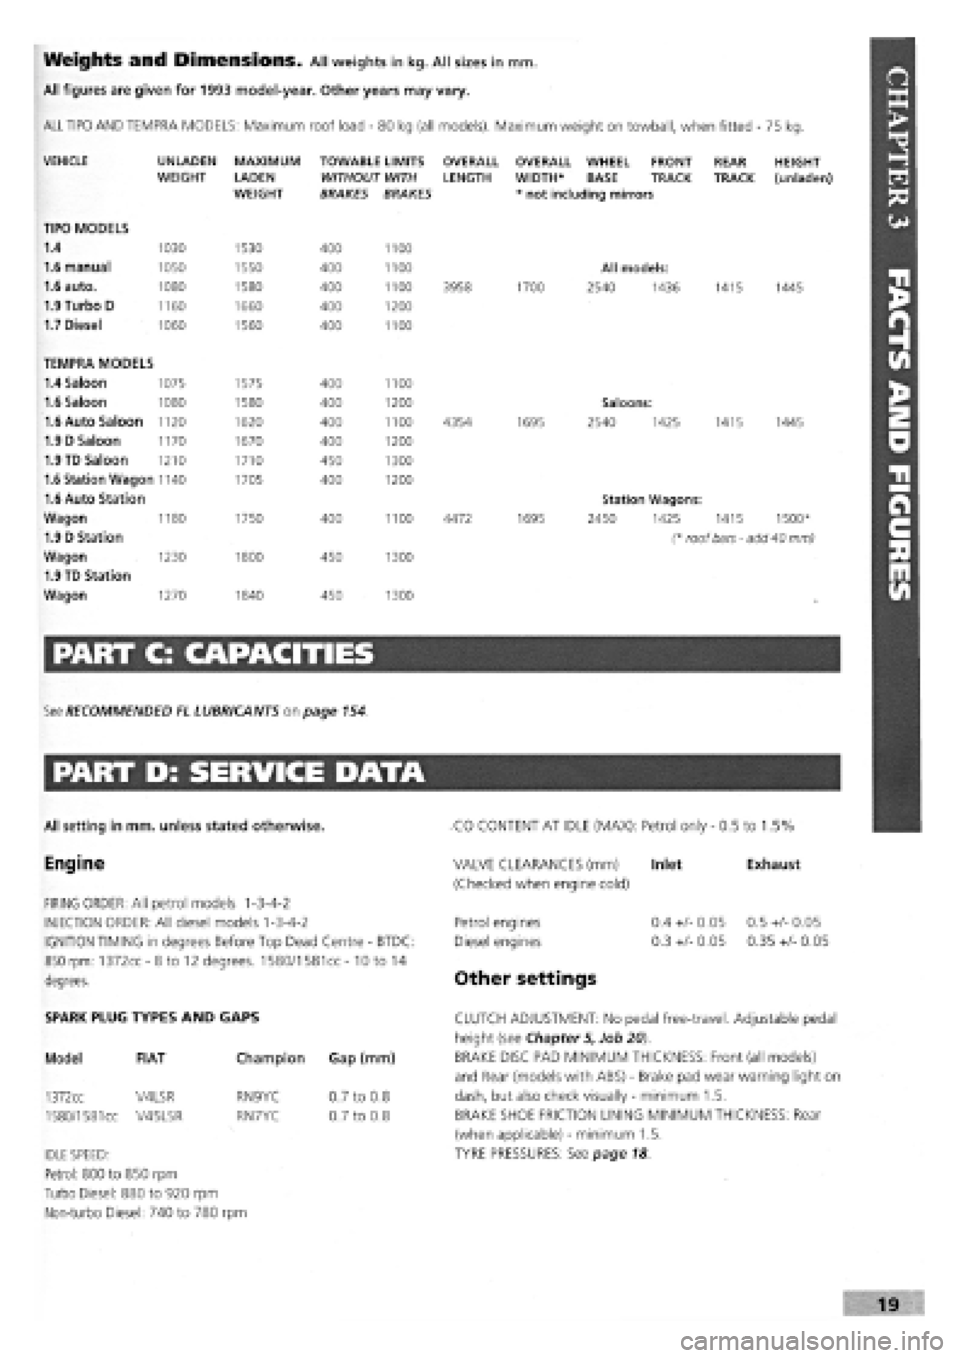
Weights and Dimensions. All weights in kg. All sizes in mm.
All figures are given for 1993 model-year. Other years may vary.
ALL TIPO AND TEMPRA MODELS: Maximum roof load
-
80 kg (all models). Maximum weight on towball, when fitted - 75 kg.
VEHICLE
TIPO MODELS
1.4
1.6 manual
1.6 auto.
1.9 Turbo D
1.7 Diesel
UNLADEN WEIGHT
1030
1050
1080
1160
1060
MAXIMUM
LADEN WEIGHT
1530
1550
1580
1660
1560
TOWABLE LIMITS WITHOUT WITH BRAKES BRAKES
400
400
400
400
400
1100
1100
1100
1200
1100
OVERALL LENGTH
3958
OVERALL WHEEL FRONT WIDTH* BASE TRACK * not including mirrors
1700
All models:
2540 1436
REAR TRACK
1415
HEIGHT (unladen)
1445
TEMPRA MODELS
1.4 Saloon 1075 1575 400 1100
1.6 Saloon 1080 1580 400 1200 Saloons:
1.6 Auto Saloon 1120 1620 400 1100 4354 1695 2540 1425 1415 1445
1.9 D Saloon 1170 1670 400 1200
1.9 TD Saloon 1210 1710 450 1300
1.6 Station Wagon 1140 1705 400 1200
1.6 Auto Station Station Wagons:
Wagon 1180 1750 400 1100 4472 1695 2450 1425 1415 1500*
1.9 D Station (* roof bars - add 40 mm)
Wagon 1230 1800 450 1300
1.9 TD Station
Wagon 1270 1840 450 1300
PART C: CAPACITIES
See RECOMMENDED EL LUBRICANTS on page 154.
PART D: SERVICE DATA
All setting in mm. unless stated otherwise.
Engine
FIRING ORDER: All petrol models 1-3-4-2
INJECTION ORDER: All diesel models 1-3-4-2
IGNITION TIMING in degrees Before Top Dead Centre
-
BTDC:
850 rpm: 1372cc-8to 12 degrees. 1580/1581cc- 10 to 14
degrees.
CO CONTENT AT IDLE (MAX): Petrol only
-
0.5 to 1.5%
Exhaust VALVE CLEARANCES (mm) Inlet
(Checked when engine cold)
Petrol engines
Diesel engines
Other settings
0.4
+/-
0.05
0.3
+/-
0.05
0.5
+/-
0.05
0.35
+/-
0.05
SPARK PLUG TYPES AND GAPS
Model FIAT
1372cc V4LSR
1580/1581
cc V45LSR
Champion Gap (mm)
RN9YC
RN7YC
IDLE SPEED:
Petrol: 800 to 850 rpm
Turbo Diesel: 880 to 920 rpm
Non-turbo Diesel: 740 to 780 rpm
0.7 to 0.8
0.7 to 0.8
CLUTCH ADJUSTMENT: No pedal free-travel. Adjustable pedal
height (see Chapter 5, Job 20).
BRAKE DISC PAD MINIMUM THICKNESS: Front (all models)
and Rear (models with ABS)
-
Brake pad wear warning light on
dash, but also check visually
-
minimum 1.5.
BRAKE SHOE FRICTION LINING MINIMUM THICKNESS: Rear
(when applicable)
-
minimum 1.5.
TYRE PRESSURES: See page 18
Page 26 of 171

PART C: VEHICLE RAISED OFF THE GROUND
Bodywork Structure
01
.
Any sharp edges on the external bodywork, caused by damage or corrosion will cause the vehicle to fail.
02 . Check all load bearing areas for corrosion. Open the doors and check the sills inside and out, above and below. Any corrosion in structural metalwork within 30 cm (12 in.) of seat belt mounting, steering and suspension attachment points will cause the vehicle to fail.
Wheels and Tyres
Under the Front of the
Car
You will need to support the front of the car on axle stands with the rear wheels firmly chocked in both directions.
OE . Have your helper turn the steering from lock to lock and check that the steering turns smoothly and that the brake hoses or pipes do not contact the wheel, tyre or any part of the steering or suspension.
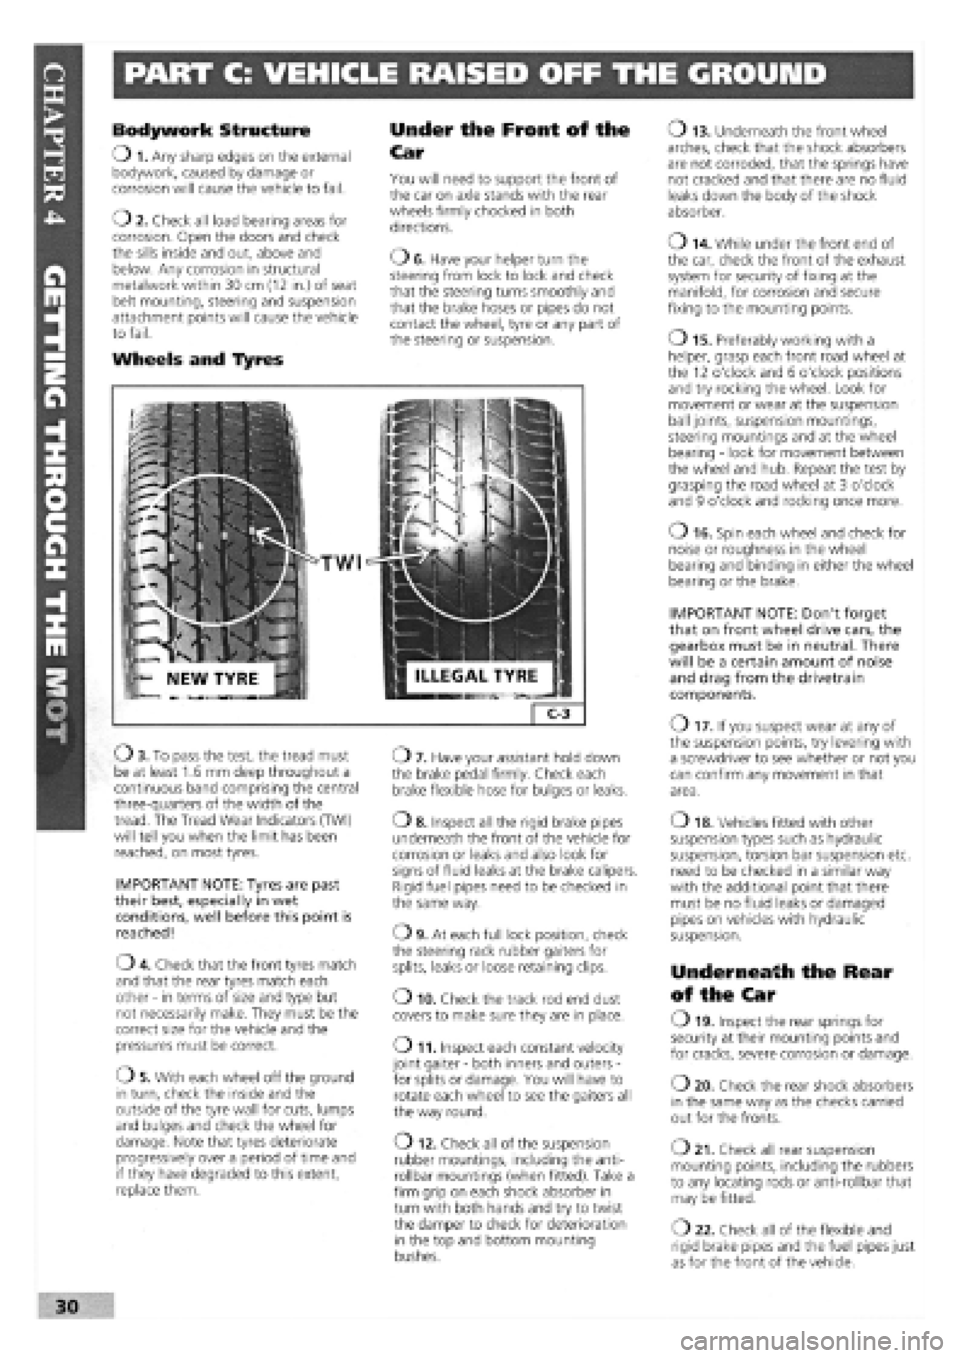
TWI
Ob . To pass the test, the tread must be at least 1.6 mm deep throughout a continuous band comprising the central three-quarters of the width of the tread. The Tread Wear Indicators (TWI) will tell you when the limit has been reached, on most tyres.
IMPORTANT NOTE: Tyres are past their best, especially in wet conditions, well before this point is reached!
04 . Check that the front tyres match and that the rear tyres match each other
-
in terms of size and type but not necessarily make. They must be the correct size for the vehicle and the pressures must be correct.
05 . With each wheel off the ground in turn, check the inside and the outside of the tyre wall for cuts, lumps and bulges and check the wheel for damage. Note that tyres deteriorate progressively over a period of time and if they have degraded to this extent, replace them.
07 . Have your assistant hold down the brake pedal firmly. Check each brake flexible hose for bulges or leaks.
o 8. Inspect all the rigid brake pipes underneath the front of the vehicle for corrosion or leaks and also look for signs of fluid leaks at the brake calipers. Rigid fuel pipes need to be checked in the same way.
09 . At each full lock position, check the steering rack rubber gaiters for splits, leaks or loose retaining clips.
o 10. Check the track rod end dust covers to make sure they are in place.
o 11. Inspect each constant velocity joint gaiter
-
both inners and outers
-
for splits or damage. You will have to rotate each wheel to see the gaiters all the way round.
O 12. Check all of the suspension rubber mountings, including the anti-rollbar mountings (when fitted). Take a firm grip on each shock absorber in turn with both hands and try to twist the damper to check for deterioration in the top and bottom mounting bushes.
o 13. Underneath the front wheel arches, check that the shock absorbers are not corroded, that the springs have not cracked and that there are no fluid leaks down the body of the shock absorber.
o 14. While under the front end of the car, check the front of the exhaust system for security of fixing at the manifold, for corrosion and secure fixing to the mounting points.
o 15. Preferably working with a helper, grasp each front road wheel at the 12 o'clock and 6 o'clock positions and try rocking the wheel. Look for movement or wear at the suspension ball joints, suspension mountings, steering mountings and at the wheel bearing
-
look for movement between the wheel and hub. Repeat the test by grasping the road wheel at 3 o'clock and 9 o'clock and rocking once more.
o 16. Spin each wheel and check for noise or roughness in the wheel bearing and binding in either the wheel bearing or the brake.
IMPORTANT NOTE: Don't forget that on front wheel drive cars, the gearbox must be in neutral. There will be a certain amount of noise and drag from the drivetrain components.
O 17. If you suspect wear at any of the suspension points, try levering with a screwdriver to see whether or not you can confirm any movement in that area.
o 18. Vehicles fitted with other suspension types such as hydraulic suspension, torsion bar suspension etc. need to be checked in a similar way with the additional point that there must be no fluid leaks or damaged pipes on vehicles with hydraulic suspension.
Underneath the Rear
of the Car
O 19. Inspect the rear springs for security at their mounting points and for cracks, severe corrosion or damage.
o 20. Check the rear shock absorbers in the same way as the checks carried out for the fronts.
o 21. Check all rear suspension mounting points, including the rubbers to any locating rods or anti-rollbar that may be fitted.
O 22. Check all of the flexible and rigid brake pipes and the fuel pipes just as for the front of the vehicle.
30