driver seat adjustment FIAT TIPO 5DOORS STATION WAGON 2019 Owner handbook (in English)
[x] Cancel search | Manufacturer: FIAT, Model Year: 2019, Model line: TIPO 5DOORS STATION WAGON, Model: FIAT TIPO 5DOORS STATION WAGON 2019Pages: 304, PDF Size: 9.12 MB
Page 10 of 304
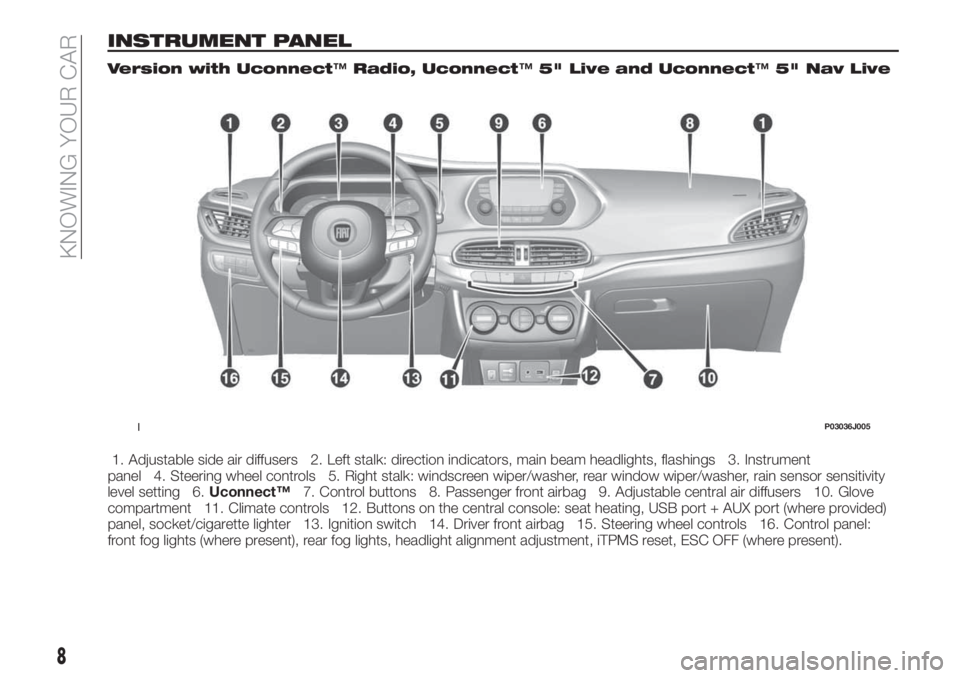
INSTRUMENT PANEL
Version with Uconnect™Radio, Uconnect™5" Live and Uconnect™5" Nav Live
1. Adjustable side air diffusers 2. Left stalk: direction indicators, main beam headlights, flashings 3. Instrument
panel 4. Steering wheel controls 5. Right stalk: windscreen wiper/washer, rear window wiper/washer, rain sensor sensitivity
level setting 6.Uconnect™7. Control buttons 8. Passenger front airbag 9. Adjustable central air diffusers 10. Glove
compartment 11. Climate controls 12. Buttons on the central console: seat heating, USB port + AUX port (where provided)
panel, socket/cigarette lighter 13. Ignition switch 14. Driver front airbag 15. Steering wheel controls 16. Control panel:
front fog lights (where present), rear fog lights, headlight alignment adjustment, iTPMS reset, ESC OFF (where present).
1P03036J005
8
KNOWING YOUR CAR
Page 11 of 304
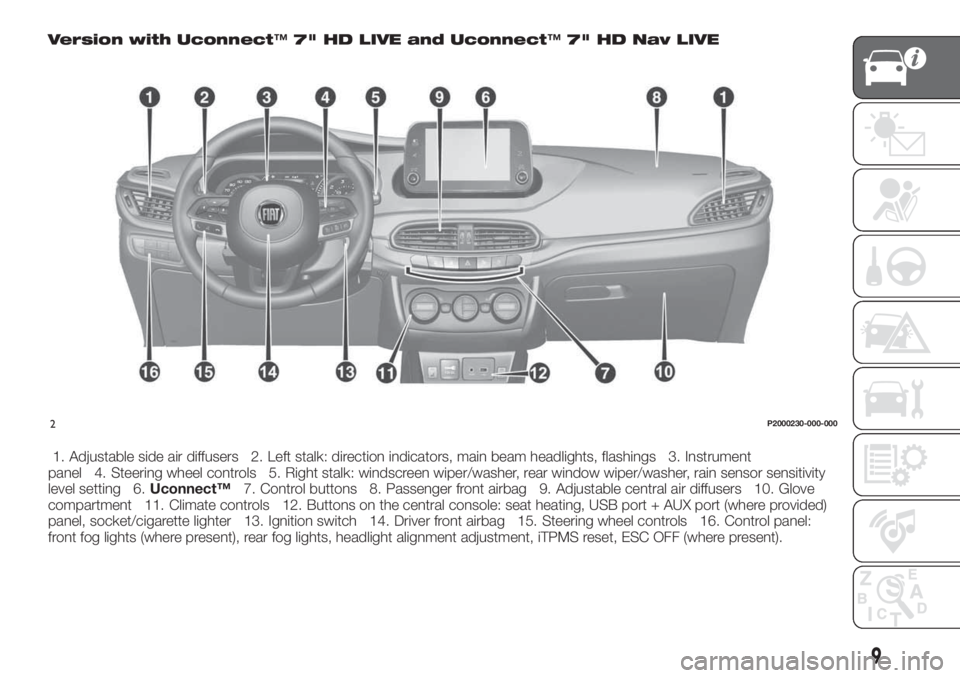
Version with Uconnect™7" HD LIVE and Uconnect™7" HD Nav LIVE
1. Adjustable side air diffusers 2. Left stalk: direction indicators, main beam headlights, flashings 3. Instrument
panel 4. Steering wheel controls 5. Right stalk: windscreen wiper/washer, rear window wiper/washer, rain sensor sensitivity
level setting 6.Uconnect™7. Control buttons 8. Passenger front airbag 9. Adjustable central air diffusers 10. Glove
compartment 11. Climate controls 12. Buttons on the central console: seat heating, USB port + AUX port (where provided)
panel, socket/cigarette lighter 13. Ignition switch 14. Driver front airbag 15. Steering wheel controls 16. Control panel:
front fog lights (where present), rear fog lights, headlight alignment adjustment, iTPMS reset, ESC OFF (where present).
2P2000230-000-000
9
Page 12 of 304
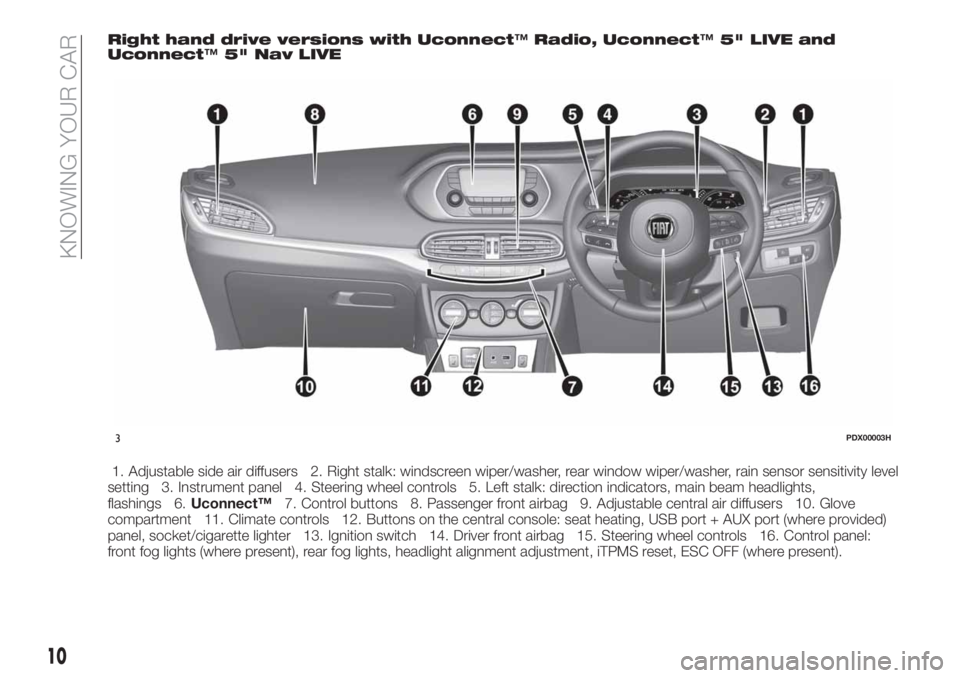
Right hand drive versions with Uconnect™Radio, Uconnect™5" LIVE and
Uconnect™5" Nav LIVE
1. Adjustable side air diffusers 2. Right stalk: windscreen wiper/washer, rear window wiper/washer, rain sensor sensitivity level
setting 3. Instrument panel 4. Steering wheel controls 5. Left stalk: direction indicators, main beam headlights,
flashings 6.Uconnect™7. Control buttons 8. Passenger front airbag 9. Adjustable central air diffusers 10. Glove
compartment 11. Climate controls 12. Buttons on the central console: seat heating, USB port + AUX port (where provided)
panel, socket/cigarette lighter 13. Ignition switch 14. Driver front airbag 15. Steering wheel controls 16. Control panel:
front fog lights (where present), rear fog lights, headlight alignment adjustment, iTPMS reset, ESC OFF (where present).
3PDX00003H
10
KNOWING YOUR CAR
Page 17 of 304
IMPORTANT
2)Make sure to take the key with you once
a door or the tailgate is locked, to prevent
locking the same key inside the vehicle. If
the key has been locked in, it can only be
recovered using the second provided key.
3)If the child lock was engaged and the
previously described locking procedure
carried out, operating the internal opening
handle will not open the door: in this case,
to open the door, the outside handle must
be used. The central locking/unlocking
button is not disabled by the engagement
of the emergency lock.
SEATS
The front seats can be adjusted so as
to ensure maximum comfort for the
occupants.
Driver seat adjustment must also be
carried out remembering that, keeping
the shoulders resting firmly against the
backrest, the wrists must be able to
reach the top of the steering wheel rim.
Additionally, it must be possible to
depress the clutch pedal with the left
foot, for versions with manual
transmission, or fully depress the brake
pedal with the right foot (versions with
automatic transmission, if present).
FRONT SEATS WITH
MANUAL ADJUSTMENT
11)
4)
Longitudinal adjustment
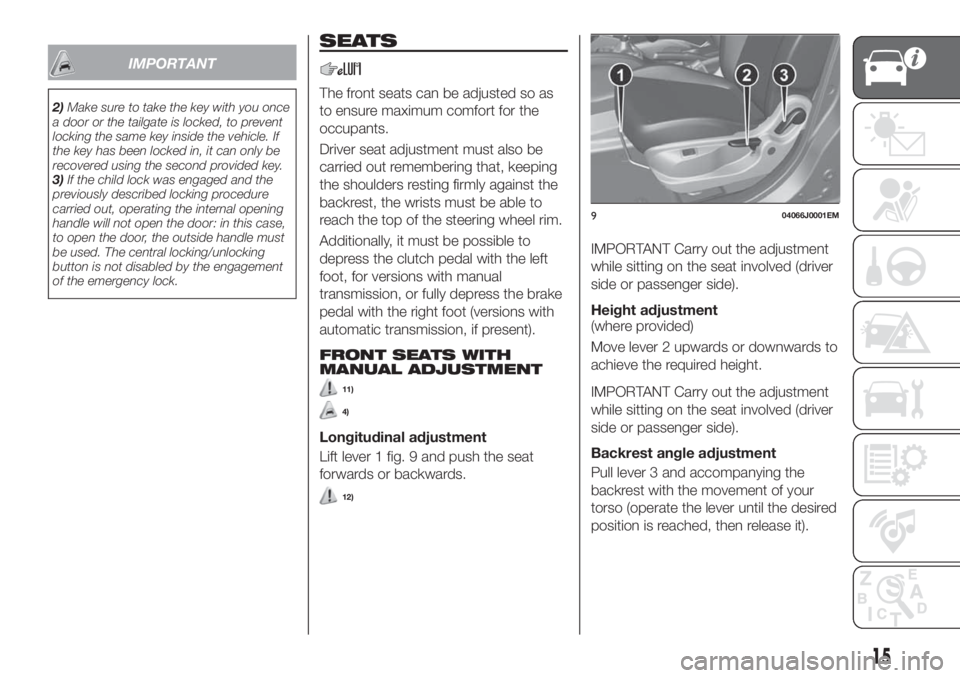
Lift lever 1 fig. 9 and push the seat
forwards or backwards.
12)
IMPORTANT Carry out the adjustment
while sitting on the seat involved (driver
side or passenger side).
Height adjustment
(where provided)
Move lever 2 upwards or downwards to
achieve the required height.
IMPORTANT Carry out the adjustment
while sitting on the seat involved (driver
side or passenger side).
Backrest angle adjustment
Pull lever 3 and accompanying the
backrest with the movement of your
torso (operate the lever until the desired
position is reached, then release it).
904066J0001EM
15
Page 21 of 304
Check that there are no objects on the
cushion surface, turn the backrests
backwards, insert them under the
backrest and press downwards until
they click. Visually check that the
correct position they had before they
were tipped is restored.
IMPORTANT Always free the seat belt
fastening devices before repositioning
the seat cushion to allow it to be
repositioned correctly without damage.
WARNING
11)All adjustments must be made with the
car stationary.
12)Once you have released the
adjustment lever, always check that the
seat is locked on the guides by trying to
move it back and forth. If the seat is not
locked into place, it may unexpectedly slide
and cause the driver to lose control of the
car.
13)Make sure the backrests are properly
secured at both sides (not visible "red
notches) to prevent them from moving
forward, in the event of sharp braking, with
possible impact with of the passengers.
14)People who can't feel skin pain due to
advanced age, chronic diseases, diabetes,
spine damage, medication, alcohol,
exhaustion, or other physical conditions,
must be careful when using the seat
heater. It could cause burns even at a low
temperature, especially when used for long
periods of time.15)Do not place objects on the seat or on
the backrest that may isolate the heat,
such as a cover or a pillow. It may cause
the seat heating device to overheat. Sitting
on an overheated seat may cause severe
burns due to the increase in temperature of
the seat surface.
IMPORTANT
4)The fabric upholstery of the seats has
been designed to withstand long-term wear
deriving from normal use of the car. Some
precautions are however required. Avoid
prolonged and/or excessive rubbing
against clothing accessories such as metal
buckles and Velcro strips which, by
applying a high pressure on the fabric in a
small area, could cause it to break, thereby
damaging the upholstery.
HEAD RESTRAINTS
16)
FRONT HEAD
RESTRAINTS
Adjustment
They can be adjusted to 4 height
positions (completely raised /
2 intermediate positions / completely
lowered).
Upward adjustment: raise the head
restraint until it clicks into place.
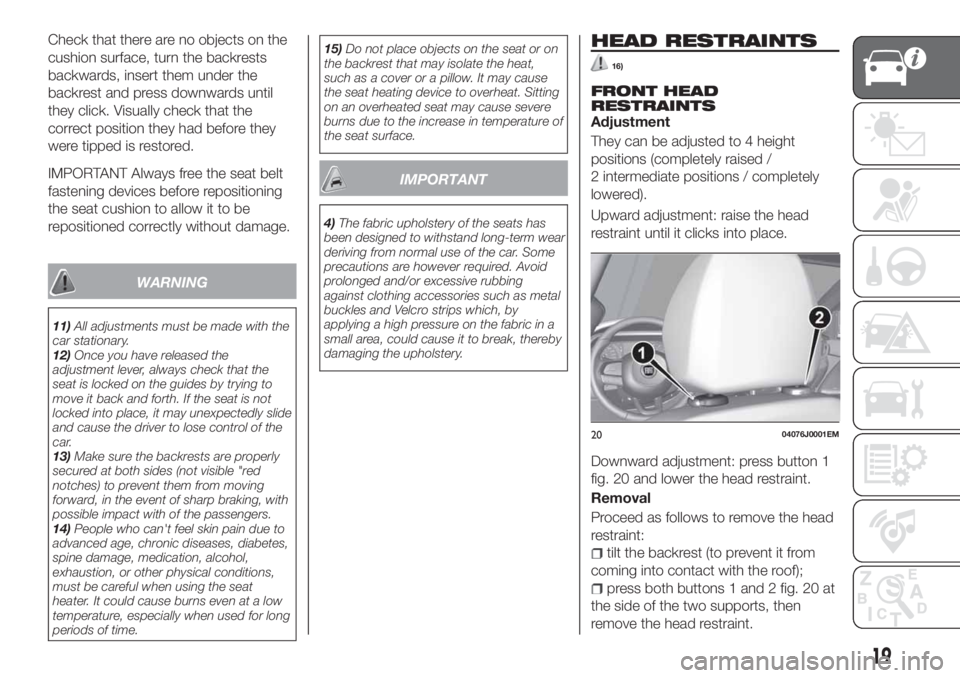
Downward adjustment: press button 1
fig. 20 and lower the head restraint.
Removal
Proceed as follows to remove the head
restraint:
tilt the backrest (to prevent it from
coming into contact with the roof);
press both buttons 1 and 2 fig. 20 at
the side of the two supports, then
remove the head restraint.
2004076J0001EM
19
Page 22 of 304
IMPORTANT Always reposition the
head restraints if they have been
removed before starting to drive
normally.
REAR HEAD RESTRAINTS
Adjustment
Two side and one central head
restraints (where present) can be
height-adjusted to 3 positions
(completely raised / intermediate /
completely lowered) are provided for
the rear seats
Upward adjustment: raise the head
restraint until it clicks into place.
Travelling with the head restraints in the
not-in-use position (all low) occupied
rear seats is not advised.
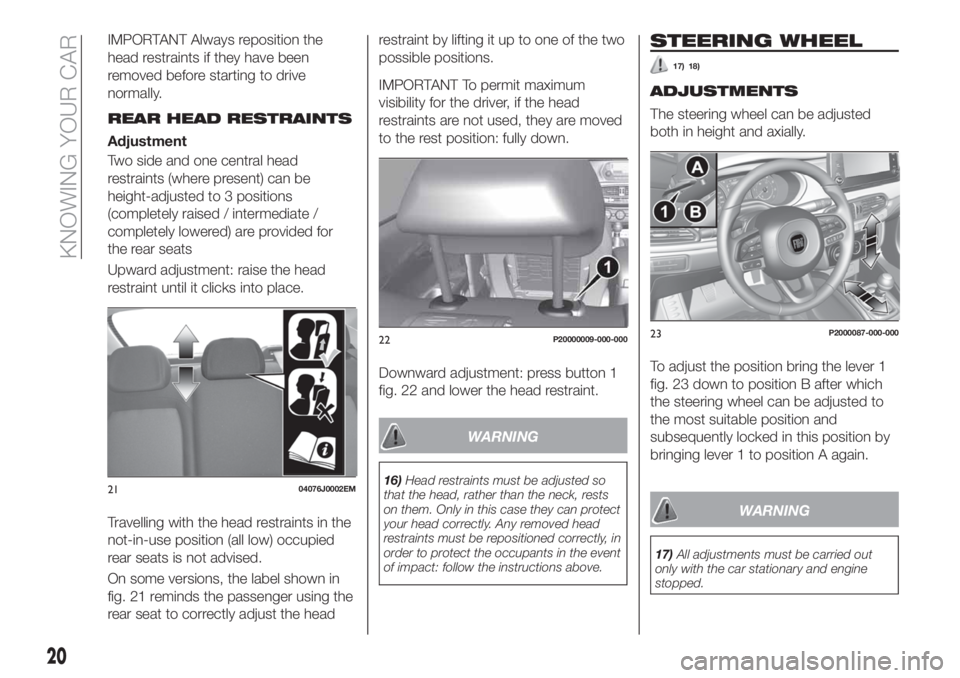
On some versions, the label shown in
fig. 21 reminds the passenger using the
rear seat to correctly adjust the headrestraint by lifting it up to one of the two
possible positions.
IMPORTANT To permit maximum
visibility for the driver, if the head
restraints are not used, they are moved
to the rest position: fully down.
Downward adjustment: press button 1
fig. 22 and lower the head restraint.
WARNING
16)Head restraints must be adjusted so
that the head, rather than the neck, rests
on them. Only in this case they can protect
your head correctly. Any removed head
restraints must be repositioned correctly, in
order to protect the occupants in the event
of impact: follow the instructions above.
STEERING WHEEL
17) 18)
ADJUSTMENTS
The steering wheel can be adjusted
both in height and axially.
To adjust the position bring the lever 1
fig. 23 down to position B after which
the steering wheel can be adjusted to
the most suitable position and
subsequently locked in this position by
bringing lever 1 to position A again.
WARNING
17)All adjustments must be carried out
only with the car stationary and engine
stopped.
2104076J0002EM
22P20000009-000-00023P2000087-000-000
20
KNOWING YOUR CAR
Page 56 of 304
Doors & Locks.
Display
By selecting item "Display" you can
access the settings/information
regarding: " Display Settings”,
Language", "See phone" (available in
versions and markets where present),
"See navigation" (available in versions
and markets where present),
"Automatic reset Trip B", “Display
lighting”.
Units
Select item "Units" to choose the unit of
measurement between: "Imperial",
"Metric", "Customised".
Clock & Date
Select item "Clock & Date" to make the
following adjustments: "Set time", "Time
format", "Set date".
Safety
Select item "Security" to make the
following adjustments: "Passenger
AIRBAG", "Speed warning", "Seat belt
buzzer".
"Passenger AIRBAG" adjustment allows
you to activate/deactivate the
passenger airbag.Passenger's
protection not active: the
LED
comes on constantly in the dashboard
dashboard.Safety & Assistance
Select item "Safety & Assistance" to
make the following adjustments: Rain
sensor, Warning Volume, Brake Control,
Brake C.Sensivity, Park Assist, Vol. Park
Assist.
Lights
Select item "Lights" to make the
following adjustments: "Courtesy
lights", "Daytime running lights",
"Cornering lights", "Headlamp sensor",
"Follow me home".
Doors & Locks
Select item "Doors & Locks" to make
the following adjustments: "Autoclose",
"Flash Lights w/Lock", "Auto unlock on
exit".
NOTE With theUconnect™system,
some Menu items are shown and
managed on the display of the latter
and not on the instrument panel display
(refer to the dedicated Multimedia
chapter or to the supplement available
online).CONTROL BUTTONS
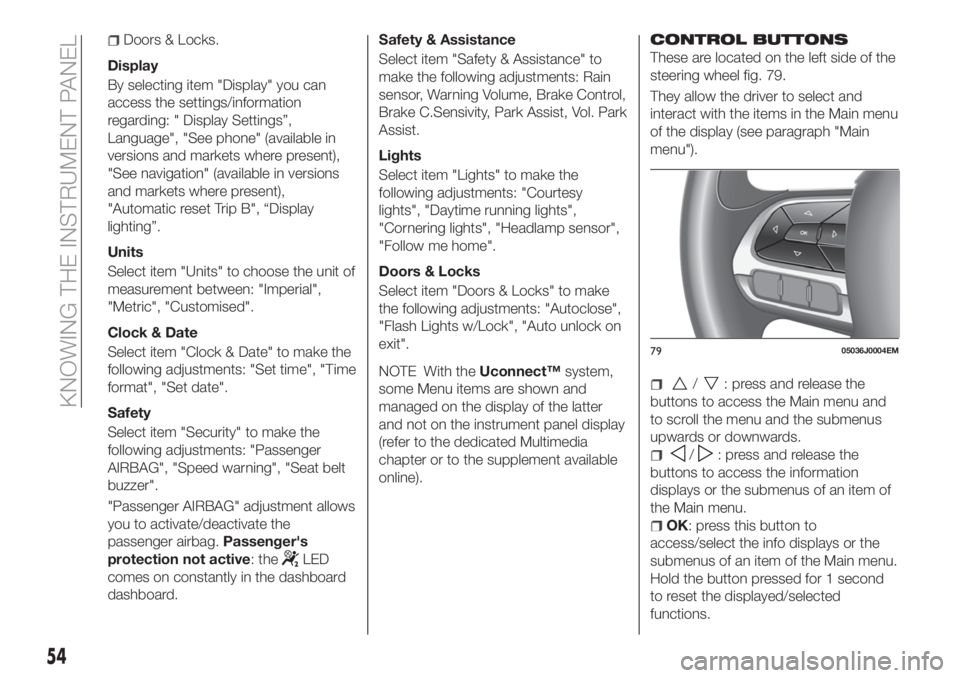
These are located on the left side of the
steering wheel fig. 79.
They allow the driver to select and
interact with the items in the Main menu
of the display (see paragraph "Main
menu").
/: press and release the
buttons to access the Main menu and
to scroll the menu and the submenus
upwards or downwards.
/: press and release the
buttons to access the information
displays or the submenus of an item of
the Main menu.
OK: press this button to
access/select the info displays or the
submenus of an item of the Main menu.
Hold the button pressed for 1 second
to reset the displayed/selected
functions.
7905036J0004EM
54
KNOWING THE INSTRUMENT PANEL
Page 87 of 304
37)Be careful in the case of repairs and
new paintings in the area around the
sensor (panel covering the sensor on the
left side of the bumper). In the event of a
frontal impact the sensor may automatically
deactivate and display a warning to indicate
that the sensor needs to be repaired. Even
without a malfunction warning, deactivate
the system operation if you think that the
position of the radar sensor has changed
(e.g. due to low-speed frontal impact as
during parking manoeuvres). In these
cases, go to a Fiat Dealership to have the
radar sensor realigned or replaced.OCCUPANT
PROTECTION
SYSTEMS
Some of the most important safety
equipment of the vehicle comprise the
following protection systems:
seat belts;
SBR (Seat Belt Reminder) system;
head restraints;
child restraint systems;
Front air bags, side air bags and
drop down air bags (where provided).
Read the information given the following
pages with the utmost care. It is of
fundamental importance that the
protection systems are used in the
correct way to guarantee the maximum
possible safety level for the driver and
the passengers.
For the description of the head restraint
adjustment see the "Head restraints"
paragraph in the "Knowing your vehicle"
chapter.
SEAT BELTS
All vehicle seats are equipped with seat
belts with three anchor points and a
retractor.
The retractor mechanism operates
locking the belt in the event of sharp
braking or strong deceleration due to
an impact. This allows the belt strap to
slide freely and to adapt to the body of
the occupant. In the event of an
accident, the belt will lock reducing the
risk of impact inside the passenger
compartment and of being projected
outside the vehicle.
The driver is responsible for respecting,
and ensuring that all the other
occupants of the vehicle also respect,
the local laws in force in relation to the
use of the seat belts.
Always fasten the seat belts before
setting off.
USING THE SEAT BELTS
The seat belt should be worn keeping
the chest straight and rested against
the backrest.
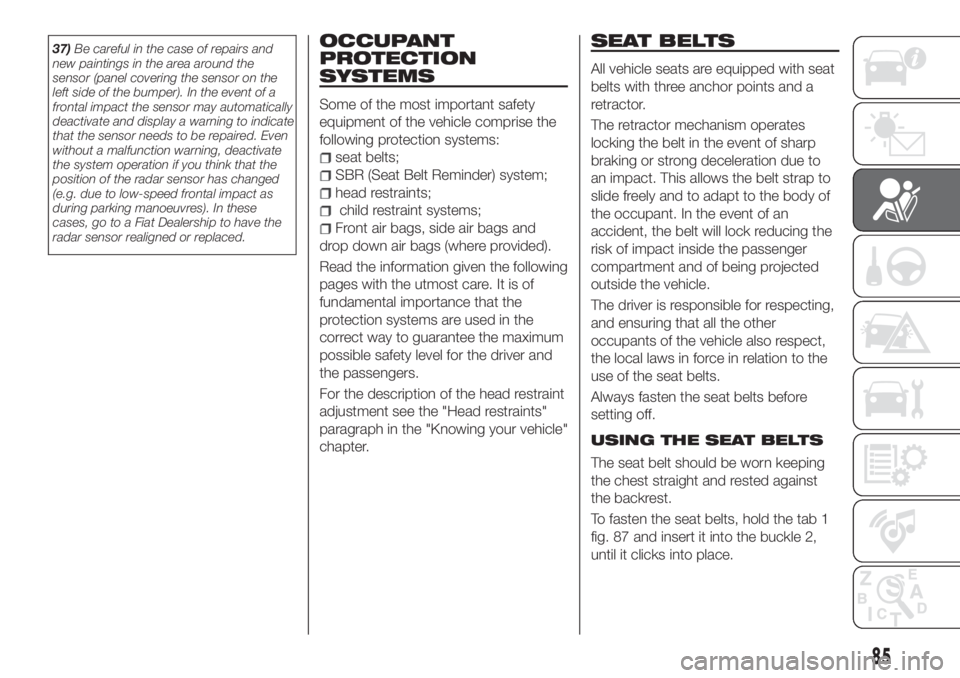
To fasten the seat belts, hold the tab 1
fig. 87 and insert it into the buckle 2,
until it clicks into place.
85
Page 89 of 304
75)After the height adjustment, always
check that the grip is locked in one of the
preset positions. To do this, with button
1 released, exert further pressure
downwards to allow the locking device to
click if the grip has not been released in
one of the possible positions.SBR (SEAT BELT
REMINDER) SYSTEM
(for versions/markets, where provided)
The SBR system warns the passengers
of the front and rear (where provided)
seats if their seat belt is not fastened.
The system signals unfastened seat
belts with visual warnings (warning
lights on in the instrument panel and
symbols on the display) and an
acoustic signal (see the following
paragraphs).
NOTE To deactivate the acoustic
warning permanently go to a Fiat
Dealership. The acoustic warning can
be reactivated at any time through the
display menu (see the "Display"
paragraph in the "Knowing the
instrument panel" chapter).
Front seat belt warning light
behaviour
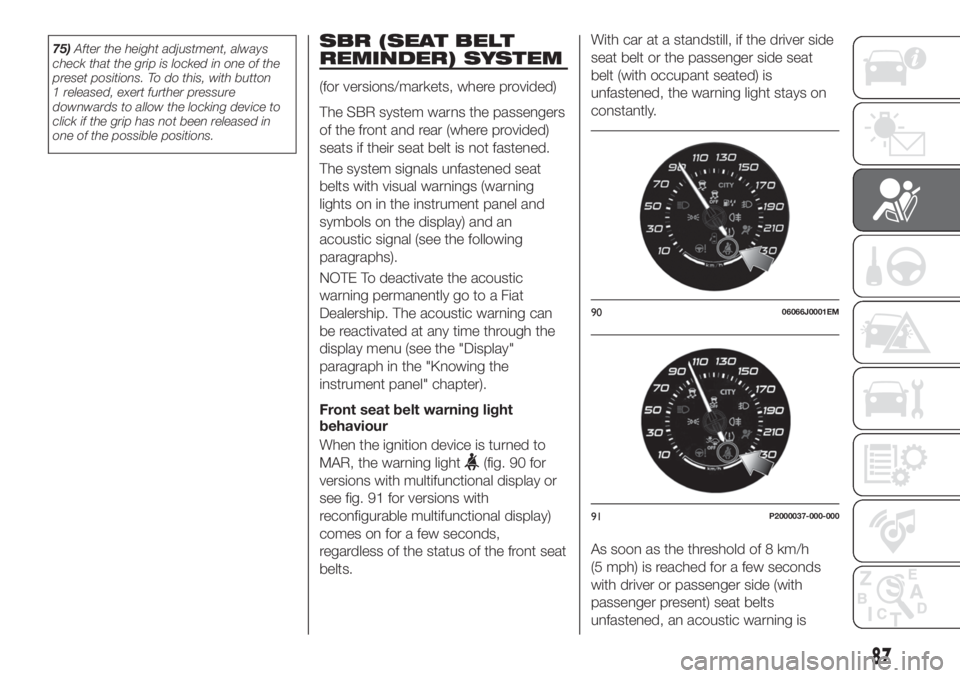
When the ignition device is turned to
MAR, the warning light
(fig. 90 for
versions with multifunctional display or
see fig. 91 for versions with
reconfigurable multifunctional display)
comes on for a few seconds,
regardless of the status of the front seat
belts.With car at a standstill, if the driver side
seat belt or the passenger side seat
belt (with occupant seated) is
unfastened, the warning light stays on
constantly.
As soon as the threshold of 8 km/h
(5 mph) is reached for a few seconds
with driver or passenger side (with
passenger present) seat belts
unfastened, an acoustic warning is
9006066J0001EM
91P2000037-000-000
87
Page 106 of 304
84)Incorrect fitting of the child restraint
system may result in an inefficient
protection system. In the event of an
accident the child restraint system may
become loose and the child may be
injured, even fatally. When fitting a restraint
system for newborns or children, strictly
comply with the instructions provided by
the Manufacturer.
85)When the child restraint system is not
used, secure it with the seat belt or with
the ISOFIX anchorages, or remove it from
the vehicle. Do not leave it unsecured
inside the passenger compartment. In this
way, in the case of sudden braking or an
accident, it will not cause injuries to the
occupants.
86)After installing a child restraint system,
do not move the seat: always remove the
child restraint system before making any
adjustment.
87)Always make sure that the diagonal
section of the seat belt does not pass
under the arms or behind the back of the
child. In the event of an accident the seat
belt will not be able to secure the child,
with the risk of injury, including fatal injury.
Therefore the child must always wear the
seat belt correctly.
88)Do not use the same lower anchorage
to install more than one child restraint
system.
89)If a Universal ISOFIX child seat is not
fixed to all three anchorages, the child seat
will not be able to protect the child
correctly. In a crash, the child could be
seriously or fatally injured.90)Fit the child restraint system when the
car is stationary. The child restraint system
is correctly fixed to the brackets when you
hear the click. Follow the instructions for
assembly, disassembly and positioning that
the Manufacturer must supply with the
child restraint system.SUPPLEMENTARY
RESTRAINT SYSTEM
(SRS) - AIRBAG
The vehicle is equipped with:
front driver airbag;
front passenger airbag;
driver and passenger front side bags
for pelvis, chest and shoulder
protection (Side bags);
side bags for head protection of front
seat passengers and rear side seat
passengers (window bag).
The location of the airbags on the
vehicle is marked by the word
"AIRBAG" in the middle of the steering
wheel, on the dashboard, on the side
trim or on a label placed next to the
airbag deployment area.
FRONT AIRBAGS
The front (driver and passenger) airbags
protect the front seat occupants in the
event of head-on crashes of
medium-high severity, by placing the
cushion between the occupant and the
steering wheel or dashboard.
Therefore non-activation of airbags in
other types of collisions (side impacts,
rear shunts, roll-overs, etc.) does not
indicate a system malfunction.
104
SAFETY