FIAT ULYSSE 2007 2.G Owners Manual
Manufacturer: FIAT, Model Year: 2007, Model line: ULYSSE, Model: FIAT ULYSSE 2007 2.GPages: 254, PDF Size: 3.42 MB
Page 171 of 254
IN AN EMERGENCY
170
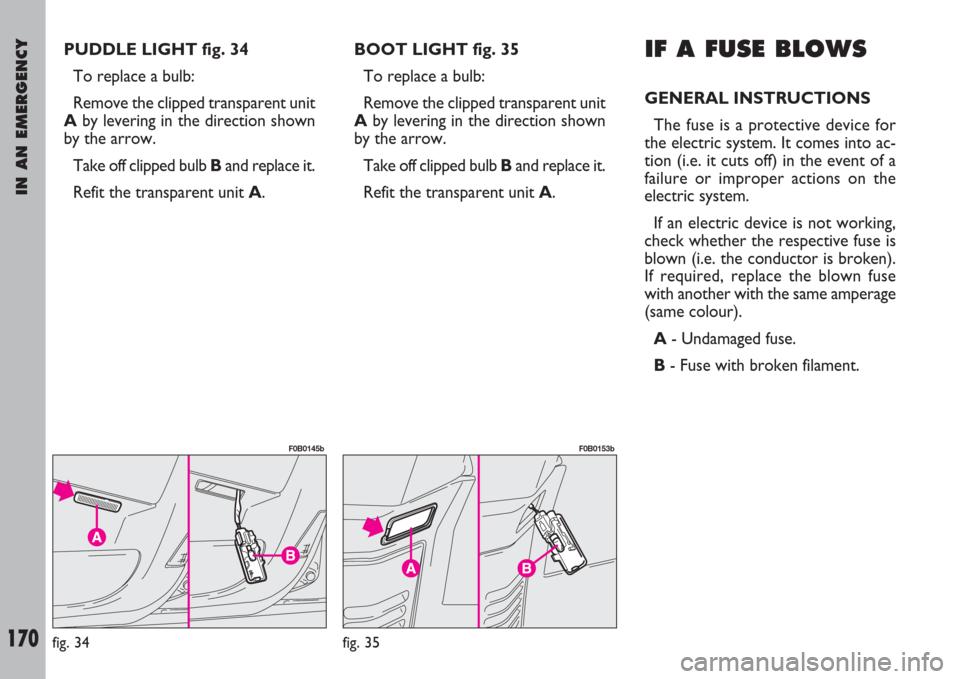
PUDDLE LIGHT fig. 34
To replace a bulb:
Remove the clipped transparent unit
Aby levering in the direction shown
by the arrow.
Take off clipped bulb Band replace it.
Refit the transparent unit A.BOOT LIGHT fig. 35
To replace a bulb:
Remove the clipped transparent unit
Aby levering in the direction shown
by the arrow.
Take off clipped bulb Band replace it.
Refit the transparent unit A. IF A FUSE BLOWS
GENERAL INSTRUCTIONS
The fuse is a protective device for
the electric system. It comes into ac-
tion (i.e. it cuts off) in the event of a
failure or improper actions on the
electric system.
If an electric device is not working,
check whether the respective fuse is
blown (i.e. the conductor is broken).
If required, replace the blown fuse
with another with the same amperage
(same colour).
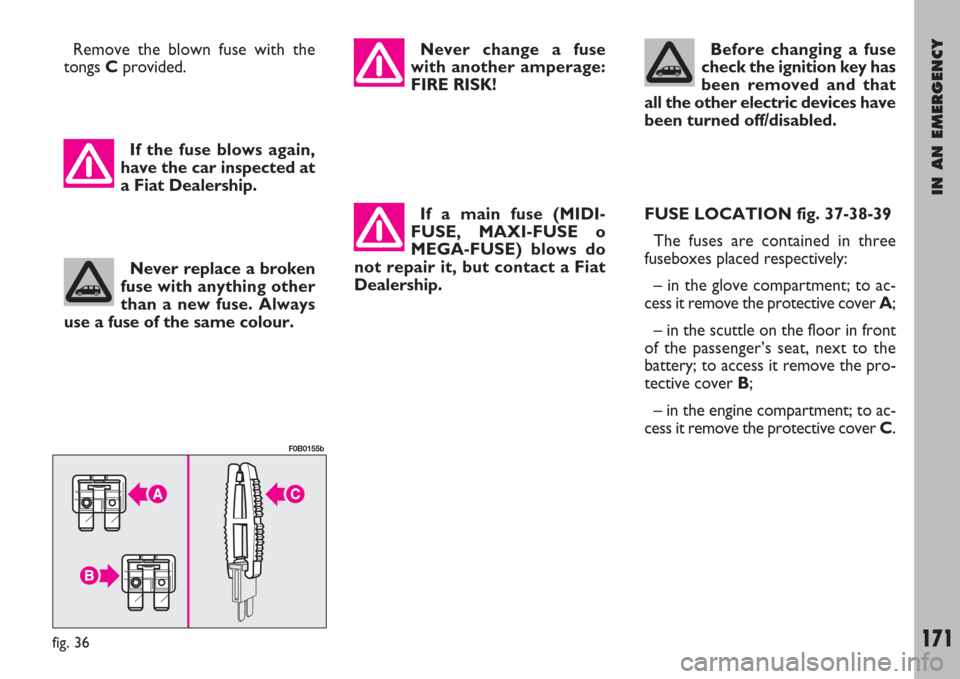
A- Undamaged fuse.
B- Fuse with broken filament.
fig. 34
F0B0145b
fig. 35
F0B0153b
Page 172 of 254
IN AN EMERGENCY
171
Remove the blown fuse with the
tongs Cprovided.
If a main fuse (MIDI-
FUSE, MAXI-FUSE o
MEGA-FUSE) blows do
not repair it, but contact a Fiat
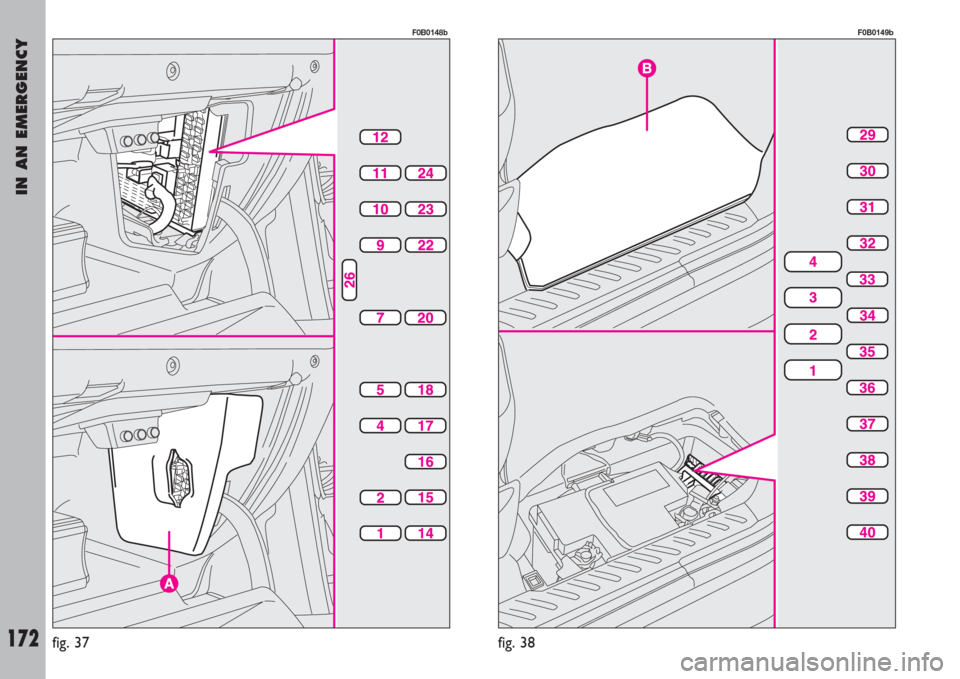
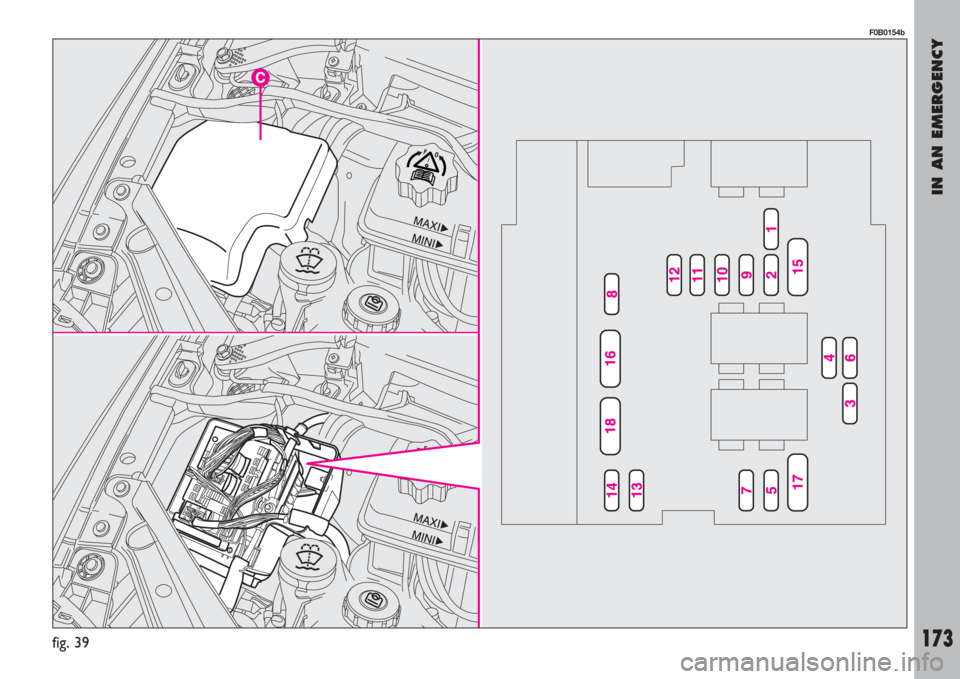
Dealership.FUSE LOCATION fig. 37-38-39
The fuses are contained in three
fuseboxes placed respectively:
– in the glove compartment; to ac-
cess it remove the protective cover A;
– in the scuttle on the floor in front
of the passenger’s seat, next to the
battery; to access it remove the pro-
tective cover B;
– in the engine compartment; to ac-
cess it remove the protective cover C. Never replace a broken
fuse with anything other
than a new fuse. Always
use a fuse of the same colour.Before changing a fuse
check the ignition key has
been removed and that
all the other electric devices have
been turned off/disabled.Never change a fuse
with another amperage:
FIRE RISK!
fig. 36
F0B0155b
If the fuse blows again,
have the car inspected at
a Fiat Dealership.
Page 173 of 254
IN AN EMERGENCY
172fig. 37
F0B0148b
fig. 38
F0B0149b
Page 174 of 254
IN AN EMERGENCY
173fig. 39
F0B0154b
Page 175 of 254
IN AN EMERGENCY
174
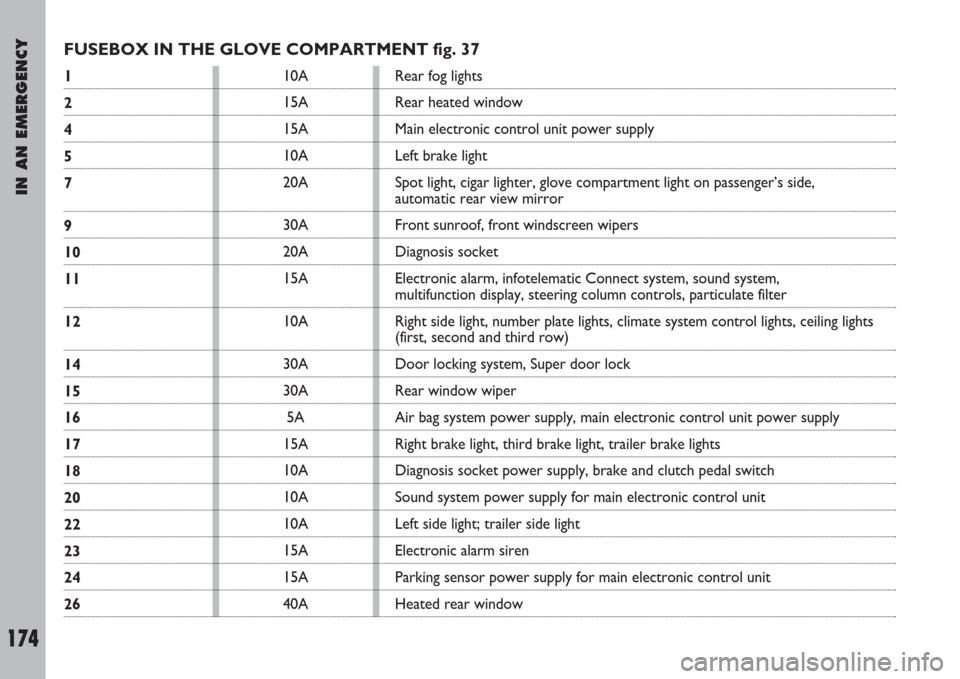
FUSEBOX IN THE GLOVE COMPARTMENT fig. 37
1
2
4
5
7
9
10
11
12
14
15
16
17
18
20
22
23
24
2610A
15A
15A
10A
20A
30A
20A
15A
10A
30A
30A
5A
15A
10A
10A
10A
15A
15A
40ARear fog lights
Rear heated window
Main electronic control unit power supply
Left brake light
Spot light, cigar lighter, glove compartment light on passenger’s side,
automatic rear view mirror
Front sunroof, front windscreen wipers
Diagnosis socket
Electronic alarm, infotelematic Connect system, sound system,
multifunction display, steering column controls, particulate filter
Right side light, number plate lights, climate system control lights, ceiling lights
(first, second and third row)
Door locking system, Super door lock
Rear window wiper
Air bag system power supply, main electronic control unit power supply
Right brake light, third brake light, trailer brake lights
Diagnosis socket power supply, brake and clutch pedal switch
Sound system power supply for main electronic control unit
Left side light; trailer side light
Electronic alarm siren
Parking sensor power supply for main electronic control unit
Heated rear window
Page 176 of 254
IN AN EMERGENCY
175
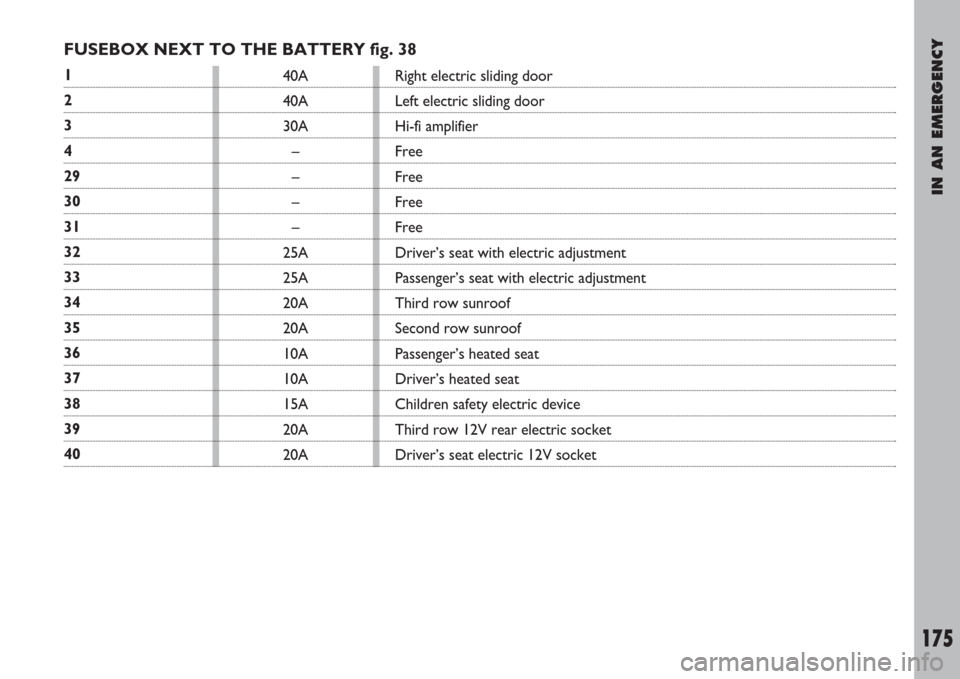
FUSEBOX NEXT TO THE BATTERY fig. 38
1
2
3
4
29
30
31
32
33
34
35
36
37
38
39
4040A
40A
30A
–
–
–
–
25A
25A
20A
20A
10A
10A
15A
20A
20ARight electric sliding door
Left electric sliding door
Hi-fi amplifier
Free
Free
Free
Free
Driver’s seat with electric adjustment
Passenger’s seat with electric adjustment
Third row sunroof
Second row sunroof
Passenger’s heated seat
Driver’s heated seat
Children safety electric device
Third row 12V rear electric socket
Driver’s seat electric 12V socket
Page 177 of 254
IN AN EMERGENCY
176
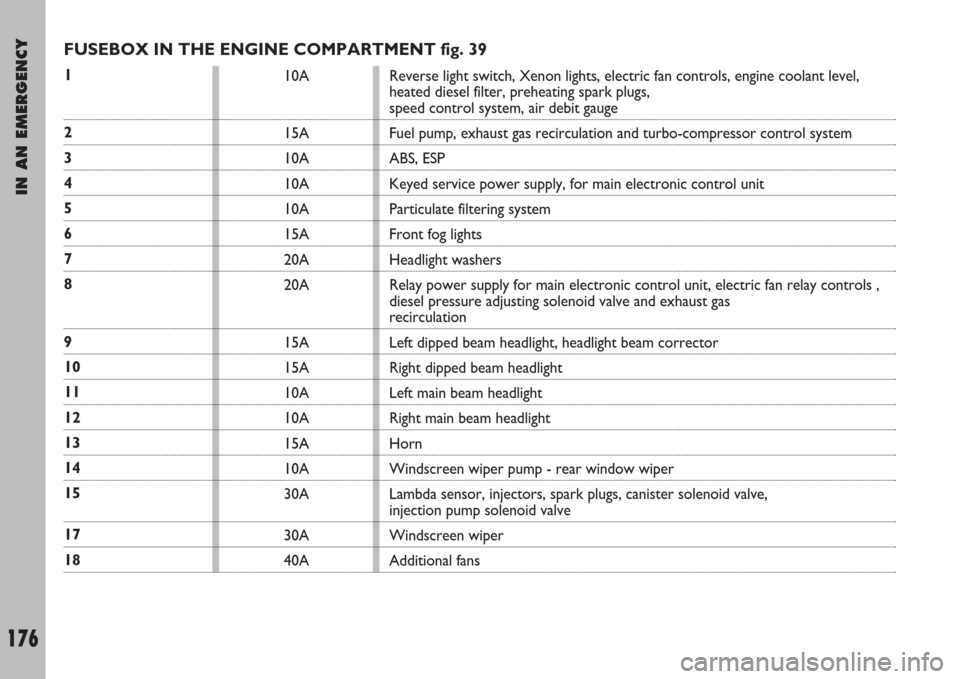
FUSEBOX IN THE ENGINE COMPARTMENT fig. 39
1
2
3
4
5
6
7
8
9
10
11
12
13
14
15
17
1810A
15A
10A
10A
10A
15A
20A
20A
15A
15A
10A
10A
15A
10A
30A
30A
40AReverse light switch, Xenon lights, electric fan controls, engine coolant level,
heated diesel filter, preheating spark plugs,
speed control system, air debit gauge
Fuel pump, exhaust gas recirculation and turbo-compressor control system
ABS, ESP
Keyed service power supply, for main electronic control unit
Particulate filtering system
Front fog lights
Headlight washers
Relay power supply for main electronic control unit, electric fan relay controls ,
diesel pressure adjusting solenoid valve and exhaust gas
recirculation
Left dipped beam headlight, headlight beam corrector
Right dipped beam headlight
Left main beam headlight
Right main beam headlight
Horn
Windscreen wiper pump - rear window wiper
Lambda sensor, injectors, spark plugs, canister solenoid valve,
injection pump solenoid valve
Windscreen wiper
Additional fans
Page 178 of 254
IN AN EMERGENCY
177
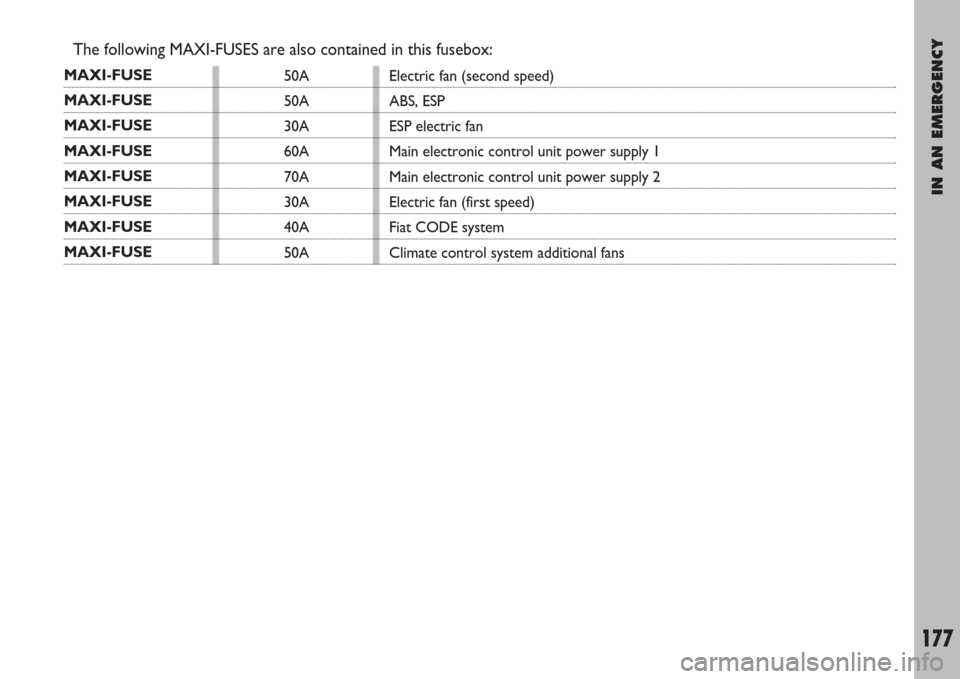
The following MAXI-FUSES are also contained in this fusebox:
MAXI-FUSE
MAXI-FUSE
MAXI-FUSE
MAXI-FUSE
MAXI-FUSE
MAXI-FUSE
MAXI-FUSE
MAXI-FUSE 50A
50A
30A
60A
70A
30A
40A
50AElectric fan (second speed)
ABS, ESP
ESP electric fan
Main electronic control unit power supply 1
Main electronic control unit power supply 2
Electric fan (first speed)
Fiat CODE system
Climate control system additional fans
Page 179 of 254
IN AN EMERGENCY
178
IF THE BATTERY
IS FLAT
First of all, read the “Car mainte-
nance” section for steps to be taken
to avoid the battery running down and
to ensure it has a long life.
IMPORTANTBattery recharging
procedure is given as information on-
ly since this operation shall be only
performed at a Fiat Dealership.
RECHARGING THE BATTERY
You are advised to recharge the bat-
tery slowly for a period of approxi-
mately 24 hours at a low amperage.
Charging for too long could damage
the battery.
Proceed as follows:
1)disconnect the terminal from the
battery negative pole.IMPORTANTIf the vehicle is
equipped with an alarm, switch it off
with the remote control.
2)Connect the charger cables to the
battery terminals.
3) Turn on the charger.
4)When you have finished, turn the
charger off before disconnecting the
battery.
5)Reconnect the cables to the bat-
tery terminals. Make sure the polari-
ty is correct.
The liquid in the battery
is poisonous and corro-
sive. Do not let it touch
the skin or eyes. Recharging the
battery should be done in a well-
ventilated area away from naked
flames or possible sources of
sparks: explosion and fire risk.Do not attempt to
charge a frozen battery: it
must firstly be thawed,
otherwise it may burst. If freez-
ing has occurred, the battery
should be checked by skilled per-
sonnel to make sure that the in-
ternal elements are not damaged
and that the body is not cracked,
with the risk of leaking poisonous
and corrosive acid.
JUMP STARTING
See “Jump starting” in this chapter.
Page 180 of 254
IN AN EMERGENCY
179
JACKING THE CAR
WITH THE JACK
See “If a tyre is punctured”, in this
chapter.
Please note:
– the jack requires no adjustments;
– the jack cannot be repaired. If it
breaks it must be replaced with a new
jack;
– no other tool, apart from the han-
dle shown in this chapter, can be fit-
ted to the jack.An incorrectly posi-
tioned jack may cause the
vehicle to fall. Do not use
the jack to lift loads exceeding
that indicated on the label at-
tached to the jack itself.WITH A SHOP JACK
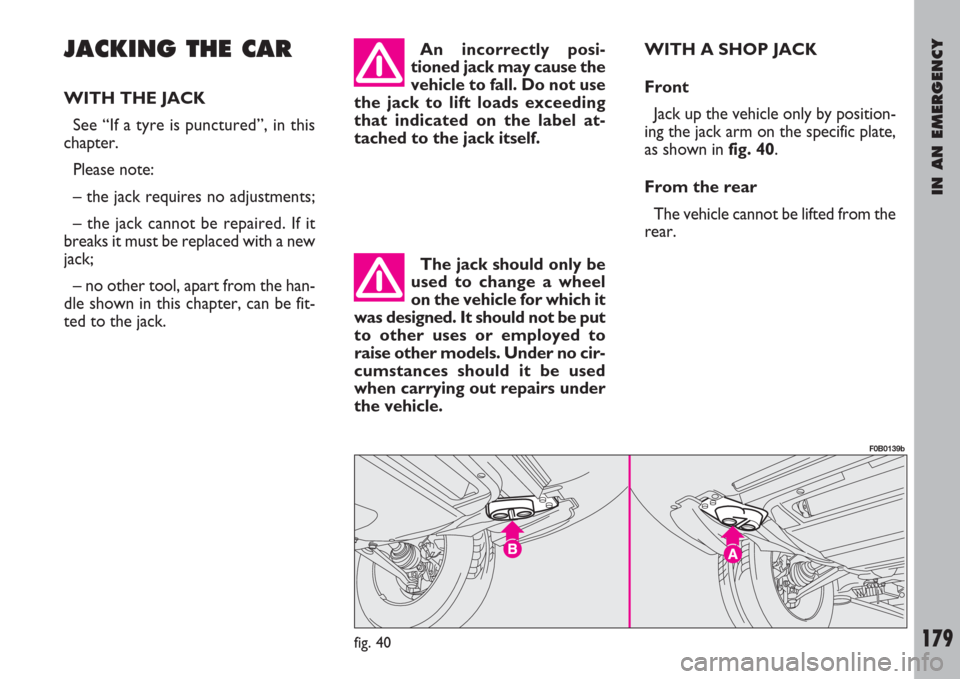
Front
Jack up the vehicle only by position-
ing the jack arm on the specific plate,
as shown in fig. 40.
From the rear
The vehicle cannot be lifted from the
rear.
The jack should only be
used to change a wheel
on the vehicle for which it
was designed. It should not be put
to other uses or employed to
raise other models. Under no cir-
cumstances should it be used
when carrying out repairs under
the vehicle.
fig. 40
F0B0139b