FORD B MAX 2012 1.G Owners Manual
Manufacturer: FORD, Model Year: 2012, Model line: B MAX, Model: FORD B MAX 2012 1.GPages: 256, PDF Size: 19.67 MB
Page 171 of 256
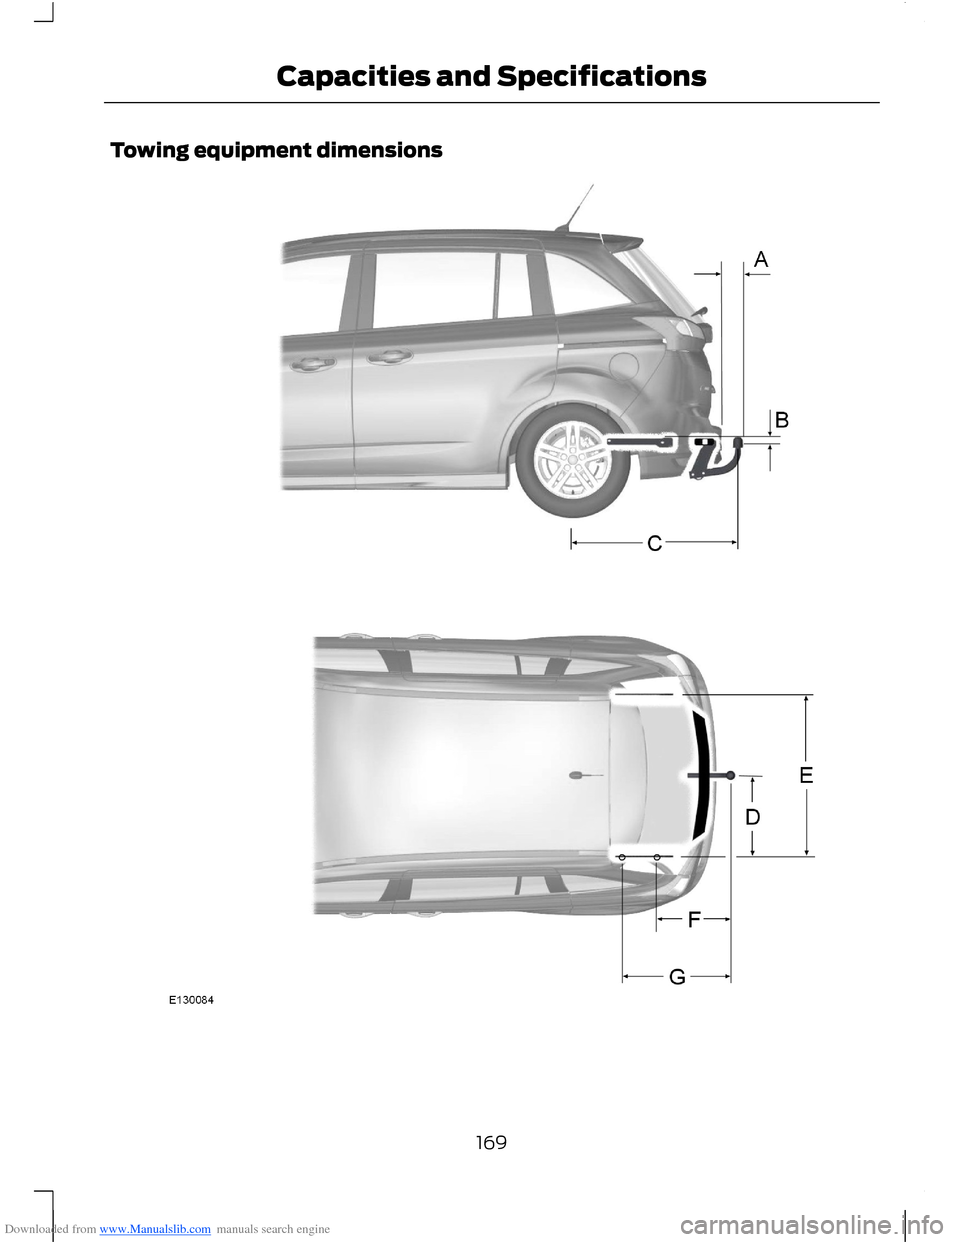
Downloaded from www.Manualslib.com manuals search engine Towing equipment dimensions
169Capacities and Specifications
Page 172 of 256
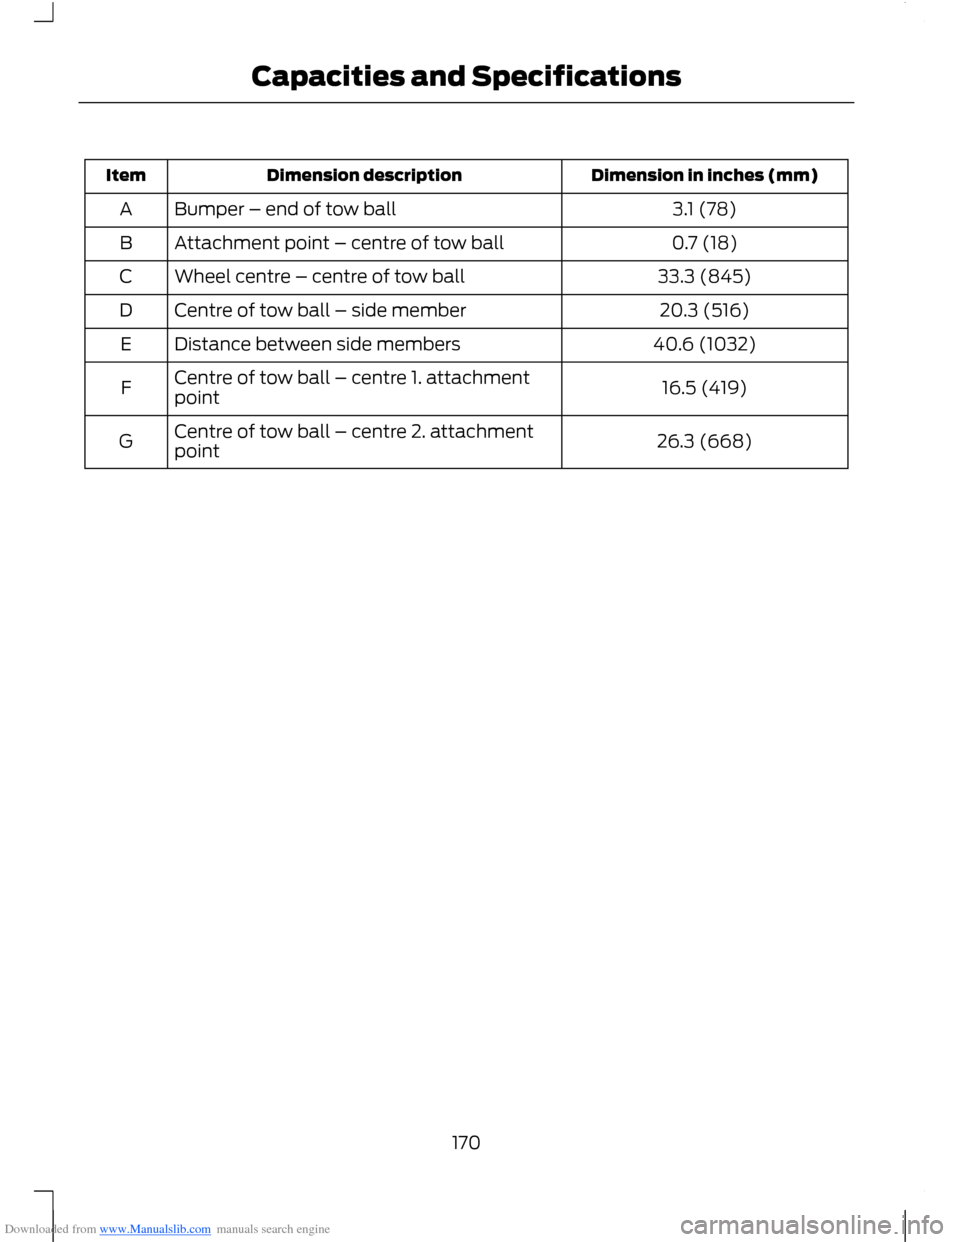
Downloaded from www.Manualslib.com manuals search engine Dimension in inches (mm)Dimension descriptionItem
3.1 (78)Bumper – end of tow ballA
0.7 (18)Attachment point – centre of tow ballB
33.3 (845)Wheel centre – centre of tow ballC
20.3 (516)Centre of tow ball – side memberD
40.6 (1032)Distance between side membersE
16.5 (419)Centre of tow ball – centre 1. attachmentpointF
26.3 (668)Centre of tow ball – centre 2. attachmentpointG
170Capacities and Specifications
Page 173 of 256
Downloaded from www.Manualslib.com manuals search engine GENERAL INFORMATION
Radio Frequencies and ReceptionFactors
WARNING
Radio sound levels can go above85dCB. Listening to sounds about 85decibels can harm the humanauditory system.
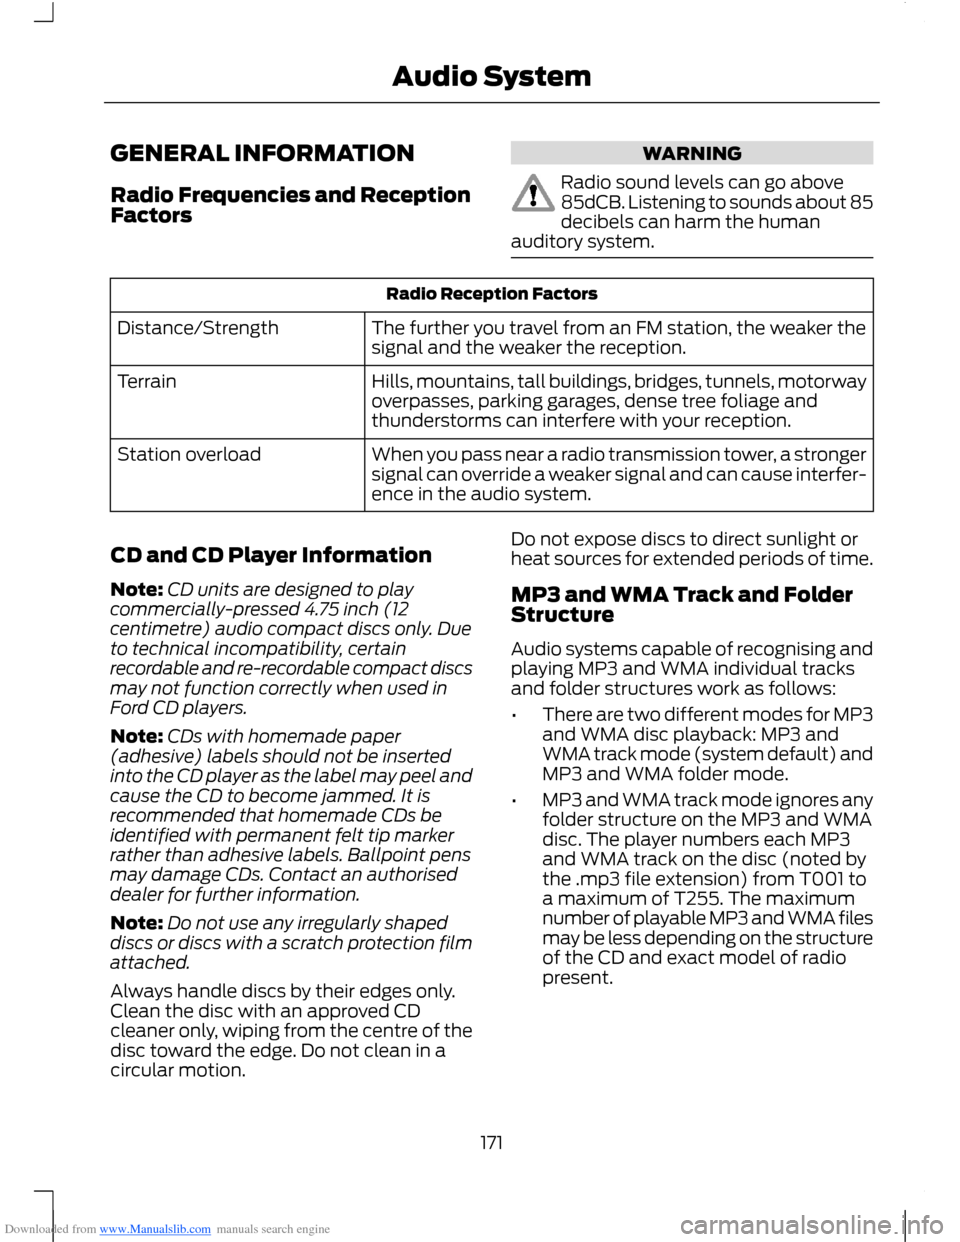
Radio Reception Factors
The further you travel from an FM station, the weaker thesignal and the weaker the reception.Distance/Strength
Hills, mountains, tall buildings, bridges, tunnels, motorwayoverpasses, parking garages, dense tree foliage andthunderstorms can interfere with your reception.
Terrain
When you pass near a radio transmission tower, a strongersignal can override a weaker signal and can cause interfer-ence in the audio system.
Station overload
CD and CD Player Information
Note:CD units are designed to playcommercially-pressed 4.75 inch (12centimetre) audio compact discs only. Dueto technical incompatibility, certainrecordable and re-recordable compact discsmay not function correctly when used inFord CD players.
Note:CDs with homemade paper(adhesive) labels should not be insertedinto the CD player as the label may peel andcause the CD to become jammed. It isrecommended that homemade CDs beidentified with permanent felt tip markerrather than adhesive labels. Ballpoint pensmay damage CDs. Contact an authoriseddealer for further information.
Note:Do not use any irregularly shapeddiscs or discs with a scratch protection filmattached.
Always handle discs by their edges only.Clean the disc with an approved CDcleaner only, wiping from the centre of thedisc toward the edge. Do not clean in acircular motion.
Do not expose discs to direct sunlight orheat sources for extended periods of time.
MP3 and WMA Track and FolderStructure
Audio systems capable of recognising andplaying MP3 and WMA individual tracksand folder structures work as follows:
•There are two different modes for MP3and WMA disc playback: MP3 andWMA track mode (system default) andMP3 and WMA folder mode.
•MP3 and WMA track mode ignores anyfolder structure on the MP3 and WMAdisc. The player numbers each MP3and WMA track on the disc (noted bythe .mp3 file extension) from T001 toa maximum of T255. The maximumnumber of playable MP3 and WMA filesmay be less depending on the structureof the CD and exact model of radiopresent.
171Audio System
Page 174 of 256
Downloaded from www.Manualslib.com manuals search engine •MP3 and WMA folder mode representsa folder structure consisting of onelevel of folders. The CD player numbersall MP3 and WMA tracks on the disc(noted by the .mp3 or . WMA fileextension) and all folders containingMP3 and WMA files, from F001 (folder)T001 (track) to F253 T255.
•Creating discs with only one level offolders helps with navigation throughthe disc files.
If you are burning your own MP3 and WMAdiscs, it is important to understand howthe system reads the structures you create.While various files may be present, (fileswith extensions other than mp3 andWMA), only files with the .mp3 and WMAextension are played; other files areignored by the system. This enables you touse the same MP3 and WMA disc for avariety of tasks on your work computer,home computer and your in-vehiclesystem.
In track mode, the system displays andplays the structure as if it were only onelevel deep (all .mp3 and WMA files areplayed, regardless of being in a specificfolder). In folder mode, the system onlyplays the .mp3 or WMA files in the currentfolder.
AUDIO UNIT - VEHICLES WITH:
AM/FM/CD
WARNING
Driving while distracted can result inloss of vehicle control, accident andinjury. We strongly recommend thatyou use extreme caution when using anydevice or feature that may take your focusoff the road. Your primary responsibility isthe safe operation of your vehicle. Werecommend against the use of anyhandheld device while driving andencourage the use of voice-operatedsystems when possible. Make sure you areaware of all applicable local laws that mayaffect the use of electronic devices whiledriving.
172Audio System
Page 175 of 256
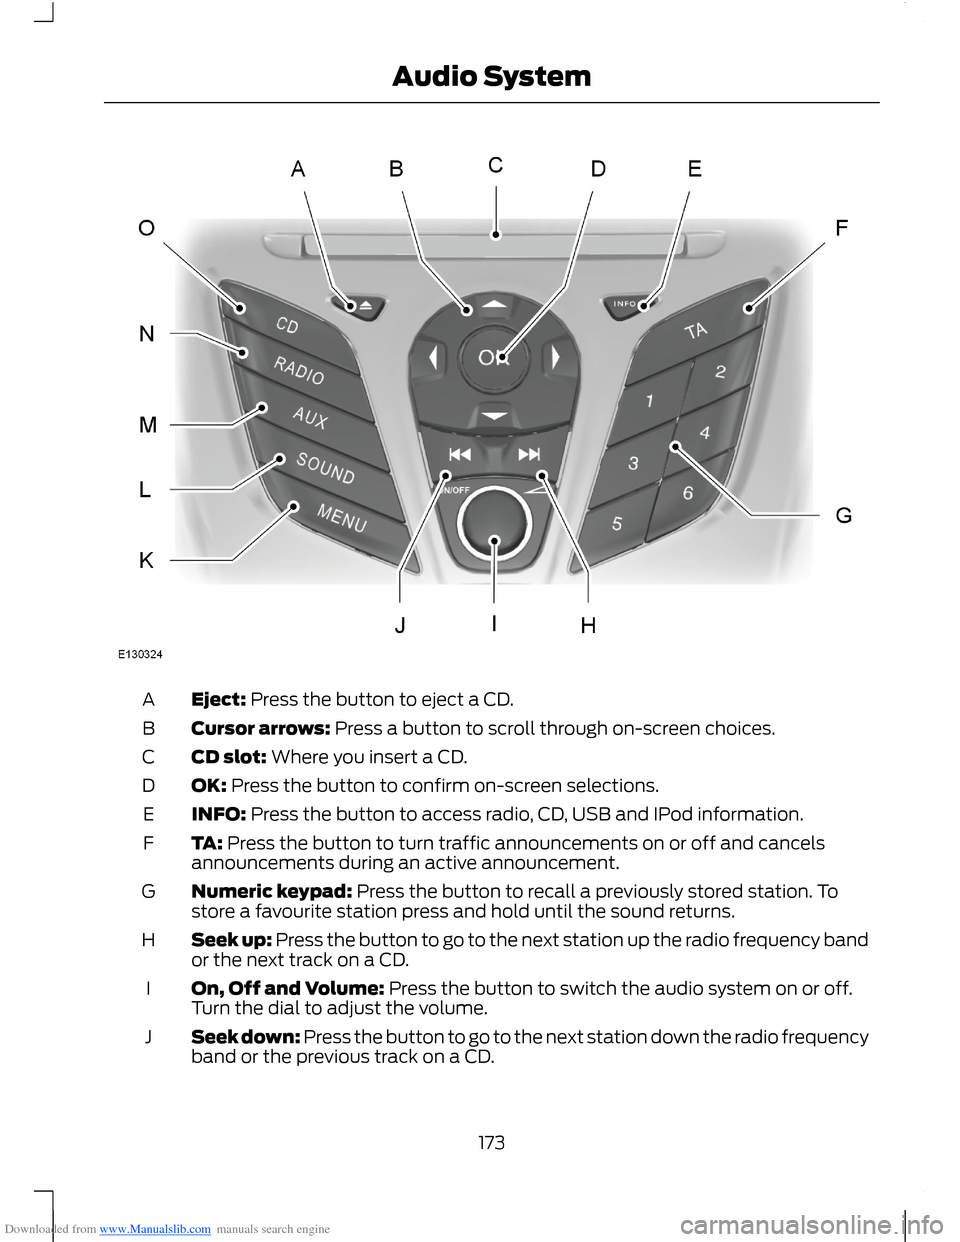
Downloaded from www.Manualslib.com manuals search engine Eject: Press the button to eject a CD.A
Cursor arrows: Press a button to scroll through on-screen choices.B
CD slot: Where you insert a CD.C
OK: Press the button to confirm on-screen selections.D
INFO: Press the button to access radio, CD, USB and IPod information.E
TA: Press the button to turn traffic announcements on or off and cancelsannouncements during an active announcement.F
Numeric keypad: Press the button to recall a previously stored station. Tostore a favourite station press and hold until the sound returns.G
Seek up: Press the button to go to the next station up the radio frequency bandor the next track on a CD.H
On, Off and Volume: Press the button to switch the audio system on or off.Turn the dial to adjust the volume.I
Seek down: Press the button to go to the next station down the radio frequencyband or the previous track on a CD.J
173Audio System
Page 176 of 256
Downloaded from www.Manualslib.com manuals search engine MENU: Press the button to access different audio system features.K
SOUND: Press the button to adjust the sound settings for bass, treble, middle,balance and fade.L
AUX: Press the button to access the AUX and SYNC features, it will also cancelthe menu or list browsing.M
RADIO: Press the button to select different radio bands, it will also cancel themenu or list browsing.N
CD: Press the button to change source to CD, it will also cancel the menu orlist browsing.O
Sound Button
This will allow you to adjust the soundsettings (for example bass, middle andtreble).
1.Press the SOUND button.
2.Use the up and down arrow buttons toselect the required setting.
3.Use the left and right arrow buttons tomake the necessary adjustment. Thedisplay indicates the level selected.
4.Press the OK button to confirm thenew settings.
Waveband Button
Press the RADIO button to select from thewavebands available.
You can use the selector to return to radioreception when you have been listening toanother source.
Alternatively, press the left arrow buttonto display the available wavebands. Scrollto the required waveband and press OK.
Station Tuning Control
Seek Tuning
Select a waveband and briefly press oneof the seek buttons. The unit will stop atthe first station it finds in the direction youhave chosen.
Manual Tuning
1.Press the MENU button.
2.Select RADIO mode and thenMANUAL TUNE.
3.Use the left and right arrow buttons totune down or up the waveband in smallincrements or press and hold toincrement quickly, until you find astation you want to listen to.
4.Press OK to continue listening to astation.
Scan Tuning
Scan allows you to listen to a few secondsof each station detected.
1.Press the MENU button.
2.Select RADIO mode and then SCAN.
3.Use the seek buttons to scan up ordown the selected waveband.
4.Press OK to continue listening to astation.
Station Preset Buttons
This feature allows you to store yourfavourite stations, they can be recalled byselecting the appropriate waveband andpressing one of the preset buttons.
1.Select a waveband.
2.Tune to the station required.
174Audio System
Page 177 of 256
Downloaded from www.Manualslib.com manuals search engine 3.Press and hold one of the presetbuttons. A progress bar and messagewill appear. When the progress barcompletes the station has been stored.The audio unit will also mutemomentarily as confirmation.
You can repeat this on each waveband andfor each preset button.
Note:When you drive to another part of thecountry, stations that broadcast onalternative frequencies and are stored onpreset buttons, may be updated with thecorrect frequency and station name for thatarea.
Autostore Control
Note:This will store up to a maximum ofthe six strongest signals available, eitherfrom the AM or the FM waveband andoverwrite the previously stored stations. Youcan also store stations manually in the sameway as other wavebands.
•Press the MENU button, select RADIOmode, press AUTOSTORE.
•When the search is complete, sound isrestored and the strongest signals arestored on the autostore presets.
Traffic Information Control
Many stations that broadcast on the FMwaveband have a TP code to signify thatthey carry traffic program information.
Turning Traffic Announcements On andOff
Before you can receive trafficannouncements, you must press either theTA or TRAFFIC button. A TA display willappear to show the feature is switched on.
If you are already tuned to a station thatbroadcasts traffic information,TP will alsobe displayed. Otherwise the unit will searchfor a traffic program.
When traffic information is broadcast, itwill automatically interrupt normal radioor CD playback and Trafficannouncement will appear in the display.
If a non-traffic station is selected orrecalled using a preset button, the audiounit will remain on that station unless TAor TRAFFIC is turned off, then on again.
Note:If traffic announcement is on and youselect a preset or manual tune to a nontraffic announcement station no trafficannouncement will be heard.
Note:When you are listening to a nontraffic announcement station and turntraffic announcement off and on again a TPseek will occur.
Traffic Announcement Volume
Traffic announcements interrupt normalbroadcasts at a preset minimum level thatis usually louder than normal listeningvolumes.
To adjust the preset volume:
•Use the volume control to make thenecessary adjustment during anincoming traffic announcementbroadcast. The display will show thelevel selected.
Ending Traffic Announcements
The audio unit will return to normaloperation at the end of each trafficannouncement. To end the announcementprematurely, press TA or TRAFFIC duringthe announcement.
Note:If you press TA or TRAFFIC at anyother time it will switch all announcementsoff.
Automatic Volume Control
When available, automatic volume controladjusts the volume level to compensatefor engine noise and road speed noise.
175Audio System
Page 178 of 256
Downloaded from www.Manualslib.com manuals search engine 1.Press the MENU button and selectAUDIO or AUDIO SETTINGS.
2.Select AVC LEVEL or ADAPTIVEVOL.
3.Use the left or right arrow button toadjust the setting.
4.Press the OK button to confirm yourselection.
5.Press the MENU button to return.
News Broadcasts
Your audio unit may interrupt normalreception to broadcast news bulletins fromstations on the FM waveband, radio datasystem or other enhanced network linkedstations.
The display will indicate there is anincoming announcement, during newsbroadcasts. When the audio unit interruptsfor a news broadcast the preset volumelevel will be the same as trafficannouncements.
1.Press the MENU button.
2.Select AUDIO or AUDIO SETTINGS.
3.Scroll to NEWS and turn on or off withthe OK button.
4.Press the MENU button to return.
Alternative Frequencies
The majority of programs that broadcaston the FM waveband have a programidentification code, it can be recognised byaudio units.
When your vehicle moves from onetransmission area to another with thealternative frequencies tuning switchedon, this function will search for thestrongest station signal.
Under certain conditions, alternativefrequencies tuning may temporarily disruptnormal reception.
When selected, the unit continuallyevaluates signal strength and if a bettersignal becomes available, the unit willswitch to that alternative. It mutes whileit checks a list of alternative frequenciesand if necessary, it will search once acrossthe selected waveband for a genuinealternative frequency.
It will restore radio reception when it findsone or if one is not found, the unit willreturn to the original stored frequency.
When selected,AF will be shown in thedisplay.
1.Press the MENU button.
2.Select AUDIO or AUDIO SETTINGS.
3.Scroll to ALTERNAT FREQ orALTERNATIVE FREQ and turn on oroff with the OK button.
4.Press the MENU button to return.
Regional Mode
Regional mode controls the behavior ofalternative frequencies switching betweenregionally related networks of a parentbroadcaster. A broadcaster may run a fairlylarge network across a large part of thecountry. At various times of the day thislarge network may be broken down into anumber of smaller regional networks,typically centred on major towns or cities.When the network is not split into regionalvariants, the whole network caries thesame programming.
Regional mode ON: This prevents randomalternative frequency switches whenneighbouring regional networks are notcarrying the same programming.
Regional mode OFF: This allows a largercoverage area if neighbouring regionalnetworks are carrying the sameprogramming, but can cause randomalternative frequency switches if they arenot.
1.Press the MENU button.
176Audio System
Page 179 of 256
Downloaded from www.Manualslib.com manuals search engine 2.Select AUDIO or AUDIO SETTINGS.
3.Scroll to RDS REGIONAL and turn onor off with the OK button.
4.Press the MENU button to return.
AUDIO UNIT - VEHICLES WITH:
AM/FM/CD/BLUETOOTH
WARNING
Driving while distracted can result inloss of vehicle control, accident andinjury. We strongly recommend thatyou use extreme caution when using anydevice or feature that may take your focusoff the road. Your primary responsibility isthe safe operation of your vehicle. Werecommend against the use of anyhandheld device while driving andencourage the use of voice-operatedsystems when possible. Make sure you areaware of all applicable local laws that mayaffect the use of electronic devices whiledriving.
177Audio System
Page 180 of 256
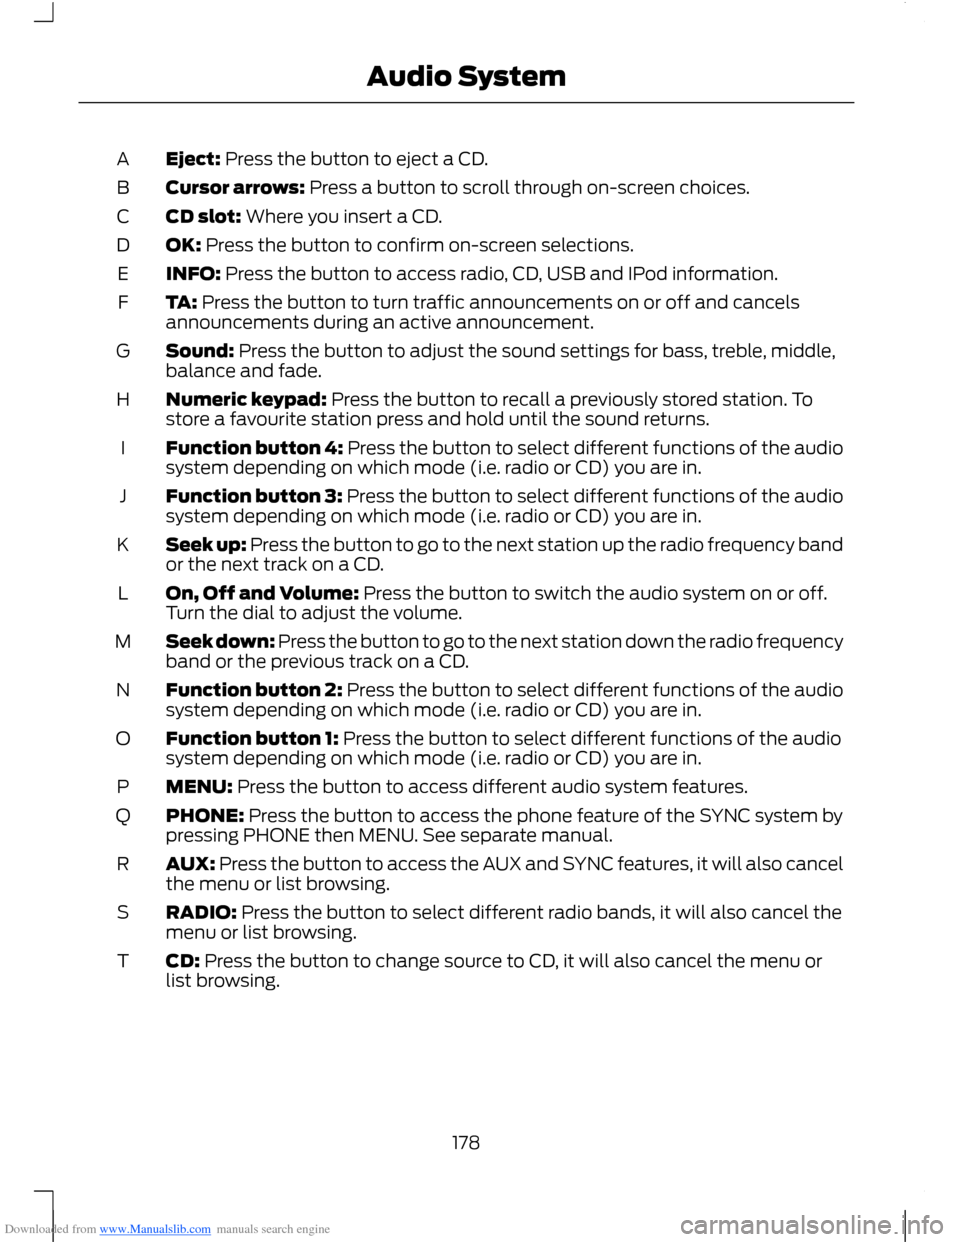
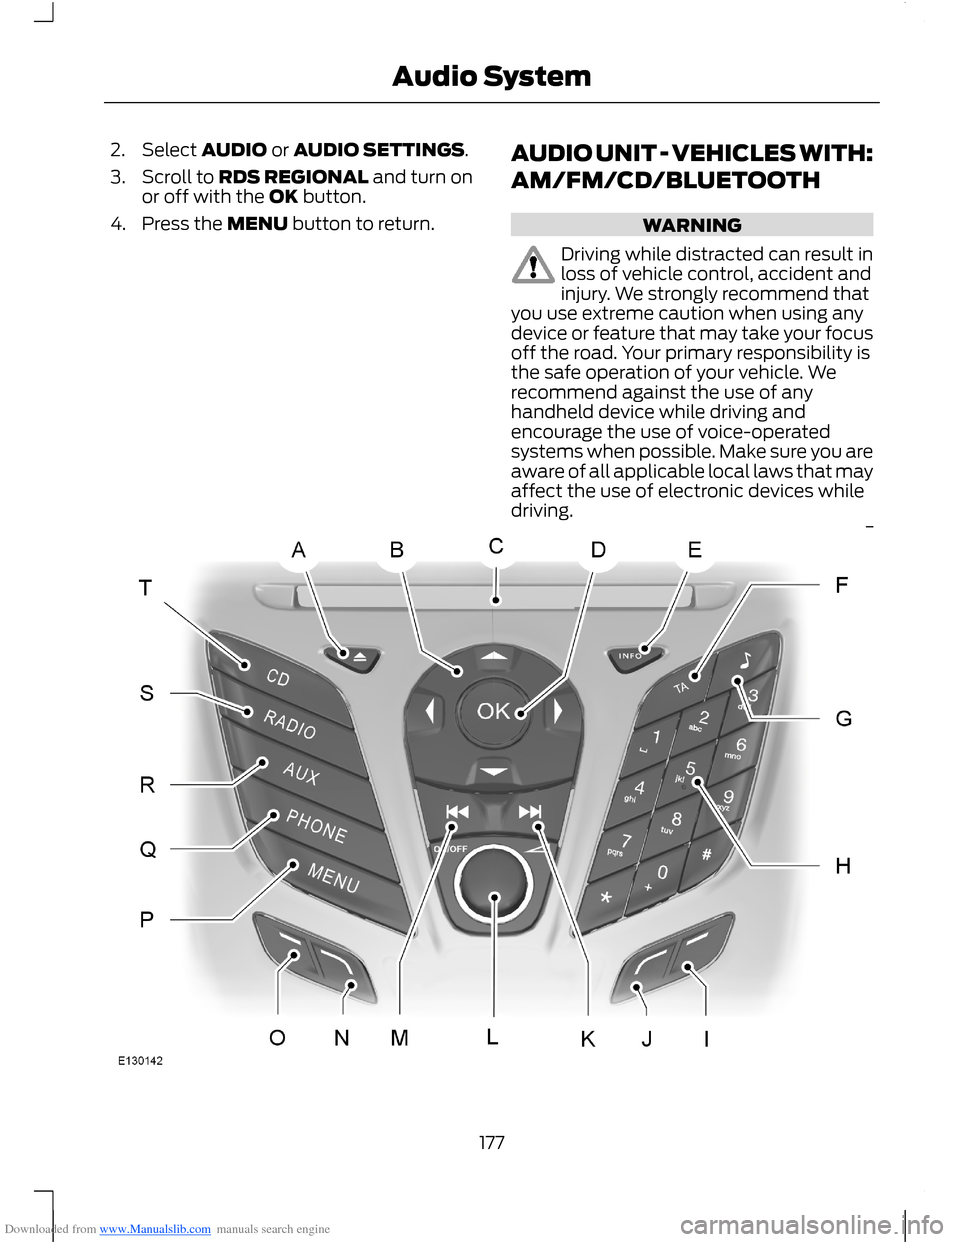
Downloaded from www.Manualslib.com manuals search engine Eject: Press the button to eject a CD.A
Cursor arrows: Press a button to scroll through on-screen choices.B
CD slot: Where you insert a CD.C
OK: Press the button to confirm on-screen selections.D
INFO: Press the button to access radio, CD, USB and IPod information.E
TA: Press the button to turn traffic announcements on or off and cancelsannouncements during an active announcement.F
Sound: Press the button to adjust the sound settings for bass, treble, middle,balance and fade.G
Numeric keypad: Press the button to recall a previously stored station. Tostore a favourite station press and hold until the sound returns.H
Function button 4: Press the button to select different functions of the audiosystem depending on which mode (i.e. radio or CD) you are in.I
Function button 3: Press the button to select different functions of the audiosystem depending on which mode (i.e. radio or CD) you are in.J
Seek up: Press the button to go to the next station up the radio frequency bandor the next track on a CD.K
On, Off and Volume: Press the button to switch the audio system on or off.Turn the dial to adjust the volume.L
Seek down: Press the button to go to the next station down the radio frequencyband or the previous track on a CD.M
Function button 2: Press the button to select different functions of the audiosystem depending on which mode (i.e. radio or CD) you are in.N
Function button 1: Press the button to select different functions of the audiosystem depending on which mode (i.e. radio or CD) you are in.O
MENU: Press the button to access different audio system features.P
PHONE: Press the button to access the phone feature of the SYNC system bypressing PHONE then MENU. See separate manual.Q
AUX: Press the button to access the AUX and SYNC features, it will also cancelthe menu or list browsing.R
RADIO: Press the button to select different radio bands, it will also cancel themenu or list browsing.S
CD: Press the button to change source to CD, it will also cancel the menu orlist browsing.T
178Audio System