key FORD B MAX 2012 1.G Owner's Guide
[x] Cancel search | Manufacturer: FORD, Model Year: 2012, Model line: B MAX, Model: FORD B MAX 2012 1.GPages: 256, PDF Size: 19.67 MB
Page 121 of 256
Downloaded from www.Manualslib.com manuals search engine Maintenance
WARNING
Remove the tow ball arm andprotect the seat with the plug beforesteam cleaning your vehicle.
Keep the system clean. Periodicallylubricate bearings, sliding surfaces, andlocking balls with resin-free grease or oiland the lock with graphite.
In case of loss, replacement keys areavailable from the manufacturer by statingthe number on the lock cylinder.
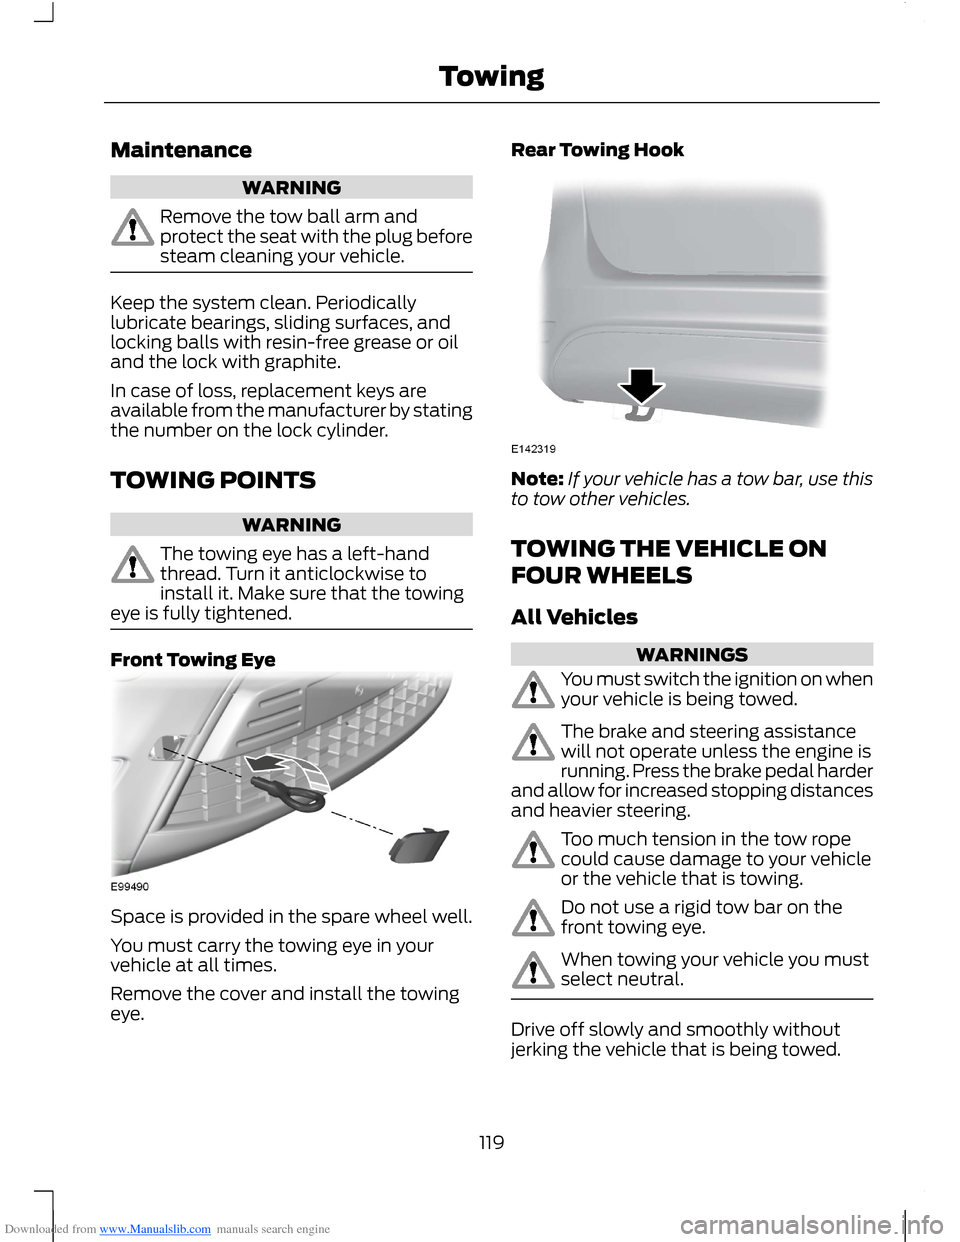
TOWING POINTS
WARNING
The towing eye has a left-handthread. Turn it anticlockwise toinstall it. Make sure that the towingeye is fully tightened.
Front Towing Eye
Space is provided in the spare wheel well.
You must carry the towing eye in yourvehicle at all times.
Remove the cover and install the towingeye.
Rear Towing Hook
Note:If your vehicle has a tow bar, use thisto tow other vehicles.
TOWING THE VEHICLE ON
FOUR WHEELS
All Vehicles
WARNINGS
You must switch the ignition on whenyour vehicle is being towed.
The brake and steering assistancewill not operate unless the engine isrunning. Press the brake pedal harderand allow for increased stopping distancesand heavier steering.
Too much tension in the tow ropecould cause damage to your vehicleor the vehicle that is towing.
Do not use a rigid tow bar on thefront towing eye.
When towing your vehicle you mustselect neutral.
Drive off slowly and smoothly withoutjerking the vehicle that is being towed.
119Towing
Page 129 of 256
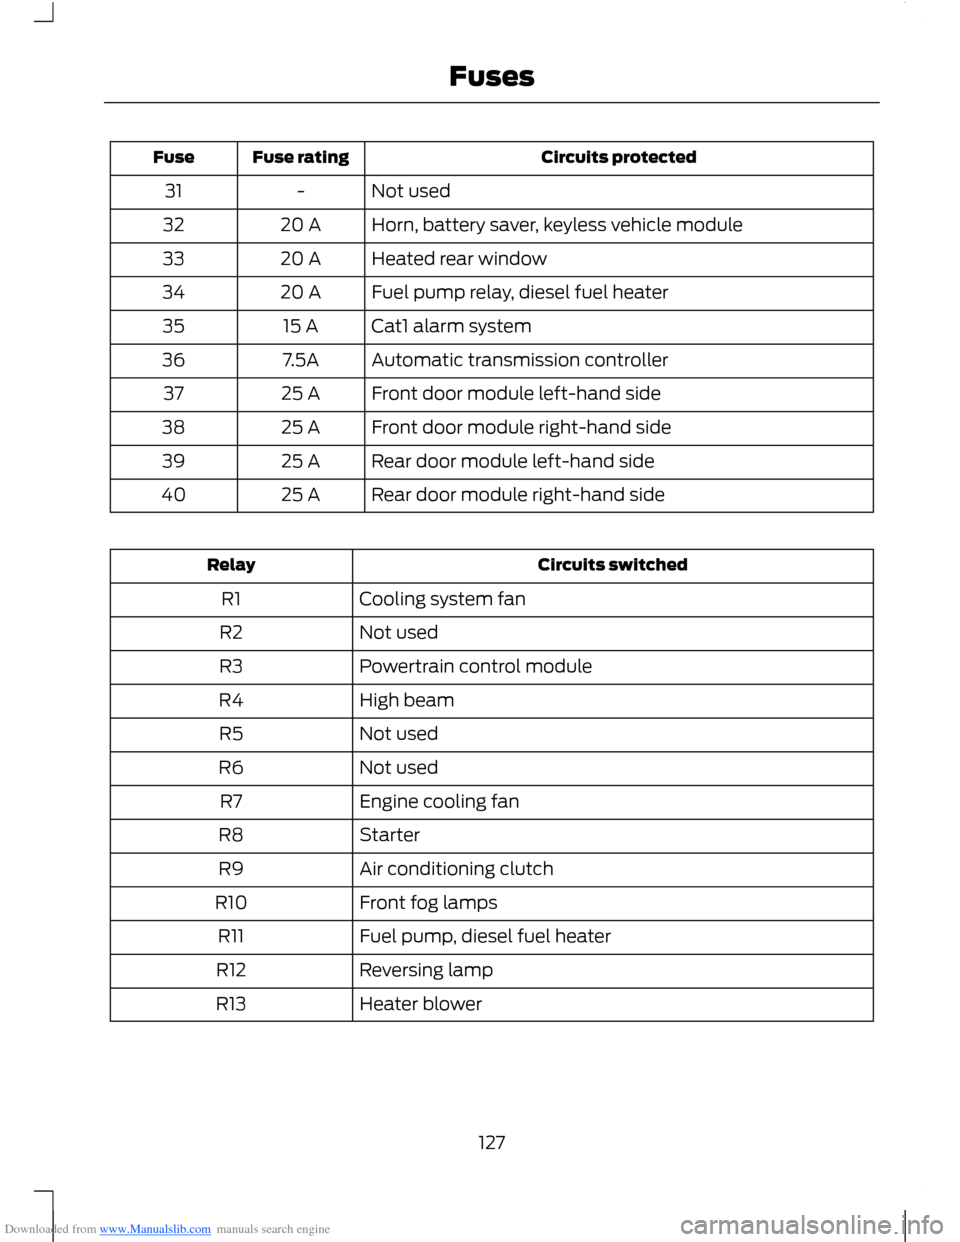
Downloaded from www.Manualslib.com manuals search engine Circuits protectedFuse ratingFuse
Not used-31
Horn, battery saver, keyless vehicle module20 A32
Heated rear window20 A33
Fuel pump relay, diesel fuel heater20 A34
Cat1 alarm system15 A35
Automatic transmission controller7.5A36
Front door module left-hand side25 A37
Front door module right-hand side25 A38
Rear door module left-hand side25 A39
Rear door module right-hand side25 A40
Circuits switchedRelay
Cooling system fanR1
Not usedR2
Powertrain control moduleR3
High beamR4
Not usedR5
Not usedR6
Engine cooling fanR7
StarterR8
Air conditioning clutchR9
Front fog lampsR10
Fuel pump, diesel fuel heaterR11
Reversing lampR12
Heater blowerR13
127Fuses
Page 134 of 256
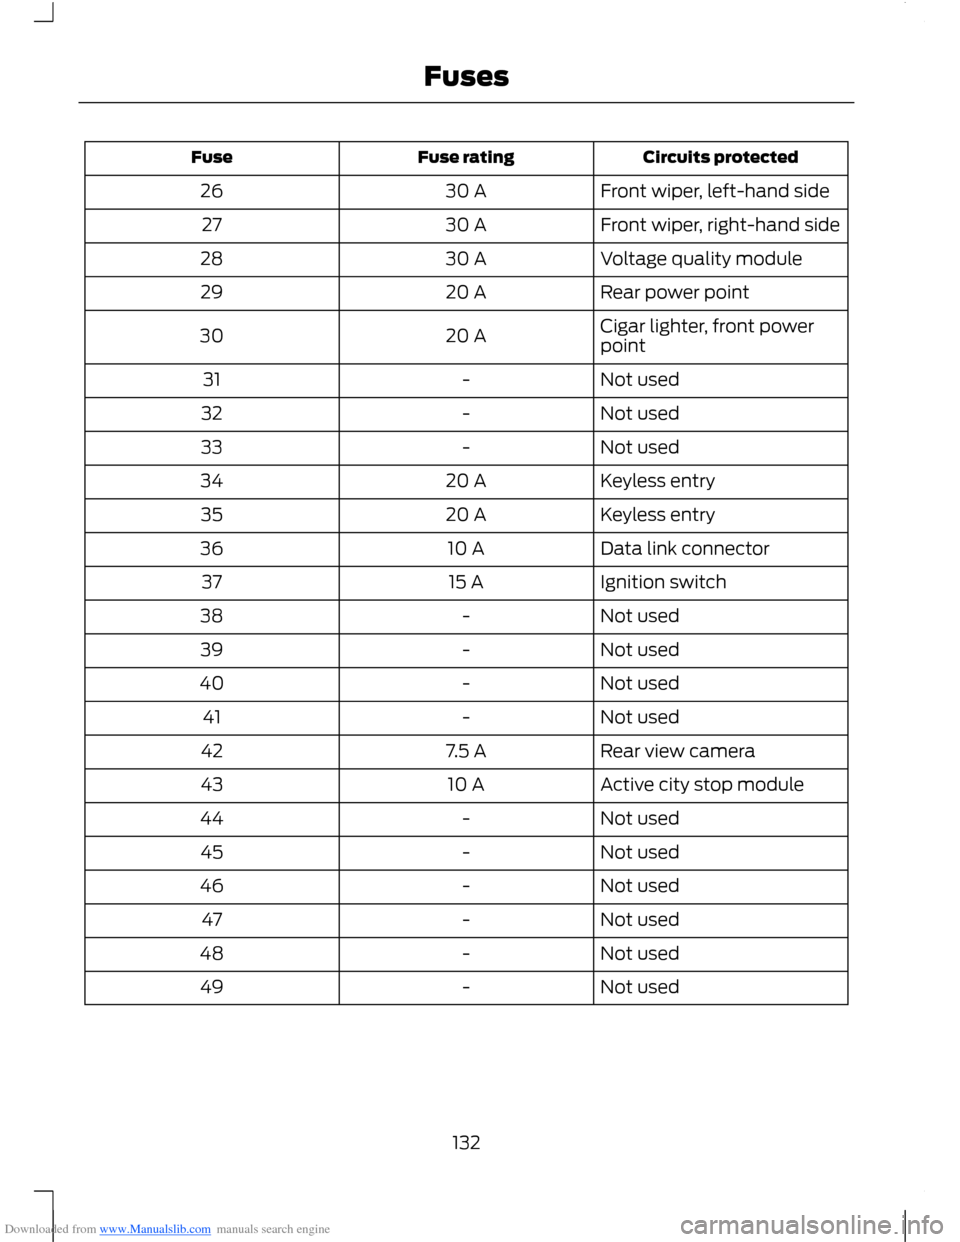
Downloaded from www.Manualslib.com manuals search engine Circuits protectedFuse ratingFuse
Front wiper, left-hand side30 A26
Front wiper, right-hand side30 A27
Voltage quality module30 A28
Rear power point20 A29
Cigar lighter, front powerpoint20 A30
Not used-31
Not used-32
Not used-33
Keyless entry20 A34
Keyless entry20 A35
Data link connector10 A36
Ignition switch15 A37
Not used-38
Not used-39
Not used-40
Not used-41
Rear view camera7.5 A42
Active city stop module10 A43
Not used-44
Not used-45
Not used-46
Not used-47
Not used-48
Not used-49
132Fuses
Page 135 of 256
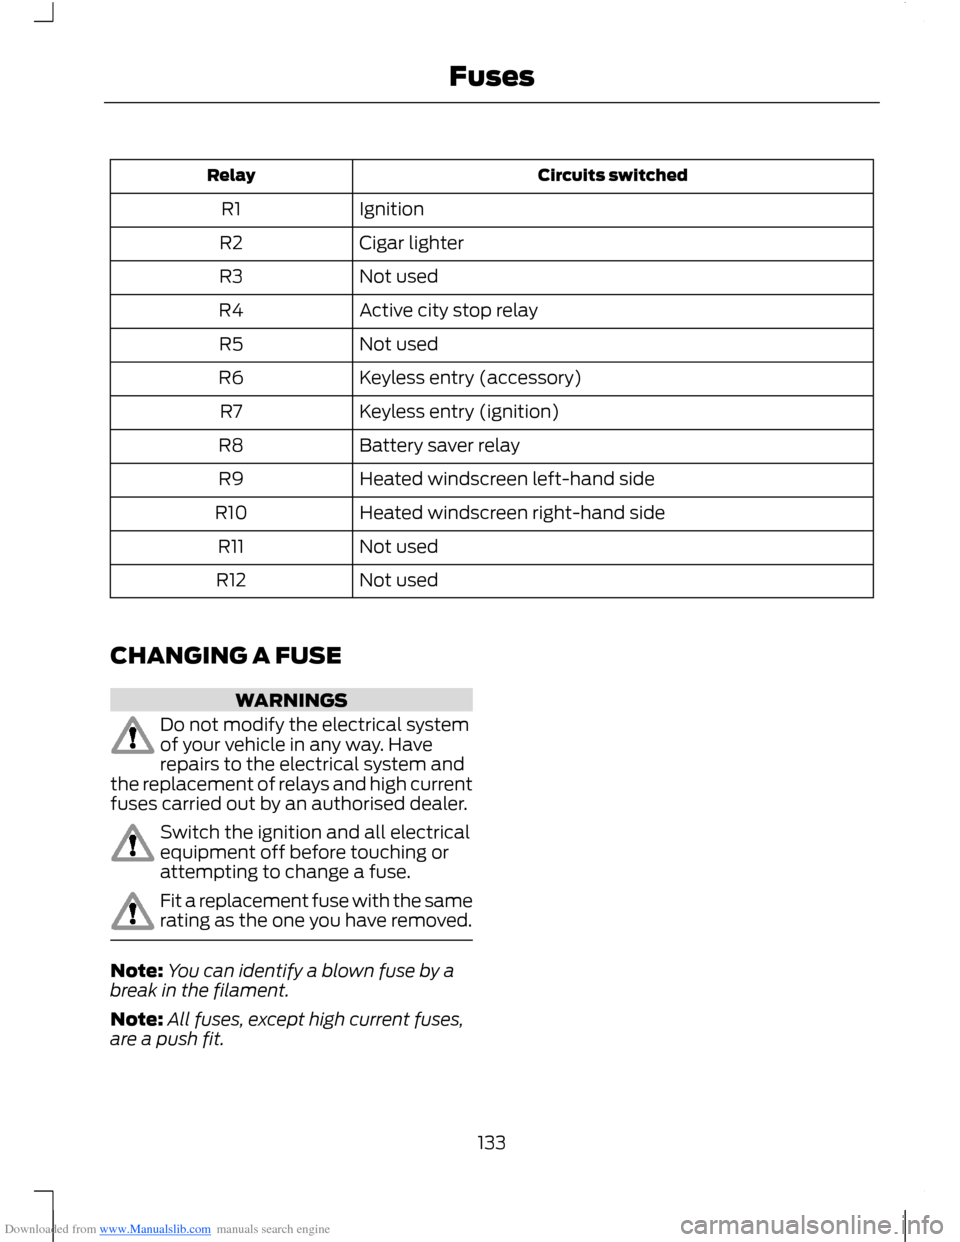
Downloaded from www.Manualslib.com manuals search engine Circuits switchedRelay
IgnitionR1
Cigar lighterR2
Not usedR3
Active city stop relayR4
Not usedR5
Keyless entry (accessory)R6
Keyless entry (ignition)R7
Battery saver relayR8
Heated windscreen left-hand sideR9
Heated windscreen right-hand sideR10
Not usedR11
Not usedR12
CHANGING A FUSE
WARNINGS
Do not modify the electrical systemof your vehicle in any way. Haverepairs to the electrical system andthe replacement of relays and high currentfuses carried out by an authorised dealer.
Switch the ignition and all electricalequipment off before touching orattempting to change a fuse.
Fit a replacement fuse with the samerating as the one you have removed.
Note:You can identify a blown fuse by abreak in the filament.
Note:All fuses, except high current fuses,are a push fit.
133Fuses
Page 143 of 256
Downloaded from www.Manualslib.com manuals search engine BRAKE AND CLUTCH FLUID
CHECK
WARNINGS
Use of any fluid other than therecommended brake fluid mayreduce brake efficiency and not meetFord's performance standards.
Do not allow the fluid to touch yourskin or eyes. If this happens, rinse theaffected areas immediately withplenty of water and contact your doctor.
If the level is at the MIN mark, havethe system checked by an authoriseddealer as soon as possible.
Note:Keep brake fluid clean and dry.Contamination with dirt, water, petroleumproducts or other materials may result inbrake system damage and possible failure.
Note:The brake and the clutch systems aresupplied from the same reservoir.
Add fluid that meets the Ford specification.See Technical Specifications (page 150).
WASHER FLUID CHECK
Note:The reservoir supplies the front andrear washer systems.
When adding fluid, use a mixture of washerfluid and water to help prevent freezing incold weather and improve the cleaningcapability. We recommend that you useonly high quality washer fluid.
For information on fluid dilution, refer tothe product instructions.
CHANGING THE 12V BATTERY
WARNING
For vehicles with start-stop thebattery requirement is different. Youmust replace the battery with one ofexactly the same specification.
Note:Where applicable you mustreprogram the audio system using thekeycode.
The battery is located in the enginecompartment. See Maintenance (page134).
CHECKING THE WIPER
BLADES
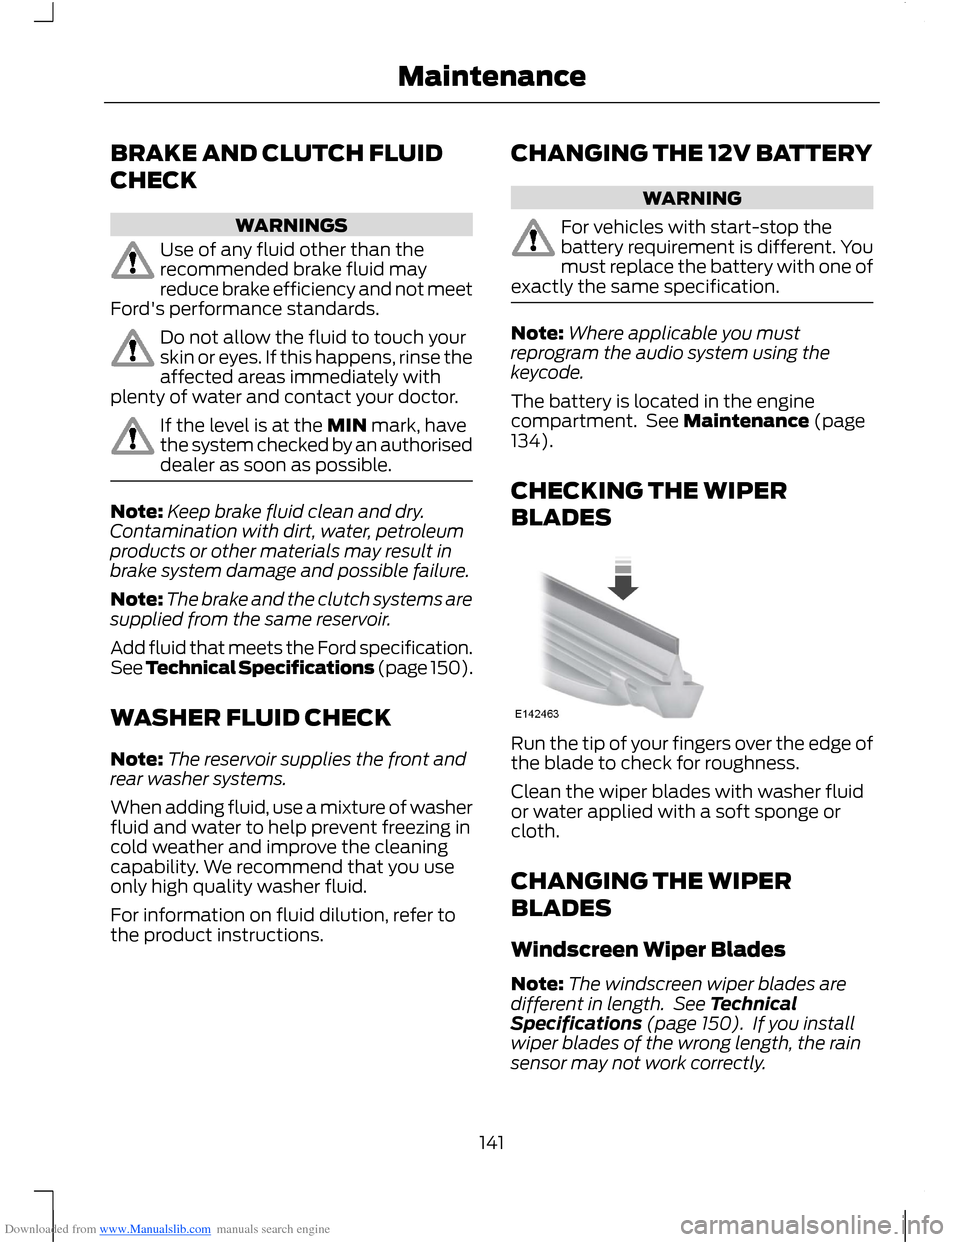
Run the tip of your fingers over the edge ofthe blade to check for roughness.
Clean the wiper blades with washer fluidor water applied with a soft sponge orcloth.
CHANGING THE WIPER
BLADES
Windscreen Wiper Blades
Note:The windscreen wiper blades aredifferent in length. See TechnicalSpecifications (page 150). If you installwiper blades of the wrong length, the rainsensor may not work correctly.
141Maintenance
Page 162 of 256
Downloaded from www.Manualslib.com manuals search engine Apart from a too low tyre pressure or adamaged tyre, the following situations canaffect the rolling circumference:
•Vehicle load is uneven.
•When using a trailer or travelling up anddown an incline.
•Using snow chains.
•Driving on soft surfaces such as snowor mud.
Note:The system will still functioncorrectly, but there may be an increaseddetection time.
System Reset
Note:Do not reset the system when yourvehicle is moving.
Note:You should reset the systemfollowing any adjustment to the tyrepressures or any changing of tyres.
1.Switch the ignition on.
2.Using the information display control,navigate to Menu > Vehicle settings> Deflation detection.
3.Press and hold the OK button untilconfirmation appears.
CHANGING A ROAD WHEEL
Wheel Nuts
You can obtain a replacement lockingwheel nut key and replacement lockingwheel nuts from your dealer using thereference number certificate.
Vehicles With a Spare Wheel
If the spare wheel is exactly the same typeand size as the other fitted road wheels,you can replace the existing road wheelwith the spare wheel and continue to drivein the normal manner.
If the spare wheel is different to the otherroad wheels, it will carry a yellow label withthe appropriate speed limit.
Refer to the following information beforechanging the road wheel.
WARNINGS
Drive the shortest possible distances.
Do not fit more than one spare wheelon your vehicle at any one time.
Do not carry out any tyre repairs ona spare wheel.
Do not drive through an automaticcar wash.
If you are unsure what type of sparewheel you have do not exceed 80km/h (50 mph).
Only fit snow chains to specifiedtyres. See TechnicalSpecifications (page 164).
The ground clearance of your vehiclemay be reduced. Take care whenparking next to a kerb.
Note:Your vehicle may exhibit someunusual driving characteristics.
Vehicle Jack
WARNINGS
The vehicle jack supplied with yourvehicle should only be used whenchanging a wheel in emergencysituations.
Before using the vehicle jack, checkthat it is not damaged or deformedand that the thread is lubricated andfree from foreign matter.
Never place anything between thejack and the ground, or the jack andyour vehicle.
160Wheels and Tyres
Page 165 of 256
Downloaded from www.Manualslib.com manuals search engine Note:Make sure that you pull the wheeltrim remover at right angles to the trim.
Removing a Road Wheel
WARNINGS
Park your vehicle in such a positionthat neither the traffic nor you arehindered or endangered.
Set up a warning triangle.
Make sure that your vehicle is on firm,level ground with the wheels pointingstraight ahead.
Switch the ignition off and apply theparking brake.
If your vehicle has a manualtransmission, move the selector leverto first or reverse gear. If it has anautomatic transmission, move the selectorlever to position (P).
Have the passengers leave yourvehicle.
Secure the diagonally oppositewheel with an appropriate block orwheel chock.
Make sure that the arrows ondirectional tyres point in the directionof rotation when your vehicle ismoving forward. If you have to fit a sparewheel with the arrows pointing in theopposite direction, have the tyre refittedin the correct direction by an authoriseddealer.
Do not work underneath your vehiclewhen it is supported only by a jack.
Make sure that the jack is vertical tothe jacking point and the base is flaton the ground.
Note:Do not lay alloy wheels face downon the ground, this will damage the paint.
Note:The spare wheel is located under thefloor cover in the luggage compartment.
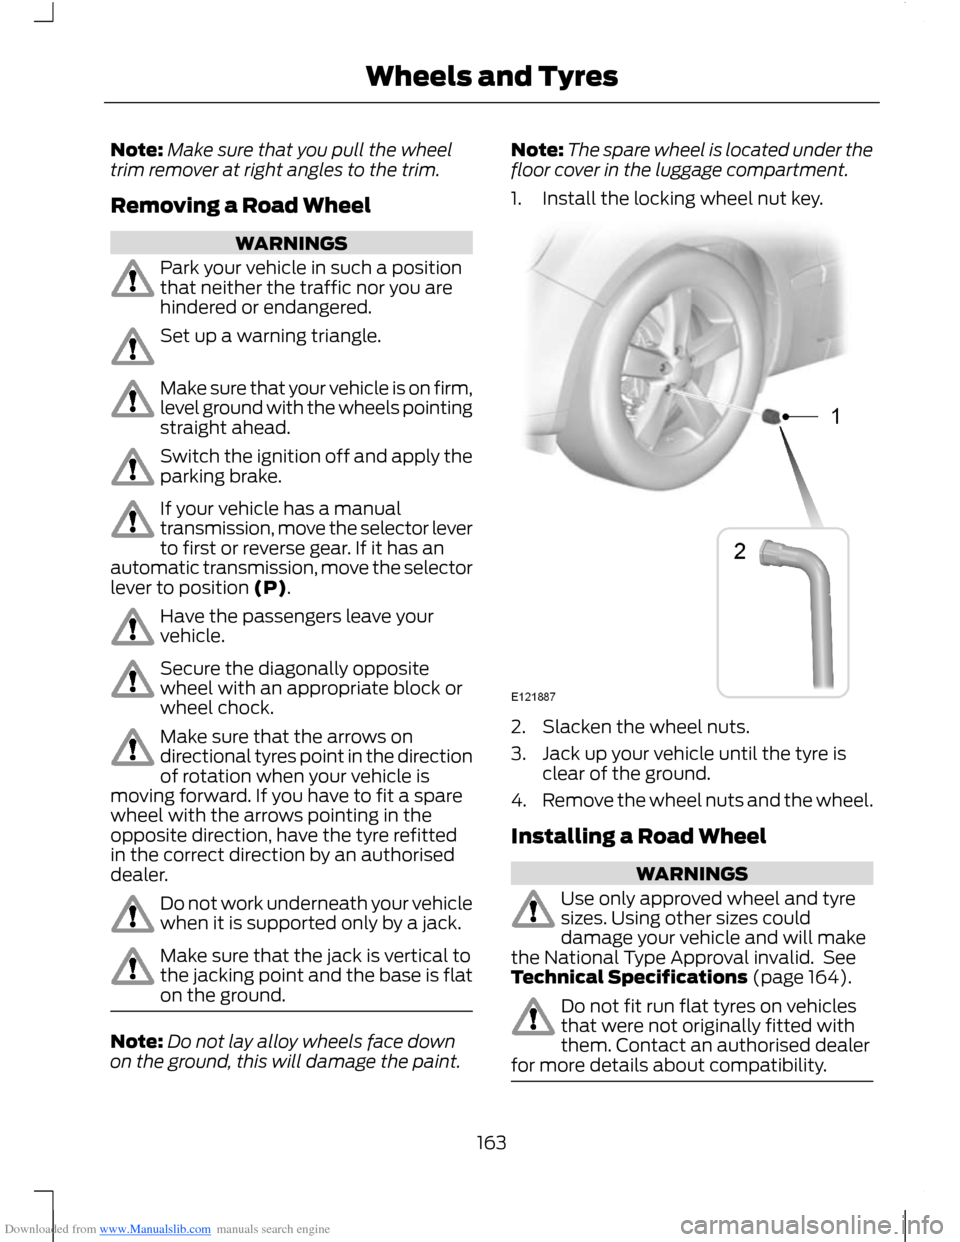
1.Install the locking wheel nut key.
2.Slacken the wheel nuts.
3.Jack up your vehicle until the tyre isclear of the ground.
4.Remove the wheel nuts and the wheel.
Installing a Road Wheel
WARNINGS
Use only approved wheel and tyresizes. Using other sizes coulddamage your vehicle and will makethe National Type Approval invalid. SeeTechnical Specifications (page 164).
Do not fit run flat tyres on vehiclesthat were not originally fitted withthem. Contact an authorised dealerfor more details about compatibility.
163Wheels and Tyres
Page 166 of 256
Downloaded from www.Manualslib.com manuals search engine WARNING
Do not install alloy wheels usingwheel nuts designed for use withsteel wheels.
Note:The wheel nuts of alloy wheels andspoked steel wheels can also be used forthe steel spare wheel for a short time(maximum two weeks).
Note:Make sure the wheel and hub contactsurfaces are free from foreign matter.
Note:Make sure that the cones on thewheel nuts are against the wheel.
1.Install the wheel.
2.Install the wheel nuts finger tight.
3.Install the locking wheel nut key.
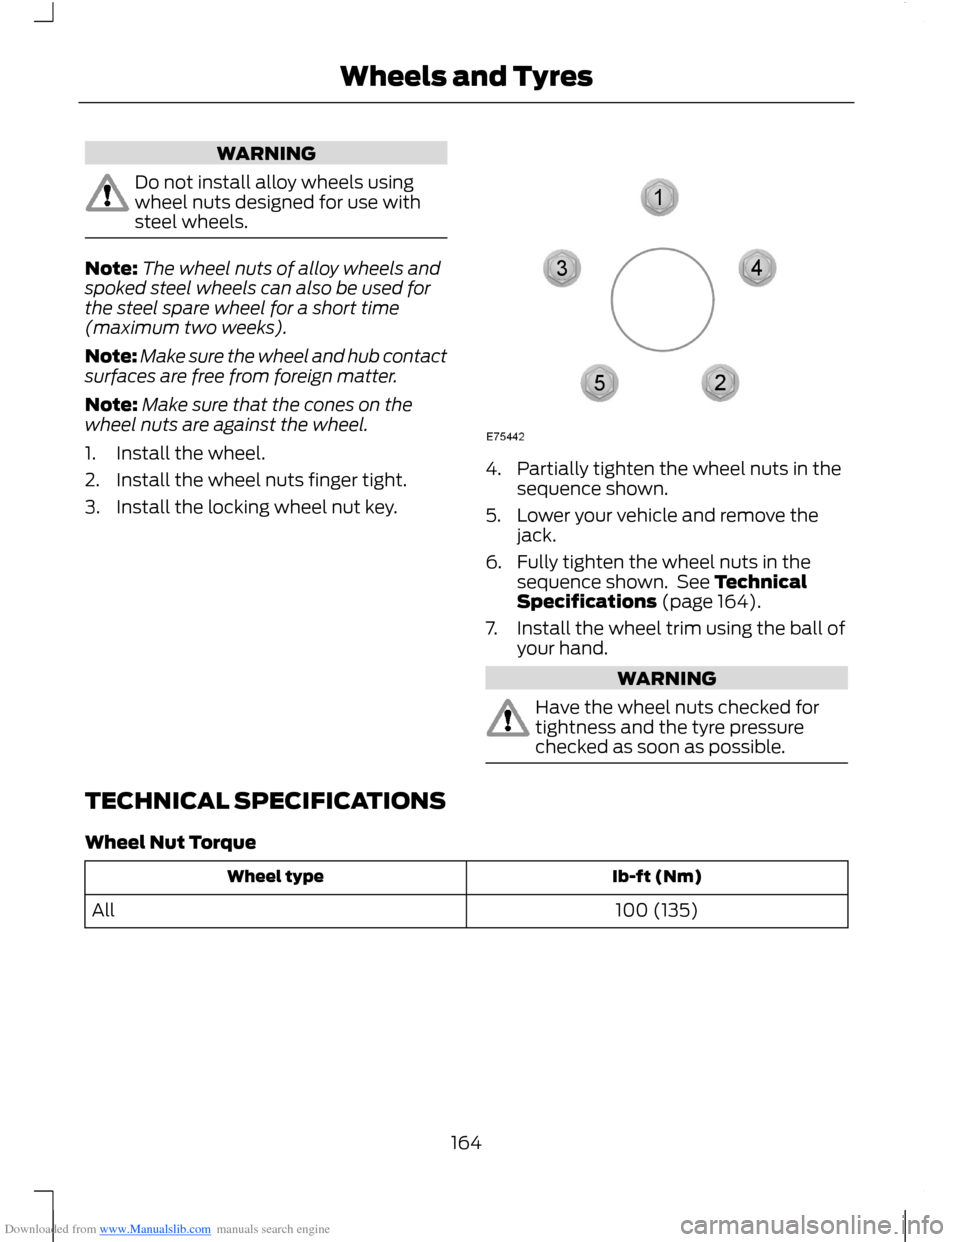
4.Partially tighten the wheel nuts in thesequence shown.
5.Lower your vehicle and remove thejack.
6.Fully tighten the wheel nuts in thesequence shown. See TechnicalSpecifications (page 164).
7.Install the wheel trim using the ball ofyour hand.
WARNING
Have the wheel nuts checked fortightness and the tyre pressurechecked as soon as possible.
TECHNICAL SPECIFICATIONS
Wheel Nut Torque
Ib-ft (Nm)Wheel type
100 (135)All
164Wheels and Tyres
Page 175 of 256
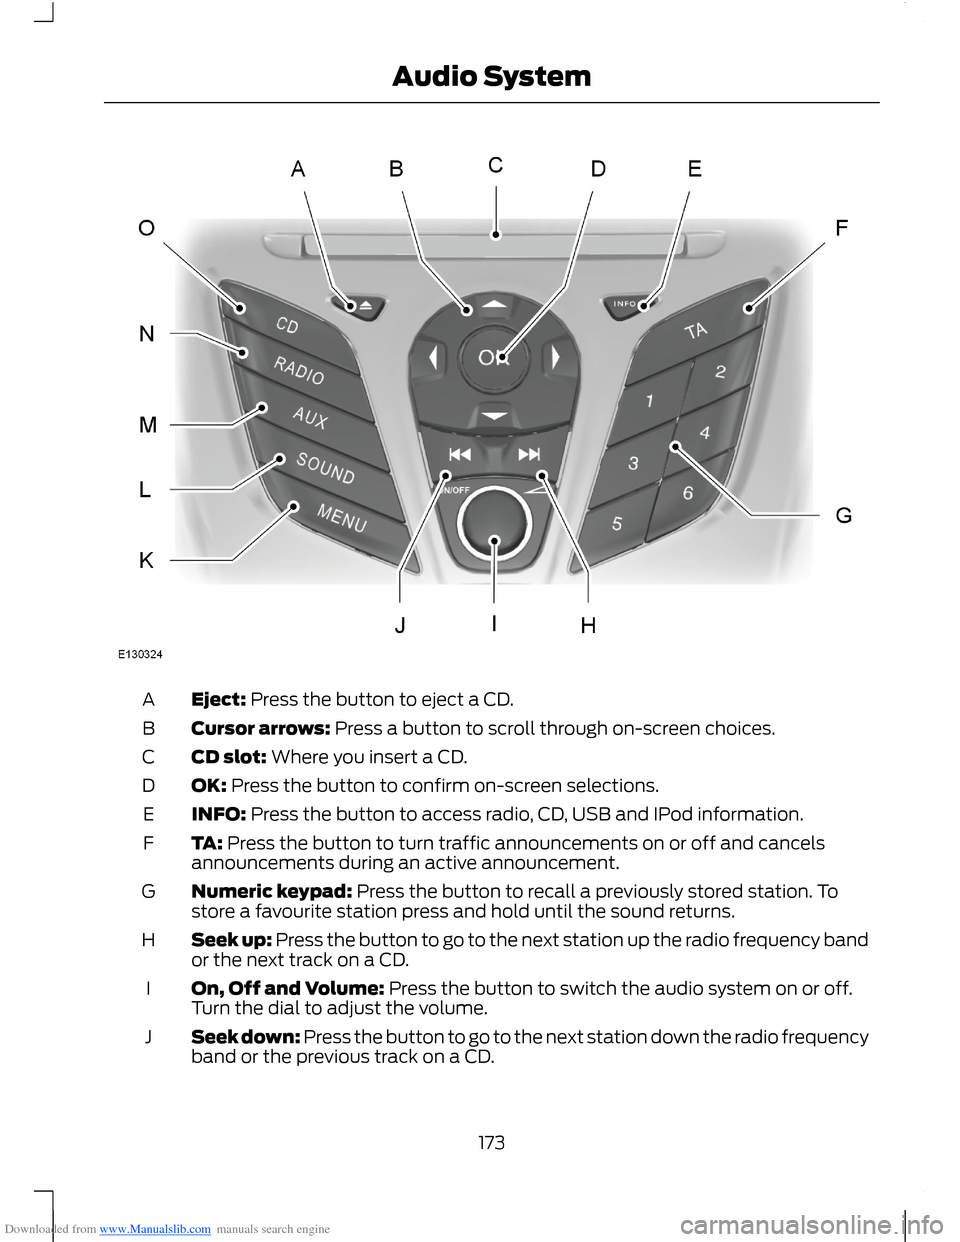
Downloaded from www.Manualslib.com manuals search engine Eject: Press the button to eject a CD.A
Cursor arrows: Press a button to scroll through on-screen choices.B
CD slot: Where you insert a CD.C
OK: Press the button to confirm on-screen selections.D
INFO: Press the button to access radio, CD, USB and IPod information.E
TA: Press the button to turn traffic announcements on or off and cancelsannouncements during an active announcement.F
Numeric keypad: Press the button to recall a previously stored station. Tostore a favourite station press and hold until the sound returns.G
Seek up: Press the button to go to the next station up the radio frequency bandor the next track on a CD.H
On, Off and Volume: Press the button to switch the audio system on or off.Turn the dial to adjust the volume.I
Seek down: Press the button to go to the next station down the radio frequencyband or the previous track on a CD.J
173Audio System
Page 180 of 256
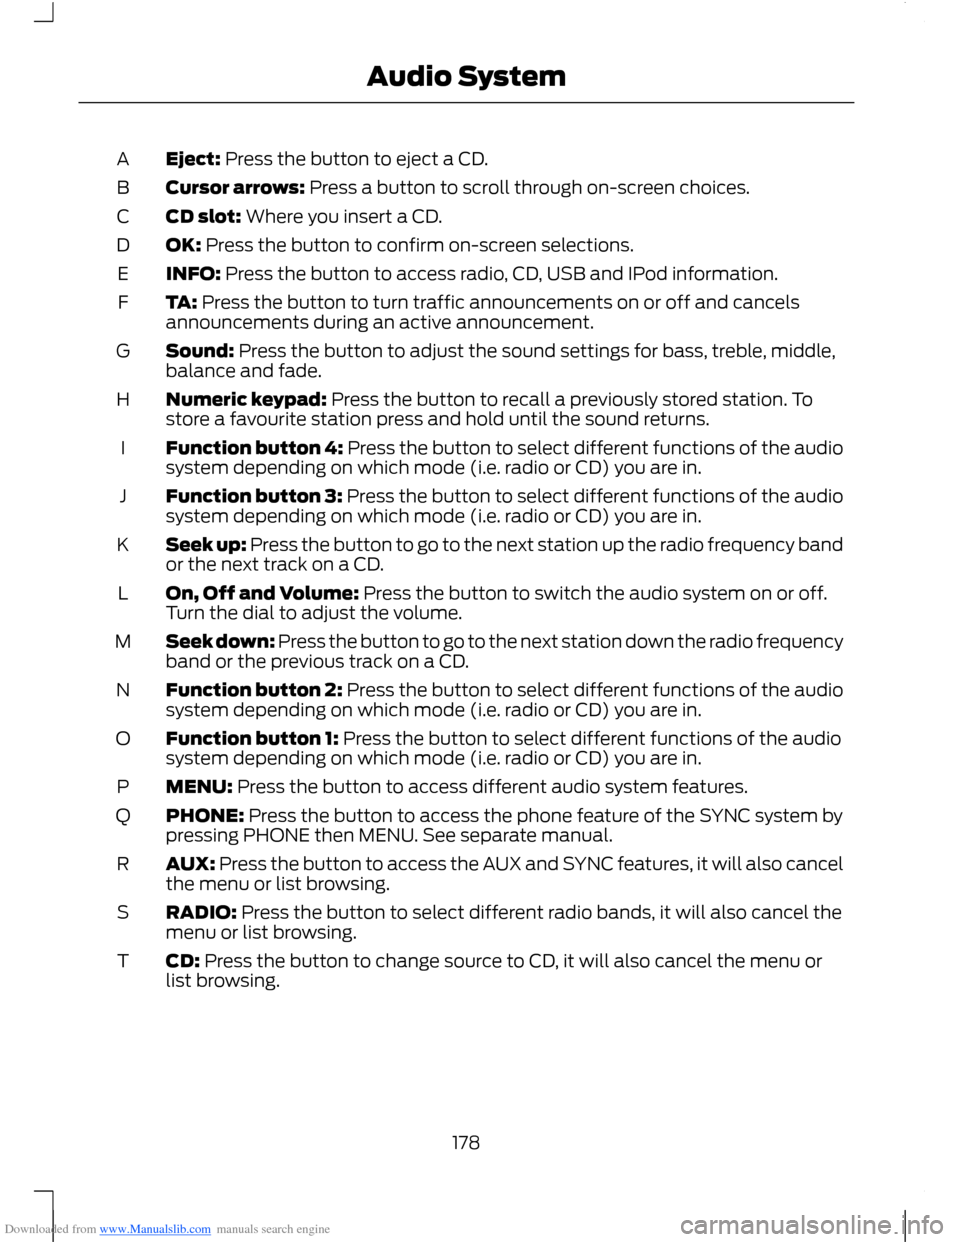
Downloaded from www.Manualslib.com manuals search engine Eject: Press the button to eject a CD.A
Cursor arrows: Press a button to scroll through on-screen choices.B
CD slot: Where you insert a CD.C
OK: Press the button to confirm on-screen selections.D
INFO: Press the button to access radio, CD, USB and IPod information.E
TA: Press the button to turn traffic announcements on or off and cancelsannouncements during an active announcement.F
Sound: Press the button to adjust the sound settings for bass, treble, middle,balance and fade.G
Numeric keypad: Press the button to recall a previously stored station. Tostore a favourite station press and hold until the sound returns.H
Function button 4: Press the button to select different functions of the audiosystem depending on which mode (i.e. radio or CD) you are in.I
Function button 3: Press the button to select different functions of the audiosystem depending on which mode (i.e. radio or CD) you are in.J
Seek up: Press the button to go to the next station up the radio frequency bandor the next track on a CD.K
On, Off and Volume: Press the button to switch the audio system on or off.Turn the dial to adjust the volume.L
Seek down: Press the button to go to the next station down the radio frequencyband or the previous track on a CD.M
Function button 2: Press the button to select different functions of the audiosystem depending on which mode (i.e. radio or CD) you are in.N
Function button 1: Press the button to select different functions of the audiosystem depending on which mode (i.e. radio or CD) you are in.O
MENU: Press the button to access different audio system features.P
PHONE: Press the button to access the phone feature of the SYNC system bypressing PHONE then MENU. See separate manual.Q
AUX: Press the button to access the AUX and SYNC features, it will also cancelthe menu or list browsing.R
RADIO: Press the button to select different radio bands, it will also cancel themenu or list browsing.S
CD: Press the button to change source to CD, it will also cancel the menu orlist browsing.T
178Audio System