FORD B MAX 2012 1.G Service Manual
Manufacturer: FORD, Model Year: 2012, Model line: B MAX, Model: FORD B MAX 2012 1.GPages: 256, PDF Size: 19.67 MB
Page 41 of 256
Downloaded from www.Manualslib.com manuals search engine Volume downC
Seek down, previous or acceptcallD
Seek, Next or Previous
Press the seek button to:
•tune the radio to the next or previousstored preset
•play the next or the previous track.
Press and hold the seek button to:
•tune the radio to the next station up ordown the frequency band
•seek through a track.
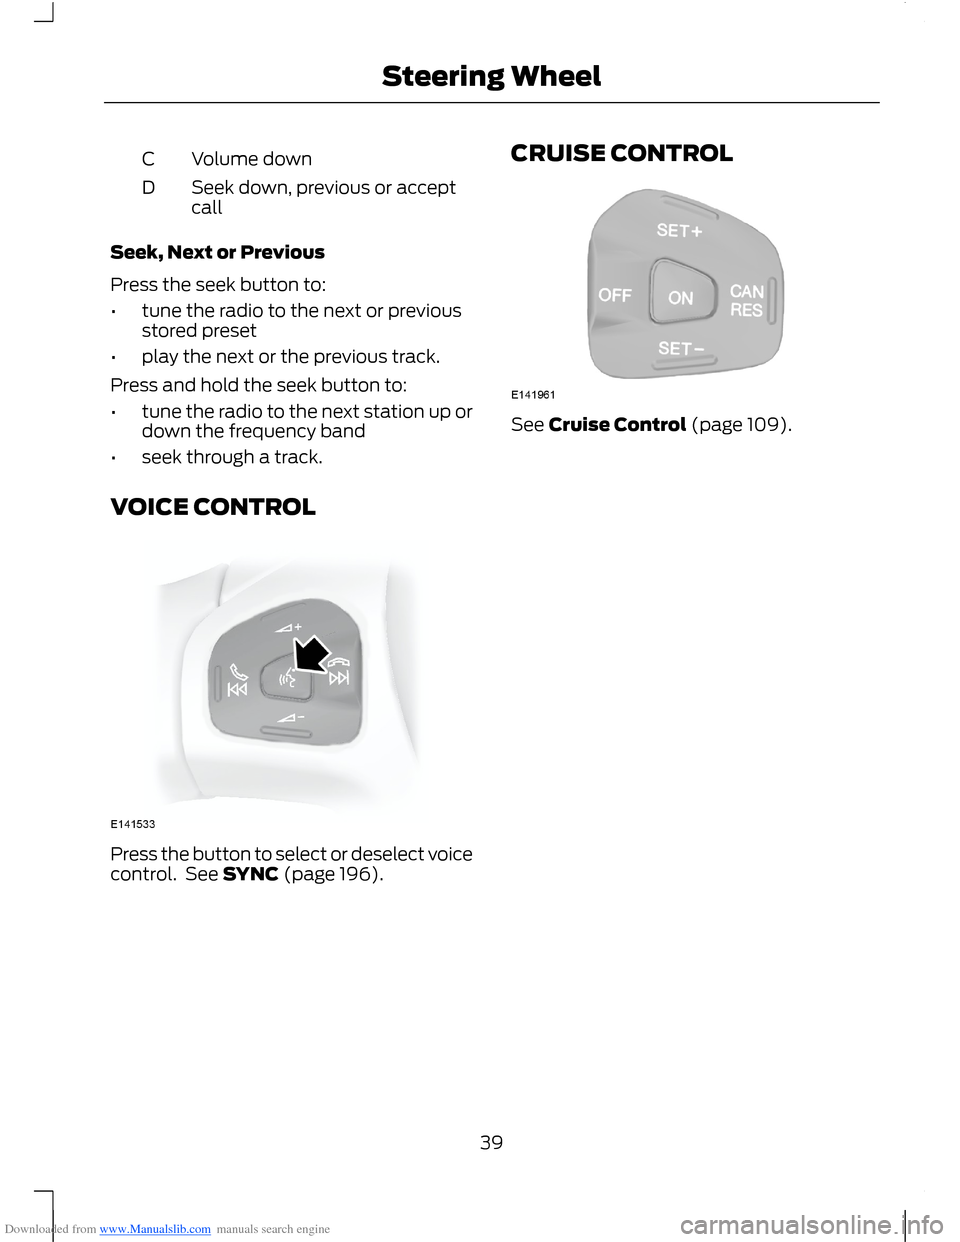
VOICE CONTROL
Press the button to select or deselect voicecontrol. See SYNC (page 196).
CRUISE CONTROL
See Cruise Control (page 109).
39Steering Wheel
Page 42 of 256
Downloaded from www.Manualslib.com manuals search engine WINDSCREEN WIPERS
Note:Fully defrost the windscreen beforeswitching on the windscreen wipers.
Note:Make sure the windscreen wipers areswitched off before entering a car wash.
Note:Install new wiper blades as soon asthey begin to leave bands of water andsmears on the windscreen.
Note:Do not operate the wipers on a drywindscreen. This may scratch the glass,damage the wiper blades or cause the wipermotor to burn out. Always use thewindscreen washers before wiping a drywindscreen.
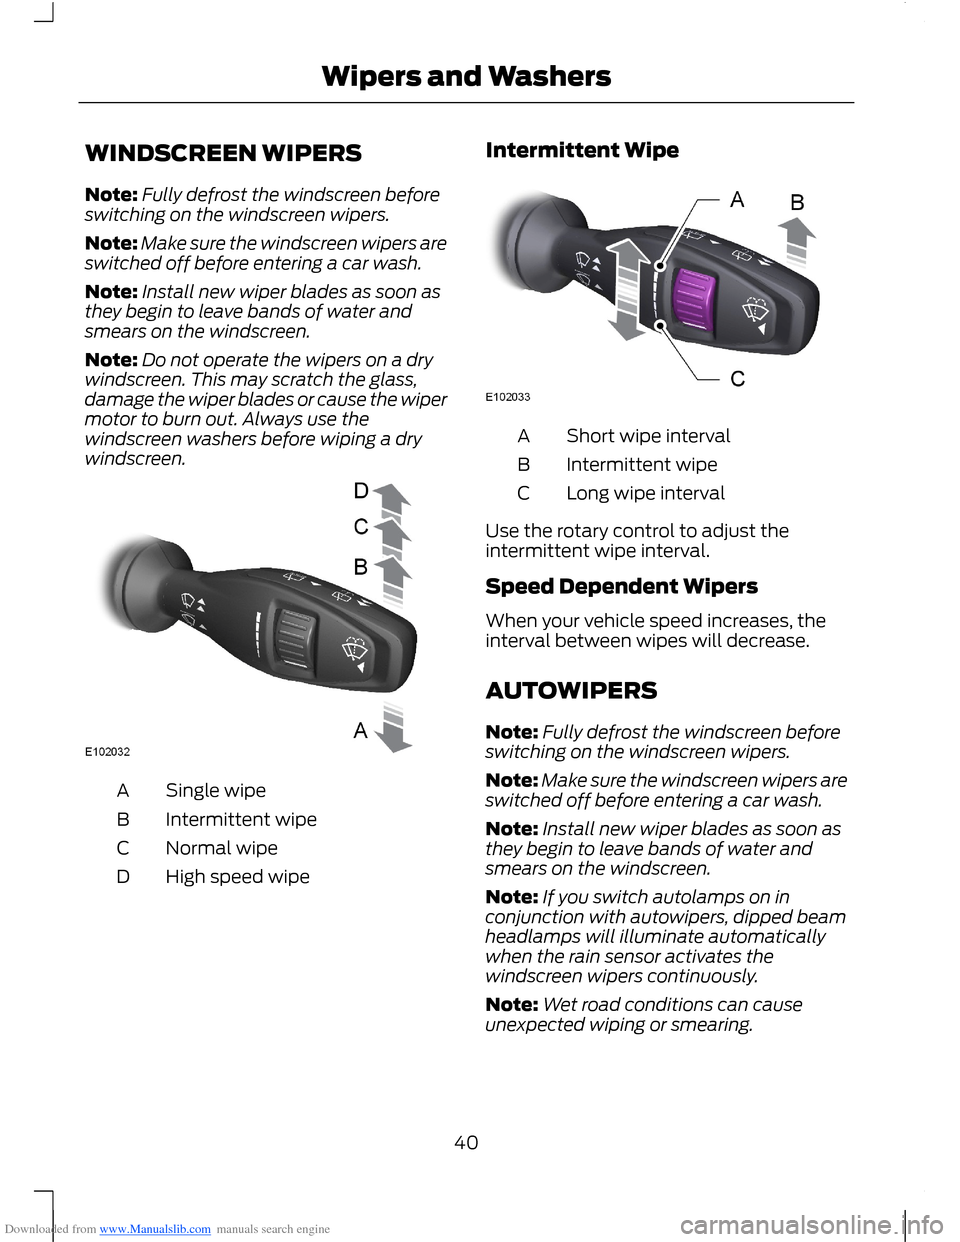
Single wipeA
Intermittent wipeB
Normal wipeC
High speed wipeD
Intermittent Wipe
Short wipe intervalA
Intermittent wipeB
Long wipe intervalC
Use the rotary control to adjust theintermittent wipe interval.
Speed Dependent Wipers
When your vehicle speed increases, theinterval between wipes will decrease.
AUTOWIPERS
Note:Fully defrost the windscreen beforeswitching on the windscreen wipers.
Note:Make sure the windscreen wipers areswitched off before entering a car wash.
Note:Install new wiper blades as soon asthey begin to leave bands of water andsmears on the windscreen.
Note:If you switch autolamps on inconjunction with autowipers, dipped beamheadlamps will illuminate automaticallywhen the rain sensor activates thewindscreen wipers continuously.
Note:Wet road conditions can causeunexpected wiping or smearing.
40Wipers and Washers
Page 43 of 256
Downloaded from www.Manualslib.com manuals search engine To reduce smearing we recommend thefollowing:
•Lower the sensitivity of the autowipers.
•Switch to normal or high speed wipe.
•Switch the autowipers off.
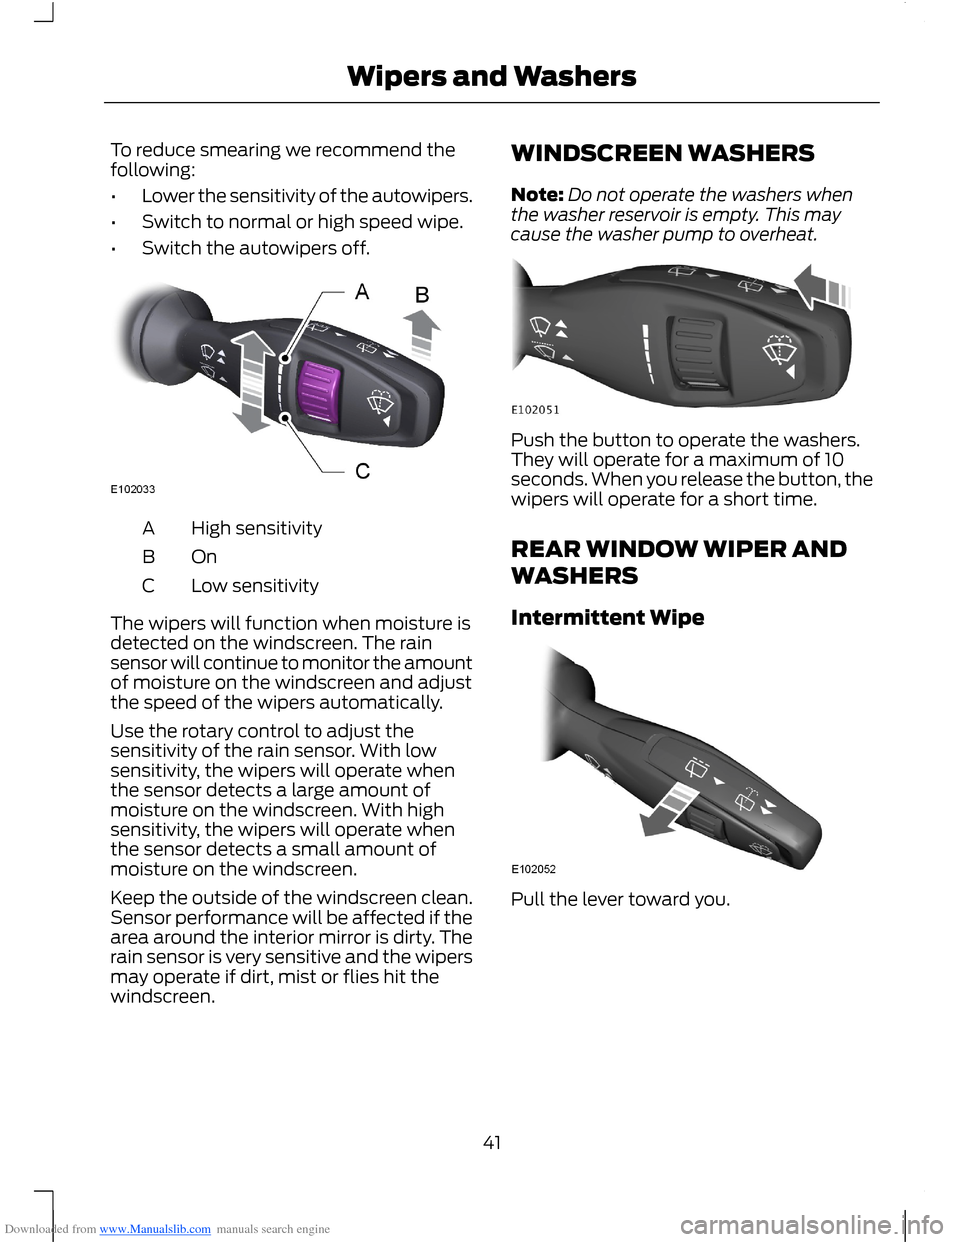
High sensitivityA
OnB
Low sensitivityC
The wipers will function when moisture isdetected on the windscreen. The rainsensor will continue to monitor the amountof moisture on the windscreen and adjustthe speed of the wipers automatically.
Use the rotary control to adjust thesensitivity of the rain sensor. With lowsensitivity, the wipers will operate whenthe sensor detects a large amount ofmoisture on the windscreen. With highsensitivity, the wipers will operate whenthe sensor detects a small amount ofmoisture on the windscreen.
Keep the outside of the windscreen clean.Sensor performance will be affected if thearea around the interior mirror is dirty. Therain sensor is very sensitive and the wipersmay operate if dirt, mist or flies hit thewindscreen.
WINDSCREEN WASHERS
Note:Do not operate the washers whenthe washer reservoir is empty. This maycause the washer pump to overheat.
Push the button to operate the washers.They will operate for a maximum of 10seconds. When you release the button, thewipers will operate for a short time.
REAR WINDOW WIPER AND
WASHERS
Intermittent Wipe
Pull the lever toward you.
41Wipers and Washers
Page 44 of 256
Downloaded from www.Manualslib.com manuals search engine Reverse Gear Wipe
The rear wiper will turn on automaticallywhen selecting reverse gear if:
•the rear wiper is not already switchedon
•the wiper lever is in position A, B, C orD
•the front wiper is operating (when setto position B).
The rear wiper will follow the front wiperinterval (at intermittent or normal speed).
Rear Window Washer
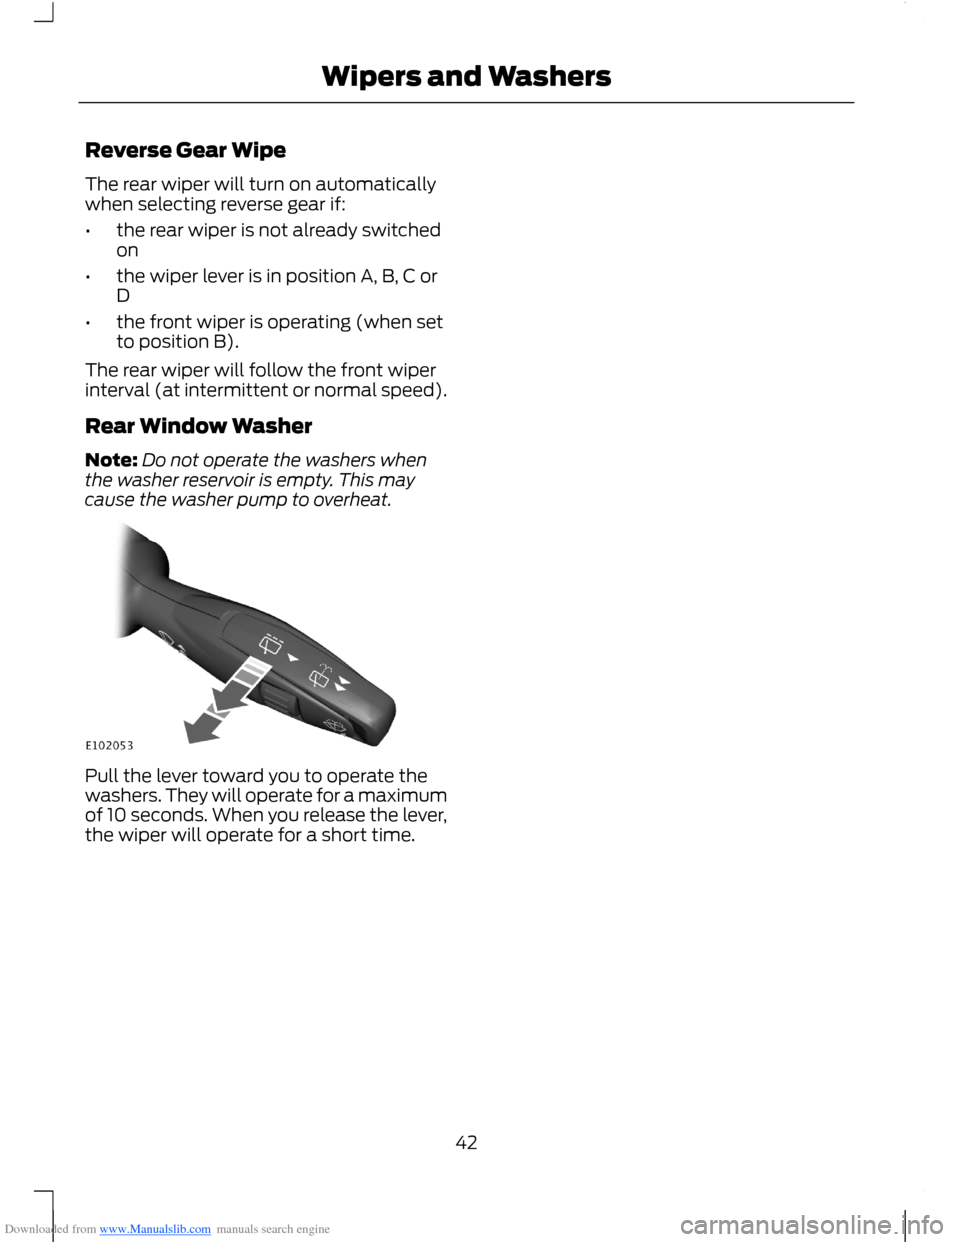
Note:Do not operate the washers whenthe washer reservoir is empty. This maycause the washer pump to overheat.
Pull the lever toward you to operate thewashers. They will operate for a maximumof 10 seconds. When you release the lever,the wiper will operate for a short time.
42Wipers and Washers
Page 45 of 256
Downloaded from www.Manualslib.com manuals search engine LIGHTING CONTROL
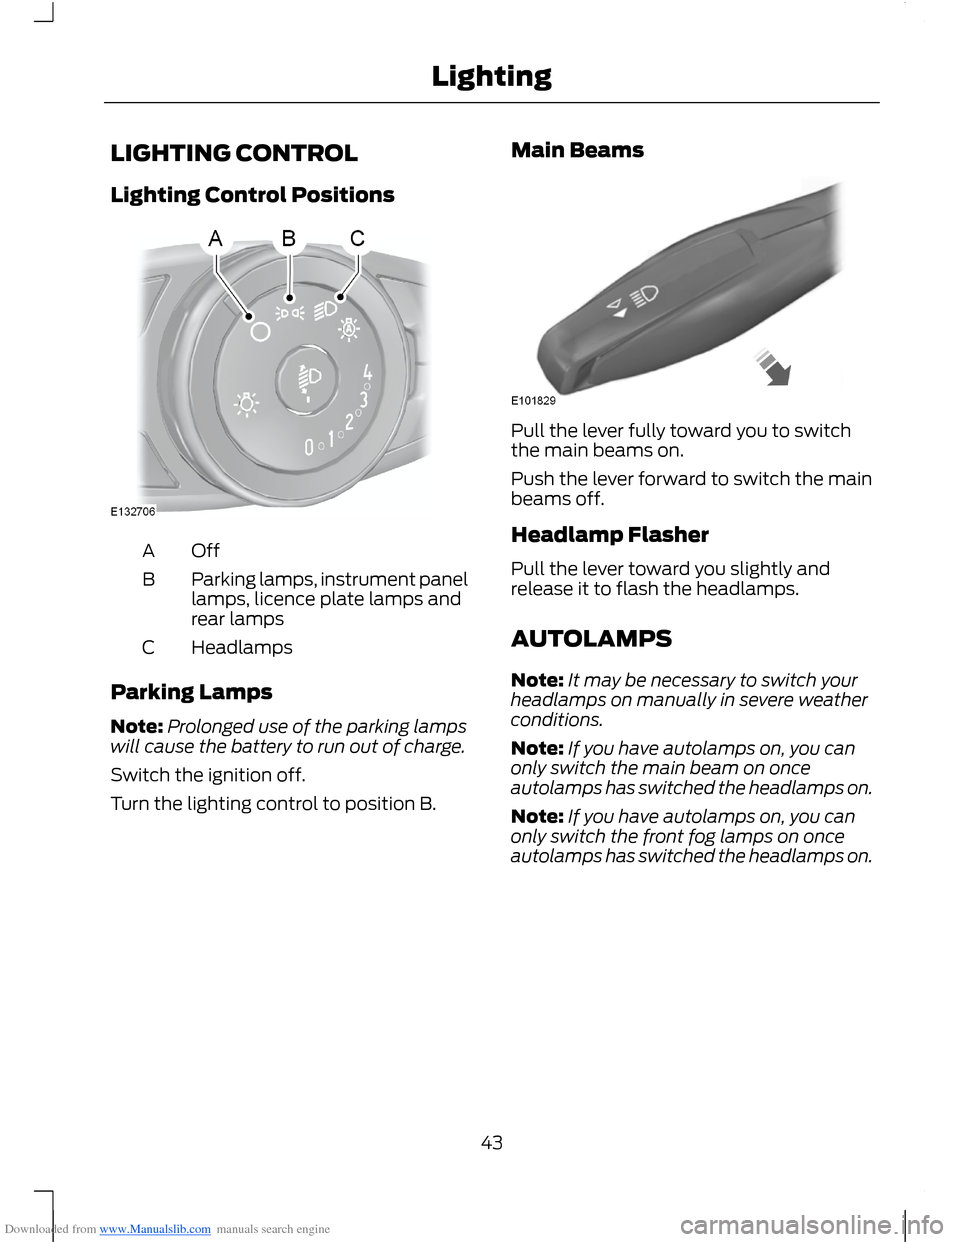
Lighting Control Positions
OffA
Parking lamps, instrument panellamps, licence plate lamps andrear lamps
B
HeadlampsC
Parking Lamps
Note:Prolonged use of the parking lampswill cause the battery to run out of charge.
Switch the ignition off.
Turn the lighting control to position B.
Main Beams
Pull the lever fully toward you to switchthe main beams on.
Push the lever forward to switch the mainbeams off.
Headlamp Flasher
Pull the lever toward you slightly andrelease it to flash the headlamps.
AUTOLAMPS
Note:It may be necessary to switch yourheadlamps on manually in severe weatherconditions.
Note:If you have autolamps on, you canonly switch the main beam on onceautolamps has switched the headlamps on.
Note:If you have autolamps on, you canonly switch the front fog lamps on onceautolamps has switched the headlamps on.
43Lighting
Page 46 of 256
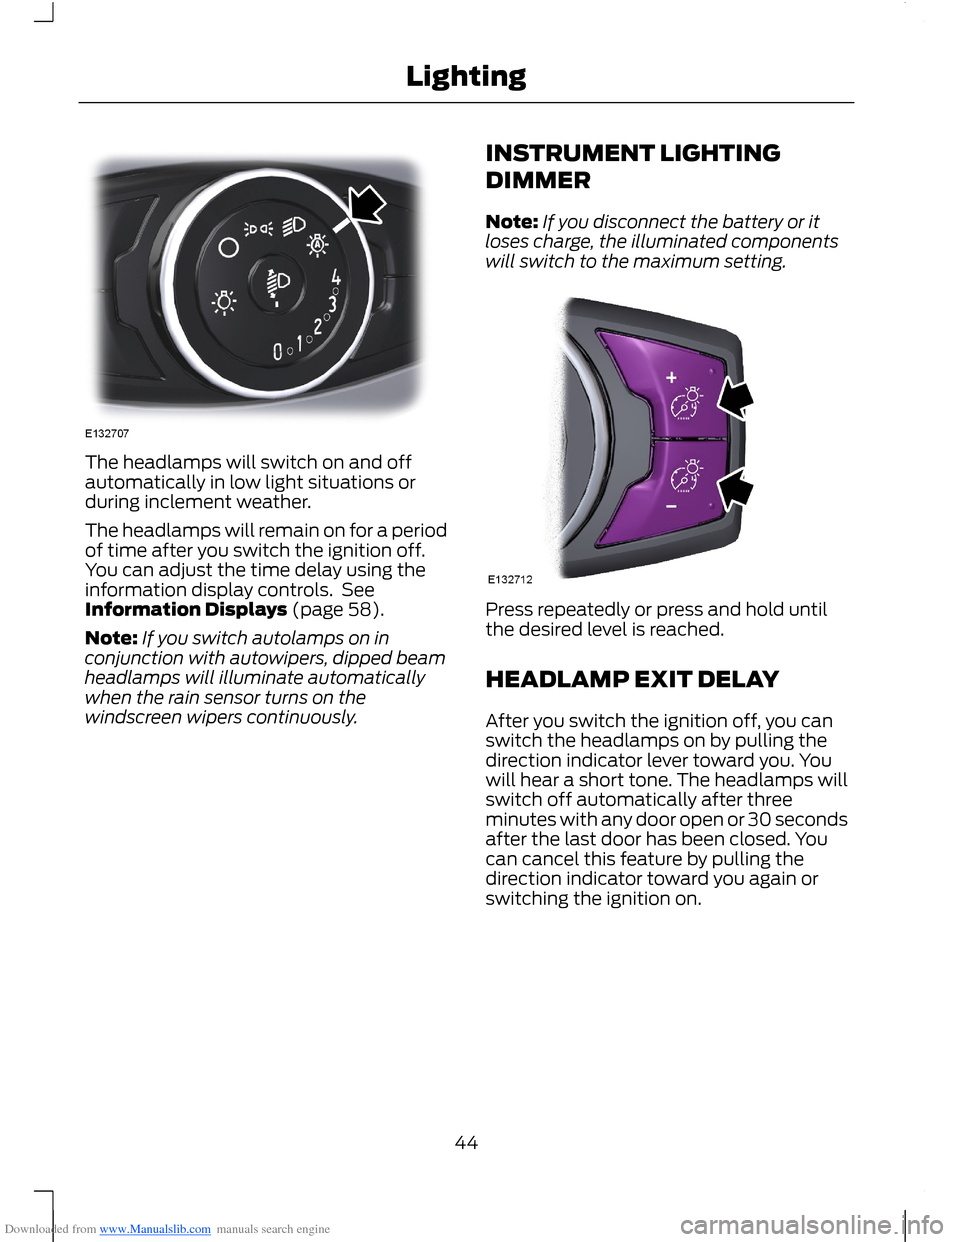
Downloaded from www.Manualslib.com manuals search engine The headlamps will switch on and offautomatically in low light situations orduring inclement weather.
The headlamps will remain on for a periodof time after you switch the ignition off.You can adjust the time delay using theinformation display controls. SeeInformation Displays (page 58).
Note:If you switch autolamps on inconjunction with autowipers, dipped beamheadlamps will illuminate automaticallywhen the rain sensor turns on thewindscreen wipers continuously.
INSTRUMENT LIGHTING
DIMMER
Note:If you disconnect the battery or itloses charge, the illuminated componentswill switch to the maximum setting.
Press repeatedly or press and hold untilthe desired level is reached.
HEADLAMP EXIT DELAY
After you switch the ignition off, you canswitch the headlamps on by pulling thedirection indicator lever toward you. Youwill hear a short tone. The headlamps willswitch off automatically after threeminutes with any door open or 30 secondsafter the last door has been closed. Youcan cancel this feature by pulling thedirection indicator toward you again orswitching the ignition on.
44Lighting
Page 47 of 256
Downloaded from www.Manualslib.com manuals search engine DAYTIME RUNNING LAMPS
WARNING
Always remember to switch yourheadlamps on in low light situationsor during inclement weather. Thesystem does not turn on the tail lamps andmay not provide adequate lighting duringthese conditions. Failure to switch theheadlamps on under these conditions mayresult in a collision.
The system switches the headlamps on inlow light situations.
To switch the system on:
1.Switch the ignition on.
2.Turn the lighting control to the off,autolamp or parking lamp position.
3.Make sure the transmission selectorlever is not in position P.
FRONT FOG LAMPS
WARNING
Only use the front fog lamps whenvisibility is considerably restricted byfog, snow or rain.
Note:If you switch autolamps on, you canonly switch the front fog lamps on onceautolamps has switched the headlamps on.
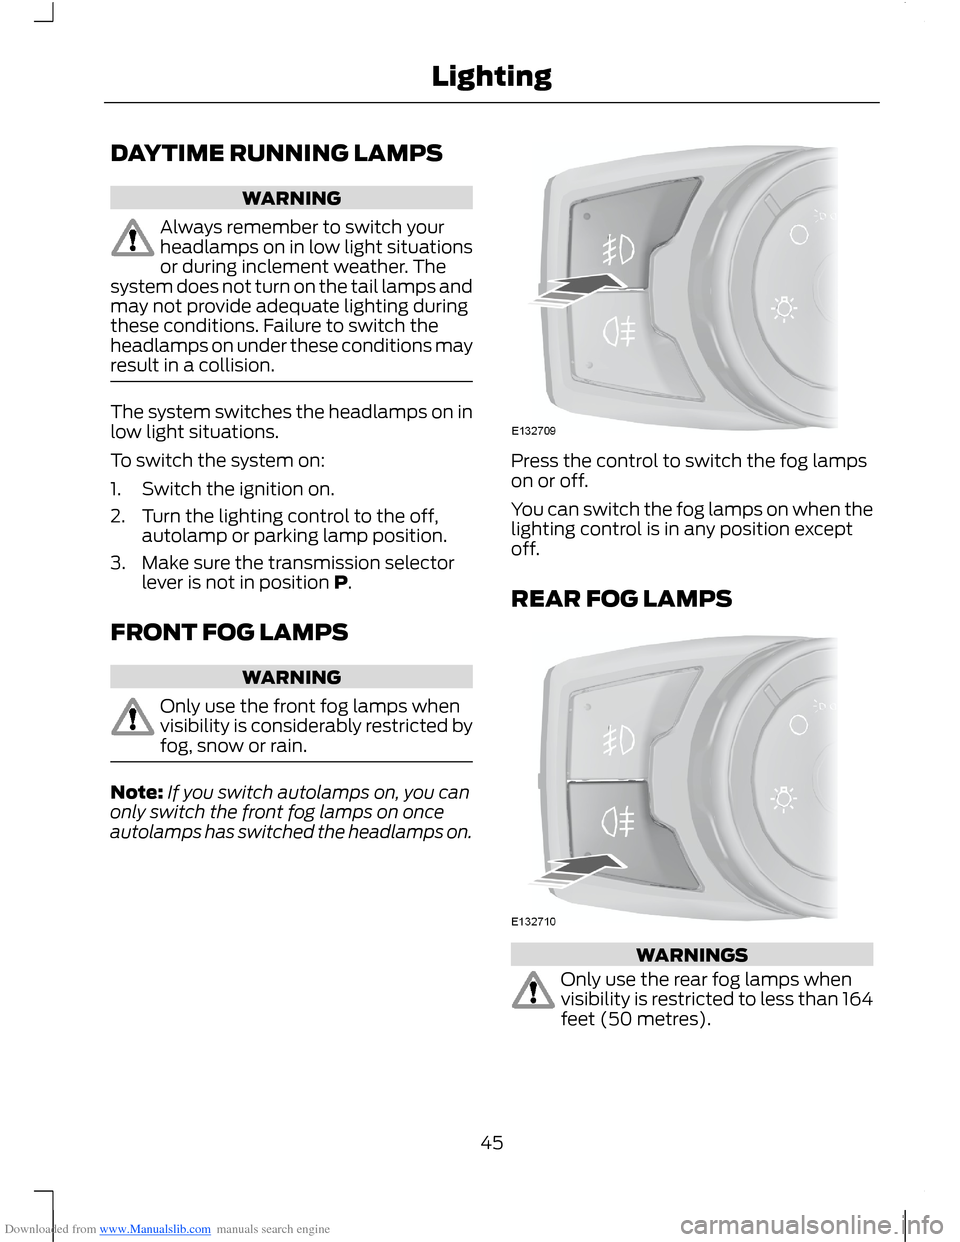
Press the control to switch the fog lampson or off.
You can switch the fog lamps on when thelighting control is in any position exceptoff.
REAR FOG LAMPS
WARNINGS
Only use the rear fog lamps whenvisibility is restricted to less than 164feet (50 metres).
45Lighting
Page 48 of 256
Downloaded from www.Manualslib.com manuals search engine WARNINGS
Do not use the rear fog lamps whenit is raining or snowing and visibilityis more than 164 feet (50 metres).
Press the control to switch the fog lampson or off.
You can switch the fog lamps on wheneither the front fog lamps or dipped beamheadlamps are on.
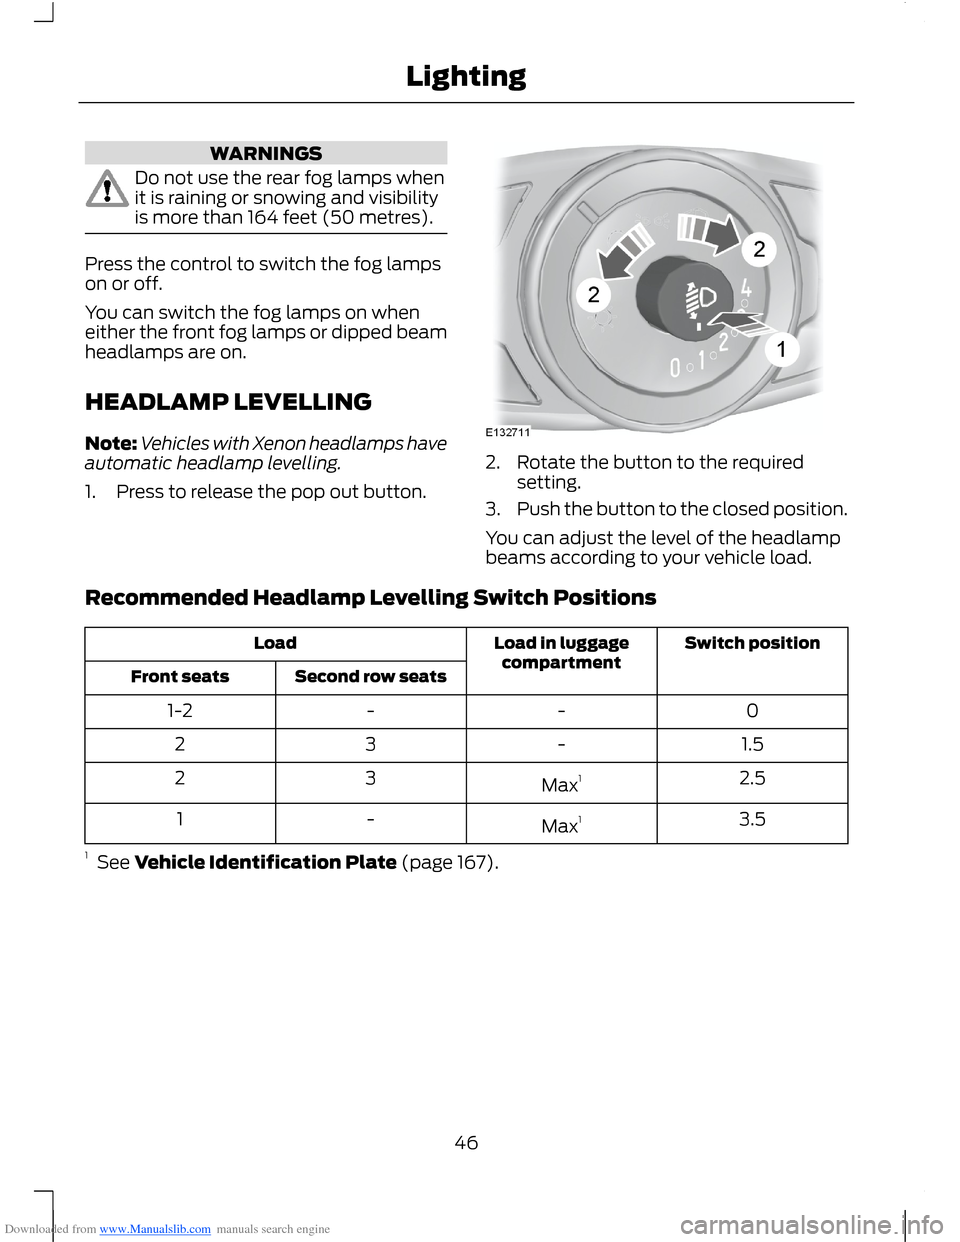
HEADLAMP LEVELLING
Note:Vehicles with Xenon headlamps haveautomatic headlamp levelling.
1.Press to release the pop out button.
2.Rotate the button to the requiredsetting.
3.Push the button to the closed position.
You can adjust the level of the headlampbeams according to your vehicle load.
Recommended Headlamp Levelling Switch Positions
Switch positionLoad in luggagecompartmentLoad
Second row seatsFront seats
0--1-2
1.5-32
2.5Max132
3.5Max1-1
1 See Vehicle Identification Plate (page 167).
46Lighting
Page 49 of 256
Downloaded from www.Manualslib.com manuals search engine DIRECTION INDICATORS
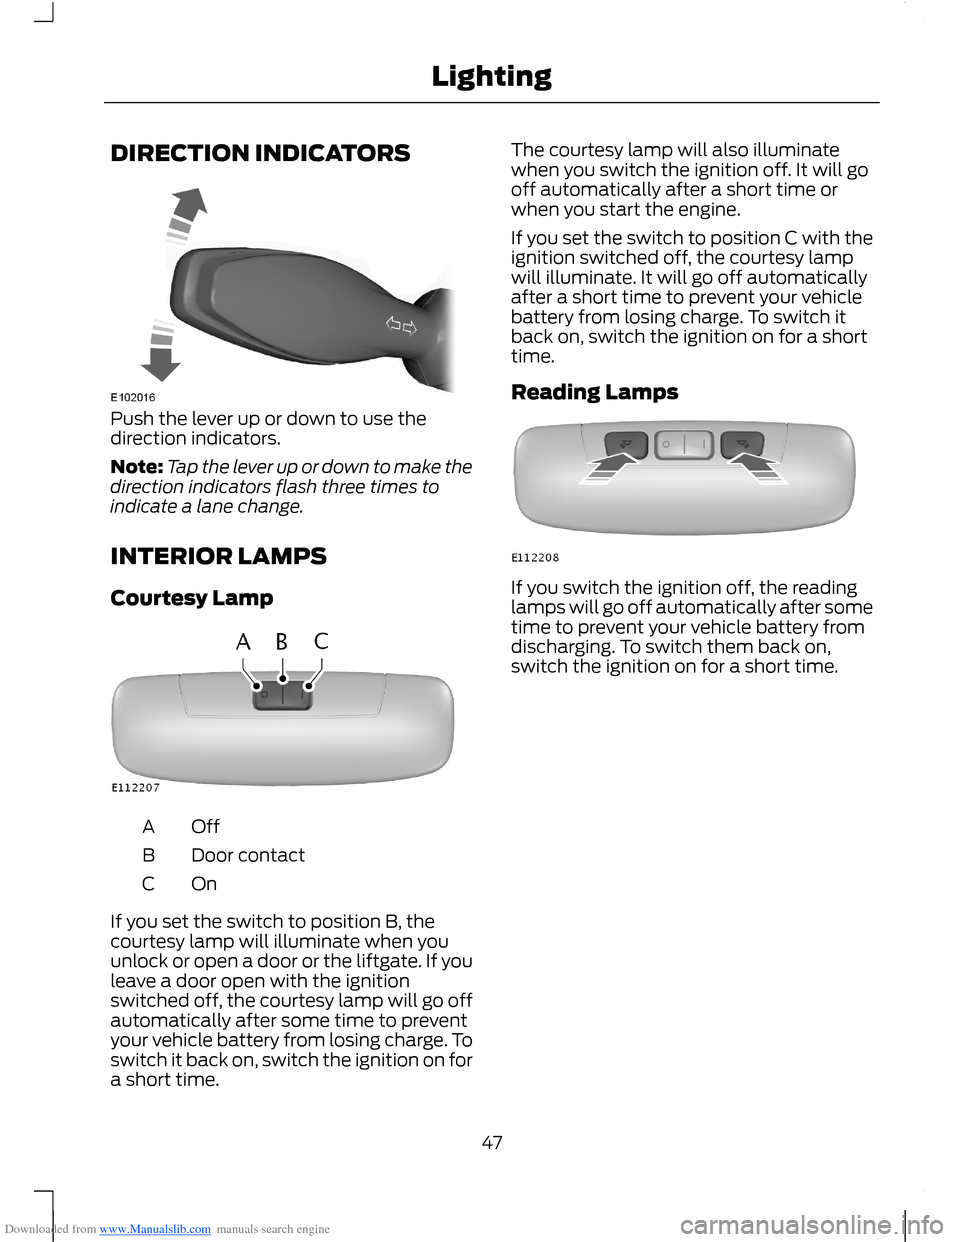
Push the lever up or down to use thedirection indicators.
Note:Tap the lever up or down to make thedirection indicators flash three times toindicate a lane change.
INTERIOR LAMPS
Courtesy Lamp
OffA
Door contactB
OnC
If you set the switch to position B, thecourtesy lamp will illuminate when youunlock or open a door or the liftgate. If youleave a door open with the ignitionswitched off, the courtesy lamp will go offautomatically after some time to preventyour vehicle battery from losing charge. Toswitch it back on, switch the ignition on fora short time.
The courtesy lamp will also illuminatewhen you switch the ignition off. It will gooff automatically after a short time orwhen you start the engine.
If you set the switch to position C with theignition switched off, the courtesy lampwill illuminate. It will go off automaticallyafter a short time to prevent your vehiclebattery from losing charge. To switch itback on, switch the ignition on for a shorttime.
Reading Lamps
If you switch the ignition off, the readinglamps will go off automatically after sometime to prevent your vehicle battery fromdischarging. To switch them back on,switch the ignition on for a short time.
47Lighting
Page 50 of 256
Downloaded from www.Manualslib.com manuals search engine POWER WINDOWS
WARNINGS
Do not leave children unattended inthe vehicle and do not let them playwith the power windows. They mayseriously injure themselves.
When closing the power windows,you should verify they are free ofobstructions and make sure thatchildren and pets are not in the proximityof the window openings.
Note:You may hear a rumbling noise whenjust one of the windows are open. Lower theopposite window slightly to reduce thisnoise.
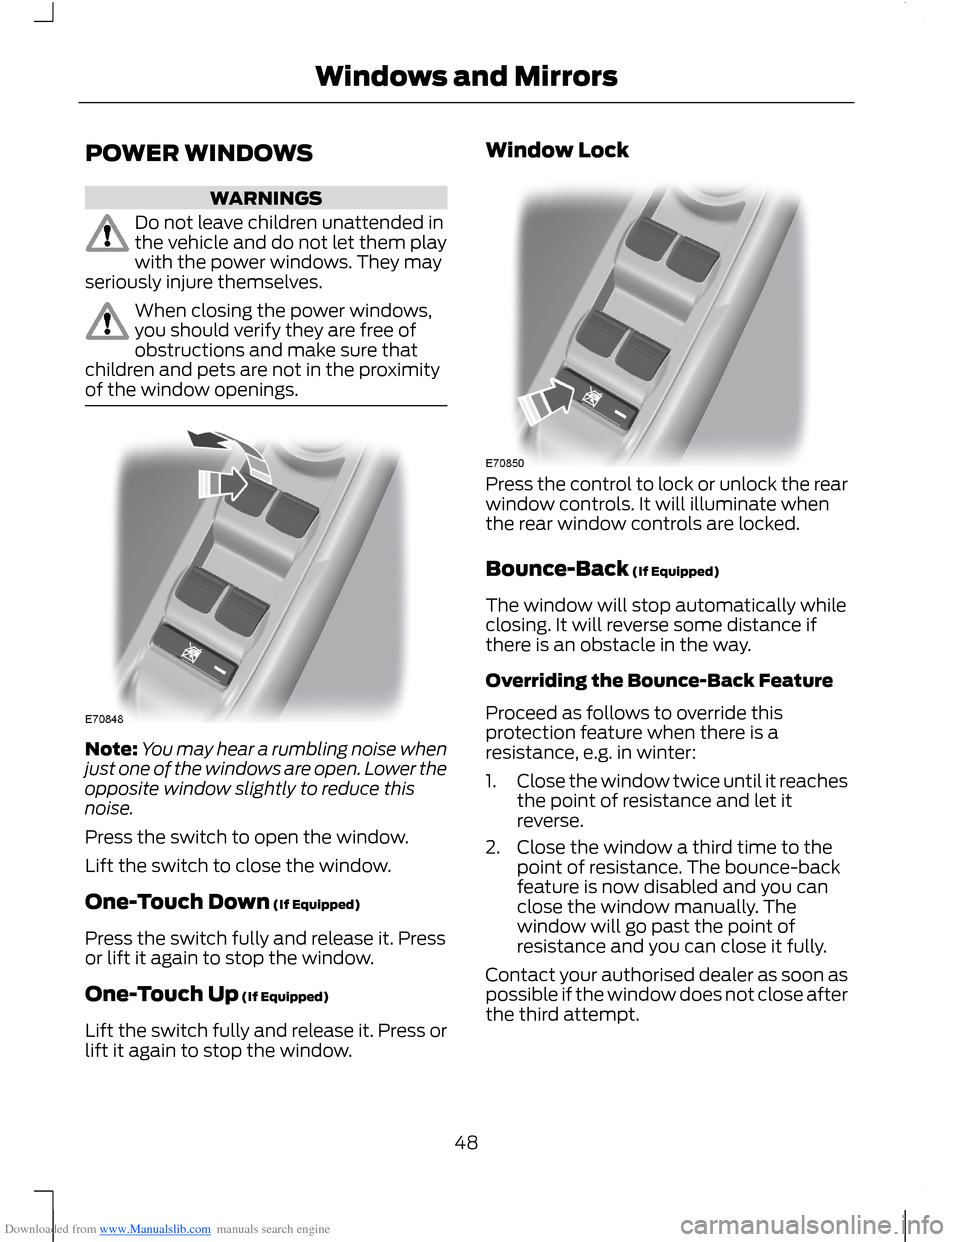
Press the switch to open the window.
Lift the switch to close the window.
One-Touch Down (If Equipped)
Press the switch fully and release it. Pressor lift it again to stop the window.
One-Touch Up (If Equipped)
Lift the switch fully and release it. Press orlift it again to stop the window.
Window Lock
Press the control to lock or unlock the rearwindow controls. It will illuminate whenthe rear window controls are locked.
Bounce-Back (If Equipped)
The window will stop automatically whileclosing. It will reverse some distance ifthere is an obstacle in the way.
Overriding the Bounce-Back Feature
Proceed as follows to override thisprotection feature when there is aresistance, e.g. in winter:
1.Close the window twice until it reachesthe point of resistance and let itreverse.
2.Close the window a third time to thepoint of resistance. The bounce-backfeature is now disabled and you canclose the window manually. Thewindow will go past the point ofresistance and you can close it fully.
Contact your authorised dealer as soon aspossible if the window does not close afterthe third attempt.
48Windows and Mirrors