FORD B MAX 2013 1.G Manual Online
Manufacturer: FORD, Model Year: 2013, Model line: B MAX, Model: FORD B MAX 2013 1.GPages: 298, PDF Size: 20.63 MB
Page 81 of 298
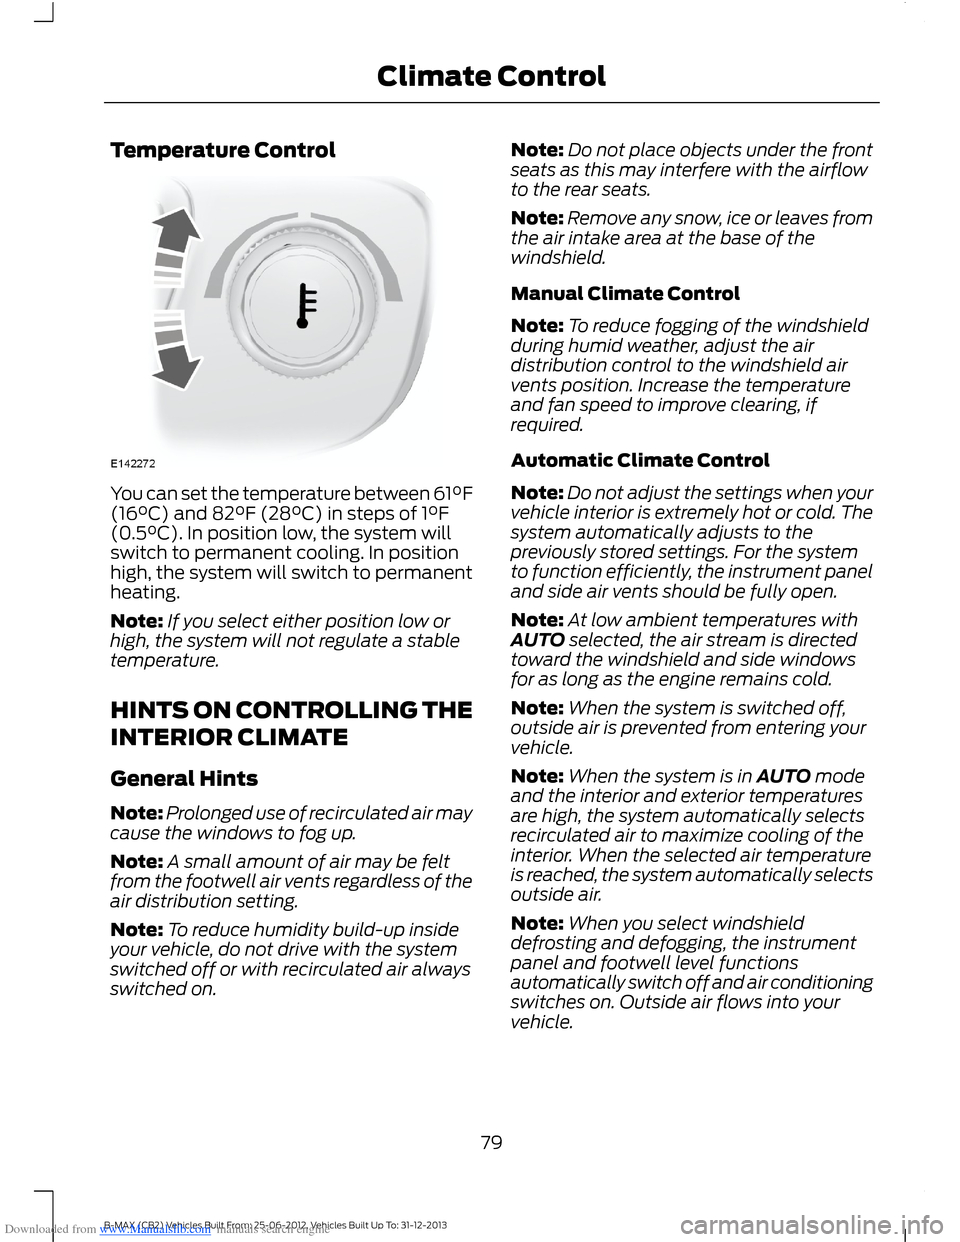
Downloaded from www.Manualslib.com manuals search engine Temperature Control
You can set the temperature between 61°F(16°C) and 82°F (28°C) in steps of 1°F(0.5°C). In position low, the system willswitch to permanent cooling. In positionhigh, the system will switch to permanentheating.
Note:If you select either position low orhigh, the system will not regulate a stabletemperature.
HINTS ON CONTROLLING THE
INTERIOR CLIMATE
General Hints
Note:Prolonged use of recirculated air maycause the windows to fog up.
Note:A small amount of air may be feltfrom the footwell air vents regardless of theair distribution setting.
Note:To reduce humidity build-up insideyour vehicle, do not drive with the systemswitched off or with recirculated air alwaysswitched on.
Note:Do not place objects under the frontseats as this may interfere with the airflowto the rear seats.
Note:Remove any snow, ice or leaves fromthe air intake area at the base of thewindshield.
Manual Climate Control
Note:To reduce fogging of the windshieldduring humid weather, adjust the airdistribution control to the windshield airvents position. Increase the temperatureand fan speed to improve clearing, ifrequired.
Automatic Climate Control
Note:Do not adjust the settings when yourvehicle interior is extremely hot or cold. Thesystem automatically adjusts to thepreviously stored settings. For the systemto function efficiently, the instrument paneland side air vents should be fully open.
Note:At low ambient temperatures withAUTO selected, the air stream is directedtoward the windshield and side windowsfor as long as the engine remains cold.
Note:When the system is switched off,outside air is prevented from entering yourvehicle.
Note:When the system is in AUTO modeand the interior and exterior temperaturesare high, the system automatically selectsrecirculated air to maximize cooling of theinterior. When the selected air temperatureis reached, the system automatically selectsoutside air.
Note:When you select windshielddefrosting and defogging, the instrumentpanel and footwell level functionsautomatically switch off and air conditioningswitches on. Outside air flows into yourvehicle.
79B-MAX (CB2) Vehicles Built From: 25-06-2012, Vehicles Built Up To: 31-12-2013Climate Control
Page 82 of 298
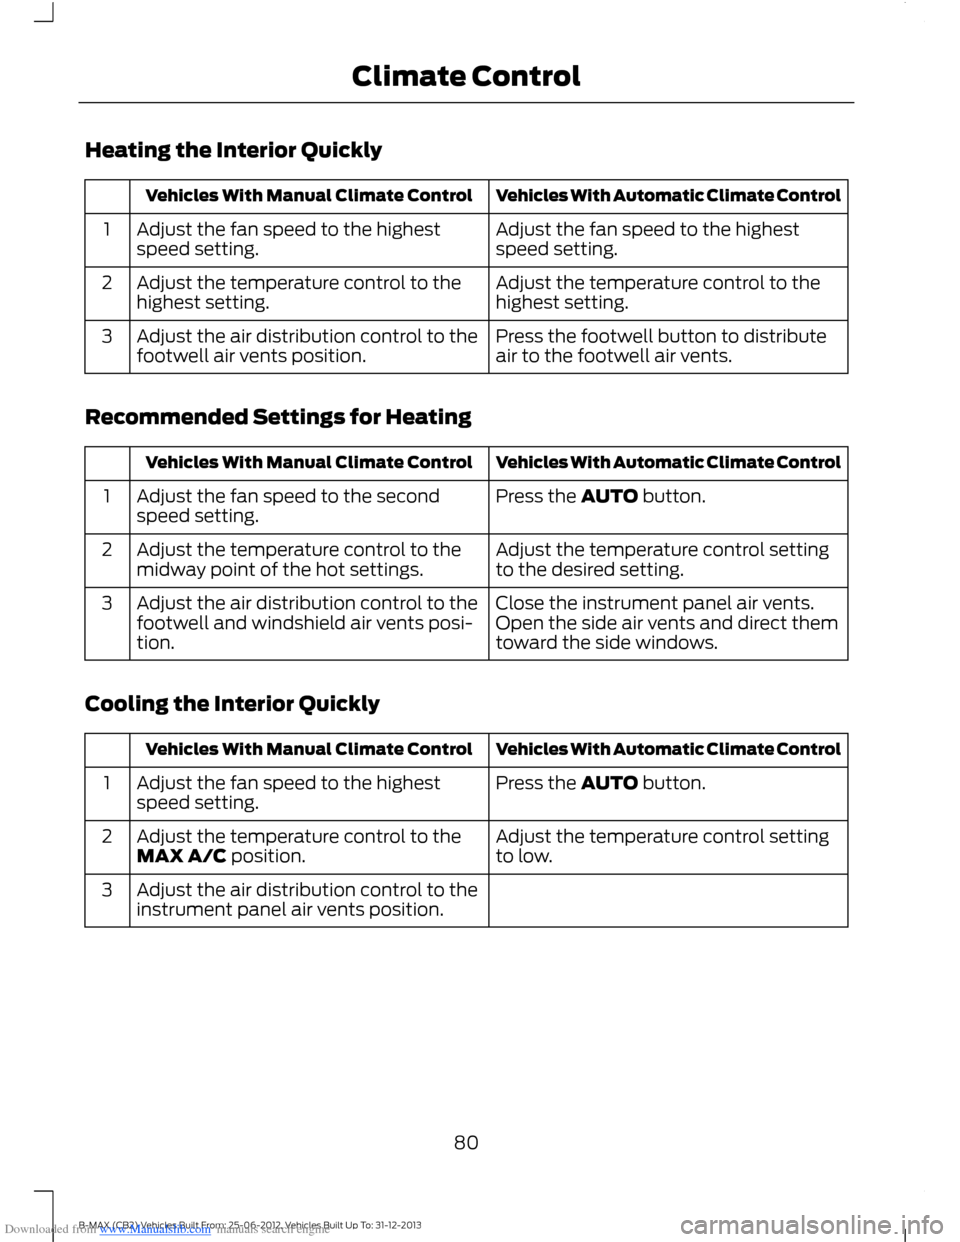
Downloaded from www.Manualslib.com manuals search engine Heating the Interior Quickly
Vehicles With Automatic Climate ControlVehicles With Manual Climate Control
Adjust the fan speed to the highestspeed setting.Adjust the fan speed to the highestspeed setting.1
Adjust the temperature control to thehighest setting.Adjust the temperature control to thehighest setting.2
Press the footwell button to distributeair to the footwell air vents.Adjust the air distribution control to thefootwell air vents position.3
Recommended Settings for Heating
Vehicles With Automatic Climate ControlVehicles With Manual Climate Control
Press the AUTO button.Adjust the fan speed to the secondspeed setting.1
Adjust the temperature control settingto the desired setting.Adjust the temperature control to themidway point of the hot settings.2
Close the instrument panel air vents.Open the side air vents and direct themtoward the side windows.
Adjust the air distribution control to thefootwell and windshield air vents posi-tion.
3
Cooling the Interior Quickly
Vehicles With Automatic Climate ControlVehicles With Manual Climate Control
Press the AUTO button.Adjust the fan speed to the highestspeed setting.1
Adjust the temperature control settingto low.Adjust the temperature control to theMAX A/C position.2
Adjust the air distribution control to theinstrument panel air vents position.3
80B-MAX (CB2) Vehicles Built From: 25-06-2012, Vehicles Built Up To: 31-12-2013Climate Control
Page 83 of 298
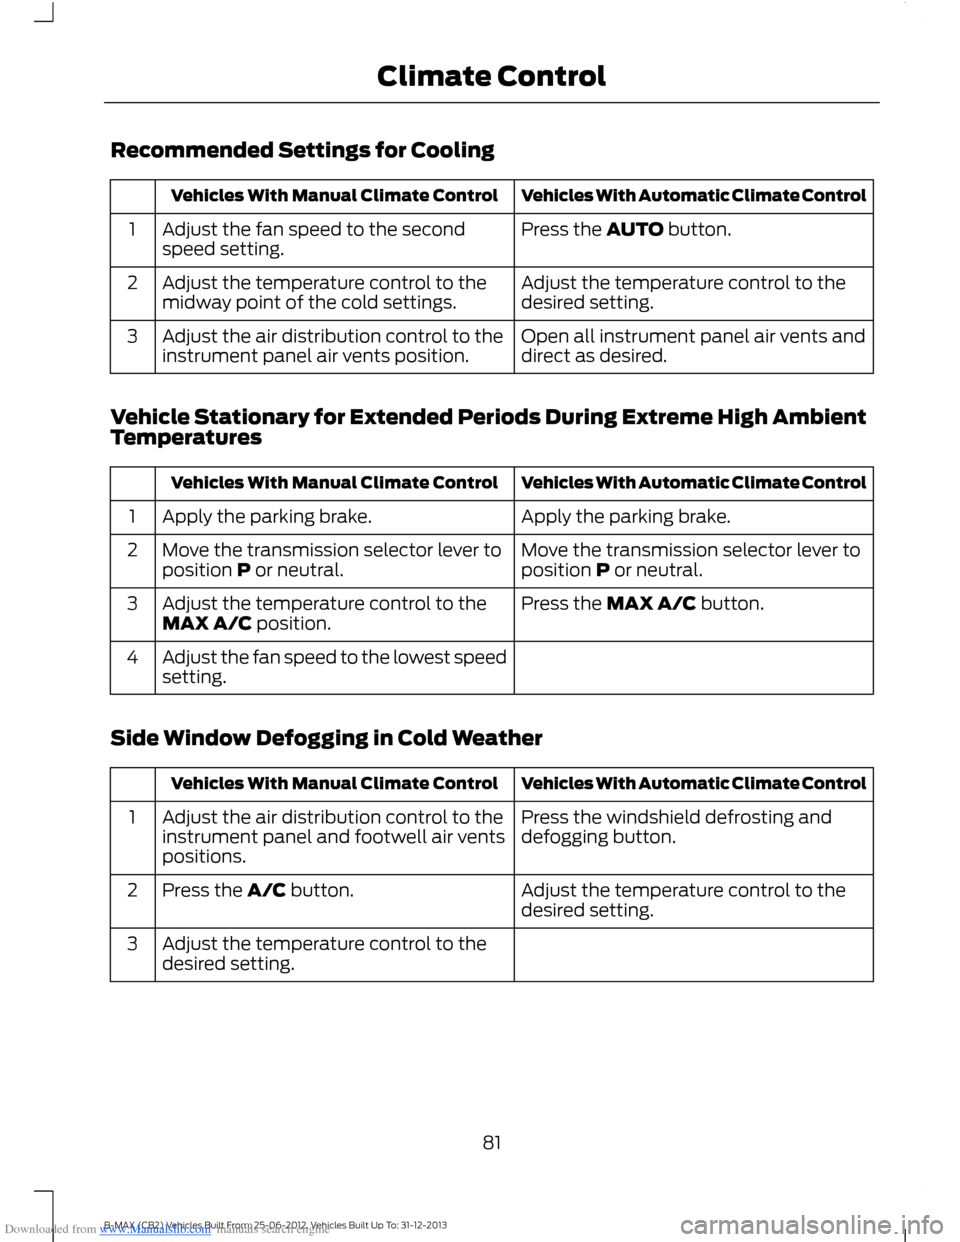
Downloaded from www.Manualslib.com manuals search engine Recommended Settings for Cooling
Vehicles With Automatic Climate ControlVehicles With Manual Climate Control
Press the AUTO button.Adjust the fan speed to the secondspeed setting.1
Adjust the temperature control to thedesired setting.Adjust the temperature control to themidway point of the cold settings.2
Open all instrument panel air vents anddirect as desired.Adjust the air distribution control to theinstrument panel air vents position.3
Vehicle Stationary for Extended Periods During Extreme High AmbientTemperatures
Vehicles With Automatic Climate ControlVehicles With Manual Climate Control
Apply the parking brake.Apply the parking brake.1
Move the transmission selector lever toposition P or neutral.Move the transmission selector lever toposition P or neutral.2
Press the MAX A/C button.Adjust the temperature control to theMAX A/C position.3
Adjust the fan speed to the lowest speedsetting.4
Side Window Defogging in Cold Weather
Vehicles With Automatic Climate ControlVehicles With Manual Climate Control
Press the windshield defrosting anddefogging button.Adjust the air distribution control to theinstrument panel and footwell air ventspositions.
1
Adjust the temperature control to thedesired setting.Press the A/C button.2
Adjust the temperature control to thedesired setting.3
81B-MAX (CB2) Vehicles Built From: 25-06-2012, Vehicles Built Up To: 31-12-2013Climate Control
Page 84 of 298
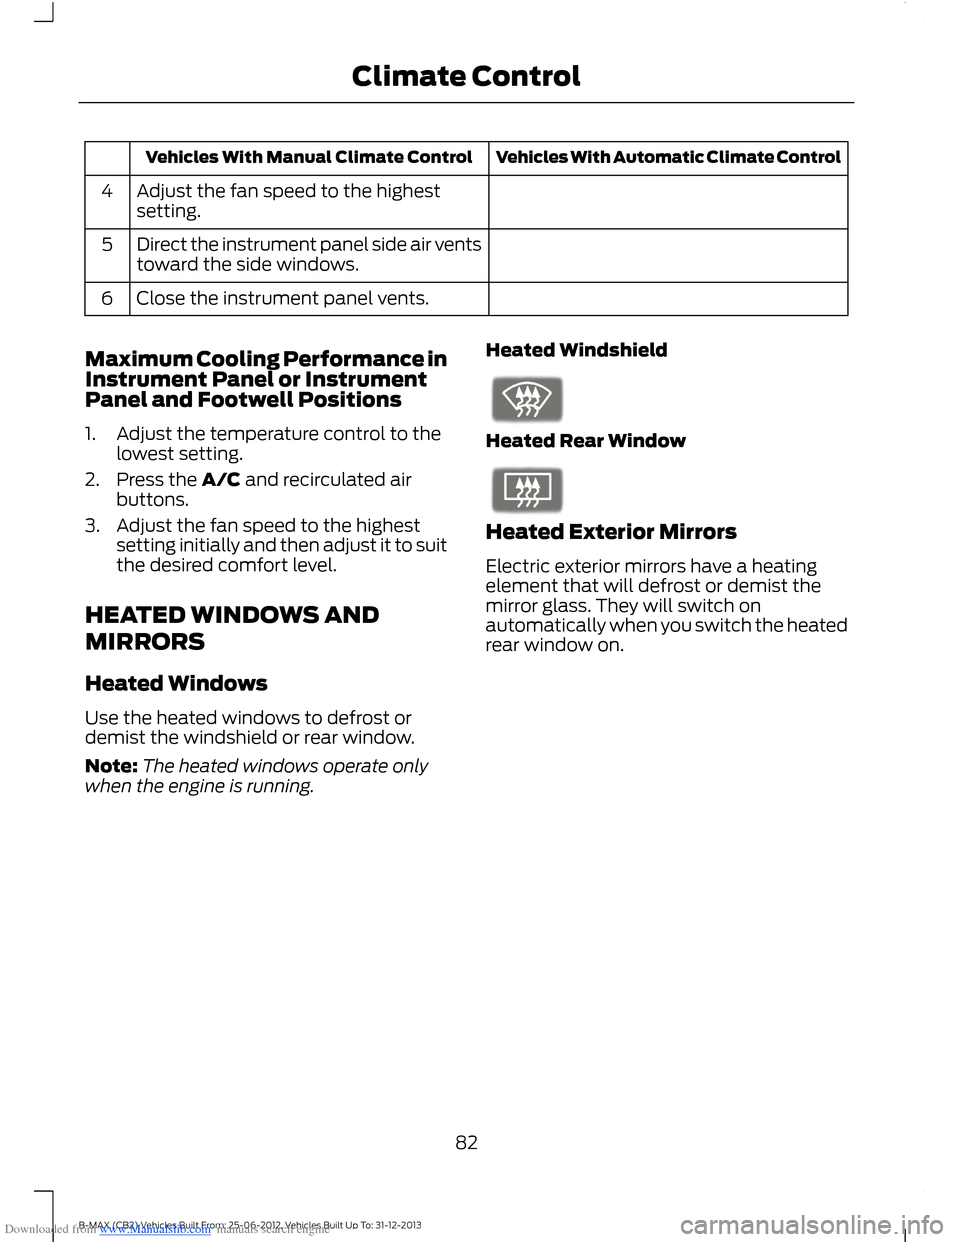
Downloaded from www.Manualslib.com manuals search engine Vehicles With Automatic Climate ControlVehicles With Manual Climate Control
Adjust the fan speed to the highestsetting.4
Direct the instrument panel side air ventstoward the side windows.5
Close the instrument panel vents.6
Maximum Cooling Performance inInstrument Panel or InstrumentPanel and Footwell Positions
1.Adjust the temperature control to thelowest setting.
2.Press the A/C and recirculated airbuttons.
3.Adjust the fan speed to the highestsetting initially and then adjust it to suitthe desired comfort level.
HEATED WINDOWS AND
MIRRORS
Heated Windows
Use the heated windows to defrost ordemist the windshield or rear window.
Note:The heated windows operate onlywhen the engine is running.
Heated Windshield
Heated Rear Window
Heated Exterior Mirrors
Electric exterior mirrors have a heatingelement that will defrost or demist themirror glass. They will switch onautomatically when you switch the heatedrear window on.
82B-MAX (CB2) Vehicles Built From: 25-06-2012, Vehicles Built Up To: 31-12-2013Climate Control
Page 85 of 298
Downloaded from www.Manualslib.com manuals search engine SITTING IN THE CORRECT
POSITION
WARNINGS
Do not recline the seatback too faras this can cause the occupant toslide under the safety belt, resultingin serious injury in the event of a collision.
Sitting improperly, out of position orwith the seatback reclined too far,can result in serious injury or deathin the event of a collision. Always situpright against your seatback, with yourfeet on the floor.
Do not place objects higher than theseatback to reduce the risk of seriousinjury in the event of a collision orduring heavy braking.
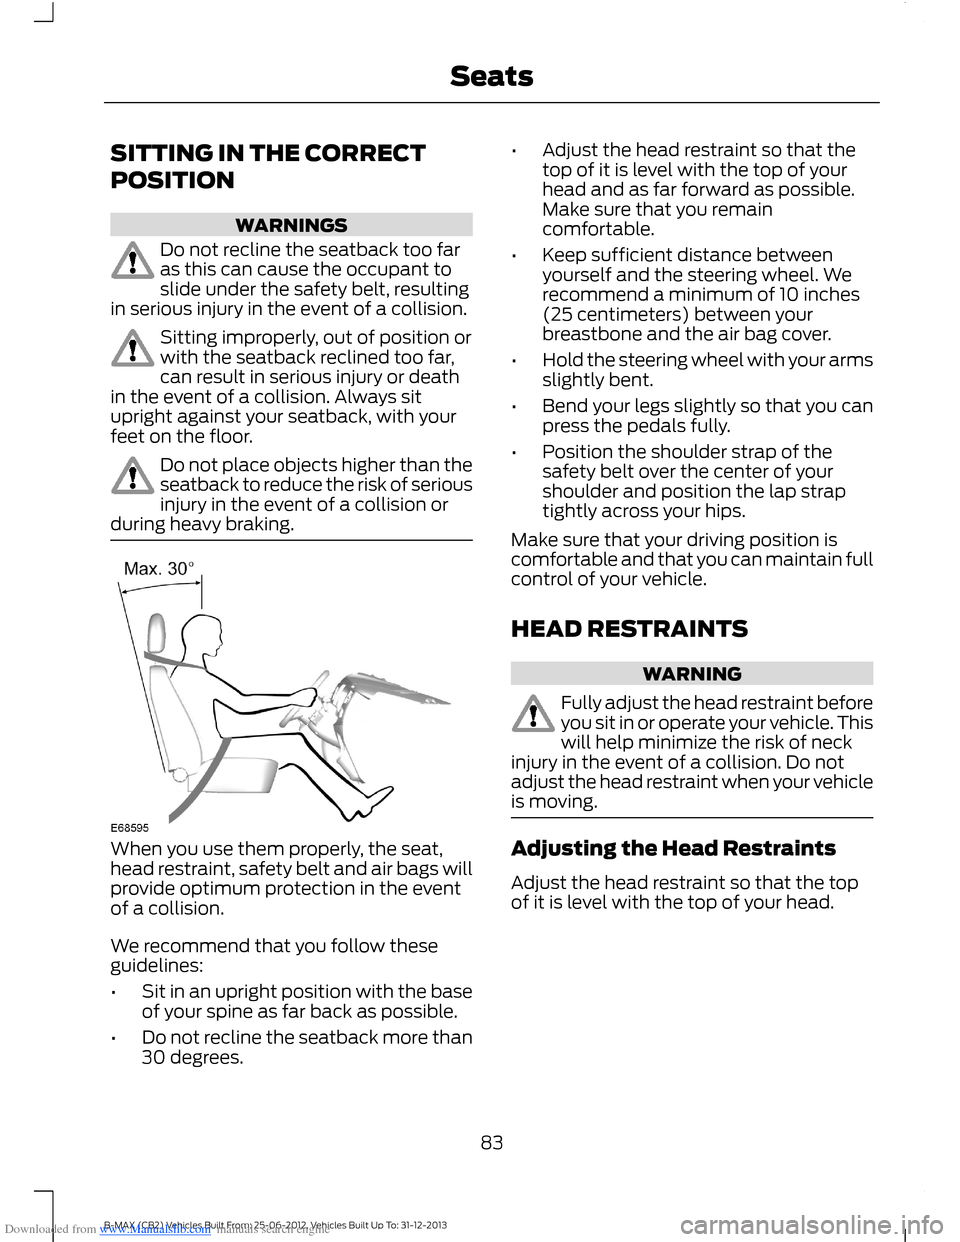
When you use them properly, the seat,head restraint, safety belt and air bags willprovide optimum protection in the eventof a collision.
We recommend that you follow theseguidelines:
•Sit in an upright position with the baseof your spine as far back as possible.
•Do not recline the seatback more than30 degrees.
•Adjust the head restraint so that thetop of it is level with the top of yourhead and as far forward as possible.Make sure that you remaincomfortable.
•Keep sufficient distance betweenyourself and the steering wheel. Werecommend a minimum of 10 inches(25 centimeters) between yourbreastbone and the air bag cover.
•Hold the steering wheel with your armsslightly bent.
•Bend your legs slightly so that you canpress the pedals fully.
•Position the shoulder strap of thesafety belt over the center of yourshoulder and position the lap straptightly across your hips.
Make sure that your driving position iscomfortable and that you can maintain fullcontrol of your vehicle.
HEAD RESTRAINTS
WARNING
Fully adjust the head restraint beforeyou sit in or operate your vehicle. Thiswill help minimize the risk of neckinjury in the event of a collision. Do notadjust the head restraint when your vehicleis moving.
Adjusting the Head Restraints
Adjust the head restraint so that the topof it is level with the top of your head.
83B-MAX (CB2) Vehicles Built From: 25-06-2012, Vehicles Built Up To: 31-12-2013Seats
Page 86 of 298
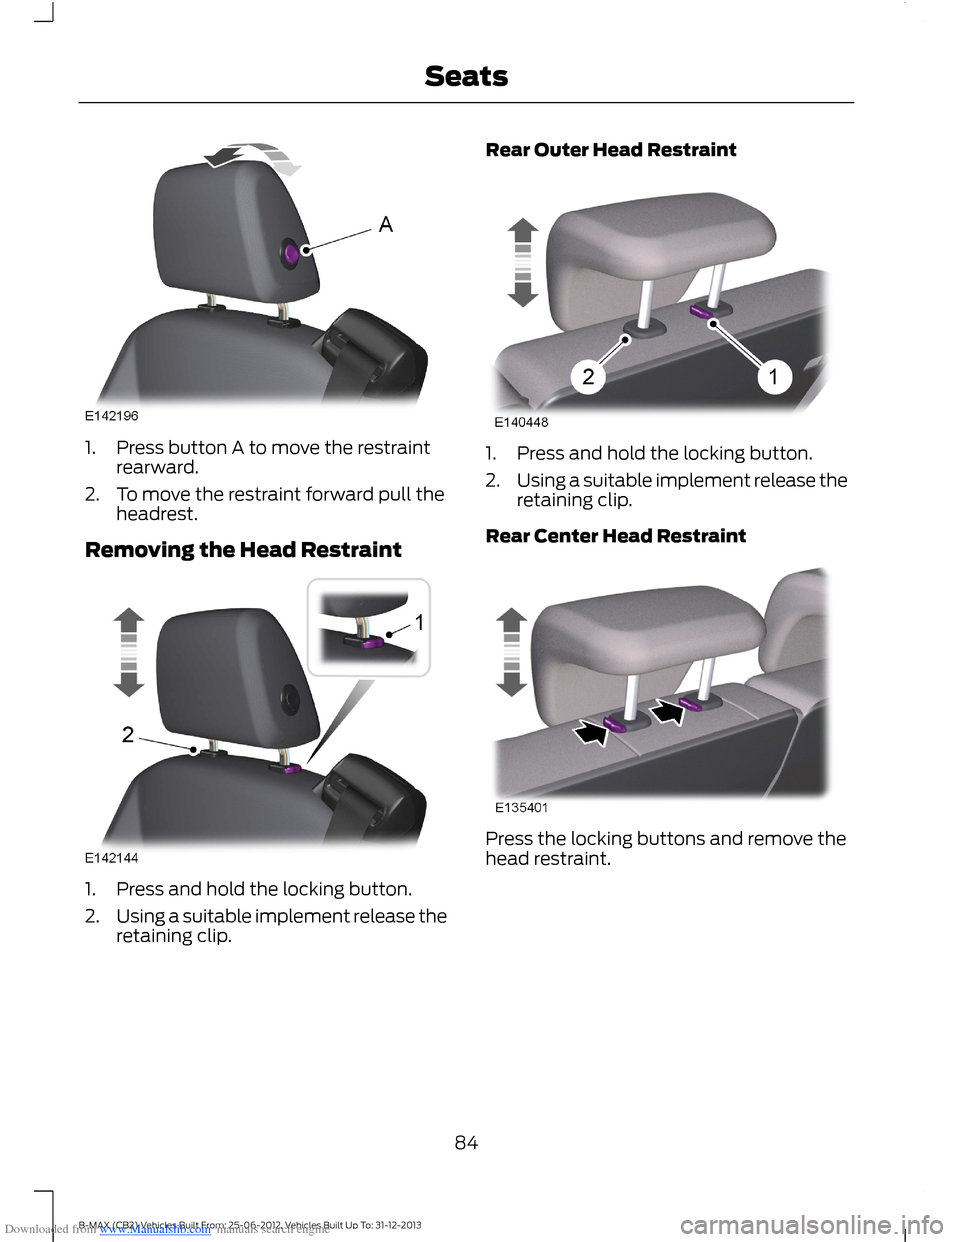
Downloaded from www.Manualslib.com manuals search engine 1.Press button A to move the restraintrearward.
2.To move the restraint forward pull theheadrest.
Removing the Head Restraint
1.Press and hold the locking button.
2.Using a suitable implement release theretaining clip.
Rear Outer Head Restraint
1.Press and hold the locking button.
2.Using a suitable implement release theretaining clip.
Rear Center Head Restraint
Press the locking buttons and remove thehead restraint.
84B-MAX (CB2) Vehicles Built From: 25-06-2012, Vehicles Built Up To: 31-12-2013Seats
Page 87 of 298
Downloaded from www.Manualslib.com manuals search engine MANUAL SEATS
WARNINGS
Do not place cargo or any objectsbehind the seatback before returningit to the original position. Pull on theseatback to make sure that it has fullylatched after returning the seatback to itsoriginal position. An unlatched seat maybecome dangerous if you stop suddenly orhave a collision.
Rock the seat backward and forwardafter releasing the lever to make surethat it is fully engaged in its catch.
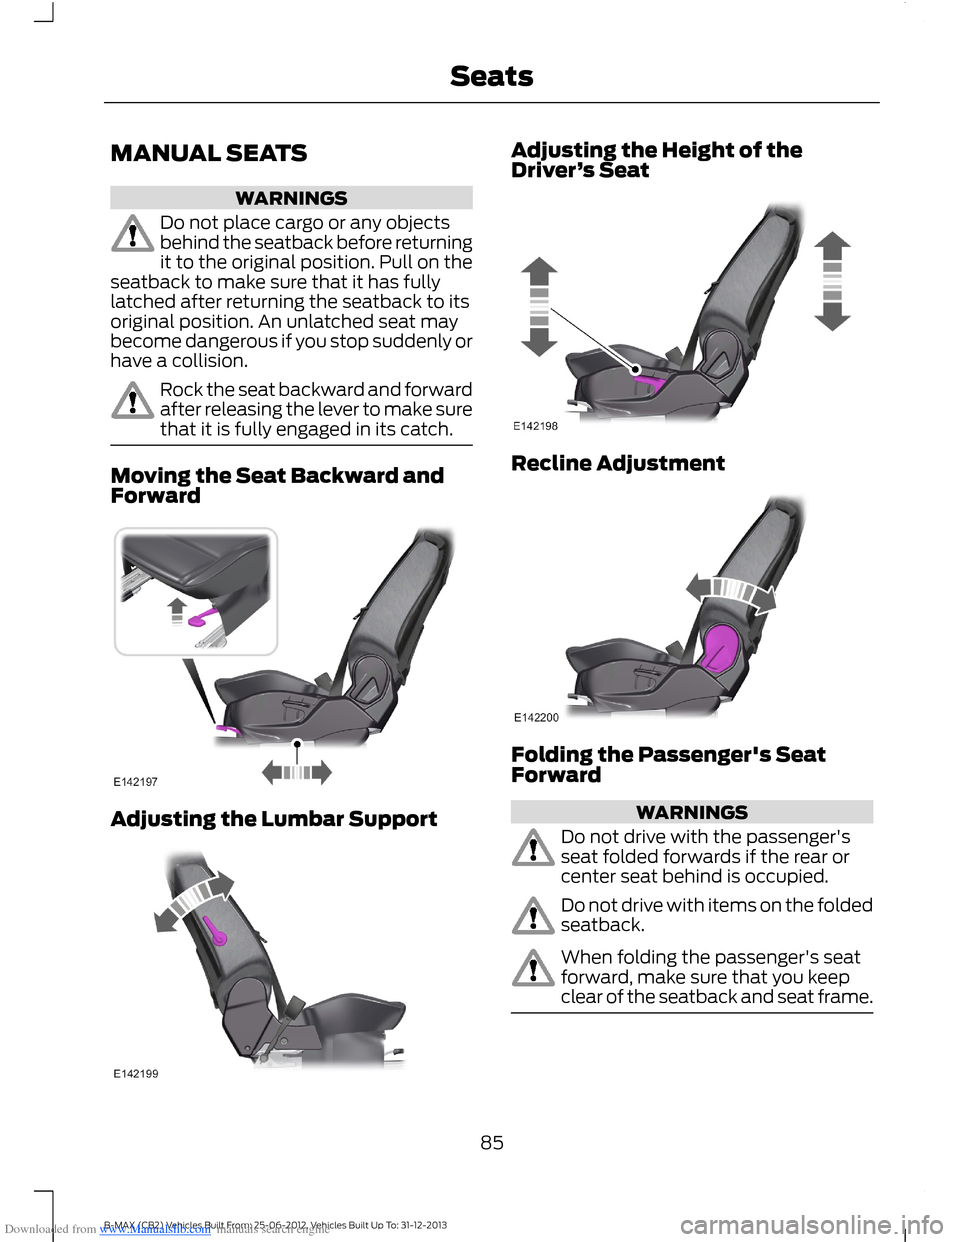
Moving the Seat Backward andForward
Adjusting the Lumbar Support
Adjusting the Height of theDriver’s Seat
Recline Adjustment
Folding the Passenger's SeatForward
WARNINGS
Do not drive with the passenger'sseat folded forwards if the rear orcenter seat behind is occupied.
Do not drive with items on the foldedseatback.
When folding the passenger's seatforward, make sure that you keepclear of the seatback and seat frame.
85B-MAX (CB2) Vehicles Built From: 25-06-2012, Vehicles Built Up To: 31-12-2013Seats
Page 88 of 298
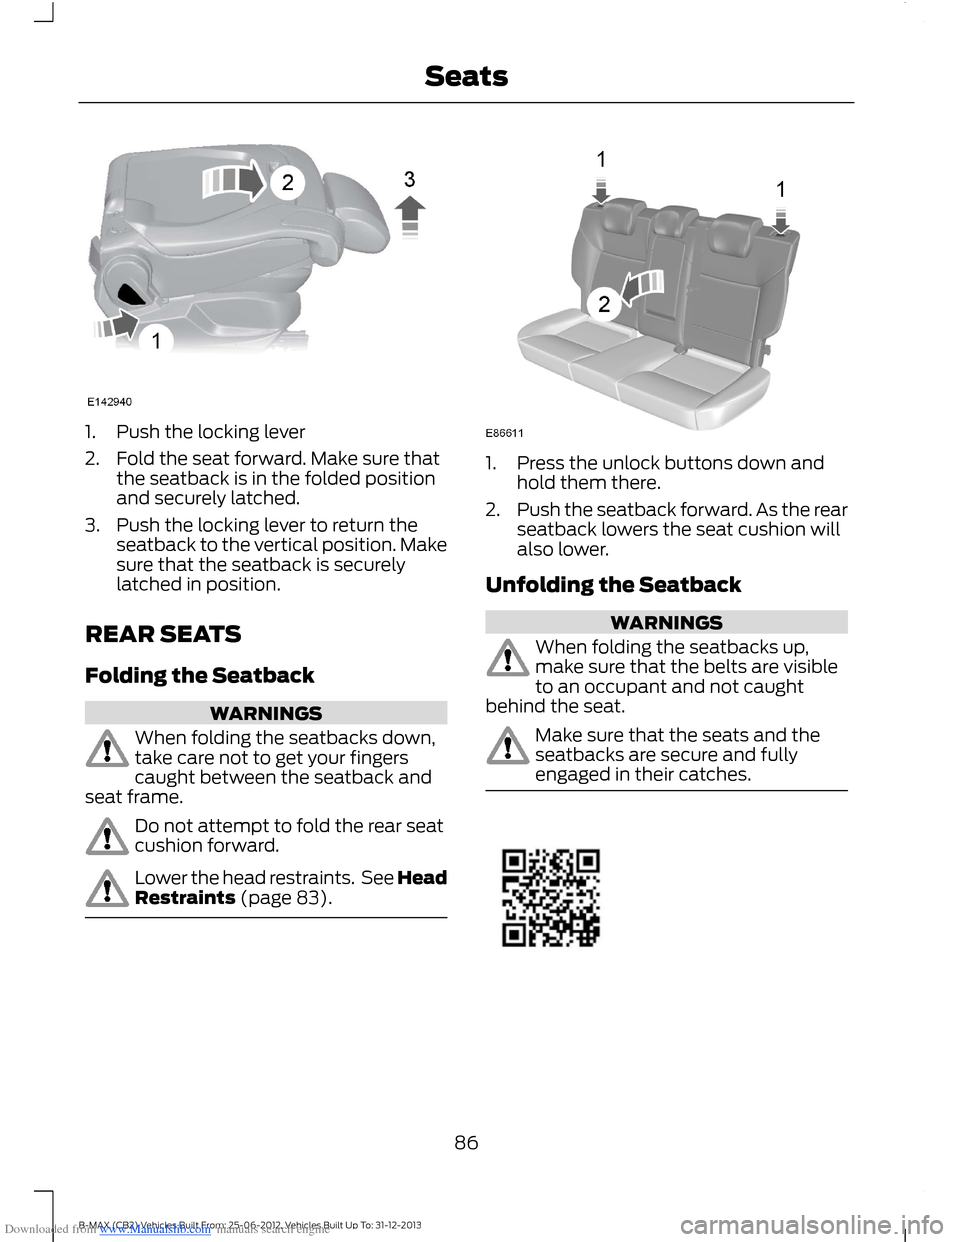
Downloaded from www.Manualslib.com manuals search engine 1.Push the locking lever
2.Fold the seat forward. Make sure thatthe seatback is in the folded positionand securely latched.
3.Push the locking lever to return theseatback to the vertical position. Makesure that the seatback is securelylatched in position.
REAR SEATS
Folding the Seatback
WARNINGS
When folding the seatbacks down,take care not to get your fingerscaught between the seatback andseat frame.
Do not attempt to fold the rear seatcushion forward.
Lower the head restraints. See HeadRestraints (page 83).
1.Press the unlock buttons down andhold them there.
2.Push the seatback forward. As the rearseatback lowers the seat cushion willalso lower.
Unfolding the Seatback
WARNINGS
When folding the seatbacks up,make sure that the belts are visibleto an occupant and not caughtbehind the seat.
Make sure that the seats and theseatbacks are secure and fullyengaged in their catches.
86B-MAX (CB2) Vehicles Built From: 25-06-2012, Vehicles Built Up To: 31-12-2013Seats
Page 89 of 298
Downloaded from www.Manualslib.com manuals search engine HEATED SEATS
WARNING
People who are unable to feel painto their skin because of advancedage, chronic illness, diabetes, spinalcord injury, medication, alcohol use,exhaustion or other physical conditions,must exercise care when using the heatedseat. The heated seat may cause burnseven at low temperatures, especially ifused for long periods of time. Do not placeanything on the seat that insulates againstheat, such as a blanket or cushion. Thismay cause the heated seat to overheat.Do not puncture the seat with pins, needlesor other pointed objects. This may damagethe heating element which may cause theheated seat to overheat. An overheatedseat may cause serious personal injury.
Do not do the following:
•Place heavy objects on the seat.
•Operate the heated seat if water or anyother liquid is spilled on the seat. Allowthe seat to dry thoroughly.
•Operate the heated seats unless theengine is running. Doing so could drainyour vehicle battery.
For item location: See Climate Control(page 75).
The heated seat will only operate with theignition switched on.
The maximum temperature is reachedafter five or six minutes. It is regulatedthermostatically.
The heated seat will remain on until eitherthe heated seat switch or the ignition isswitched off.
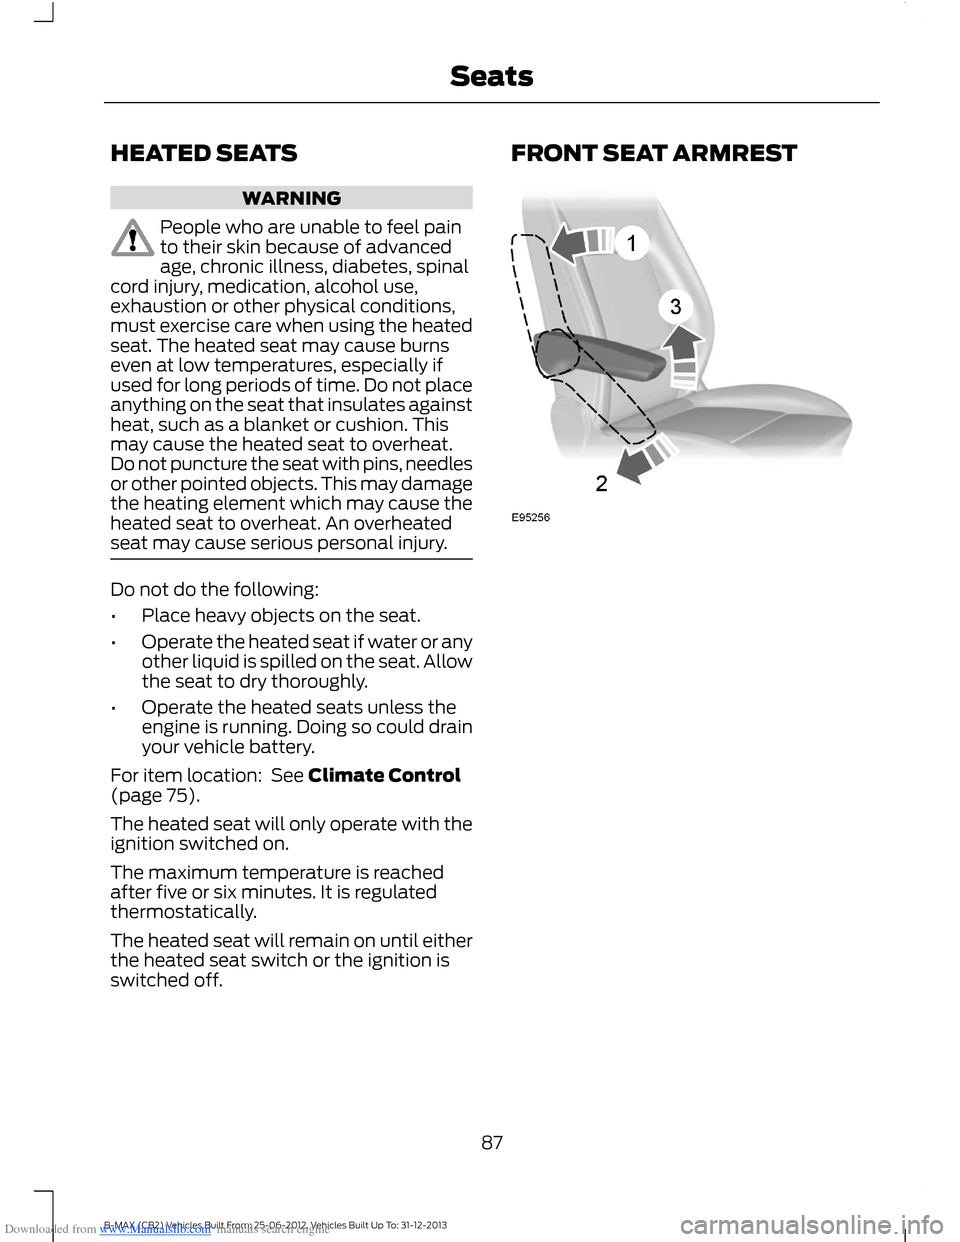
FRONT SEAT ARMREST
87B-MAX (CB2) Vehicles Built From: 25-06-2012, Vehicles Built Up To: 31-12-2013Seats
Page 90 of 298
Downloaded from www.Manualslib.com manuals search engine 12 Volt DC Power Point
WARNING
Do not plug optional electricalaccessories into the cigar lightersocket. Incorrect use of the lightercan cause damage not covered by yourwarranty, and can result in fire or seriousinjury.
Note:When you switch the ignition on, youcan use the socket to power 12 voltappliances with a maximum current ratingof 20 amps.
After you switch the ignition off the powersupply will only work for a maximum of 30minutes.Note:Do not insert objects other than anaccessory plug into the power point. Thiswill damage the outlet and blow the fuse.
Note:Do not hang any type of accessory oraccessory bracket from the plug.
Note:Do not use the power point over thevehicle capacity of 12 volt DC 180 watt or afuse may blow.
Note:Do not use the power point foroperating a cigar lighter element.
Note:Incorrect use of the power point cancause damage not covered by yourwarranty.
Note:Always keep the power point capsclosed when not in use.
Run the engine for full capacity use of thepower point.
To prevent the battery from running out ofcharge:
•Do not use the power point longer thannecessary when the engine is notrunning.
•Do not leave devices plugged inovernight or when your vehicle isparked for extended periods.
Location
Power points may be found:
•on the center console
•on the rear of the center console.
CIGAR LIGHTER
Note:Do not hold the cigar lighter elementpressed in.
Note:If you use the socket when the engineis not running, the battery may lose charge.
Note:When you switch the ignition on, youcan use the socket to power 12 voltappliances with a maximum current ratingof 20 amps.
Note:After you switch the ignition off thepower supply will only work for a maximumof 30 minutes.
Note:Use only Ford accessory connectorsor connectors specified for use with SAEstandard sockets.
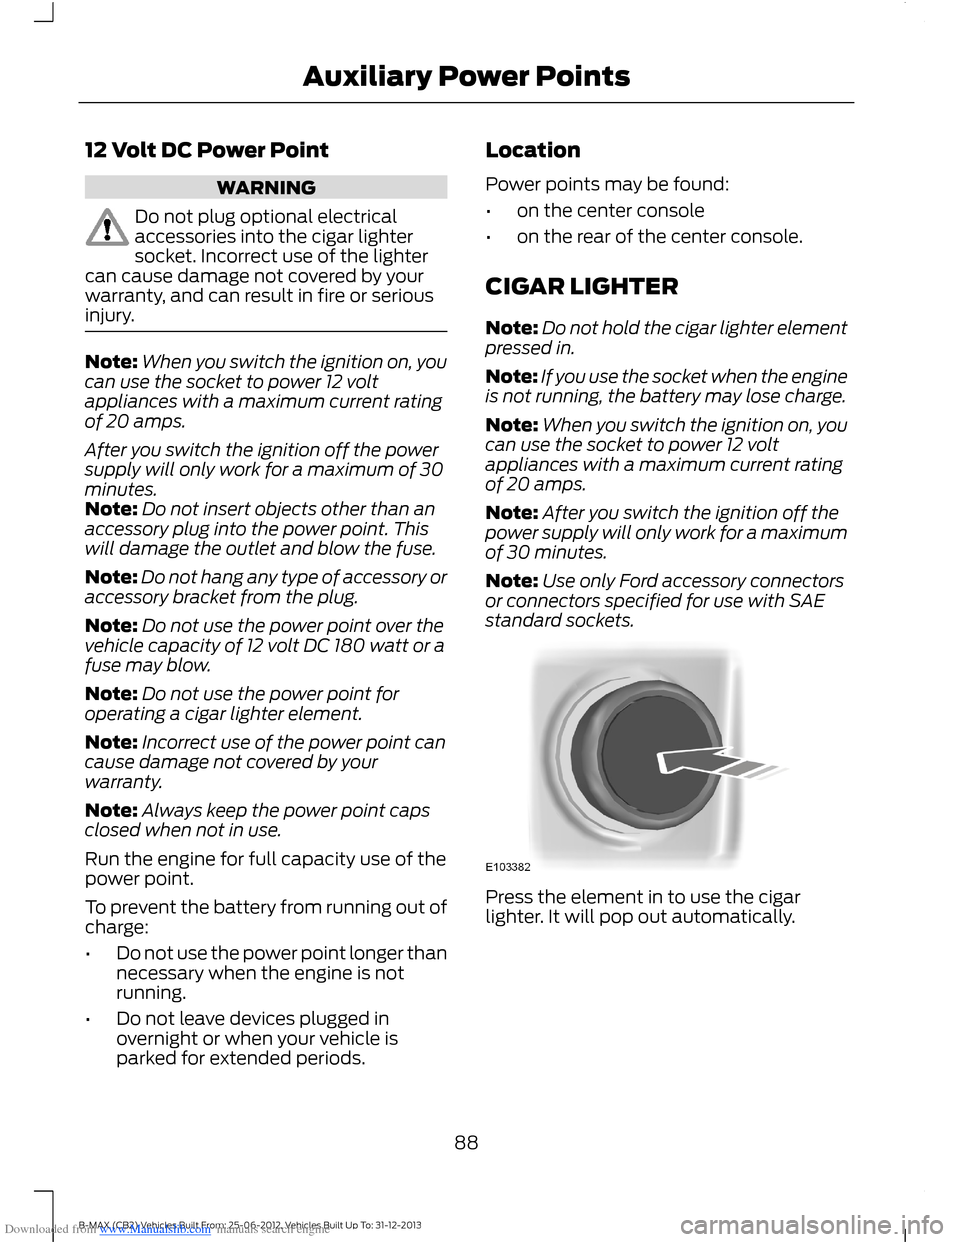
Press the element in to use the cigarlighter. It will pop out automatically.
88B-MAX (CB2) Vehicles Built From: 25-06-2012, Vehicles Built Up To: 31-12-2013Auxiliary Power Points