low 4L FORD BRONCO 2023 Owners Manual
[x] Cancel search | Manufacturer: FORD, Model Year: 2023, Model line: BRONCO, Model: FORD BRONCO 2023Pages: 642, PDF Size: 14.71 MB
Page 370 of 642
1.Park your vehicle directly in front of awall or screen on a level surface,approximately 25 ft (7.6 m) away.
2.Measure the height from the center ofyour headlamp, indicated by a 3millimeter circle on the lens, to theground and mark an 8 ft (2.4 m)horizontal reference line on the verticalwall or screen at this height, a piece ofmasking tape works well.
3.Switch on the low beam headlamps toilluminate the wall or screen and openthe hood. Cover one of the headlampsso no light hits the wall.
4.On the wall or screen, observe a lightpattern with a distinct horizontal edgetoward the right. If this edge is not atthe horizontal reference line, adjust thebeam so the edge is at the same heightas the horizontal reference line.
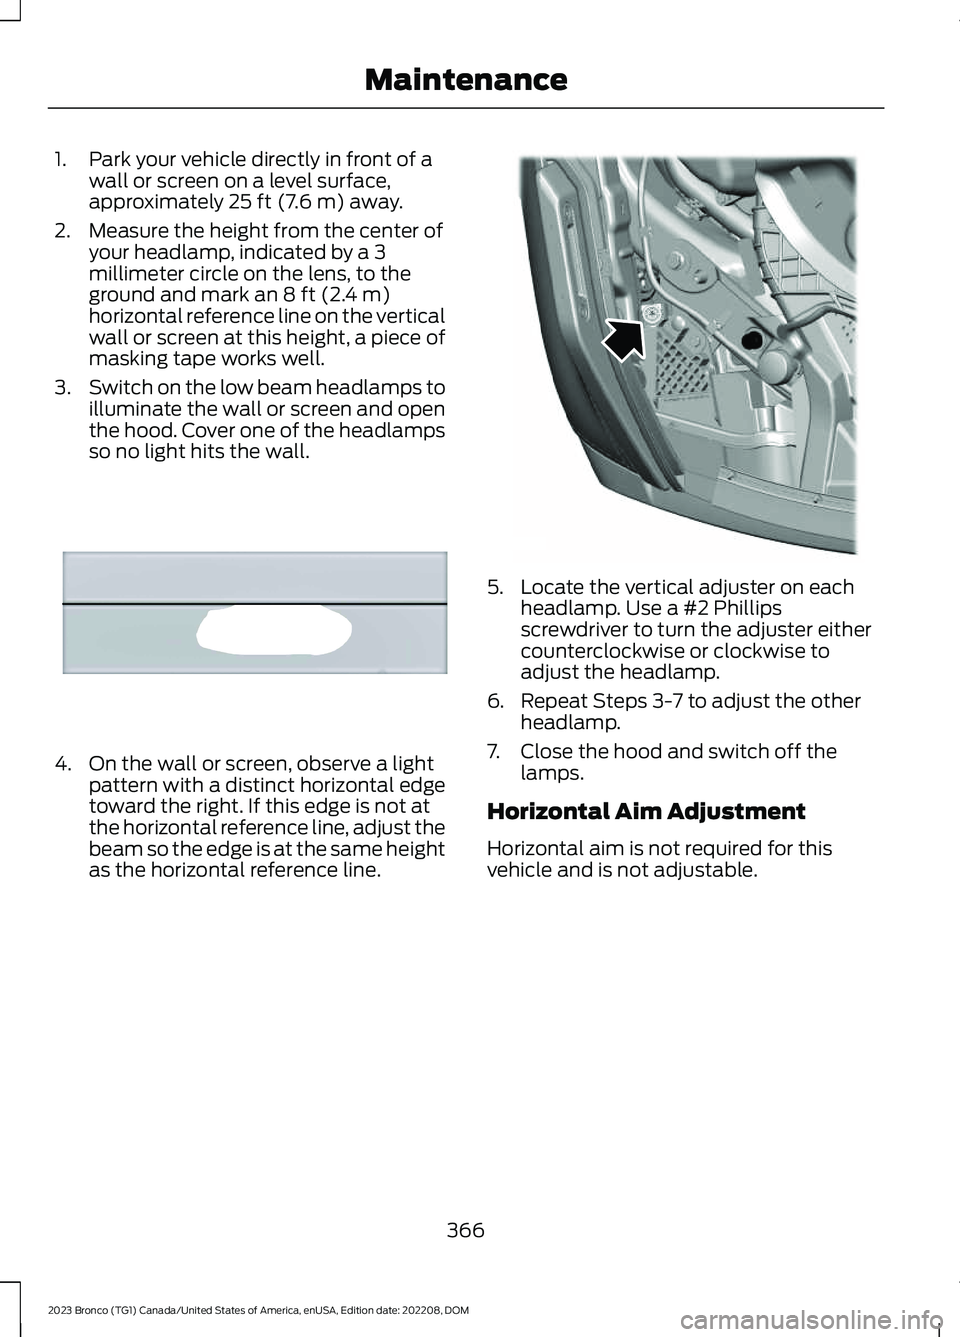
5.Locate the vertical adjuster on eachheadlamp. Use a #2 Phillipsscrewdriver to turn the adjuster eithercounterclockwise or clockwise toadjust the headlamp.
6.Repeat Steps 3-7 to adjust the otherheadlamp.
7.Close the hood and switch off thelamps.
Horizontal Aim Adjustment
Horizontal aim is not required for thisvehicle and is not adjustable.
366
2023 Bronco (TG1) Canada/United States of America, enUSA, Edition date: 202208, DOMMaintenanceE167358 E339582
Page 371 of 642
EXTERIOR BULBS
EXTERIOR BULB SPECIFICATIONCHART
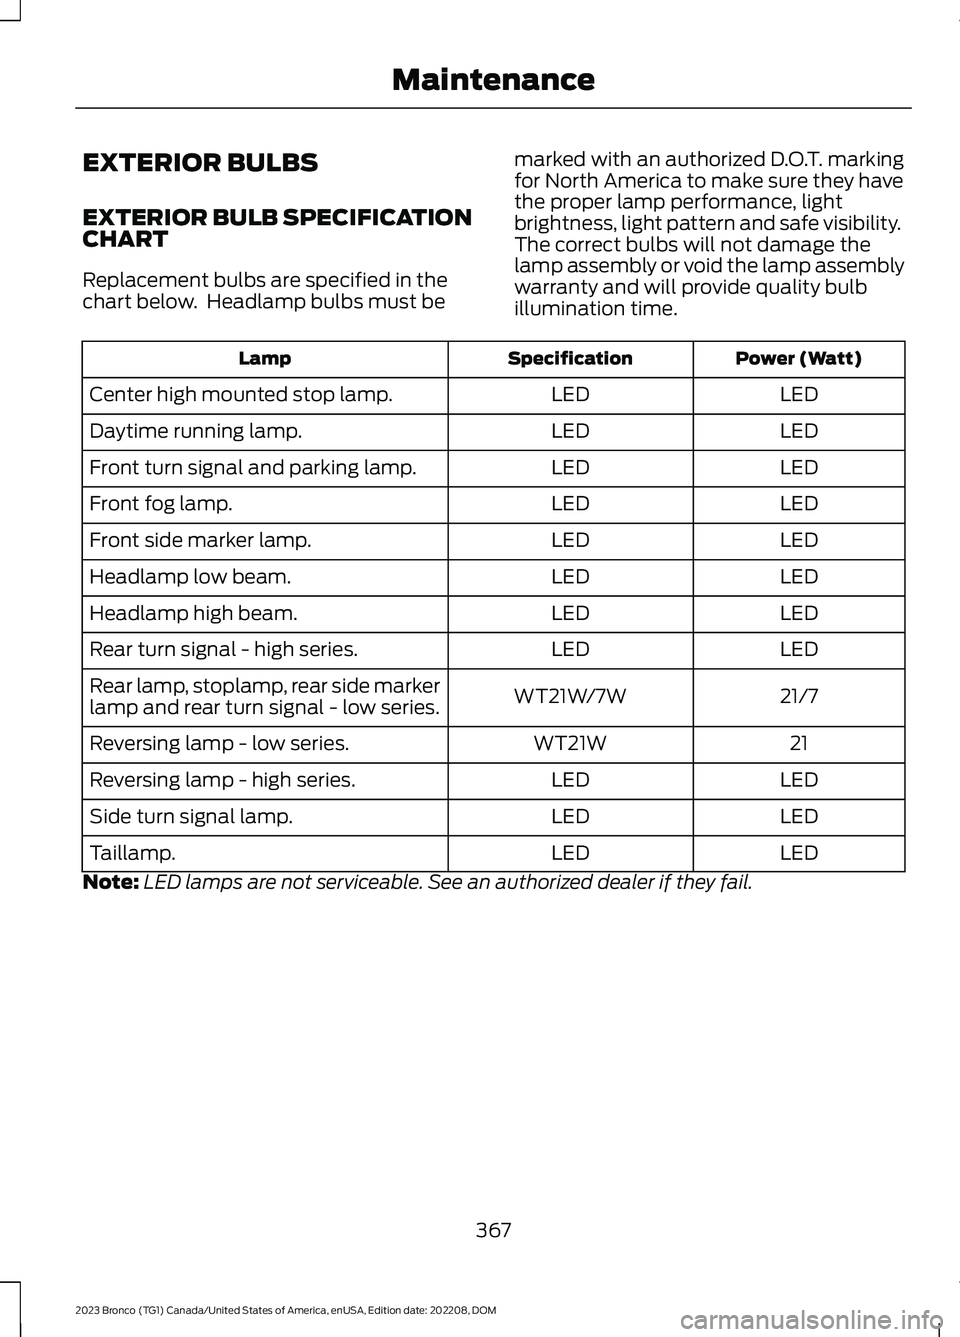
Replacement bulbs are specified in thechart below. Headlamp bulbs must be
marked with an authorized D.O.T. markingfor North America to make sure they havethe proper lamp performance, lightbrightness, light pattern and safe visibility.The correct bulbs will not damage thelamp assembly or void the lamp assemblywarranty and will provide quality bulbillumination time.
Power (Watt)SpecificationLamp
LEDLEDCenter high mounted stop lamp.
LEDLEDDaytime running lamp.
LEDLEDFront turn signal and parking lamp.
LEDLEDFront fog lamp.
LEDLEDFront side marker lamp.
LEDLEDHeadlamp low beam.
LEDLEDHeadlamp high beam.
LEDLEDRear turn signal - high series.
21/7WT21W/7WRear lamp, stoplamp, rear side markerlamp and rear turn signal - low series.
21WT21WReversing lamp - low series.
LEDLEDReversing lamp - high series.
LEDLEDSide turn signal lamp.
LEDLEDTaillamp.
Note:LED lamps are not serviceable. See an authorized dealer if they fail.
367
2023 Bronco (TG1) Canada/United States of America, enUSA, Edition date: 202208, DOMMaintenance
Page 372 of 642
REMOVING A REAR LAMPASSEMBLY
1.Make sure the headlamps are off.
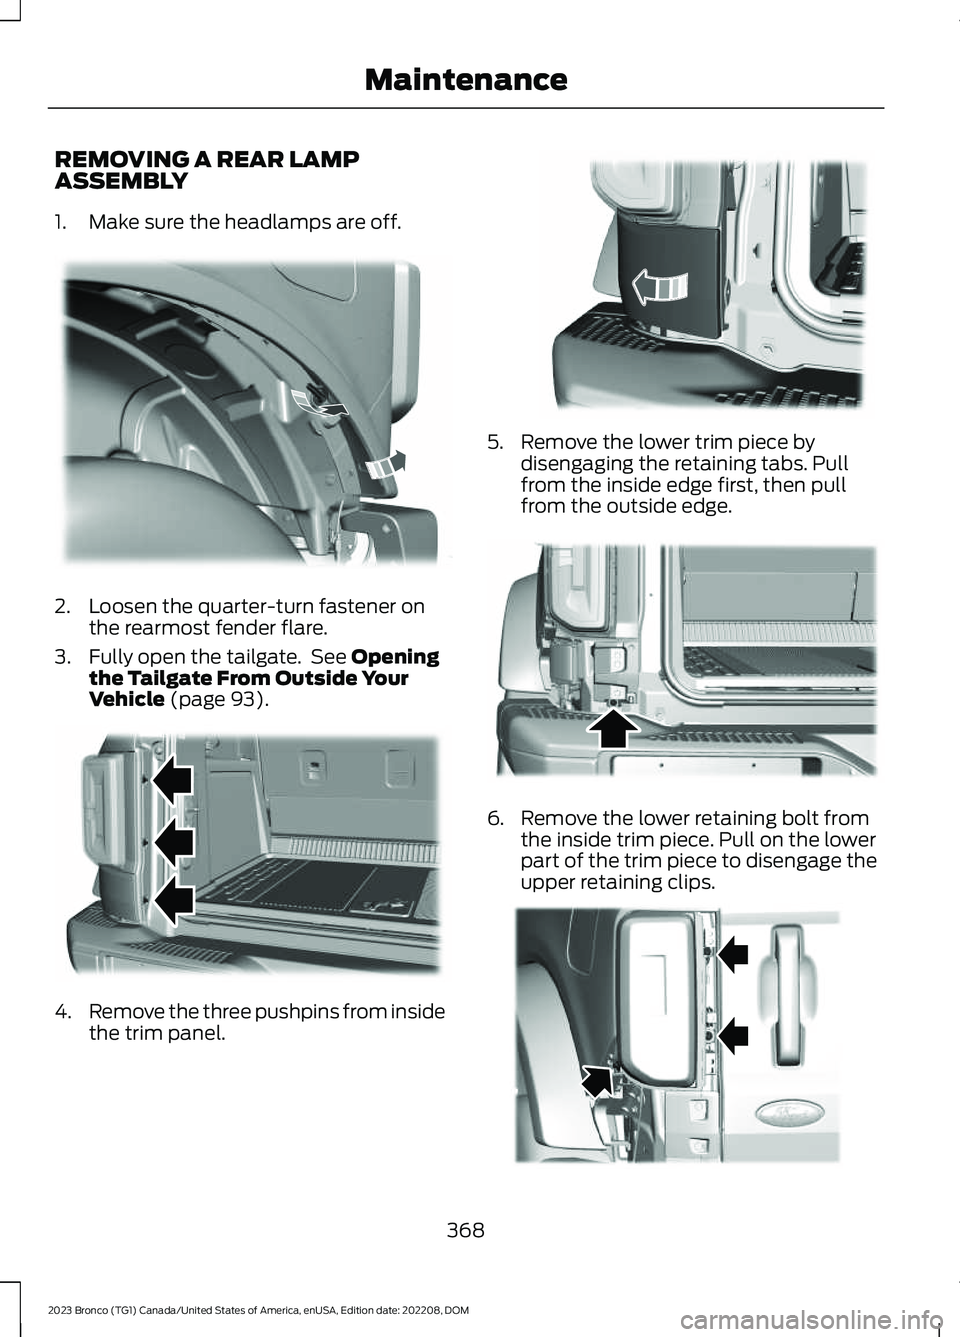
2.Loosen the quarter-turn fastener onthe rearmost fender flare.
3.Fully open the tailgate. See Openingthe Tailgate From Outside YourVehicle (page 93).
4.Remove the three pushpins from insidethe trim panel.
5.Remove the lower trim piece bydisengaging the retaining tabs. Pullfrom the inside edge first, then pullfrom the outside edge.
6.Remove the lower retaining bolt fromthe inside trim piece. Pull on the lowerpart of the trim piece to disengage theupper retaining clips.
368
2023 Bronco (TG1) Canada/United States of America, enUSA, Edition date: 202208, DOMMaintenanceE334894 E334848 E334849 E334850 E339584
Page 375 of 642
REMOVABLE WINDOWS (IF
EQUIPPED)
REMOVABLE WINDOWSPRECAUTIONS
WARNING: Do not drive unless allrear windows are removed or securelyinstalled. Failure to follow theseinstructions could result in personalinjury.
Note:Use caution when moving or handlingthe windows. Do not drop the windows.
Note:Do not place the windows directly onhard or sharp surfaces. This could causedamage to the window.
REMOVING AND INSTALLING THEREAR QUARTER WINDOWS -VEHICLES WITH: HARD TOP
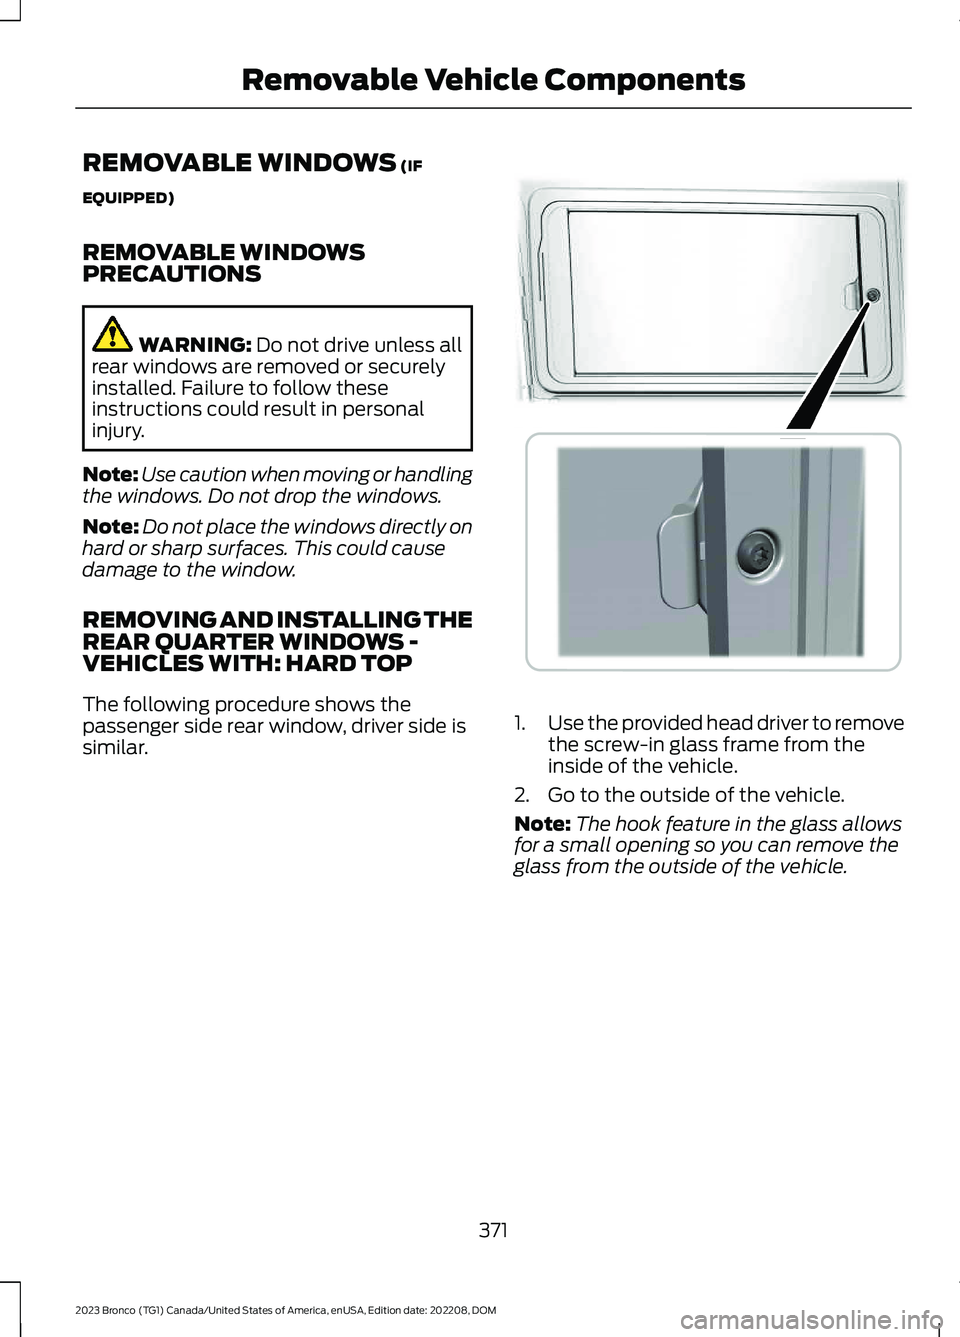
The following procedure shows thepassenger side rear window, driver side issimilar.1.Use the provided head driver to removethe screw-in glass frame from theinside of the vehicle.
2.Go to the outside of the vehicle.
Note:The hook feature in the glass allowsfor a small opening so you can remove theglass from the outside of the vehicle.
371
2023 Bronco (TG1) Canada/United States of America, enUSA, Edition date: 202208, DOMRemovable Vehicle Components E385078
Page 376 of 642
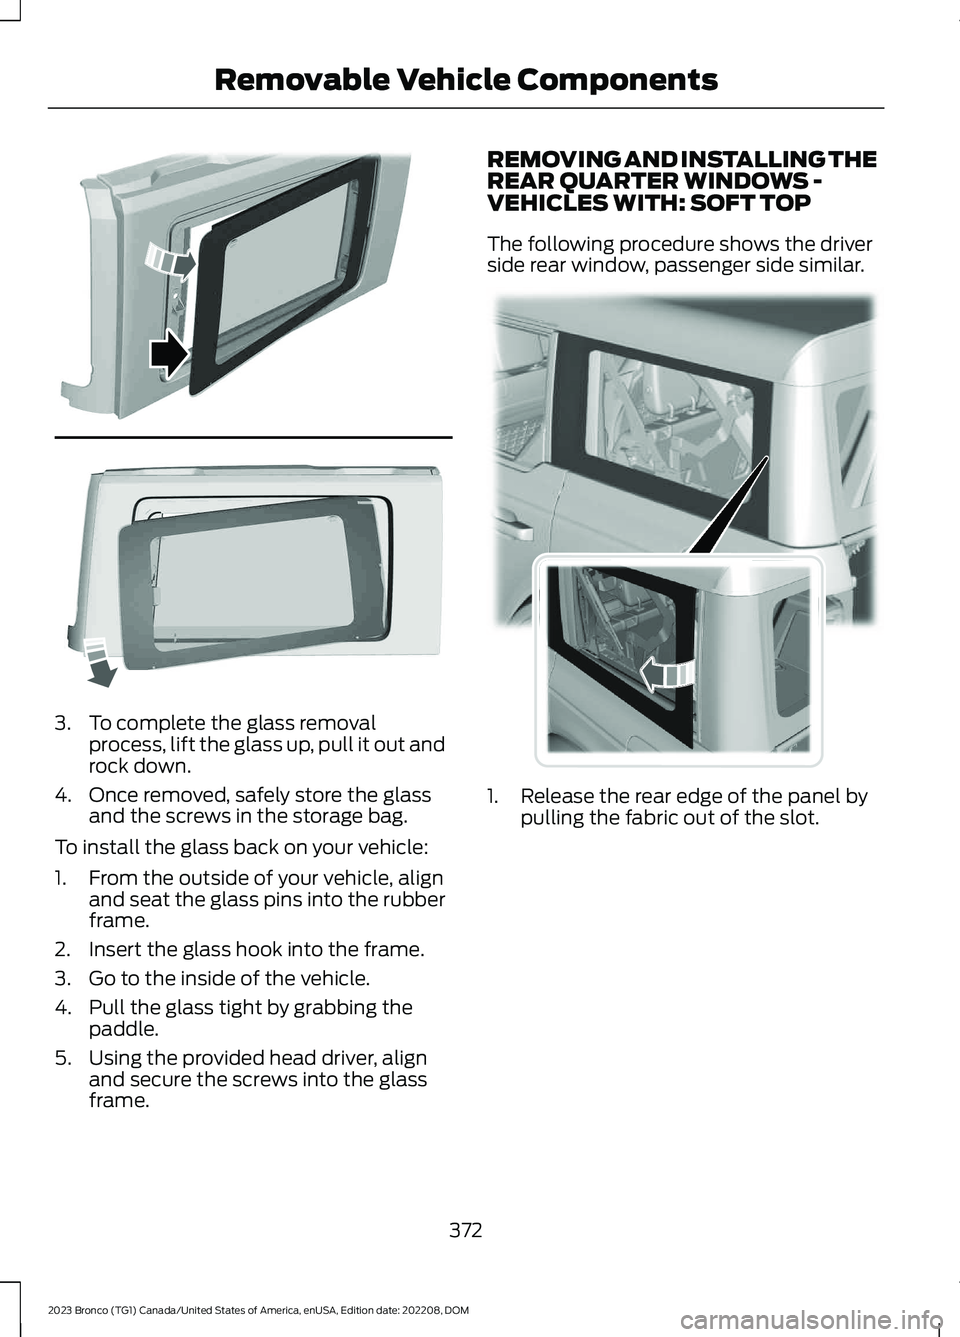
3.To complete the glass removalprocess, lift the glass up, pull it out androck down.
4.Once removed, safely store the glassand the screws in the storage bag.
To install the glass back on your vehicle:
1.From the outside of your vehicle, alignand seat the glass pins into the rubberframe.
2.Insert the glass hook into the frame.
3.Go to the inside of the vehicle.
4.Pull the glass tight by grabbing thepaddle.
5.Using the provided head driver, alignand secure the screws into the glassframe.
REMOVING AND INSTALLING THEREAR QUARTER WINDOWS -VEHICLES WITH: SOFT TOP
The following procedure shows the driverside rear window, passenger side similar.
1.Release the rear edge of the panel bypulling the fabric out of the slot.
372
2023 Bronco (TG1) Canada/United States of America, enUSA, Edition date: 202208, DOMRemovable Vehicle ComponentsE385079 E347134
Page 381 of 642
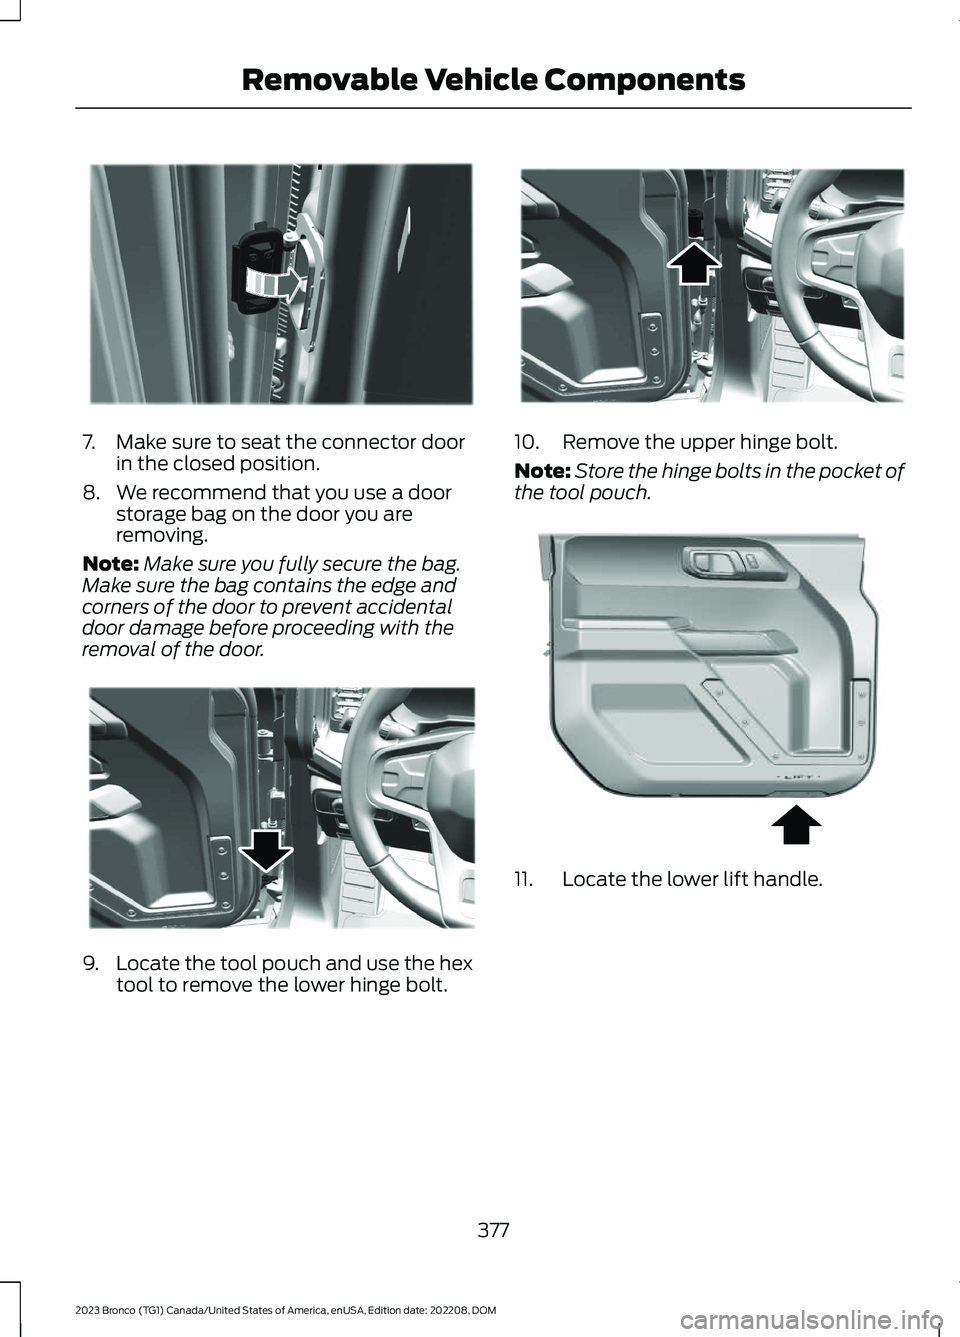
7.Make sure to seat the connector doorin the closed position.
8.We recommend that you use a doorstorage bag on the door you areremoving.
Note:Make sure you fully secure the bag.Make sure the bag contains the edge andcorners of the door to prevent accidentaldoor damage before proceeding with theremoval of the door.
9.Locate the tool pouch and use the hextool to remove the lower hinge bolt.
10.Remove the upper hinge bolt.
Note:Store the hinge bolts in the pocket ofthe tool pouch.
11.Locate the lower lift handle.
377
2023 Bronco (TG1) Canada/United States of America, enUSA, Edition date: 202208, DOMRemovable Vehicle ComponentsE328724 E328730 E328731 E346853
Page 382 of 642
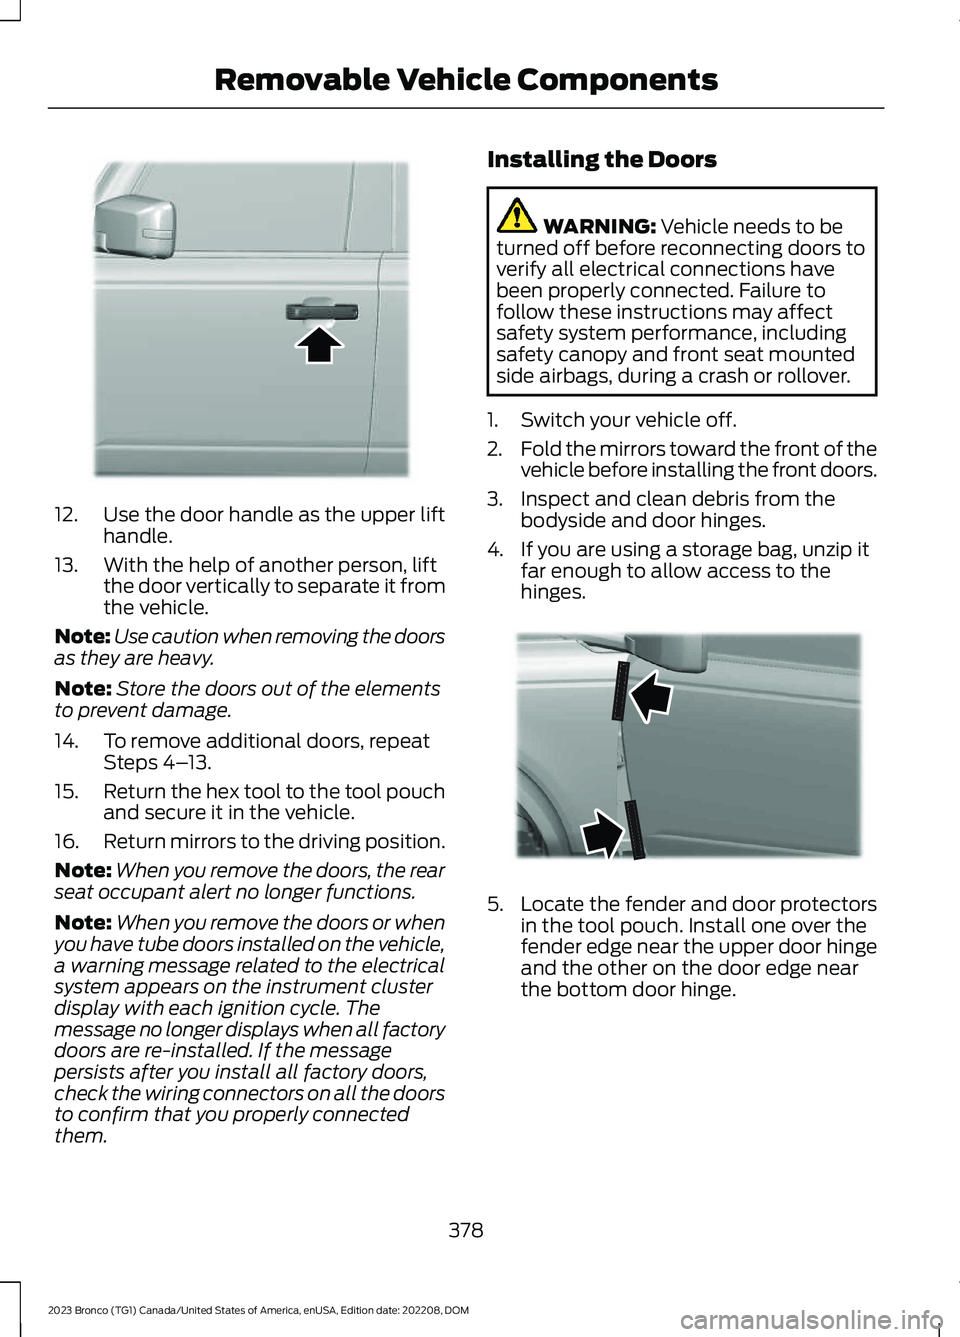
12.Use the door handle as the upper lifthandle.
13.With the help of another person, liftthe door vertically to separate it fromthe vehicle.
Note:Use caution when removing the doorsas they are heavy.
Note:Store the doors out of the elementsto prevent damage.
14.To remove additional doors, repeatSteps 4–13.
15.Return the hex tool to the tool pouchand secure it in the vehicle.
16.Return mirrors to the driving position.
Note:When you remove the doors, the rearseat occupant alert no longer functions.
Note:When you remove the doors or whenyou have tube doors installed on the vehicle,a warning message related to the electricalsystem appears on the instrument clusterdisplay with each ignition cycle. Themessage no longer displays when all factorydoors are re-installed. If the messagepersists after you install all factory doors,check the wiring connectors on all the doorsto confirm that you properly connectedthem.
Installing the Doors
WARNING: Vehicle needs to beturned off before reconnecting doors toverify all electrical connections havebeen properly connected. Failure tofollow these instructions may affectsafety system performance, includingsafety canopy and front seat mountedside airbags, during a crash or rollover.
1.Switch your vehicle off.
2.Fold the mirrors toward the front of thevehicle before installing the front doors.
3.Inspect and clean debris from thebodyside and door hinges.
4.If you are using a storage bag, unzip itfar enough to allow access to thehinges.
5.Locate the fender and door protectorsin the tool pouch. Install one over thefender edge near the upper door hingeand the other on the door edge nearthe bottom door hinge.
378
2023 Bronco (TG1) Canada/United States of America, enUSA, Edition date: 202208, DOMRemovable Vehicle ComponentsE346854 E347604
Page 383 of 642
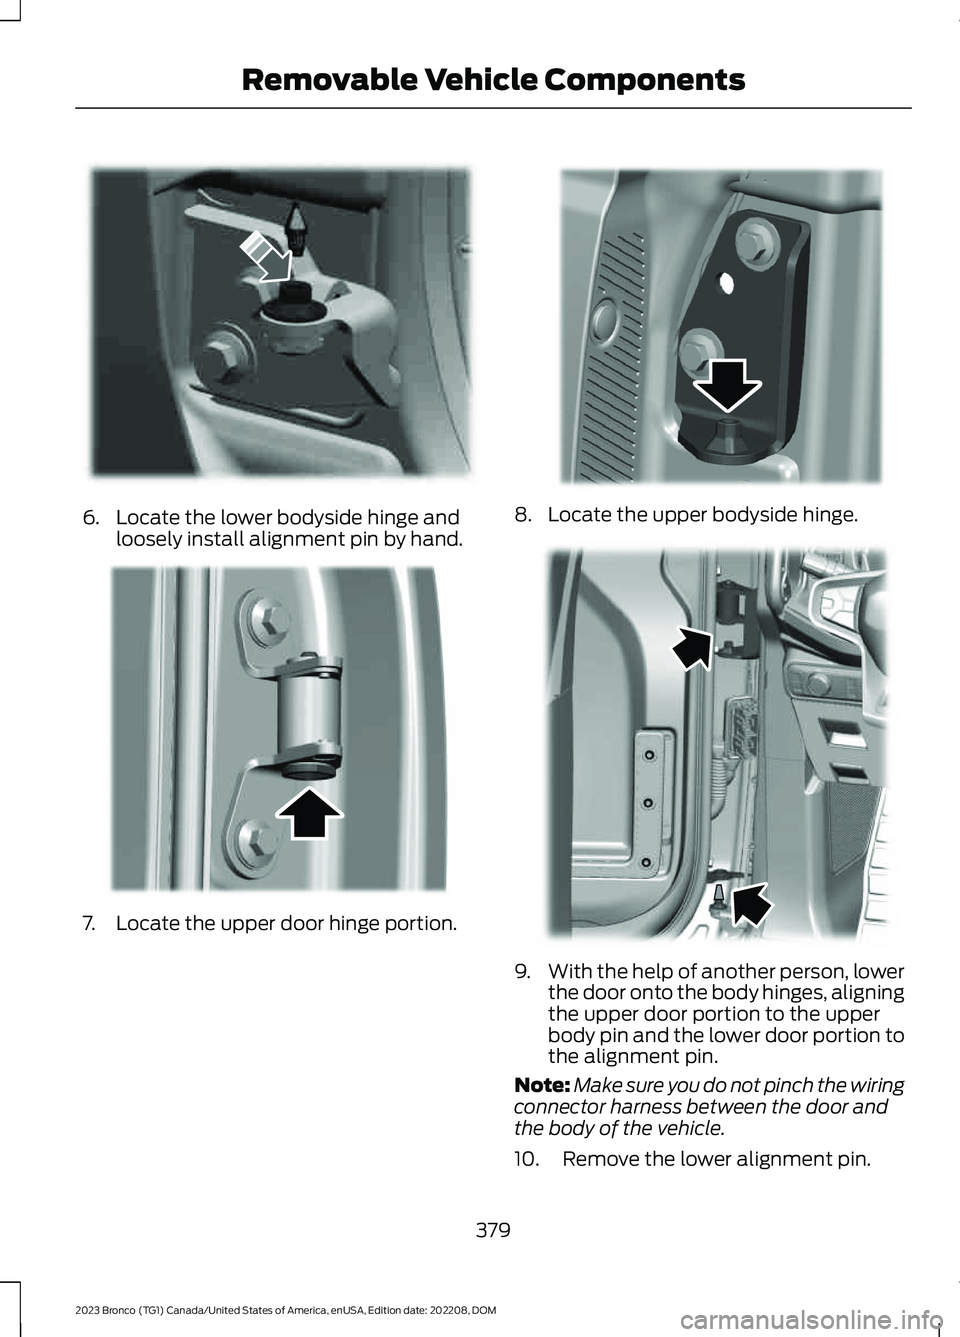
6.Locate the lower bodyside hinge andloosely install alignment pin by hand.
7.Locate the upper door hinge portion.
8.Locate the upper bodyside hinge.
9.With the help of another person, lowerthe door onto the body hinges, aligningthe upper door portion to the upperbody pin and the lower door portion tothe alignment pin.
Note:Make sure you do not pinch the wiringconnector harness between the door andthe body of the vehicle.
10.Remove the lower alignment pin.
379
2023 Bronco (TG1) Canada/United States of America, enUSA, Edition date: 202208, DOMRemovable Vehicle ComponentsE347537 E347540 E347538 E347242
Page 384 of 642
11.Hand start the hinge bolts to theupper and lower door hinges.
12.Use the hex tool to tighten the bolts.
Note:We recommend that you use a torquewrench to tighten the bolts to the required22 lb.ft (30 Nm) specification.
13.If using a storage bag, remove it fromthe door.
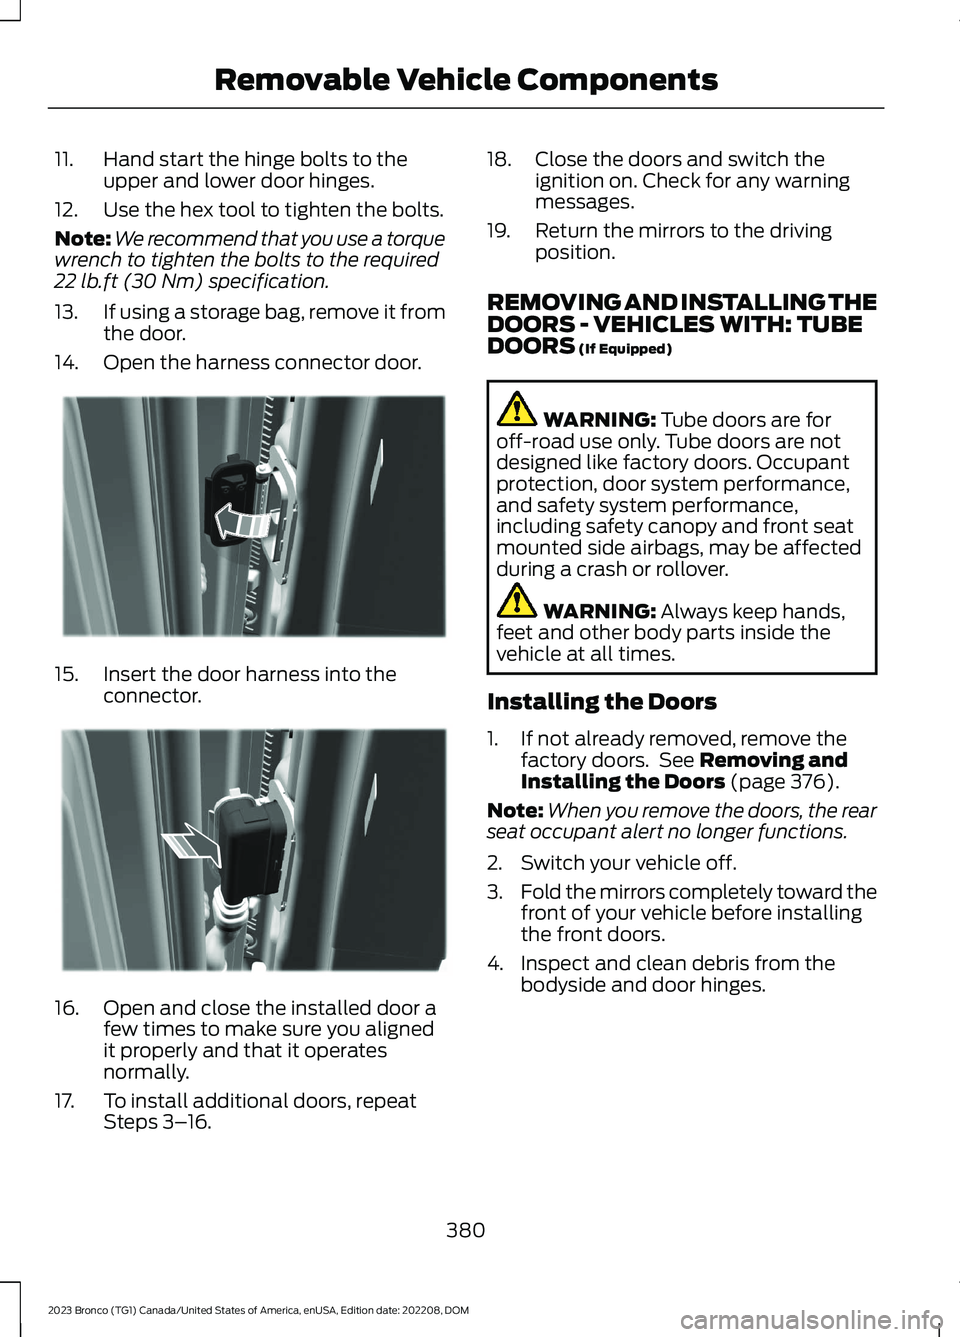
14.Open the harness connector door.
15.Insert the door harness into theconnector.
16.Open and close the installed door afew times to make sure you alignedit properly and that it operatesnormally.
17.To install additional doors, repeatSteps 3–16.
18.Close the doors and switch theignition on. Check for any warningmessages.
19.Return the mirrors to the drivingposition.
REMOVING AND INSTALLING THEDOORS - VEHICLES WITH: TUBEDOORS (If Equipped)
WARNING: Tube doors are foroff-road use only. Tube doors are notdesigned like factory doors. Occupantprotection, door system performance,and safety system performance,including safety canopy and front seatmounted side airbags, may be affectedduring a crash or rollover.
WARNING: Always keep hands,feet and other body parts inside thevehicle at all times.
Installing the Doors
1.If not already removed, remove thefactory doors. See Removing andInstalling the Doors (page 376).
Note:When you remove the doors, the rearseat occupant alert no longer functions.
2.Switch your vehicle off.
3.Fold the mirrors completely toward thefront of your vehicle before installingthe front doors.
4.Inspect and clean debris from thebodyside and door hinges.
380
2023 Bronco (TG1) Canada/United States of America, enUSA, Edition date: 202208, DOMRemovable Vehicle ComponentsE328723 E328726
Page 385 of 642
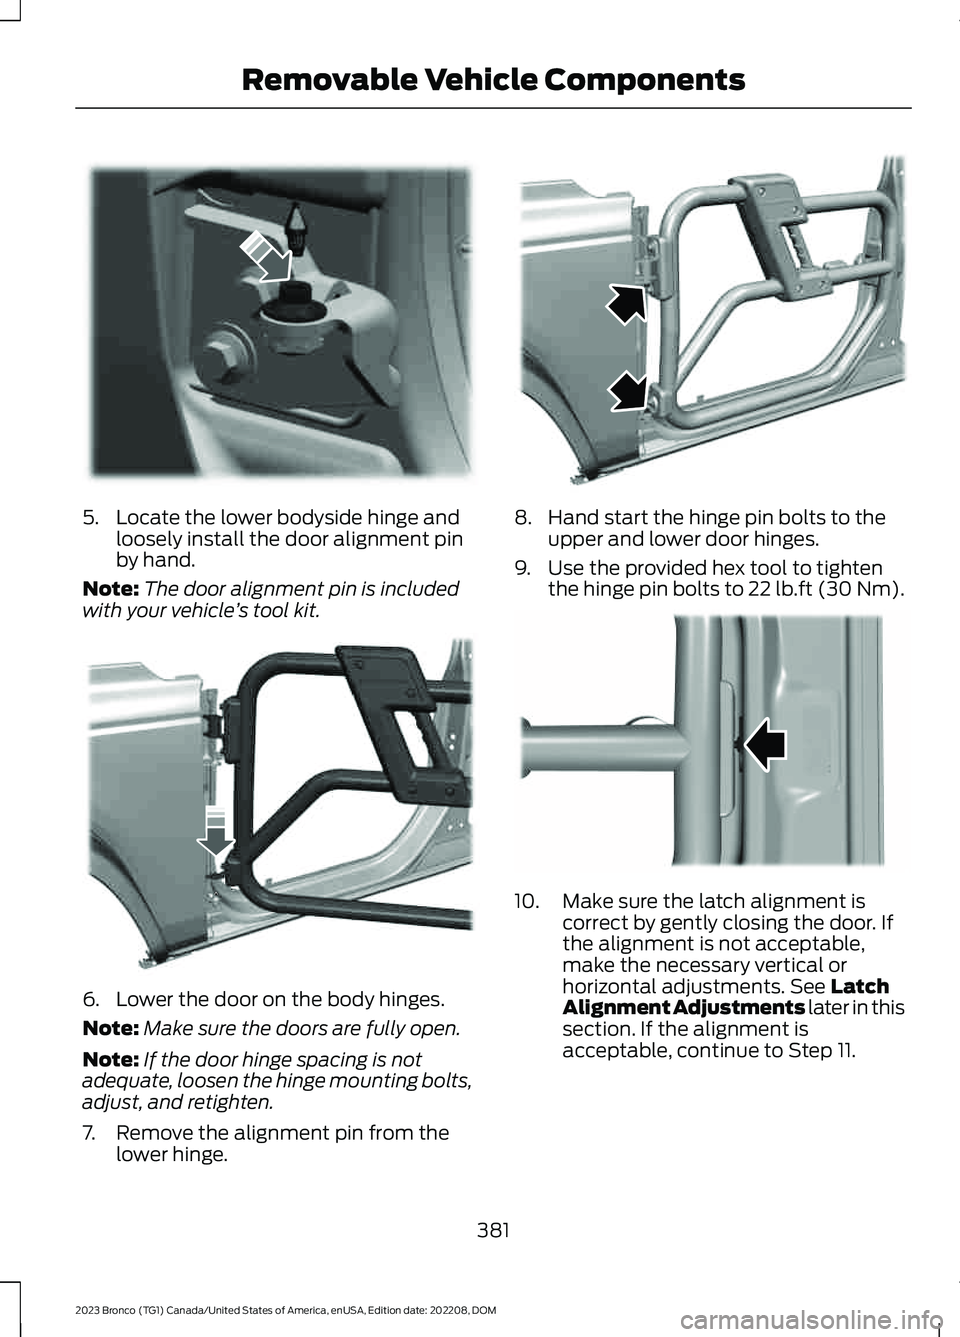
5.Locate the lower bodyside hinge andloosely install the door alignment pinby hand.
Note:The door alignment pin is includedwith your vehicle’s tool kit.
6.Lower the door on the body hinges.
Note:Make sure the doors are fully open.
Note:If the door hinge spacing is notadequate, loosen the hinge mounting bolts,adjust, and retighten.
7.Remove the alignment pin from thelower hinge.
8.Hand start the hinge pin bolts to theupper and lower door hinges.
9.Use the provided hex tool to tightenthe hinge pin bolts to 22 lb.ft (30 Nm).
10.Make sure the latch alignment iscorrect by gently closing the door. Ifthe alignment is not acceptable,make the necessary vertical orhorizontal adjustments. See LatchAlignment Adjustments later in thissection. If the alignment isacceptable, continue to Step 11.
381
2023 Bronco (TG1) Canada/United States of America, enUSA, Edition date: 202208, DOMRemovable Vehicle ComponentsE347537 E344795 E366570 E344778