ECU FORD BRONCO 2023 Owner's Manual
[x] Cancel search | Manufacturer: FORD, Model Year: 2023, Model line: BRONCO, Model: FORD BRONCO 2023Pages: 642, PDF Size: 14.71 MB
Page 259 of 642
Optimal system performance requires aclear view of the road by thewindshield-mounted camera.
Optimal performance may not occur if:
•The camera is blocked.
•There is poor visibility or lightingconditions.
•There are bad weather conditions.
SWITCHING ADAPTIVE
CRUISE CONTROL ON AND OFF
The cruise controls are on the steeringwheel. See Cruise Control (page 250).
Switching Adaptive Cruise ControlOn
Press the button to activate thesystem. When the systemactivates, the set speed is equalto the current vehicle speed. If the speedis too low, or other conditions are notcorrect for adaptive cruise controlactivation, the system enters standbymode.
Note:The minimum set speed is 15 mph or20 km/h.
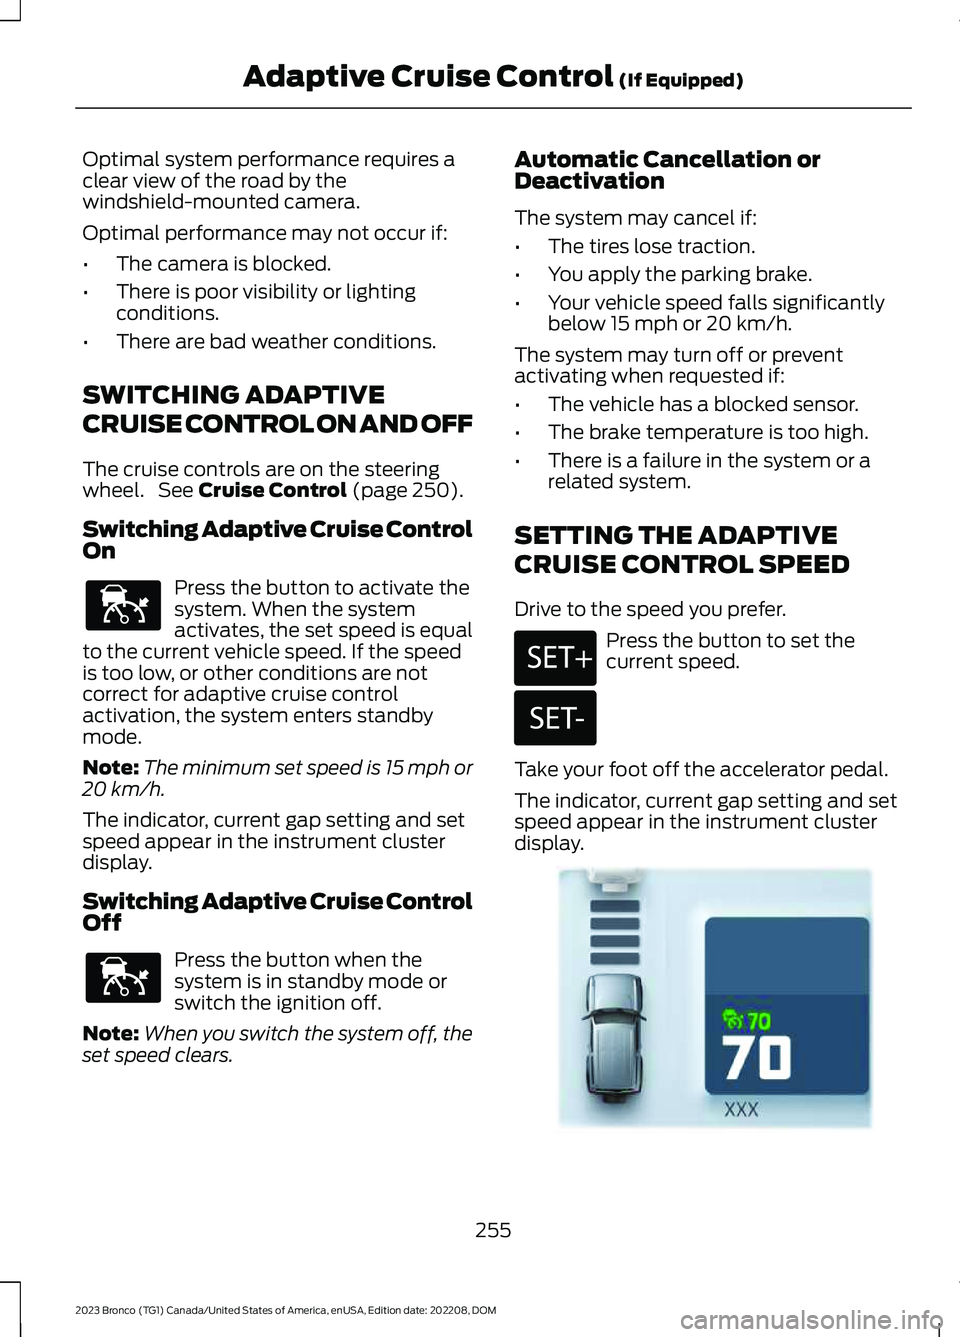
The indicator, current gap setting and setspeed appear in the instrument clusterdisplay.
Switching Adaptive Cruise ControlOff
Press the button when thesystem is in standby mode orswitch the ignition off.
Note:When you switch the system off, theset speed clears.
Automatic Cancellation orDeactivation
The system may cancel if:
•The tires lose traction.
•You apply the parking brake.
•Your vehicle speed falls significantlybelow 15 mph or 20 km/h.
The system may turn off or preventactivating when requested if:
•The vehicle has a blocked sensor.
•The brake temperature is too high.
•There is a failure in the system or arelated system.
SETTING THE ADAPTIVE
CRUISE CONTROL SPEED
Drive to the speed you prefer.
Press the button to set thecurrent speed.
Take your foot off the accelerator pedal.
The indicator, current gap setting and setspeed appear in the instrument clusterdisplay.
255
2023 Bronco (TG1) Canada/United States of America, enUSA, Edition date: 202208, DOMAdaptive Cruise Control (If Equipped)E144529 E144529 E246884 E246885 E355963
Page 266 of 642
•Comfort – Slightly more assist fordriver preference and daily driving ease.
•Off-road – Similar assist to Normalwith added damping for improvedcontrol during off-road driving.
After selecting the desired setting, you mayfeel a soft feedback bump in the steeringwheel when the changeover occurs.
Note:If you disconnect or remove thebattery, the steering system defaults tonormal.
Selecting a Suspension Mode
To change the suspension feel,press the button on the steeringwheel. The first press displays apop-up message in the instrument clusterdisplay for the selected mode andsubsequent presses changes the selectedmode.
Modes:
•Normal – Default factory setting.
•Sport – Slightly stiffer suspension withemphasis on handling and control.
•Off-road – Maximizes shockperformance in extreme off-roadenvironments.
Selecting an Exhaust Mode
To change the exhaust sound,press the button on the steeringwheel. The first press displays apop-up message in the instrument clusterdisplay for the selected mode andsubsequent presses changes the selectedmode.
Modes:
•Normal – Default setting provides abalance of comfort and feedback.
•Sport – Slightly louder than normal forspirited driving.
•Baja – Loudest setting for off-road useonly. Maximum exhaust noise under alldriving conditions.
•Quiet – Quietest setting for maximumcomfort under all driving conditions.
Quiet Start
Quiet start allows you to schedule whenthe exhaust mode turns on the quietsetting. The time window can be from 1 to24 hours
Enabling and disabling quiet start:
1.Press Settings.
2.Press Vehicle.
3.Press Quiet Start.
4.Press Quiet Start.
5.Press Settings.
Setting quiet time:
1.Press Settings.
2.Press Vehicle.
3.Press Quiet Start.
4.Press Set Quiet Time.
5.Set your desired start and end times.
MyMode
You can use MyMode to createone custom vehicleconfiguration based on thecurrent state of your vehicle.
When you have your vehicle configured toyour desired settings, you can press andhold the button for a few seconds to saveas MyMode.
Double-pressing the button activates yoursaved MyMode.
You can check the saved MyMode settingswith a single press of the button.
262
2023 Bronco (TG1) Canada/United States of America, enUSA, Edition date: 202208, DOMG.O.A.T. Mode ControlE347107 E347131 E359278
Page 304 of 642
Make sure that you securely fasten theload. Check the tightness of the loadbefore driving and at each fuel stop.
REMOVING AND INSTALLING THEROOF RACK
Removing the Roof Rack (If Equipped)
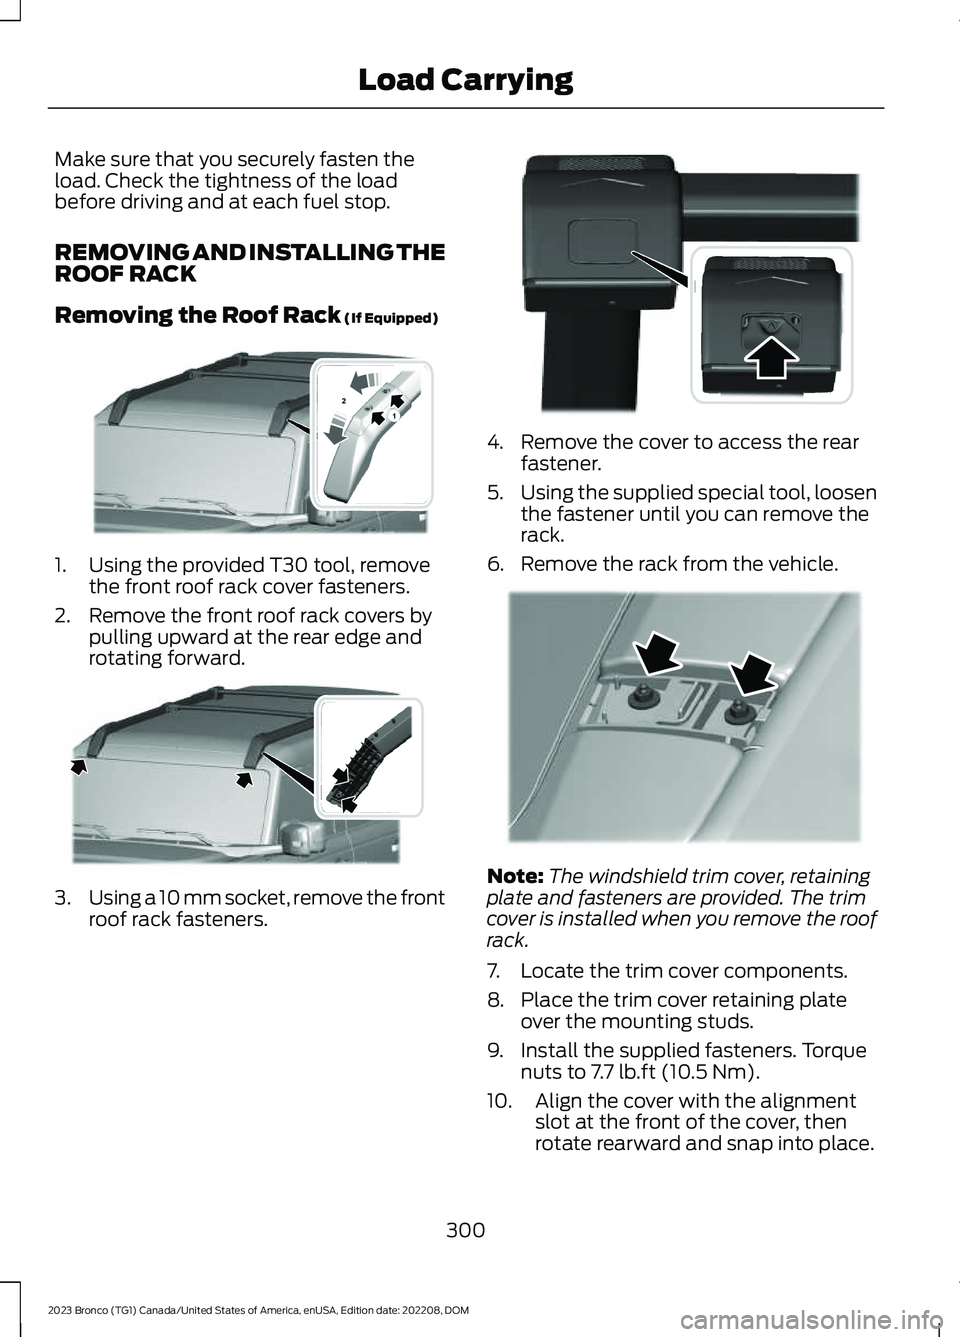
1.Using the provided T30 tool, removethe front roof rack cover fasteners.
2.Remove the front roof rack covers bypulling upward at the rear edge androtating forward.
3.Using a 10 mm socket, remove the frontroof rack fasteners.
4.Remove the cover to access the rearfastener.
5.Using the supplied special tool, loosenthe fastener until you can remove therack.
6.Remove the rack from the vehicle.
Note:The windshield trim cover, retainingplate and fasteners are provided. The trimcover is installed when you remove the roofrack.
7.Locate the trim cover components.
8.Place the trim cover retaining plateover the mounting studs.
9.Install the supplied fasteners. Torquenuts to 7.7 lb.ft (10.5 Nm).
10.Align the cover with the alignmentslot at the front of the cover, thenrotate rearward and snap into place.
300
2023 Bronco (TG1) Canada/United States of America, enUSA, Edition date: 202208, DOMLoad Carrying12E339405 E339073 E339074 E339407
Page 308 of 642
REAR CARGO AREA ANCHOR
POINTS
REAR CARGO AREA ANCHORPOINT PRECAUTIONS
WARNING: Always properly securecargo to prevent shifting cargo or cargofalling from the vehicle. Failure to do socould result in compromised vehiclestability and serious personal injury tovehicle occupants or others.
WARNING: The appropriateloading capacity of your vehicle can belimited either by volume capacity (howmuch space is available) or by payloadcapacity (how much weight the vehicleshould carry). Once you have reachedthe maximum payload of your vehicle,do not add more cargo, even if there isspace available. Overloading orimproperly loading your vehicle cancontribute to loss of vehicle control andvehicle rollover.
WARNING: It is extremelydangerous to ride in a cargo area, insideor outside of a vehicle. In a crash, peopleriding in these areas are more likely to beseriously injured or killed. Do not allowpeople to ride in any area of your vehiclethat is not equipped with seats andseatbelts. Make sure everyone in yourvehicle is in a seat and properly using aseatbelt. Failure to follow this warningcould result in serious personal injury ordeath.
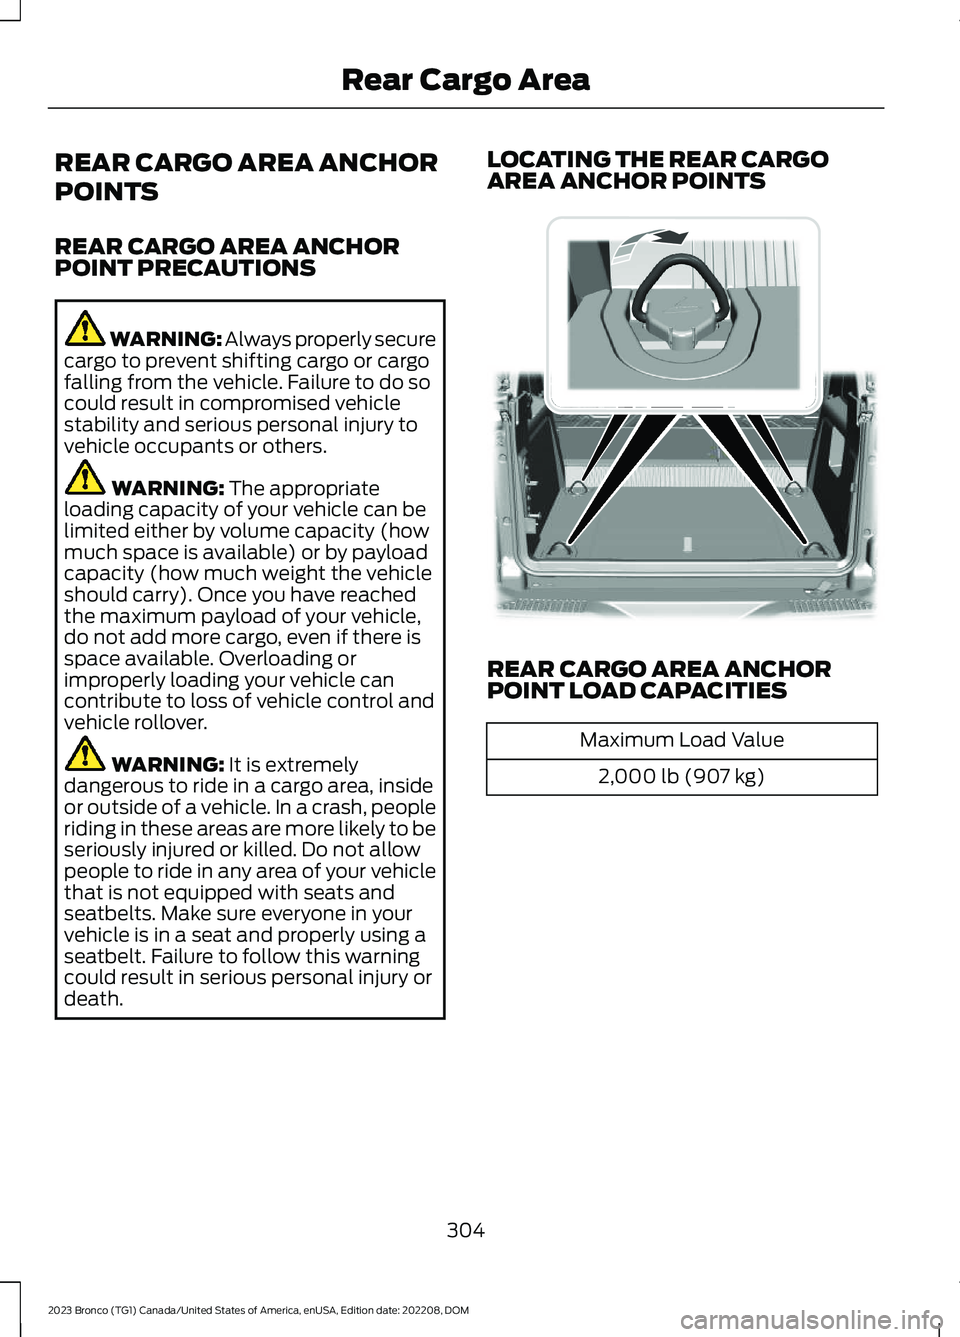
LOCATING THE REAR CARGOAREA ANCHOR POINTS
REAR CARGO AREA ANCHORPOINT LOAD CAPACITIES
Maximum Load Value
2,000 lb (907 kg)
304
2023 Bronco (TG1) Canada/United States of America, enUSA, Edition date: 202208, DOMRear Cargo Area E324512
Page 316 of 642
WHAT IS THE MAXIMUM LOADEDTRAILER WEIGHT
The maximum loaded trailerweight is the highest possibleweight of a fully loaded trailer thevehicle can tow.
CALCULATING THE MAXIMUMLOADED TRAILER WEIGHT FORYOUR VEHICLE
1.Start with the gross combinedweight rating for your vehiclemodel and axle ratio.
2.Subtract all of the followingthat apply to your vehicle:
•Vehicle curb weight.
•Hitch hardware weight, forexample a draw bar, ball, locksor weight distributing hardware.
•Driver weight.
•Passenger weight.
•Payload, cargo and luggageweight.
•Aftermarket equipment weight.
This equals the maximum loadedtrailer weight for this combination.
Note:The trailer tongue load isconsidered part of the payload foryour vehicle. Reduce the totalpayload by the final trailer tongueweight.
Note:Consult an authorized dealerto determine the maximum trailerweight allowed for your vehicle ifyou are not sure.
TOWING A TRAILER – TROUBLESHOOTING
TOWING A TRAILER – INFORMATION MESSAGES
DetailsMessage
The trailer sway control detects trailersway. Reduce the vehicle's speed.Trailer Sway Reduce Speed
Verify the trailer brake connections aresecure and that the aftermarket trailerbrake controller device is correctly installed.Perform a trailer brake and trailer lightcheck if possible. If the message persists,have your vehicle checked as soon aspossible.
Trailer brake system fault See manual
Perform a trailer brake and trailer lightcheck if possible. If the message persists,have your vehicle checked as soon aspossible.
Trailer brake module fault
312
2023 Bronco (TG1) Canada/United States of America, enUSA, Edition date: 202208, DOMTowing a Trailer
Page 319 of 642
WARNING: Never link two winchropes together with a clevis pin. Theseheavy metal objects could becomeprojectiles if the winch rope breaks.
WARNING: When using the winch,take care not to get your fingers or handscaught in the mechanism. Failure tofollow this instruction could result inpersonal injury.
WARNING: Avoid wearing loosefitting clothing or jewelry when winching.
WARNING: Make sure to wear eyeprotection when winching.
WARNING: Do not exceed thewinch or winch rope capacity. Failure tofollow this instruction could result inpersonal injury.
WARNING: Wear gloves whenhandling the winch rope. Failure to followthis instruction could result in personalinjury.
WARNING: Do not use the winchto secure loads.
WARNING: Do not use the winchto tow a trailer. This can damage,overload and break the winch rope.
WARNING: Make sure the anchorpoint can properly support the load andsecure the winching equipment. Failureto follow this instruction could result inpersonal injury.
WARNING: Only use theequipment supplied with the winch whenwinching.
WARNING: Do not engage ordisengage the winch clutch when thewinch is in use.
WARNING: The winch andassociated components become hotwhen in use. Let them cool down beforeremoving them.
WARNING: Do not attempt toservice, repair or modify the winchingsystem. Failure to follow this instructioncould result in personal injury or death.
WARNING: Make sure to properlystore the winch rope to the shackle pointor fairlead when not in use. Failure toproperly store the winch rope couldcause it to become a projectile.
WINCHING REQUIREMENTS
To winch your vehicle, make sure of thefollowing:
•The intended anchor point is secure.The anchor point must be strongenough to hold the weight of yourvehicle when winching.
•The intended anchor point allows youto pull your vehicle straight ahead.
•The intended anchor point is as faraway as possible, within the 100 ft(30 m) rope length. This allows thegreatest pulling power for the winch.
•The winch rope is in good condition andfree of visible cuts, tear or damage.
•Use a damper device such as a tarp,heavy blanket or piece of carpet, andplace it over the winch rope to helpabsorb the energy in the event thewinch rope breaks.
•Bystanders are to the sides of thevehicle, at a distance of at least twicethe length of the winch rope.
315
2023 Bronco (TG1) Canada/United States of America, enUSA, Edition date: 202208, DOMWinching - Everglades
Page 320 of 642

WINCHING LIMITATIONS
The following could impact winchoperation:
•Temperatures below 32°F (0°C).
•Low battery charge.
•Winching without the engine runningor for sustained pulls of a minute ormore.
•Try winching using shorter pullswith breaks, both to check setupand to allow the vehicle's batteryto recharge.
•Exceeding the winch or winch roperating.
You may see messages on your instrumentcluster if the system voltage drops belowa set threshold, specifically if batteryhealth is poor, winching occurs in freezingtemperatures, and/or a continuouswinching cycle. These messages go awayonce vehicle system voltage returns tonormal.
WINCHING YOUR VEHICLE
For more information, refer to The BasicGuide to Winching Techniques.
1.Put on gloves.
2.Switch the clutch to the freespoolposition.
3.Pull the winch rope to the anchor point.
4.Secure the winch rope to the anchorpoint using a tree trunk protector orchoker chain.
5.Secure the clevis to the tree trunkprotector or choker chain and the hookstrap by threading the two ends of thetree trunk protector or choker chain andthe hook strap loop through the clevis.Do not overtighten the clevis.
6.Switch the clutch to the lockedposition.
7.Remove the cap from the control boxand connect the remote control to thecontrol box.
8.Put the winch rope under tension byslowly winding it with the remotecontrol.
9.Check the anchor and make sure allthe connections are secure and free ofdebris.
10.Make sure the winch rope is neatlywound around the spooling drum.
11.Place an energy absorber, such as atree limb, heavy jacket, chain orbackpack, over the winch rope,halfway between the winch andanchor point.
12.Make sure that everyone in theimmediate area is clear of thewinching vehicle.
13.With your vehicle switched on, beginwinching slowly and steadily with theremote control.
14.Continue winching your vehicle untilit is on stable ground.
15.Place your vehicle in park (P).
Note:If your vehicle is manual transmission,place it in first gear.
16.Disconnect the winch rope from theanchor.
17.Wind the winch rope back onto thewinch drum by walking it back withthe remote control. Keep tension onthe rope when rewinding it onto thedrum to evenly distribute the winchrope on the drum.
18.Secure the winch hook to the shacklepoint or the fairlead.
19.Disconnect the remote control fromthe control box. Store the remote ina clean, dry place. Place the cap backon the control box.
316
2023 Bronco (TG1) Canada/United States of America, enUSA, Edition date: 202208, DOMWinching - Everglades
Page 324 of 642
Driving In Sand
When driving over sand, try to keep all fourwheels on the most solid area of the trail.Drive through the terrain without varyingvehicle speed. Apply the accelerator andavoid excessive wheel slip.
Use the vehicle's momentum to maintainforward motion in sand. Avoid coming toa stop on steep sand slopes as the vehiclemay not be able to continue forward afterit has stopped.
Driving In Mud
Be cautious of sudden changes in vehiclespeed or direction when you are driving inmud.
Even four-wheel drive vehicles can losetraction in slick mud. If your vehicle doesslide, steer in the direction of the slide untilyou regain control of your vehicle.
After driving through mud, clean off residuestuck to the wheels and tires and rotatingdriveshafts. Excess mud stuck on thewheels and tires and rotating driveshaftscan cause an imbalance that coulddamage drive components.
Note:The vehicle brakes are less effectivewhen wet or muddy.
Driving Over Rocks and Gravel
Gravel is a constantly changing, low-gripsurface. Driving at slow speeds on gravelreduces the risk of losing traction when youstop, accelerate or turn a corner.
When approaching large rocks, positionthe vehicle so that the tires pass over thelargest obstacle.
Note:Never attempt to straddle a rock thatis large enough to strike your axles orundercarriage.
Note:Never attempt to drive over a rockwhich is large enough to contact the doorsills if your vehicle does not have rock rails.
If you lose traction on your wheels facinguphill, stop and choose a more suitableroute.
Leave a generous gap between yourvehicle and other vehicles to minimize therisk of damage from flying gravel. Avoiddust clouds as they reduce visibility.
Before navigating on uneven ground,secure anything inside the vehicle. Ifpossible, remove any roof-rack items. Usethe lowest gear possible and approach theobstacle at a slow speed.
If your vehicle begins to slide down a slope,steer downhill and gently apply thethrottle. If you lose traction on your uphillwheels, stop immediately and choose amore suitable route.
Approach logs, rocky steps or ditchesdiagonally. Keep at least three wheels onthe ground at all times.
Climbing A Hill
WARNING: Extreme care shouldbe used when steering the vehicle inreverse down a slope so as not to causethe vehicle to swerve out of control.
Although natural obstacles can make itnecessary to travel diagonally up or downa hill or steep incline, try to drive straightup or straight down.
Note: Avoid turning on steep slopes orhills. A danger lies in losing traction, slippingsideways and possible vehicle roll over.
Whenever driving on a hill, you must firstdetermine the route you can use.
When climbing a steep slope or hill, startin a lower gear rather than downshifting toa lower gear from a higher gear. Thisreduces strain on the engine and thepossibility of stalling.
320
2023 Bronco (TG1) Canada/United States of America, enUSA, Edition date: 202208, DOMDriving Hints
Page 325 of 642
If your vehicle stalls, do not try to turnaround because this could cause yourvehicle to roll over. It is better to reverseback to a safe location.
Do not drive over the crest of a hill withoutseeing what conditions are on the otherside. Do not drive in reverse over a hillwithout the aid of an observer.
If the vehicle is unable to make it up thehill, do not attempt to turn back down theslope.
Apply the accelerator just enough for thewheels to climb the hill.
Note:Too much acceleration can causethe tires to slip, spin or lose traction,resulting in loss of vehicle control.
Descending A Hill:
•Use the same gear you would use toclimb the hill.
•Do not descend in neutral.
•Disengage overdrive.
•Avoid sudden and excessive braking.
Note:The front wheels have to be turningin order to steer your vehicle.
When descending a steep hill in a manualtransmission vehicle do not leave thevehicle in gear with the clutch pressed. Thiscould cause damage to your driveline.
Driving Through Water
WARNING: Do not attempt tocross a deep, fast flowing body of water.Failure to follow this instruction couldresult in the loss of control of yourvehicle, personal injury or death.
As the water depth increases, you mustreduce your vehicle speed to avoidpotential vehicle damage.
The key to a safe crossing is the waterdepth, current and bottom of the water'scondition. On soft bottoms, the vehiclesinks in, effectively increasing the waterlevel on the vehicle. Make sure to considerthis when determining the depth of water.
Determine the depth and speed of thecurrent before attempting a water crossing.
Be aware that obstacles and debris maybe beneath the water’s surface.
Note:Cross flowing water at an angleheading slightly upstream.
Note:You should tread lightly and avoiddamage to the environment.
Drive slowly when crossing water. Proceedwith a constant slow speed lightly pressingon the accelerator.
Drive through the water very slowly whenentering, then build up momentum. Keepyour vehicle moving at a steady pace.
Note:Do not try to accelerate through thewater crossing.
When driving too fast in water or throughdeep water, the engine, transmission,transfer case, axles, electrical componentsor vehicle interior could ingest water. Watercan cause permanent damage that maynot be covered by your vehicle warranty.See Driving Through Water Limitations(page 323).
Note:Failure to follow the recommendedspeeds can result in vehicle damage.
Never stop or shut a vehicle off whencrossing deep water unless your vehicleingested water into the engine air intake.If the engine stalls, do not attempt torestart it.
Ease off the accelerator as you reach theother side to diminish the front wave. Applythe accelerator slowly and as necessaryto climb out of the other side.
321
2023 Bronco (TG1) Canada/United States of America, enUSA, Edition date: 202208, DOMDriving Hints
Page 331 of 642
FLOOR MATS
WARNING: Use a floor matdesigned to fit the footwell of yourvehicle that does not obstruct the pedalarea. Failure to follow this instructioncould result in the loss of control of yourvehicle, personal injury or death.
WARNING: Pedals that cannotmove freely can cause loss of vehiclecontrol and increase the risk of seriouspersonal injury.
WARNING: Secure the floor matto both retention devices so that itcannot slip out of position and interferewith the pedals. Failure to follow thisinstruction could result in the loss ofcontrol of your vehicle, personal injury ordeath.
WARNING: Do not place additionalfloor mats or any other covering on topof the original floor mats. This couldresult in the floor mat interfering with theoperation of the pedals. Failure to followthis instruction could result in the loss ofcontrol of your vehicle, personal injury ordeath.
WARNING: Always make sure thatobjects cannot fall into the driver footwell while your vehicle is moving. Objectsthat are loose can become trappedunder the pedals causing a loss ofvehicle control.
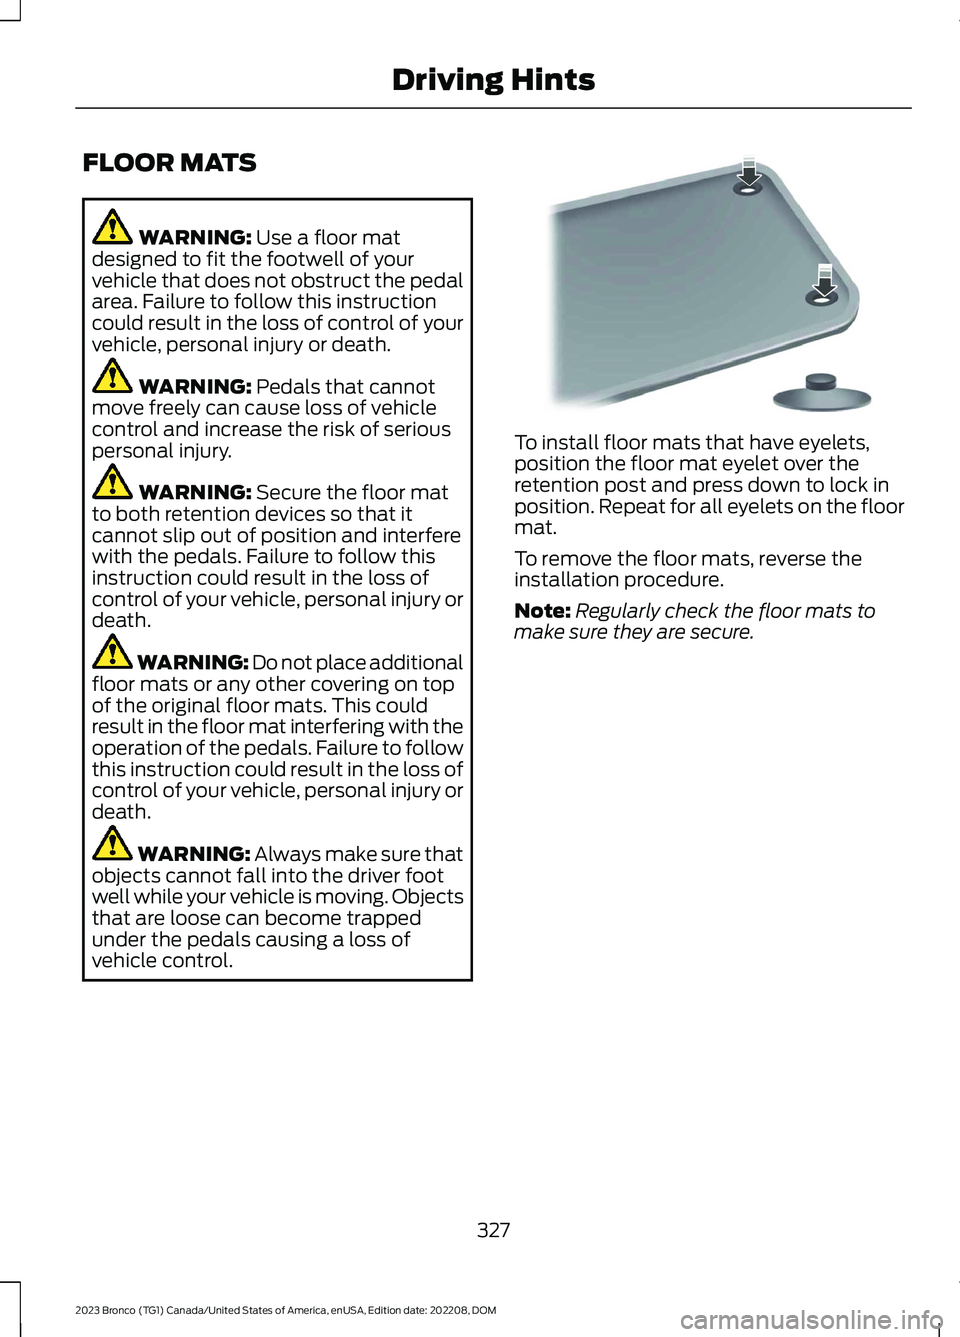
To install floor mats that have eyelets,position the floor mat eyelet over theretention post and press down to lock inposition. Repeat for all eyelets on the floormat.
To remove the floor mats, reverse theinstallation procedure.
Note:Regularly check the floor mats tomake sure they are secure.
327
2023 Bronco (TG1) Canada/United States of America, enUSA, Edition date: 202208, DOMDriving HintsE142666