engine FORD C MAX 2008 1.G Manual Online
[x] Cancel search | Manufacturer: FORD, Model Year: 2008, Model line: C MAX, Model: FORD C MAX 2008 1.GPages: 278, PDF Size: 17.5 MB
Page 81 of 278
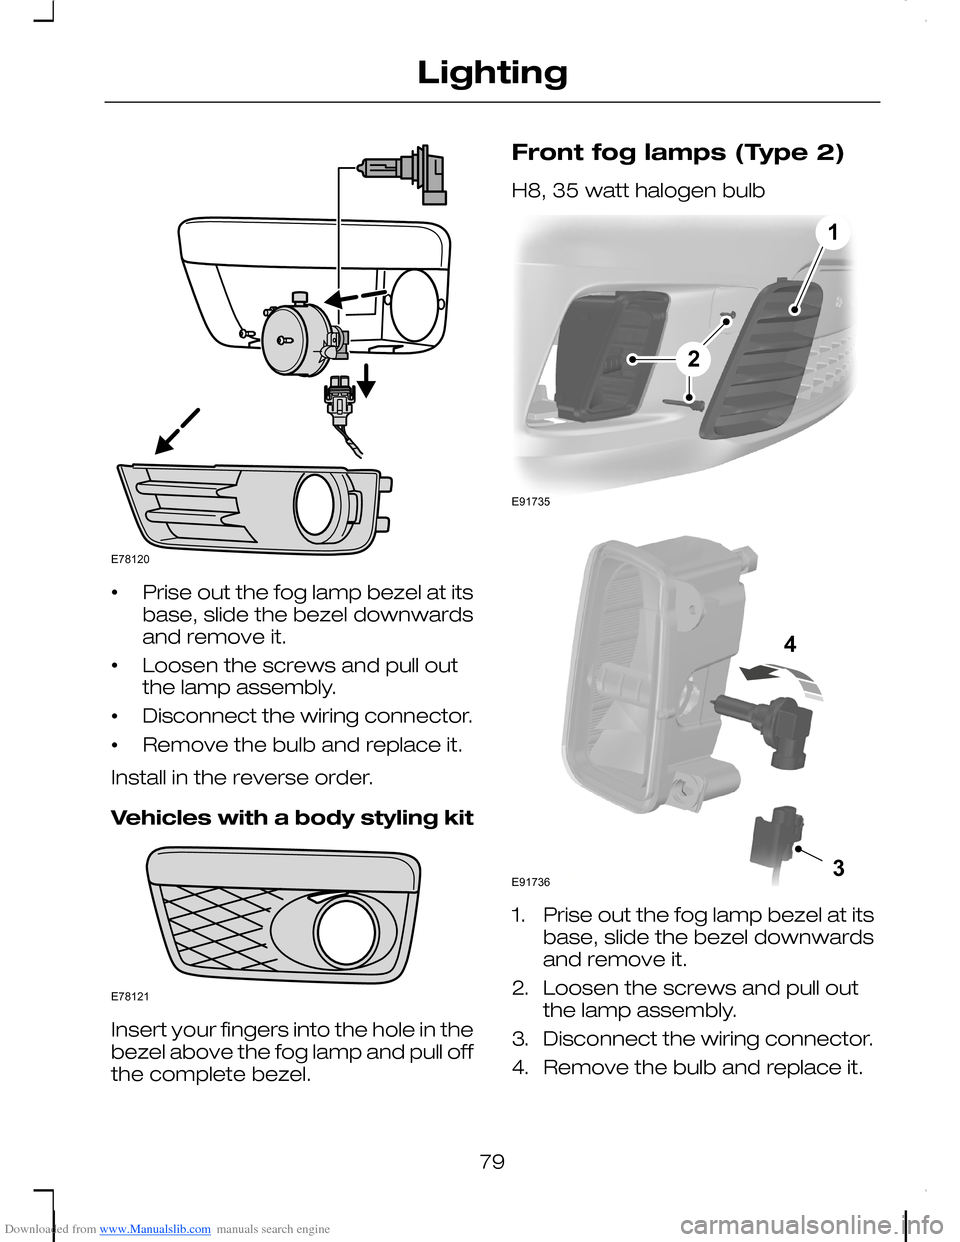
Downloaded from www.Manualslib.com manuals search engine •Prise out the fog lamp bezel at itsbase, slide the bezel downwardsand remove it.
•Loosen the screws and pull outthe lamp assembly.
•Disconnect the wiring connector.
•Remove the bulb and replace it.
Install in the reverse order.
Vehicles with a body styling kit
Insert your fingers into the hole in thebezel above the fog lamp and pull offthe complete bezel.
Front fog lamps (Type 2)
H8, 35 watt halogen bulb
1.Prise out the fog lamp bezel at itsbase, slide the bezel downwardsand remove it.
2.Loosen the screws and pull outthe lamp assembly.
3.Disconnect the wiring connector.
4.Remove the bulb and replace it.
79
LightingE78120 E78121 12E91735 34E91736
Page 82 of 278
Downloaded from www.Manualslib.com manuals search engine Install in the reverse order.
Rear lamps
Open the tailgate.
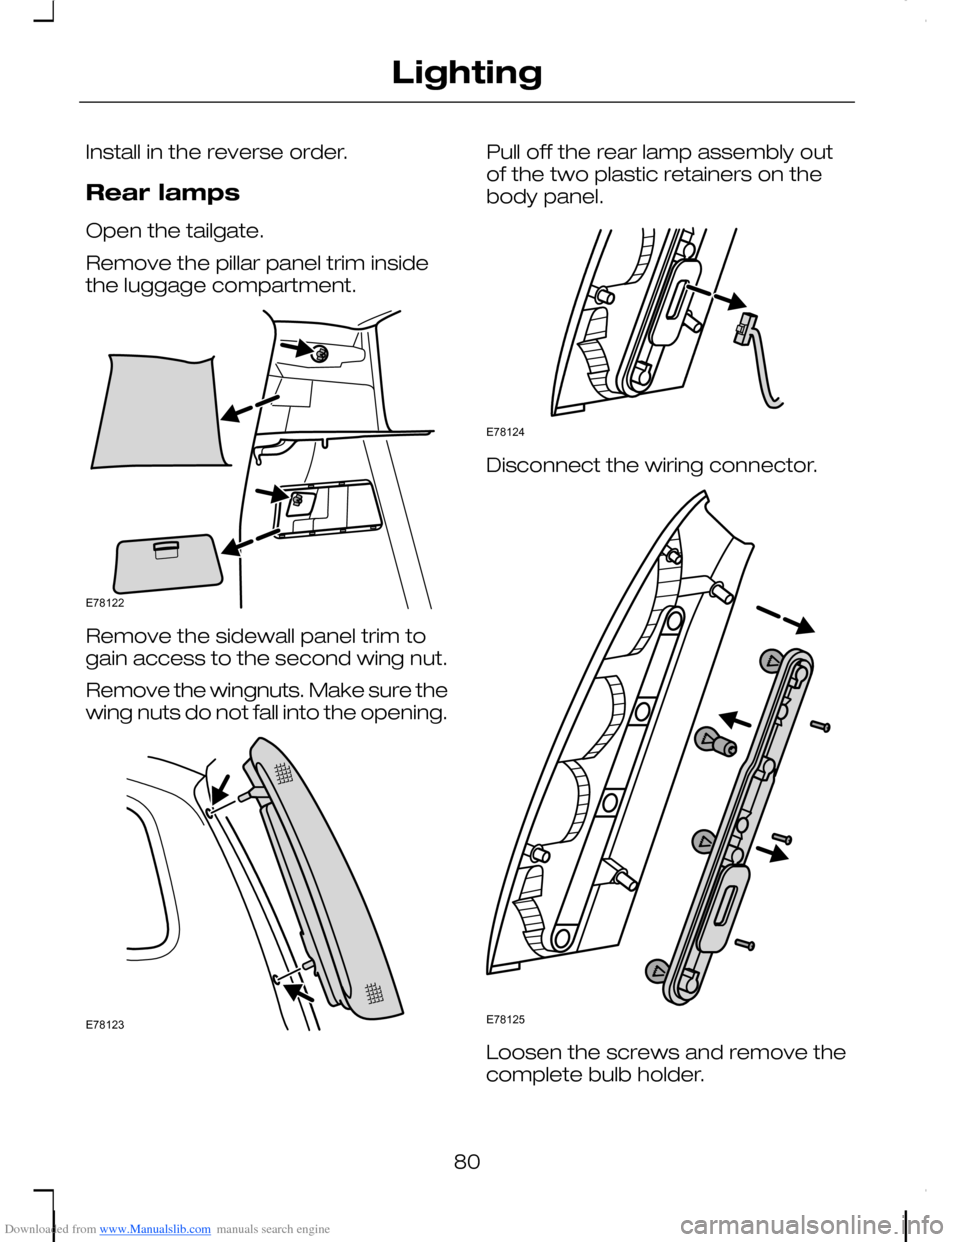
Remove the pillar panel trim insidethe luggage compartment.
Remove the sidewall panel trim togain access to the second wing nut.
Remove the wingnuts. Make sure thewing nuts do not fall into the opening.
Pull off the rear lamp assembly outof the two plastic retainers on thebody panel.
Disconnect the wiring connector.
Loosen the screws and remove thecomplete bulb holder.
80
LightingE78122 E78123 E78124 E78125
Page 83 of 278
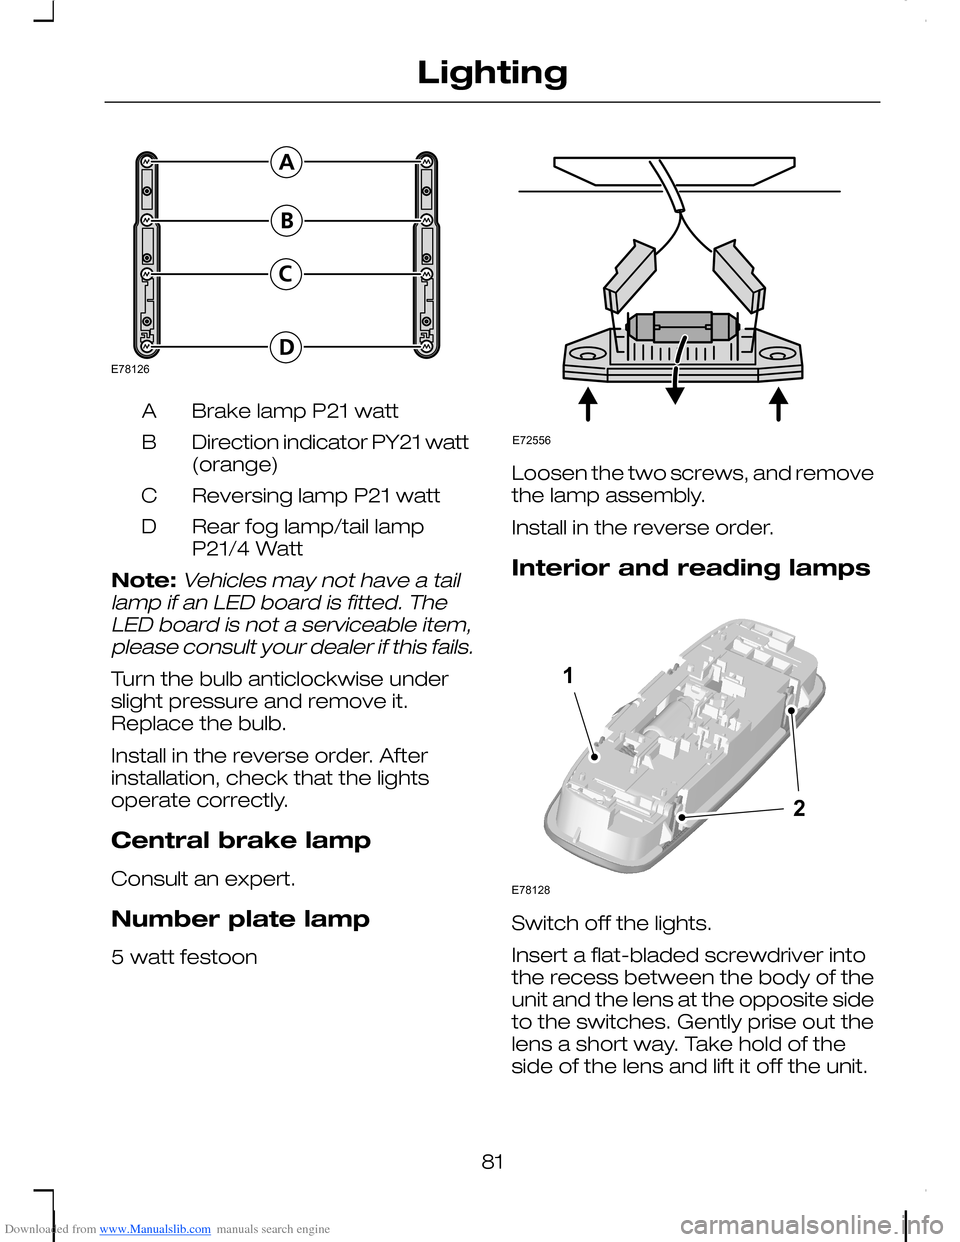
Downloaded from www.Manualslib.com manuals search engine Brake lamp P21 wattA
Direction indicator PY21 watt(orange)B
Reversing lamp P21 wattC
Rear fog lamp/tail lampP21/4 WattD
Note:Vehicles may not have a taillamp if an LED board is fitted. TheLED board is not a serviceable item,please consult your dealer if this fails.
Turn the bulb anticlockwise underslight pressure and remove it.Replace the bulb.
Install in the reverse order. Afterinstallation, check that the lightsoperate correctly.
Central brake lamp
Consult an expert.
Number plate lamp
5 watt festoon
Loosen the two screws, and removethe lamp assembly.
Install in the reverse order.
Interior and reading lamps
Switch off the lights.
Insert a flat-bladed screwdriver intothe recess between the body of theunit and the lens at the opposite sideto the switches. Gently prise out thelens a short way. Take hold of theside of the lens and lift it off the unit.
81
LightingE78126 E72556 E7812812
Page 84 of 278
Downloaded from www.Manualslib.com manuals search engine Interior lamps
10 watt festoon bulb
Remove and replace the bulb.
Snap the lens back onto the unit.
Reading lamps
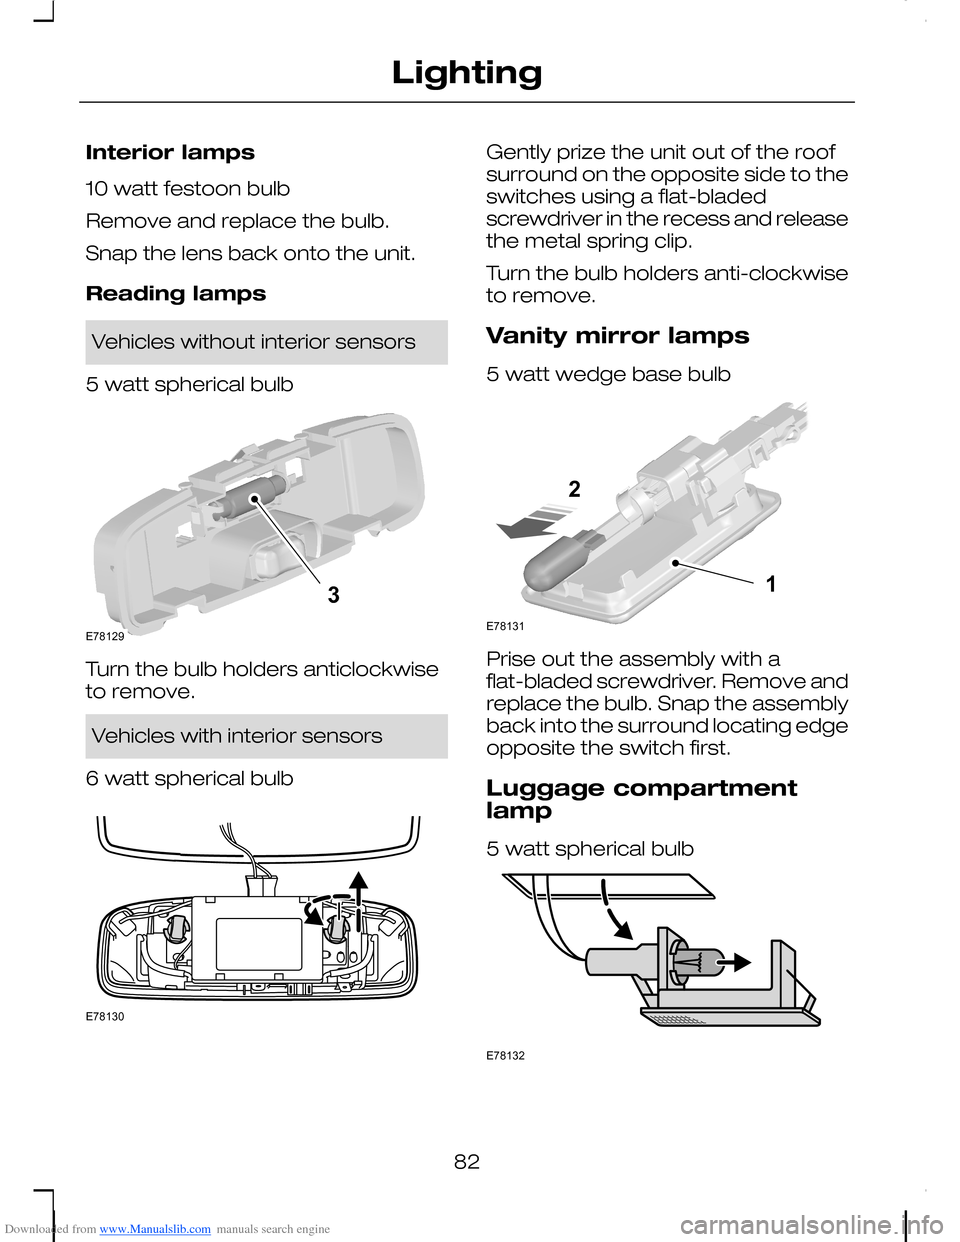
Vehicles without interior sensors
5 watt spherical bulb
Turn the bulb holders anticlockwiseto remove.
Vehicles with interior sensors
6 watt spherical bulb
Gently prize the unit out of the roofsurround on the opposite side to theswitches using a flat-bladedscrewdriver in the recess and releasethe metal spring clip.
Turn the bulb holders anti-clockwiseto remove.
Vanity mirror lamps
5 watt wedge base bulb
Prise out the assembly with aflat-bladed screwdriver. Remove andreplace the bulb. Snap the assemblyback into the surround locating edgeopposite the switch first.
Luggage compartmentlamp
5 watt spherical bulb
82
Lighting3E78129 E78130 12E78131 E78132
Page 85 of 278
Downloaded from www.Manualslib.com manuals search engine Carefully prise out the lamp assemblyfrom the holder with a flat-bladedscrewdriver and remove the bulb.
Install in the reverse order.
Footwell lamp
5 watt wedge base bulb
Pull the bulb out and replace it.
83
Lighting
Page 86 of 278
Downloaded from www.Manualslib.com manuals search engine ELECTRIC WINDOWS
WARNING
Do not operate the electricwindows unless they are freefrom obstruction.
Note:If you operate the switchesoften during a short period of time,the system might become inoperablefor a certain time to prevent damagedue to overheating.
Switch on the ignition to operate theelectric windows.
Global opening and closing
You can also operate the electricwindows with the ignition off via theglobal opening and closing function.See Locks (page 40).
Driver's door switches
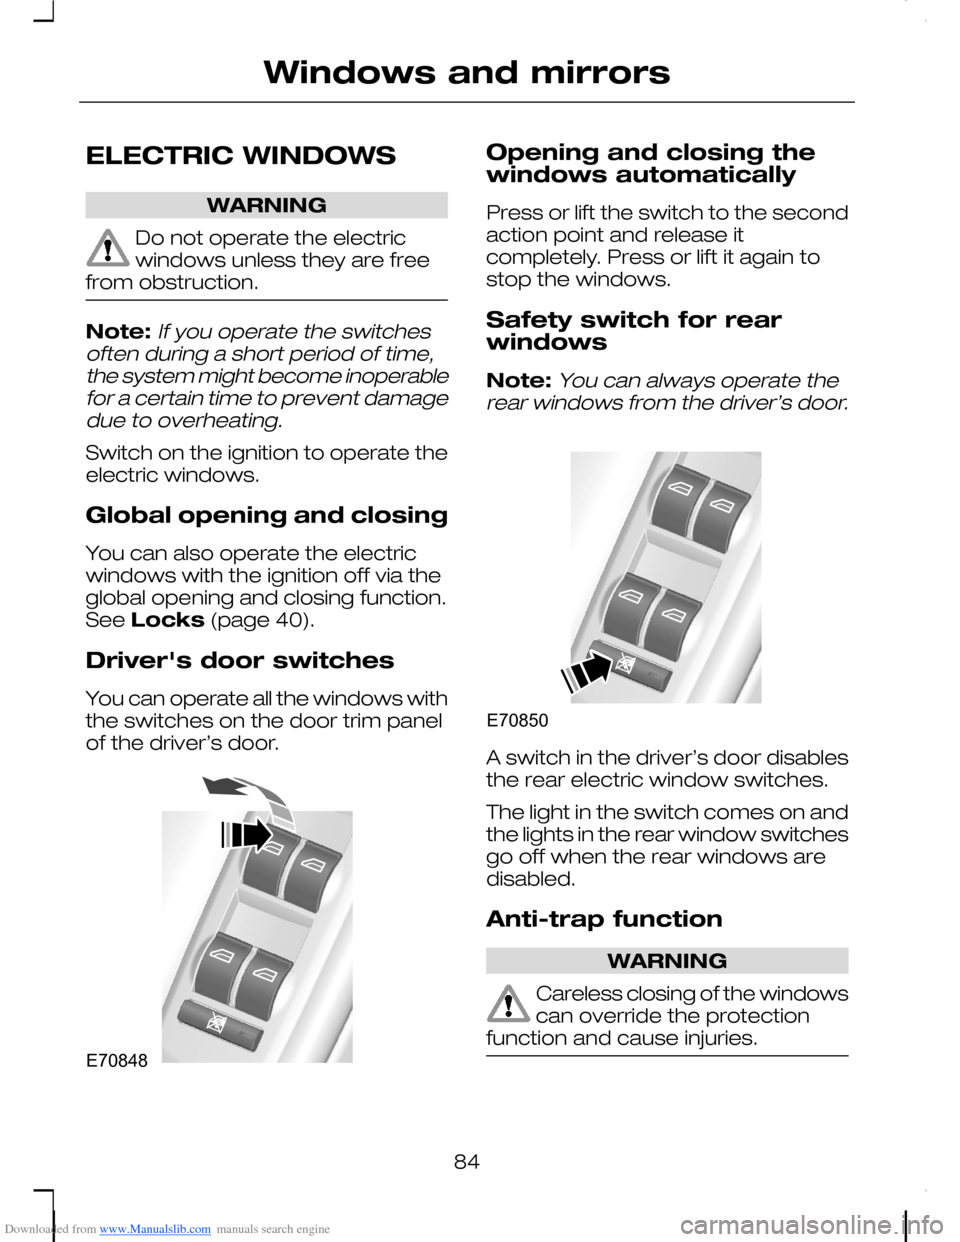
You can operate all the windows withthe switches on the door trim panelof the driver’s door.
Opening and closing thewindows automatically
Press or lift the switch to the secondaction point and release itcompletely. Press or lift it again tostop the windows.
Safety switch for rearwindows
Note:You can always operate therear windows from the driver’s door.
A switch in the driver’s door disablesthe rear electric window switches.
The light in the switch comes on andthe lights in the rear window switchesgo off when the rear windows aredisabled.
Anti-trap function
WARNING
Careless closing of the windowscan override the protectionfunction and cause injuries.
84
Windows and mirrorsE70848 E70850
Page 87 of 278
Downloaded from www.Manualslib.com manuals search engine The electric windows will stopautomatically while closing andreverse some distance if there is anobstacle in the way.
Overriding the anti-trapfunction
CAUTION
While you close the window forthe third time, the anti-trapfunction is disabled. Make sure thereare no obstacles in the way of theclosing window.
To override this protection functionwhen there is a resistance, e.g. in thewinter, proceed as follows:
1.Close the window twice until itreaches the resistance and let itreverse.
2.Close the window a third time tothe resistance. The anti-trapfunction is disabled and youcannot close the windowautomatically. The window willoverride the resistance and youcan close it fully.
3.If the window does not close afterthe third attempt, have it checkedby an expert.
Resetting the memory of
the electric windows
WARNING
The anti-trap function isdeactivated until you have resetthe memory.
After the battery has beendisconnected from the vehicle youmust reset the memory separatelyfor each window:
1.Lift and hold the switch until thewindow is fully closed.
2.Release the switch.
3.Lift the switch again for one moresecond.
4.Push and hold the switch until thewindow is fully open.
5.Release the switch.
6.Lift and hold the switch until thewindow is fully closed.
7.Open the window and try to closeit automatically.
8.Reset and repeat procedure if thewindow does not closeautomatically.
EXTERIOR MIRRORS
Convex mirrors
85
Windows and mirrorsE71042
Page 88 of 278
Downloaded from www.Manualslib.com manuals search engine WARNING
Do not overestimate thedistance of the objects that yousee in the convex mirror. Objectsseen in convex mirrors will appearsmaller and further away than theyactually are.
Folding mirrors
Make sure that you fully engage themirror in its support when returningit to its original position.
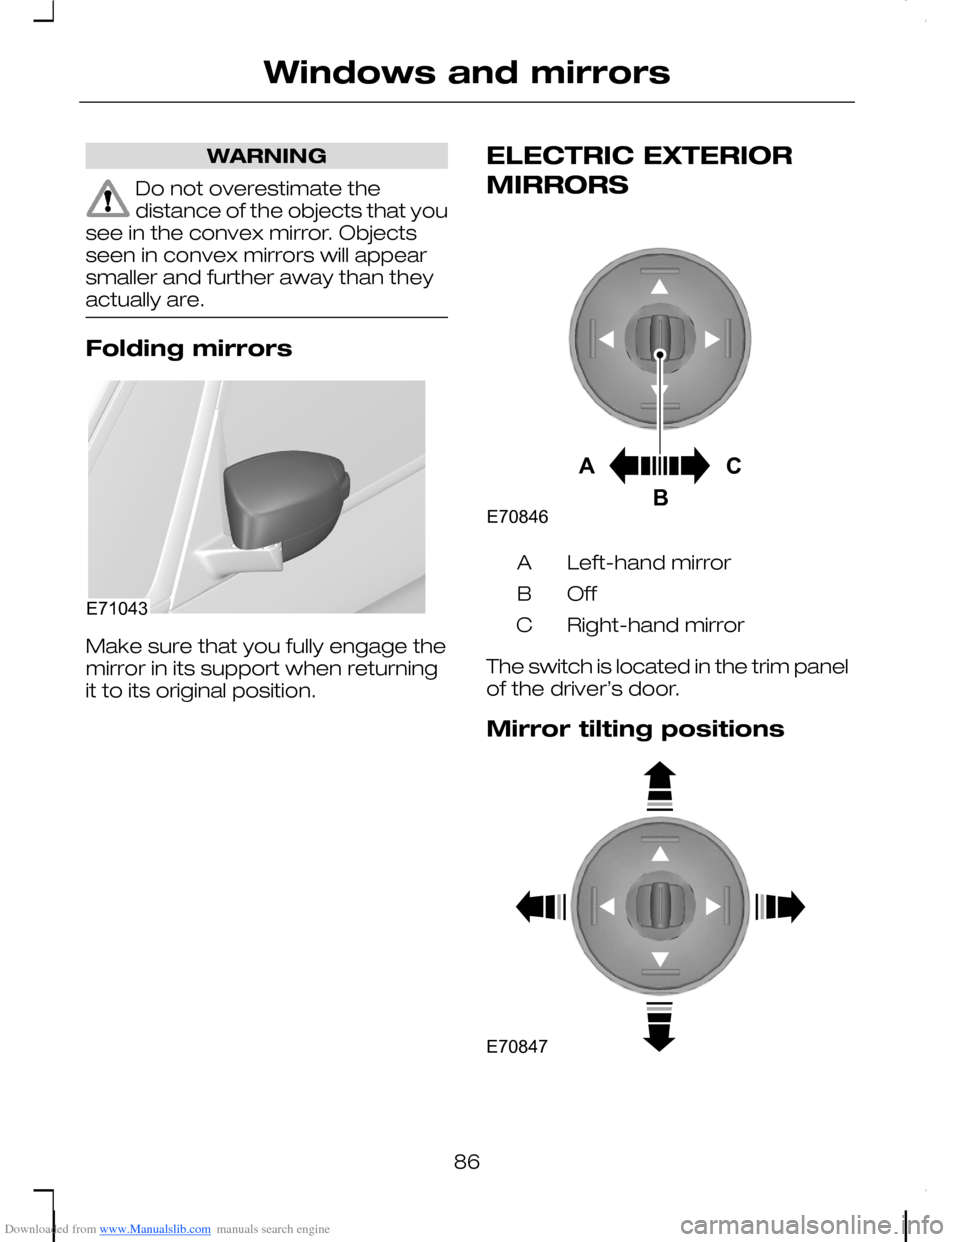
ELECTRIC EXTERIOR
MIRRORS
Left-hand mirrorA
OffB
Right-hand mirrorC
The switch is located in the trim panelof the driver’s door.
Mirror tilting positions
86
Windows and mirrorsE71043 ACBE70846 E70847
Page 89 of 278
Downloaded from www.Manualslib.com manuals search engine On some models, the door mirrorsare heated when the heated rearwindow is switched on.
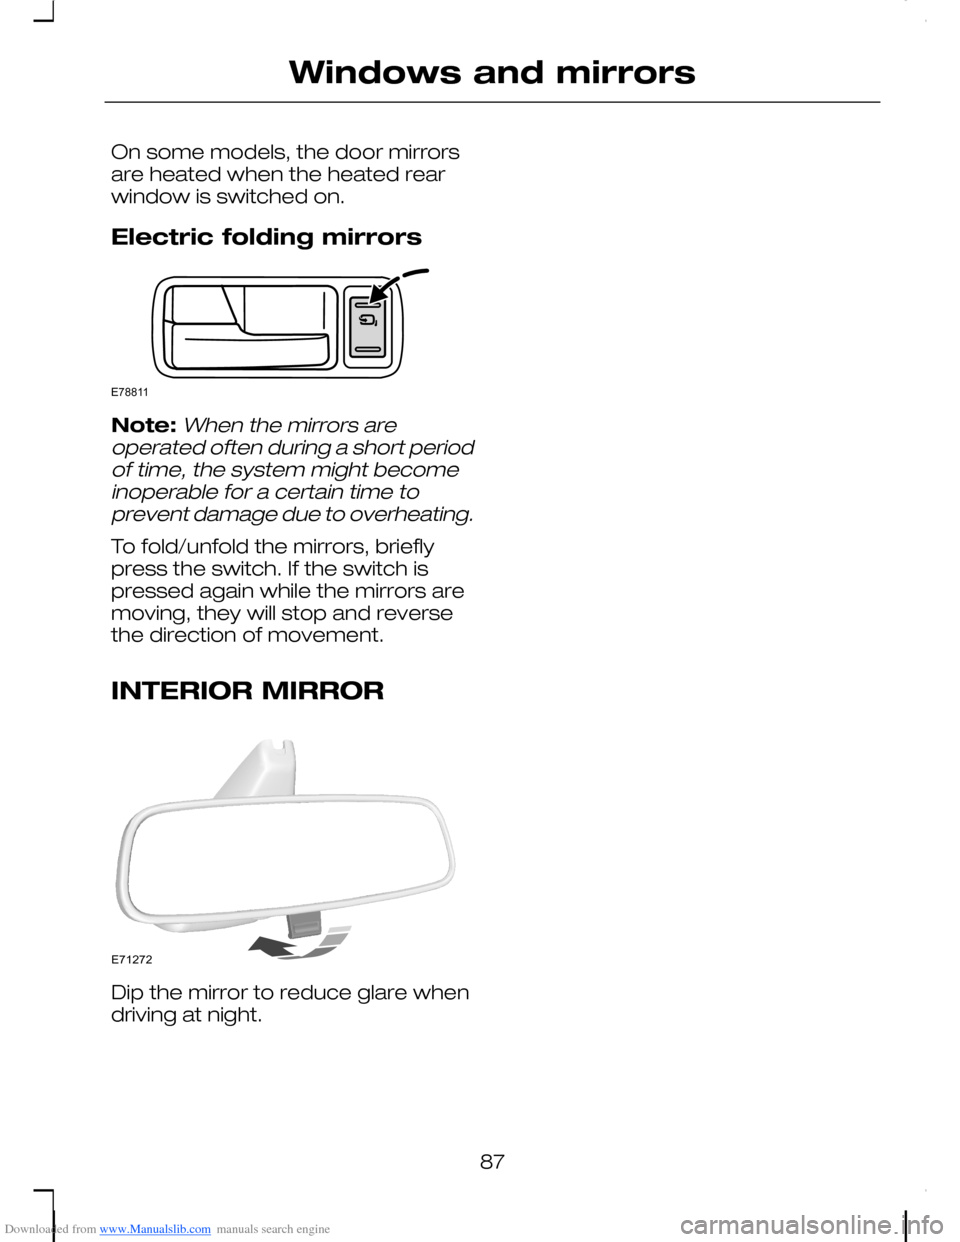
Electric folding mirrors
Note:When the mirrors areoperated often during a short periodof time, the system might becomeinoperable for a certain time toprevent damage due to overheating.
To fold/unfold the mirrors, brieflypress the switch. If the switch ispressed again while the mirrors aremoving, they will stop and reversethe direction of movement.
INTERIOR MIRROR
Dip the mirror to reduce glare whendriving at night.
87
Windows and mirrorsE78811 E71272
Page 90 of 278
Downloaded from www.Manualslib.com manuals search engine GAUGES
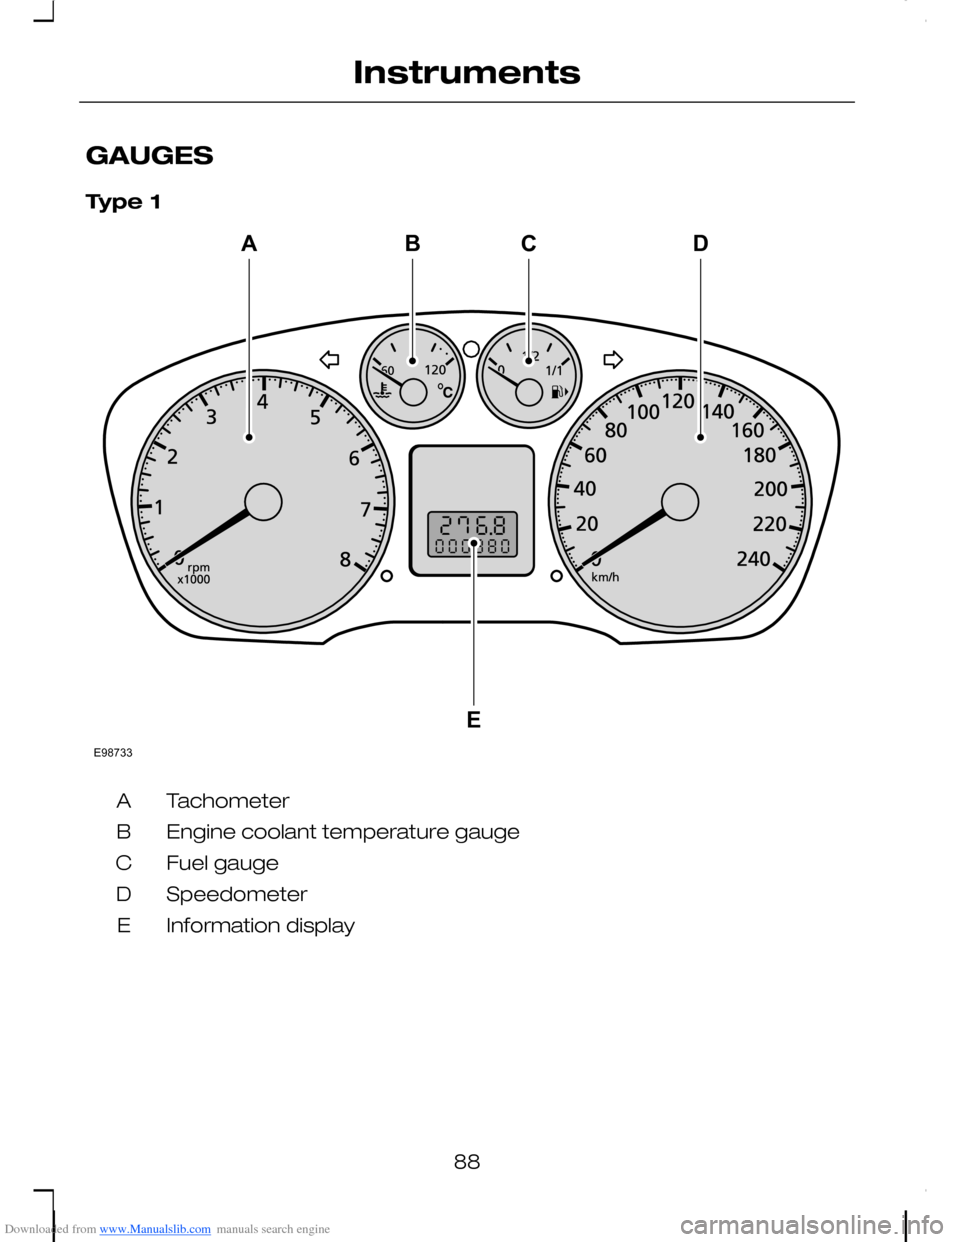
Type 1
TachometerA
Engine coolant temperature gaugeB
Fuel gaugeC
SpeedometerD
Information displayE
88
InstrumentsE98733ABCED