Menu FORD C MAX 2008 1.G Owners Manual
[x] Cancel search | Manufacturer: FORD, Model Year: 2008, Model line: C MAX, Model: FORD C MAX 2008 1.GPages: 278, PDF Size: 17.5 MB
Page 98 of 278
Downloaded from www.Manualslib.com manuals search engine GENERAL INFORMATION
WARNING
Do not operate the informationdisplay controls when thevehicle is moving.
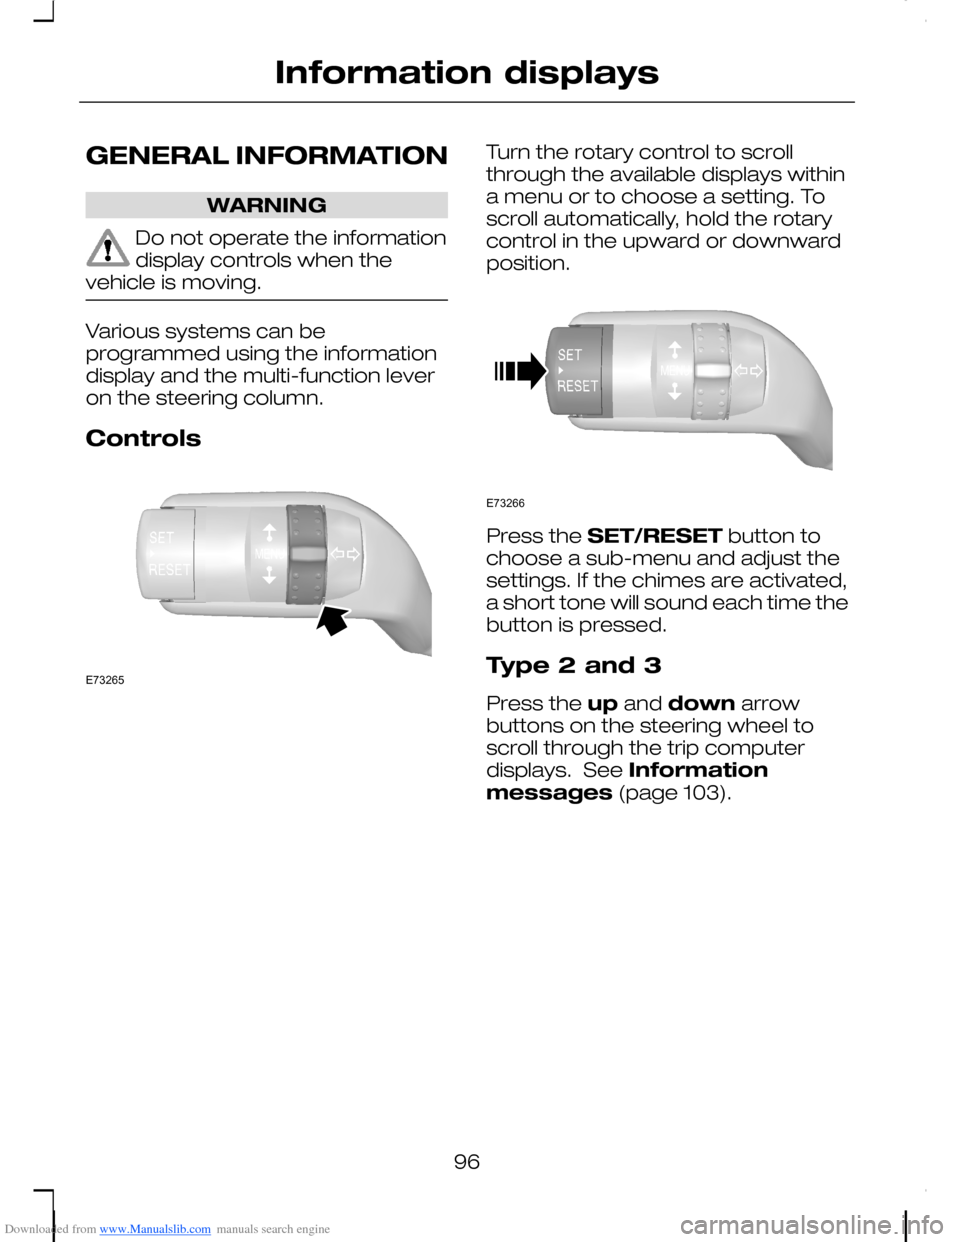
Various systems can beprogrammed using the informationdisplay and the multi-function leveron the steering column.
Controls
Turn the rotary control to scrollthrough the available displays withina menu or to choose a setting. Toscroll automatically, hold the rotarycontrol in the upward or downwardposition.
Press the SET/RESET button tochoose a sub-menu and adjust thesettings. If the chimes are activated,a short tone will sound each time thebutton is pressed.
Type 2 and 3
Press the up and down arrowbuttons on the steering wheel toscroll through the trip computerdisplays. See Informationmessages (page 103).
96
Information displaysE73265 E73266
Page 99 of 278
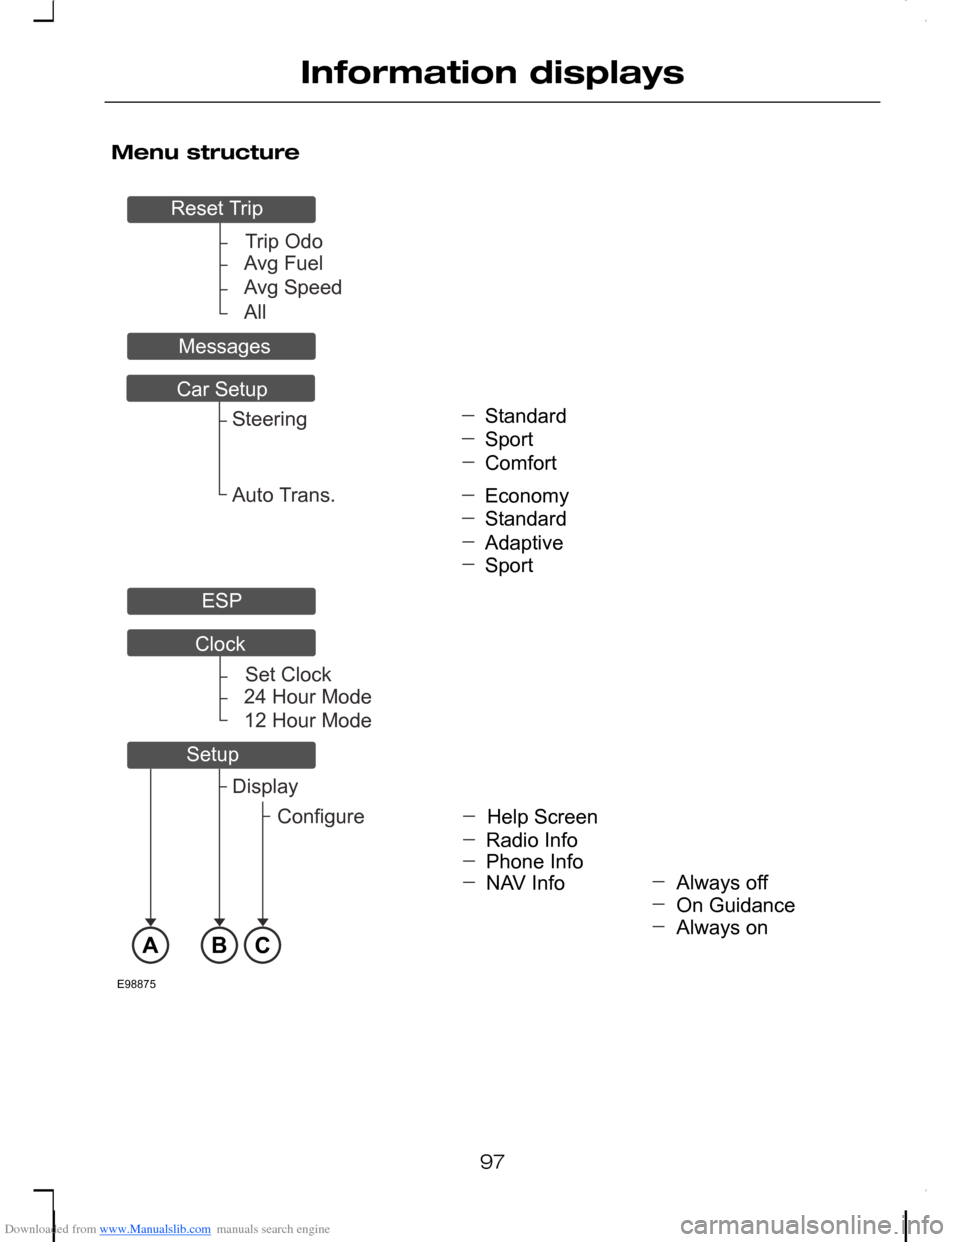
Downloaded from www.Manualslib.com manuals search engine Menu structure
97
Information displaysTripOdoAvgFuelAvgSpeedAllSetClock24HourMode12HourModeABCE98875StandardSportComfortAlwaysoffHelpScreenDisplayConfigureRadioInfoEconomyStandardAdaptiveSportPhoneInfoNAVInfoOnGuidanceAlwaysonSteeringAutoTrans.ResetTripMessagesCarSetupESPClockSetup
Page 101 of 278
Downloaded from www.Manualslib.com manuals search engine PERSONALISED
SETTINGS
Car Setup menu
Note:For road safety reasons,changes in the Car Setup menucan only be made while the vehicleis stationary. If this menu or one of itssub-menus is open when the vehiclebegins to move, the informationdisplay will automatically exit the CarSetup menu.
Use the rotary control to scrollthrough the displays and pressSET/RESET to choose a sub-menuand adjust the settings.
Scroll to the Car Setup displayusing the rotary control and press theSET/RESET button.
EHPAS personalisation
Note:When the vehicle is stationary,the steering assistance is optimizedin all three settings and does notdiffer noticeably.
Standard: The standard settingsuitable for all driving styles.
Sport: The steering assistance isreduced. This suits a sportier drivingstyle by increasing the feedbackthrough the steering wheel. The sportsetting is also an advantage whendriving on icy and snowy roadconditions.
Comfort: The steering assistanceis increased. The steering will feellighter and you will not need to exertas much force on the wheel.
99
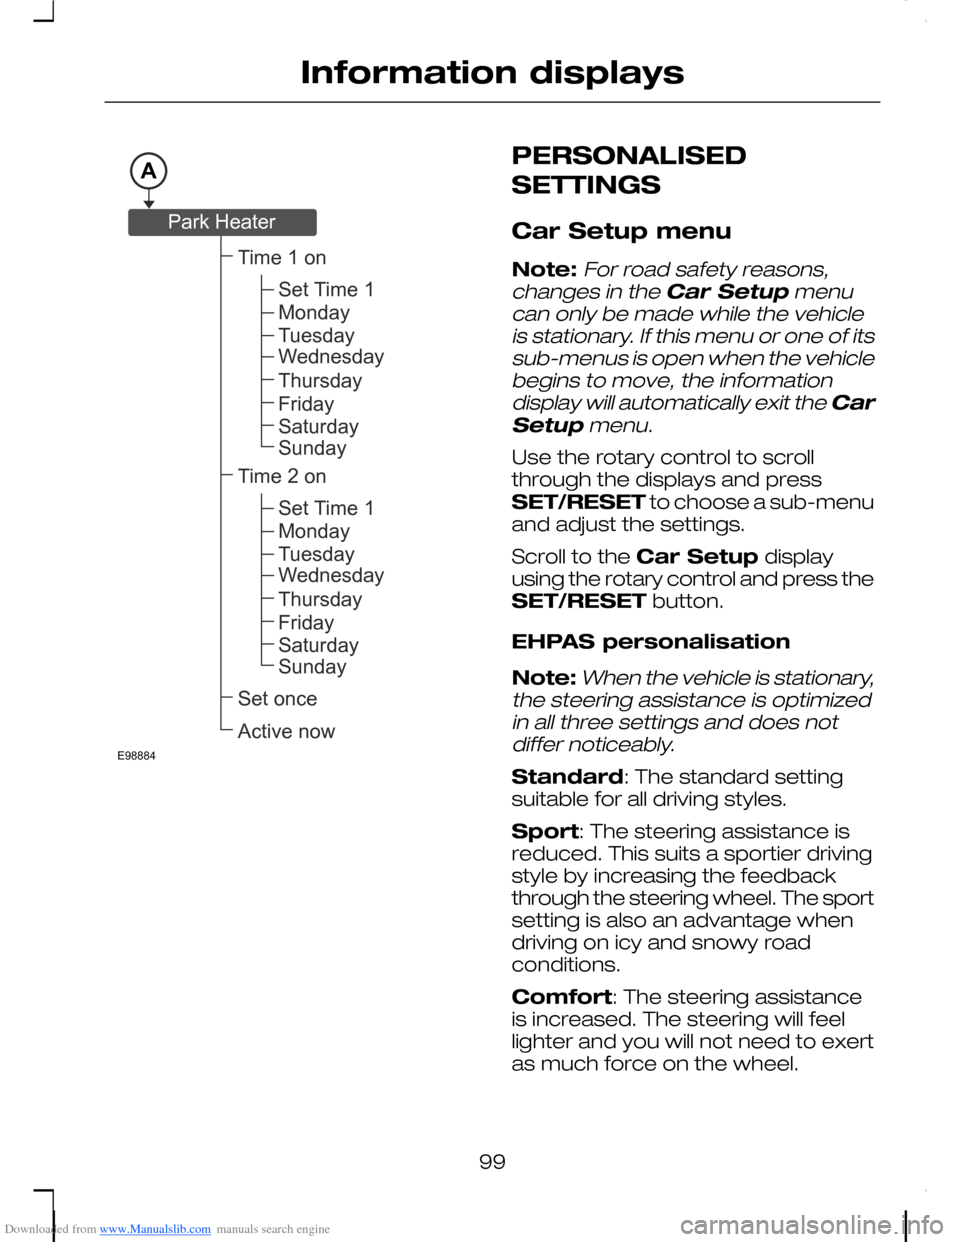
Information displaysAE98884Time1onSetonceActivenowSetTime1MondayTuesdayWednesdayThursdayFridaySaturdaySundayTime2onSetTime1MondayTuesdayWednesdayThursdayFridaySaturdaySundayParkHeater
Page 102 of 278
Downloaded from www.Manualslib.com manuals search engine ATM personalisation
Note:Kickdown functions in thesame way in all three modes.
Economy: The transmission keepsthe engine at lower engine speedsin order to optimize fuel economy.
Adaptive: The standard setupsuitable for all driving styles.
Sport: Initially, the transmission letsthe engine run at higher enginespeeds to provide faster accelerationand greater engine braking efficiency.Thereafter, it will adapt to yourindividual driving style.
ESP
Select this option to activate ESP.
Language setting
A choice of eleven languages areavailable.
Scroll to this display using the rotarycontrol and press the SET/RESETbutton to select the desiredlanguage. Turn the rotary control tosave the setting and exit the menu.
Clock setting
Note:This display is only present onvehicles equipped with aprogrammable auxiliary heater butno Ford audio or navigation system.If the vehicle is equipped with a Fordaudio or navigation system, the timeis set on the audio or navigationsystem. See separate audio ornavigation handbook.
Scroll to this display using the rotarycontrol and press SET/RESET. Thehours start to flash and can be setusing the rotary control.
Press the SET/RESET button toconfirm the setting and move to theminutes.
Proceed in the same way to set theminutes and the date.
After setting the year and pressingSET/RESET, the time and date arestored.
Units of measure
To toggle between metric andimperial units, scroll to this display andpress the SET/RESET button.
Toggling the units of measure usingthis display will affect the followingdisplays:
•Distance to empty
•Average fuel consumption
•Instantaneous fuel consumption
•Average speed
•Outside air temperature
•The temperature display in theautomatic climate control.
The units of measure for outside airtemperature and the automaticclimate control can be toggledindependent of the other displays.See General information (page96).
Auxiliary heaterprogramming
See Auxiliary heater (page 114).
100
Information displays
Page 103 of 278
Downloaded from www.Manualslib.com manuals search engine To programme the auxiliary heater,scroll to this display using the rotarycontrol and press the SET/RESETbutton.
Instant control
To switch on the programmableauxiliary heater or fuel operatedheater, scroll to this display and pressSET/RESET. The cursor will changeto a tick. The tick in this displayconfirms that the heater is nowactivated and will perform oneheating cycle.
AUX. HEATER ON will appear inthe display.
To switch off the programmableauxiliary heater or fuel operatedheater during a heating cycle, scrollto this display and pressSET/RESET. The cursor will changeto a tick. The tick in this displayconfirms that the heater is nowdeactivated.
AUX. HEATER OFF will appear inthe display.
Programme times
Note:The programmed time is thetime at which you wish the vehicle tobe warm and ready to drive, not thetime at which the heater switches on.
Note:Times must be programmedat least 70 minutes in advance of thetime you wish to set.
Note:The time and date must becorrectly set on the audio/ navigationsystem or on the information display.See Clock setting.
Four functions are available forsetting the times at which the vehicleshould be warmed up:
Seven days in the week
One or two times can beprogrammed for every day of theweek.
Five days in the week
One or two times can beprogrammed for the days Mondayto Friday.
Single day within week
One or two times can beprogrammed for one particular dayof the week.
Any time and date
One time can be programmed forone particular day in the next 12months from the date ofprogramming.
Programming procedure forSeven days in the week, Fivedays in the week, Single daywithin week:
In the Auxiliary heaterprogramming menu, scroll to therelevant display using the rotarycontrol and press the SET/RESETbutton.
When programming the functionSingle day within week, choosethe day using the rotary control andpress SET/RESET.
The first programme time will flash.
Press SET/RESET and the hourswill flash.
101
Information displays
Page 104 of 278
Downloaded from www.Manualslib.com manuals search engine Set the hours with the rotary control.
Press SET/RESET and the minuteswill flash.
Set the minutes with the rotarycontrol.
Press SET/RESET and the secondprogramme time will flash. Repeat toset the second programme time.
Note:If only one programme timeis desired, select dashes whenscrolling through the hours andminutes. These appear between 23and 00 hours and between 59 and00 minutes.
After setting the minutes of thesecond programme time, pressSET/RESET and the cursor will flash.
Press SET/RESET again and thecursor will change to a tick. The tickconfirms that the time schedules arenow stored and that the heater willhave the vehicle warmed up at thetimes set.
Note:It is not possible to select theSeven days in the week, Fivedays in the week and Singleday within week functionssimultaneously as only one set oftimes can be programmed for eachday.
If programme times for one of thesefunctions are stored and active,confirmed by a tick, a lock symbol willappear in the programming displayof the other two, showing that thesefunctions cannot be activated. Toactivate one of the other twofunctions, first deactivate the functioncurrently active by deleting the tick.
To deactivate the function, scroll tothe relevant display and pressSET/RESET repeatedly until the tickflashes. Press SET/RESET again todelete the tick and deactivate thefunction.
Programming procedure forAny time and date
In the Auxiliary heaterprogramming menu, scroll to thisdisplay using the rotary control andpress the SET/RESET button.
The hours will flash.
Set the hours with the rotary control.
Press SET/RESET and the minuteswill flash.
Proceed in the same way to set theminutes, the month and the day.
After setting the day, pressSET/RESET and the cursor will flash.
Press SET/RESET to confirm thesettings. The cursor will change to atick. The tick confirms that the timeschedule is now stored and theheater will have the vehicle warmedup at the time set.
To deactivate the function, scroll tothis display and press SET/RESETrepeatedly until the tick flashes. PressSET/RESET again to delete the tickand deactivate the function.
Chime deactivation
The following chimes can bedeactivated:
•Low fuel warning.
•General warning messages.
102
Information displays
Page 234 of 278
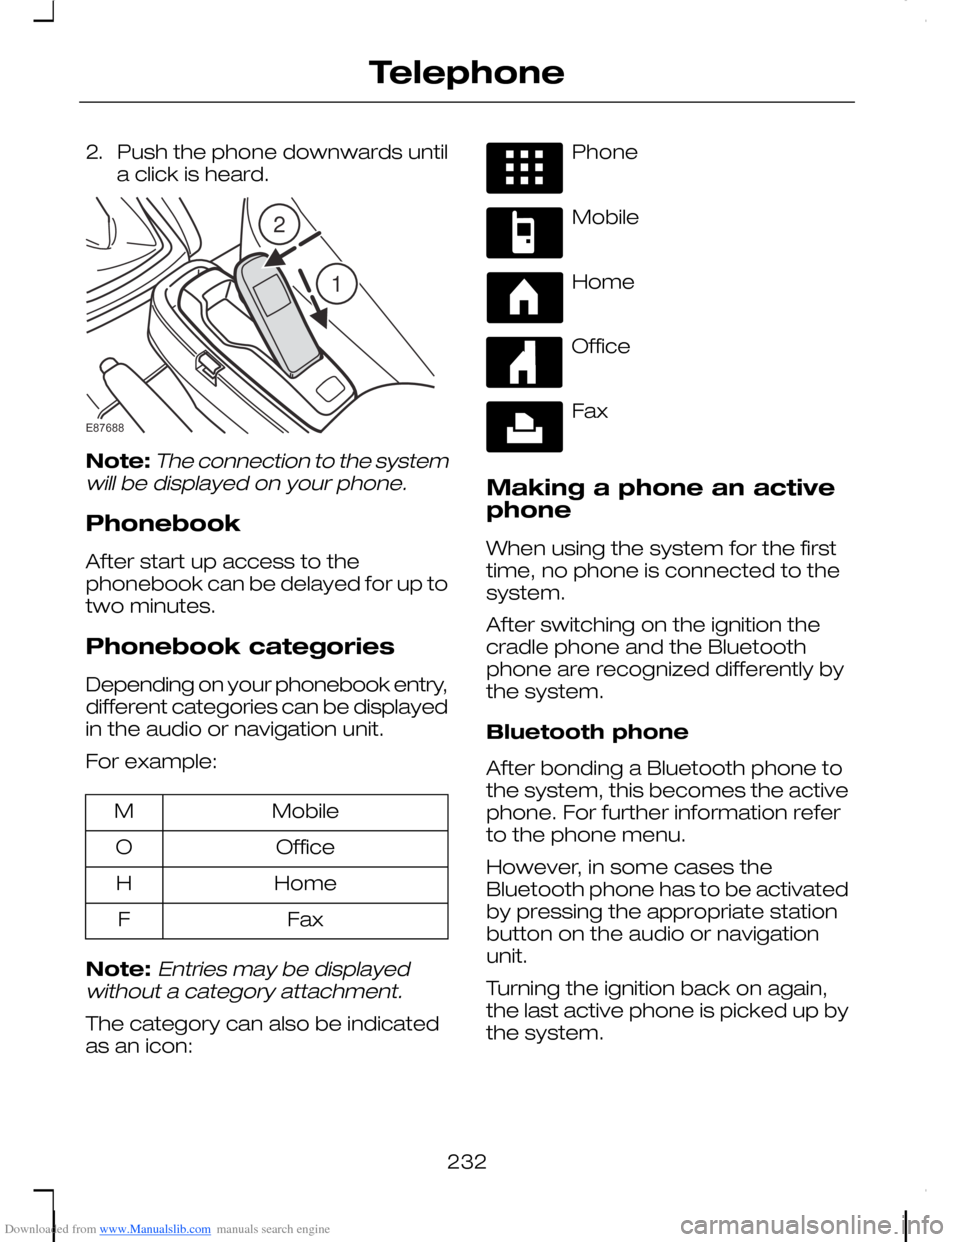
Downloaded from www.Manualslib.com manuals search engine 2.Push the phone downwards untila click is heard.
Note:The connection to the systemwill be displayed on your phone.
Phonebook
After start up access to thephonebook can be delayed for up totwo minutes.
Phonebook categories
Depending on your phonebook entry,different categories can be displayedin the audio or navigation unit.
For example:
MobileM
OfficeO
HomeH
FaxF
Note:Entries may be displayedwithout a category attachment.
The category can also be indicatedas an icon:
Phone
Mobile
Home
Office
Fax
Making a phone an activephone
When using the system for the firsttime, no phone is connected to thesystem.
After switching on the ignition thecradle phone and the Bluetoothphone are recognized differently bythe system.
Bluetooth phone
After bonding a Bluetooth phone tothe system, this becomes the activephone. For further information referto the phone menu.
However, in some cases theBluetooth phone has to be activatedby pressing the appropriate stationbutton on the audio or navigationunit.
Turning the ignition back on again,the last active phone is picked up bythe system.
232
Telephone21E87688
Page 237 of 278
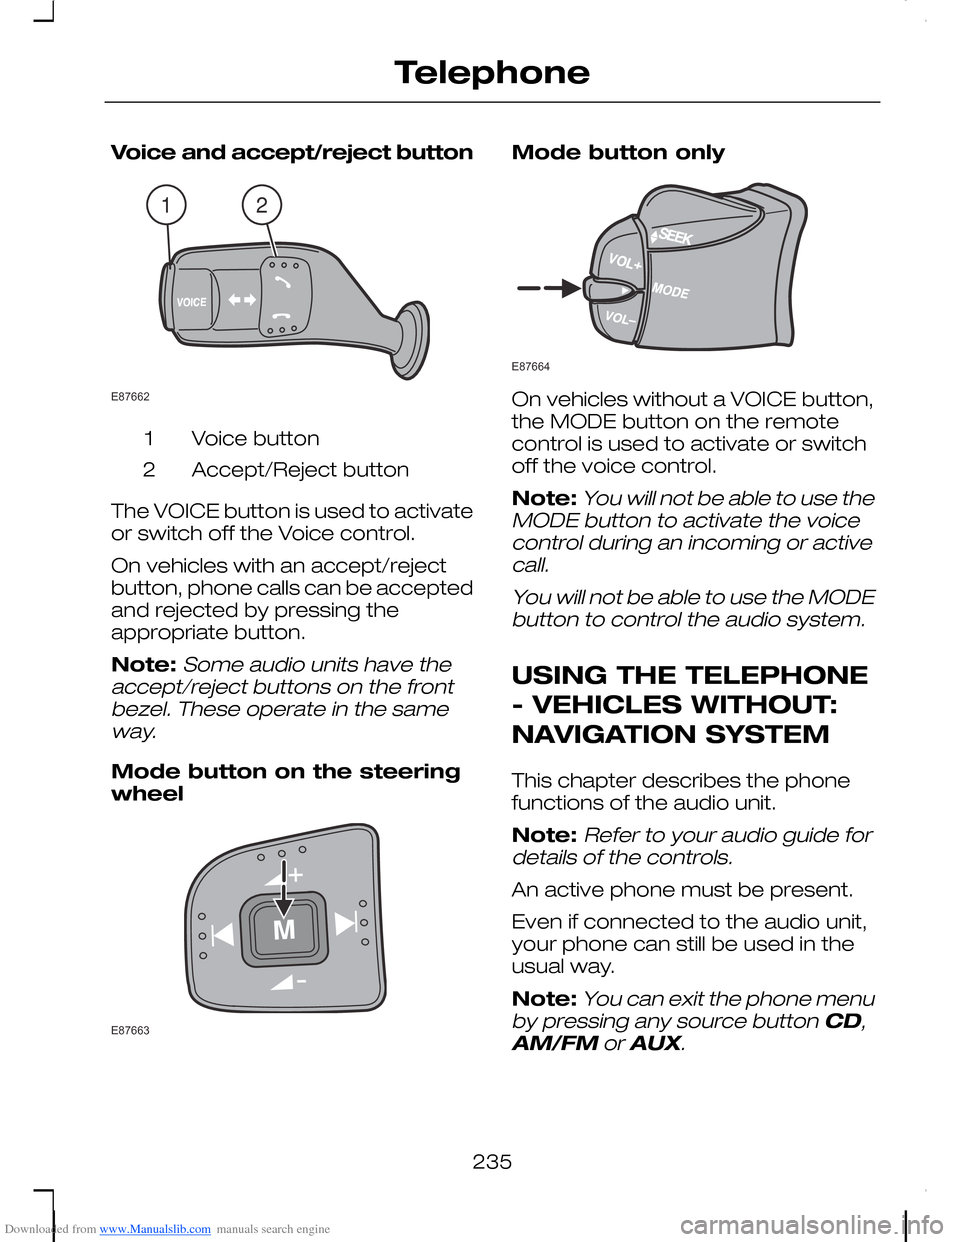
Downloaded from www.Manualslib.com manuals search engine Voice and accept/reject button
Voice button1
Accept/Reject button2
The VOICE button is used to activateor switch off the Voice control.
On vehicles with an accept/rejectbutton, phone calls can be acceptedand rejected by pressing theappropriate button.
Note:Some audio units have theaccept/reject buttons on the frontbezel. These operate in the sameway.
Mode button on the steeringwheel
Mode button only
On vehicles without a VOICE button,the MODE button on the remotecontrol is used to activate or switchoff the voice control.
Note:You will not be able to use theMODE button to activate the voicecontrol during an incoming or activecall.
You will not be able to use the MODEbutton to control the audio system.
USING THE TELEPHONE
- VEHICLES WITHOUT:
NAVIGATION SYSTEM
This chapter describes the phonefunctions of the audio unit.
Note:Refer to your audio guide fordetails of the controls.
An active phone must be present.
Even if connected to the audio unit,your phone can still be used in theusual way.
Note:You can exit the phone menuby pressing any source button CD,AM/FM or AUX.
235
Telephone12E87662 E87663 E87664
Page 238 of 278
Downloaded from www.Manualslib.com manuals search engine Making a call
Dialling a number
You can access your phone addressbook either with the phone dockedin the cradle or via Bluetooth. Theentries will appear in the audio unitdisplay.
1.Press the PHONE or the callaccept button.
2.Press the MENU button.
3.Keep pressing the MENU buttonuntil PHONEBOOK appears.
4.Press the seek buttons to selectthe desired phone number.
Note:Press and hold the seekbutton to skip to the next letter in thealphabet.
5.Press the PHONE or the callaccept button to dial the selectedphone number.
If you have an audio unit with atelephone keypad (buttons 0-9, * and#), you can also direct dial by enteringthe number on the radio display viathe keypad and pressing the callaccept button:
1.Press the call accept button.
2.Dial the number using thetelephone keypad on the audiounit.
3.Press the call accept button.
Note:If you enter an incorrect digitwhilst entering a phone number,press the seek down button to erasethe last digit. A long press will erasethe complete string of digits.
Press and hold 0 to enter a + digit.
Ending a call
Calls can be ended by either:
•pressing one of the followingbuttons on the audio unit:PHONE, CD, AM/FM orON/OFF
•pressing the MODE button onthe remote control
•pressing the call reject button.
Note: If you have an audio unit witha telephone keypad you can end acall only with the call reject button.
Redialling a number
1.Press the PHONE or the callaccept button.
2.Press the MENU button.
3.Select the CALL OUT list or theCALL IN list.
Note:If the active phone does notprovide a call out list, the lastoutgoing call number/entry isdisplayed.
4.Press the seek button on theaudio unit.
5.Press the PHONE or the callaccept button to dial the desiredphone number.
Redialling the last diallednumber
Note:This applies to only audio unitswith a telephone keypad
1.Press the call accept button.
236
Telephone
Page 240 of 278
Downloaded from www.Manualslib.com manuals search engine Using the audio unit menu
1.Press the PHONE or call acceptbutton.
2.Press the MENU button on theaudio unit.
3.Select the ACTIVE PHONEoption on the audio unit.
4.Scroll through the different storedphones by using the seek buttonsto display the bonded phones.
5.Press the MENU button to selectthe phone which is to be theactive phone.
Note:After bonding a Bluetoothphone to the system, this becomesthe active phone.
Debonding a bonded phone
A bonded phone can be deletedfrom the system at any time, unlessa phone call is in progress.
1.Press the PHONE or call acceptbutton.
2.Press the MENU button on theaudio unit.
3.Select the DEBOND option onthe audio unit.
4.Scroll through the differentphones by using the seek buttonsand display the phone to bedebonded.
5.Press the MENU button to selectthe phone which is to bedebonded.
USING THE TELEPHONE
- TRAVEL PILOT EX
This chapter describes the phonefunctions of the Navigation SystemTravelPilot EX.
Note:Refer to your NavigationSystem TravelPilot EX guide fordetails of the controls.
An active phone must be present.
Even if connected to the NavigationSystem TravelPilot EX, your phonecan still be used in the usual way.
Making a call
Dialling a number - cradlephone
Using the cradle phone allows you toaccess your mobile phone addressbook. The entries will appear in theTravelPilot EX display.
1.Press the PHONE button on theaudio unit.
2.Using the PHONEBOOK optionin the menu.
3.Choose one of the letter areas.
4.Turning the right rotary entrycontrol, select the desired phonenumber.
5.By pressing the INFO button thedetails of the phonebook entrycan be displayed.
6.Press the right rotary entry controlbutton.
238
Telephone