spare wheel FORD C MAX 2008 1.G Owners Manual
[x] Cancel search | Manufacturer: FORD, Model Year: 2008, Model line: C MAX, Model: FORD C MAX 2008 1.GPages: 278, PDF Size: 17.5 MB
Page 187 of 278
Downloaded from www.Manualslib.com manuals search engine TOWING POINTS
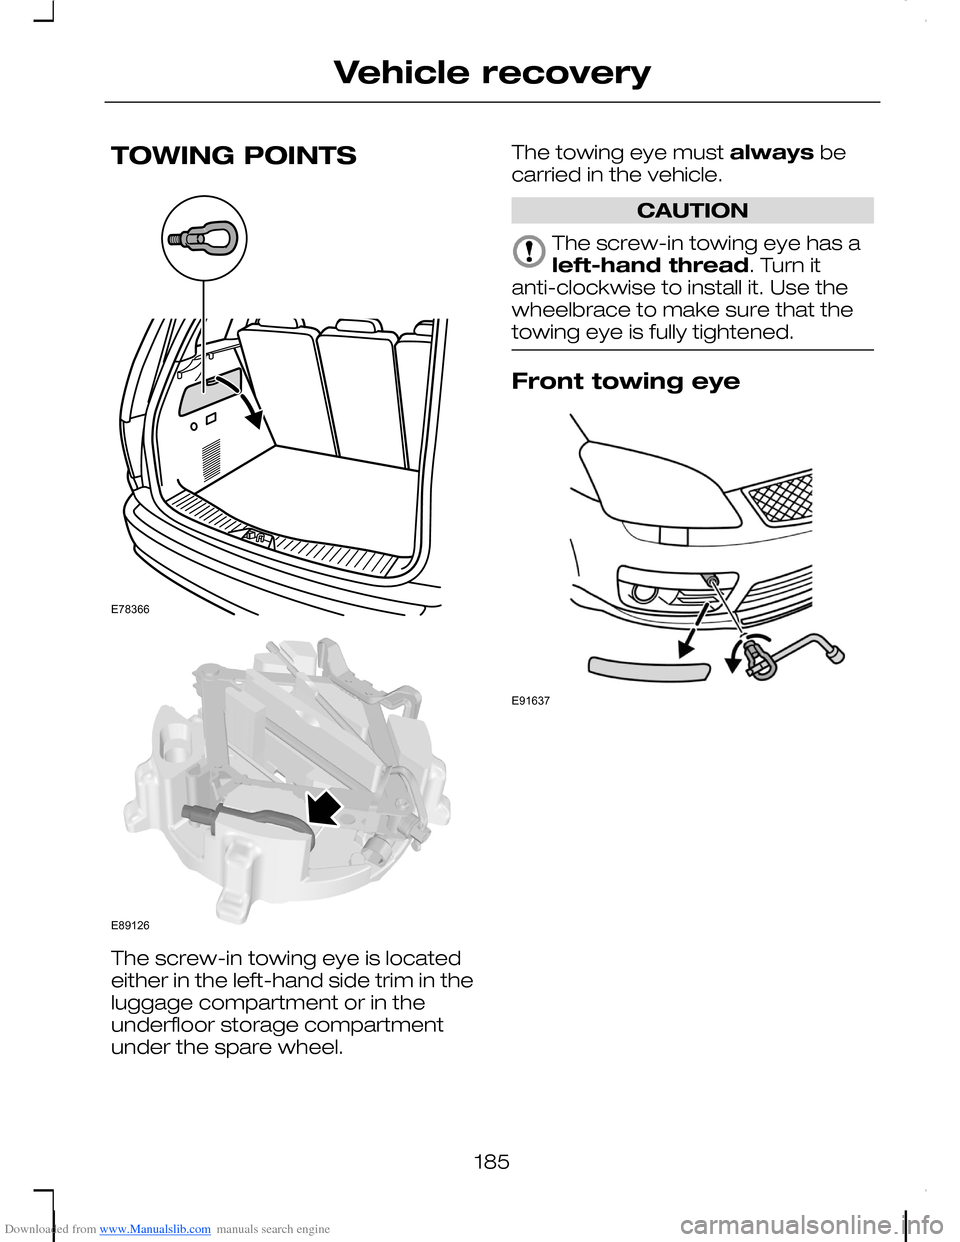
The screw-in towing eye is locatedeither in the left-hand side trim in theluggage compartment or in theunderfloor storage compartmentunder the spare wheel.
The towing eye must always becarried in the vehicle.
CAUTION
The screw-in towing eye has aleft-hand thread. Turn itanti-clockwise to install it. Use thewheelbrace to make sure that thetowing eye is fully tightened.
Front towing eye
185
Vehicle recoveryE78366 E89126 E91637
Page 213 of 278
Downloaded from www.Manualslib.com manuals search engine GENERAL INFORMATION
CAUTIONS
Use only approved wheel andtyre sizes. Using other sizescould damage the vehicle and willmake the National Type Approvalinvalid.
If you change the diameter of thetyres from that fitted at thefactory, the speedometer may notdisplay the correct speed. Take thevehicle to your dealer to have theengine management systemreprogrammed.
A decal with tyre pressure data islocated in the driver’s door openingat the B-pillar.
Check and set the tyre pressure atthe ambient temperature in whichyou are intending to drive the vehicleand when the tyres are cold.
CHANGING A ROAD
WHEEL
Spare wheel
Your vehicle is equipped with eithera spare wheel or a tyre repair kit(ContiMobilityKit). See Tyre repairkit (page 217).
All vehicles
WARNINGS
Use only approved wheel andtyre sizes. Using other sizescould damage the vehicle and willmake the National Type Approvalinvalid.
If you change the diameter ofthe tyres from that fitted at thefactory, the speedometer may notdisplay the correct speed. Take thevehicle to your dealer to have theengine management systemreprogrammed.
Vehicles with a temporaryspare wheel
WARNINGS
If the spare wheel differs fromthe other fitted wheels, theserules must be followed:
Do not exceed 80 km/h (50mph).
Drive the shortest possibledistances.
Do not fit more than one sparewheel on your vehicle at anyone time.
Do not use snow chains on thistype of wheel.
Do not drive through anautomatic car wash.
211
Wheels and tyres
Page 214 of 278
Downloaded from www.Manualslib.com manuals search engine Vehicles with stability control
Vehicles with ESP may exhibit someunusual driving characteristics. Switchthe ESP off. See Using stabilitycontrol (page 161).
All vehicles
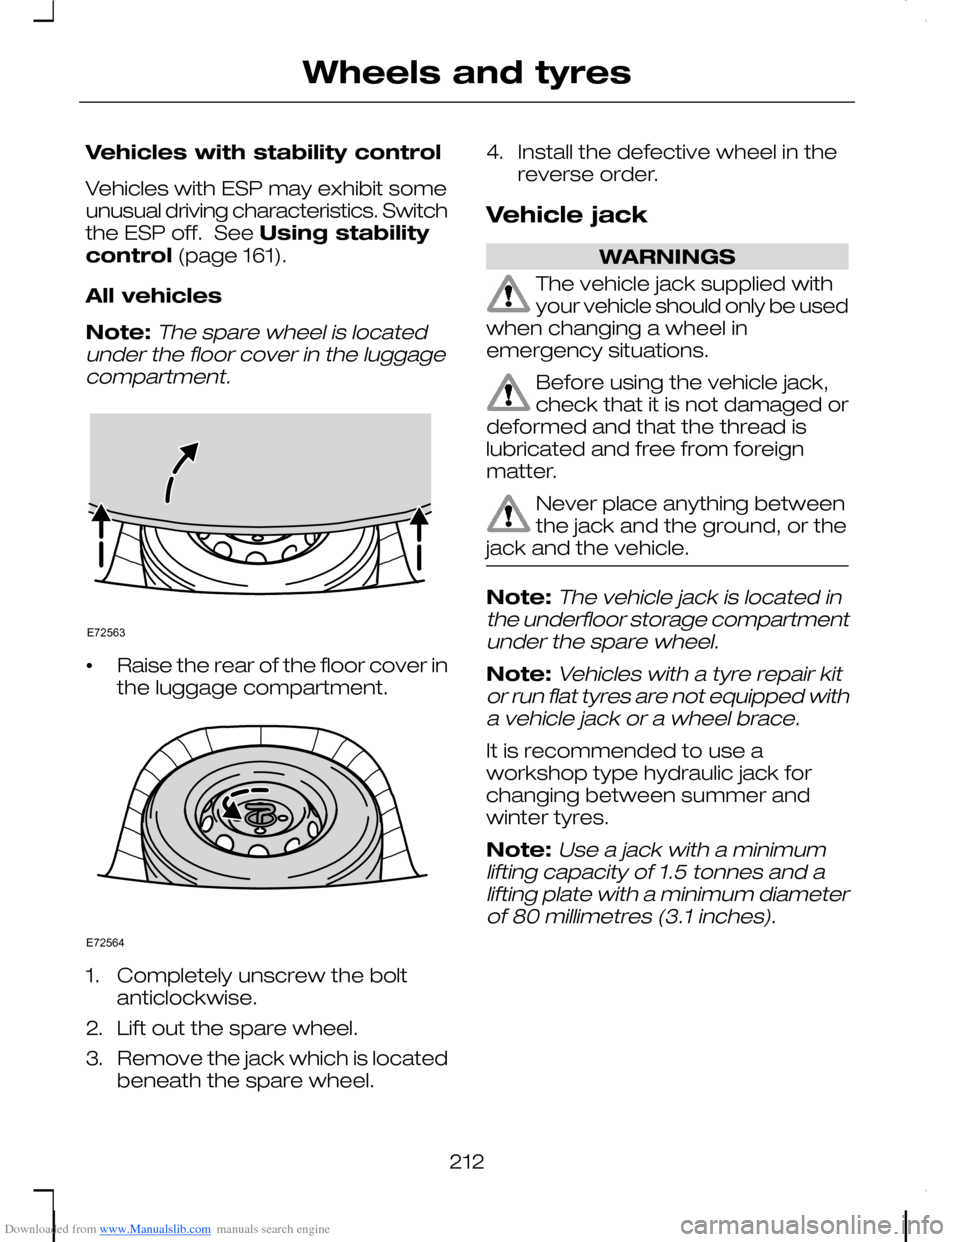
Note:The spare wheel is locatedunder the floor cover in the luggagecompartment.
•Raise the rear of the floor cover inthe luggage compartment.
1.Completely unscrew the boltanticlockwise.
2.Lift out the spare wheel.
3.Remove the jack which is locatedbeneath the spare wheel.
4.Install the defective wheel in thereverse order.
Vehicle jack
WARNINGS
The vehicle jack supplied withyour vehicle should only be usedwhen changing a wheel inemergency situations.
Before using the vehicle jack,check that it is not damaged ordeformed and that the thread islubricated and free from foreignmatter.
Never place anything betweenthe jack and the ground, or thejack and the vehicle.
Note:The vehicle jack is located inthe underfloor storage compartmentunder the spare wheel.
Note:Vehicles with a tyre repair kitor run flat tyres are not equipped witha vehicle jack or a wheel brace.
It is recommended to use aworkshop type hydraulic jack forchanging between summer andwinter tyres.
Note:Use a jack with a minimumlifting capacity of 1.5 tonnes and alifting plate with a minimum diameterof 80 millimetres (3.1 inches).
212
Wheels and tyresE72563 E72564
Page 215 of 278
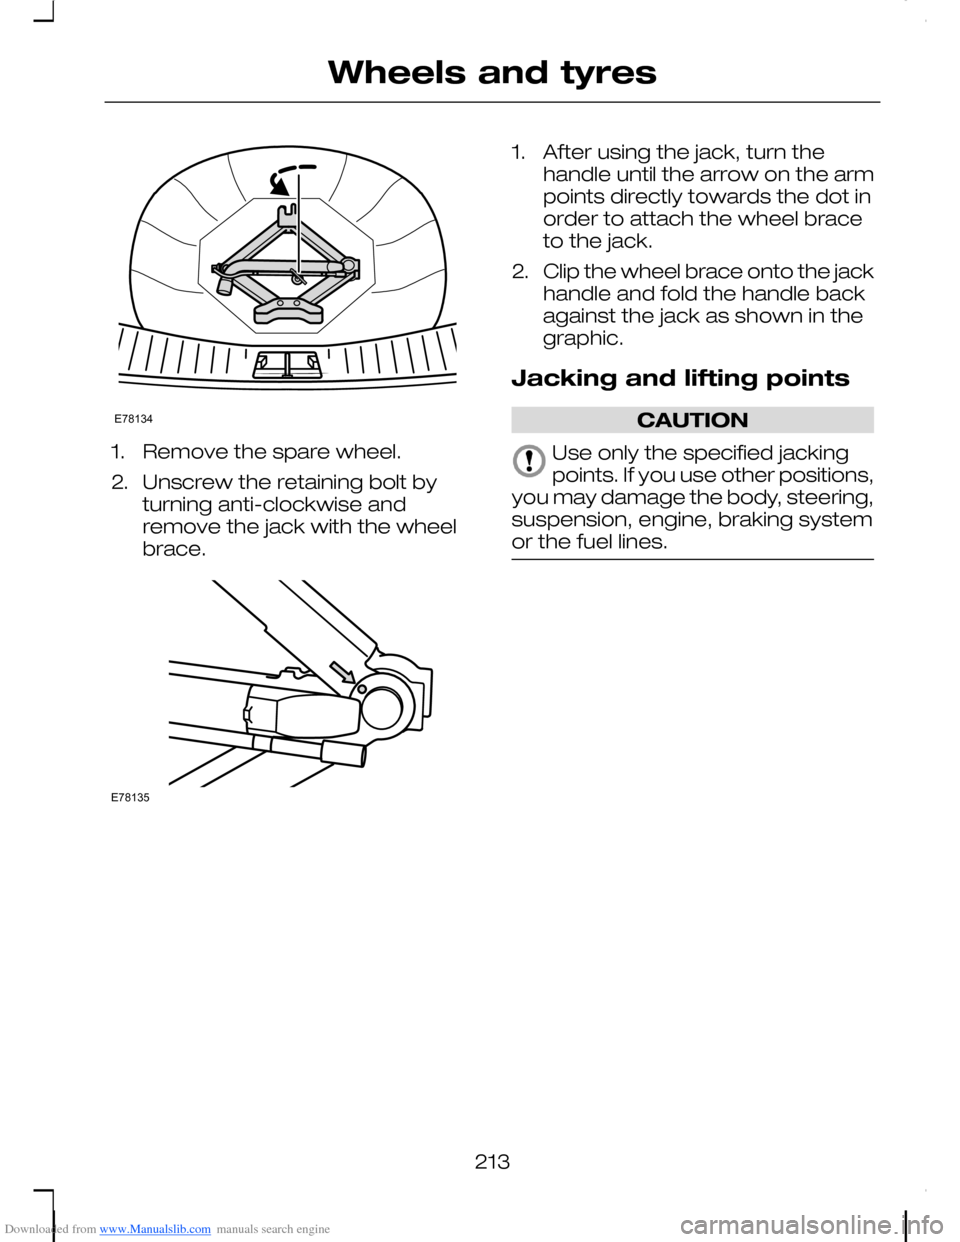
Downloaded from www.Manualslib.com manuals search engine 1.Remove the spare wheel.
2.Unscrew the retaining bolt byturning anti-clockwise andremove the jack with the wheelbrace.
1.After using the jack, turn thehandle until the arrow on the armpoints directly towards the dot inorder to attach the wheel braceto the jack.
2.Clip the wheel brace onto the jackhandle and fold the handle backagainst the jack as shown in thegraphic.
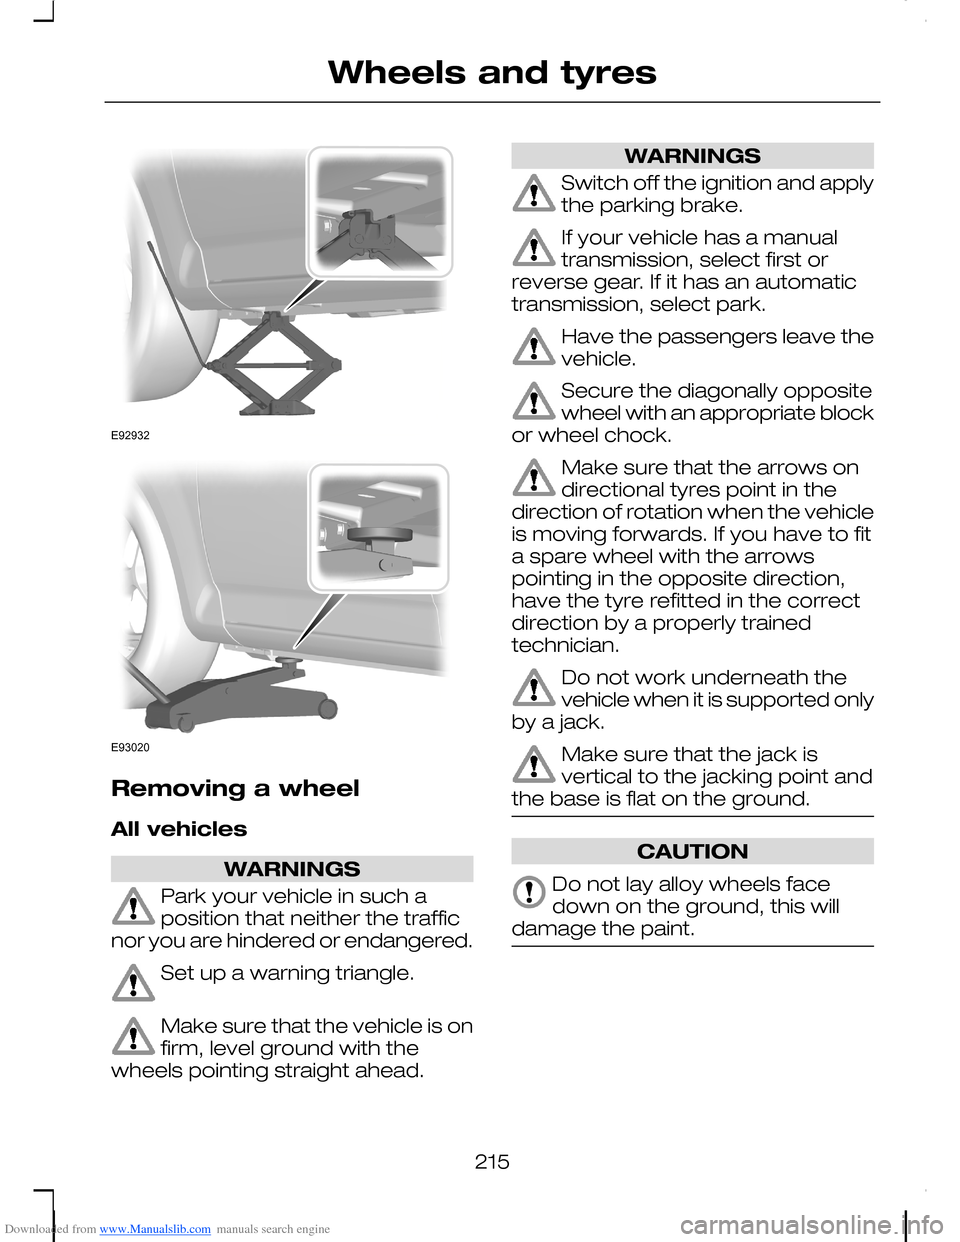
Jacking and lifting points
CAUTION
Use only the specified jackingpoints. If you use other positions,you may damage the body, steering,suspension, engine, braking systemor the fuel lines.
213
Wheels and tyresE78134 E78135
Page 217 of 278
Downloaded from www.Manualslib.com manuals search engine Removing a wheel
All vehicles
WARNINGS
Park your vehicle in such aposition that neither the trafficnor you are hindered or endangered.
Set up a warning triangle.
Make sure that the vehicle is onfirm, level ground with thewheels pointing straight ahead.
WARNINGS
Switch off the ignition and applythe parking brake.
If your vehicle has a manualtransmission, select first orreverse gear. If it has an automatictransmission, select park.
Have the passengers leave thevehicle.
Secure the diagonally oppositewheel with an appropriate blockor wheel chock.
Make sure that the arrows ondirectional tyres point in thedirection of rotation when the vehicleis moving forwards. If you have to fita spare wheel with the arrowspointing in the opposite direction,have the tyre refitted in the correctdirection by a properly trainedtechnician.
Do not work underneath thevehicle when it is supported onlyby a jack.
Make sure that the jack isvertical to the jacking point andthe base is flat on the ground.
CAUTION
Do not lay alloy wheels facedown on the ground, this willdamage the paint.
215
Wheels and tyresE92932 E93020
Page 219 of 278
Downloaded from www.Manualslib.com manuals search engine All vehicles
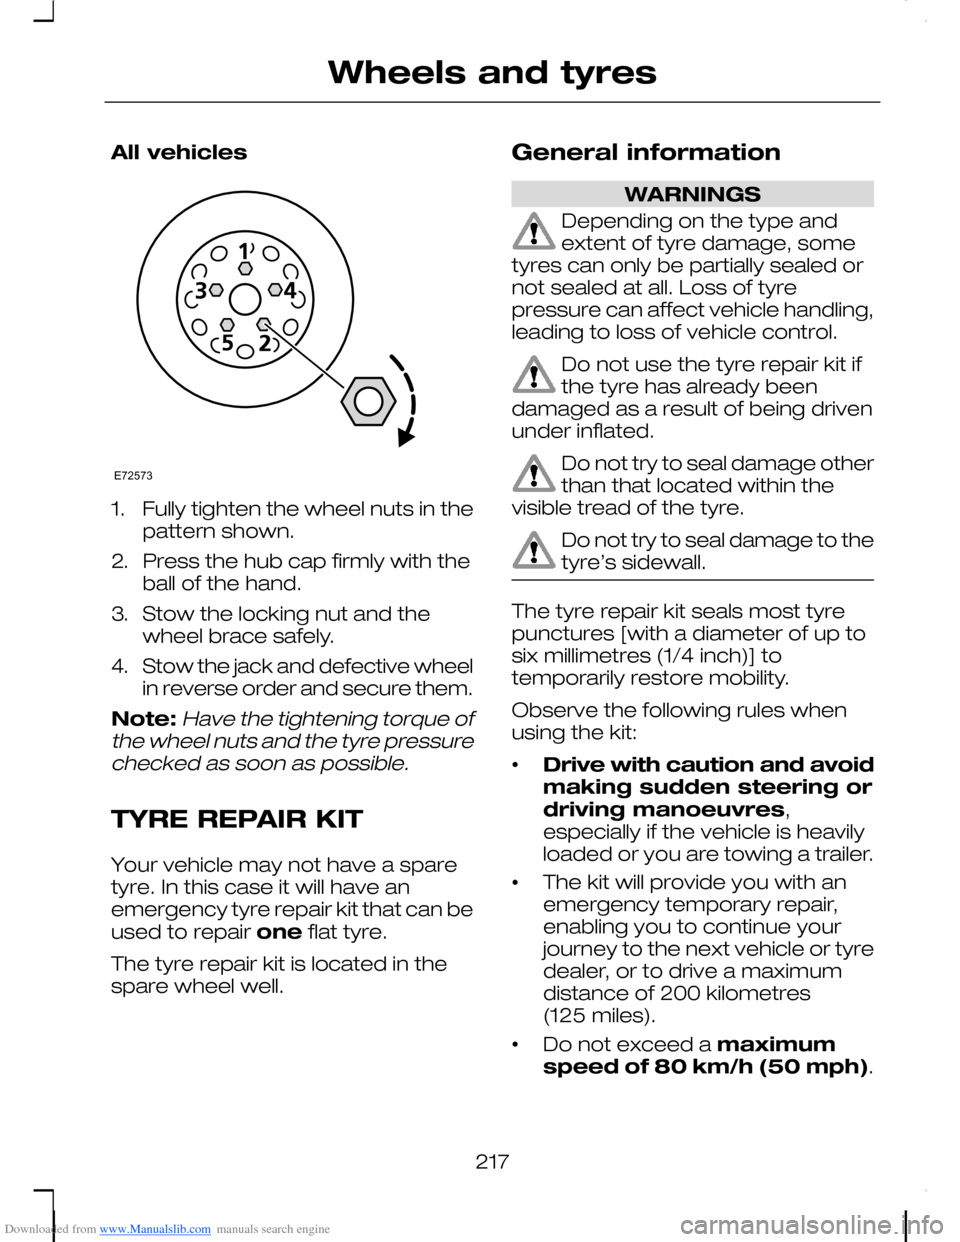
1.Fully tighten the wheel nuts in thepattern shown.
2.Press the hub cap firmly with theball of the hand.
3.Stow the locking nut and thewheel brace safely.
4.Stow the jack and defective wheelin reverse order and secure them.
Note:Have the tightening torque ofthe wheel nuts and the tyre pressurechecked as soon as possible.
TYRE REPAIR KIT
Your vehicle may not have a sparetyre. In this case it will have anemergency tyre repair kit that can beused to repair one flat tyre.
The tyre repair kit is located in thespare wheel well.
General information
WARNINGS
Depending on the type andextent of tyre damage, sometyres can only be partially sealed ornot sealed at all. Loss of tyrepressure can affect vehicle handling,leading to loss of vehicle control.
Do not use the tyre repair kit ifthe tyre has already beendamaged as a result of being drivenunder inflated.
Do not try to seal damage otherthan that located within thevisible tread of the tyre.
Do not try to seal damage to thetyre’s sidewall.
The tyre repair kit seals most tyrepunctures [with a diameter of up tosix millimetres (1/4 inch)] totemporarily restore mobility.
Observe the following rules whenusing the kit:
•Drive with caution and avoidmaking sudden steering ordriving manoeuvres,especially if the vehicle is heavilyloaded or you are towing a trailer.
•The kit will provide you with anemergency temporary repair,enabling you to continue yourjourney to the next vehicle or tyredealer, or to drive a maximumdistance of 200 kilometres(125 miles).
•Do not exceed a maximumspeed of 80 km/h (50 mph).
217
Wheels and tyresE72573
Page 225 of 278
Downloaded from www.Manualslib.com manuals search engine Empty sealant bottles can bedisposed of together with normalhousehold waste. Return remains ofsealant to your dealer or dispose ofit in compliance with local wastedisposal regulations.
TYRE CARE
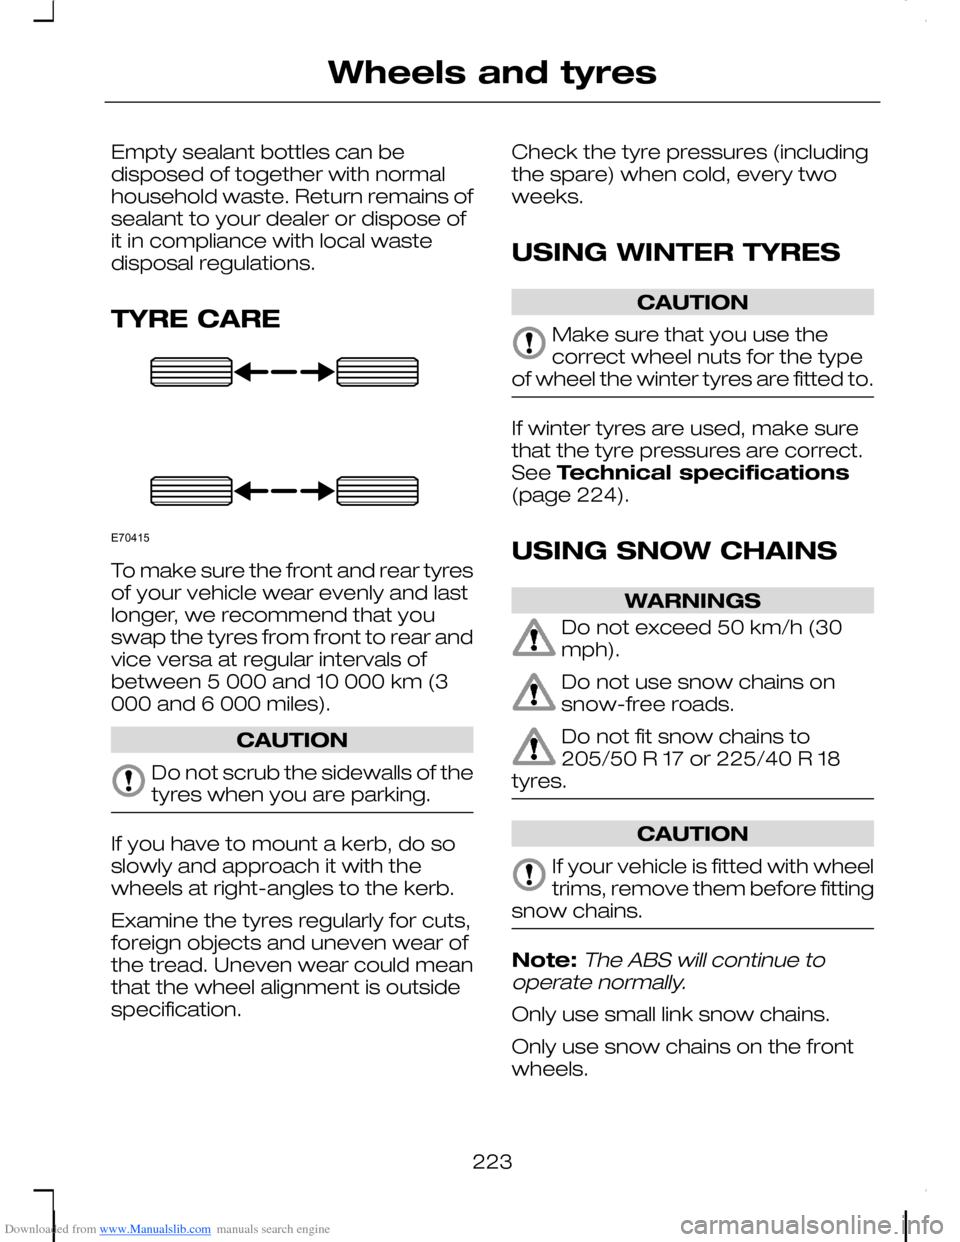
To make sure the front and rear tyresof your vehicle wear evenly and lastlonger, we recommend that youswap the tyres from front to rear andvice versa at regular intervals ofbetween 5 000 and 10 000 km (3000 and 6 000 miles).
CAUTION
Do not scrub the sidewalls of thetyres when you are parking.
If you have to mount a kerb, do soslowly and approach it with thewheels at right-angles to the kerb.
Examine the tyres regularly for cuts,foreign objects and uneven wear ofthe tread. Uneven wear could meanthat the wheel alignment is outsidespecification.
Check the tyre pressures (includingthe spare) when cold, every twoweeks.
USING WINTER TYRES
CAUTION
Make sure that you use thecorrect wheel nuts for the typeof wheel the winter tyres are fitted to.
If winter tyres are used, make surethat the tyre pressures are correct.See Technical specifications(page 224).
USING SNOW CHAINS
WARNINGS
Do not exceed 50 km/h (30mph).
Do not use snow chains onsnow-free roads.
Do not fit snow chains to205/50 R 17 or 225/40 R 18tyres.
CAUTION
If your vehicle is fitted with wheeltrims, remove them before fittingsnow chains.
Note:The ABS will continue tooperate normally.
Only use small link snow chains.
Only use snow chains on the frontwheels.
223
Wheels and tyresE70415
Page 226 of 278
Downloaded from www.Manualslib.com manuals search engine Vehicles with stabilitycontrol (ESP)
Vehicles with stability control (ESP)may exhibit some unusual drivingcharacteristics which can be avoidedby switching the system off. SeeStability control (page 160).
TECHNICAL SPECIFICATIONS
Wheel nut torque
130 NmSteel wheel nuts
130 NmFive spoke steel wheel nuts
130 NmAlloy wheel nuts
Up to 160 km/h (100 mph)
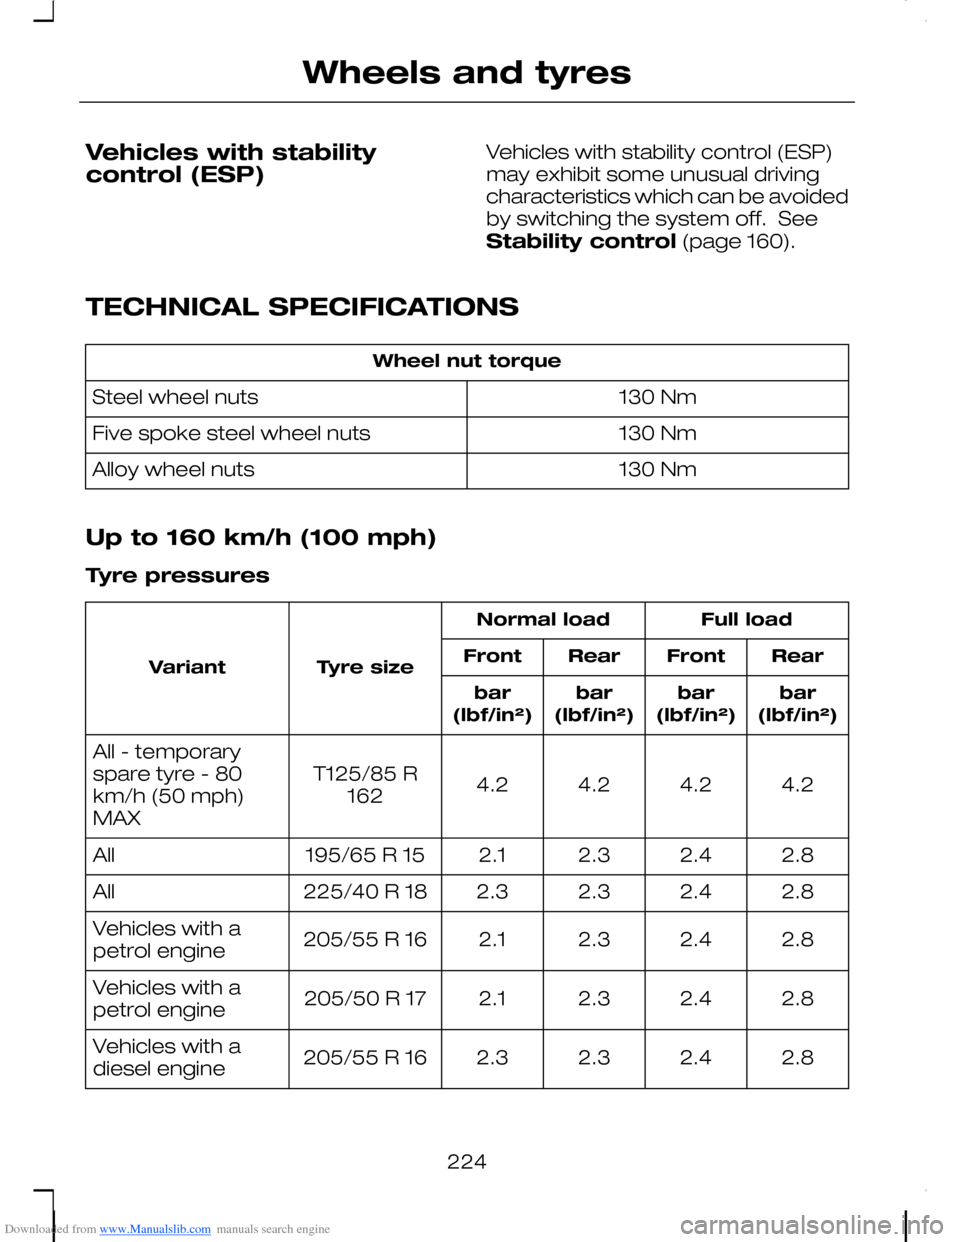
Tyre pressures
Full loadNormal load
Tyre sizeVariantRearFrontRearFront
bar(lbf/in²)bar(lbf/in²)bar(lbf/in²)bar(lbf/in²)
4.24.24.24.2T125/85 R162
All - temporaryspare tyre - 80km/h (50 mph)MAX
2.82.42.32.1195/65 R 15All
2.82.42.32.3225/40 R 18All
2.82.42.32.1205/55 R 16Vehicles with apetrol engine
2.82.42.32.1205/50 R 17Vehicles with apetrol engine
2.82.42.32.3205/55 R 16Vehicles with adiesel engine
224
Wheels and tyres
Page 268 of 278
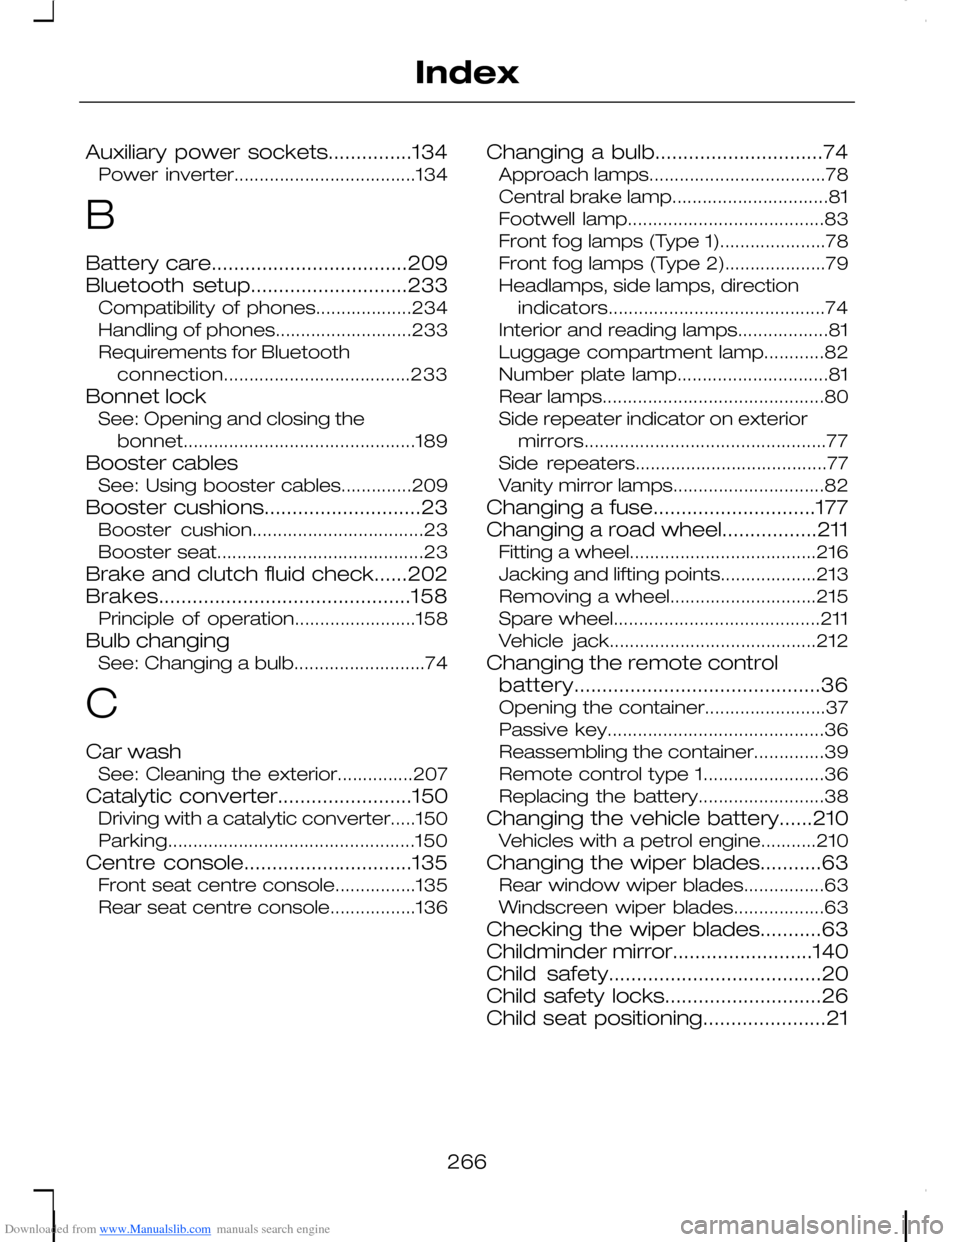
Downloaded from www.Manualslib.com manuals search engine Auxiliary power sockets...............134Power inverter....................................134
B
Battery care...................................209Bluetooth setup............................233Compatibility of phones...................234Handling of phones...........................233Requirements for Bluetoothconnection.....................................233
Bonnet lockSee: Opening and closing thebonnet..............................................189
Booster cablesSee: Using booster cables..............209
Booster cushions............................23Booster cushion..................................23Booster seat.........................................23
Brake and clutch fluid check......202Brakes.............................................158Principle of operation........................158
Bulb changingSee: Changing a bulb..........................74
C
Car washSee: Cleaning the exterior...............207
Catalytic converter........................150Driving with a catalytic converter.....150Parking.................................................150
Centre console..............................135Front seat centre console................135Rear seat centre console.................136
Changing a bulb..............................74Approach lamps...................................78Central brake lamp...............................81Footwell lamp.......................................83Front fog lamps (Type 1).....................78Front fog lamps (Type 2)....................79Headlamps, side lamps, directionindicators...........................................74Interior and reading lamps..................81Luggage compartment lamp............82Number plate lamp..............................81Rear lamps............................................80Side repeater indicator on exteriormirrors................................................77Side repeaters......................................77Vanity mirror lamps..............................82
Changing a fuse.............................177Changing a road wheel.................211Fitting a wheel.....................................216Jacking and lifting points...................213Removing a wheel.............................215Spare wheel.........................................211Vehicle jack.........................................212
Changing the remote controlbattery............................................36Opening the container........................37Passive key...........................................36Reassembling the container..............39Remote control type 1........................36Replacing the battery.........................38
Changing the vehicle battery......210Vehicles with a petrol engine...........210
Changing the wiper blades...........63Rear window wiper blades................63Windscreen wiper blades..................63
Checking the wiper blades...........63Childminder mirror.........................140Child safety......................................20Child safety locks............................26Child seat positioning......................21
266
Index