headlamp FORD C MAX 2011 2.G User Guide
[x] Cancel search | Manufacturer: FORD, Model Year: 2011, Model line: C MAX, Model: FORD C MAX 2011 2.GPages: 296, PDF Size: 7.87 MB
Page 63 of 296
Downloaded from www.Manualslib.com manuals search engine The cornering lamps illuminate the inside
of a corner when you are turning.
INTERIOR LAMPS
Interior lighting
Note:
Individual lamps may be switched on
independently, but not off if all lamps have
been switched on by the driver.
Note: All other lamps will be either
non-switchable or with individual reading
or dome lamp functionality only.
The lamps will come on when you unlock
or open a door or the luggage
compartment lid. If you leave a door open
with the ignition switch off, all lamps will
go off automatically after some time to
prevent the vehicle battery from
discharging. To switch them back on,
switch on the ignition for a short time.
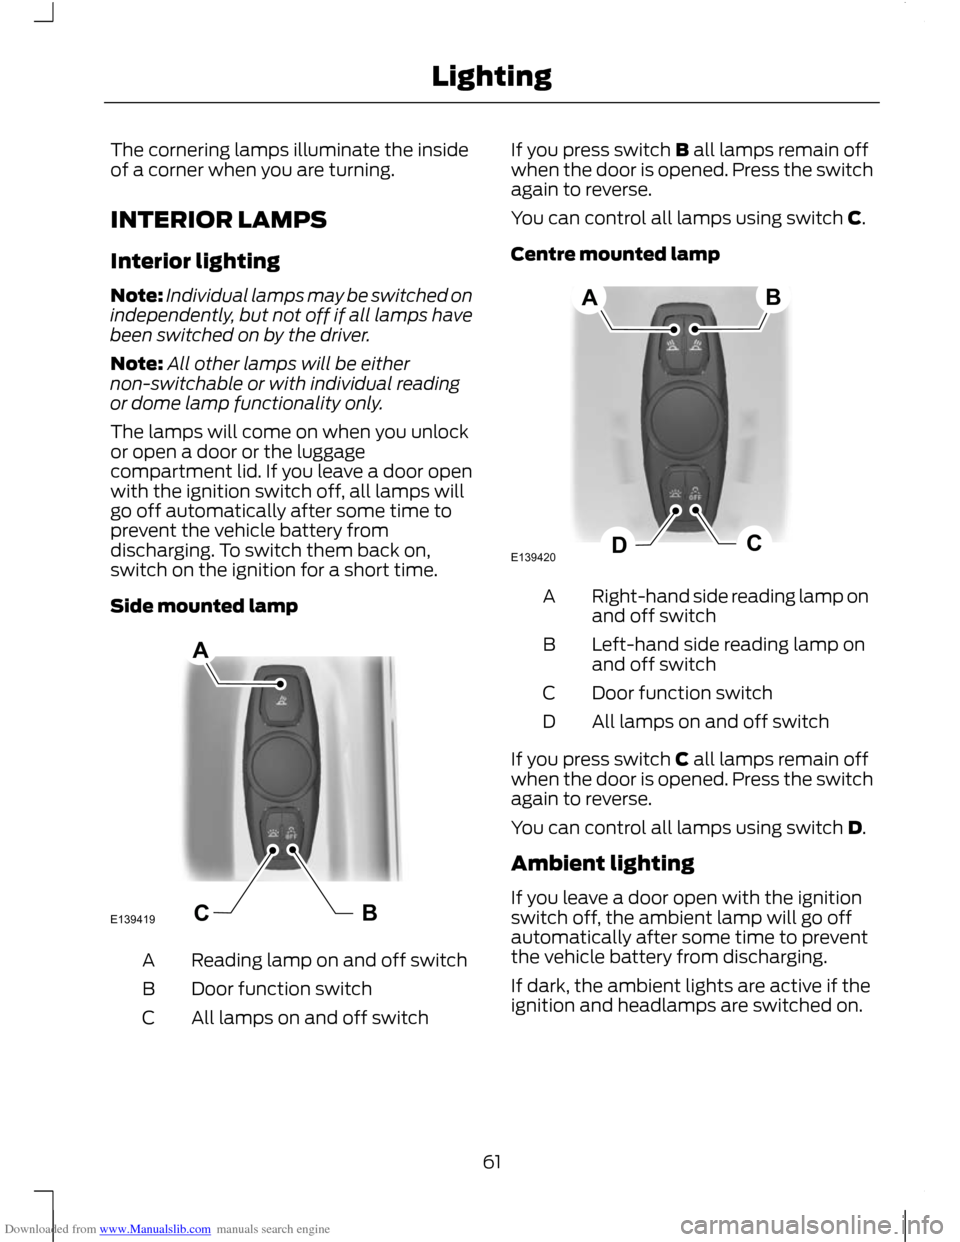
Side mounted lamp Reading lamp on and off switch
A
Door function switch
B
All lamps on and off switch
C If you press switch B all lamps remain off
when the door is opened. Press the switch
again to reverse.
You can control all lamps using switch C.
Centre mounted lamp
Right-hand side reading lamp on
and off switch
A
Left-hand side reading lamp on
and off switch
B
Door function switch
C
All lamps on and off switch
D
If you press switch C all lamps remain off
when the door is opened. Press the switch
again to reverse.
You can control all lamps using switch D.
Ambient lighting
If you leave a door open with the ignition
switch off, the ambient lamp will go off
automatically after some time to prevent
the vehicle battery from discharging.
If dark, the ambient lights are active if the
ignition and headlamps are switched on.
61
LightingBCE139419A E139420CDAB
Page 64 of 296
Downloaded from www.Manualslib.com manuals search engine Ambient lighting illuminates several areas,
for example footwells, cup holders and
doors with a single colour and can be
switched on and off using the information
display menu. See General Information
(page 83).
Use the instrument lighting dimmer
switches to adjust to the desired
brightness. See Instrument Lighting
Dimmer (page 122).
REMOVING A HEADLAMP
WARNING
Have Xenon bulbs changed by a
trained technician. There is a risk of
electric shock.
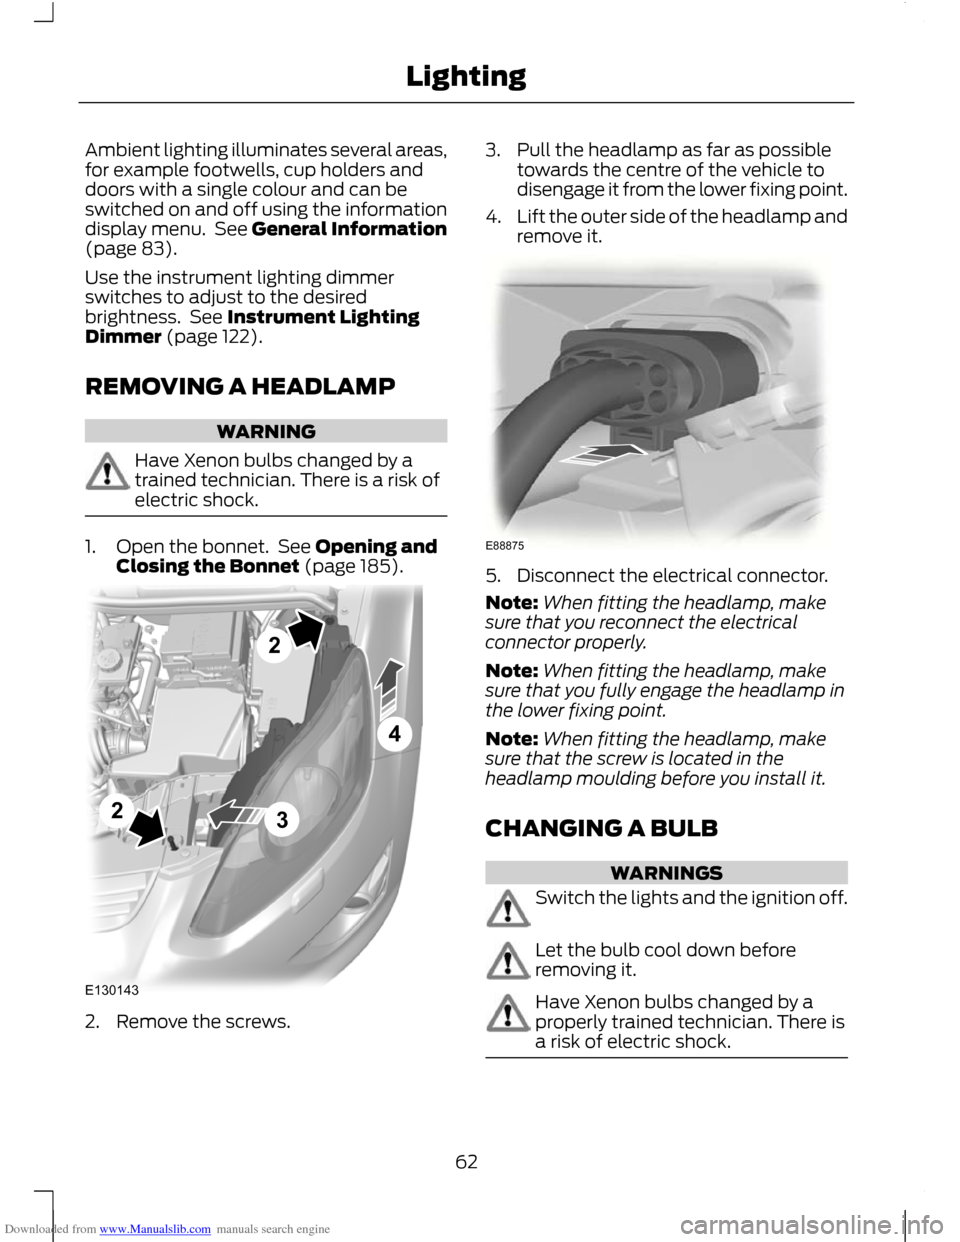
1. Open the bonnet. See Opening and
Closing the Bonnet (page 185). 2. Remove the screws. 3. Pull the headlamp as far as possible
towards the centre of the vehicle to
disengage it from the lower fixing point.
4. Lift the outer side of the headlamp and
remove it. 5. Disconnect the electrical connector.
Note:
When fitting the headlamp, make
sure that you reconnect the electrical
connector properly.
Note: When fitting the headlamp, make
sure that you fully engage the headlamp in
the lower fixing point.
Note: When fitting the headlamp, make
sure that the screw is located in the
headlamp moulding before you install it.
CHANGING A BULB WARNINGS
Switch the lights and the ignition off.
Let the bulb cool down before
removing it.
Have Xenon bulbs changed by a
properly trained technician. There is
a risk of electric shock.
62
LightingE1301432243 E88875
Page 65 of 296
Downloaded from www.Manualslib.com manuals search engine CAUTIONS
Do not touch the glass of the bulb.
Only fit bulbs of the correct
specification. See Bulb
Specification Chart (page 69).
Note:
The following instructions describe
how to remove the bulbs. Fit replacements
in the reverse order unless otherwise stated.
Headlamp
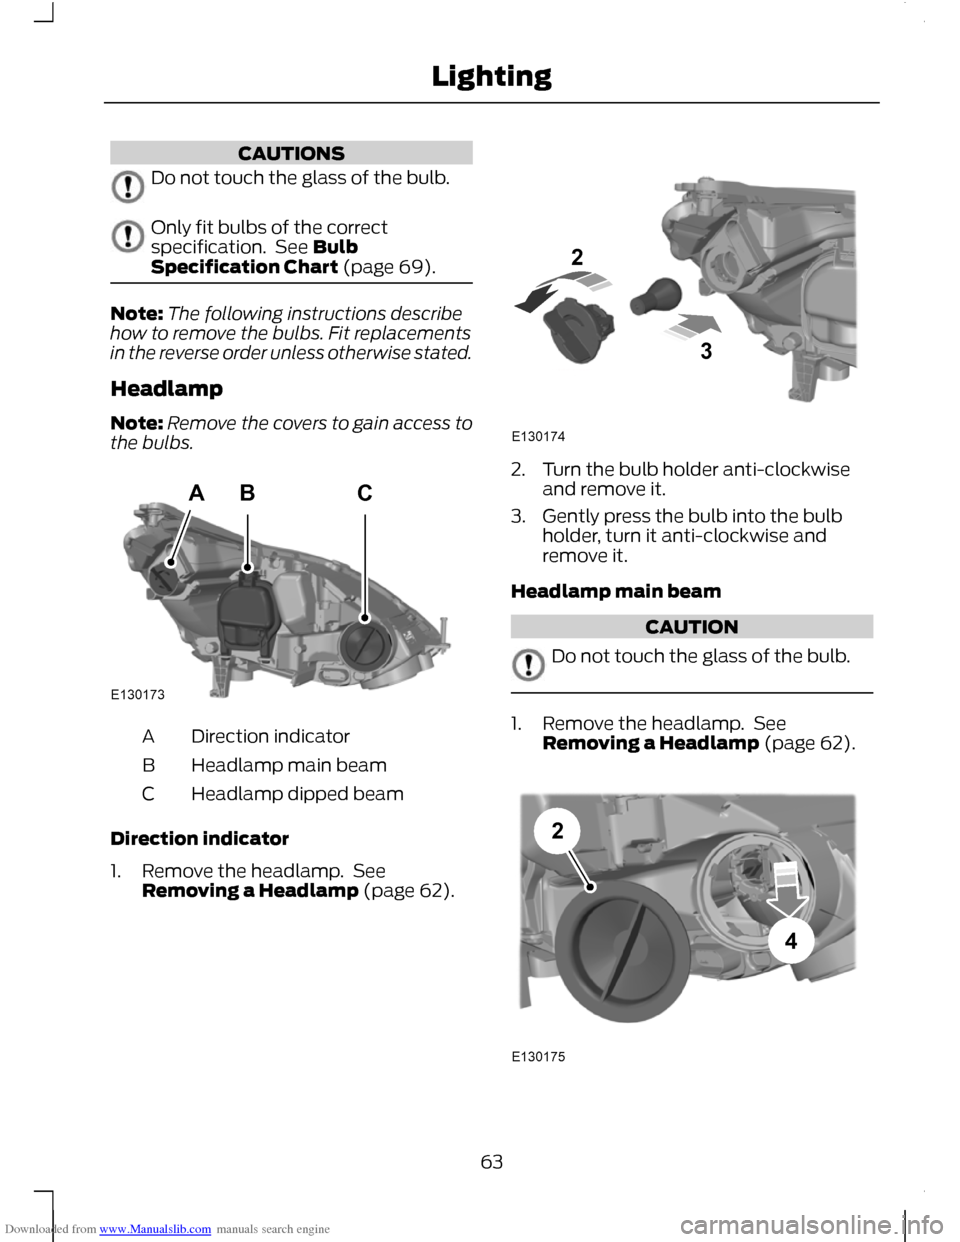
Note: Remove the covers to gain access to
the bulbs. Direction indicator
A
Headlamp main beam
B
Headlamp dipped beam
C
Direction indicator
1. Remove the headlamp. See Removing a Headlamp (page 62). 2. Turn the bulb holder anti-clockwise
and remove it.
3. Gently press the bulb into the bulb holder, turn it anti-clockwise and
remove it.
Headlamp main beam CAUTION
Do not touch the glass of the bulb.
1. Remove the headlamp. See
Removing a Headlamp (page 62). 63
LightingABCE130173 E13017423 E13017542
Page 66 of 296
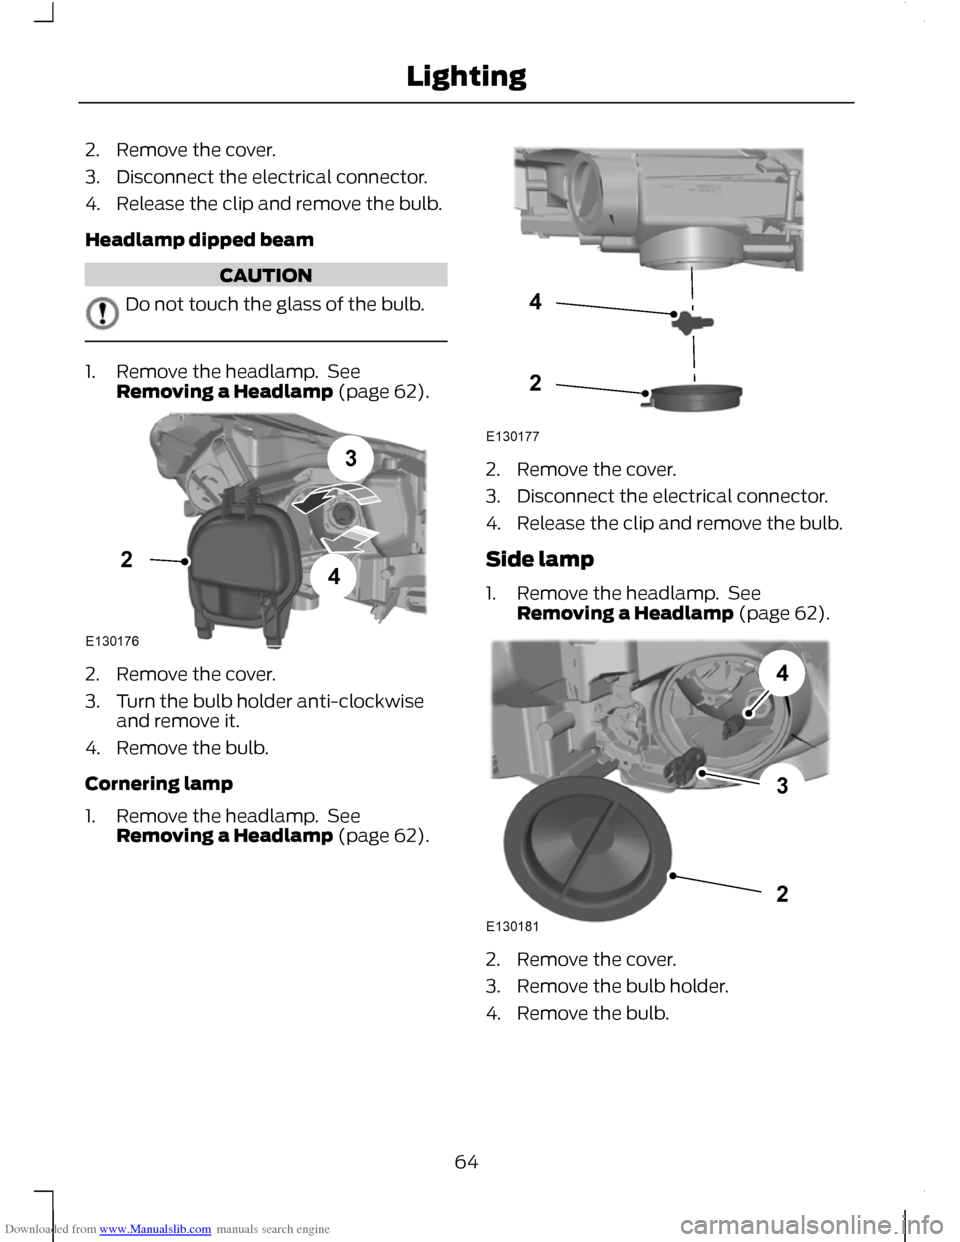
Downloaded from www.Manualslib.com manuals search engine 2. Remove the cover.
3. Disconnect the electrical connector.
4. Release the clip and remove the bulb.
Headlamp dipped beam
CAUTION
Do not touch the glass of the bulb.
1. Remove the headlamp. See
Removing a Headlamp (page 62). 2. Remove the cover.
3. Turn the bulb holder anti-clockwise
and remove it.
4. Remove the bulb.
Cornering lamp
1. Remove the headlamp. See Removing a Headlamp (page 62). 2. Remove the cover.
3. Disconnect the electrical connector.
4. Release the clip and remove the bulb.
Side lamp
1. Remove the headlamp. See
Removing a Headlamp (page 62). 2. Remove the cover.
3. Remove the bulb holder.
4. Remove the bulb.
64
LightingE130176342 E13017724 E130181234
Page 71 of 296
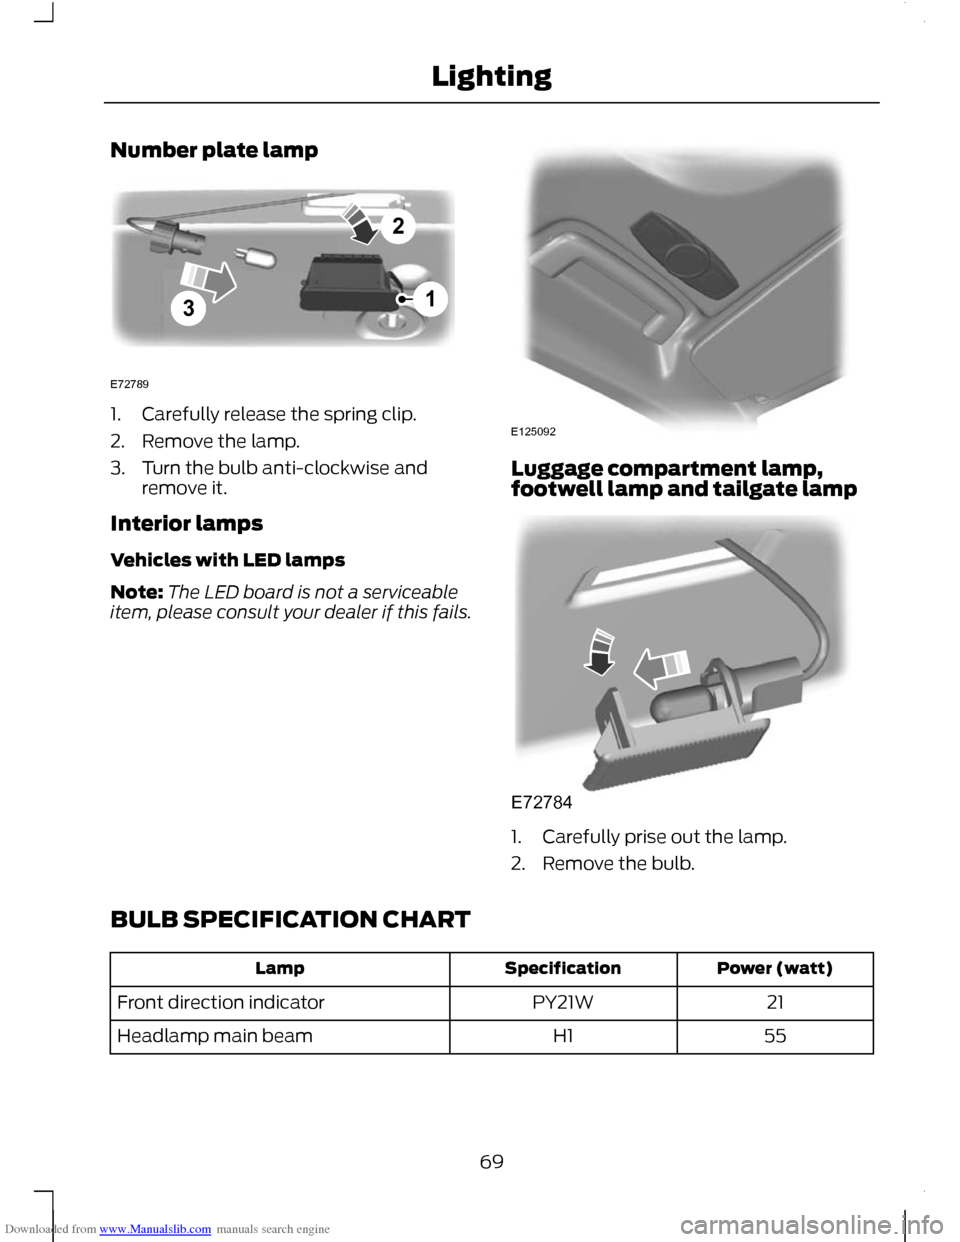
Downloaded from www.Manualslib.com manuals search engine Number plate lamp
1. Carefully release the spring clip.
2. Remove the lamp.
3. Turn the bulb anti-clockwise and
remove it.
Interior lamps
Vehicles with LED lamps
Note: The LED board is not a serviceable
item, please consult your dealer if this fails. Luggage compartment lamp,
footwell lamp and tailgate lamp
1. Carefully prise out the lamp.
2. Remove the bulb.
BULB SPECIFICATION CHART Power (watt)
Specification
Lamp
21
PY21W
Front direction indicator
55
H1
Headlamp main beam
69
Lighting321E72789 E125092 E72784
Page 72 of 296
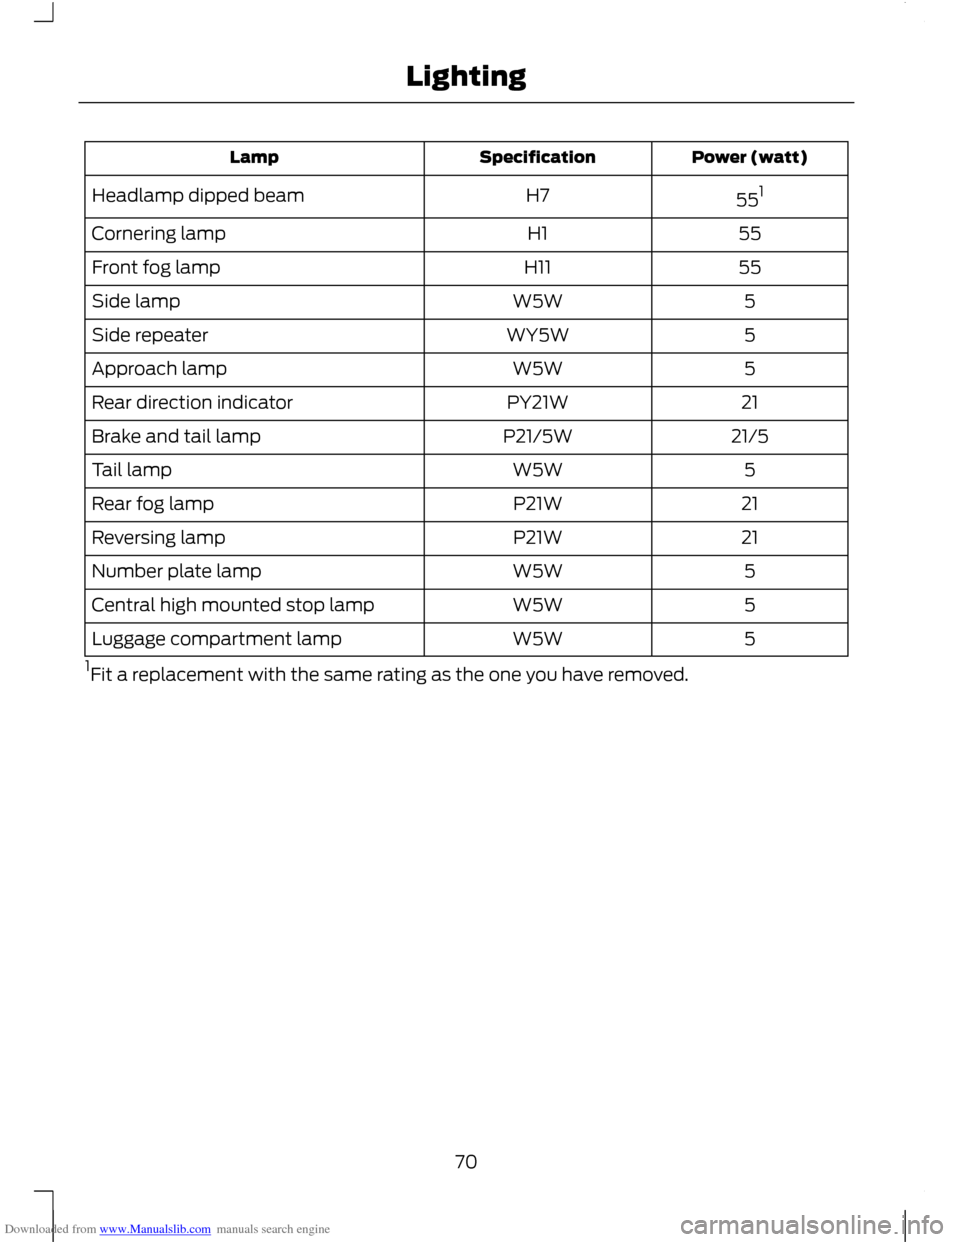
Downloaded from www.Manualslib.com manuals search engine Power (watt)
Specification
Lamp
551
H7
Headlamp dipped beam
55
H1
Cornering lamp
55
H11
Front fog lamp
5
W5W
Side lamp
5
WY5W
Side repeater
5
W5W
Approach lamp
21
PY21W
Rear direction indicator
21/5
P21/5W
Brake and tail lamp
5
W5W
Tail lamp
21
P21W
Rear fog lamp
21
P21W
Reversing lamp
5
W5W
Number plate lamp
5
W5W
Central high mounted stop lamp
5
W5W
Luggage compartment lamp
1 Fit a replacement with the same rating as the one you have removed.
70
Lighting
Page 82 of 296
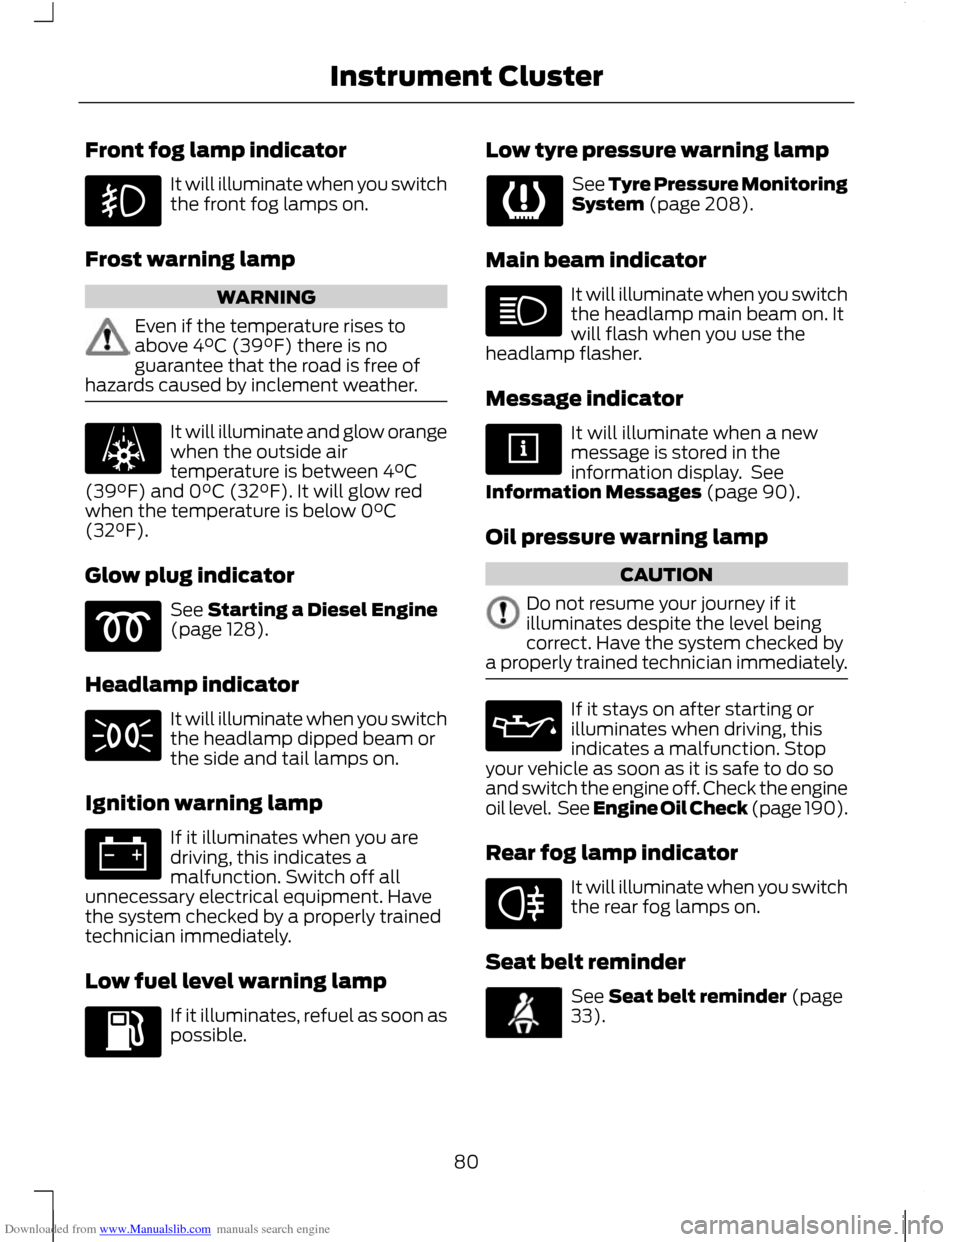
Downloaded from www.Manualslib.com manuals search engine Front fog lamp indicator
It will illuminate when you switch
the front fog lamps on.
Frost warning lamp WARNING
Even if the temperature rises to
above 4°C (39°F) there is no
guarantee that the road is free of
hazards caused by inclement weather. It will illuminate and glow orange
when the outside air
temperature is between 4°C
(39°F) and 0°C (32°F). It will glow red
when the temperature is below 0°C
(32°F).
Glow plug indicator See Starting a Diesel Engine
(page 128).
Headlamp indicator It will illuminate when you switch
the headlamp dipped beam or
the side and tail lamps on.
Ignition warning lamp If it illuminates when you are
driving, this indicates a
malfunction. Switch off all
unnecessary electrical equipment. Have
the system checked by a properly trained
technician immediately.
Low fuel level warning lamp If it illuminates, refuel as soon as
possible. Low tyre pressure warning lamp See Tyre Pressure Monitoring
System (page 208).
Main beam indicator It will illuminate when you switch
the headlamp main beam on. It
will flash when you use the
headlamp flasher.
Message indicator It will illuminate when a new
message is stored in the
information display. See
Information Messages (page 90).
Oil pressure warning lamp CAUTION
Do not resume your journey if it
illuminates despite the level being
correct. Have the system checked by
a properly trained technician immediately. If it stays on after starting or
illuminates when driving, this
indicates a malfunction. Stop
your vehicle as soon as it is safe to do so
and switch the engine off. Check the engine
oil level. See Engine Oil Check (page 190).
Rear fog lamp indicator It will illuminate when you switch
the rear fog lamps on.
Seat belt reminder See Seat belt reminder (page
33).
80
Instrument Cluster
Page 96 of 296
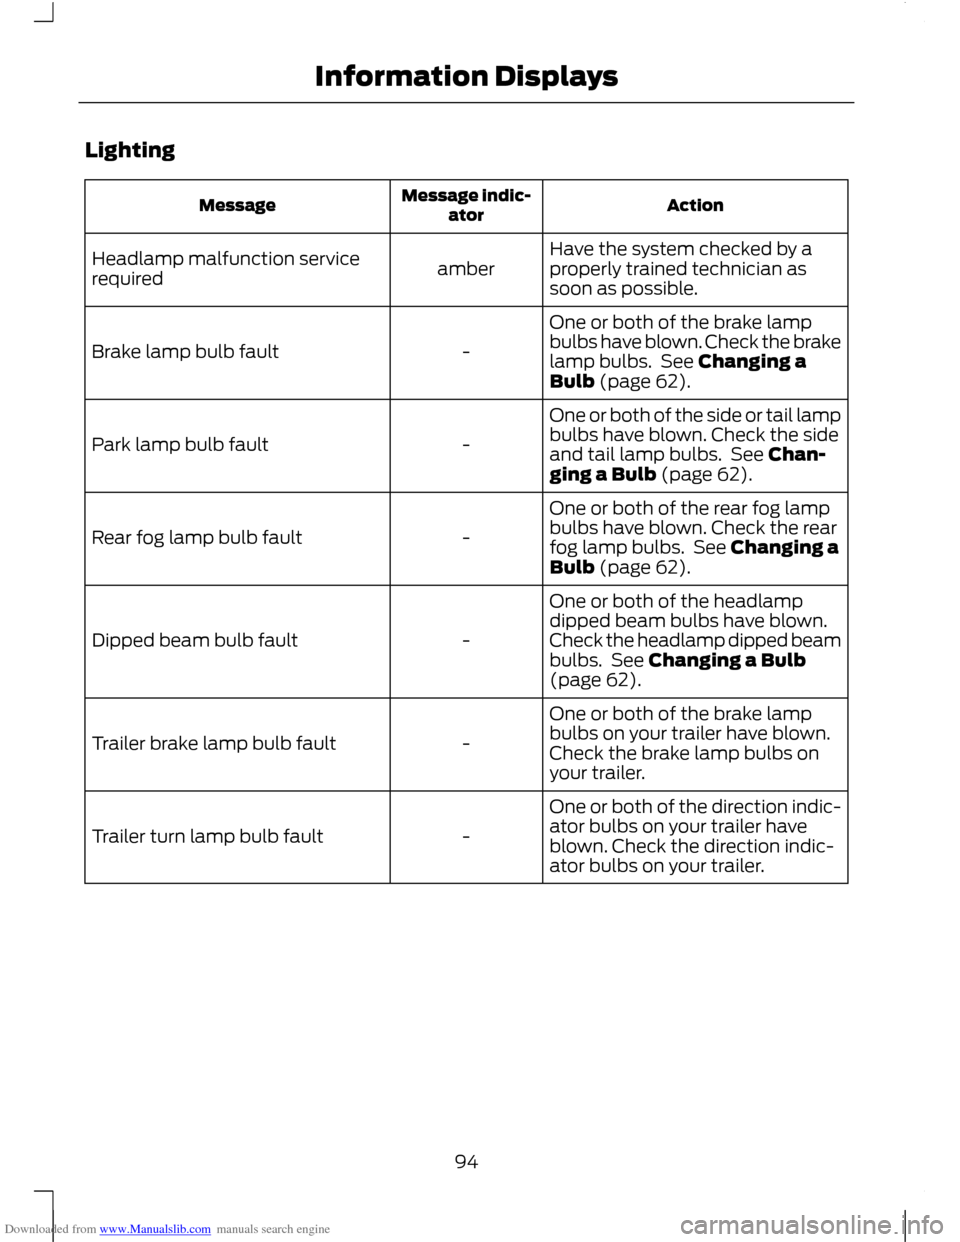
Downloaded from www.Manualslib.com manuals search engine Lighting
Action
Message indic-
ator
Message
Have the system checked by a
properly trained technician as
soon as possible.
amber
Headlamp malfunction service
required
One or both of the brake lamp
bulbs have blown. Check the brake
lamp bulbs. See Changing a
Bulb (page 62).
-
Brake lamp bulb fault
One or both of the side or tail lamp
bulbs have blown. Check the side
and tail lamp bulbs. See Chan-
ging a Bulb (page 62).
-
Park lamp bulb fault
One or both of the rear fog lamp
bulbs have blown. Check the rear
fog lamp bulbs. See Changing a
Bulb (page 62).
-
Rear fog lamp bulb fault
One or both of the headlamp
dipped beam bulbs have blown.
Check the headlamp dipped beam
bulbs. See Changing a Bulb
(page 62).
-
Dipped beam bulb fault
One or both of the brake lamp
bulbs on your trailer have blown.
Check the brake lamp bulbs on
your trailer.
-
Trailer brake lamp bulb fault
One or both of the direction indic-
ator bulbs on your trailer have
blown. Check the direction indic-
ator bulbs on your trailer.
-
Trailer turn lamp bulb fault
94
Information Displays
Page 177 of 296
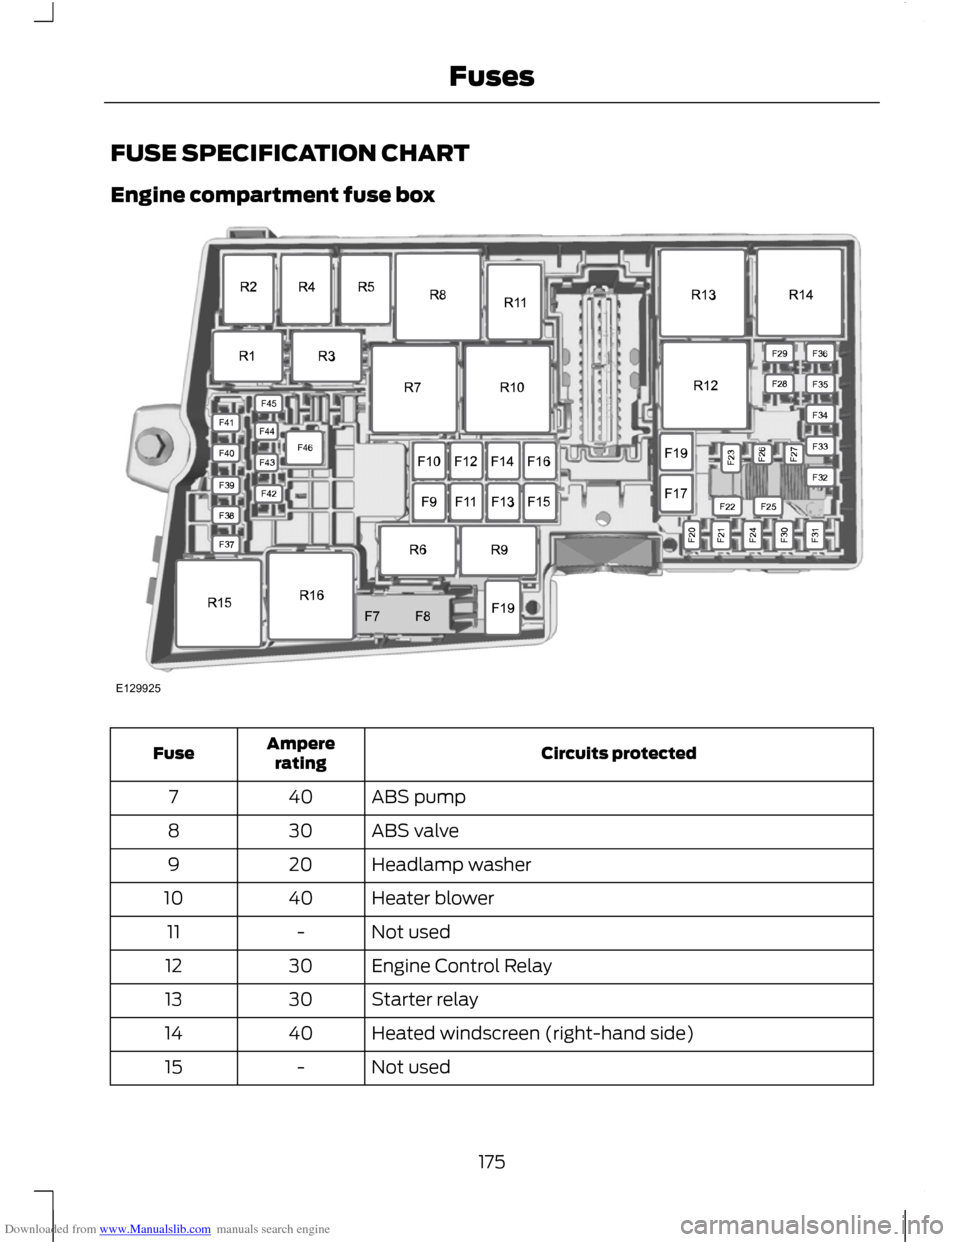
Downloaded from www.Manualslib.com manuals search engine FUSE SPECIFICATION CHART
Engine compartment fuse box
Circuits protected
Ampere
rating
Fuse
ABS pump
40
7
ABS valve
30
8
Headlamp washer
20
9
Heater blower
40
10
Not used
-
11
Engine Control Relay
30
12
Starter relay
30
13
Heated windscreen (right-hand side)
40
14
Not used
-
15
175
FusesE129925
Page 178 of 296
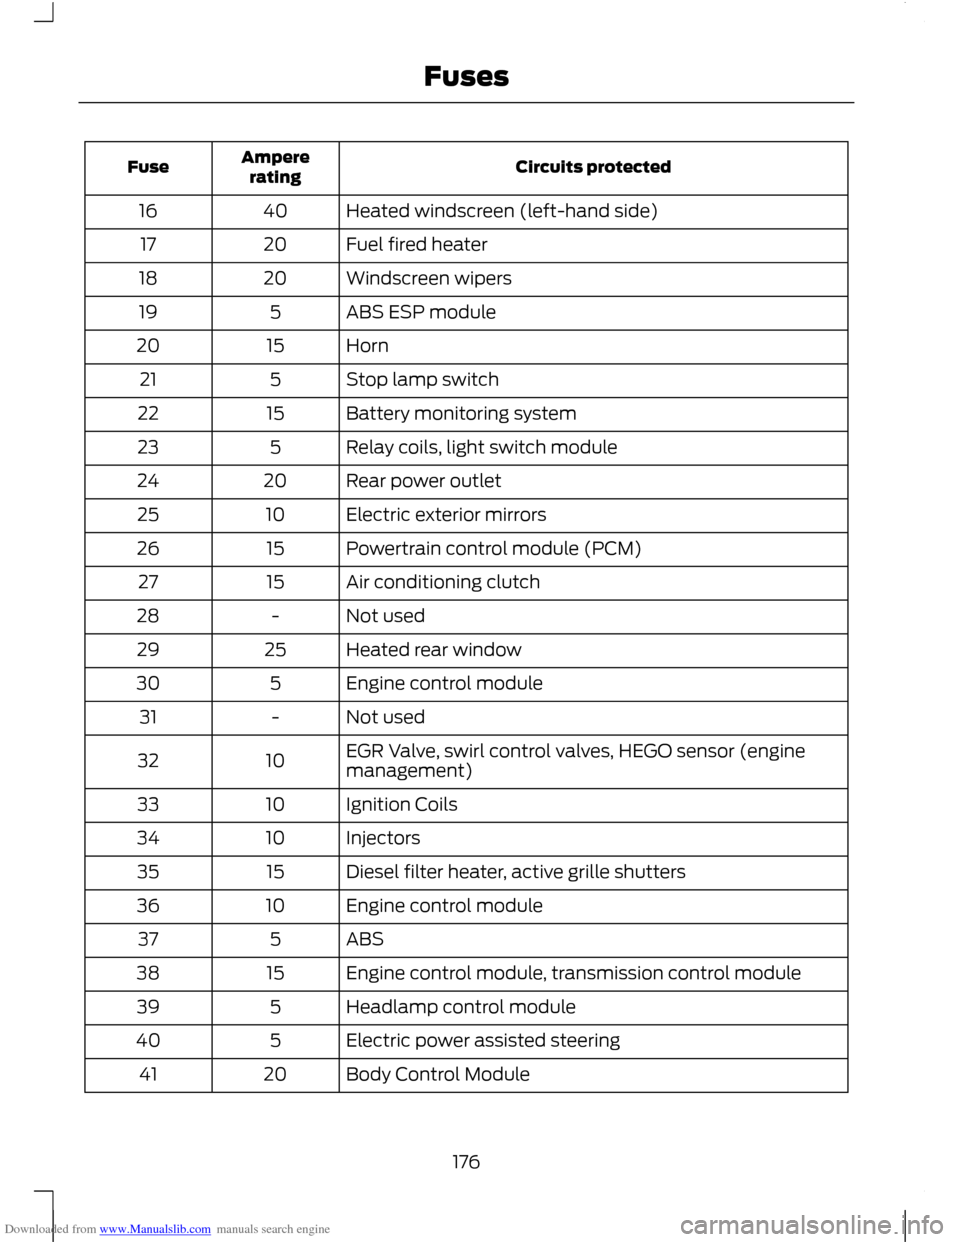
Downloaded from www.Manualslib.com manuals search engine Circuits protected
Ampere
rating
Fuse
Heated windscreen (left-hand side)
40
16
Fuel fired heater
20
17
Windscreen wipers
20
18
ABS ESP module
5
19
Horn
15
20
Stop lamp switch
5
21
Battery monitoring system
15
22
Relay coils, light switch module
5
23
Rear power outlet
20
24
Electric exterior mirrors
10
25
Powertrain control module (PCM)
15
26
Air conditioning clutch
15
27
Not used
-
28
Heated rear window
25
29
Engine control module
5
30
Not used
-
31
EGR Valve, swirl control valves, HEGO sensor (engine
management)
10
32
Ignition Coils
10
33
Injectors
10
34
Diesel filter heater, active grille shutters
15
35
Engine control module
10
36
ABS
5
37
Engine control module, transmission control module
15
38
Headlamp control module
5
39
Electric power assisted steering
5
40
Body Control Module
20
41
176
Fuses