light FORD C MAX 2011 2.G User Guide
[x] Cancel search | Manufacturer: FORD, Model Year: 2011, Model line: C MAX, Model: FORD C MAX 2011 2.GPages: 296, PDF Size: 7.87 MB
Page 59 of 296
Downloaded from www.Manualslib.com manuals search engine LIGHTING CONTROL
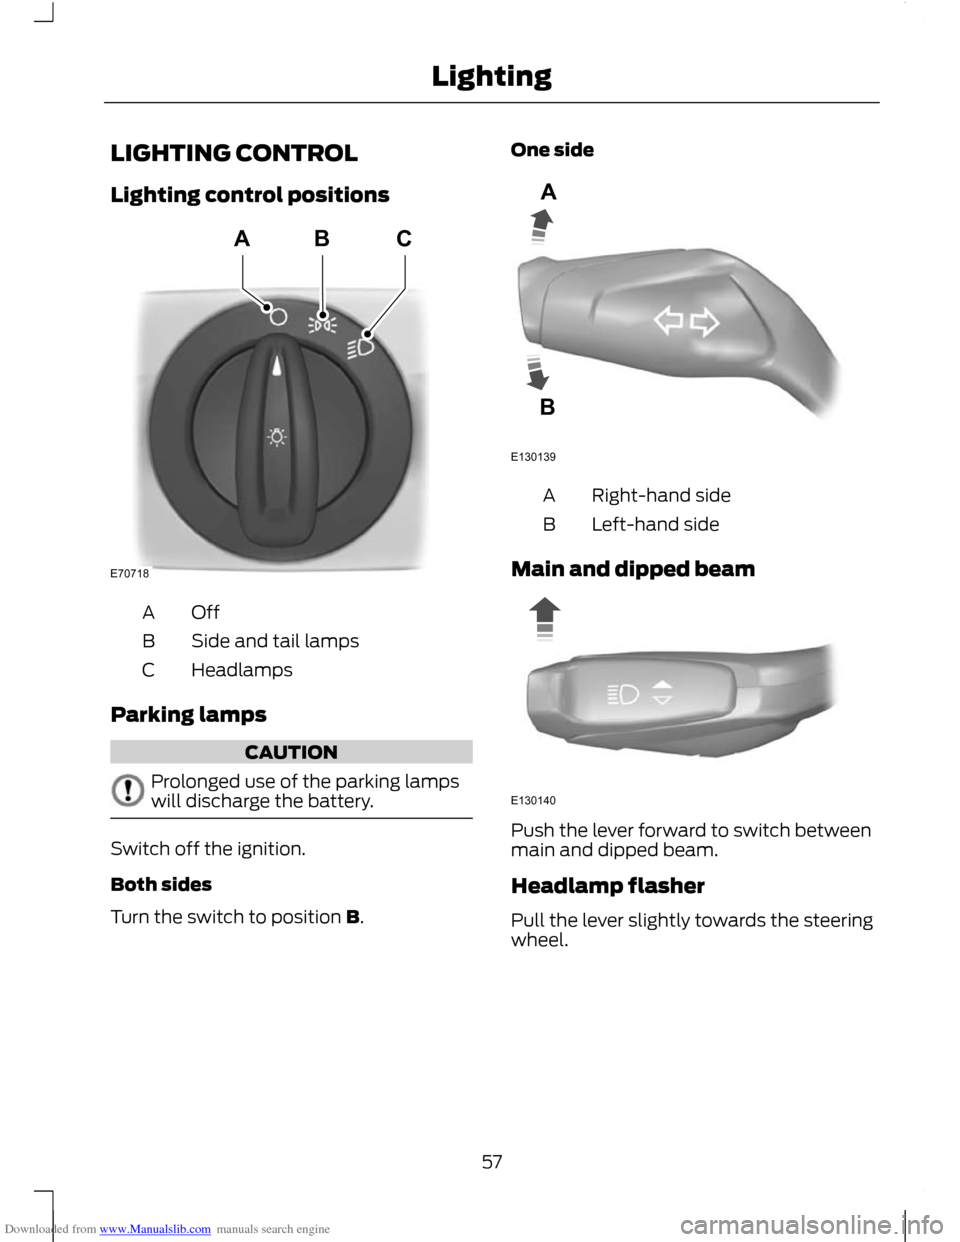
Lighting control positions
OffA
Side and tail lamps
B
Headlamps
C
Parking lamps CAUTION
Prolonged use of the parking lamps
will discharge the battery.
Switch off the ignition.
Both sides
Turn the switch to position B. One side
Right-hand side
A
Left-hand side
B
Main and dipped beam Push the lever forward to switch between
main and dipped beam.
Headlamp flasher
Pull the lever slightly towards the steering
wheel.
57
LightingE70718ABC E130139AB E130140
Page 60 of 296
Downloaded from www.Manualslib.com manuals search engine Home safe lighting
Switch the ignition off and pull the
direction indicator lever towards the
steering wheel to switch the headlamps
on. You will hear a short tone. The
headlamps will go off automatically after
three minutes with any door open, or 30
seconds after the last door has been
closed.
The home safe lights can be cancelled by
either pulling the direction indicator lever
towards the steering wheel again or by
turning the ignition switch ON.
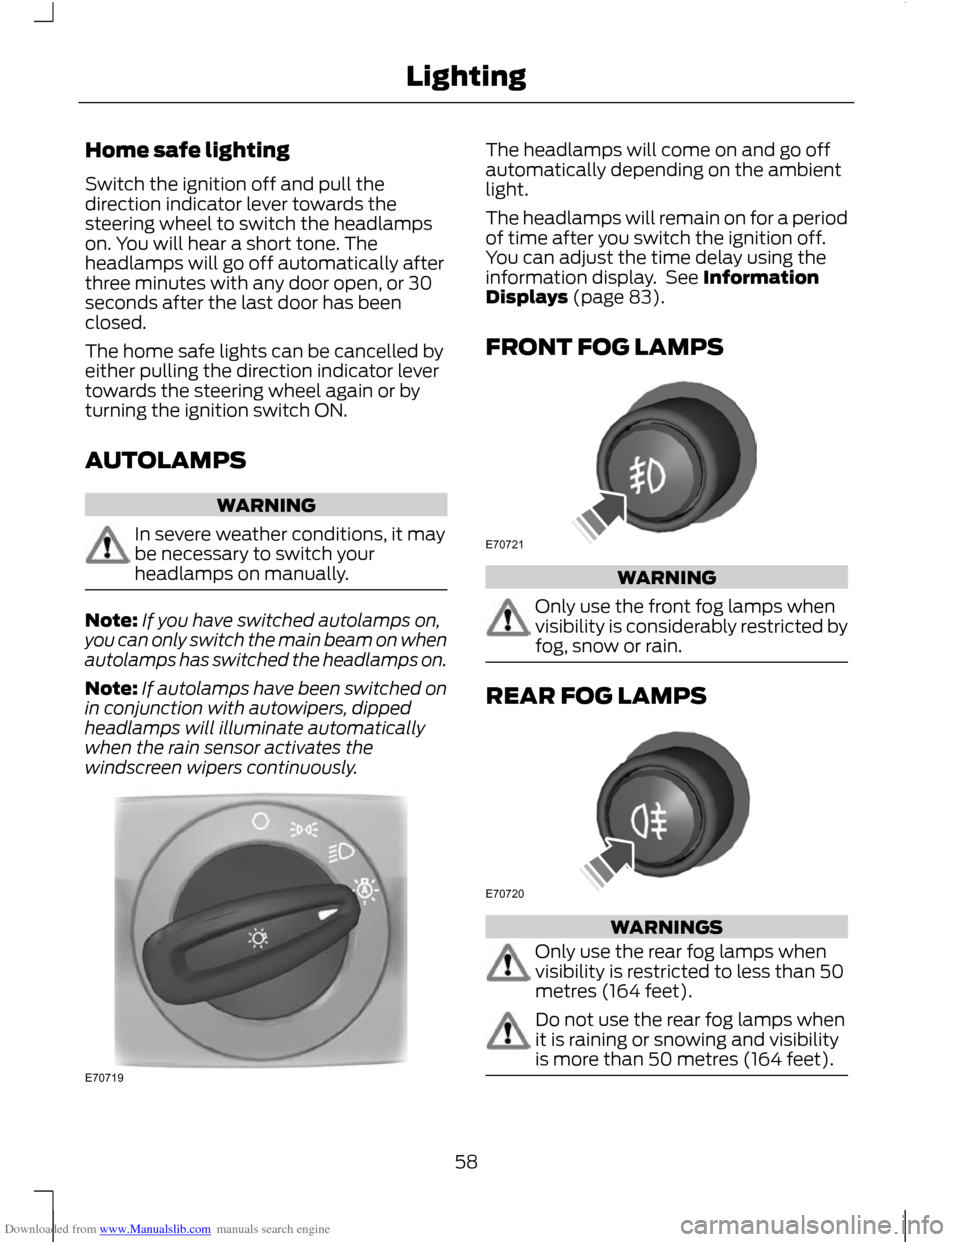
AUTOLAMPS
WARNING
In severe weather conditions, it may
be necessary to switch your
headlamps on manually.
Note:
If you have switched autolamps on,
you can only switch the main beam on when
autolamps has switched the headlamps on.
Note: If autolamps have been switched on
in conjunction with autowipers, dipped
headlamps will illuminate automatically
when the rain sensor activates the
windscreen wipers continuously. The headlamps will come on and go off
automatically depending on the ambient
light.
The headlamps will remain on for a period
of time after you switch the ignition off.
You can adjust the time delay using the
information display. See Information
Displays (page 83).
FRONT FOG LAMPS
WARNING
Only use the front fog lamps when
visibility is considerably restricted by
fog, snow or rain.
REAR FOG LAMPS
WARNINGS
Only use the rear fog lamps when
visibility is restricted to less than 50
metres (164 feet).
Do not use the rear fog lamps when
it is raining or snowing and visibility
is more than 50 metres (164 feet).
58
LightingE70719 E70721 E70720
Page 61 of 296
Downloaded from www.Manualslib.com manuals search engine ADJUSTING THE HEADLAMPS
- VEHICLES WITH: ADAPTIVE
FRONT LIGHTING/XENON
HEADLAMPS
To adjust the headlamps for driving on the
left or right hand side of the road, see your
dealer.
HEADLAMP LEVELLING
Note:
Vehicles with Xenon headlamps are
equipped with automatic headlamp
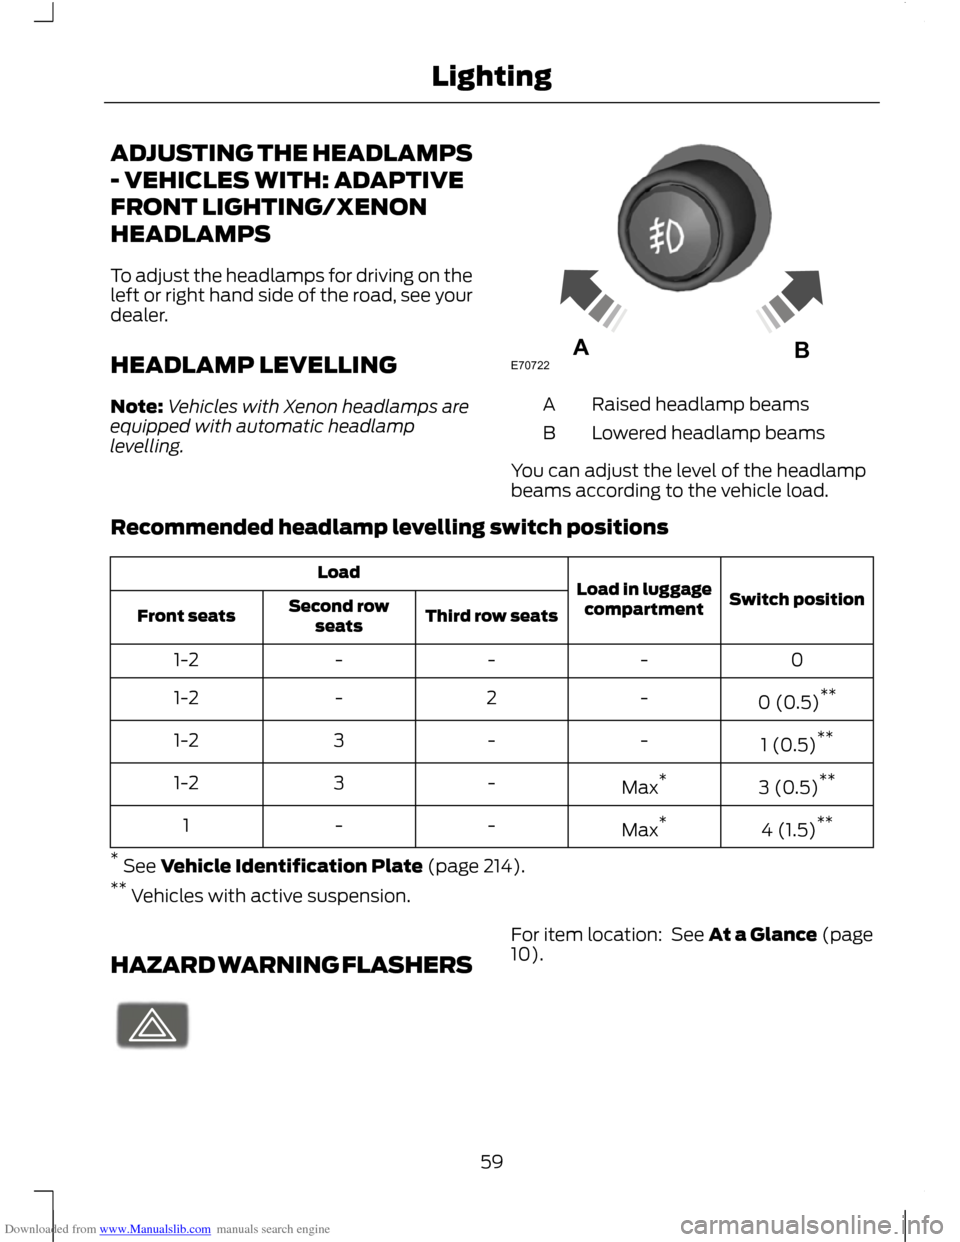
levelling. Raised headlamp beams
A
Lowered headlamp beams
B
You can adjust the level of the headlamp
beams according to the vehicle load.
Recommended headlamp levelling switch positions Switch position
Load in luggage
compartment
Load
Third row seats
Second row
seats
Front seats
0
-
-
-
1-2
0 (0.5)**
-
2
-
1-2
1 (0.5)**
-
-
3
1-2
3 (0.5)**
Max *
-
3
1-2
4 (1.5)**
Max *
-
-
1
* See Vehicle Identification Plate (page 214).
** Vehicles with active suspension.
HAZARD WARNING FLASHERS For item location: See At a Glance (page
10).
59
LightingE70722AB E71943
Page 62 of 296
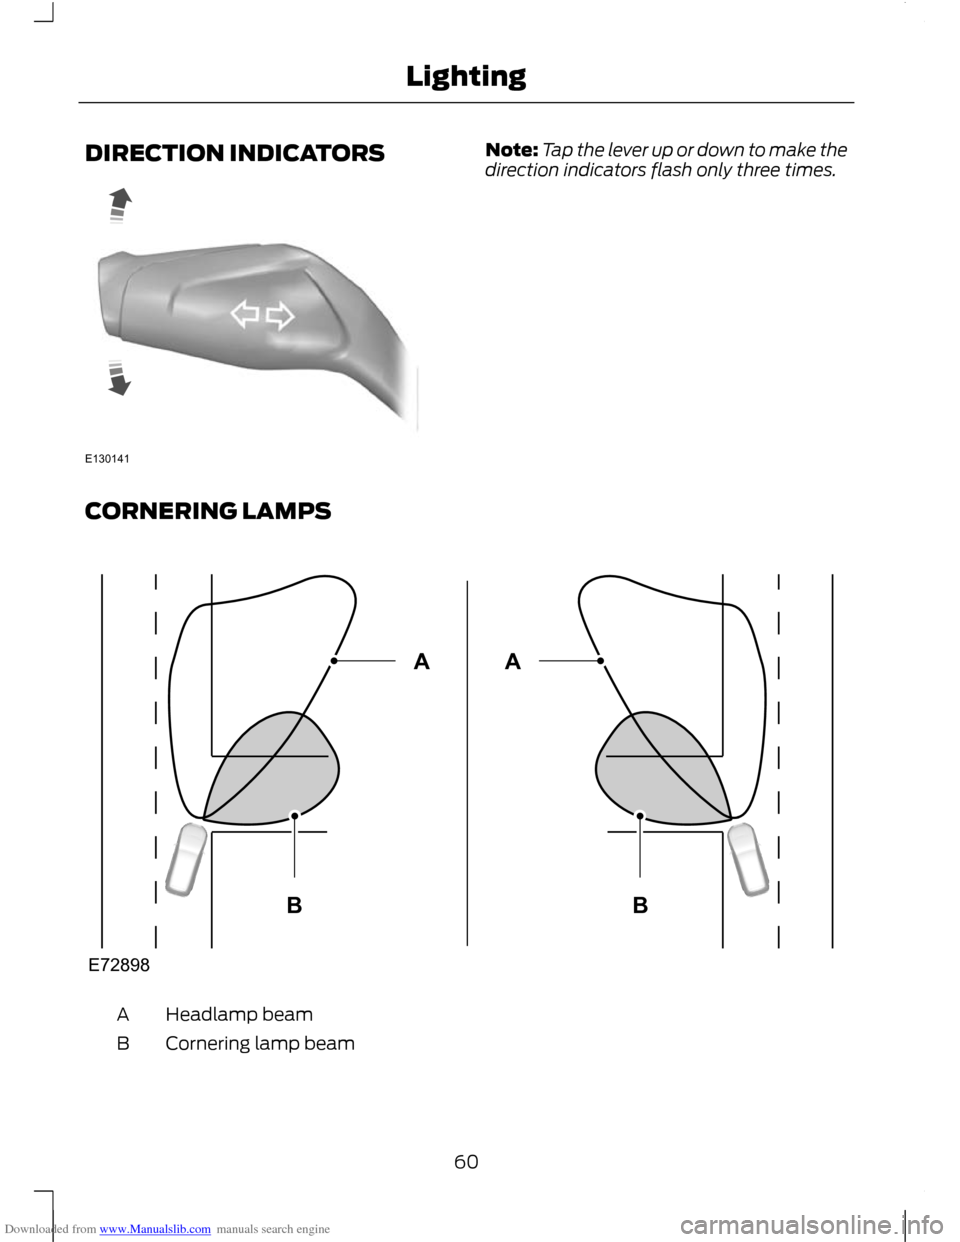
Downloaded from www.Manualslib.com manuals search engine DIRECTION INDICATORS Note:
Tap the lever up or down to make the
direction indicators flash only three times.
CORNERING LAMPS Headlamp beam
A
Cornering lamp beam
B
60
LightingE130141 E72898BABA
Page 63 of 296
Downloaded from www.Manualslib.com manuals search engine The cornering lamps illuminate the inside
of a corner when you are turning.
INTERIOR LAMPS
Interior lighting
Note:
Individual lamps may be switched on
independently, but not off if all lamps have
been switched on by the driver.
Note: All other lamps will be either
non-switchable or with individual reading
or dome lamp functionality only.
The lamps will come on when you unlock
or open a door or the luggage
compartment lid. If you leave a door open
with the ignition switch off, all lamps will
go off automatically after some time to
prevent the vehicle battery from
discharging. To switch them back on,
switch on the ignition for a short time.
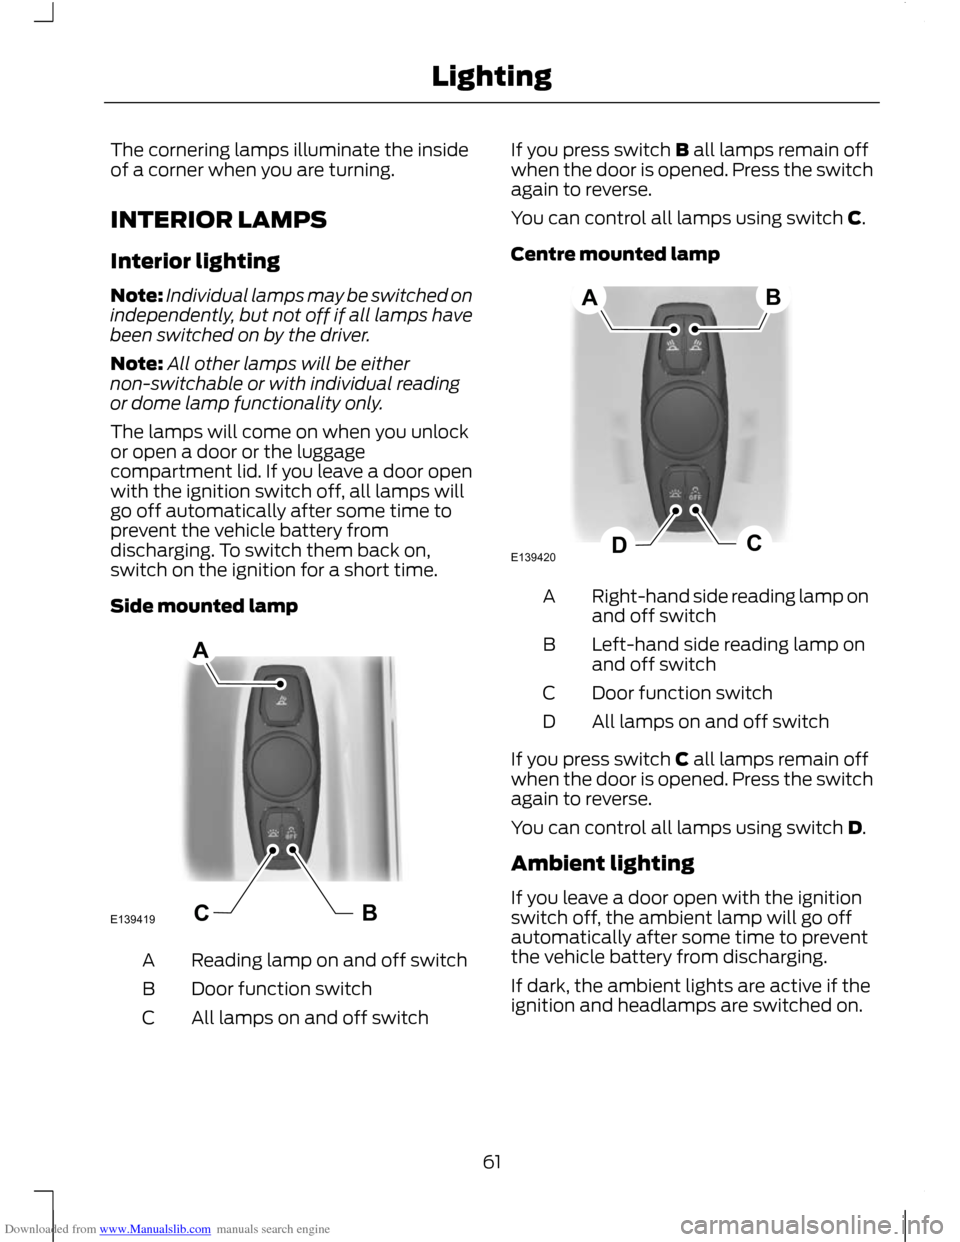
Side mounted lamp Reading lamp on and off switch
A
Door function switch
B
All lamps on and off switch
C If you press switch B all lamps remain off
when the door is opened. Press the switch
again to reverse.
You can control all lamps using switch C.
Centre mounted lamp
Right-hand side reading lamp on
and off switch
A
Left-hand side reading lamp on
and off switch
B
Door function switch
C
All lamps on and off switch
D
If you press switch C all lamps remain off
when the door is opened. Press the switch
again to reverse.
You can control all lamps using switch D.
Ambient lighting
If you leave a door open with the ignition
switch off, the ambient lamp will go off
automatically after some time to prevent
the vehicle battery from discharging.
If dark, the ambient lights are active if the
ignition and headlamps are switched on.
61
LightingBCE139419A E139420CDAB
Page 64 of 296
Downloaded from www.Manualslib.com manuals search engine Ambient lighting illuminates several areas,
for example footwells, cup holders and
doors with a single colour and can be
switched on and off using the information
display menu. See General Information
(page 83).
Use the instrument lighting dimmer
switches to adjust to the desired
brightness. See Instrument Lighting
Dimmer (page 122).
REMOVING A HEADLAMP
WARNING
Have Xenon bulbs changed by a
trained technician. There is a risk of
electric shock.
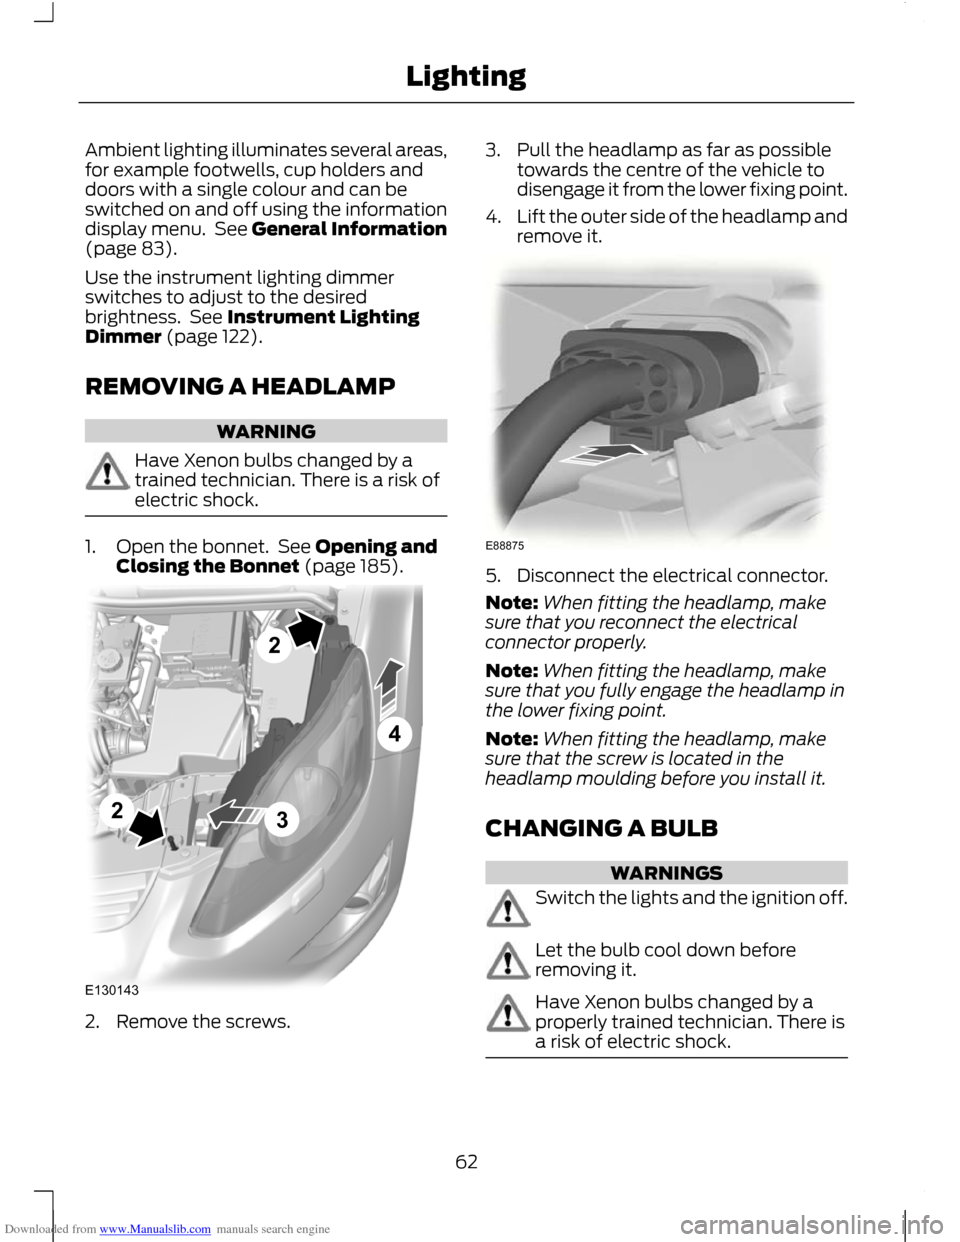
1. Open the bonnet. See Opening and
Closing the Bonnet (page 185). 2. Remove the screws. 3. Pull the headlamp as far as possible
towards the centre of the vehicle to
disengage it from the lower fixing point.
4. Lift the outer side of the headlamp and
remove it. 5. Disconnect the electrical connector.
Note:
When fitting the headlamp, make
sure that you reconnect the electrical
connector properly.
Note: When fitting the headlamp, make
sure that you fully engage the headlamp in
the lower fixing point.
Note: When fitting the headlamp, make
sure that the screw is located in the
headlamp moulding before you install it.
CHANGING A BULB WARNINGS
Switch the lights and the ignition off.
Let the bulb cool down before
removing it.
Have Xenon bulbs changed by a
properly trained technician. There is
a risk of electric shock.
62
LightingE1301432243 E88875
Page 65 of 296
Downloaded from www.Manualslib.com manuals search engine CAUTIONS
Do not touch the glass of the bulb.
Only fit bulbs of the correct
specification. See Bulb
Specification Chart (page 69).
Note:
The following instructions describe
how to remove the bulbs. Fit replacements
in the reverse order unless otherwise stated.
Headlamp
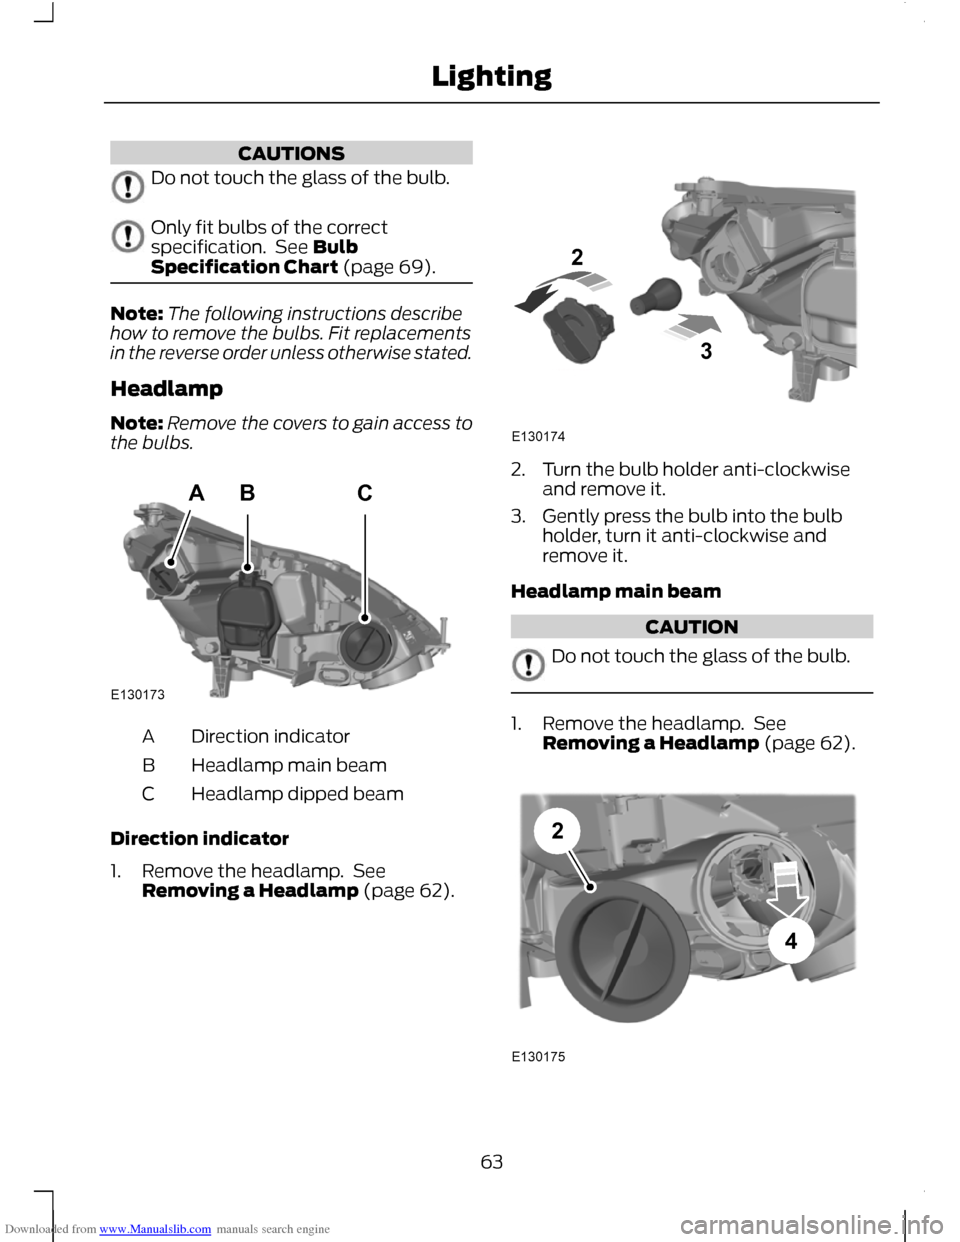
Note: Remove the covers to gain access to
the bulbs. Direction indicator
A
Headlamp main beam
B
Headlamp dipped beam
C
Direction indicator
1. Remove the headlamp. See Removing a Headlamp (page 62). 2. Turn the bulb holder anti-clockwise
and remove it.
3. Gently press the bulb into the bulb holder, turn it anti-clockwise and
remove it.
Headlamp main beam CAUTION
Do not touch the glass of the bulb.
1. Remove the headlamp. See
Removing a Headlamp (page 62). 63
LightingABCE130173 E13017423 E13017542
Page 66 of 296
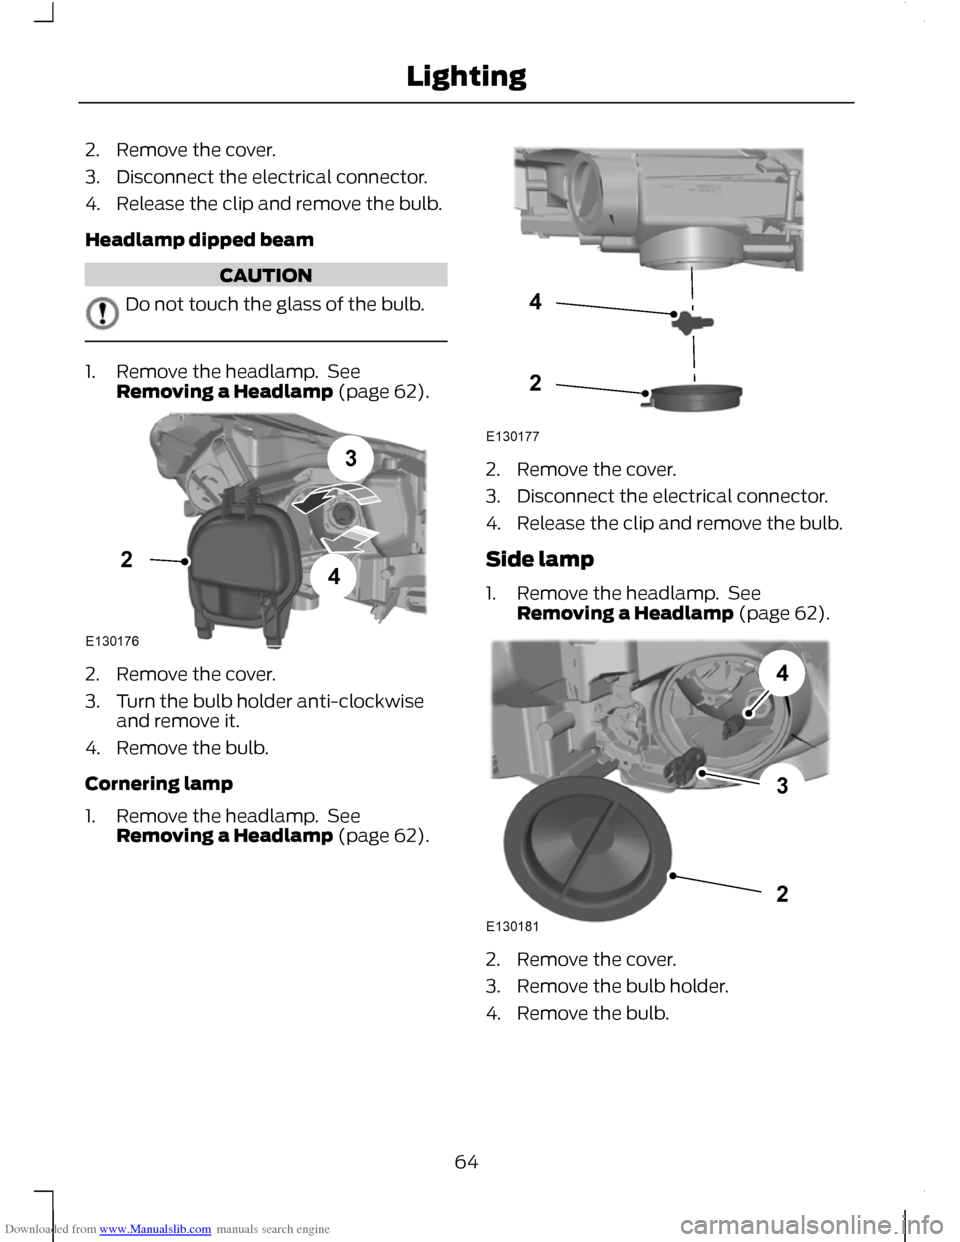
Downloaded from www.Manualslib.com manuals search engine 2. Remove the cover.
3. Disconnect the electrical connector.
4. Release the clip and remove the bulb.
Headlamp dipped beam
CAUTION
Do not touch the glass of the bulb.
1. Remove the headlamp. See
Removing a Headlamp (page 62). 2. Remove the cover.
3. Turn the bulb holder anti-clockwise
and remove it.
4. Remove the bulb.
Cornering lamp
1. Remove the headlamp. See Removing a Headlamp (page 62). 2. Remove the cover.
3. Disconnect the electrical connector.
4. Release the clip and remove the bulb.
Side lamp
1. Remove the headlamp. See
Removing a Headlamp (page 62). 2. Remove the cover.
3. Remove the bulb holder.
4. Remove the bulb.
64
LightingE130176342 E13017724 E130181234
Page 67 of 296
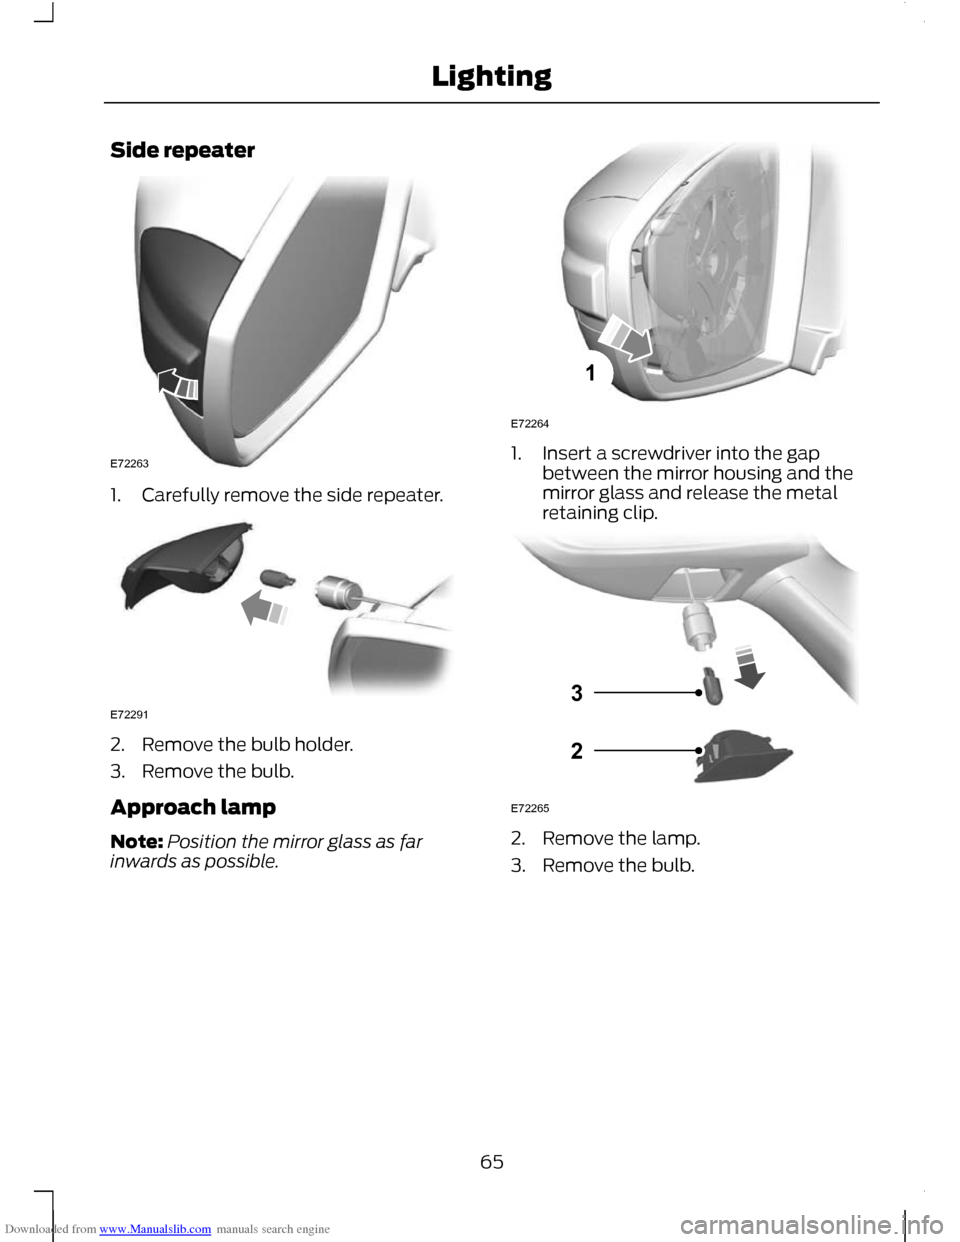
Downloaded from www.Manualslib.com manuals search engine Side repeater
1. Carefully remove the side repeater.
2. Remove the bulb holder.
3. Remove the bulb.
Approach lamp
Note:
Position the mirror glass as far
inwards as possible. 1. Insert a screwdriver into the gap
between the mirror housing and the
mirror glass and release the metal
retaining clip. 2. Remove the lamp.
3. Remove the bulb.
65
LightingE72263 E72291 1E72264 E7226523
Page 68 of 296
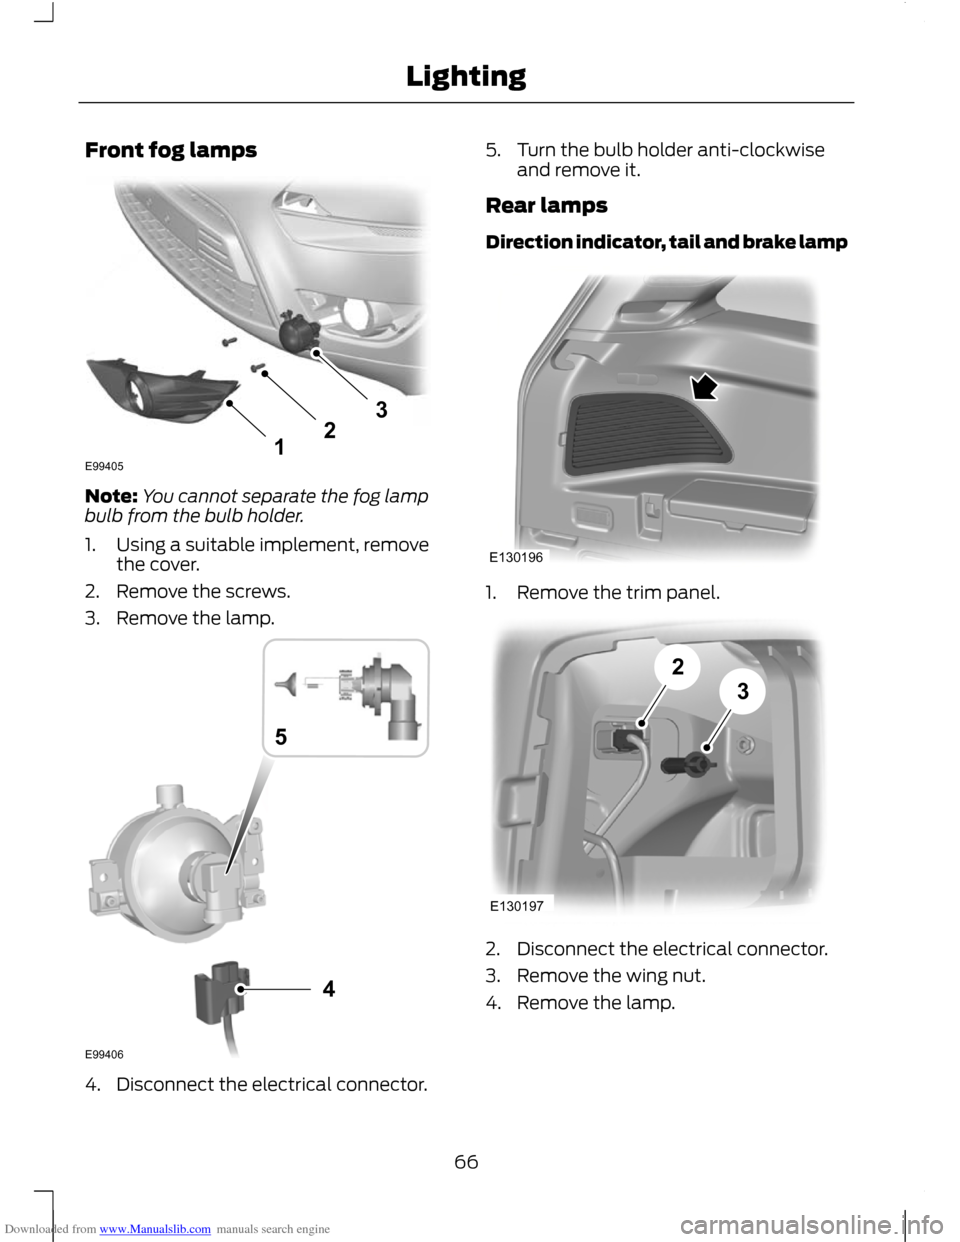
Downloaded from www.Manualslib.com manuals search engine Front fog lamps
Note:
You cannot separate the fog lamp
bulb from the bulb holder.
1. Using a suitable implement, remove the cover.
2. Remove the screws.
3. Remove the lamp. 4. Disconnect the electrical connector. 5. Turn the bulb holder anti-clockwise
and remove it.
Rear lamps
Direction indicator, tail and brake lamp 1. Remove the trim panel.
2. Disconnect the electrical connector.
3. Remove the wing nut.
4. Remove the lamp.
66
Lighting123E99405 4E994065 E130196 E13019723