remote control FORD C MAX 2011 2.G User Guide
[x] Cancel search | Manufacturer: FORD, Model Year: 2011, Model line: C MAX, Model: FORD C MAX 2011 2.GPages: 296, PDF Size: 7.87 MB
Page 47 of 296
Downloaded from www.Manualslib.com manuals search engine Unlocking only the driver's door
If the unlocking function is reprogrammed
so that only the driver
’s door and the
luggage compartment lid are unlocked (
See Programming the remote control
(page 36). ), note the following:
If the driver ’s door is the first door which is
opened, the other doors will remain locked.
All the other doors can be unlocked from
inside the vehicle by pressing the unlock
button on the instrument panel. For item
location: See At a Glance (page 10).
Doors can be unlocked individually by
pulling the interior door handles on those
doors.
Disabled keys
Any keys left inside the vehicle interior
when it is locked will be disabled.
A disabled key cannot be used to turn the
ignition on or start the engine.
In order to use these passive keys again,
they have to be enabled.
To enable all your passive keys, unlock the
vehicle using a passive key or the remote
control unlocking function.
All passive keys will then be enabled if the
ignition is turned on or the vehicle is started
using a valid key. Locking and unlocking the doors
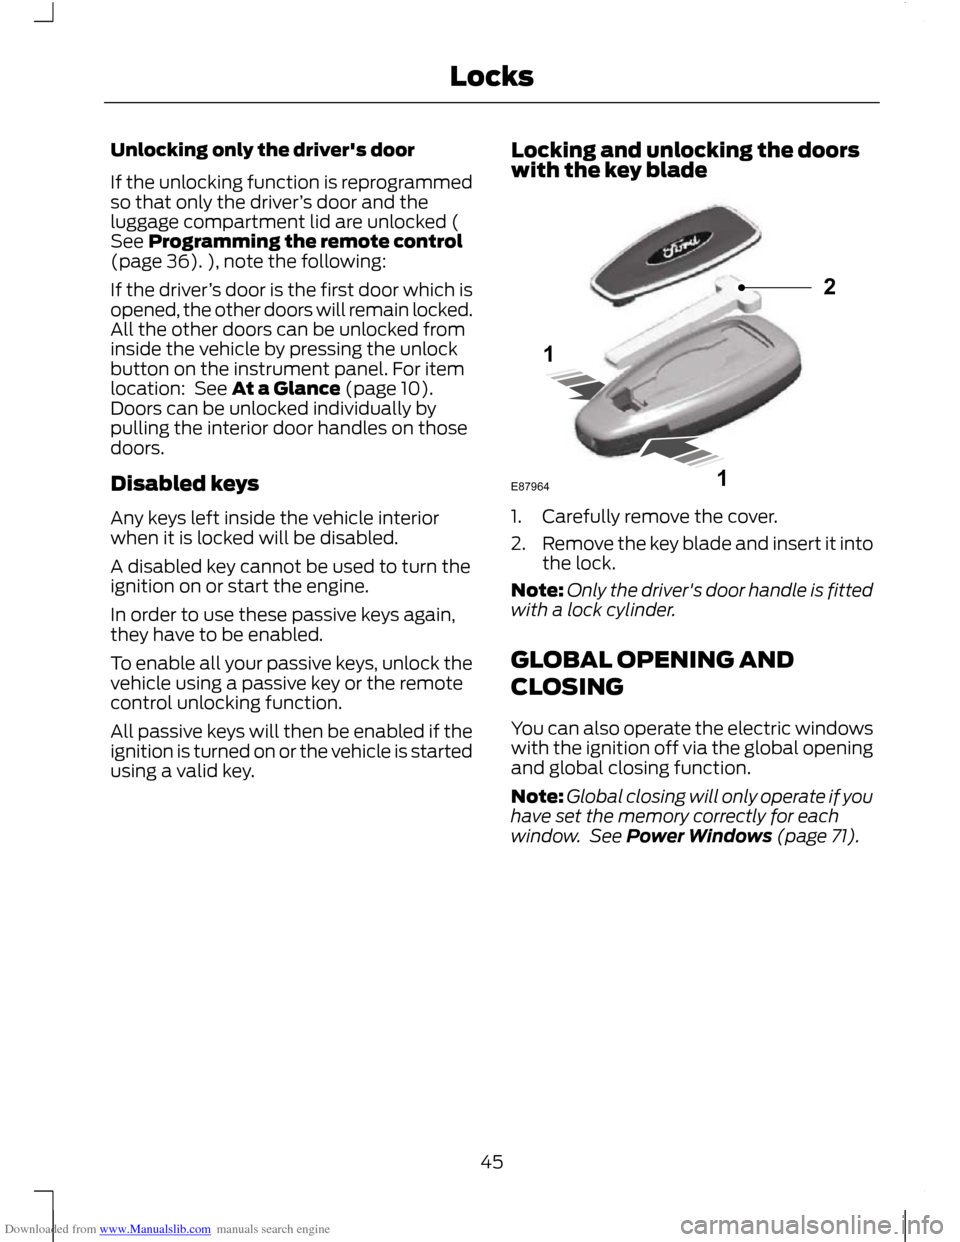
with the key blade 1. Carefully remove the cover.
2.
Remove the key blade and insert it into
the lock.
Note: Only the driver's door handle is fitted
with a lock cylinder.
GLOBAL OPENING AND
CLOSING
You can also operate the electric windows
with the ignition off via the global opening
and global closing function.
Note: Global closing will only operate if you
have set the memory correctly for each
window. See Power Windows (page 71).
45
Locks121E87964
Page 48 of 296
Downloaded from www.Manualslib.com manuals search engine Global opening
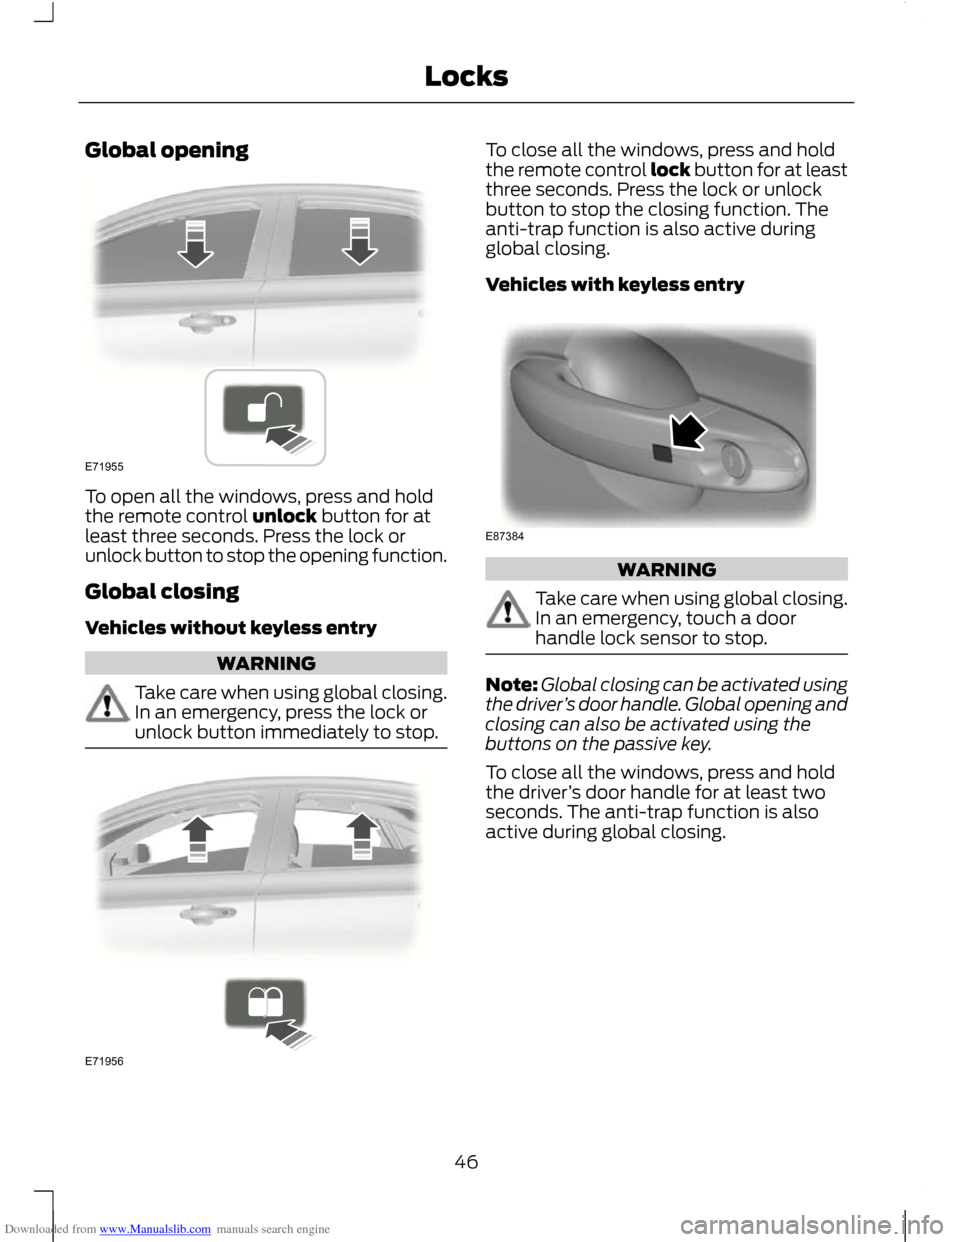
To open all the windows, press and hold
the remote control unlock button for at
least three seconds. Press the lock or
unlock button to stop the opening function.
Global closing
Vehicles without keyless entry
WARNING
Take care when using global closing.
In an emergency, press the lock or
unlock button immediately to stop. To close all the windows, press and hold
the remote control lock button for at least
three seconds. Press the lock or unlock
button to stop the closing function. The
anti-trap function is also active during
global closing.
Vehicles with keyless entry
WARNING
Take care when using global closing.
In an emergency, touch a door
handle lock sensor to stop.
Note:
Global closing can be activated using
the driver ’s door handle. Global opening and
closing can also be activated using the
buttons on the passive key.
To close all the windows, press and hold
the driver ’s door handle for at least two
seconds. The anti-trap function is also
active during global closing.
46
LocksE71955 E71956 E87384
Page 50 of 296
Downloaded from www.Manualslib.com manuals search engine PRINCIPLE OF OPERATION
Alarm system
Your vehicle may be equipped with one of
the following alarm systems:
•
Perimeter alarm.
• Perimeter alarm with interior sensors.
• Category one alarm with interior
sensors and battery back-up sounder.
Perimeter alarm
The perimeter alarm is a deterrent against
unauthorised access to your vehicle
through the doors and the bonnet. It also
protects the audio unit.
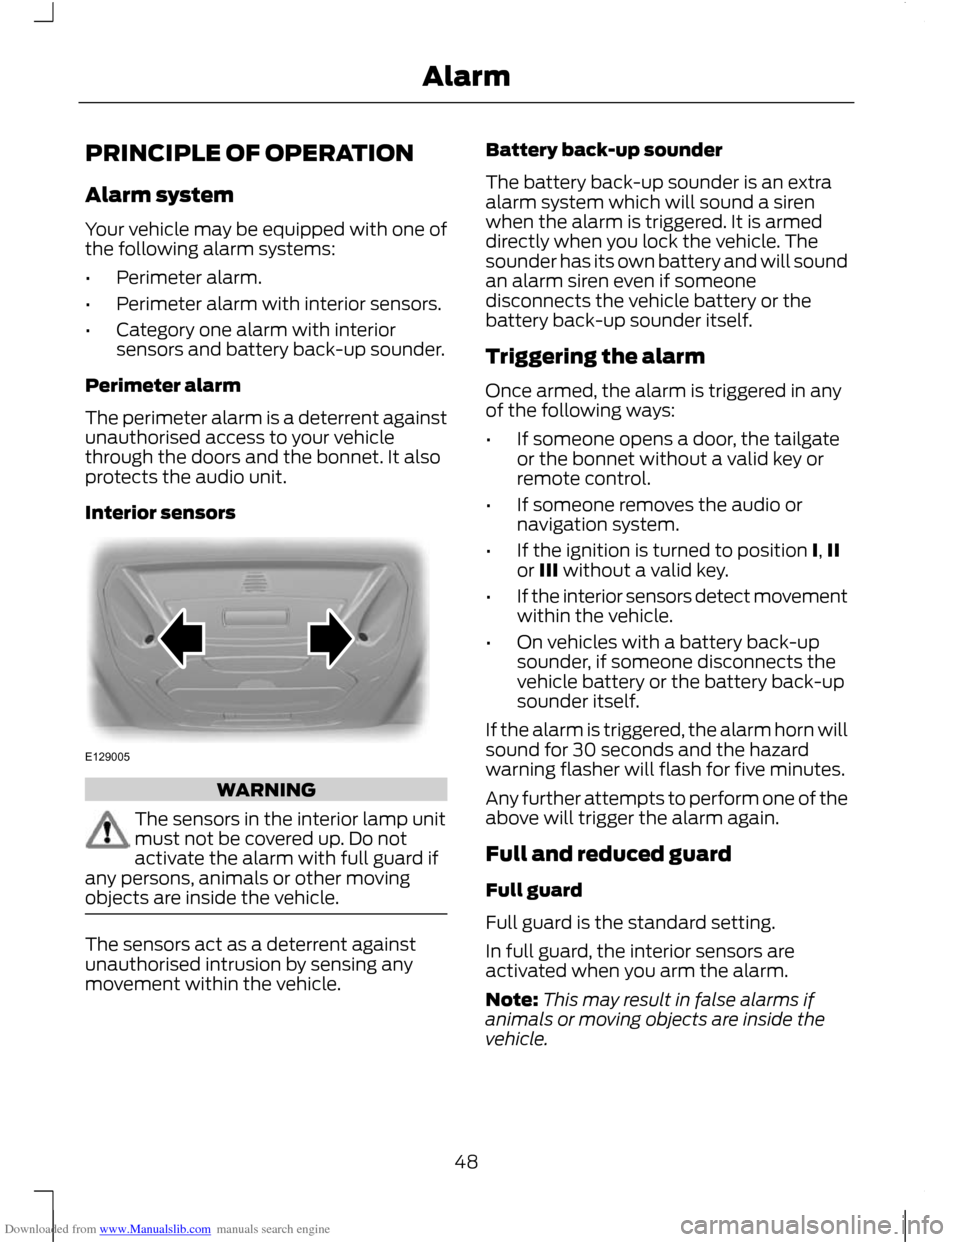
Interior sensors WARNING
The sensors in the interior lamp unit
must not be covered up. Do not
activate the alarm with full guard if
any persons, animals or other moving
objects are inside the vehicle. The sensors act as a deterrent against
unauthorised intrusion by sensing any
movement within the vehicle. Battery back-up sounder
The battery back-up sounder is an extra
alarm system which will sound a siren
when the alarm is triggered. It is armed
directly when you lock the vehicle. The
sounder has its own battery and will sound
an alarm siren even if someone
disconnects the vehicle battery or the
battery back-up sounder itself.
Triggering the alarm
Once armed, the alarm is triggered in any
of the following ways:
•
If someone opens a door, the tailgate
or the bonnet without a valid key or
remote control.
• If someone removes the audio or
navigation system.
• If the ignition is turned to position I, II
or III without a valid key.
• If the interior sensors detect movement
within the vehicle.
• On vehicles with a battery back-up
sounder, if someone disconnects the
vehicle battery or the battery back-up
sounder itself.
If the alarm is triggered, the alarm horn will
sound for 30 seconds and the hazard
warning flasher will flash for five minutes.
Any further attempts to perform one of the
above will trigger the alarm again.
Full and reduced guard
Full guard
Full guard is the standard setting.
In full guard, the interior sensors are
activated when you arm the alarm.
Note: This may result in false alarms if
animals or moving objects are inside the
vehicle.
48
AlarmE129005
Page 51 of 296
Downloaded from www.Manualslib.com manuals search engine Note:
False alarms can also be triggered
by the auxiliary heater See Auxiliary Heater
(page 106). If you are using the auxiliary
heater, direct the air flow towards the
footwell.
Reduced guard
In reduced guard, the interior sensors are
deactivated when you arm the alarm.
Note: You can set the alarm to reduced
guard for the current ignition cycle only. The
next time you switch on the ignition, the
alarm will be reset to full guard.
Ask on Exit
You can set the information display to ask
you each time which level of guard you
wish to set.
If you select Ask on Exit, the message
Reduced guard? appears in the
instrument cluster display each time you
switch the ignition off.
If you wish to arm the alarm with reduced
guard, press the OK button when this
message appears.
If you wish to arm the alarm with full guard,
leave the vehicle without pressing the OK
button.
Selecting full or reduced guard
Note: Selecting Reduced does not set the
alarm permanently to reduced guard. It sets
it to reduced guard only for the current
ignition cycle. If you regularly set the alarm
to reduced guard, select Ask on Exit.
You can select full or reduced guard using
the information display. See General
Information (page 83).
Information messages
See Information Messages (page 90). ARMING THE ALARM
To arm the alarm, lock the vehicle. See
Locks (page 39).
DISARMING THE ALARM
Vehicles without keyless entry
Perimeter alarm
Disarm and silence the alarm by unlocking
the doors with the key and switching the
ignition on with a correctly coded key, or
unlocking the doors or the luggage
compartment lid with the remote control.
Category one alarm
Disarm and silence the alarm by unlocking
the doors with the key and switching the
ignition on with a correctly coded key
within 12 seconds, or unlocking the doors
or the luggage compartment lid with the
remote control.
Vehicles with keyless entry
Note:
A valid passive key must be located
within the detection range of that door for
keyless entry. See Keyless Entry (page 43).
Perimeter alarm
Disarm and silence the alarm by unlocking
the doors and switching the ignition on, or
unlocking the doors or the luggage
compartment lid with the remote control.
Category one alarm
Disarm and silence the alarm by unlocking
the doors and switching the ignition on
within 12 seconds, or unlocking the doors
or the luggage compartment lid with the
remote control.
49
Alarm
Page 52 of 296
Downloaded from www.Manualslib.com manuals search engine ADJUSTING THE STEERING
WHEEL
WARNING
Never adjust the steering wheel
when the vehicle is moving.
Note:
Make sure that you are sitting in the
correct position. See Sitting in the Correct
Position (page 109). WARNING
Make sure that you fully engage the
locking lever when returning it to its
original position.
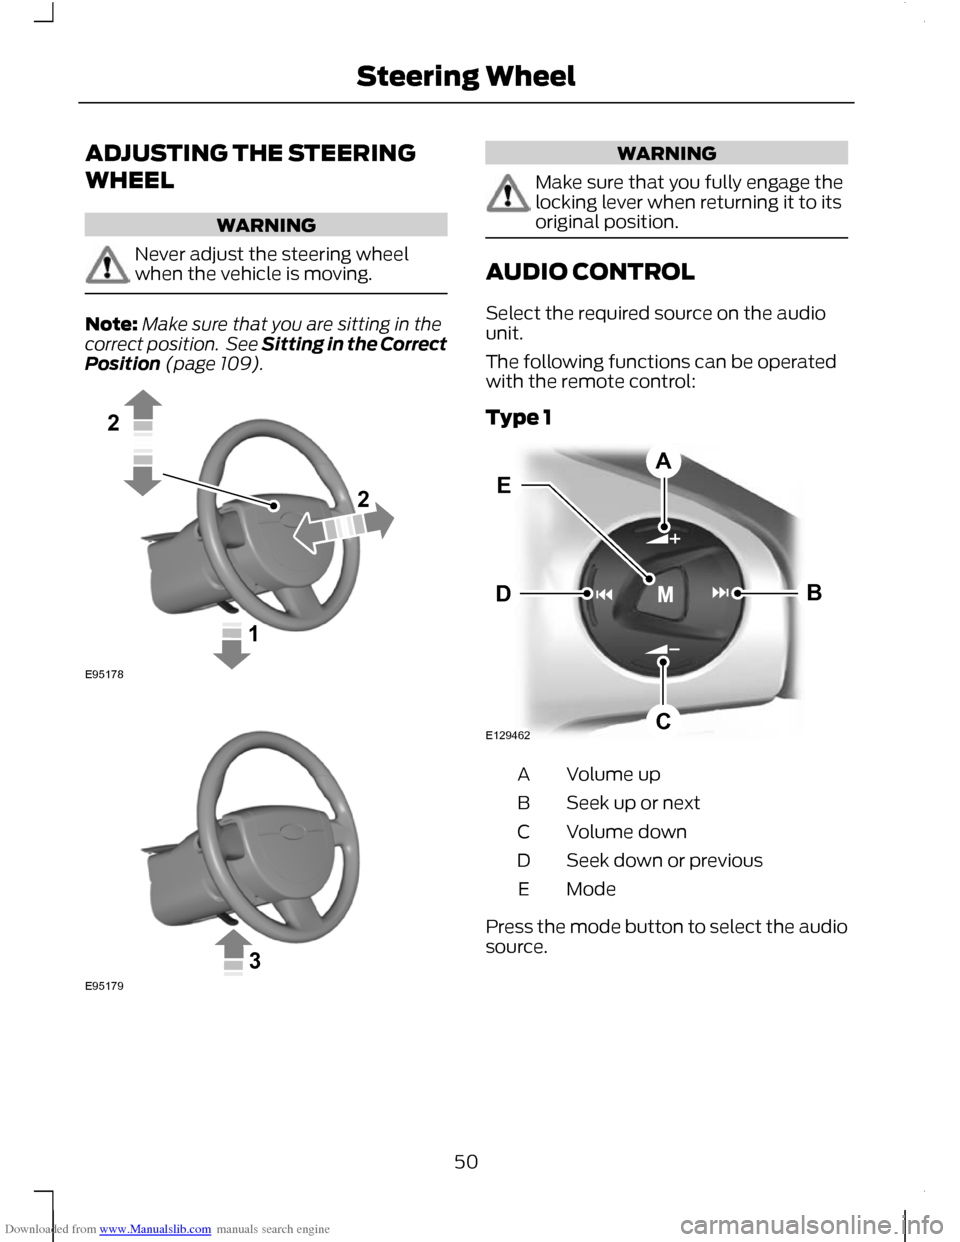
AUDIO CONTROL
Select the required source on the audio
unit.
The following functions can be operated
with the remote control:
Type 1
Volume up
A
Seek up or next
B
Volume down
C
Seek down or previous
D
Mode
E
Press the mode button to select the audio
source.
50
Steering Wheel122E95178 3E95179 E129462BDCAE
Page 75 of 296
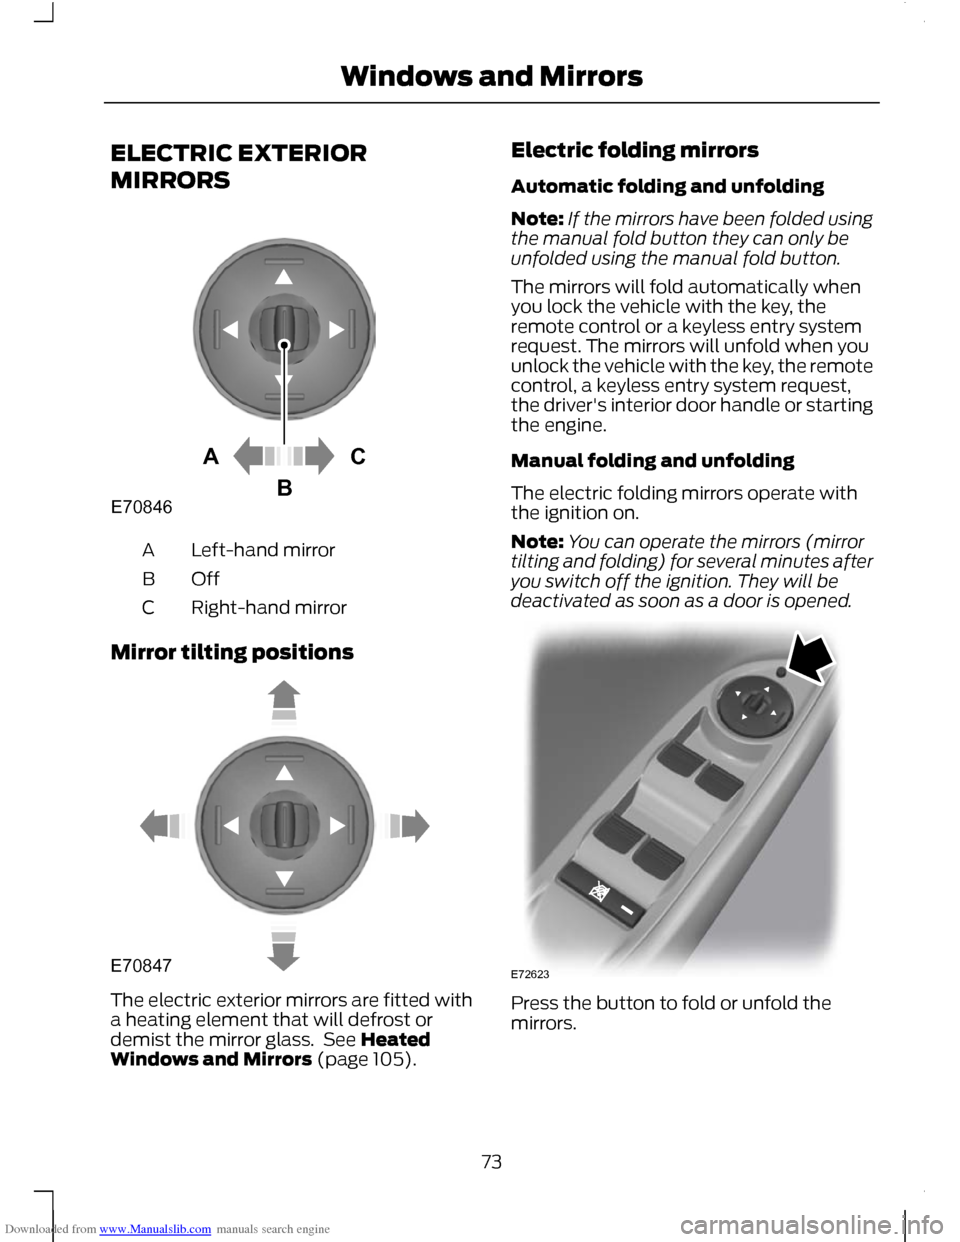
Downloaded from www.Manualslib.com manuals search engine ELECTRIC EXTERIOR
MIRRORS
Left-hand mirror
A
OffB
Right-hand mirror
C
Mirror tilting positions The electric exterior mirrors are fitted with
a heating element that will defrost or
demist the mirror glass. See Heated
Windows and Mirrors (page 105). Electric folding mirrors
Automatic folding and unfolding
Note:
If the mirrors have been folded using
the manual fold button they can only be
unfolded using the manual fold button.
The mirrors will fold automatically when
you lock the vehicle with the key, the
remote control or a keyless entry system
request. The mirrors will unfold when you
unlock the vehicle with the key, the remote
control, a keyless entry system request,
the driver's interior door handle or starting
the engine.
Manual folding and unfolding
The electric folding mirrors operate with
the ignition on.
Note: You can operate the mirrors (mirror
tilting and folding) for several minutes after
you switch off the ignition. They will be
deactivated as soon as a door is opened. Press the button to fold or unfold the
mirrors.
73
Windows and MirrorsACBE70846 E70847 E72623
Page 95 of 296
Downloaded from www.Manualslib.com manuals search engine Engine immobiliser
Action
Message indic-
ator
Message
Your key has not been recognised.
Remove the key and try again.
amber
Immobiliser active check hand-
book
Have the system checked by a
properly trained technician as
soon as possible.
amber
Immobiliser malfunction service
required
Hill start assist Action
Message indic-
ator
Message
Have the system checked by a
properly trained technician.
amber
Hill start assist not available
Keyless entry Action
Message indic-
ator
Message
See Keyless Entry (page 43).
red
Ford KeyFree key not inside car
See Keyless Entry (page 43).
amber
Ford KeyFree key inside vehicle
See Keyless Entry (page 43).
-
Ford KeyFree Place key in key
holder
See Keyless Entry (page 43).
-
Ford KeyFree no key detected
See Changing the remote
control battery (page 36).
-
Key battery low replace soon
See Steering Wheel Lock (page
127).
-
Steering lock engaged turn
steering wheel
93
Information Displays
Page 240 of 296
Downloaded from www.Manualslib.com manuals search engine After start up access to the phonebook list
can be delayed for several minutes,
depending upon the size.
Phonebook categories
The category is indicated as an icon:
Phone
Mobile
Home
Office
Making a phone an active phone
Note: If there is an ongoing call when the
phone in use is selected as the new active
phone, the call is transferred to the vehicle
audio system.
When using the system for the first time,
no phone is connected to the system.
After switching on the ignition and the
audio unit, the Bluetooth phone must be
bonded to the system. See Bluetooth
setup (page 237).
After bonding a Bluetooth phone to the
system, this becomes the active phone.
For further information refer to the phone
menu.
Select the phone from the active phone
menu.
Turning the ignition and radio back on
again, the last active phone is picked up by
the system.
Note: In some cases the Bluetooth
connection must also be confirmed on the
phone. Bond another Bluetooth phone
Bond a new Bluetooth phone as described
in the requirements for a Bluetooth
connection.
Phones stored in the system are accessible
by using the phone list on the audio unit.
Note:
A maximum of six devices may be
bonded. If six Bluetooth devices have
already been bonded, one of these has to
be debonded in order to bond a new device.
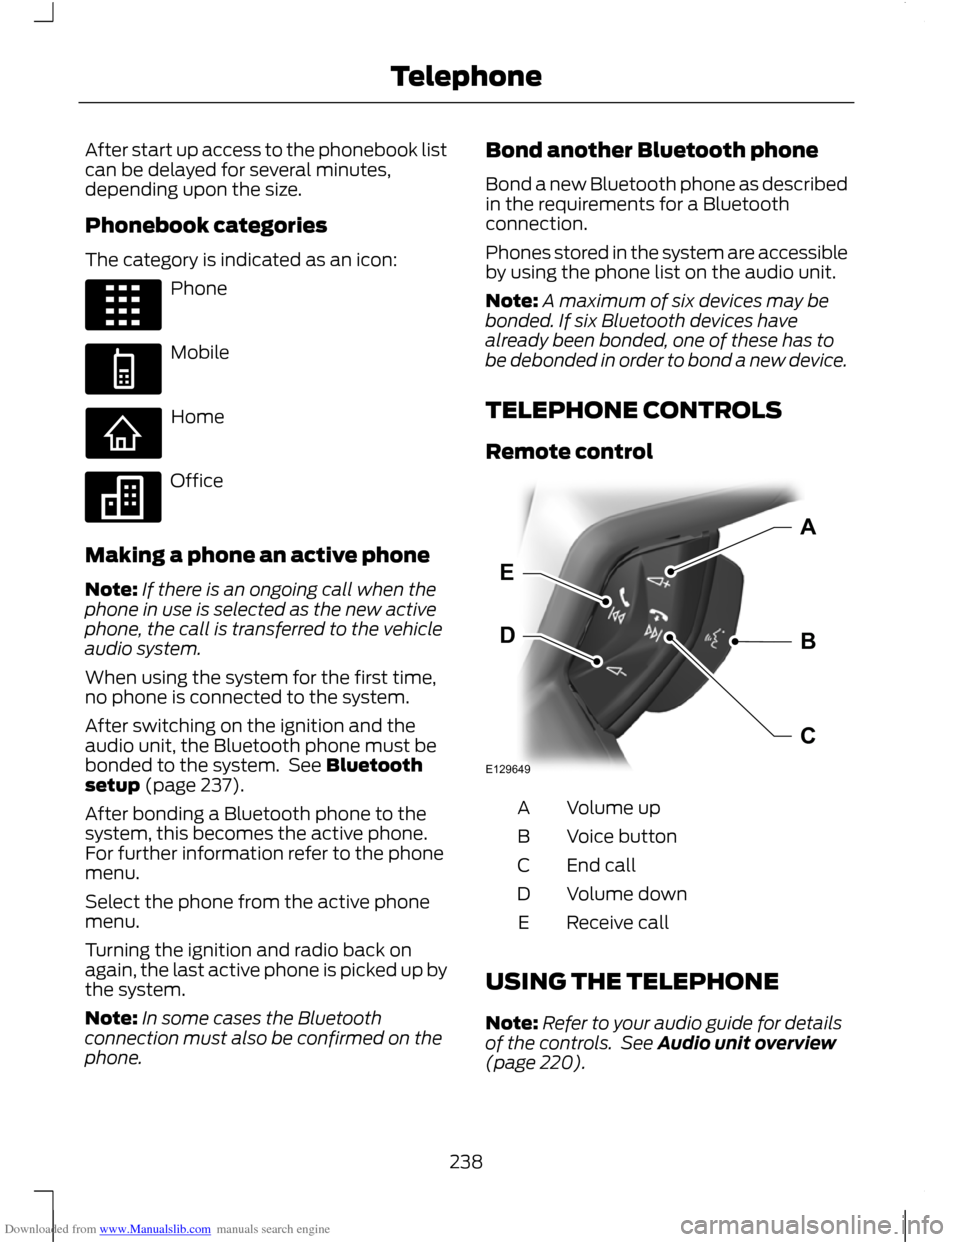
TELEPHONE CONTROLS
Remote control Volume up
A
Voice button
B
End call
C
Volume down
D
Receive call
E
USING THE TELEPHONE
Note: Refer to your audio guide for details
of the controls. See Audio unit overview
(page 220).
238
TelephoneE87990 E87991 E87992 E87993 E129649BDEAC
Page 254 of 296
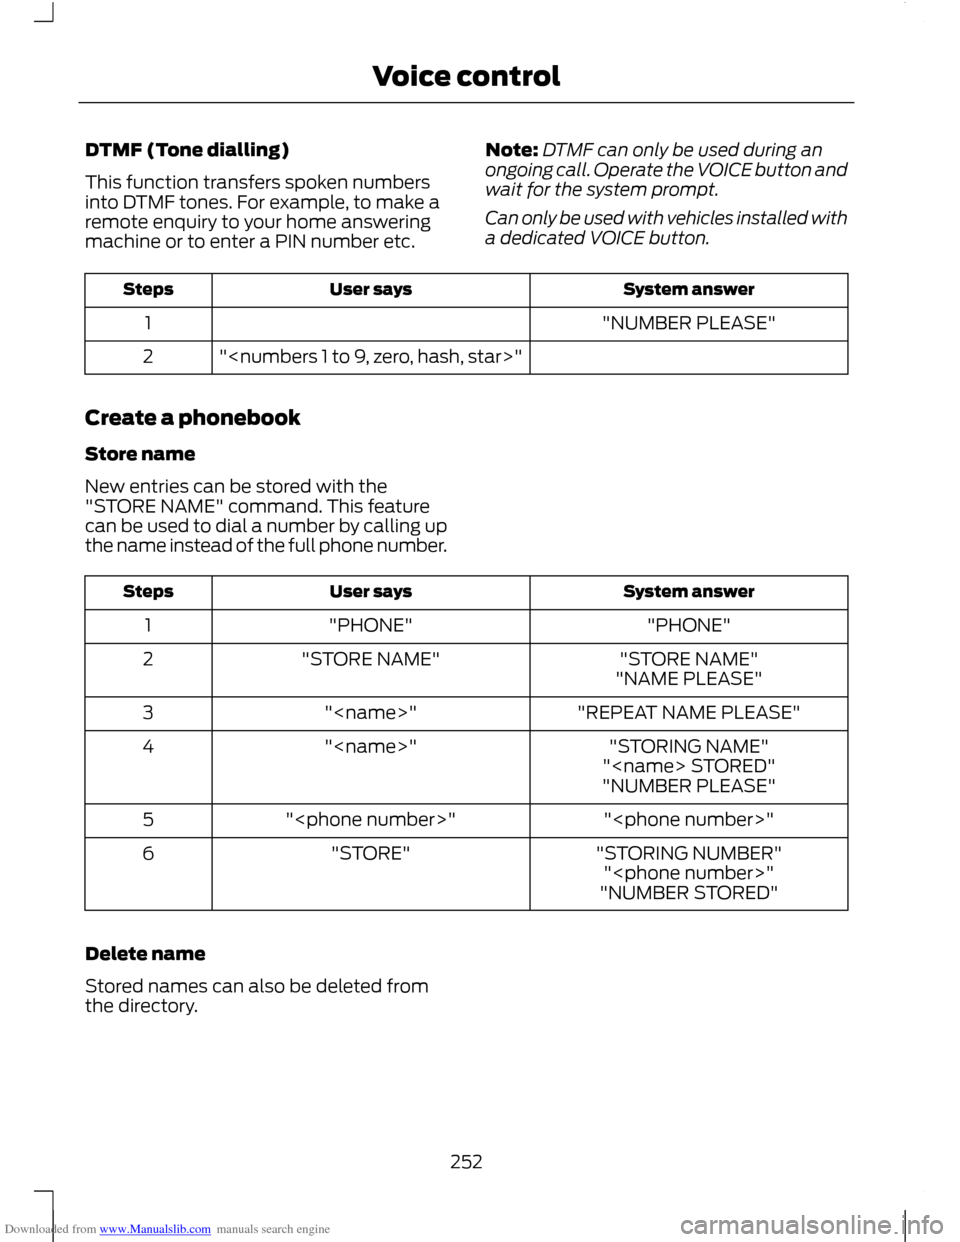
Downloaded from www.Manualslib.com manuals search engine DTMF (Tone dialling)
This function transfers spoken numbers
into DTMF tones. For example, to make a
remote enquiry to your home answering
machine or to enter a PIN number etc.
Note:
DTMF can only be used during an
ongoing call. Operate the VOICE button and
wait for the system prompt.
Can only be used with vehicles installed with
a dedicated VOICE button. System answer
User says
Steps
"NUMBER PLEASE"
1
"
2
Create a phonebook
Store name
New entries can be stored with the
"STORE NAME" command. This feature
can be used to dial a number by calling up
the name instead of the full phone number. System answer
User says
Steps
"PHONE"
"PHONE"
1
"STORE NAME"
"STORE NAME"
2
"NAME PLEASE"
"REPEAT NAME PLEASE"
"
3
"STORING NAME"
"
4
"
"NUMBER PLEASE"
"
"
5
"STORING NUMBER"
"STORE"
6
"
"NUMBER STORED"
Delete name
Stored names can also be deleted from
the directory.
252
Voice control
Page 287 of 296
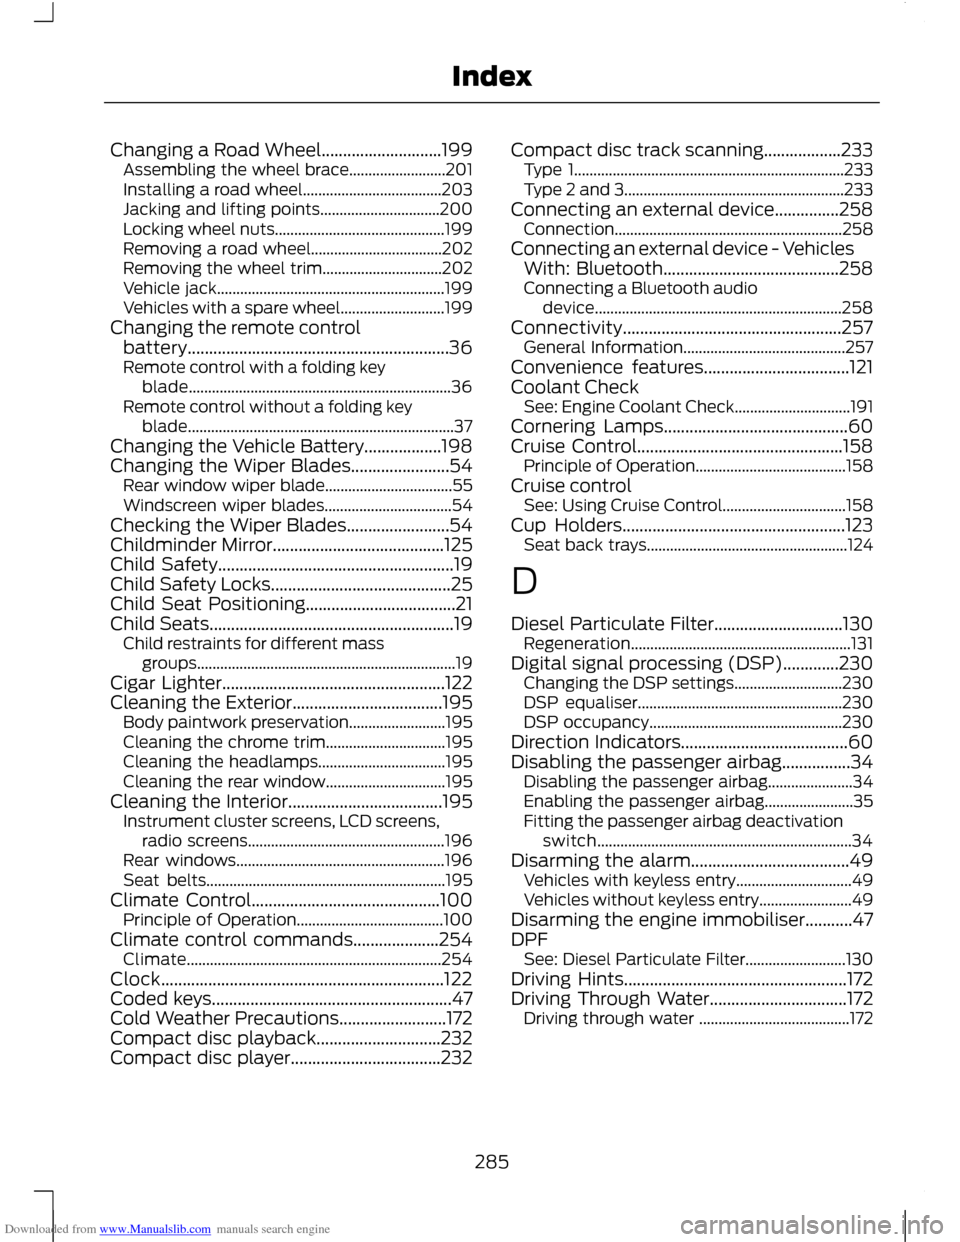
Downloaded from www.Manualslib.com manuals search engine Changing a Road Wheel............................199
Assembling the wheel brace......................... 201
Installing a road wheel.................................... 203
Jacking and lifting points............................... 200
Locking wheel nuts............................................ 199
Removing a road wheel.................................. 202
Removing the wheel trim............................... 202
Vehicle jack........................................................... 199
Vehicles with a spare wheel........................... 199
Changing the remote control battery.............................................................36
Remote control with a folding key blade.................................................................... 36
Remote control without a folding key blade..................................................................... 37
Changing the Vehicle Battery..................198
Changing the Wiper Blades.......................54 Rear window wiper blade................................. 55
Windscreen wiper blades................................. 54
Checking the Wiper Blades........................54
Childminder Mirror........................................125
Child Safety.......................................................19
Child Safety Locks..........................................25
Child Seat Positioning...................................21
Child Seats.........................................................19 Child restraints for different mass
groups................................................................... 19
Cigar Lighter....................................................122
Cleaning the Exterior...................................195 Body paintwork preservation......................... 195
Cleaning the chrome trim............................... 195
Cleaning the headlamps................................. 195
Cleaning the rear window............................... 195
Cleaning the Interior....................................195 Instrument cluster screens, LCD screens,
radio screens................................................... 196
Rear windows...................................................... 196
Seat belts.............................................................. 195
Climate Control............................................100 Principle of Operation...................................... 100
Climate control commands....................254 Climate.................................................................. 254
Clock..................................................................122
Coded keys........................................................47
Cold Weather Precautions.........................172
Compact disc playback.............................232
Compact disc player...................................232 Compact disc track scanning..................233
Type 1...................................................................... 233
Type 2 and 3......................................................... 233
Connecting an external device...............258 Connection........................................................... 258
Connecting an external device - Vehicles With: Bluetooth.........................................258
Connecting a Bluetooth audio device................................................................ 258
Connectivity...................................................257 General Information.......................................... 257
Convenience features..................................121
Coolant Check See: Engine Coolant Check.............................. 191
Cornering Lamps...........................................60
Cruise Control................................................158 Principle of Operation....................................... 158
Cruise control See: Using Cruise Control................................ 158
Cup Holders....................................................123 Seat back trays.................................................... 124
D
Diesel Particulate Filter..............................130 Regeneration......................................................... 131
Digital signal processing (DSP).............230 Changing the DSP settings............................ 230
DSP equaliser..................................................... 230
DSP occupancy.................................................. 230
Direction Indicators.......................................60
Disabling the passenger airbag................34 Disabling the passenger airbag...................... 34
Enabling the passenger airbag....................... 35
Fitting the passenger airbag deactivation switch.................................................................. 34
Disarming the alarm.....................................49 Vehicles with keyless entry.............................. 49
Vehicles without keyless entry........................ 49
Disarming the engine immobiliser...........47
DPF See: Diesel Particulate Filter.......................... 130
Driving Hints....................................................172
Driving Through Water................................172 Driving through water ....................................... 172
285
Index