audio FORD C MAX 2011 2.G Owner's Guide
[x] Cancel search | Manufacturer: FORD, Model Year: 2011, Model line: C MAX, Model: FORD C MAX 2011 2.GPages: 296, PDF Size: 7.87 MB
Page 240 of 296
Downloaded from www.Manualslib.com manuals search engine After start up access to the phonebook list
can be delayed for several minutes,
depending upon the size.
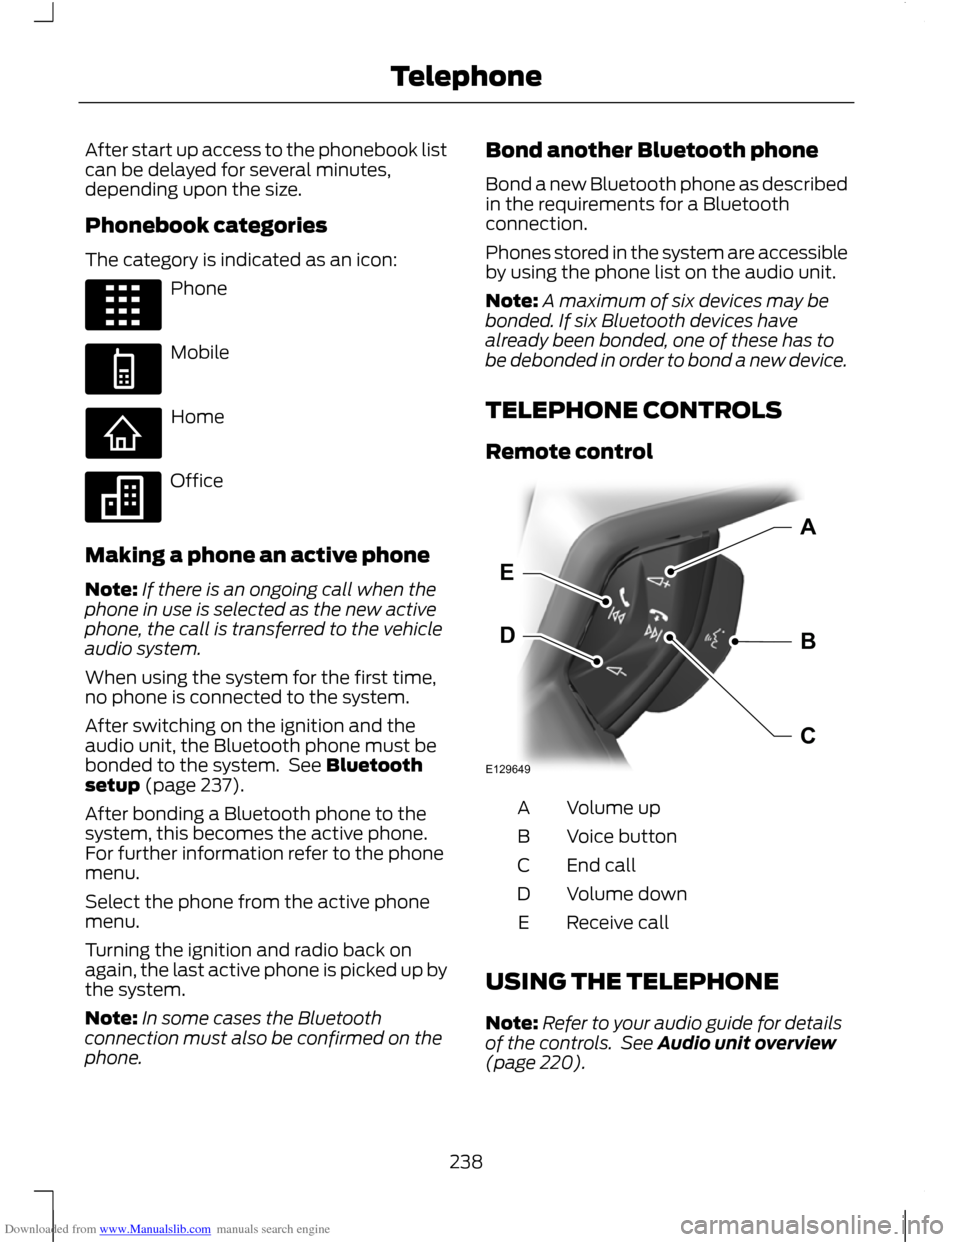
Phonebook categories
The category is indicated as an icon:
Phone
Mobile
Home
Office
Making a phone an active phone
Note: If there is an ongoing call when the
phone in use is selected as the new active
phone, the call is transferred to the vehicle
audio system.
When using the system for the first time,
no phone is connected to the system.
After switching on the ignition and the
audio unit, the Bluetooth phone must be
bonded to the system. See Bluetooth
setup (page 237).
After bonding a Bluetooth phone to the
system, this becomes the active phone.
For further information refer to the phone
menu.
Select the phone from the active phone
menu.
Turning the ignition and radio back on
again, the last active phone is picked up by
the system.
Note: In some cases the Bluetooth
connection must also be confirmed on the
phone. Bond another Bluetooth phone
Bond a new Bluetooth phone as described
in the requirements for a Bluetooth
connection.
Phones stored in the system are accessible
by using the phone list on the audio unit.
Note:
A maximum of six devices may be
bonded. If six Bluetooth devices have
already been bonded, one of these has to
be debonded in order to bond a new device.
TELEPHONE CONTROLS
Remote control Volume up
A
Voice button
B
End call
C
Volume down
D
Receive call
E
USING THE TELEPHONE
Note: Refer to your audio guide for details
of the controls. See Audio unit overview
(page 220).
238
TelephoneE87990 E87991 E87992 E87993 E129649BDEAC
Page 241 of 296
Downloaded from www.Manualslib.com manuals search engine Note:
You can exit the phone menu by
pressing any source button CD, RADIO or
AUX.
Note: When referred to, the use of the
up/down arrow buttons, seek up and seek
down buttons, and the OK button can be
used on either the steering wheel or the
audio unit.
This chapter describes the phone functions
of the audio unit.
An active phone must be present.
Even if connected to the audio unit, your
phone can still be used in the usual way.
Making a call
Dialling a number using voice control
Phone numbers can be dialled using voice
control. See Telephone commands
(page 249).
Dialling a number using the address
book
1. Press the PHONE button.
2. Press the up/down arrow buttons until
PHONEBOOK is shown.
3. Press the OK button.
Note: You can also use the telephone
keypad to select the first letter of the entry
you are looking for. Press the relevant
number that corresponds to the letter
repeatedly until the required letter is
displayed.
4. Press the up/down arrow buttons to select the desired phone number.
Note: Press and hold the up/down arrow
buttons to search forwards or backwards
within the phonebook.
5. Press the OK button to dial the selected phone number. Dialling a number using the telephone
keypad
1. Press the PHONE button.
2. Dial the number using the telephone
keypad on the audio unit.
3. Press the OK button.
Note: If you enter an incorrect digit whilst
entering a phone number, press function
button 3 to erase the last digit. A long press
will erase the complete string of digits.
Ending a call
Calls can be ended by:
• pressing the seek up button
• pressing the OK button
• pressing function button 4.
Redialling a number
1. Press the PHONE button.
2. Press the up/down arrow buttons until
CALL LISTS is displayed.
3. Press the OK button.
Note: If the active phone does not provide
a call out list, the last outgoing call
number/entry can be redialled.
4. Press the up/down buttons to select the desired call list.
5. Press the OK button.
6. Press the up/down buttons to select the desired phone number.
7. Press the OK button.
Redialling the last dialled number
1. Press the PHONE button.
2. Press the up/down arrow buttons until
REDIAL is displayed.
3. Press the OK button.
239
Telephone
Page 242 of 296
Downloaded from www.Manualslib.com manuals search engine Receiving an incoming call
Accepting an incoming call
Incoming calls can be accepted by pressing
the seek down button, or by pressing the
OK button.
Rejecting an incoming call
Incoming calls can be rejected by:
•
pressing the seek up button, or
• pressing the arrow down button to
highlight REJECT and then pressing
the OK button.
Receiving a second incoming call
Note: The second incoming call function
must be activated in your phone.
If there is an incoming call whilst there is
an ongoing call, a beep will be heard and
you will have the option to end the active
call and to accept the incoming call.
Accepting a second incoming call
Note: The first incoming call will be
disconnected and replaced by the second
incoming call.
Second incoming calls can be accepted
by pressing the seek down button on the
steering wheel or on the audio unit, or by
pressing the OK button on the audio unit.
Rejecting a second incoming call
Second incoming calls can be rejected by:
• pressing the seek up button, or
• pressing the arrow down button to
highlight REJECT and then pressing
the OK button.
Second incoming calls can be rejected by
pressing function button 4. Muting the microphone
Note:
During a call, it is possible to mute
the microphone. Whilst muted, confirmation
will appear in the display.
Press function button 1. Press the button
once again to turn this function off.
Changing the active phone
Note: Phones must be bonded to the
system before they can be made active.
Note: After bonding a phone to the system,
this becomes the active phone.
1. Press the PHONE button.
2. Press the up/down buttons until SELECT PHONE is shown.
3. Press the OK button.
4. Scroll through the different stored phones by using the up/down buttons
to display the bonded phones.
5. Press the OK button to select the phone which is to be the active phone.
Debonding a bonded phone
A bonded phone can be deleted from the
system at any time, unless a phone call is
in progress.
1. Press the PHONE button.
2. Press the up/down buttons until SELECT PHONE is shown.
3. Press the OK button.
4. Press the up/down buttons to highlight
the required phone.
5. Press function button 1.
240
Telephone
Page 244 of 296
Downloaded from www.Manualslib.com manuals search engine Start communicating with the system
Before you can start talking to the system
you first have to press the VOICE button
for each operation and wait until the
system answers with a beep. See Voice
Control (page 51).
Press the button again to cancel the voice
session.
Name tag
The name tag functionality can support
the phone, audio and navigation features
by using the "STORE NAME" function. You
can assign name tags to items such as
favourite radio stations and personal
phone contacts. See Audio unit
commands (page 242). See Telephone
commands (page 249).
•
Store up to 20 name tags per function.
• The average recording time for each
name tag is approximately 2-3
seconds.
AUDIO UNIT COMMANDS
CD Player
You can control playback directly by voice
control.
Overview
The overview below shows the available
voice commands. The following lists will
give further information about the
complete command menu in selected
examples. "CD PLAYER"
"HELP""PLAY"
"TRACK" *
"SHUFFLE ALL"
"SHUFFLE FOLDER" **
"SHUFFLE OFF"
"REPEAT FOLDER" **
"REPEAT TRACK" "REPEAT OFF"
* Can be used as a shortcut.
** Only available if the CD contains audio data files like MP3.
Track
You can choose a track on your CD directly.
242
Voice control
Page 248 of 296
Downloaded from www.Manualslib.com manuals search engine System answer
User says
Steps
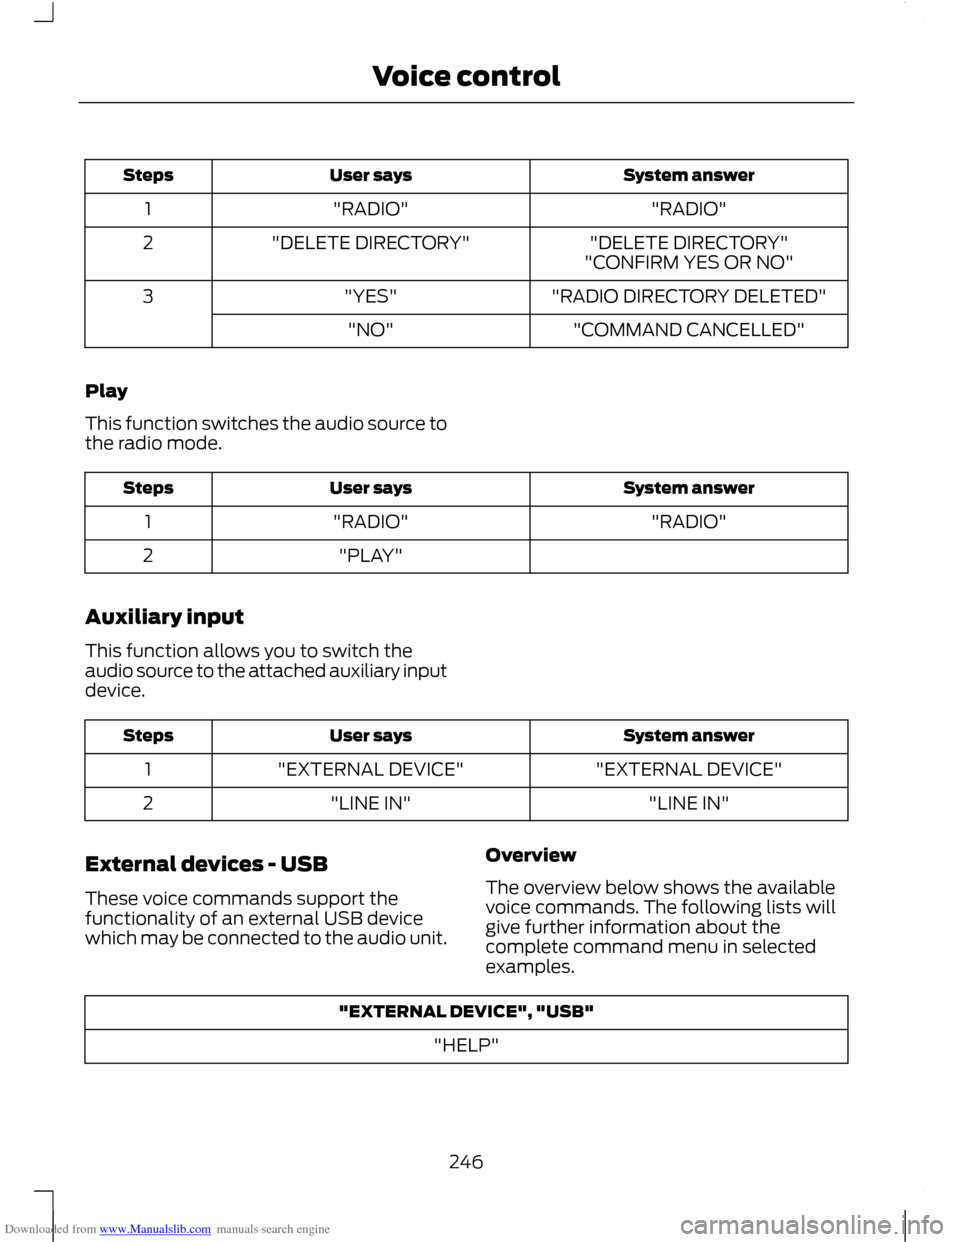
"RADIO"
"RADIO"
1
"DELETE DIRECTORY"
"DELETE DIRECTORY"
2
"CONFIRM YES OR NO"
"RADIO DIRECTORY DELETED"
"YES"
3
"COMMAND CANCELLED"
"NO"
Play
This function switches the audio source to
the radio mode. System answer
User says
Steps
"RADIO"
"RADIO"
1
"PLAY"
2
Auxiliary input
This function allows you to switch the
audio source to the attached auxiliary input
device. System answer
User says
Steps
"EXTERNAL DEVICE"
"EXTERNAL DEVICE"
1
"LINE IN"
"LINE IN"
2
External devices - USB
These voice commands support the
functionality of an external USB device
which may be connected to the audio unit. Overview
The overview below shows the available
voice commands. The following lists will
give further information about the
complete command menu in selected
examples."EXTERNAL DEVICE", "USB"
"HELP"
246
Voice control
Page 249 of 296
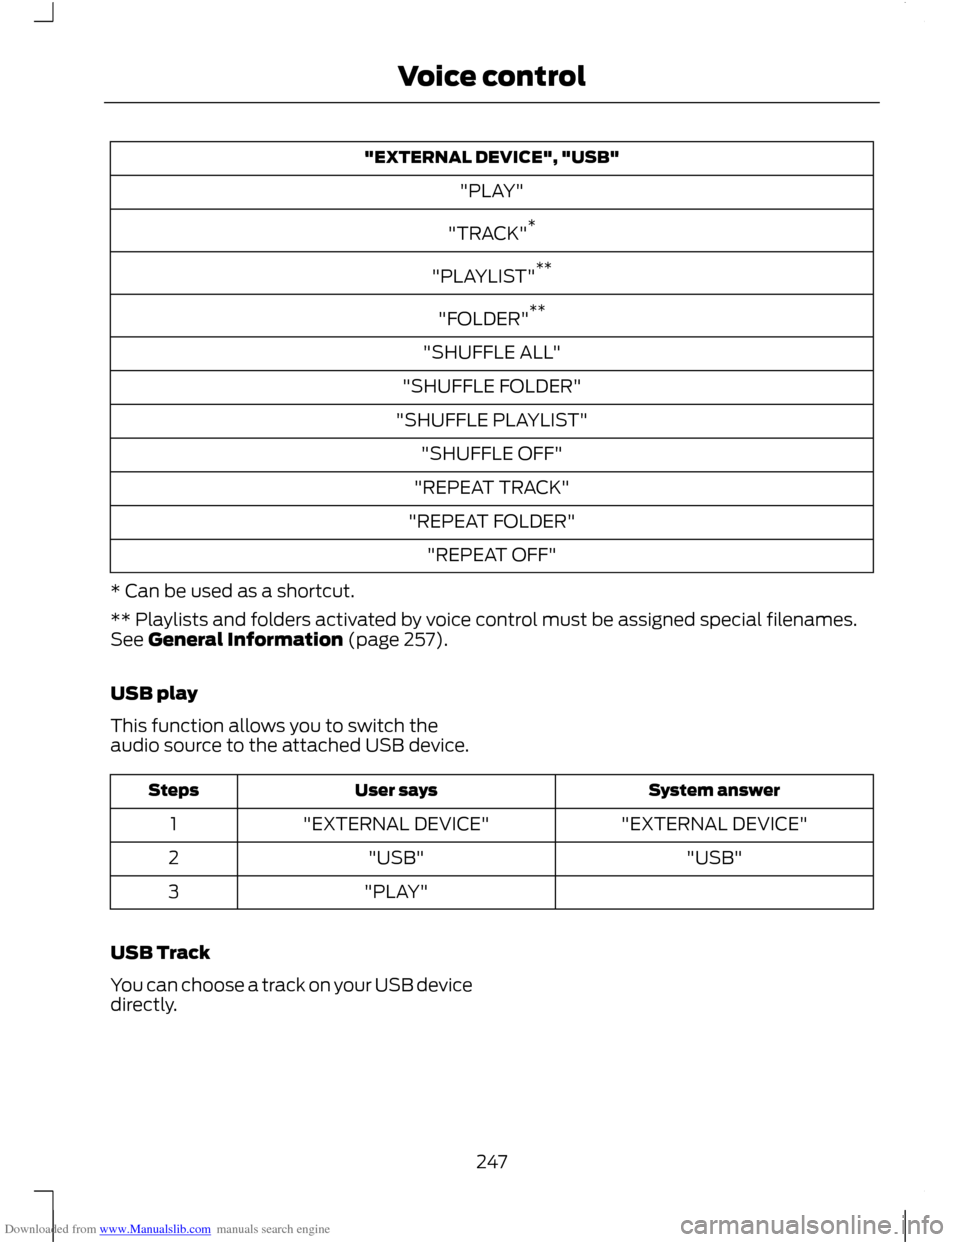
Downloaded from www.Manualslib.com manuals search engine "EXTERNAL DEVICE", "USB"
"PLAY"
"TRACK" *
"PLAYLIST" **
"FOLDER" **
"SHUFFLE ALL"
"SHUFFLE FOLDER"
"SHUFFLE PLAYLIST" "SHUFFLE OFF"
"REPEAT TRACK"
"REPEAT FOLDER" "REPEAT OFF"
* Can be used as a shortcut.
** Playlists and folders activated by voice control must be assigned special filenames.
See General Information (page 257).
USB play
This function allows you to switch the
audio source to the attached USB device. System answer
User says
Steps
"EXTERNAL DEVICE"
"EXTERNAL DEVICE"
1
"USB"
"USB"
2
"PLAY"
3
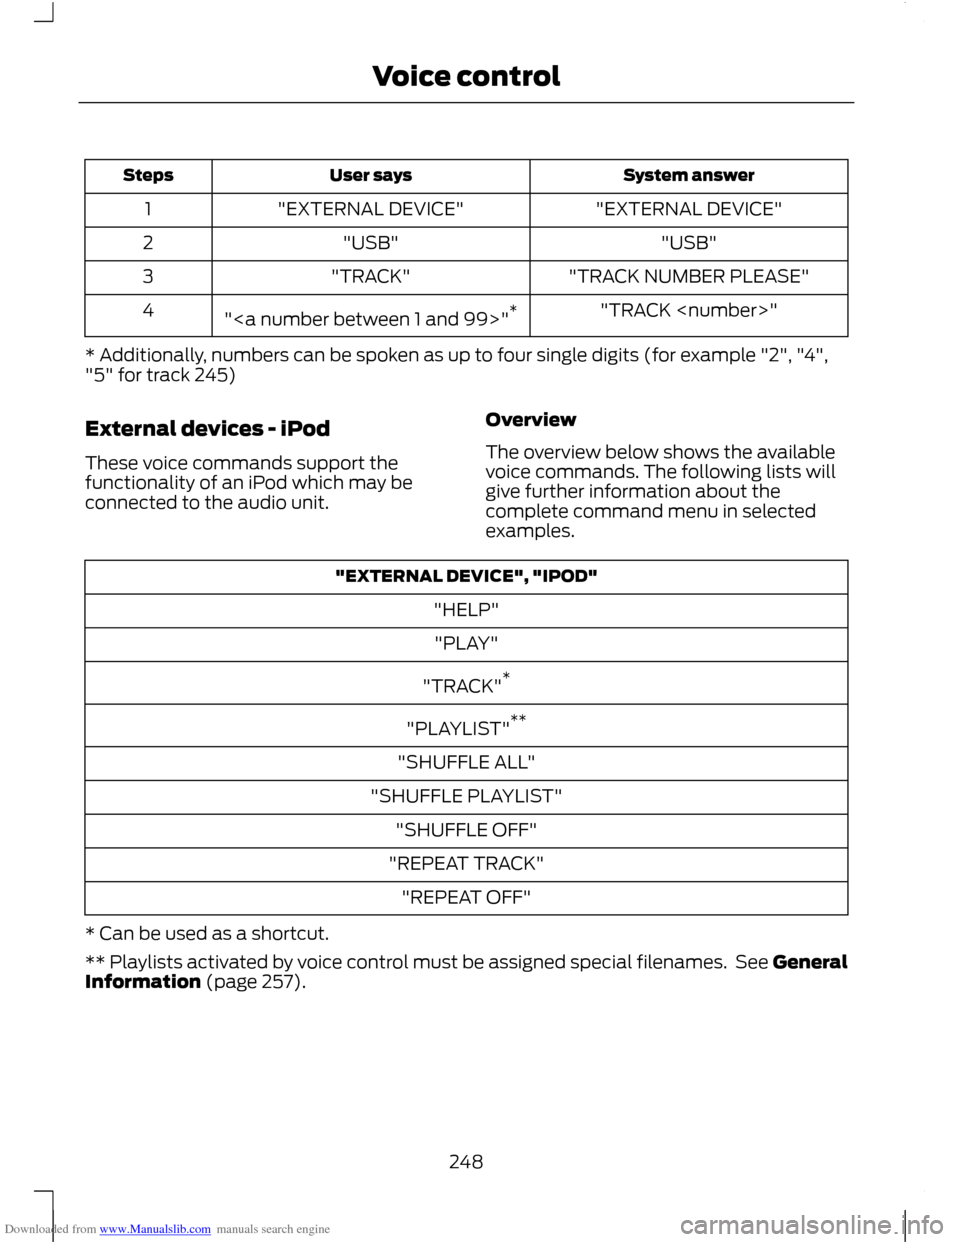
USB Track
You can choose a track on your USB device
directly.
247
Voice control
Page 250 of 296
Downloaded from www.Manualslib.com manuals search engine System answer
User says
Steps
"EXTERNAL DEVICE"
"EXTERNAL DEVICE"
1
"USB"
"USB"
2
"TRACK NUMBER PLEASE"
"TRACK"
3
"TRACK
"" *
4
* Additionally, numbers can be spoken as up to four single digits (for example "2", "4",
"5" for track 245)
External devices - iPod
These voice commands support the
functionality of an iPod which may be
connected to the audio unit. Overview
The overview below shows the available
voice commands. The following lists will
give further information about the
complete command menu in selected
examples."EXTERNAL DEVICE", "IPOD"
"HELP""PLAY"
"TRACK" *
"PLAYLIST" **
"SHUFFLE ALL"
"SHUFFLE PLAYLIST" "SHUFFLE OFF"
"REPEAT TRACK" "REPEAT OFF"
* Can be used as a shortcut.
** Playlists activated by voice control must be assigned special filenames. See General
Information (page 257).
248
Voice control
Page 259 of 296
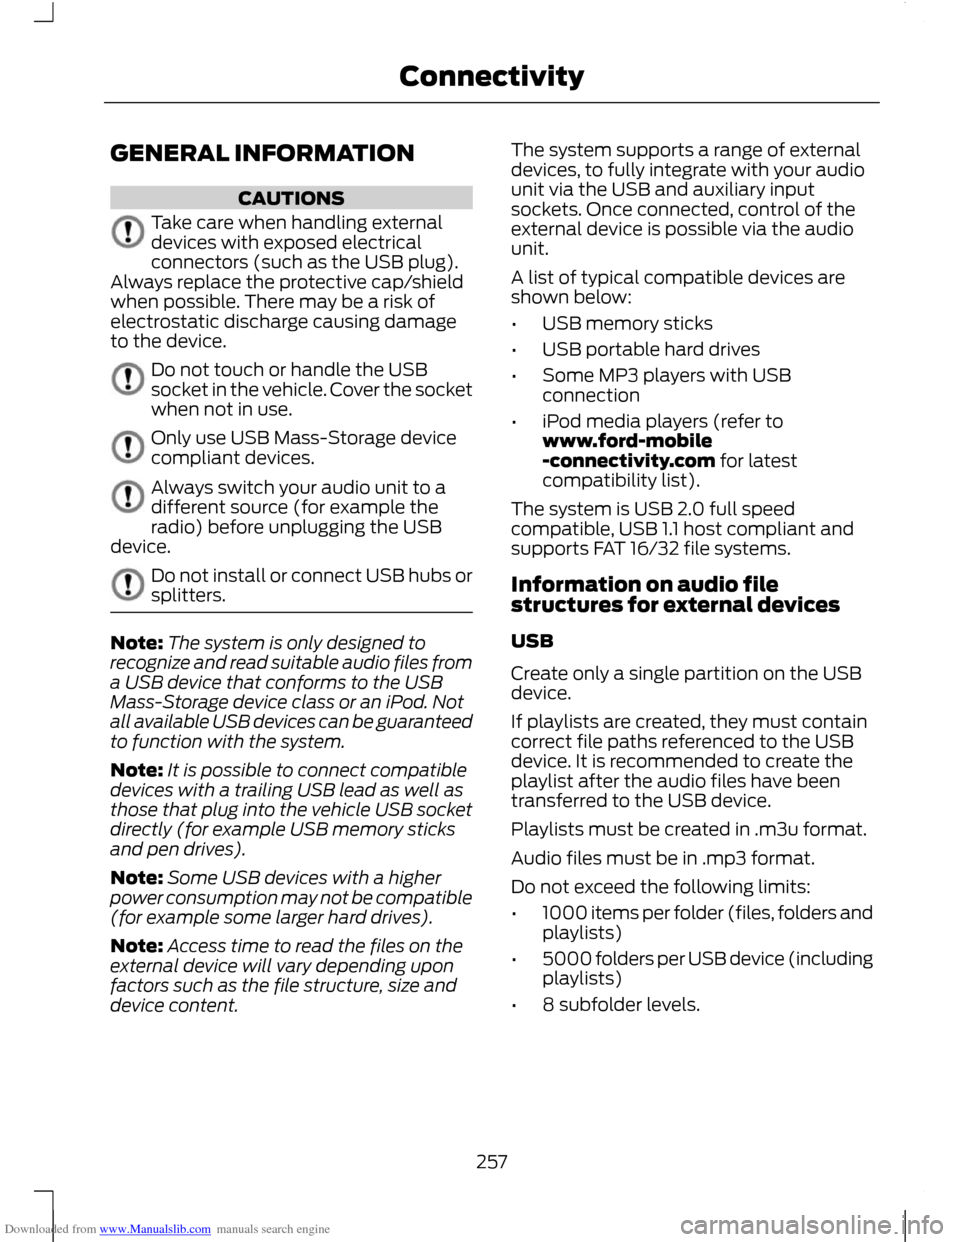
Downloaded from www.Manualslib.com manuals search engine GENERAL INFORMATION
CAUTIONS
Take care when handling external
devices with exposed electrical
connectors (such as the USB plug).
Always replace the protective cap/shield
when possible. There may be a risk of
electrostatic discharge causing damage
to the device. Do not touch or handle the USB
socket in the vehicle. Cover the socket
when not in use.
Only use USB Mass-Storage device
compliant devices.
Always switch your audio unit to a
different source (for example the
radio) before unplugging the USB
device. Do not install or connect USB hubs or
splitters.
Note:
The system is only designed to
recognize and read suitable audio files from
a USB device that conforms to the USB
Mass-Storage device class or an iPod. Not
all available USB devices can be guaranteed
to function with the system.
Note: It is possible to connect compatible
devices with a trailing USB lead as well as
those that plug into the vehicle USB socket
directly (for example USB memory sticks
and pen drives).
Note: Some USB devices with a higher
power consumption may not be compatible
(for example some larger hard drives).
Note: Access time to read the files on the
external device will vary depending upon
factors such as the file structure, size and
device content. The system supports a range of external
devices, to fully integrate with your audio
unit via the USB and auxiliary input
sockets. Once connected, control of the
external device is possible via the audio
unit.
A list of typical compatible devices are
shown below:
•
USB memory sticks
• USB portable hard drives
• Some MP3 players with USB
connection
• iPod media players (refer to
www.ford-mobile
-connectivity.com for latest
compatibility list).
The system is USB 2.0 full speed
compatible, USB 1.1 host compliant and
supports FAT 16/32 file systems.
Information on audio file
structures for external devices
USB
Create only a single partition on the USB
device.
If playlists are created, they must contain
correct file paths referenced to the USB
device. It is recommended to create the
playlist after the audio files have been
transferred to the USB device.
Playlists must be created in .m3u format.
Audio files must be in .mp3 format.
Do not exceed the following limits:
• 1000 items per folder (files, folders and
playlists)
• 5000 folders per USB device (including
playlists)
• 8 subfolder levels.
257
Connectivity
Page 260 of 296
Downloaded from www.Manualslib.com manuals search engine To enable voice control for custom
playlists and folders, follow the procedure
below:
•
Create folders named with the
structure "Ford<*>" where <*> is a
number 1-10. For example "Ford3"
without an extension.
• Create playlists named with the
structure "Ford<*>.m3u" where <*>
is a number 1-10. For example
"Ford5.m3u" without any space
between "Ford" and the number.
Thereafter, custom folders and playlists
will be selectable with voice control. See
Audio unit commands (page 242).
iPod
To enable voice control for custom
playlists, create playlists named with the
structure "Ford<*>" where <*> is a
number 1-10. For example "Ford7" without
any space between "Ford" and the
number.
Thereafter, playlists will be selectable with
voice control. See Audio unit commands
(page 242).
CONNECTING AN EXTERNAL
DEVICE WARNING
Make sure the external device is
securely mounted within the vehicle,
and that trailing connections do not
obstruct any of the driving controls. External devices may be connected using
the auxiliary input socket and the USB port.
See Auxiliary input (AUX IN) socket
(page 125). See USB port (page 125). Connection
Plug in the device, and if necessary secure
it to prevent movement within the vehicle.
Connecting an iPod
For optimum convenience and audio
quality, we recommend that you purchase
a dedicated single connection lead
available from your dealer.
Alternatively, it is possible to connect your
iPod using the standard iPod USB cable
and a separate 3.5mm audio jack lead. If
using this method preset the iPod volume
to maximum and turn off any equalizer
settings before making the connections:
•
Connect the headphone output of the
iPod to the AUX IN socket.
• Connect the USB cable from the iPod
to the vehicle USB socket.
CONNECTING AN EXTERNAL
DEVICE - VEHICLES WITH:
BLUETOOTH
Connecting a Bluetooth audio
device CAUTION
As various standards exist,
manufacturers are able to implement
a variety of profiles in their Bluetooth
devices. Because of this, an incompatibility
can occur between the Bluetooth device
and the system, which in some cases may
limit system functionality. To avoid this
situation, only recommended devices
should be used.
Please visit the website
www.ford-mobile-connectivity.com
for full details. 258
Connectivity
Page 261 of 296
Downloaded from www.Manualslib.com manuals search engine Bonding the device
To connect the device to the system follow
the same procedure as for Bluetooth hands
free phones. See Bluetooth setup (page
237).
Operating the device
Note:
The seek buttons and file information
will only work on certain phones and
devices.
Select Bluetooth audio as the active
source.
1. Select AUX.
2. Press the up and down arrow buttons to select the desired function.
3. Press the OK button.
Tracks can be accessed by skipping
forwards and backwards using the steering
wheel controls, or directly from the audio
unit controls.
Audio control
Press the seek up and down keys to skip
backwards and forwards through tracks.
Press and hold the seek keys to enable fast
rewind/fast forward through track content.
Press the INFO button or function button
4 to display the following:
• Title.
• Artist.
• Album.
• File name.
USING A USB DEVICE
Various icons are used to identify types of
audio file, folders etc. USB device is the active source Folder
Playlist
Album
Artist
Filename
Track title
Information not available
Operation
Select the USB device as the audio source
by repeatedly pressing the AUX button
until the USB screen appears in the display.
After first connecting the USB device, the
first track within the first folder will start
to play automatically. Subsequently,
following audio source switching, the
position of playback on the USB device is
remembered.
To browse the device contents, press the
up/down arrow key or the OK button once.
259
ConnectivityE100029 E100022 E100023 E100024 E100025 E100026 E100027 E100028