ignition FORD C MAX 2016 Owner's Manual
[x] Cancel search | Manufacturer: FORD, Model Year: 2016, Model line: C MAX, Model: FORD C MAX 2016Pages: 395, PDF Size: 5.78 MB
Page 84 of 395
2. Close the window a third time to the
point of resistance. The bounce-back
feature is now disabled and you can
close the window manually. The
window will go past the point of
resistance and you can close it fully.
See an authorized dealer as soon as
possible if the window does not close after
the third attempt.
Resetting the Bounce-Back Feature WARNING
The bounce-back feature remains
turned off until you reset the
memory.
If you have disconnected the battery, you
must reset the bounce-back memory
separately for each window.
1. Lift and hold the switch until the
window is fully closed.
2. Release the switch.
3. Lift the switch again for one more second.
4. Press and hold the switch until the window is fully open.
5. Release the switch.
6. Lift and hold the switch until the window is fully closed.
7. Open the window and then try to close
it automatically.
8. Reset and repeat the procedure if the window does not close automatically.
Accessory Delay (If Equipped)
You can use the window switches for
several minutes after you switch the
ignition off or until you open either front
door. GLOBAL OPENING
You can use the remote control to operate
the windows with the ignition off.
Note:
To operate this feature, accessory
delay must not be active.
Opening the Windows
You can use the global opening feature to
open the windows only for a short time
after you unlock your vehicle by using the
remote control.
To use the global opening feature:
1. Press and release the remote control unlock button.
2. Press the remote control unlock button
again and hold it for approximately
three seconds. Release the control
when the windows begin to open.
3. Press the lock or unlock button on your
remote control to stop the window
opening function.
Note: Contact an authorized Ford dealer to
deactivate this feature.
EXTERIOR MIRRORS
Power Exterior Mirrors WARNING
Do not adjust the mirrors when your
vehicle is moving.
81
C-MAX (CCG) Canada/United States of America, enUSA, First Printing Windows and Mirrors
Page 87 of 395
SUN SHADES (If Equipped)
WARNINGS
Do not let children play with the sun
shade or leave them unattended in
the vehicle. They may seriously hurt
themselves. When closing the sun shade, you
should verify that it is free of
obstructions and make sure that
children and pets are not in the proximity
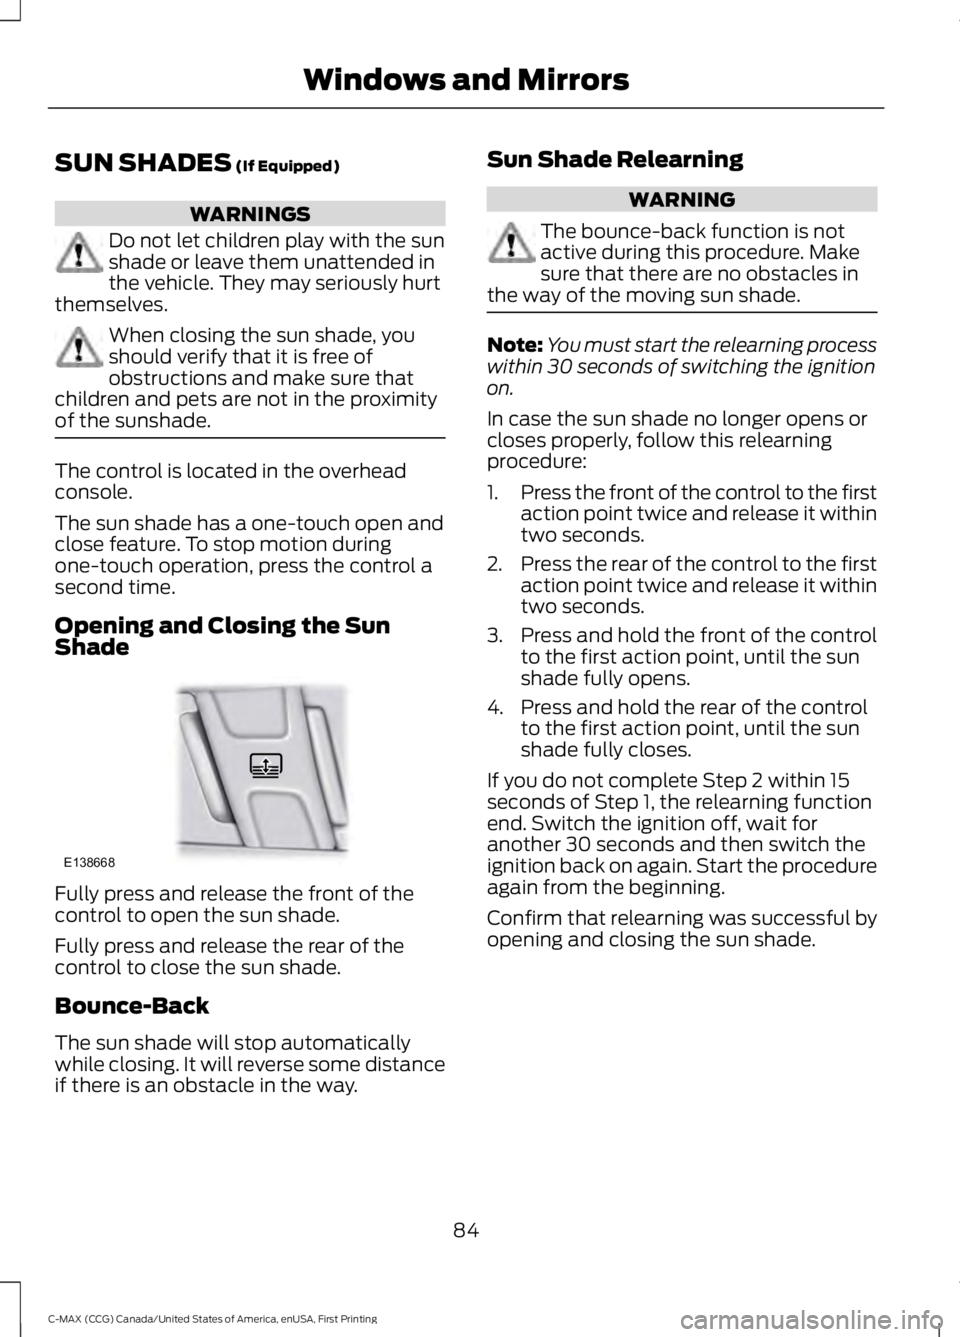
of the sunshade. The control is located in the overhead
console.
The sun shade has a one-touch open and
close feature. To stop motion during
one-touch operation, press the control a
second time.
Opening and Closing the Sun
Shade
Fully press and release the front of the
control to open the sun shade.
Fully press and release the rear of the
control to close the sun shade.
Bounce-Back
The sun shade will stop automatically
while closing. It will reverse some distance
if there is an obstacle in the way. Sun Shade Relearning WARNING
The bounce-back function is not
active during this procedure. Make
sure that there are no obstacles in
the way of the moving sun shade. Note:
You must start the relearning process
within 30 seconds of switching the ignition
on.
In case the sun shade no longer opens or
closes properly, follow this relearning
procedure:
1. Press the front of the control to the first
action point twice and release it within
two seconds.
2. Press the rear of the control to the first
action point twice and release it within
two seconds.
3. Press and hold the front of the control
to the first action point, until the sun
shade fully opens.
4. Press and hold the rear of the control to the first action point, until the sun
shade fully closes.
If you do not complete Step 2 within 15
seconds of Step 1, the relearning function
end. Switch the ignition off, wait for
another 30 seconds and then switch the
ignition back on again. Start the procedure
again from the beginning.
Confirm that relearning was successful by
opening and closing the sun shade.
84
C-MAX (CCG) Canada/United States of America, enUSA, First Printing Windows and MirrorsE138668
Page 89 of 395
Charge Assist
The up and down arrows provide
information about the energy going into
and out of the high voltage battery. The up
arrow above the battery indicates battery
charging such as from regenerative braking.
The down arrow below the battery
indicates battery discharging to provide
power for propulsion or vehicle
accessories.
Regen Active
A circular arrow symbol appears in the
center of the battery gauge when energy
is being recaptured through the
regenerative braking system.
This feature can be switched on or off in
the information displays settings menu.
See General Information (page 93).
Fuel Gauge:
Note: The fuel gauge may vary slightly
when your vehicle is moving or on a gradient. Switch the ignition on. The fuel gauge will
indicate approximately how much fuel is
left in the fuel tank. The arrow adjacent to
the fuel pump symbol indicates on which
side of your vehicle the fuel filler door is
located.
The needle should move toward F when
you refuel your vehicle. If the needle points
to E after adding fuel, this indicates your
vehicle needs service soon.
After refueling some variability in needle
position is normal:
•
It may take a short time for the needle
to reach F after leaving the gas station.
This is normal and depends upon the
slope of pavement at the gas station.
• The fuel amount dispensed into the
tank is a little less or more than the
gauge indicated. This is normal and
depends upon the slope of pavement
at the gas station.
• If the gas station nozzle shuts off
before the tank is full, try a different
gas pump nozzle.
Low Fuel Reminder
A low fuel reminder triggers when the fuel
gauge needle is at 1/16th.
Variations: Distance-to-empty
Fuel gauge position
Driving type (fuel economy
conditions)
35–80 mi (56–129 km)
1/16th
Highway driving
35 mi (56 km)
1/16th
Severe duty driving (trailer
towing, extended idle)
Vehicle Settings and Personalization
Display/Trip
See
General Information (page 93). Information
See
General Information (page 93).
Settings
See
General Information (page 93).
86
C-MAX (CCG) Canada/United States of America, enUSA, First Printing Instrument Cluster
Page 92 of 395
WARNING LAMPS AND
INDICATORS
The following warning lamps and
indicators will alert you to a vehicle
condition that may become serious. Some
lamps will light when you start your vehicle
to make sure they work. If any lamps
remain on after starting your vehicle, refer
to the respective system warning lamp for
further information.
Note:
Some warning indicators appear in
the information display and function the
same as a warning lamp but do not display
when you start your vehicle.
Anti-Lock Braking System If it lights when you are driving,
this indicates a malfunction. You
will continue to have normal
braking (without anti-lock braking system)
unless the brake system warning lamp also
lights. Have the system checked by an
authorized dealer.
Battery If it lights while driving, this
indicates a malfunction. Switch
off all unnecessary electrical
equipment and have the system checked
by an authorized dealer immediately.
Brake System Lights when you engage the
parking brake with the ignition
on.
If it lights when you are driving, check that
you do not have the parking brake
engaged. If you do not have the parking
brake engaged, this indicates low brake
fluid level or a brake system malfunction.
Have the system checked immediately by
an authorized dealer. WARNING
Driving your vehicle with the warning
lamp on is dangerous. A significant
decrease in braking performance
may occur. It will take you longer to stop
your vehicle. Have your vehicle checked by
your authorized dealer immediately. Driving
extended distances with the parking brake
engaged can cause brake failure and the
risk of personal injury. Cruise Control (If Equipped)
Lights when you switch on this
feature.
Direction Indicator Lights when you switch on the
left or right direction indicator or
hazard warning flasher. If the
indicators stay on or flash faster, check for
a burned out bulb. See
Changing a Bulb
(page 232).
Door Ajar Displays when the ignition is on
and any door is not completely
closed.
EcoSelect Lights when you switch on this
feature. See
Hybrid Vehicle
Operation (page 135).
Engine and Motor Coolant
Temperature Lights when the engine or motor
coolant temperature is high.
Stop the vehicle as soon as
possible, switch off the engine and let cool.
89
C-MAX (CCG) Canada/United States of America, enUSA, First Printing Instrument Cluster E144522 E71340 E194390
Page 93 of 395
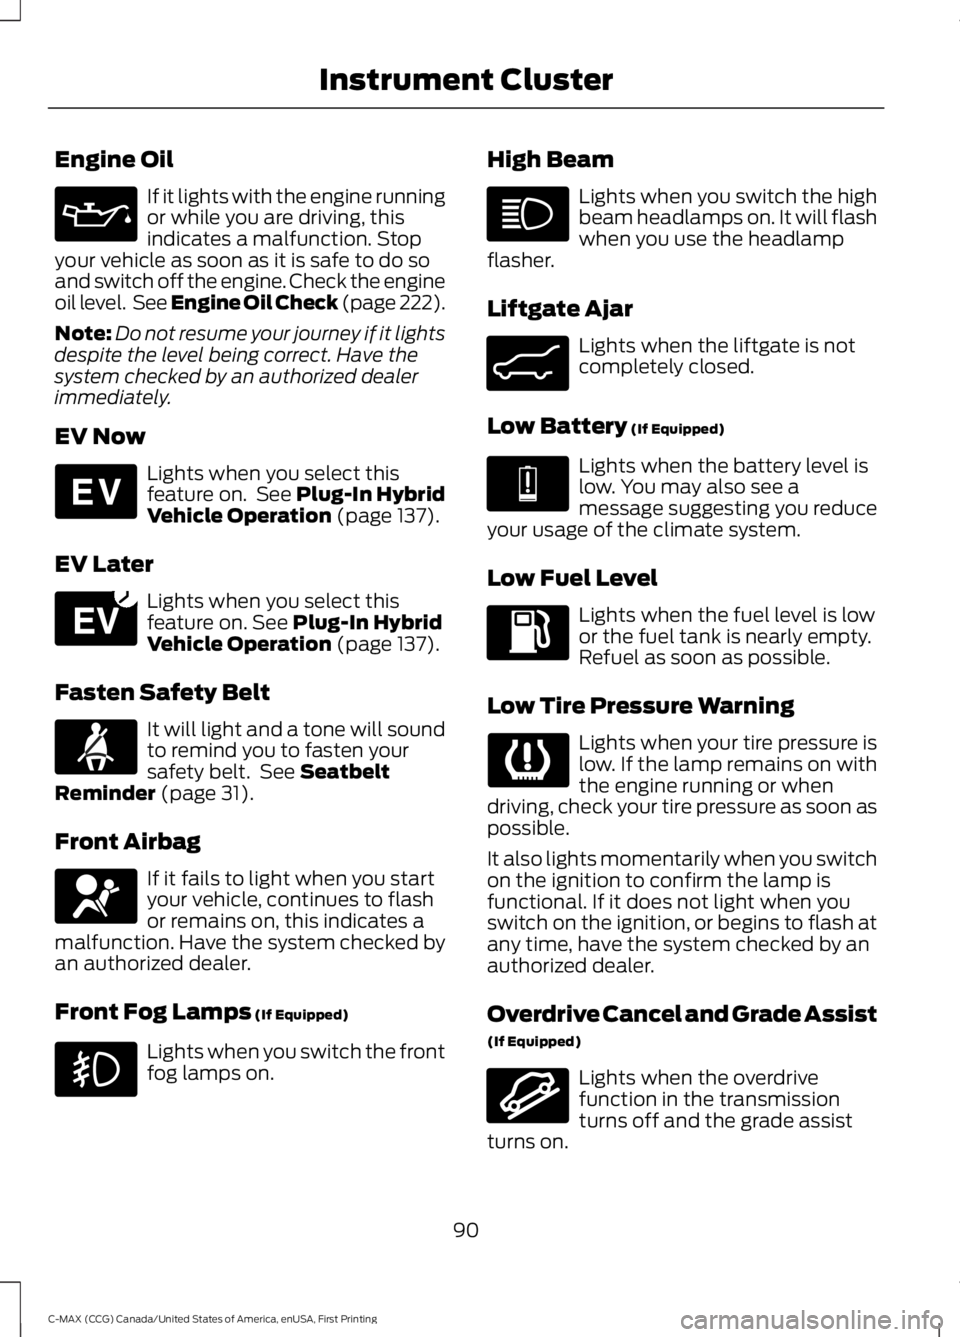
Engine Oil
If it lights with the engine running
or while you are driving, this
indicates a malfunction. Stop
your vehicle as soon as it is safe to do so
and switch off the engine. Check the engine
oil level. See Engine Oil Check (page 222).
Note: Do not resume your journey if it lights
despite the level being correct. Have the
system checked by an authorized dealer
immediately.
EV Now Lights when you select this
feature on. See Plug-In Hybrid
Vehicle Operation (page 137).
EV Later Lights when you select this
feature on.
See Plug-In Hybrid
Vehicle Operation (page 137).
Fasten Safety Belt It will light and a tone will sound
to remind you to fasten your
safety belt. See
Seatbelt
Reminder (page 31).
Front Airbag If it fails to light when you start
your vehicle, continues to flash
or remains on, this indicates a
malfunction. Have the system checked by
an authorized dealer.
Front Fog Lamps
(If Equipped) Lights when you switch the front
fog lamps on. High Beam Lights when you switch the high
beam headlamps on. It will flash
when you use the headlamp
flasher.
Liftgate Ajar Lights when the liftgate is not
completely closed.
Low Battery
(If Equipped) Lights when the battery level is
low. You may also see a
message suggesting you reduce
your usage of the climate system.
Low Fuel Level Lights when the fuel level is low
or the fuel tank is nearly empty.
Refuel as soon as possible.
Low Tire Pressure Warning Lights when your tire pressure is
low. If the lamp remains on with
the engine running or when
driving, check your tire pressure as soon as
possible.
It also lights momentarily when you switch
on the ignition to confirm the lamp is
functional. If it does not light when you
switch on the ignition, or begins to flash at
any time, have the system checked by an
authorized dealer.
Overdrive Cancel and Grade Assist
(If Equipped) Lights when the overdrive
function in the transmission
turns off and the grade assist
turns on.
90
C-MAX (CCG) Canada/United States of America, enUSA, First Printing Instrument Cluster E144814 E151263 E162453 E144691 E162456
Page 94 of 395
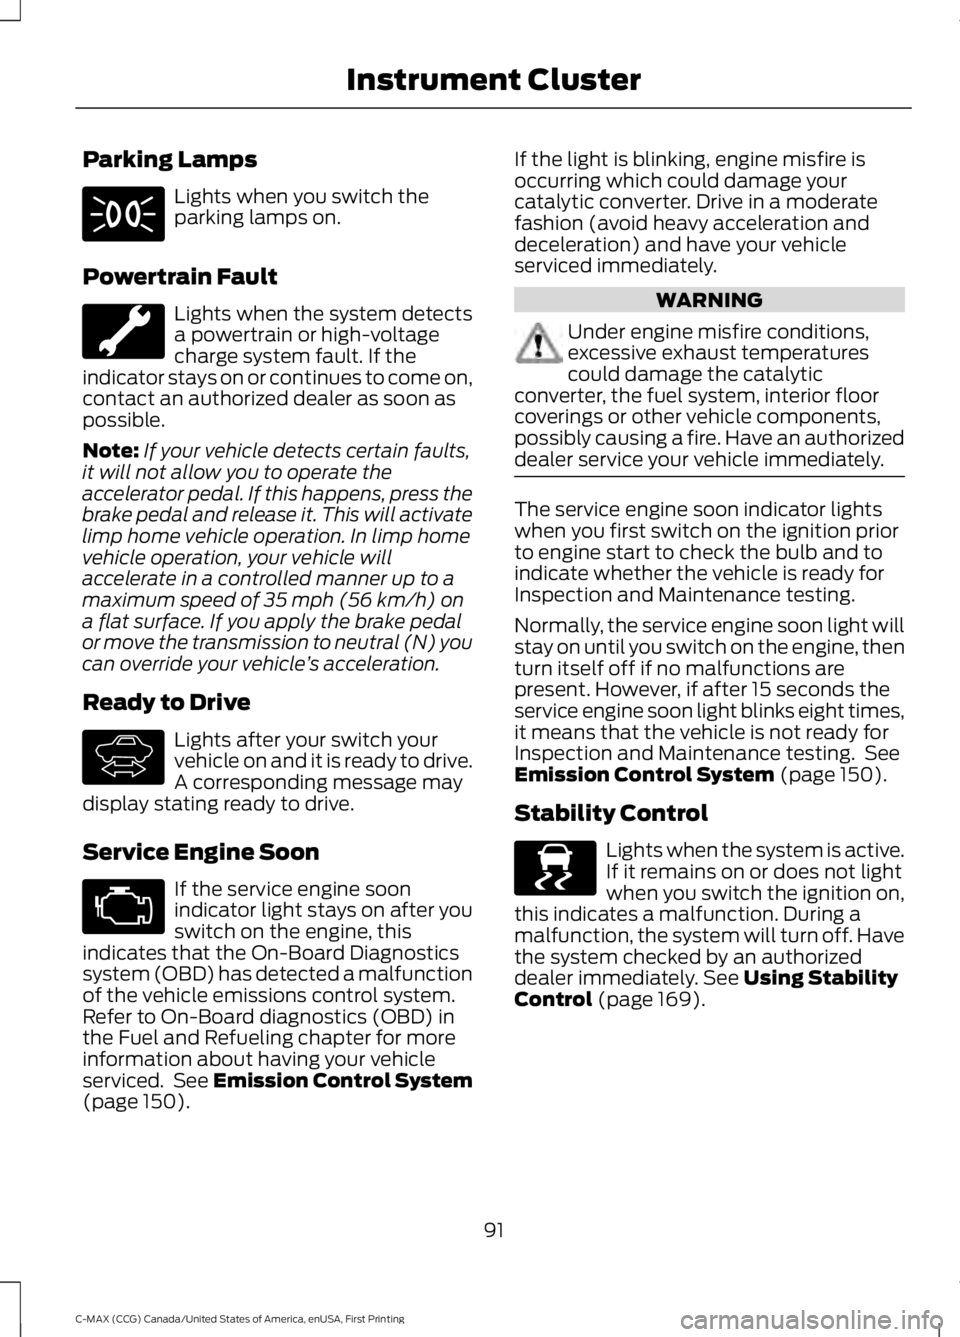
Parking Lamps
Lights when you switch the
parking lamps on.
Powertrain Fault Lights when the system detects
a powertrain or high-voltage
charge system fault. If the
indicator stays on or continues to come on,
contact an authorized dealer as soon as
possible.
Note: If your vehicle detects certain faults,
it will not allow you to operate the
accelerator pedal. If this happens, press the
brake pedal and release it. This will activate
limp home vehicle operation. In limp home
vehicle operation, your vehicle will
accelerate in a controlled manner up to a
maximum speed of 35 mph (56 km/h) on
a flat surface. If you apply the brake pedal
or move the transmission to neutral (N) you
can override your vehicle ’s acceleration.
Ready to Drive Lights after your switch your
vehicle on and it is ready to drive.
A corresponding message may
display stating ready to drive.
Service Engine Soon If the service engine soon
indicator light stays on after you
switch on the engine, this
indicates that the On-Board Diagnostics
system (OBD) has detected a malfunction
of the vehicle emissions control system.
Refer to On-Board diagnostics (OBD) in
the Fuel and Refueling chapter for more
information about having your vehicle
serviced. See Emission Control System
(page 150). If the light is blinking, engine misfire is
occurring which could damage your
catalytic converter. Drive in a moderate
fashion (avoid heavy acceleration and
deceleration) and have your vehicle
serviced immediately. WARNING
Under engine misfire conditions,
excessive exhaust temperatures
could damage the catalytic
converter, the fuel system, interior floor
coverings or other vehicle components,
possibly causing a fire. Have an authorized
dealer service your vehicle immediately. The service engine soon indicator lights
when you first switch on the ignition prior
to engine start to check the bulb and to
indicate whether the vehicle is ready for
Inspection and Maintenance testing.
Normally, the service engine soon light will
stay on until you switch on the engine, then
turn itself off if no malfunctions are
present. However, if after 15 seconds the
service engine soon light blinks eight times,
it means that the vehicle is not ready for
Inspection and Maintenance testing. See
Emission Control System
(page 150).
Stability Control Lights when the system is active.
If it remains on or does not light
when you switch the ignition on,
this indicates a malfunction. During a
malfunction, the system will turn off. Have
the system checked by an authorized
dealer immediately.
See Using Stability
Control (page 169).
91
C-MAX (CCG) Canada/United States of America, enUSA, First Printing Instrument Cluster E144692 E138639
Page 95 of 395
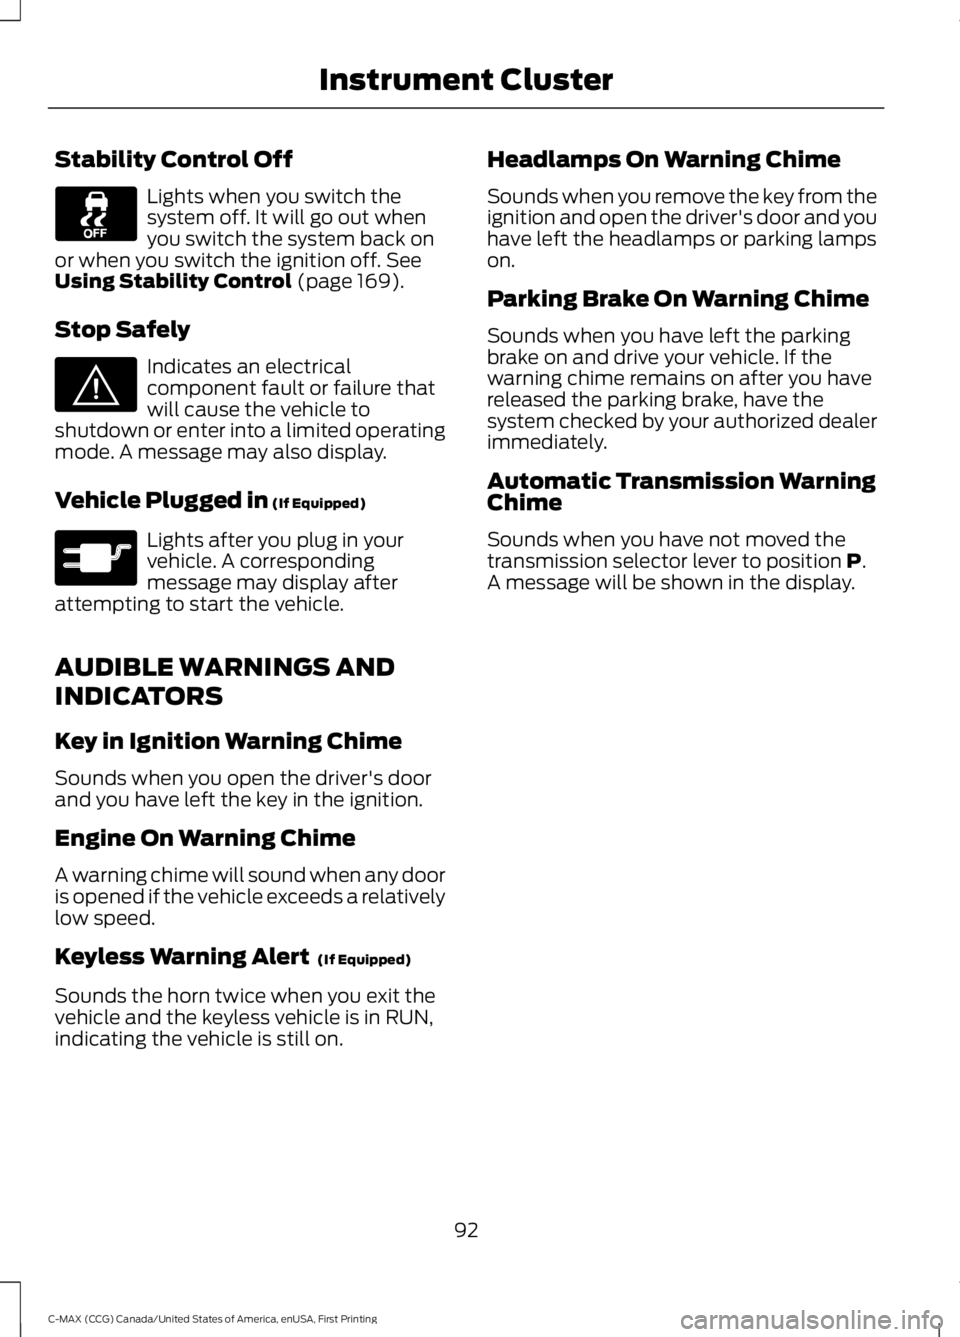
Stability Control Off
Lights when you switch the
system off. It will go out when
you switch the system back on
or when you switch the ignition off. See
Using Stability Control (page 169).
Stop Safely Indicates an electrical
component fault or failure that
will cause the vehicle to
shutdown or enter into a limited operating
mode. A message may also display.
Vehicle Plugged in
(If Equipped) Lights after you plug in your
vehicle. A corresponding
message may display after
attempting to start the vehicle.
AUDIBLE WARNINGS AND
INDICATORS
Key in Ignition Warning Chime
Sounds when you open the driver's door
and you have left the key in the ignition.
Engine On Warning Chime
A warning chime will sound when any door
is opened if the vehicle exceeds a relatively
low speed.
Keyless Warning Alert
(If Equipped)
Sounds the horn twice when you exit the
vehicle and the keyless vehicle is in RUN,
indicating the vehicle is still on. Headlamps On Warning Chime
Sounds when you remove the key from the
ignition and open the driver's door and you
have left the headlamps or parking lamps
on.
Parking Brake On Warning Chime
Sounds when you have left the parking
brake on and drive your vehicle. If the
warning chime remains on after you have
released the parking brake, have the
system checked by your authorized dealer
immediately.
Automatic Transmission Warning
Chime
Sounds when you have not moved the
transmission selector lever to position
P.
A message will be shown in the display.
92
C-MAX (CCG) Canada/United States of America, enUSA, First Printing Instrument Cluster E144693 E144694
Page 107 of 395
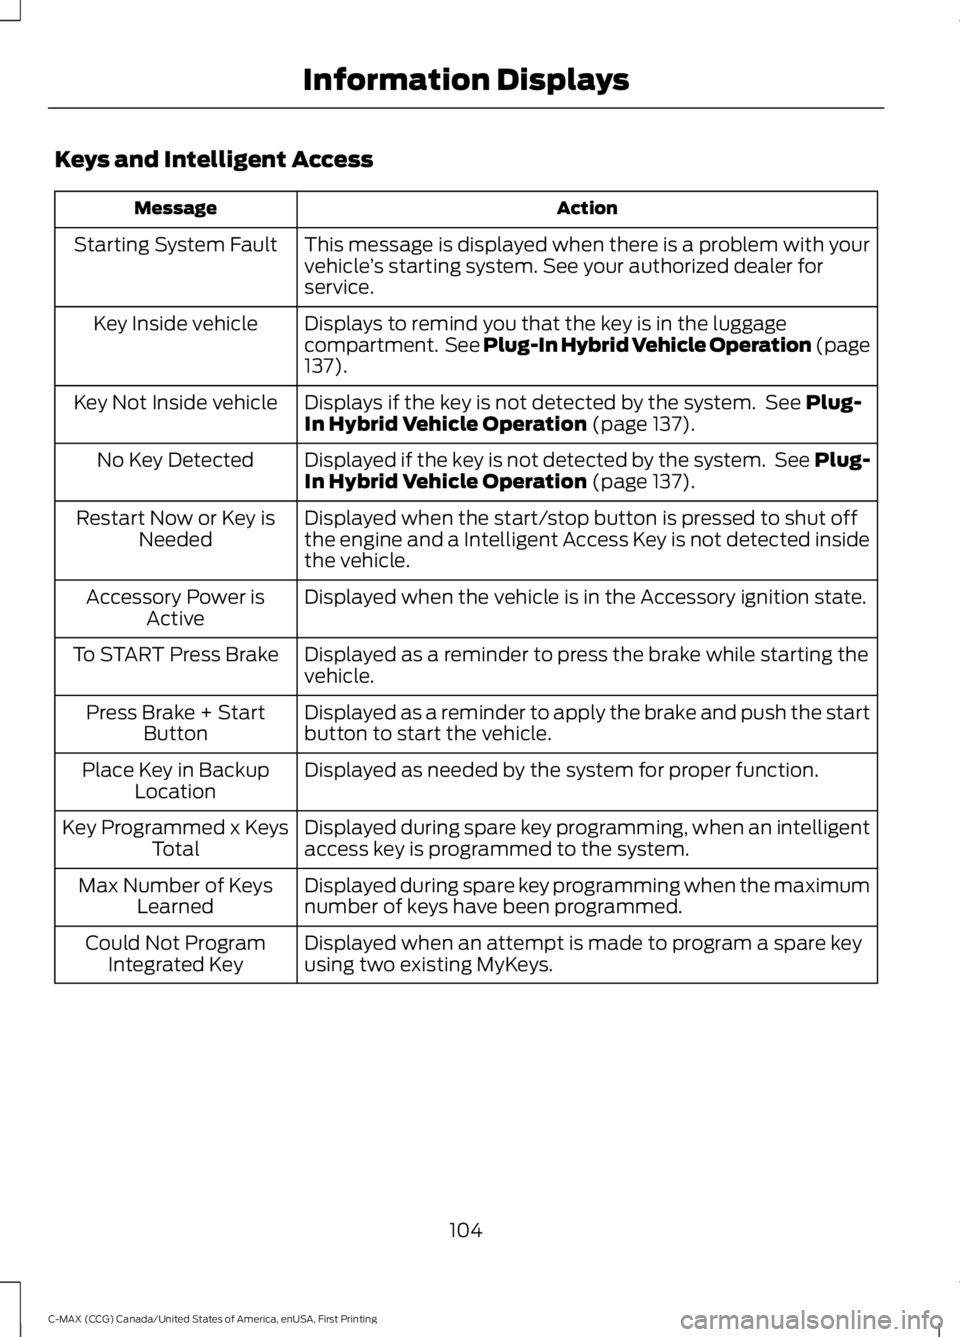
Keys and Intelligent Access
Action
Message
This message is displayed when there is a problem with your
vehicle’s starting system. See your authorized dealer for
service.
Starting System Fault
Displays to remind you that the key is in the luggage
compartment. See Plug-In Hybrid Vehicle Operation (page
137).
Key Inside vehicle
Displays if the key is not detected by the system. See
Plug-
In Hybrid Vehicle Operation (page 137).
Key Not Inside vehicle
Displayed if the key is not detected by the system. See Plug-
In Hybrid Vehicle Operation
(page 137).
No Key Detected
Displayed when the start/stop button is pressed to shut off
the engine and a Intelligent Access Key is not detected inside
the vehicle.
Restart Now or Key is
Needed
Displayed when the vehicle is in the Accessory ignition state.
Accessory Power is
Active
Displayed as a reminder to press the brake while starting the
vehicle.
To START Press Brake
Displayed as a reminder to apply the brake and push the start
button to start the vehicle.
Press Brake + Start
Button
Displayed as needed by the system for proper function.
Place Key in Backup
Location
Displayed during spare key programming, when an intelligent
access key is programmed to the system.
Key Programmed x Keys
Total
Displayed during spare key programming when the maximum
number of keys have been programmed.
Max Number of Keys
Learned
Displayed when an attempt is made to program a spare key
using two existing MyKeys.
Could Not Program
Integrated Key
104
C-MAX (CCG) Canada/United States of America, enUSA, First Printing Information Displays
Page 114 of 395
5. Direct the outer instrument panel air
vents toward the side windows.
6. To increase the airflow to the outer instrument panel vents, close the air
vents in the middle of the instrument
panel and in the rear of the center
console.
HEATED WINDOWS AND
MIRRORS
Note: Make sure the engine is running
before operating the heated windows.
Heated Rear Window The heated rear window button
is below the climate control unit.
Press the button to clear the
heated rear window of thin ice and fog.
The heated rear window will automatically
turn off after a short period of time.
Note: Do not use razor blades or other
sharp objects to clean or remove decals
from the inside of the heated rear window.
The vehicle warranty does not cover
damage caused to the heated rear window
grid lines.
Heated Exterior Mirrors (If Equipped)
When you switch the heated rear window
on, the heated exterior mirrors will
automatically turn on.
Note: Do not remove ice from the mirrors
with a scraper or adjust the mirror glass
when it is frozen in place.
Note: Do not clean the mirror housing or
glass with harsh abrasives, fuel or other
petroleum-based cleaning products. CABIN AIR FILTER
Your vehicle is equipped with a cabin air
filter, which gives you and your passengers
the following benefits:
•
It improves your driving comfort by
reducing particle concentration.
• It improves the interior compartment
cleanliness.
• It protects the climate control
components from particle deposits.
Your cabin air filter is located under the
instrument panel in the passenger footwell
area.
Note: Make sure you have a cabin air filter
installed at all times. This prevents foreign
objects from entering the system. Running
the system without a filter in place could
result in degradation or damage to the
system.
Replace the filter at regular intervals. See
Maintenance
(page 218).
For additional cabin air filter information,
or to replace the filter, see an authorized
dealer.
REMOTE START
(If Equipped)
The remote start feature allows you to
pre-condition the interior of your vehicle.
The climate control system works to
achieve comfort according to your previous
settings.
Note: You cannot adjust the system during
remote start operation.
Turn the ignition on to return the system
to its previous settings. You can now make
adjustments normally, but you need to turn
certain vehicle-dependent features back
on, such as:
• Heated seats.
• Cooled seats.
111
C-MAX (CCG) Canada/United States of America, enUSA, First Printing Climate ControlE72507
Page 125 of 395
1.
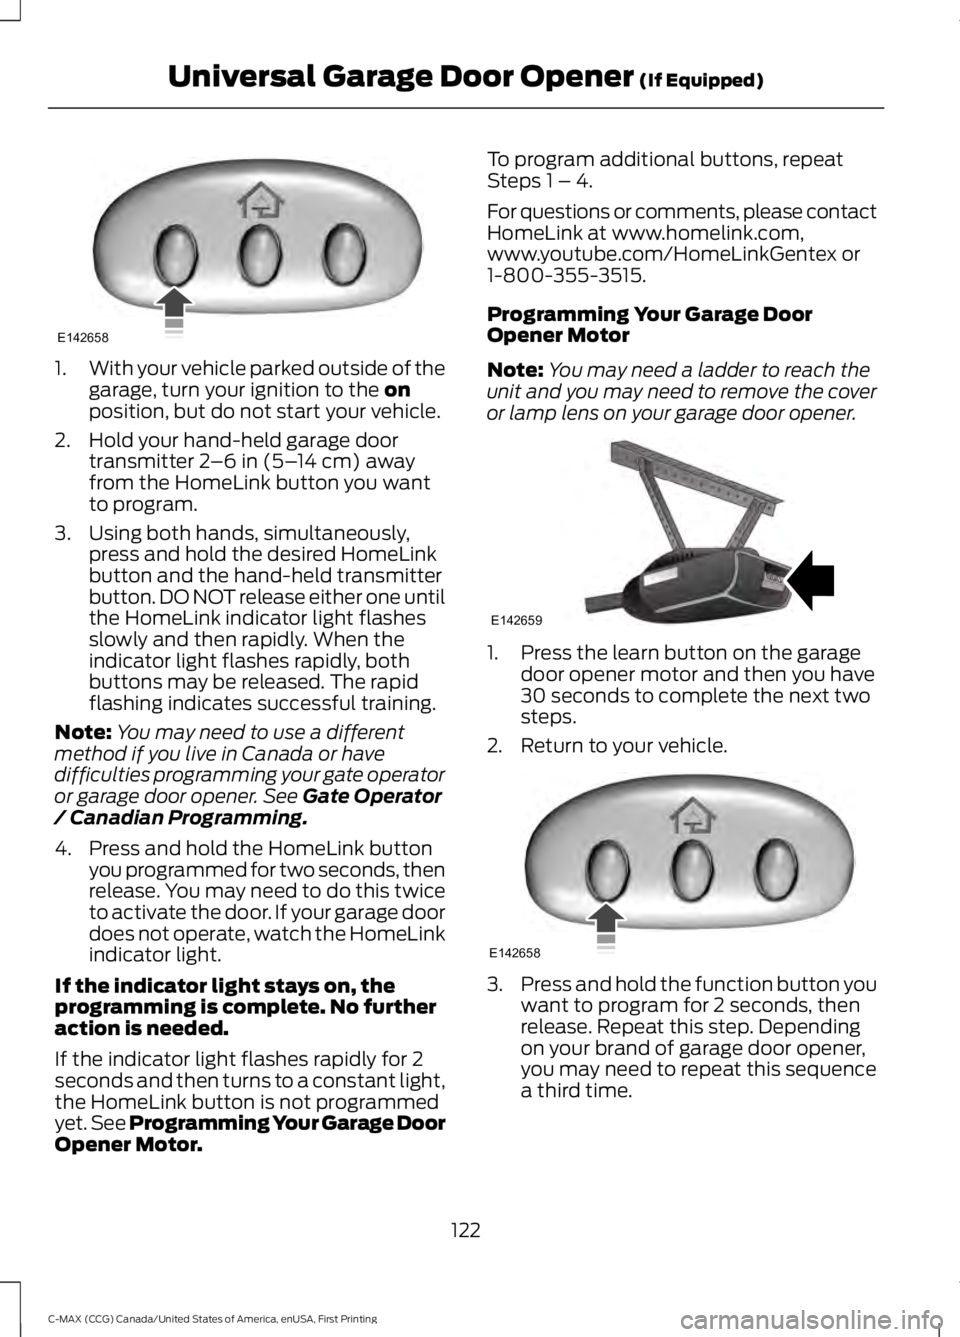
With your vehicle parked outside of the
garage, turn your ignition to the on
position, but do not start your vehicle.
2. Hold your hand-held garage door transmitter
2–6 in (5– 14 cm) away
from the HomeLink button you want
to program.
3. Using both hands, simultaneously, press and hold the desired HomeLink
button and the hand-held transmitter
button. DO NOT release either one until
the HomeLink indicator light flashes
slowly and then rapidly. When the
indicator light flashes rapidly, both
buttons may be released. The rapid
flashing indicates successful training.
Note: You may need to use a different
method if you live in Canada or have
difficulties programming your gate operator
or garage door opener. See
Gate Operator
/ Canadian Programming.
4. Press and hold the HomeLink button you programmed for two seconds, then
release. You may need to do this twice
to activate the door. If your garage door
does not operate, watch the HomeLink
indicator light.
If the indicator light stays on, the
programming is complete. No further
action is needed.
If the indicator light flashes rapidly for 2
seconds and then turns to a constant light,
the HomeLink button is not programmed
yet. See Programming Your Garage Door
Opener Motor. To program additional buttons, repeat
Steps 1 – 4.
For questions or comments, please contact
HomeLink at www.homelink.com,
www.youtube.com/HomeLinkGentex or
1-800-355-3515.
Programming Your Garage Door
Opener Motor
Note:
You may need a ladder to reach the
unit and you may need to remove the cover
or lamp lens on your garage door opener. 1. Press the learn button on the garage
door opener motor and then you have
30 seconds to complete the next two
steps.
2. Return to your vehicle. 3.
Press and hold the function button you
want to program for 2 seconds, then
release. Repeat this step. Depending
on your brand of garage door opener,
you may need to repeat this sequence
a third time.
122
C-MAX (CCG) Canada/United States of America, enUSA, First Printing Universal Garage Door Opener
(If Equipped)E142658 E142659 E142658