warning FORD C MAX ENERGI 2016 Owners Manual
[x] Cancel search | Manufacturer: FORD, Model Year: 2016, Model line: C MAX ENERGI, Model: FORD C MAX ENERGI 2016Pages: 395, PDF Size: 6.78 MB
Page 230 of 395
AUTOMATIC TRANSMISSION
FLUID CHECK
If required, have an authorized dealer checkand change the transmission fluid at thecorrect service interval. See ScheduledMaintenance (page 348).
The automatic transmission does not havea transmission fluid dipstick. Yourtransmission does not consume fluid.
An authorized dealer should check thefluid:
•If the transmission is not workingproperly.
•If you notice signs of fluid leakage.
Do not use supplemental transmissionfluid additives, treatments or cleaningagents. The use of these materials mayaffect transmission operation and resultin damage to internal transmissioncomponents.
BRAKE FLUID CHECK
Fluid levels between the MIN and MAXlines are within the normal operating range;there is no need to add fluid. If the fluidlevels are outside of the normal operatingrange, the performance of the systemcould be compromised; seek service fromyour authorized dealer immediately.
POWER STEERING FLUID
CHECK
Your vehicle is equipped with an electricpower steering (EPS) system. There is nofluid reservoir to check or fill.
WASHER FLUID CHECK
WARNING
If you operate your vehicle intemperatures below 40°F (5°C), usewasher fluid with antifreezeprotection. Failure to use washer fluid withantifreeze protection in cold weather couldresult in impaired windshield vision andincrease the risk of injury or accident.
Note:The front and rear washer systemsare supplied from the same reservoir.
Add fluid to fill the reservoir if the level islow. Only use a washer fluid that meetsFord specifications. See Capacities andSpecifications (page 276).
State or local regulations on volatileorganic compounds may restrict the useof methanol, a common windshield washerantifreeze additive. Washer fluidscontaining non-methanol antifreezeagents should be used only if they providecold weather protection without damagingthe vehicle’s paint finish, wiper blades orwasher system.
FUEL FILTER
Your vehicle is equipped with a lifetimefuel filter that is integrated with the fueltank. Regular maintenance or replacementis not needed.
227
C-MAX (CCG) Canada/United States of America, enUSA, First Printing
Maintenance
Page 231 of 395
CHANGING THE 12V BATTERY
WARNINGS
Batteries normally produce explosivegases which can cause personalinjury. Therefore, do not allowflames, sparks or lighted substances tocome near the battery. When working nearthe battery, always shield your face andprotect your eyes. Always provide correctventilation.
When lifting a plastic-cased battery,excessive pressure on the end wallscould cause acid to flow through thevent caps, resulting in personal injury anddamage to the vehicle or battery. Lift thebattery with a battery carrier or with yourhands on opposite corners.
Keep batteries out of reach ofchildren. Batteries contain sulfuricacid. Avoid contact with skin, eyes orclothing. Shield your eyes when workingnear the battery to protect against possiblesplashing of acid solution. In case of acidcontact with skin or eyes, flushimmediately with water for a minimum of15 minutes and get prompt medicalattention. If acid is swallowed, call aphysician immediately.
Battery posts, terminals and relatedaccessories contain lead and leadcompounds. Wash hands afterhandling.
Your vehicle has a Motorcraft®maintenance-free battery which normallydoes not require additional water duringits life of service.
Note:If your vehicle's battery has a coveror shield, make sure it is reinstalled after thebattery has been cleaned or replaced.
Note:See an authorized dealer for lowvoltage battery access, testing, orreplacement.
When a low voltage battery replacementis necessary, see an authorized dealer toreplace the low voltage battery with a Fordrecommended replacement low voltagebattery that matches the electricalrequirements of the vehicle.
To ensure proper operation of the batterymanagement system (BMS), do not allowa technician to connect any electricaldevice ground connection directly to thelow voltage battery negative post. Aconnection at the low voltage batterynegative post can cause inaccuratemeasurements of the battery conditionand potential incorrect system operation.
Note:If a person adds electrical orelectronic accessories or components to thevehicle, the accessories or components mayadversely affect the low voltage batteryperformance and durability and may alsoaffect the performance of other electricalsystems in the vehicle.
For longer, trouble-free operation, keep thetop of the battery clean and dry. Also,make certain the battery cables are alwaystightly fastened to the battery terminals.
If you see any corrosion on the battery orterminals, remove the cables from theterminals and clean with a wire brush. Youcan neutralize the acid with a solution ofbaking soda and water.
When a battery replacement is required,the battery should only be replaced witha Ford recommended replacement batterythat matches the electrical requirementsof the vehicle.
Because your vehicle’s engine iselectronically-controlled by a computer,some engine control settings aremaintained by power from the low voltagebattery. Some engine computer settings,like the idle trim and fuel trim strategy,optimize the driveability and performanceof the engine. Some other computersettings, like the clock and radio station
228
C-MAX (CCG) Canada/United States of America, enUSA, First Printing
Maintenance
Page 235 of 395
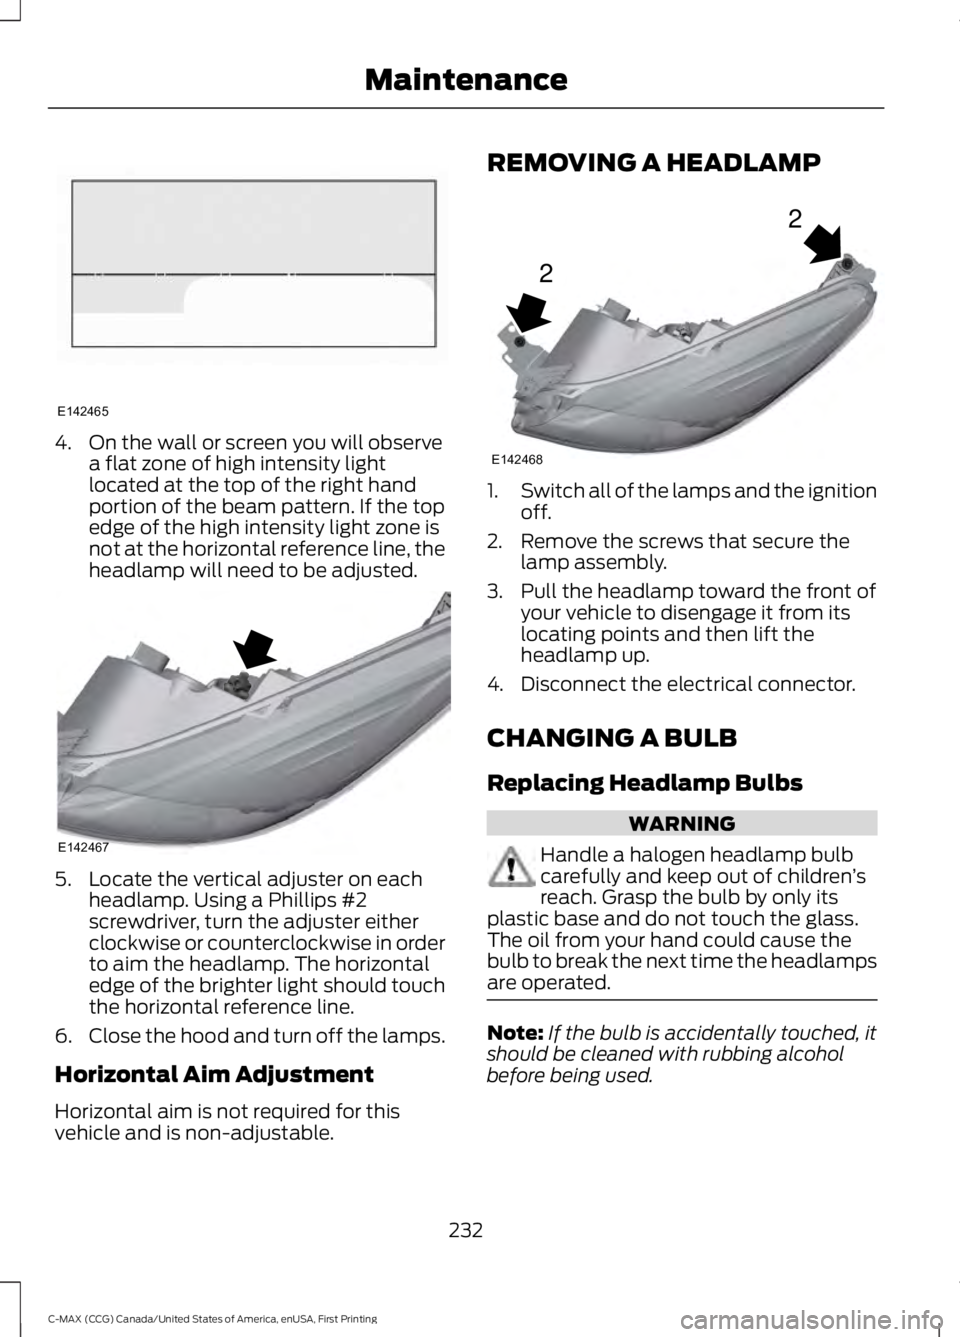
4. On the wall or screen you will observea flat zone of high intensity lightlocated at the top of the right handportion of the beam pattern. If the topedge of the high intensity light zone isnot at the horizontal reference line, theheadlamp will need to be adjusted.
5. Locate the vertical adjuster on eachheadlamp. Using a Phillips #2screwdriver, turn the adjuster eitherclockwise or counterclockwise in orderto aim the headlamp. The horizontaledge of the brighter light should touchthe horizontal reference line.
6.Close the hood and turn off the lamps.
Horizontal Aim Adjustment
Horizontal aim is not required for thisvehicle and is non-adjustable.
REMOVING A HEADLAMP
1.Switch all of the lamps and the ignitionoff.
2. Remove the screws that secure thelamp assembly.
3. Pull the headlamp toward the front ofyour vehicle to disengage it from itslocating points and then lift theheadlamp up.
4. Disconnect the electrical connector.
CHANGING A BULB
Replacing Headlamp Bulbs
WARNING
Handle a halogen headlamp bulbcarefully and keep out of children’sreach. Grasp the bulb by only itsplastic base and do not touch the glass.The oil from your hand could cause thebulb to break the next time the headlampsare operated.
Note:If the bulb is accidentally touched, itshould be cleaned with rubbing alcoholbefore being used.
232
C-MAX (CCG) Canada/United States of America, enUSA, First Printing
MaintenanceE142465 E142467 2
2
E142468
Page 241 of 395

CHANGING THE ENGINE AIR
FILTER
WARNING
To reduce the risk of vehicle damageand personal burn injuries, do notstart your engine with the air cleanerremoved and do not remove it while theengine is running.
Change the air filter element at the correctinterval.
Note:When changing the air filter element,use only the air filter element listed. SeeCapacities and Specifications (page 276).
Note: Failure to use the correct air filterelement may result in severe enginedamage. Resulting component damagemay not be covered by the vehicle Warranty.
Note:Failure to re-install the air cleanerassembly properly by fully seating on themounting studs in five places and securingwith the two bolts may result in air cleanerassembly dislodgement from engine anddamage to the air cleaner assembly andother engine components. Therefore werecommend that the air filter be serviced ata Ford dealer.
Air Cleaner Assembly Components
238
C-MAX (CCG) Canada/United States of America, enUSA, First Printing
MaintenanceE162533
ACD
E
B
Page 247 of 395
CLEANING THE INTERIOR
WARNINGS
Do not use cleaning solvents, bleachor dye on the vehicle’s safety belts,as these actions may weaken thebelt webbing.
On vehicles equipped withseat-mounted airbags, do not usechemical solvents or strongdetergents. Such products couldcontaminate the side airbag system andaffect performance of the side airbag in acollision.
For fabric, carpets, cloth seats, safety beltsand seats equipped with side airbags:
•Remove dust and loose dirt with avacuum cleaner.
•Remove light stains and soil withMotorcraft Professional StrengthCarpet & Upholstery Cleaner.
•If grease or tar is present on thematerial, spot-clean the area first withMotorcraft Spot and Stain Remover. InCanada, use Motorcraft Multi-PurposeCleaner.
•If a ring forms on the fabric after spotcleaning, clean the entire areaimmediately (but do not oversaturate)or the ring will set.
•Do not use household cleaningproducts or glass cleaners, which canstain and discolor the fabric and affectthe flame retardant abilities of the seatmaterials.
CLEANING THE INSTRUMENT
PANEL AND INSTRUMENT
CLUSTER LENS
WARNING
Do not use chemical solvents orstrong detergents when cleaning thesteering wheel or instrument panelto avoid contamination of the airbagsystem.
Note:Follow the same procedure ascleaning leather seats for cleaning leatherinstrument panels and leather interior trimsurfaces. See Cleaning Leather Seats(page 245).
Clean the instrument panel and clusterlens with a clean, damp and soft cloth,then use a clean, dry and soft cloth to drythese areas.
•Avoid cleaners or polishes that increasethe gloss of the upper portion of theinstrument panel. The dull finish in thisarea helps protect you fromundesirable windshield reflection.
•Do not use any household cleaningproducts or glass cleaners as thesemay damage the finish of theinstrument panel, interior trim andcluster lens.
•Wash or wipe your hands clean if youhave been in contact with certainproducts such as insect repellent andsuntan lotion to avoid possible damageto the interior painted surfaces.
•Do not allow air fresheners and handsanitizers to spill onto interior surfaces.If a spill occurs, wipe off immediately.Your warranty may not cover thesedamages.
If a staining liquid like coffee or juice hasbeen spilled on the instrument panel or oninterior trim surfaces:
244
C-MAX (CCG) Canada/United States of America, enUSA, First Printing
Vehicle Care
Page 253 of 395
General Information
WARNING
Failure to follow these guidelinescould result in an increased risk ofloss of vehicle control, injury or death.
Note:Do not use the kit if you have severelydamaged a tire. Only seal punctures locatedwithin the tire tread with the kit.
Do not attempt to repair punctures largerthan ¼ inch (6 millimeters) or damage tothe tire's sidewall. The tire may notcompletely seal.
Loss of air pressure may adversely affecttire performance. For this reason:
Note:Do not drive the vehicle above50 mph (80 km/h).
Note:Do not drive further than 120 mi(200 km). Drive only to the closestauthorized Ford dealer or tire repair shop tohave your tire inspected.
•Drive carefully and avoid abruptsteering maneuvers.
•Periodically monitor tire inflationpressure in the affected tire; if the tireis losing pressure, have the vehicletowed.
•Read the information in the Tips forUse of the Kit section to make sure safeoperation of the kit and your vehicle.
Tips for Use of the Kit
To ensure safe operation of the kit:
•Read all instructions and cautions fully.
•Before operating the kit, make sureyour vehicle is safely off the road andaway from moving traffic. Switch onthe hazard lights.
•Always set the parking brake to makesure the vehicle does not moveunexpectedly.
•Do not remove any foreign objects,such as nails or screws, from the tire.
•When using the kit, leave the enginerunning (only if the vehicle is outdoorsor in a well-ventilated area) so thecompressor does not drain thevehicle's battery.
•Do not allow the compressor tooperate continuously for more than 15minutes. This will help prevent thecompressor from overheating.
•Never leave the kit unattended duringoperation.
•Sealant compound contains latex.Those with latex sensitivities shoulduse appropriate precautions to avoidan allergic reaction.
•Keep the kit away from children.
•Only use the kit when the ambienttemperature is between -22°F (-30°C)and 158°F (70°C).
•Only use the sealing compound beforethe use-by date. The use-by date is ona label on the sealant canister, whichyou can see through the rectangularviewing window on the bottom of thecompressor. Check the use-by dateregularly and replace the canister afterfour years of non-use.
•Do not store the kit unsecured insidethe passenger compartment of thevehicle as it may cause injury during asudden stop or crash. Always store thekit in its original location.
•After sealant use, an authorized Forddealer must replace the tire pressuremonitoring system sensor and valvestem on the wheel.
•Operating the kit could cause anelectrical disturbance in radio, CD andDVD player operation.
250
C-MAX (CCG) Canada/United States of America, enUSA, First Printing
Wheels and Tires
Page 254 of 395
* When inflation only is requiredfor a tire or other objects, theselector must be in the Airposition.
What to Do When a Tire IsPunctured
Repair a tire puncture within the tire's treadarea in two stages with the kit.
•In the first stage, inflate the tire with asealing compound and air. After youinflate the tire, you will need to drivethe vehicle a short distance (about 4miles [6 kilometers]) to distribute thesealant in the tire.
•In the second stage, check the tirepressure and adjust, if necessary, to thevehicle's specified tire inflationpressure.
First Stage: Inflating the Tire withSealing Compound and Air
WARNINGS
Do not stand directly over the kitwhile inflating the tire. If you noticeany unusual bulges or deformationsin the tire's sidewall during inflation, stopand call roadside assistance.
If the tire does not inflate to therecommended tire pressure within15 minutes, stop and call roadsideassistance.
Do not run the engine during kitoperation unless the vehicle isoutdoors or in a well-ventilated area.
Preparation: Park the vehicle in a safe, leveland secure area, away from moving traffic.
Switch the hazard lights on. Apply theparking brake and switch the engine off.Inspect the flat tire for visible damage.
Sealant compound contains latex. Useappropriate precautions to avoid anyallergic reactions.
Do not remove any foreign object that haspierced the tire. If a puncture is located inthe tire sidewall, stop and call roadsideassistance.
1. Remove the valve cap from the tirevalve.
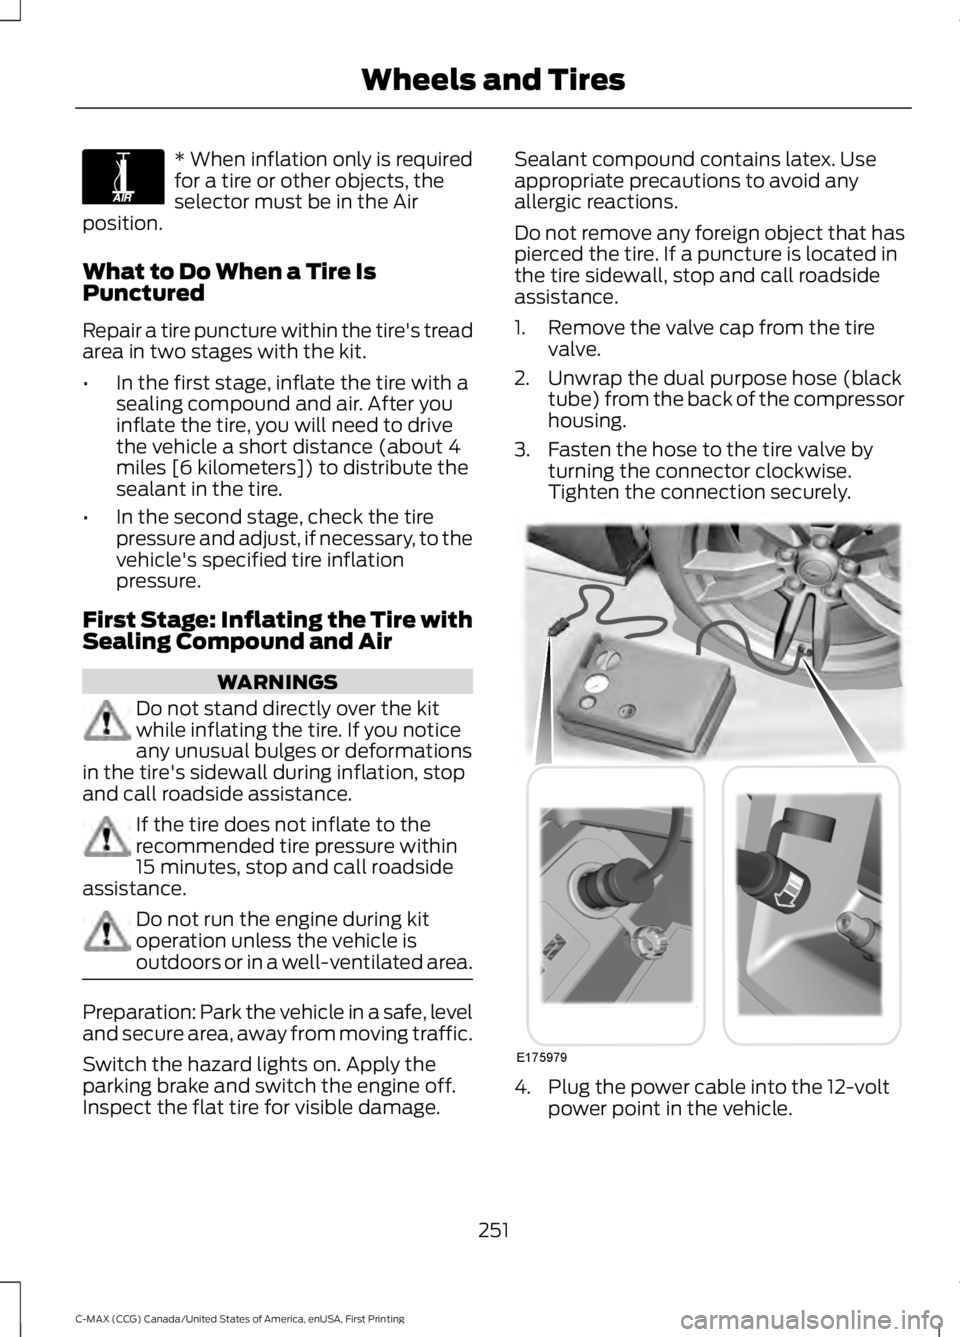
2. Unwrap the dual purpose hose (blacktube) from the back of the compressorhousing.
3. Fasten the hose to the tire valve byturning the connector clockwise.Tighten the connection securely.
4. Plug the power cable into the 12-voltpower point in the vehicle.
251
C-MAX (CCG) Canada/United States of America, enUSA, First Printing
Wheels and TiresE175978 E175979
Page 255 of 395
5. Remove the warning sticker found onthe canister and place it on the top ofthe instrument panel or the center ofthe dash.
6. Start the vehicle and leave the enginerunning so the compressor does notdrain the vehicle’s battery.
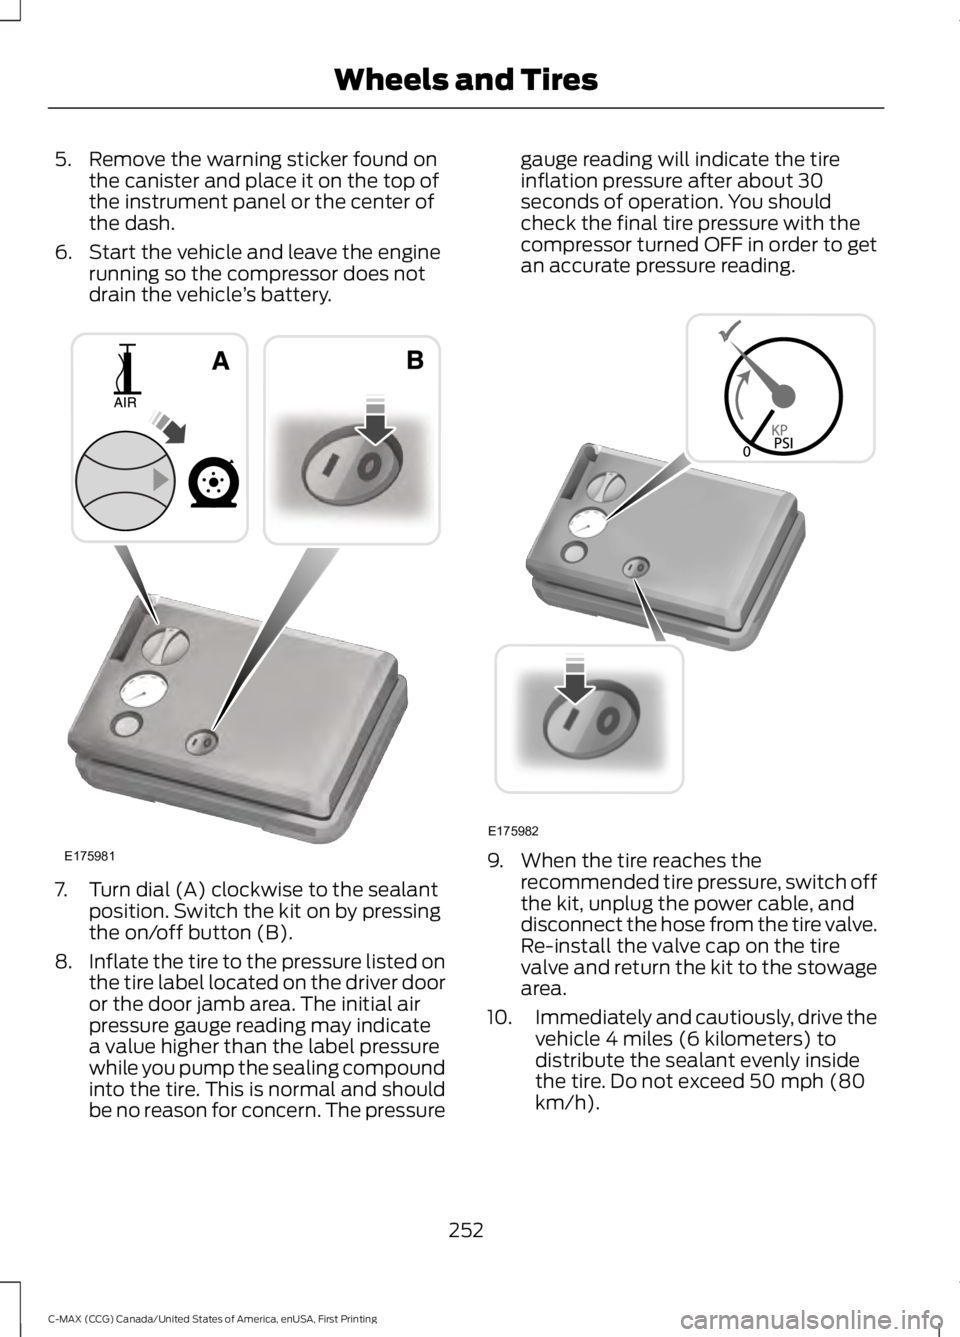
7. Turn dial (A) clockwise to the sealantposition. Switch the kit on by pressingthe on/off button (B).
8.Inflate the tire to the pressure listed onthe tire label located on the driver dooror the door jamb area. The initial airpressure gauge reading may indicatea value higher than the label pressurewhile you pump the sealing compoundinto the tire. This is normal and shouldbe no reason for concern. The pressure
gauge reading will indicate the tireinflation pressure after about 30seconds of operation. You shouldcheck the final tire pressure with thecompressor turned OFF in order to getan accurate pressure reading.
9. When the tire reaches therecommended tire pressure, switch offthe kit, unplug the power cable, anddisconnect the hose from the tire valve.Re-install the valve cap on the tirevalve and return the kit to the stowagearea.
10.Immediately and cautiously, drive thevehicle 4 miles (6 kilometers) todistribute the sealant evenly insidethe tire. Do not exceed 50 mph (80km/h).
252
C-MAX (CCG) Canada/United States of America, enUSA, First Printing
Wheels and TiresE175981 E175982
Page 256 of 395
11.After 4 miles (6 kilometers), stop andcheck the tire pressure. See SecondStage: Checking Tire Pressure.
Note:If you experience any unusualvibration, ride disturbance or noise whiledriving, reduce your speed until you cansafely pull off to the side of the road to callfor roadside assistance.
Note:Do not proceed to the second stageof this operation.
Second Stage: Checking TirePressure
WARNINGS
If you are proceeding from the Firststage: Re–inflating the tire withsealing compound and air sectionand have injected sealant in the tire andthe pressure is below 20 psi (1.4 bar), stopand call roadside assistance. If tirepressure is above 20 psi (1.4 bar), continueto the next step.
The power plug may get hot after useand should be handled carefullywhile unplugging.
Check the air pressure of your tires asfollows:
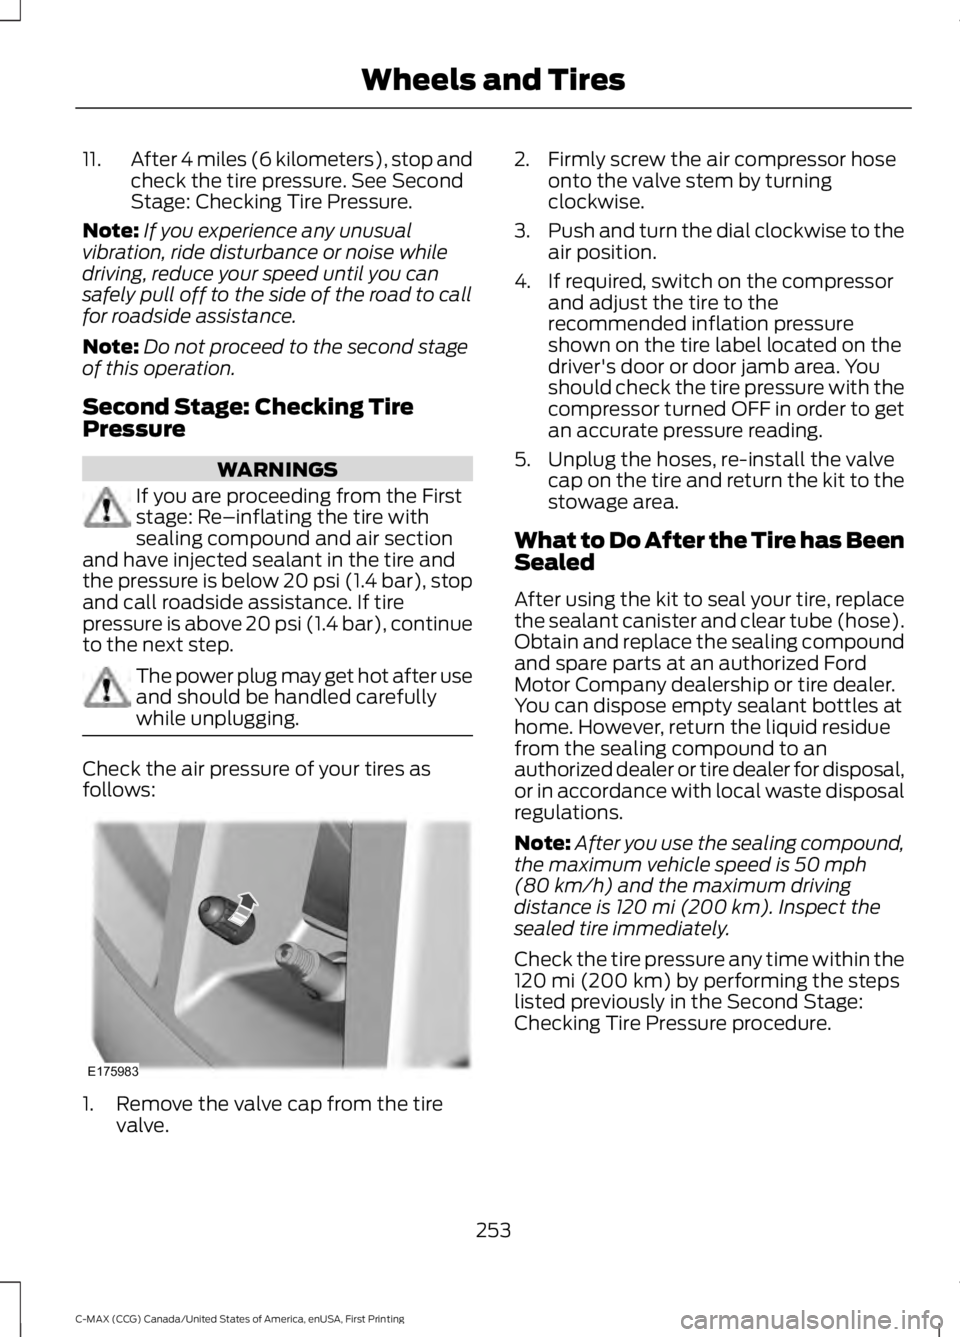
1. Remove the valve cap from the tirevalve.
2. Firmly screw the air compressor hoseonto the valve stem by turningclockwise.
3.Push and turn the dial clockwise to theair position.
4. If required, switch on the compressorand adjust the tire to therecommended inflation pressureshown on the tire label located on thedriver's door or door jamb area. Youshould check the tire pressure with thecompressor turned OFF in order to getan accurate pressure reading.
5. Unplug the hoses, re-install the valvecap on the tire and return the kit to thestowage area.
What to Do After the Tire has BeenSealed
After using the kit to seal your tire, replacethe sealant canister and clear tube (hose).Obtain and replace the sealing compoundand spare parts at an authorized FordMotor Company dealership or tire dealer.You can dispose empty sealant bottles athome. However, return the liquid residuefrom the sealing compound to anauthorized dealer or tire dealer for disposal,or in accordance with local waste disposalregulations.
Note:After you use the sealing compound,the maximum vehicle speed is 50 mph(80 km/h) and the maximum drivingdistance is 120 mi (200 km). Inspect thesealed tire immediately.
Check the tire pressure any time within the120 mi (200 km) by performing the stepslisted previously in the Second Stage:Checking Tire Pressure procedure.
253
C-MAX (CCG) Canada/United States of America, enUSA, First Printing
Wheels and TiresE175983
Page 259 of 395
U.S. Department ofTransportation Tire qualitygrades: The U.S. Department ofTransportation requires FordMotor Company to give you thefollowing information about tiregrades exactly as the governmenthas written it.
Treadwear
The treadwear grade is acomparative rating based on thewear rate of the tire when testedunder controlled conditions on aspecified government test course.For example, a tire graded 150would wear 1 ½ times as well onthe government course as a tiregraded 100. The relativeperformance of tires dependsupon the actual conditions of their
use, however, and may departsignificantly from the norm due tovariations in driving habits, servicepractices, and differences in roadcharacteristics and climate.
Traction AA A B C
WARNING
The traction grade assignedto this tire is based onstraight-ahead braking tractiontests, and does not includeacceleration, cornering,hydroplaning or peak tractioncharacteristics.
The traction grades, from highestto lowest are AA, A, B, and C. Thegrades represent the tire’s abilityto stop on wet pavement asmeasured under controlledconditions on specifiedgovernment test surfaces ofasphalt and concrete. A tiremarked C may have poor tractionperformance.
Temperature A B C
WARNING
The temperature grade forthis tire is established for atire that is properly inflated andnot overloaded. Excessive speed,underinflation, or excessiveloading, either separately or incombination, can cause heat
buildup and possible tire failure.
The temperature grades are A(the highest), B and C,representing the tire’s resistanceto the generation of heat and itsability to dissipate heat whentested under controlled conditionson a specified indoor laboratorytest wheel. Sustained hightemperature can cause thematerial of the tire to degenerateand reduce tire life, and excessivetemperature can lead to suddentire failure. The grade Ccorresponds to a level ofperformance which all passengercar tires must meet under the
256
C-MAX (CCG) Canada/United States of America, enUSA, First Printing
Wheels and Tires