wheel FORD C MAX HYBRID 2014 2.G User Guide
[x] Cancel search | Manufacturer: FORD, Model Year: 2014, Model line: C MAX HYBRID, Model: FORD C MAX HYBRID 2014 2.GPages: 447, PDF Size: 8.06 MB
Page 97 of 447
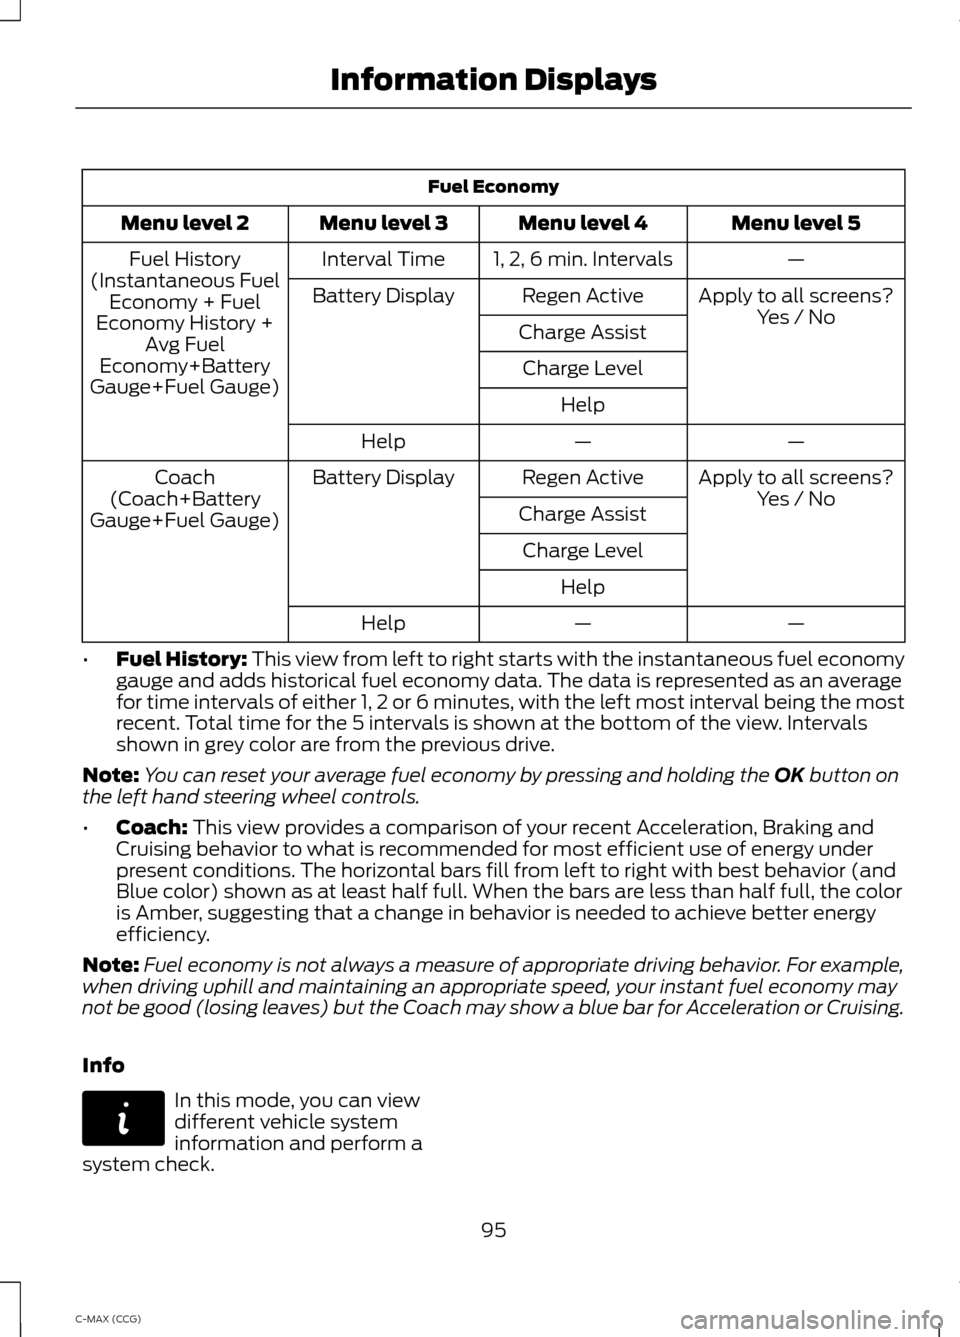
Fuel Economy
Menu level 5
Menu level 4
Menu level 3
Menu level 2
—
1, 2, 6 min. Intervals
Interval Time
Fuel History
(Instantaneous Fuel Economy + Fuel
Economy History + Avg Fuel
Economy+Battery
Gauge+Fuel Gauge) Apply to all screens?
Yes / No
Regen Active
Battery Display
Charge AssistCharge Level Help —
—
Help
Apply to all screens?
Regen Active
Battery Display
Coach
(Coach+Battery
Gauge+Fuel Gauge) Yes / No
Charge Assist
Charge Level Help —
—
Help
• Fuel History: This view from left to right starts with the instantaneous fuel economy
gauge and adds historical fuel economy data. The data is represented as an average
for time intervals of either 1, 2 or 6 minutes, with the left most interval being the most
recent. Total time for the 5 intervals is shown at the bottom of the view. Intervals
shown in grey color are from the previous drive.
Note: You can reset your average fuel economy by pressing and holding the
OK button on
the left hand steering wheel controls.
• Coach:
This view provides a comparison of your recent Acceleration, Braking and
Cruising behavior to what is recommended for most efficient use of energy under
present conditions. The horizontal bars fill from left to right with best behavior (and
Blue color) shown as at least half full. When the bars are less than half full, the color
is Amber, suggesting that a change in behavior is needed to achieve better energy
efficiency.
Note: Fuel economy is not always a measure of appropriate driving behavior. For example,
when driving uphill and maintaining an appropriate speed, your instant fuel economy may
not be good (losing leaves) but the Coach may show a blue bar for Acceleration or Cruising.
Info In this mode, you can view
different vehicle system
information and perform a
system check.
95
C-MAX (CCG) Information DisplaysE144642
Page 112 of 447
SITTING IN THE CORRECT
POSITION
WARNINGS
Sitting improperly, out of position or
with the seat back reclined too far
can take weight off the seat cushion
and affect the decision of the passenger
sensing system, resulting in serious injury
or death in the event of a crash. Always sit
upright against your seat back, with your
feet on the floor. Do not recline the seat back as this
can cause the occupant to slide
under the safety belt, resulting in
serious injury in the event of a crash. Do not place objects higher than the
seat back to reduce the risk of
serious injury in the event of a crash
or during heavy braking. When you use them properly, the seat,
head restraint, safety belt and air bags will
provide optimum protection in the event
of a crash. We recommend that you follow these
guidelines:
•
Sit in an upright position with the base
of your spine as far back as possible.
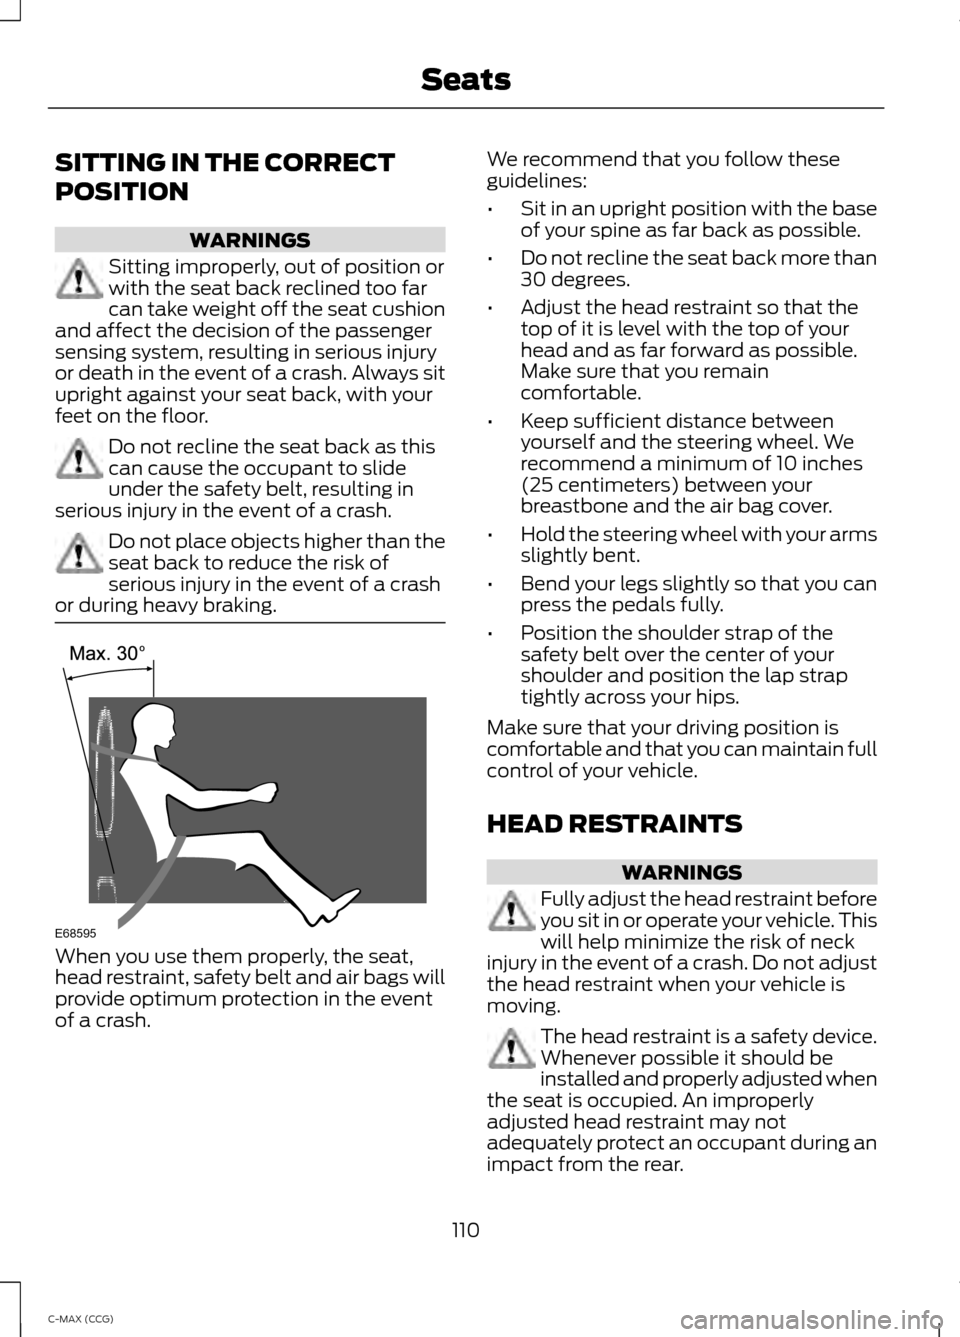
• Do not recline the seat back more than
30 degrees.
• Adjust the head restraint so that the
top of it is level with the top of your
head and as far forward as possible.
Make sure that you remain
comfortable.
• Keep sufficient distance between
yourself and the steering wheel. We
recommend a minimum of 10 inches
(25 centimeters) between your
breastbone and the air bag cover.
• Hold the steering wheel with your arms
slightly bent.
• Bend your legs slightly so that you can
press the pedals fully.
• Position the shoulder strap of the
safety belt over the center of your
shoulder and position the lap strap
tightly across your hips.
Make sure that your driving position is
comfortable and that you can maintain full
control of your vehicle.
HEAD RESTRAINTS WARNINGS
Fully adjust the head restraint before
you sit in or operate your vehicle. This
will help minimize the risk of neck
injury in the event of a crash. Do not adjust
the head restraint when your vehicle is
moving. The head restraint is a safety device.
Whenever possible it should be
installed and properly adjusted when
the seat is occupied. An improperly
adjusted head restraint may not
adequately protect an occupant during an
impact from the rear.
110
C-MAX (CCG) SeatsE68595
Page 131 of 447
HYBRID ELECTRIC VEHICLE
Plug-in Power Mode and Hybrid
Mode (C-MAX Energi Only)
You must plug C-MAX Energi vehicles in
regularly for optimal use of the high
voltage battery's extended range
capability. When you charge your vehicle,
you add electrical energy that is then used
to propel the vehicle in plug-in power
mode. You can view your estimated
electric range in this mode from the
enhanced battery gauge on the instrument
panel display. The system maximizes the
use of electric-only operation in plug-in
power mode. System conditions may
require engine operation; however, the
system uses plug-in power whenever
possible.
When your plug-in power has been
depleted, the powertrain system will
automatically switch to hybrid mode. Your
battery gauge will show an electric range
of zero before transitioning to a simple
battery graphic upon entering hybrid mode.
Hybrid mode uses both the gasoline engine
and electric motor to power your vehicle
and maximize fuel economy as with
C-MAX Hybrid.
EV Modes (C-MAX Energi Only)
Your vehicle contains selectable
EV modes through the EV button
on the center console.
These modes are available when the
vehicle can run under high voltage battery
power. With the vehicle in driving mode,
you can change EV modes with each press
of the EV button. The current mode will be
displayed in the left hand instrument
cluster screen. Auto EV This mode provides an
automatic use of high voltage
battery power during the drive,
staying in electric mode when possible and
running the engine when needed. This
mode will be the only one available if the
plug-in power has been depleted.
EV Now This mode provides an electric
only driving experience. The
left-hand information display
will change to an Energy Use screen that
supplies EV specific tools and functions.
The vehicle may accelerate more slowly
and the top speed may be lower than in
Auto mode. Your engine may be enabled
at any time by using one of the following
methods:
1. Press the OK button on the left 5– way
steering wheel control while viewing
the EV screen. The vehicle will enable
the engine as needed, and will
automatically return to EV Now after
eight seconds or when the engine is no
longer needed.
2. Press the accelerator pedal fully. A pop
up message stating Press OK to
Enable Engine will appear. Press OK
on the left steering wheel button to
activate as needed. The message will
disappear if you release the accelerator
pedal.
3. Press the EV button. This will change the mode to EV Later and permit
engine operation.
The vehicle may automatically enter
Engine Enabled mode if system conditions
require it. A message Engine Enabled for
System Performance
will display if this
occurs. This is normal function, and your
vehicle will return to EV Now when
possible.
129
C-MAX (CCG) Unique Driving CharacteristicsE144814 E155152 E144814
Page 136 of 447
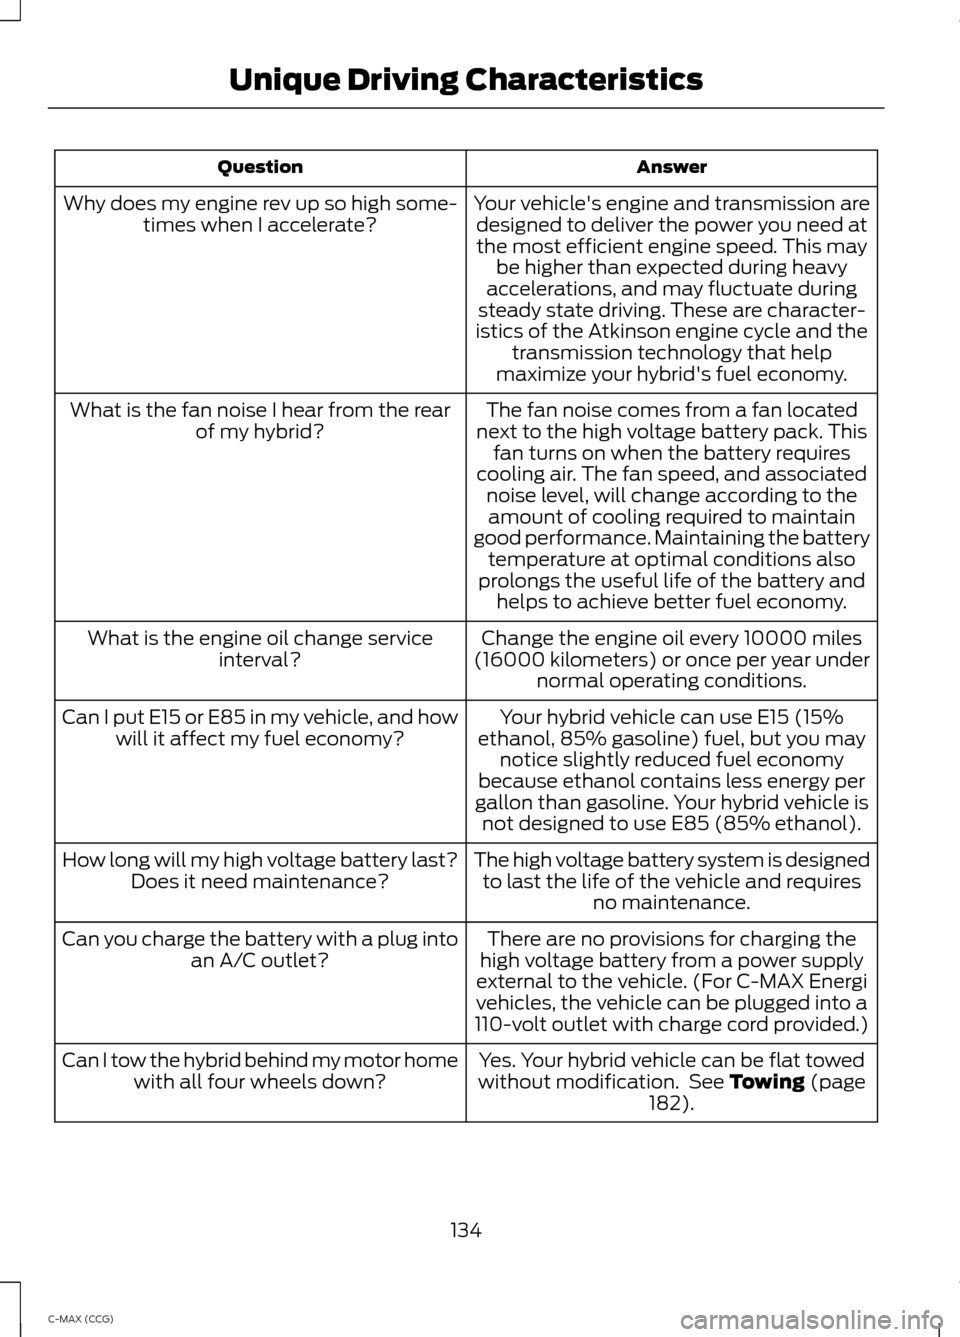
Answer
Question
Your vehicle's engine and transmission aredesigned to deliver the power you need atthe most efficient engine speed. This may be higher than expected during heavy
accelerations, and may fluctuate during
steady state driving. These are character-
istics of the Atkinson engine cycle and the transmission technology that help
maximize your hybrid's fuel economy.
Why does my engine rev up so high some-
times when I accelerate?
The fan noise comes from a fan located
next to the high voltage battery pack. This fan turns on when the battery requires
cooling air. The fan speed, and associated noise level, will change according to theamount of cooling required to maintain
good performance. Maintaining the battery temperature at optimal conditions also
prolongs the useful life of the battery and helps to achieve better fuel economy.
What is the fan noise I hear from the rear
of my hybrid?
Change the engine oil every 10000 miles
(16000 kilometers) or once per year under normal operating conditions.
What is the engine oil change service
interval?
Your hybrid vehicle can use E15 (15%
ethanol, 85% gasoline) fuel, but you may notice slightly reduced fuel economy
because ethanol contains less energy per
gallon than gasoline. Your hybrid vehicle is not designed to use E85 (85% ethanol).
Can I put E15 or E85 in my vehicle, and how
will it affect my fuel economy?
The high voltage battery system is designedto last the life of the vehicle and requires no maintenance.
How long will my high voltage battery last?
Does it need maintenance?
There are no provisions for charging the
high voltage battery from a power supply
external to the vehicle. (For C-MAX Energi
vehicles, the vehicle can be plugged into a
110-volt outlet with charge cord provided.)
Can you charge the battery with a plug into
an A/C outlet?
Yes. Your hybrid vehicle can be flat towed
without modification. See Towing (page
182).
Can I tow the hybrid behind my motor home
with all four wheels down?
134
C-MAX (CCG) Unique Driving Characteristics
Page 151 of 447
Note:
Your electrical source must meet
certain requirements for the high-voltage
batteries to charge. The AC outlet must be
a three-prong 110-120 volt AC outlet that is
properly grounded, 15– 20 amps (or greater),
and in good condition. You must use a
dedicated line, which means you cannot
have other appliances connected to the
same circuit. If you do not use a dedicated
circuit, the circuit breaker could trip or open.
If you do not have a dedicated circuit,
contact a licensed professional electrician
for proper installation.
Make sure that the 120– volt convenience
cord is completely unwound before
charging. Always plug the cord into the AC
outlet before connecting the charging
coupler into the charge port receptacle of
your vehicle. The 120– volt convenience
cord inline control box has three indicator
lights that represent the charging status,
power, charge and fault.
Power (green light) — this indicator
lights up when you plug the cord into the
AC wall outlet.
Charge (green light) —
indicates status
of charging:
• No light means you have not connected
the cord to the vehicle.
• Blinking light means that the charging
is in process.
• Solid light means you have connected
the cord, but the vehicle is not charging.
Fault (red triangle light) —
Lights up in
case of a detected failure. No charging is
possible:
• Blinking red triangle light – means that
the 120– volt convenience cord is trying
to reset the failure and could restart
the charging cycle.
• Solid red triangle light – means that
the fault is permanent. You need to
unplug the cord and then plug it back
in to reset the fault. If the fault persists,
contact your authorized dealer. Charge Port
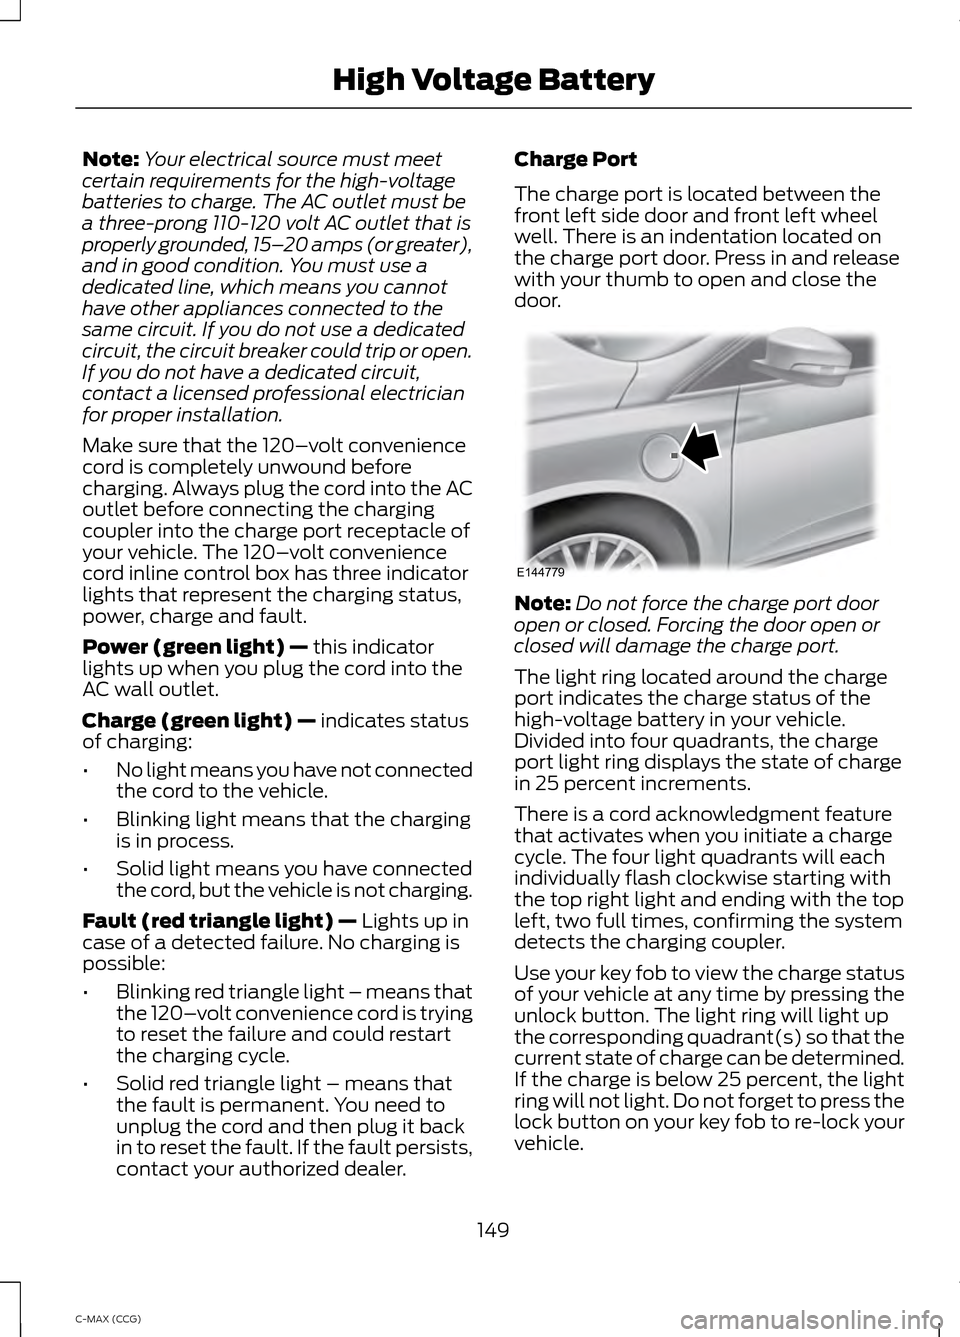
The charge port is located between the
front left side door and front left wheel
well. There is an indentation located on
the charge port door. Press in and release
with your thumb to open and close the
door.
Note:
Do not force the charge port door
open or closed. Forcing the door open or
closed will damage the charge port.
The light ring located around the charge
port indicates the charge status of the
high-voltage battery in your vehicle.
Divided into four quadrants, the charge
port light ring displays the state of charge
in 25 percent increments.
There is a cord acknowledgment feature
that activates when you initiate a charge
cycle. The four light quadrants will each
individually flash clockwise starting with
the top right light and ending with the top
left, two full times, confirming the system
detects the charging coupler.
Use your key fob to view the charge status
of your vehicle at any time by pressing the
unlock button. The light ring will light up
the corresponding quadrant(s) so that the
current state of charge can be determined.
If the charge is below 25 percent, the light
ring will not light. Do not forget to press the
lock button on your key fob to re-lock your
vehicle.
149
C-MAX (CCG) High Voltage BatteryE144779
Page 155 of 447
AUTOMATIC TRANSMISSION
WARNINGS
Always set the parking brake fully
and make sure the gearshift is
latched in P (Park). Turn the ignition
to the off position and remove the key
whenever you leave your vehicle. Do not apply the brake pedal and
accelerator pedal simultaneously.
Applying both pedals simultaneously
for more than three seconds will limit
engine rpm, which may result in difficulty
maintaining speed in traffic and could lead
to serious injury. Automatic Transmission
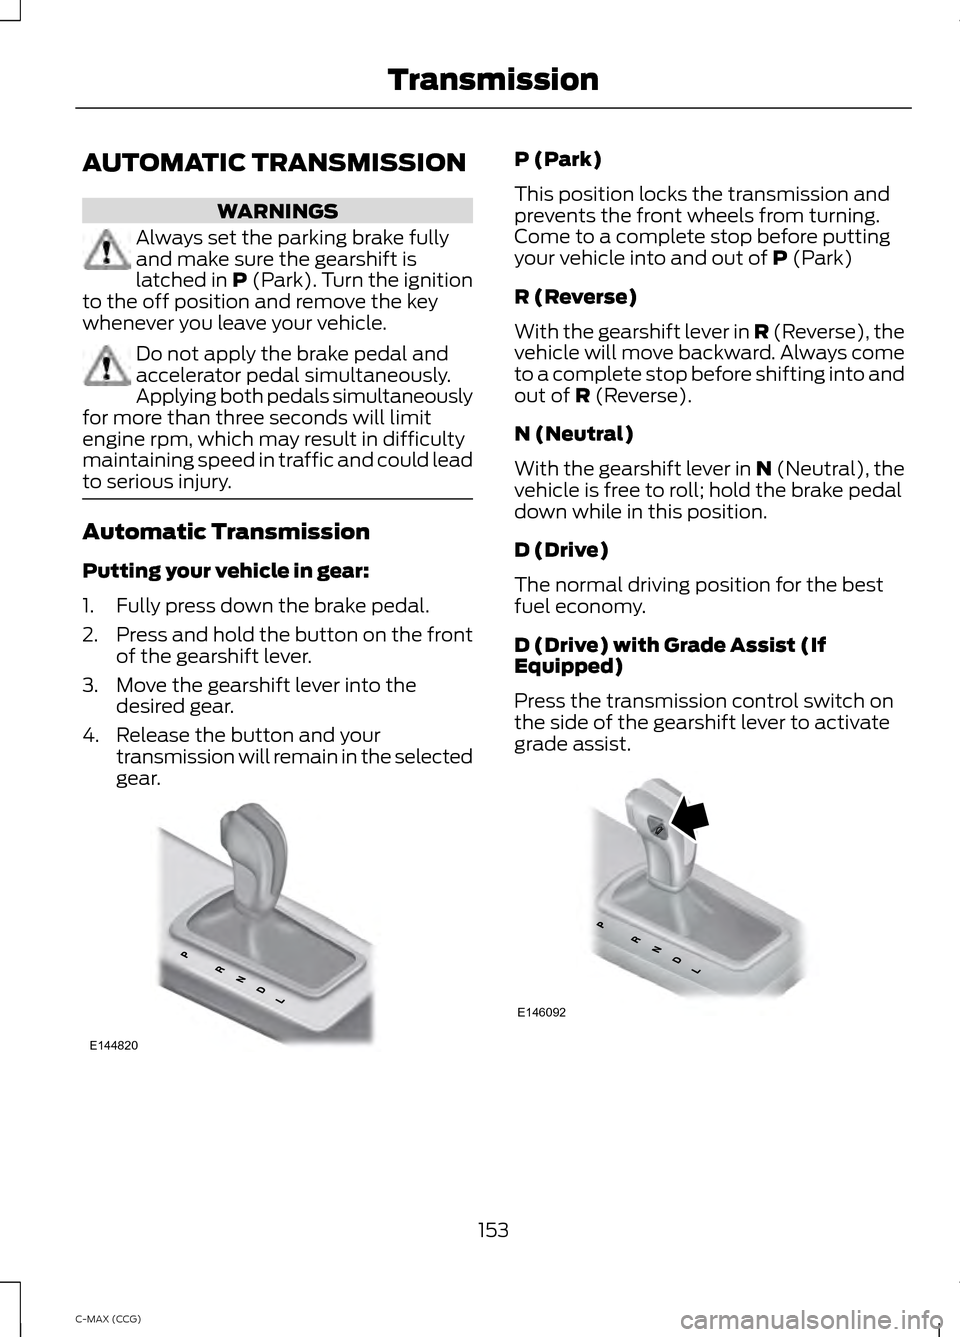
Putting your vehicle in gear:
1. Fully press down the brake pedal.
2.
Press and hold the button on the front
of the gearshift lever.
3. Move the gearshift lever into the desired gear.
4. Release the button and your transmission will remain in the selected
gear. P (Park)
This position locks the transmission and
prevents the front wheels from turning.
Come to a complete stop before putting
your vehicle into and out of P (Park)
R (Reverse)
With the gearshift lever in R (Reverse), the
vehicle will move backward. Always come
to a complete stop before shifting into and
out of
R (Reverse).
N (Neutral)
With the gearshift lever in N (Neutral), the
vehicle is free to roll; hold the brake pedal
down while in this position.
D (Drive)
The normal driving position for the best
fuel economy.
D (Drive) with Grade Assist (If
Equipped)
Press the transmission control switch on
the side of the gearshift lever to activate
grade assist. 153
C-MAX (CCG) TransmissionE144820 E146092
Page 156 of 447
Grade assist:
•
Provides additional grade braking with
a combination of engine motoring and
high-voltage battery charging to help
maintain vehicle speed when
descending a grade.
• As the vehicle determines the amount
of engine motoring and high-voltage
battery charging, you may notice the
engine speed increasing and
decreasing to help maintain your
vehicle speed when descending a
grade.
• The grade assist lamp in the instrument
cluster is illuminated. The grade assist lamp will
appear in the instrument cluster
when grade assist is turned on.
Press the transmission control switch
again to return to normal D (Drive).
L (Low)
• Provides maximum engine braking.
• The transmission may be shifted into
L
(Low) at any vehicle speed.
Brake-Shift Interlock WARNINGS
Do not drive your vehicle until you
verify that the brake lamps are
working.
When doing this procedure, you will
be taking the vehicle out of park
which means the vehicle can roll
freely. To avoid unwanted vehicle
movement, always fully set the parking
brake prior to doing this procedure. Use
wheel chocks if appropriate. If the parking brake is fully released,
but the brake warning lamp remains
illuminated, the brakes may not be
working properly. See your authorized
dealer. Note:
See your authorized dealer as soon
as possible if this procedure is used.
Note: For some markets this feature will be
disabled.
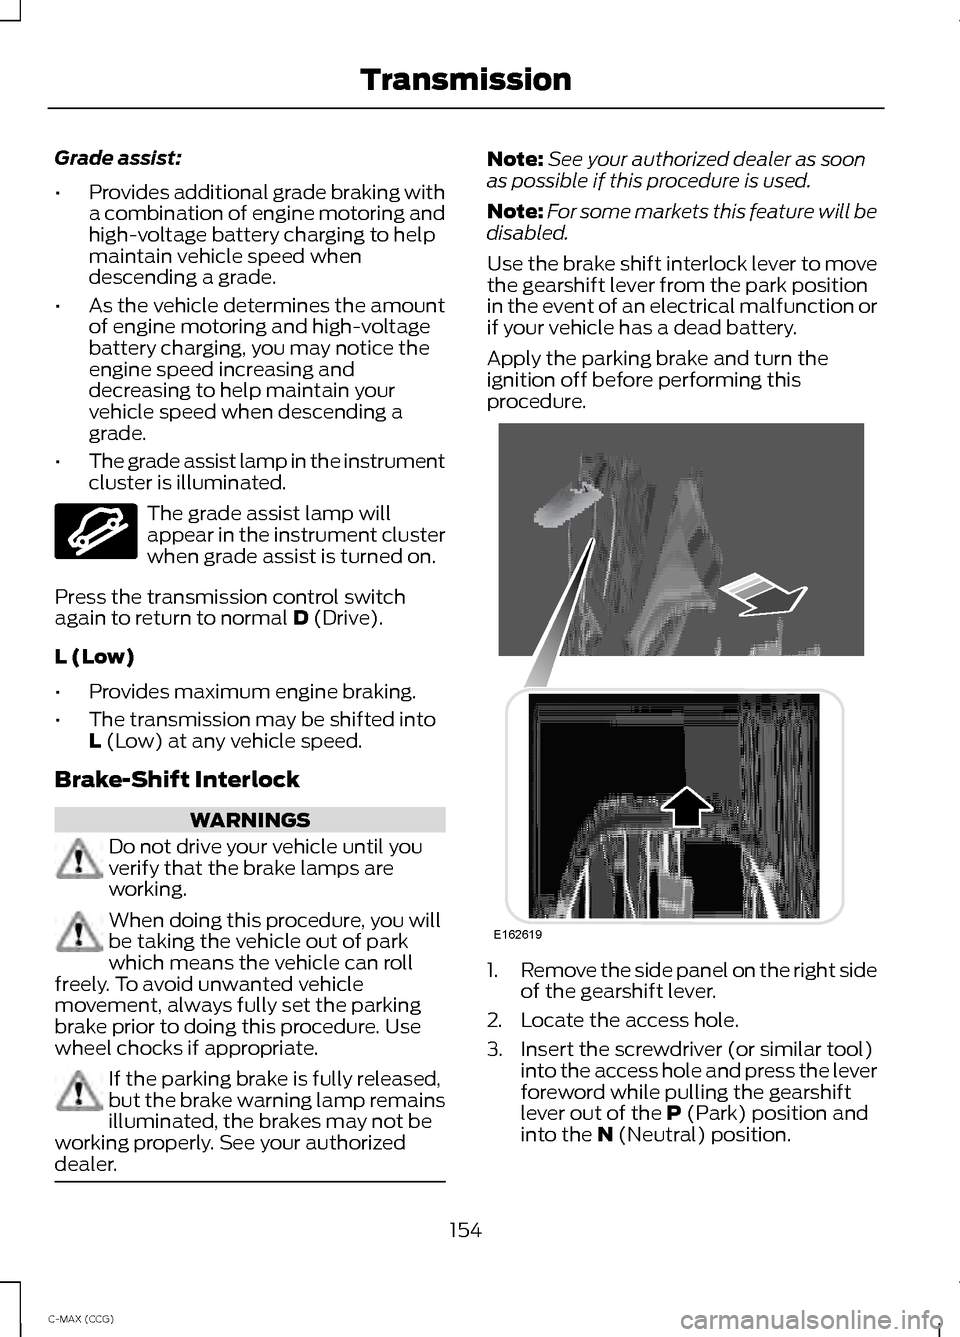
Use the brake shift interlock lever to move
the gearshift lever from the park position
in the event of an electrical malfunction or
if your vehicle has a dead battery.
Apply the parking brake and turn the
ignition off before performing this
procedure. 1.
Remove the side panel on the right side
of the gearshift lever.
2. Locate the access hole.
3. Insert the screwdriver (or similar tool) into the access hole and press the lever
foreword while pulling the gearshift
lever out of the
P (Park) position and
into the N (Neutral) position.
154
C-MAX (CCG) TransmissionE144523 E162619
Page 158 of 447
GENERAL INFORMATION
Note:
Occasional brake noise is normal. If
a metal-to-metal, continuous grinding or
continuous squeal sound is present, the
brake linings may be worn-out. Have the
system checked by an authorized dealer. If
the vehicle has continuous vibration or
shudder in the steering wheel while braking,
have it checked by an authorized dealer.
Note: Brake dust may accumulate on the
wheels, even under normal driving
conditions. Some dust is inevitable as the
brakes wear and does not contribute to
brake noise. See Cleaning the Alloy
Wheels (page 236). See
Warning Lamps and
Indicators (page 83).
Wet brakes result in reduced braking
efficiency. Gently press the brake pedal a
few times when driving from a car wash or
standing water to dry the brakes.
Brake Over Accelerator
In the event the accelerator pedal
becomes stuck or entrapped, apply steady
and firm pressure to the brake pedal to
slow the vehicle and reduce engine power.
If you experience this condition, apply the
brakes and bring your vehicle to a safe
stop. Move the transmission selector lever
to position
P, switch the engine off and
apply the parking brake. Inspect the
accelerator pedal for any interference. If
none are found and the condition persists,
have your vehicle towed to the nearest
authorized dealer. Brake Assist
Brake assist detects when you brake
heavily by measuring the rate at which you
press the brake pedal. It provides
maximum braking efficiency as long as you
press the pedal. Brake assist can reduce
stopping distances in critical situations.
Anti-lock Brake System
This system helps you maintain steering
control during emergency stops by keeping
the brakes from locking.
This lamp momentarily
illuminates when you turn the
ignition on. If the light does not
illuminate during start up, remains on or
flashes, the system may be disabled. Have
the system checked by an authorized
dealer. If the system is disabled, normal
braking is still effective. If the
brake warning lamp illuminates
when you release the parking brake, have
the system checked by an authorized
dealer.
Regenerative Braking System
This feature is used to simulate the engine
braking of an internal combustion engine
and assist the standard brake system while
recovering some of the energy of motion
and storing it in the battery to improve fuel
economy. The standard brake system is
designed to fully stop the car if
regenerative braking is not available.
During regenerative braking, the motor is
spun as a generator to create electrical
current. This recharges the battery and
slows the vehicle. In effect, once the
accelerator pedal is released, the motor
changes from an energy user to an energy
producer.
156
C-MAX (CCG) BrakesE144522 E144522
Page 159 of 447
When the accelerator pedal is released or
the brake pedal is applied, the brake
controller automatically detects the
amount of deceleration requested and
optimizes how much of the deceleration
will be produced by regenerative braking.
The remaining portion is generated by
standard friction braking. When the battery
is almost fully charged, the amount of
regenerative braking is limited to avoid
overcharging, and the requested
deceleration is produced by standard
friction braking alone.
Regenerative braking does not take the
place of the standard friction brakes; it only
assists them. Regenerative braking has
also been designed to interact with the
anti-lock brake system. Regenerative
braking is disabled when the anti-lock
brake system is activated or the battery is
fully charged.
HINTS ON DRIVING WITH
ANTI-LOCK BRAKES
Note:
When the system is operating, the
brake pedal will pulse and may travel
further. Maintain pressure on the brake
pedal. You may also hear a noise from the
system. This is normal.
The anti-lock braking system will not
eliminate the risks when:
• you drive too closely to the vehicle in
front of you
• your vehicle is hydroplaning
• you take corners too fast
• the road surface is poor. PARKING BRAKE WARNING
Always set the parking brake fully
and leave your vehicle with the
transmission selector lever in
position P. Note:
Do not press the release button while
pulling the lever up.
To apply the parking brake:
1. Press the foot brake pedal firmly.
2. Pull the parking brake lever up to its fullest extent.
Note: If you park your vehicle on a hill and
facing uphill, move the transmission selector
lever to position
P and turn the steering
wheel away from the curb.
Note: If you park your vehicle on a hill and
facing downhill, move the transmission
selector lever to
P and turn the steering
wheel toward the curb.
To release the parking brake:
1. Press the brake pedal firmly.
2. Pull the lever up slightly.
3. Press the release button and push the lever down.
HILL START ASSIST WARNINGS
The system does not replace the
parking brake. When you leave your
vehicle, always apply the parking
brake and put the transmission in park (P). You must remain in your vehicle once
you have activated the system.
During all times, you are responsible
for controlling your vehicle,
supervising the system and
intervening, if required.
157
C-MAX (CCG) Brakes
Page 161 of 447
PRINCIPLE OF OPERATION
The traction control system helps avoid
drive wheel spin and loss of traction.
If your vehicle begins to slide, the system
applies the brakes to individual wheels
and, when needed, reduces engine power
at the same time. If the wheels spin when
accelerating on slippery or loose surfaces,
the system reduces engine power in order
to increase traction.
USING TRACTION CONTROL
In certain situations for example, stuck in
snow or mud, turning the traction control
off may be beneficial as this allows the
wheels to spin with full engine power.
Depending on the type of system you have
on your vehicle, you can either turn the
system off using the information display
or by pressing the button.
Switching the System Off Using
the Information Display Controls
(If Equipped)
Your vehicle comes with this feature
already enabled. If required, you can switch
this feature off using the information
display controls. See Principle of
Operation (page 159).
Switching the System Off Using a
Switch
(If Equipped)
The button is located in the instrument
panel.
Press the button. You will see a message
in conjunction with an illuminated icon in
the display. Press the button again to
return the system to normal mode.
When you switch the traction control
system off, stability control remains fully
active. System Indicator Lights and
Messages WARNING
If a failure has been detected within
the AdvanceTrac system, the
stability control light will illuminate
steadily. Verify that the AdvanceTrac
system was not manually disabled through
the information display. If the stability
control light still illuminates steadily, have
the system serviced by an authorized
dealer immediately. Operating your vehicle
with AdvanceTrac disabled could lead to
an increased risk of loss of vehicle control,
vehicle rollover, personal injury and death. The stability control light
temporarily illuminates on
engine start-up and flashes
when a driving condition activates the
stability system. The stability control off light
temporarily illuminates on
engine start-up and stays on
when you turn the traction control system
off.
When you turn the traction control system
off or on, a message appears in the
information display showing system status.
159
C-MAX (CCG) Traction ControlE138639