engine FORD C MAX HYBRID 2015 2.G Workshop Manual
[x] Cancel search | Manufacturer: FORD, Model Year: 2015, Model line: C MAX HYBRID, Model: FORD C MAX HYBRID 2015 2.GPages: 455, PDF Size: 5.94 MB
Page 161 of 455
PRINCIPLE OF OPERATION
The traction control system helps avoid
drive wheel spin and loss of traction.
If your vehicle begins to slide, the system
applies the brakes to individual wheels
and, when needed, reduces engine power
at the same time. If the wheels spin when
accelerating on slippery or loose surfaces,
the system reduces engine power in order
to increase traction.
USING TRACTION CONTROL
In certain situations for example, stuck in
snow or mud, turning the traction control
off may be beneficial as this allows the
wheels to spin with full engine power.
Depending on the type of system you have
on your vehicle, you can either turn the
system off using the information display
or by pressing the button.
Switching the System Off Using
the Information Display Controls
(If Equipped)
Your vehicle comes with this feature
already enabled. If required, you can switch
this feature off using the information
display controls. See General
Information (page 88).
Switching the System Off Using a
Switch
(If Equipped)
The button is located in the instrument
panel.
Press the button. You will see a message
in conjunction with an illuminated icon in
the display. Press the button again to
return the system to normal mode.
When you switch the traction control
system off, stability control remains fully
active. System Indicator Lights and
Messages WARNING
If a failure has been detected within
the AdvanceTrac system, the
stability control light will illuminate
steadily. Verify that the AdvanceTrac
system was not manually disabled through
the information display. If the stability
control light still illuminates steadily, have
the system serviced by an authorized
dealer immediately. Operating your vehicle
with AdvanceTrac disabled could lead to
an increased risk of loss of vehicle control,
vehicle rollover, personal injury and death. The stability control light
temporarily illuminates on
engine start-up and flashes
when a driving condition activates the
stability system. The stability control off light
temporarily illuminates on
engine start-up and stays on
when you turn the traction control system
off.
When you turn the traction control system
off or on, a message appears in the
information display showing system status.
158
C-MAX (CCG) Mexico/United States of America/Canada, enUSA, CPE Review Traction ControlE138639
Page 173 of 455
PRINCIPLE OF OPERATION
Cruise control lets you maintain a set
speed without keeping your foot on the
accelerator pedal. You can use cruise
control when your vehicle speed is greater
than 20 mph (30 km/h).
USING CRUISE CONTROL WARNINGS
Do not use cruise control in heavy
traffic, on winding roads or when the
road surface is slippery. This could
result in loss of vehicle control, serious
injury or death. When you are going downhill, your
vehicle speed may increase above
the set speed. The system will not
apply the brakes. Change down a gear to
assist the system in maintaining the set
speed. Failure to do so could result in loss
of vehicle control, serious injury or death. Note:
Cruise control will disengage if your
vehicle speed decreases more than 10 mph
(16 km/h) below your set speed while
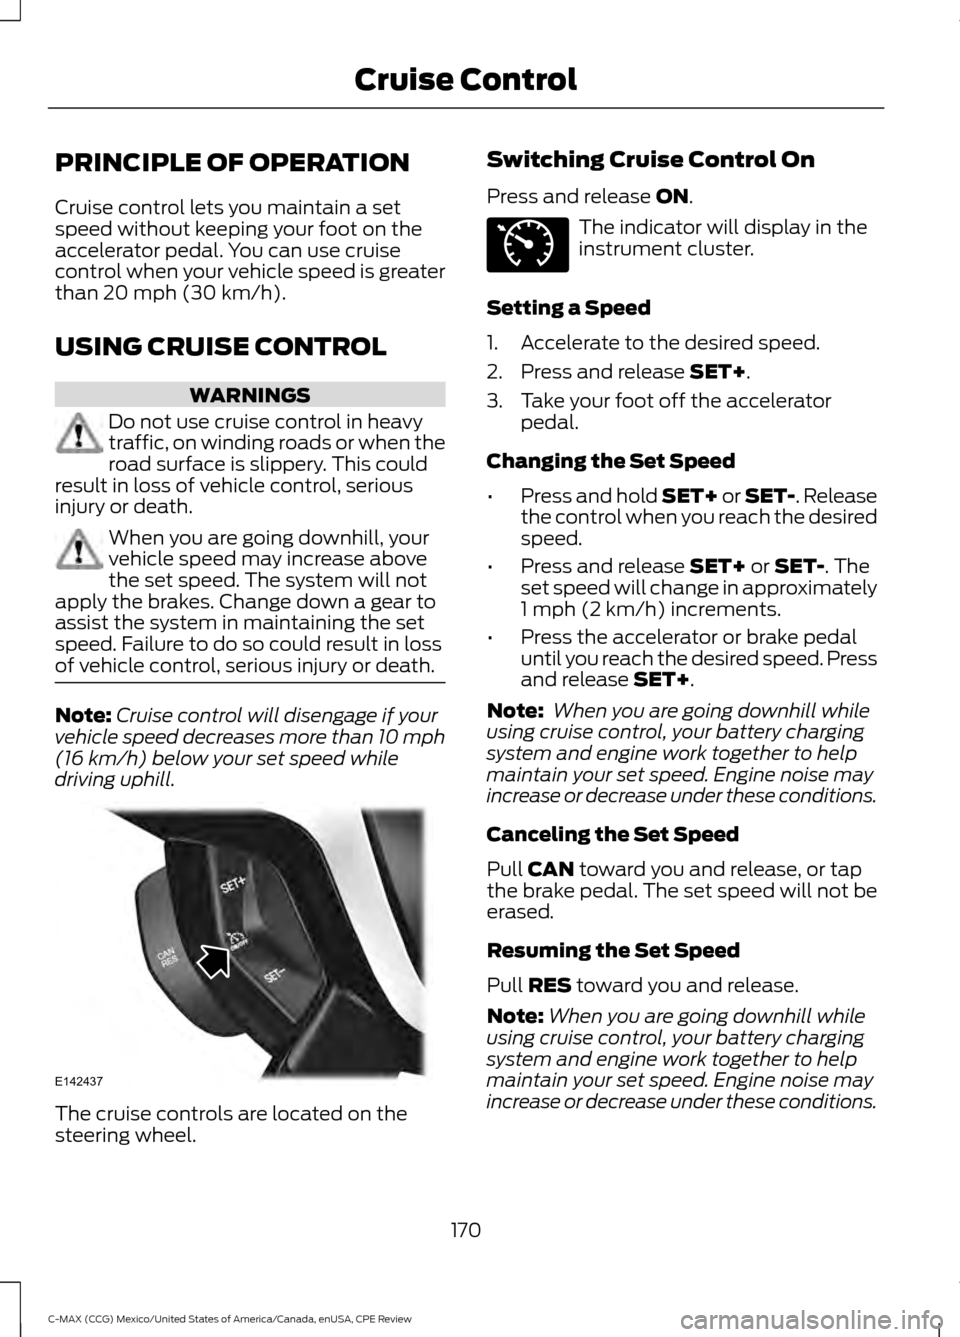
driving uphill. The cruise controls are located on the
steering wheel. Switching Cruise Control On
Press and release
ON. The indicator will display in the
instrument cluster.
Setting a Speed
1. Accelerate to the desired speed.
2. Press and release
SET+.
3. Take your foot off the accelerator pedal.
Changing the Set Speed
• Press and hold SET+ or SET-. Release
the control when you reach the desired
speed.
• Press and release
SET+ or SET-. The
set speed will change in approximately
1 mph (2 km/h) increments.
• Press the accelerator or brake pedal
until you reach the desired speed. Press
and release
SET+.
Note: When you are going downhill while
using cruise control, your battery charging
system and engine work together to help
maintain your set speed. Engine noise may
increase or decrease under these conditions.
Canceling the Set Speed
Pull
CAN toward you and release, or tap
the brake pedal. The set speed will not be
erased.
Resuming the Set Speed
Pull
RES toward you and release.
Note: When you are going downhill while
using cruise control, your battery charging
system and engine work together to help
maintain your set speed. Engine noise may
increase or decrease under these conditions.
170
C-MAX (CCG) Mexico/United States of America/Canada, enUSA, CPE Review Cruise ControlE142437 E71340
Page 181 of 455
WARNINGS
Exceeding the Safety
Compliance Certification
Label vehicle weight rating limits
could result in substandard
vehicle handling or performance,
engine, transmission and/or
structural damage, serious
damage to the vehicle, loss of
control and personal injury. Do not exceed the GVWR or
the GAWR specified on the
Safety Compliance Certification
Label. Do not use replacement tires
with lower load carrying
capacities than the original tires
because they may lower the
vehicle ’s GVWR and GAWR
limitations. Replacement tires
with a higher limit than the original
tires do not increase the GVWR
and GAWR limitations. WARNINGS
Exceeding any vehicle weight
rating limitation could result
in serious damage to the vehicle
and/or personal injury. Steps for determining the
correct load limit:
1. Locate the statement "The
combined weight of occupants
and cargo should never exceed
XXX kg or XXX lb." on your
vehicle ’s placard.
2. Determine the combined
weight of the driver and
passengers that will be riding
in your vehicle.
3. Subtract the combined weight
of the driver and passengers
from XXX kg or XXX lb.
178
C-MAX (CCG) Mexico/United States of America/Canada, enUSA, CPE Review Load CarryingE142524
Page 185 of 455
Recreational Towing
Note:
Put your climate control system in
recirculated air mode to prevent exhaust
fumes from entering the vehicle. See
Climate Control (page 104).
Follow these guidelines if you have a need
for recreational (RV) towing. An example
of recreational towing would be towing
your vehicle behind a motorhome. We
designed these guidelines to prevent
damage to your transmission.
You can tow your vehicle with all four
wheels on the ground or with the front
wheels off the ground by using a tow dolly.
If you are using a tow dolly follow the
instructions specified by the equipment
provider.
If you tow your vehicle with all four wheels
on the ground:
• Tow only in the forward direction.
• Release the parking brake.
Vehicles with Push Button Start
1. Start the vehicle by pressing the brake pedal, and then pressing the ENGINE
START/STOP button until the vehicle
starts.
2. Press the brake pedal and shift the transmission into position
N.
3. Turn the vehicle off by pressing the ENGINE START/STOP button once.
(Trip Summary appears in the left
instrument cluster screen when the
vehicle is off.)
Vehicles with Ignition Key
1. Start the vehicle by pressing the brake pedal, and then turning the ignition key
until the vehicle starts.
2. Press the brake pedal and shift the transmission into position
N. 3. Turn the vehicle off by turning the
ignition key past the accessory position.
The key position is between the
accessory and off positions. See
Ignition Switch
(page 123). (Trip
Summary appears in the left
instrument cluster screen when the
vehicle is off.)
Note: If your vehicle is equipped with an
ignition key, you cannot remove the key from
the ignition cylinder when the transmission
is in position
N and the vehicle is off.
All Vehicles
• Do not exceed 70 mph (113 km/h).
• Place the transmission in position
P,
start the vehicle, and allow the engine
to run for one minute at the beginning
of each day (you may need to press the
accelerator pedal in order to start the
engine). After allowing the vehicle to
run, place the transmission back into
position
N and the ignition in the off
position.
Note: A
SHIFT TO PARK or
TRANSMISSION NOT IN PARK message
may appear in the information display when
the transmission is in position
N and the
ignition is in the off position. You can ignore
the message during recreational towing.
182
C-MAX (CCG) Mexico/United States of America/Canada, enUSA, CPE Review Towing
Page 186 of 455
BREAKING-IN
You need to break in new tires for
approximately 300 miles (480
kilometers). During this time, your vehicle
may exhibit some unusual driving
characteristics. The engine also needs to
break in. Avoid hard accelerations and
driving too fast for the first 1000 miles
(1600 kilometers). If possible, avoid
carrying heavy loads up steep grades
during the break-in period.
ECONOMICAL DRIVING
Your fuel economy depends on:
•
How you drive your vehicle.
• How you maintain your vehicle.
• The conditions you drive your vehicle
in.
You may improve your fuel economy by
keeping these in mind:
• Drive your vehicle at reasonable
speeds. Traveling at 65 mph
(105 km/h) uses about 15% less fuel
than traveling at 75 mph (121 km/h).
• Drive at steady speeds without
stopping.
• Anticipate stops. Slowing down your
vehicle may eliminate the need to stop.
• Keep the tires properly inflated and use
only the recommended size.
• Switch off the heater if you do not need
it. When you have the heater on, keep
it at the lowest blower and
temperature setting necessary to be
comfortable.
• When it is cold outside, park in a sunny
location or a climate-controlled
environment. This may save fuel by
reducing the energy needed to heat the
cabin. •
Switch off the air conditioning if you do
not need it. When you have the air
conditioning on, keep it at the lowest
blower and highest temperature
setting necessary to be comfortable.
• When it is hot or sunny outside, parking
in a shaded or climate-controlled
environment will save fuel by reducing
the energy needed to cool the cabin.
• For the C-MAX Energi, use
preconditioning to improve your fuel
economy. See
High Voltage Battery
(page 145).
• Switch off the heated seats if you are
not using them.
• Switch off the defroster when you no
longer need it for visibility.
• For the C-MAX Energi, plug in and
recharge the high voltage battery
whenever possible.
• Use ECO Cruise Control, especially in
hilly terrain. For information on
enabling eco-cruise, See
Cruise
Control (page 170).
• Shift into low gear (L) when enhanced
engine braking is needed. Otherwise,
use drive gear (D) shift position.
• Combine errands and minimize
stop-and-go driving. A warmed up
engine works more efficiently. When
running errands, go to the farthest
destination first and then work your
way back home.
• Close the windows for high-speed
driving.
• Use the recommended engine oil. See
Capacities and Specifications (page
266
).
183
C-MAX (CCG) Mexico/United States of America/Canada, enUSA, CPE Review Driving Hints
Page 187 of 455
•
Perform all regularly scheduled
maintenance. See Scheduled
Maintenance (page 426).
• Use the coach and brake coach display
to get feedback on your economical
drive style. For more information, See
Information Displays
(page 88).
Avoid these actions because they reduce
your fuel economy:
• Avoid sudden or hard accelerations and
decelerations. Accelerate and slow
down in a smooth, moderate fashion.
• Avoid revving the engine before
switching off your vehicle.
• Avoid long idle periods.
• Do not warm up your vehicle on cold
mornings.
• Do not rest your foot on the brake
pedal while driving.
• Avoid carrying unnecessary weight.
Approximately 1 mile per gallon (0.4
kilometers per liter) is lost for every
400 lb (180 kg)
of weight carried.
• Avoid adding accessories that increase
aerodynamic drag to your vehicle such
as bug deflectors, car top carriers and
ski or bike racks.
• Avoid driving with the wheels out of
alignment.
Things to keep in mind when you refuel
your vehicle:
• Fuel generates fewer vapors when it is
cool and dark outside. Refuel your
vehicle in the early morning or late
evening.
• Use the recommended octane-rated
fuel. Using fuel below the
recommended rating will lower your
fuel economy. DRIVING THROUGH WATER WARNING
Do not drive through flowing or deep
water as you may lose control of your
vehicle.
Note:
Driving through standing water can
cause vehicle damage.
Note: Engine damage can occur if water
enters the air filter.
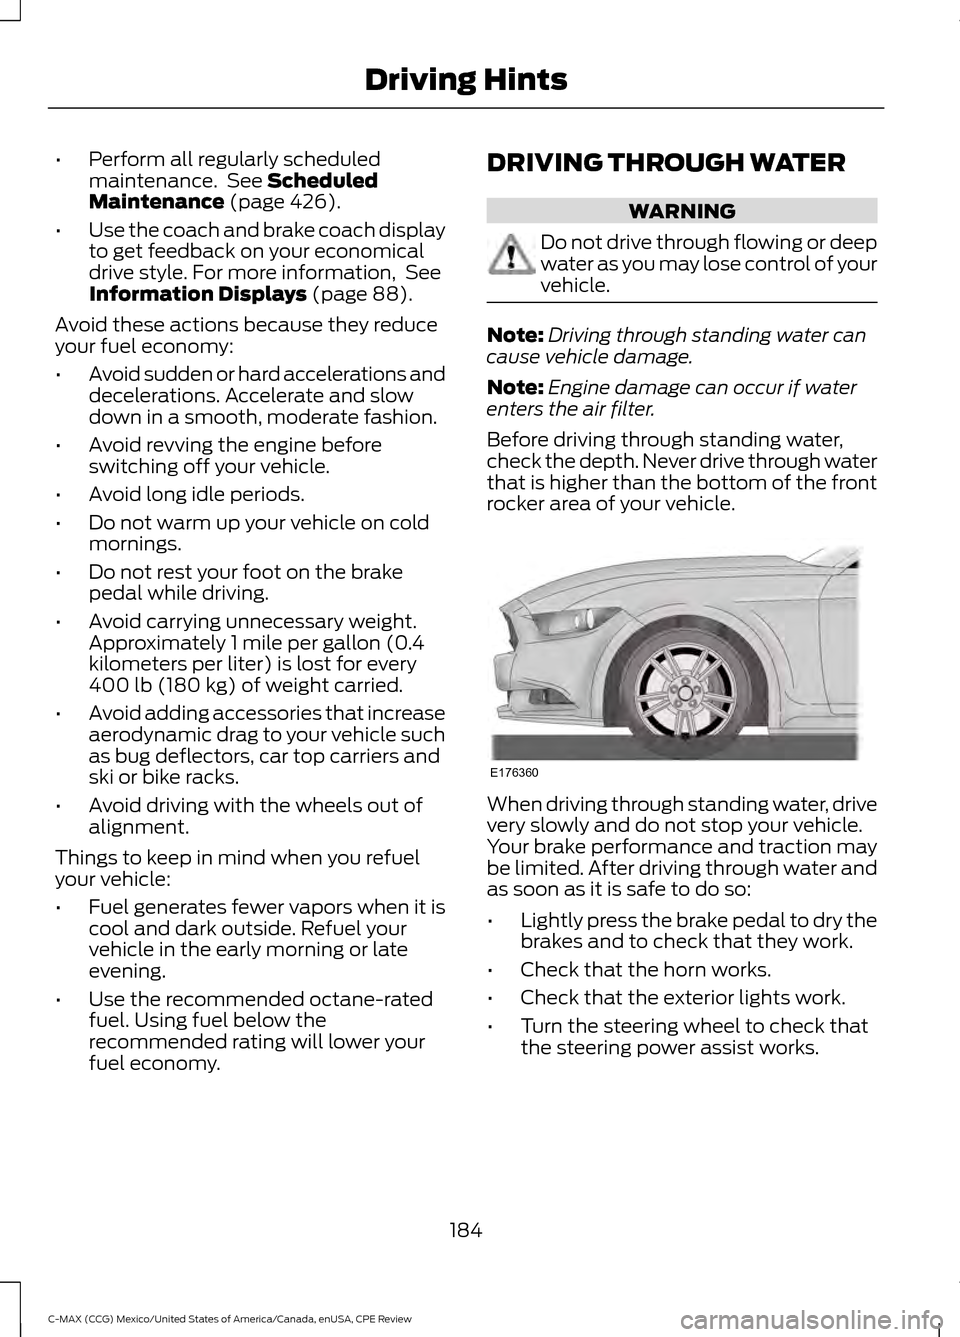
Before driving through standing water,
check the depth. Never drive through water
that is higher than the bottom of the front
rocker area of your vehicle. When driving through standing water, drive
very slowly and do not stop your vehicle.
Your brake performance and traction may
be limited. After driving through water and
as soon as it is safe to do so:
•
Lightly press the brake pedal to dry the
brakes and to check that they work.
• Check that the horn works.
• Check that the exterior lights work.
• Turn the steering wheel to check that
the steering power assist works.
184
C-MAX (CCG) Mexico/United States of America/Canada, enUSA, CPE Review Driving HintsE176360
Page 190 of 455
Canadian roadside coverage and benefits
may differ from the U.S. coverage. If you
require more information, please refer to
the coverage section of your warranty
guide, call us in Canada at
1-800-665-2006, or visit our website at
www.ford.ca.
Sykes Assistance Services Corporation
administers the Roadside Assistance
program. You must receive covered
services in Canada or the continental
United States. Coverage extends to
vehicles that use public, non-seasonal,
annually traveled roadways. Roadside
Assistance coverage does not extend to
vehicles involved in cross-country driving,
logging, autocross and any other form of
off-road use. Well maintained roads and
surfaces help ensure safe travel for the
supplier, and allow their representatives
to perform service as per the standard
operating procedures.
In Remote Locations
If our supplier cannot take your vehicle by
road to the nearest authorized dealership,
transportation by rail or water may be
necessary. The program covers a tow to
the dock or rail terminal and also to the
dealership at the end of the trip.
For rail or water transportation, however,
contact your authorized dealer to confirm
if you are eligible for additional coverage
before you authorize or pay for the service.
Call the Ford Roadside Assistance at
1-800-665-2006 for additional
information.
HAZARD WARNING FLASHERS
Note:
If used when the vehicle is not
running, the battery will lose charge. There
may be insufficient power to restart your
vehicle. The hazard warning button is
located on the instrument panel.
Use it when your vehicle is
creating a safety hazard for other
motorists.
• Press the button to turn on the hazard
warning function, and the front and
rear direction indicators will flash.
• Press the button again to turn them
off.
FUEL SHUTOFF WARNING
Failure to inspect and, if necessary,
repair fuel leaks after a collision may
increase the risk of fire and serious
injury. Ford Motor Company recommends
that the fuel system be inspected by an
authorized dealer after any collision. In the event of a moderate to severe
collision, this vehicle has a fuel pump
shut-off feature that stops the flow of fuel
to the engine. Not every impact will cause
a shut-off.
Should your vehicle shut off after a
collision, you may restart your vehicle.
For vehicles equipped with a key system:
1. Switch off the ignition.
2. Switch on the ignition.
3. Check the information display for the
Ready to Drive light as the gasoline
engine may not start, but the electric
motor may be running. If you do not see
the Ready to Drive light, repeat Steps
1 and 2 up to two more times.
For vehicles equipped with a push button
start system:
1. Press the push button start to switch off the ignition.
187
C-MAX (CCG) Mexico/United States of America/Canada, enUSA, CPE Review Roadside Emergencies
Page 191 of 455
2. Press the brake pedal and press the
push button start to switch on the
ignition.
3. Check the information display for the Ready to Drive light as the gasoline
engine may not start, but the electric
motor may be running. If you do not see
the Ready to Drive light, repeat Steps
1 and 2 up to two more times.
Note: When you try to restart your vehicle
after a fuel shutoff, the vehicle makes sure
that the electrical system is safe to restart.
Once your vehicle determines that the
electrical system is safe, then the vehicle
will allow you to restart.
Note: In the event that your vehicle does
not restart after your third attempt, contact
an authorized dealer.
JUMP STARTING THE VEHICLE WARNINGS
The gases around the battery can
explode if exposed to flames, sparks
or lit cigarettes. An explosion could
result in injury or vehicle damage. Batteries contain sulfuric acid which
can burn skin, eyes and clothing, if
contacted. Do not attempt to push-start your
automatic transmission vehicle. Automatic
transmissions do not have push-start
capability. Attempting to push-start a
vehicle with an automatic transmission
may cause transmission damage.
Preparing Your Vehicle
Note:
Use only a 12-volt supply to start your
vehicle.
Note: Do not disconnect the battery of the
disabled vehicle as this could damage the
vehicle's electrical system.
1. Park the booster vehicle close to the hood of the disabled vehicle making
sure the two vehicles do not touch. Set
the parking brake on both vehicles and
stay clear of the engine cooling fan and
other moving parts.
2. Check all battery terminals and remove
any excessive corrosion before you
attach the battery cables. Ensure that
vent caps are tight and level.
3. Turn the heater fan on in both vehicles
to protect from any electrical surges.
Turn all other accessories off.
Connecting the Jumper Cables
Your vehicle has a 12-volt battery that has
two prongs accessible from under the
hood. Your vehicle can be jumped the
same way conventional vehicles can by
using these prongs. The illustration below
shows the two connector prongs used for
jump-starting your vehicle.
188
C-MAX (CCG) Mexico/United States of America/Canada, enUSA, CPE Review Roadside Emergencies
Page 193 of 455
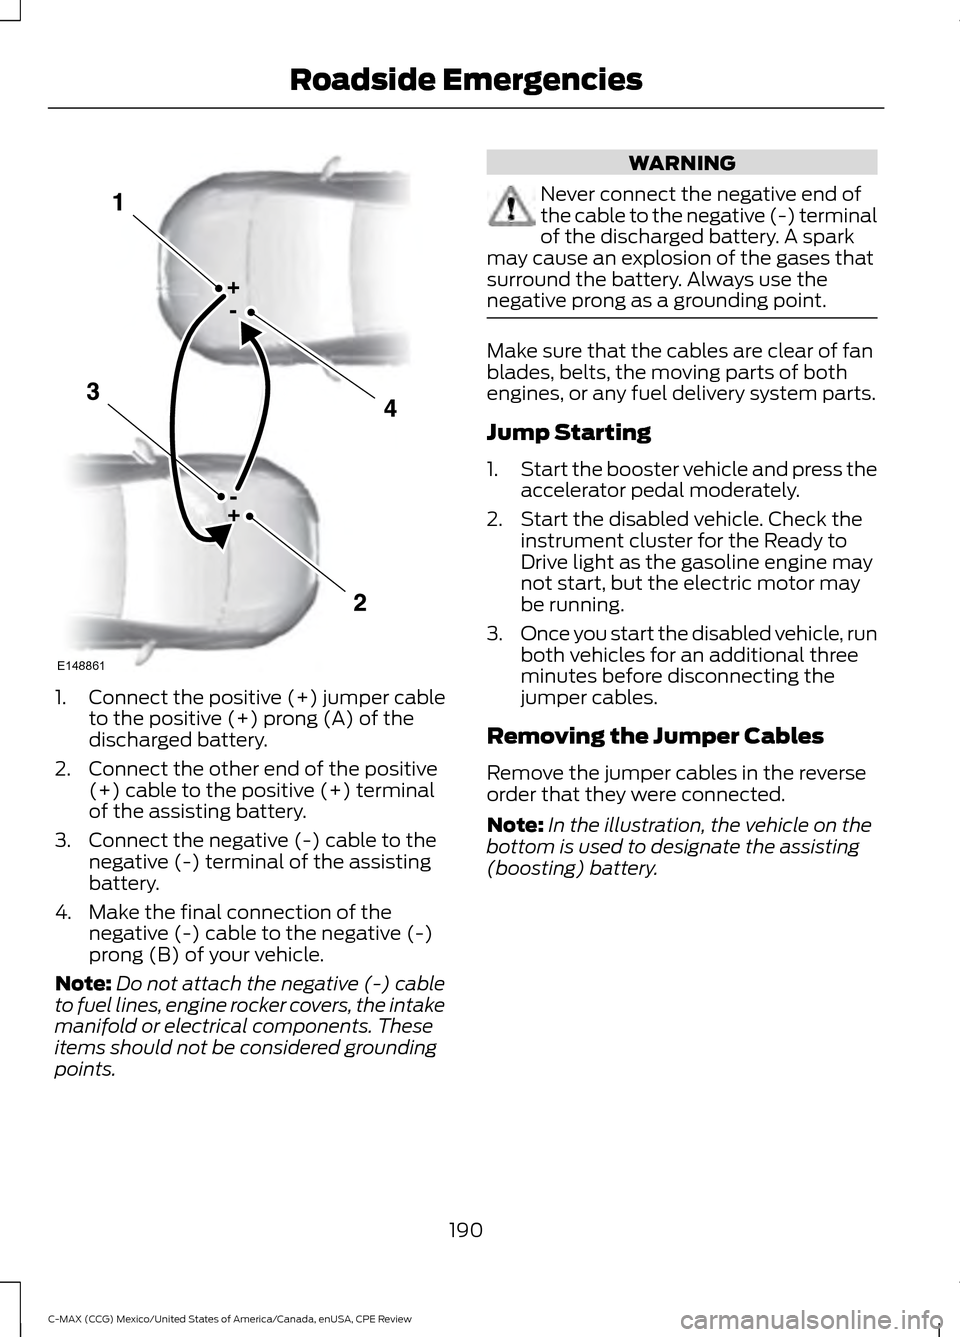
1.
Connect the positive (+) jumper cable
to the positive (+) prong (A) of the
discharged battery.
2. Connect the other end of the positive (+) cable to the positive (+) terminal
of the assisting battery.
3. Connect the negative (-) cable to the negative (-) terminal of the assisting
battery.
4. Make the final connection of the negative (-) cable to the negative (-)
prong (B) of your vehicle.
Note: Do not attach the negative (-) cable
to fuel lines, engine rocker covers, the intake
manifold or electrical components. These
items should not be considered grounding
points. WARNING
Never connect the negative end of
the cable to the negative (-) terminal
of the discharged battery. A spark
may cause an explosion of the gases that
surround the battery. Always use the
negative prong as a grounding point. Make sure that the cables are clear of fan
blades, belts, the moving parts of both
engines, or any fuel delivery system parts.
Jump Starting
1.
Start the booster vehicle and press the
accelerator pedal moderately.
2. Start the disabled vehicle. Check the instrument cluster for the Ready to
Drive light as the gasoline engine may
not start, but the electric motor may
be running.
3. Once you start the disabled vehicle, run
both vehicles for an additional three
minutes before disconnecting the
jumper cables.
Removing the Jumper Cables
Remove the jumper cables in the reverse
order that they were connected.
Note: In the illustration, the vehicle on the
bottom is used to designate the assisting
(boosting) battery.
190
C-MAX (CCG) Mexico/United States of America/Canada, enUSA, CPE Review Roadside EmergenciesE148861
Page 194 of 455
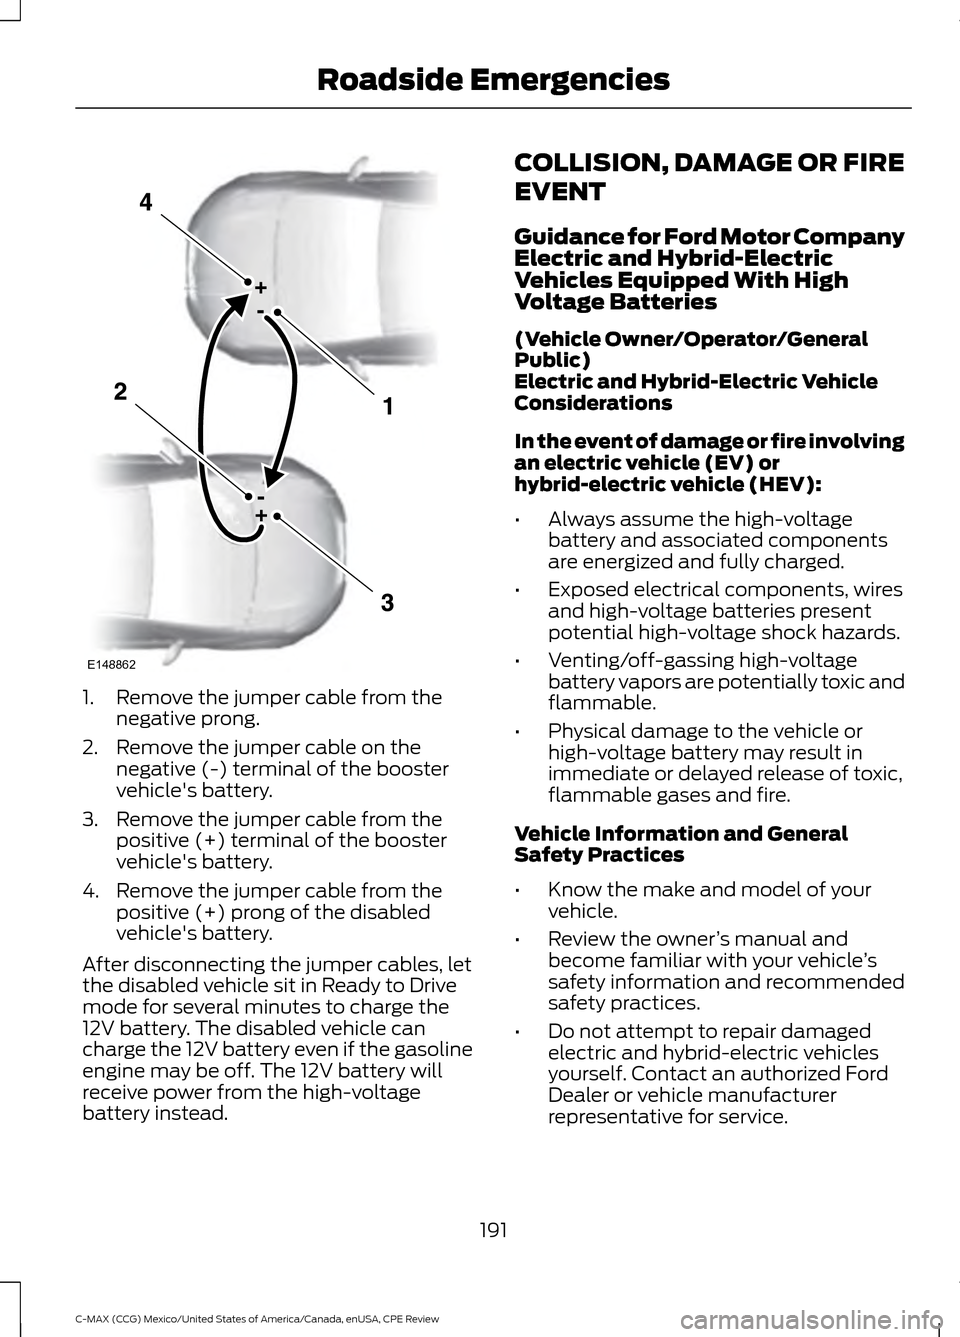
1. Remove the jumper cable from the
negative prong.
2. Remove the jumper cable on the negative (-) terminal of the booster
vehicle's battery.
3. Remove the jumper cable from the positive (+) terminal of the booster
vehicle's battery.
4. Remove the jumper cable from the positive (+) prong of the disabled
vehicle's battery.
After disconnecting the jumper cables, let
the disabled vehicle sit in Ready to Drive
mode for several minutes to charge the
12V battery. The disabled vehicle can
charge the 12V battery even if the gasoline
engine may be off. The 12V battery will
receive power from the high-voltage
battery instead. COLLISION, DAMAGE OR FIRE
EVENT
Guidance for Ford Motor Company
Electric and Hybrid-Electric
Vehicles Equipped With High
Voltage Batteries
(Vehicle Owner/Operator/General
Public)
Electric and Hybrid-Electric Vehicle
Considerations
In the event of damage or fire involving
an electric vehicle (EV) or
hybrid-electric vehicle (HEV):
•
Always assume the high-voltage
battery and associated components
are energized and fully charged.
• Exposed electrical components, wires
and high-voltage batteries present
potential high-voltage shock hazards.
• Venting/off-gassing high-voltage
battery vapors are potentially toxic and
flammable.
• Physical damage to the vehicle or
high-voltage battery may result in
immediate or delayed release of toxic,
flammable gases and fire.
Vehicle Information and General
Safety Practices
• Know the make and model of your
vehicle.
• Review the owner ’s manual and
become familiar with your vehicle ’s
safety information and recommended
safety practices.
• Do not attempt to repair damaged
electric and hybrid-electric vehicles
yourself. Contact an authorized Ford
Dealer or vehicle manufacturer
representative for service.
191
C-MAX (CCG) Mexico/United States of America/Canada, enUSA, CPE Review Roadside EmergenciesE148862