warning FORD C MAX HYBRID 2015 2.G Workshop Manual
[x] Cancel search | Manufacturer: FORD, Model Year: 2015, Model line: C MAX HYBRID, Model: FORD C MAX HYBRID 2015 2.GPages: 455, PDF Size: 5.94 MB
Page 103 of 455
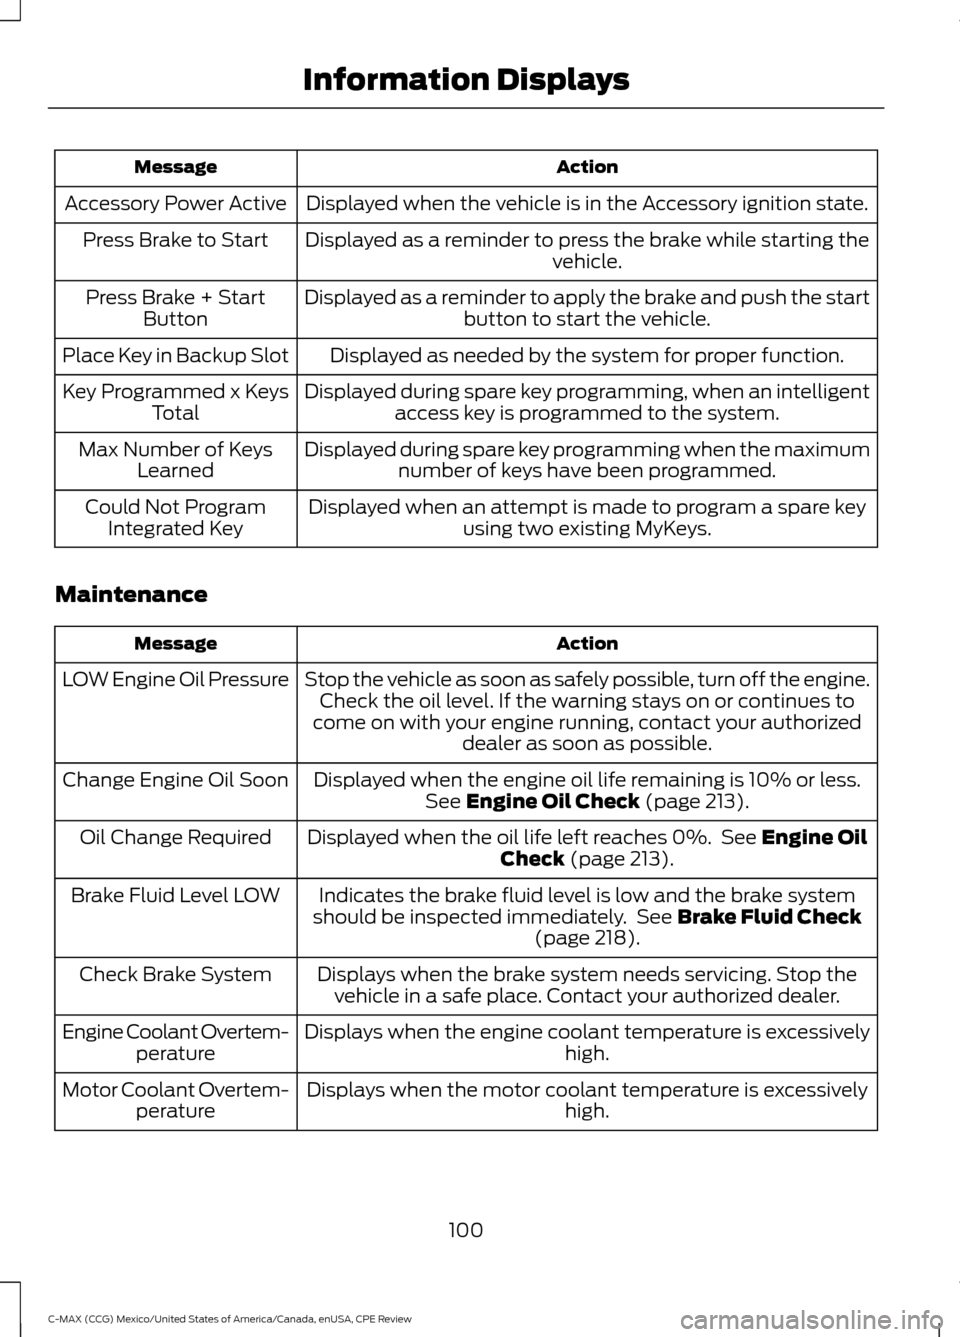
Action
Message
Displayed when the vehicle is in the Accessory ignition state.
Accessory Power Active
Displayed as a reminder to press the brake while starting the vehicle.
Press Brake to Start
Displayed as a reminder to apply the brake and push the startbutton to start the vehicle.
Press Brake + Start
Button
Displayed as needed by the system for proper function.
Place Key in Backup Slot
Displayed during spare key programming, when an intelligentaccess key is programmed to the system.
Key Programmed x Keys
Total
Displayed during spare key programming when the maximumnumber of keys have been programmed.
Max Number of Keys
Learned
Displayed when an attempt is made to program a spare keyusing two existing MyKeys.
Could Not Program
Integrated Key
Maintenance Action
Message
Stop the vehicle as soon as safely possible, turn off the engine.Check the oil level. If the warning stays on or continues to
come on with your engine running, contact your authorized dealer as soon as possible.
LOW Engine Oil Pressure
Displayed when the engine oil life remaining is 10% or less.See Engine Oil Check (page 213).
Change Engine Oil Soon
Displayed when the oil life left reaches 0%. See
Engine Oil
Check (page 213).
Oil Change Required
Indicates the brake fluid level is low and the brake system
should be inspected immediately. See
Brake Fluid Check
(page 218).
Brake Fluid Level LOW
Displays when the brake system needs servicing. Stop thevehicle in a safe place. Contact your authorized dealer.
Check Brake System
Displays when the engine coolant temperature is excessively high.
Engine Coolant Overtem-
perature
Displays when the motor coolant temperature is excessively high.
Motor Coolant Overtem-
perature
100
C-MAX (CCG) Mexico/United States of America/Canada, enUSA, CPE Review Information Displays
Page 105 of 455
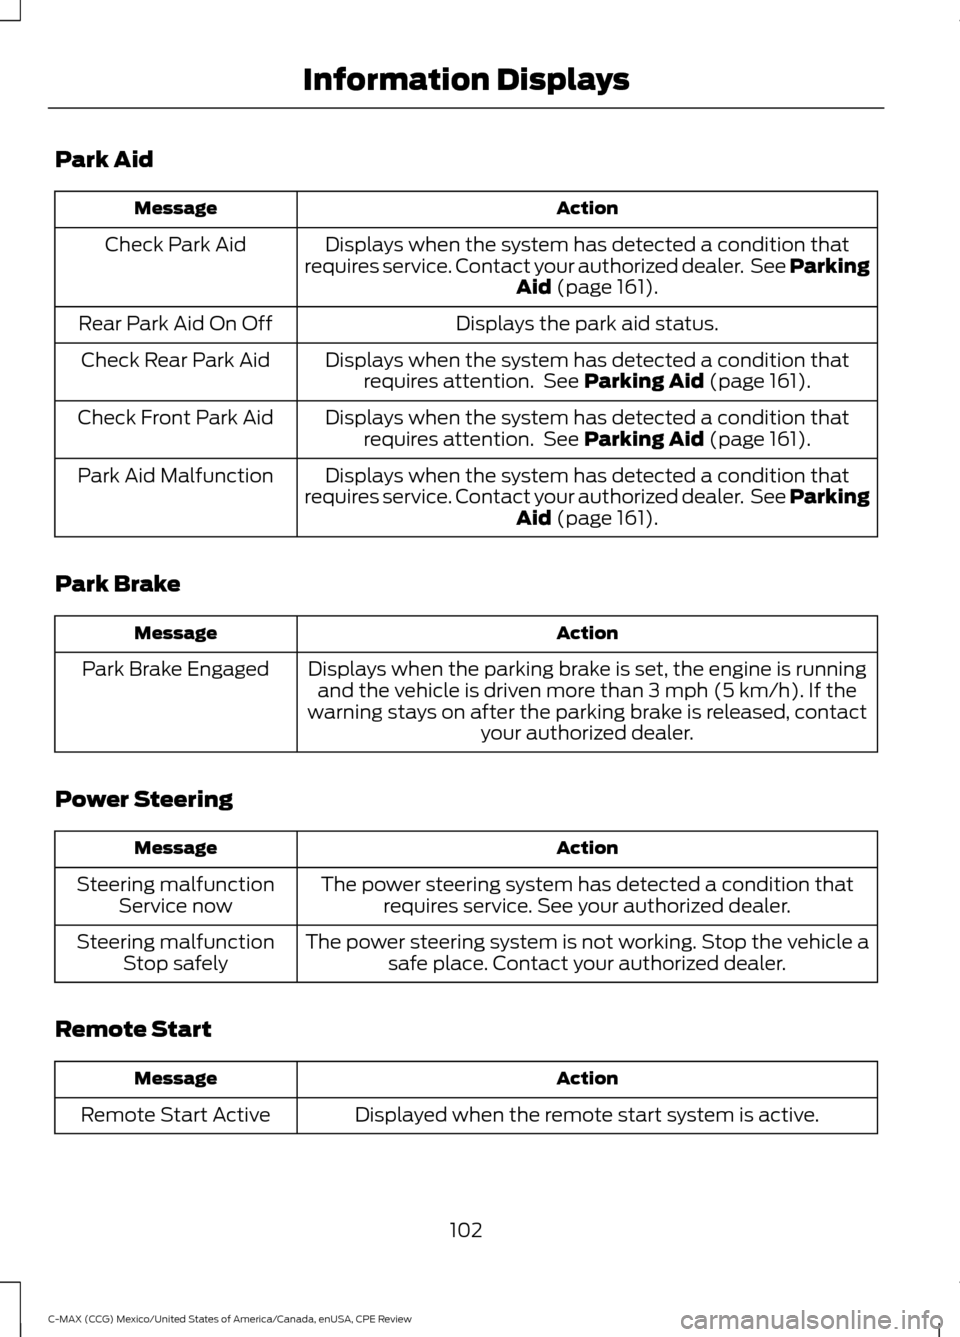
Park Aid
Action
Message
Displays when the system has detected a condition that
requires service. Contact your authorized dealer. See Parking Aid (page 161).
Check Park Aid
Displays the park aid status.
Rear Park Aid On Off
Displays when the system has detected a condition thatrequires attention. See
Parking Aid (page 161).
Check Rear Park Aid
Displays when the system has detected a condition thatrequires attention. See
Parking Aid (page 161).
Check Front Park Aid
Displays when the system has detected a condition that
requires service. Contact your authorized dealer. See Parking Aid
(page 161).
Park Aid Malfunction
Park Brake Action
Message
Displays when the parking brake is set, the engine is runningand the vehicle is driven more than 3 mph (5 km/h). If the
warning stays on after the parking brake is released, contact your authorized dealer.
Park Brake Engaged
Power Steering Action
Message
The power steering system has detected a condition thatrequires service. See your authorized dealer.
Steering malfunction
Service now
The power steering system is not working. Stop the vehicle asafe place. Contact your authorized dealer.
Steering malfunction
Stop safely
Remote Start Action
Message
Displayed when the remote start system is active.
Remote Start Active
102
C-MAX (CCG) Mexico/United States of America/Canada, enUSA, CPE Review Information Displays
Page 106 of 455
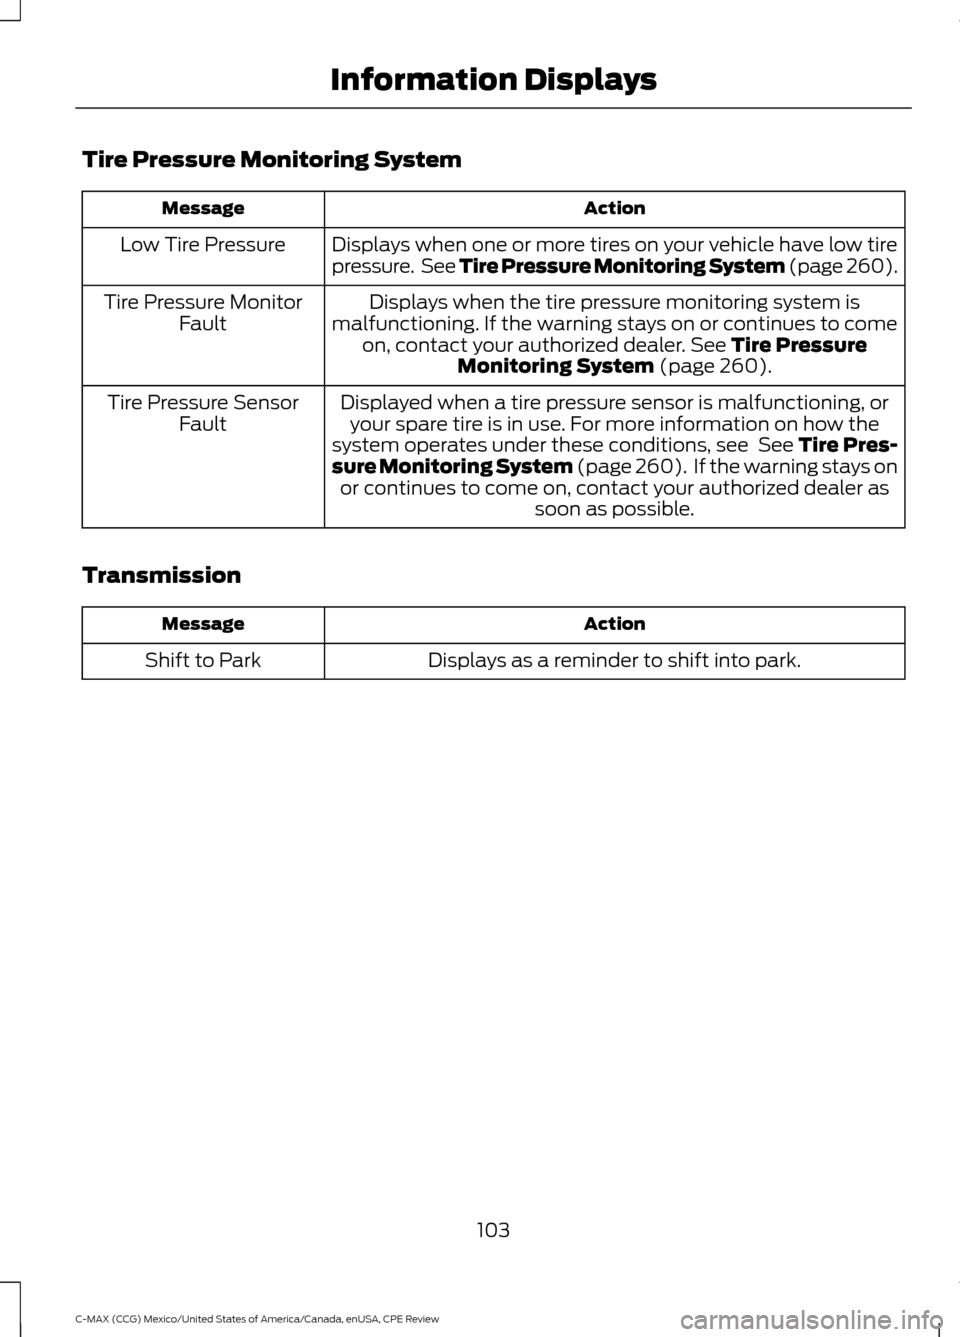
Tire Pressure Monitoring System
Action
Message
Displays when one or more tires on your vehicle have low tire
pressure. See Tire Pressure Monitoring System (page 260).
Low Tire Pressure
Displays when the tire pressure monitoring system is
malfunctioning. If the warning stays on or continues to come on, contact your authorized dealer.
See Tire Pressure
Monitoring System (page 260).
Tire Pressure Monitor
Fault
Displayed when a tire pressure sensor is malfunctioning, oryour spare tire is in use. For more information on how the
system operates under these conditions, see See Tire Pres-
sure Monitoring System (page 260). If the warning stays on or continues to come on, contact your authorized dealer as soon as possible.
Tire Pressure Sensor
Fault
Transmission Action
Message
Displays as a reminder to shift into park.
Shift to Park
103
C-MAX (CCG) Mexico/United States of America/Canada, enUSA, CPE Review Information Displays
Page 112 of 455
SITTING IN THE CORRECT
POSITION
WARNINGS
Sitting improperly, out of position or
with the seatback reclined too far
can take weight off the seat cushion
and affect the decision of the passenger
sensing system, resulting in serious injury
or death in the event of a crash. Always sit
upright against your seat back, with your
feet on the floor. Do not recline the seatback as this
can cause the occupant to slide
under the safety belt, resulting in
serious injury in the event of a crash. Do not place objects higher than the
seatback to reduce the risk of serious
injury in the event of a crash or during
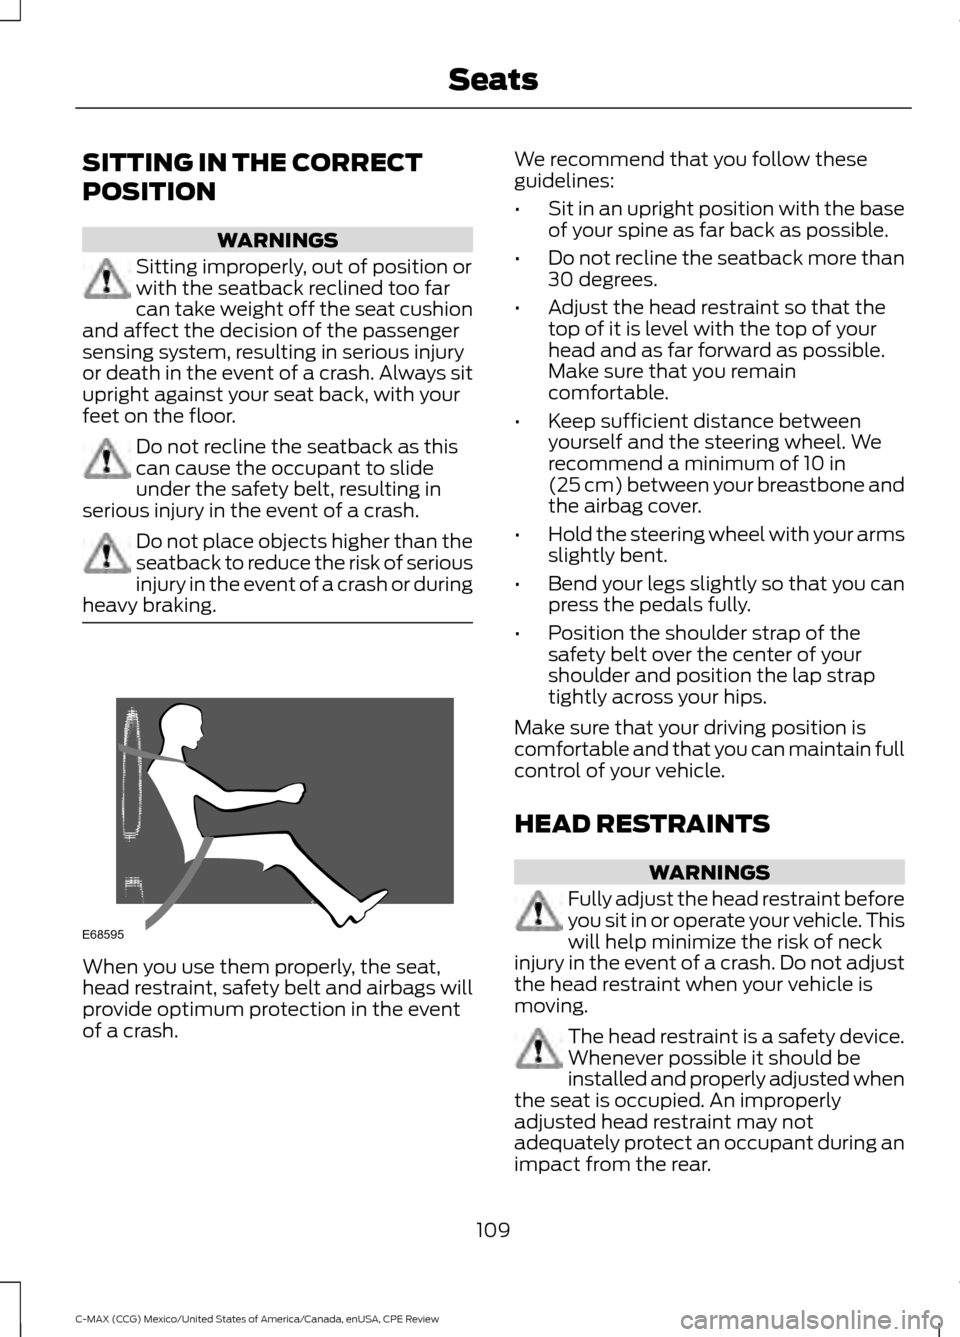
heavy braking. When you use them properly, the seat,
head restraint, safety belt and airbags will
provide optimum protection in the event
of a crash. We recommend that you follow these
guidelines:
•
Sit in an upright position with the base
of your spine as far back as possible.
• Do not recline the seatback more than
30 degrees.
• Adjust the head restraint so that the
top of it is level with the top of your
head and as far forward as possible.
Make sure that you remain
comfortable.
• Keep sufficient distance between
yourself and the steering wheel. We
recommend a minimum of 10 in
(25 cm) between your breastbone and
the airbag cover.
• Hold the steering wheel with your arms
slightly bent.
• Bend your legs slightly so that you can
press the pedals fully.
• Position the shoulder strap of the
safety belt over the center of your
shoulder and position the lap strap
tightly across your hips.
Make sure that your driving position is
comfortable and that you can maintain full
control of your vehicle.
HEAD RESTRAINTS WARNINGS
Fully adjust the head restraint before
you sit in or operate your vehicle. This
will help minimize the risk of neck
injury in the event of a crash. Do not adjust
the head restraint when your vehicle is
moving. The head restraint is a safety device.
Whenever possible it should be
installed and properly adjusted when
the seat is occupied. An improperly
adjusted head restraint may not
adequately protect an occupant during an
impact from the rear.
109
C-MAX (CCG) Mexico/United States of America/Canada, enUSA, CPE Review SeatsE68595
Page 113 of 455
WARNINGS
Install the head restraint properly to
help minimize the risk of neck injury
in the event of a crash.
Note:
Adjust the seat back to an upright
driving position before adjusting the head
restraint. Adjust the head restraint so that
the top of it is level with the top of your head
and as far forward as possible. Make sure
that you remain comfortable. If you are
extremely tall, adjust the head restraint to
its highest position.
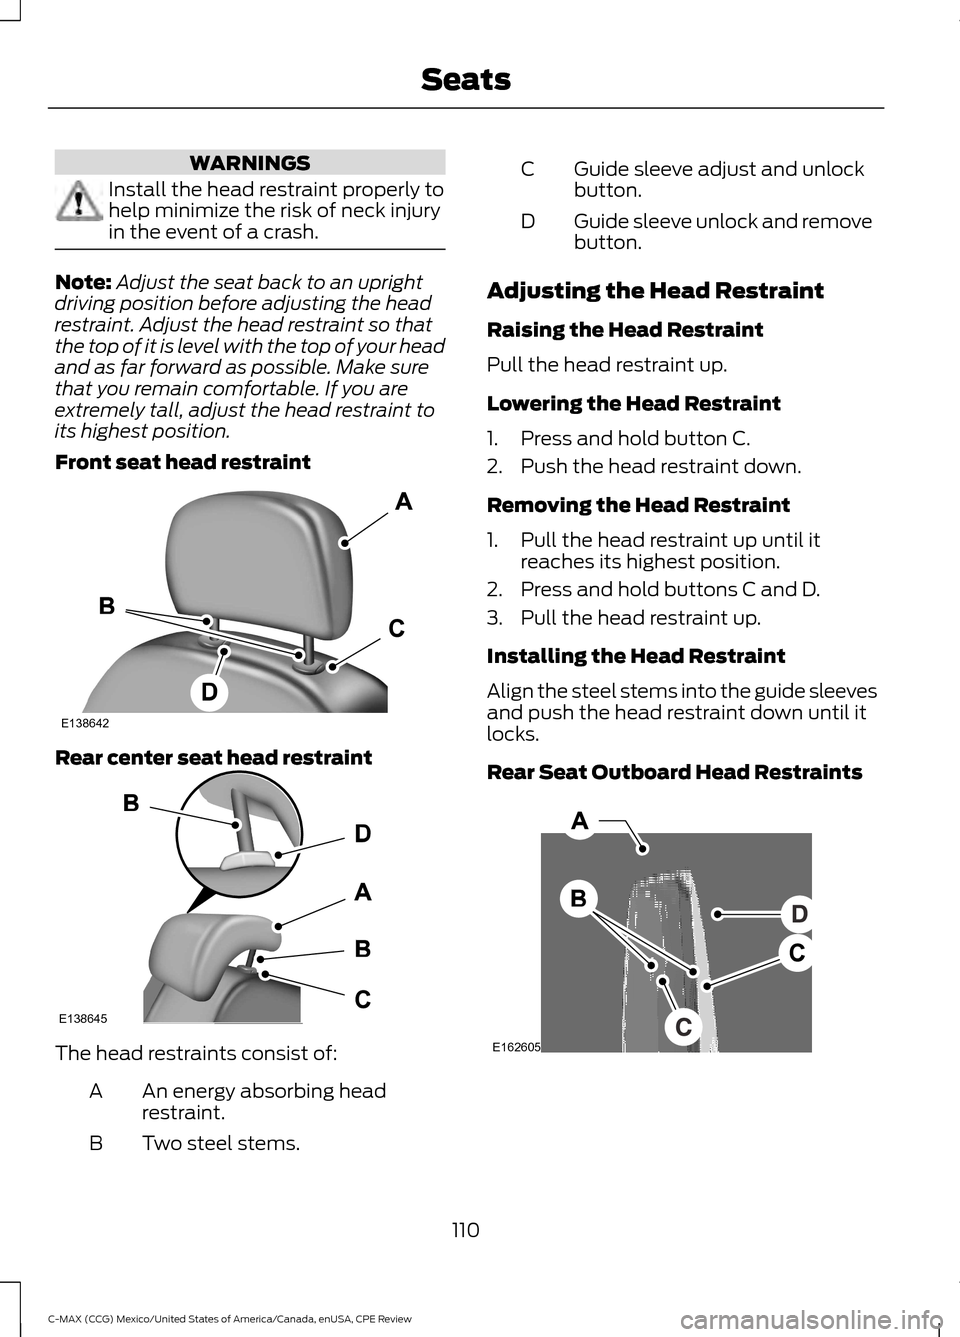
Front seat head restraint Rear center seat head restraint
The head restraints consist of:
An energy absorbing head
restraint.
A
Two steel stems.
B Guide sleeve adjust and unlock
button.
C
Guide sleeve unlock and remove
button.
D
Adjusting the Head Restraint
Raising the Head Restraint
Pull the head restraint up.
Lowering the Head Restraint
1. Press and hold button C.
2. Push the head restraint down.
Removing the Head Restraint
1. Pull the head restraint up until it reaches its highest position.
2. Press and hold buttons C and D.
3. Pull the head restraint up.
Installing the Head Restraint
Align the steel stems into the guide sleeves
and push the head restraint down until it
locks.
Rear Seat Outboard Head Restraints 110
C-MAX (CCG) Mexico/United States of America/Canada, enUSA, CPE Review SeatsE138642 E138645 E162605
Page 114 of 455
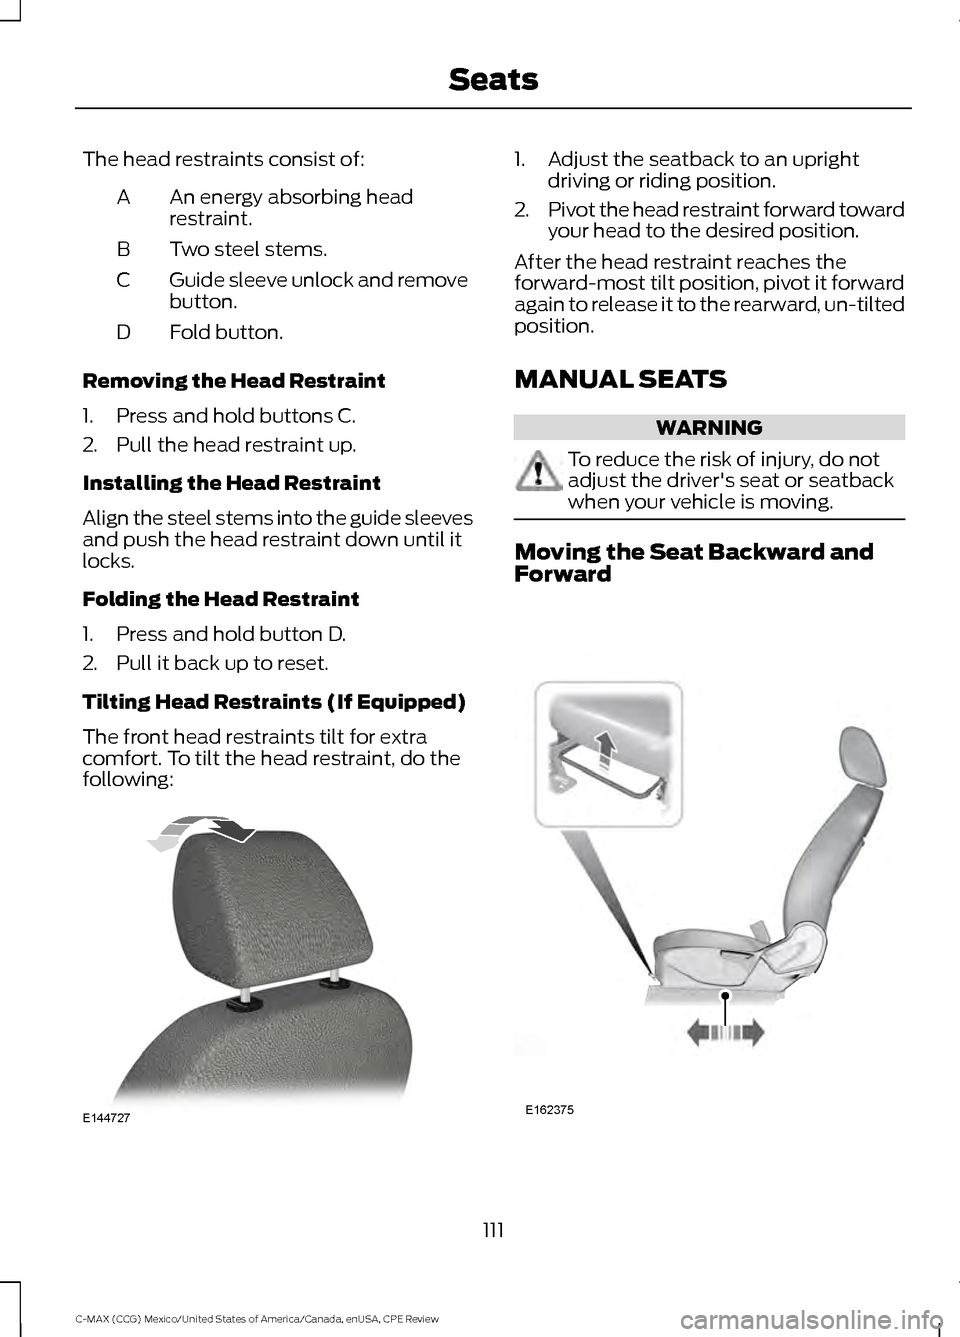
The head restraints consist of:
An energy absorbing head
restraint.
A
Two steel stems.
B
Guide sleeve unlock and remove
button.
C
Fold button.
D
Removing the Head Restraint
1. Press and hold buttons C.
2. Pull the head restraint up.
Installing the Head Restraint
Align the steel stems into the guide sleeves
and push the head restraint down until it
locks.
Folding the Head Restraint
1. Press and hold button D.
2. Pull it back up to reset.
Tilting Head Restraints (If Equipped)
The front head restraints tilt for extra
comfort. To tilt the head restraint, do the
following: 1. Adjust the seatback to an upright
driving or riding position.
2. Pivot the head restraint forward toward
your head to the desired position.
After the head restraint reaches the
forward-most tilt position, pivot it forward
again to release it to the rearward, un-tilted
position.
MANUAL SEATS WARNING
To reduce the risk of injury, do not
adjust the driver's seat or seatback
when your vehicle is moving.
Moving the Seat Backward and
Forward
111
C-MAX (CCG) Mexico/United States of America/Canada, enUSA, CPE Review SeatsE144727 E162375
Page 115 of 455
WARNING
Rock the seat backward and forward
after releasing the lever to make sure
that it is fully engaged.
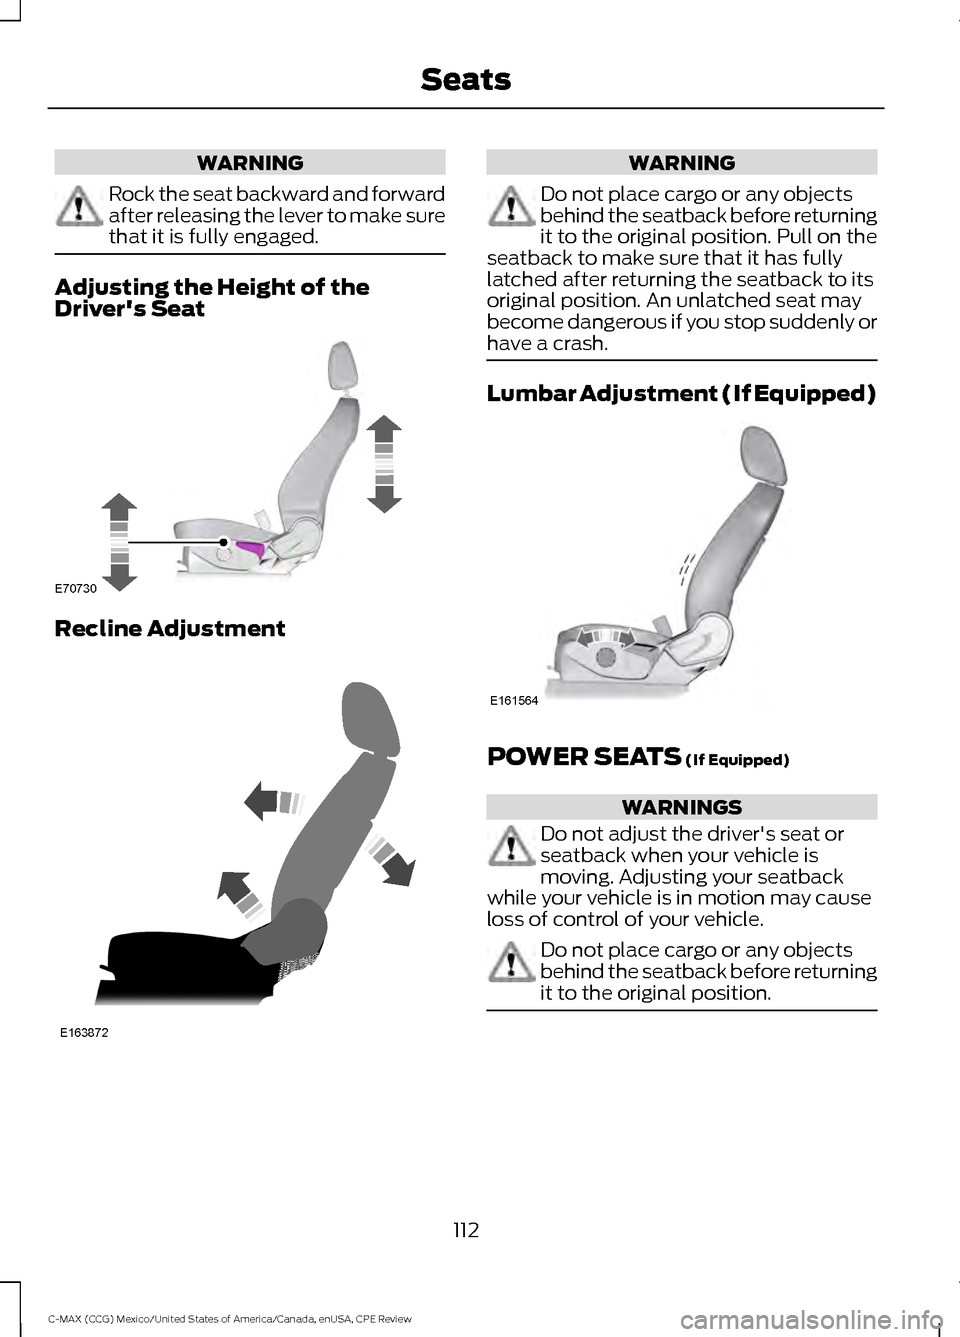
Adjusting the Height of the
Driver's Seat
Recline Adjustment WARNING
Do not place cargo or any objects
behind the seatback before returning
it to the original position. Pull on the
seatback to make sure that it has fully
latched after returning the seatback to its
original position. An unlatched seat may
become dangerous if you stop suddenly or
have a crash. Lumbar Adjustment (If Equipped)
POWER SEATS (If Equipped)
WARNINGS
Do not adjust the driver's seat or
seatback when your vehicle is
moving. Adjusting your seatback
while your vehicle is in motion may cause
loss of control of your vehicle. Do not place cargo or any objects
behind the seatback before returning
it to the original position.
112
C-MAX (CCG) Mexico/United States of America/Canada, enUSA, CPE Review SeatsE70730 E163872 E161564
Page 117 of 455
REAR SEATS
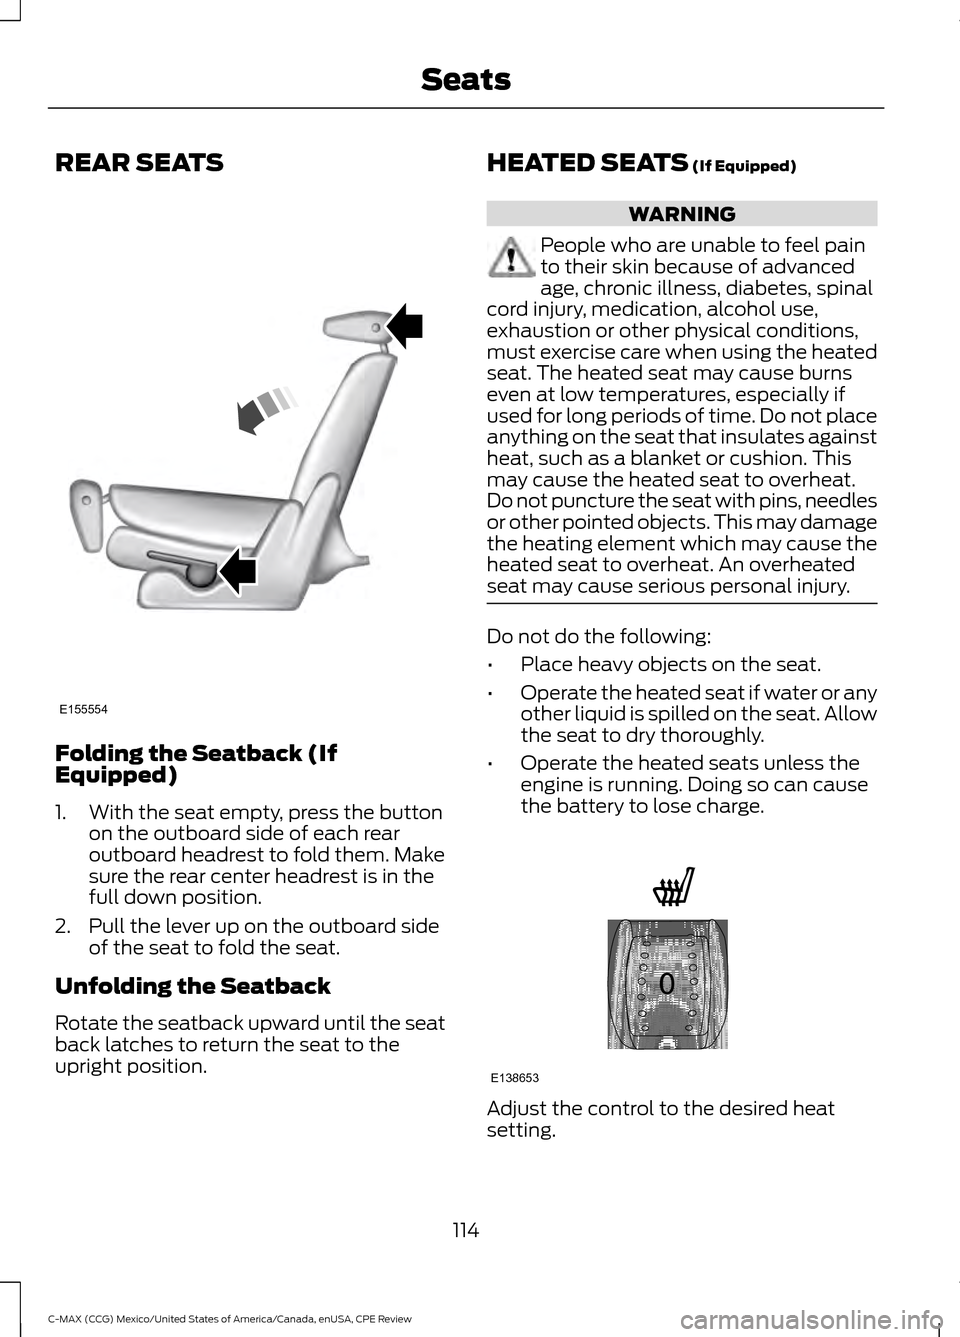
Folding the Seatback (If
Equipped)
1. With the seat empty, press the button
on the outboard side of each rear
outboard headrest to fold them. Make
sure the rear center headrest is in the
full down position.
2. Pull the lever up on the outboard side of the seat to fold the seat.
Unfolding the Seatback
Rotate the seatback upward until the seat
back latches to return the seat to the
upright position. HEATED SEATS (If Equipped) WARNING
People who are unable to feel pain
to their skin because of advanced
age, chronic illness, diabetes, spinal
cord injury, medication, alcohol use,
exhaustion or other physical conditions,
must exercise care when using the heated
seat. The heated seat may cause burns
even at low temperatures, especially if
used for long periods of time. Do not place
anything on the seat that insulates against
heat, such as a blanket or cushion. This
may cause the heated seat to overheat.
Do not puncture the seat with pins, needles
or other pointed objects. This may damage
the heating element which may cause the
heated seat to overheat. An overheated
seat may cause serious personal injury. Do not do the following:
•
Place heavy objects on the seat.
• Operate the heated seat if water or any
other liquid is spilled on the seat. Allow
the seat to dry thoroughly.
• Operate the heated seats unless the
engine is running. Doing so can cause
the battery to lose charge. Adjust the control to the desired heat
setting.
114
C-MAX (CCG) Mexico/United States of America/Canada, enUSA, CPE Review SeatsE155554 E138653
Page 119 of 455
HomeLink Wireless Control
System (If Equipped)
WARNING
Do not use the system with any
garage door opener that does not
have the safety stop and reverse
feature as required by U.S. Federal Safety
Standards (this includes any garage door
opener manufactured before April 1, 1982).
A garage door opener which cannot detect
an object, signaling the door to stop and
reverse, does not meet current federal
safety standards. Using a garage door
opener without these features increases
the risk of serious injury or death. Note:
Make sure that the garage door and
security device are free from obstruction
when you are programming. Do not program
the system with the vehicle in the garage.
Note: Make sure you keep the original
remote control transmitter for use in other
vehicles as well as for future system
programming.
Note: We recommend that upon the sale
or lease termination of your vehicle, you
erase the programmed function buttons for
security reasons. See Erasing the function
button codes later in this section.
Note: You can program a maximum of
three devices. To change or replace any of
the three devices after it has been initially
programmed, you must first erase the
current settings. See Erasing the function
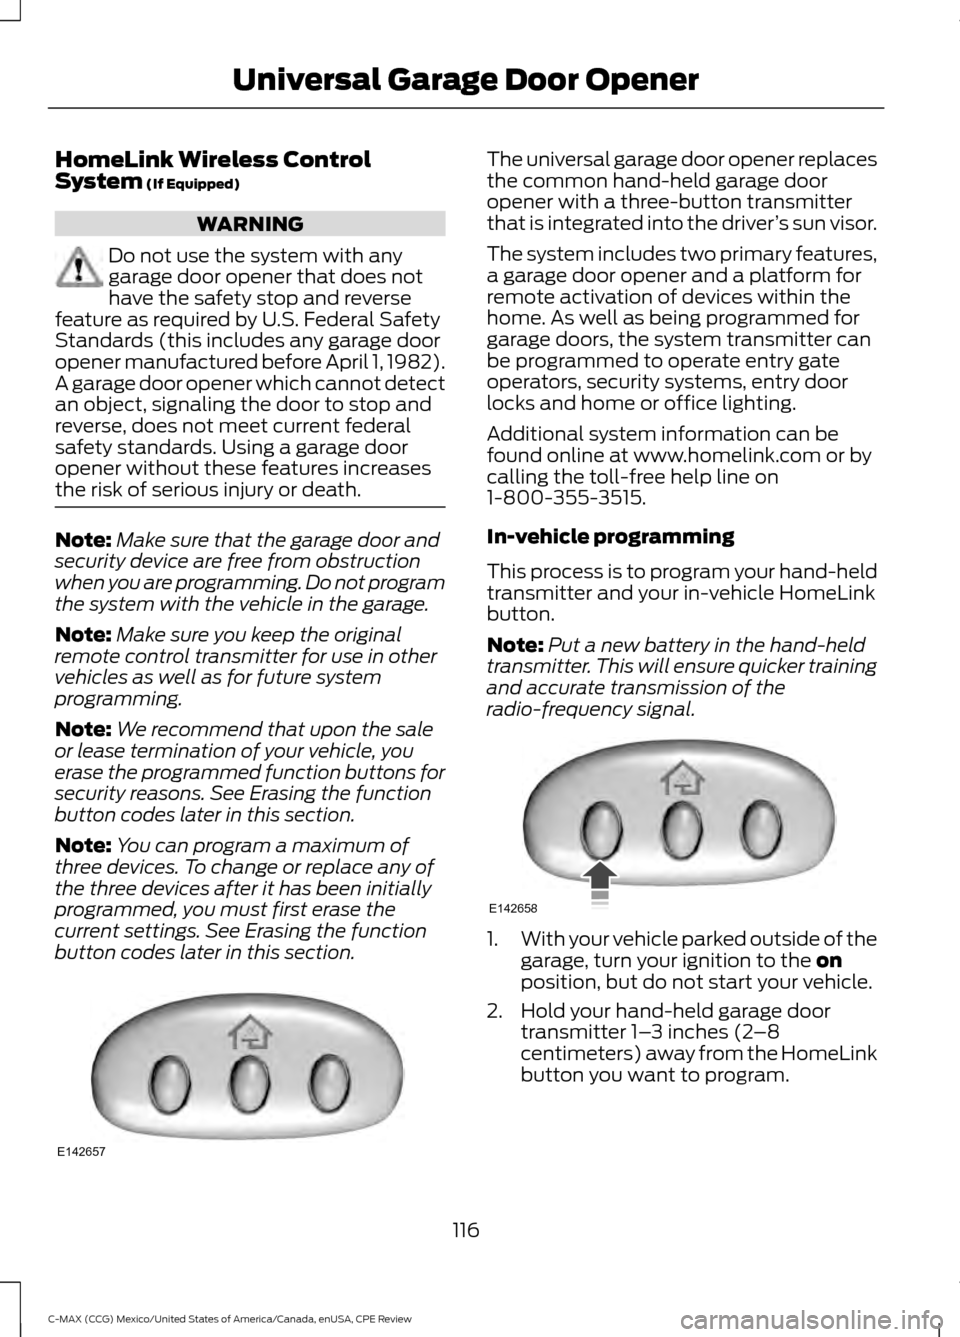
button codes later in this section. The universal garage door opener replaces
the common hand-held garage door
opener with a three-button transmitter
that is integrated into the driver
’s sun visor.
The system includes two primary features,
a garage door opener and a platform for
remote activation of devices within the
home. As well as being programmed for
garage doors, the system transmitter can
be programmed to operate entry gate
operators, security systems, entry door
locks and home or office lighting.
Additional system information can be
found online at www.homelink.com or by
calling the toll-free help line on
1-800-355-3515.
In-vehicle programming
This process is to program your hand-held
transmitter and your in-vehicle HomeLink
button.
Note: Put a new battery in the hand-held
transmitter. This will ensure quicker training
and accurate transmission of the
radio-frequency signal. 1.
With your vehicle parked outside of the
garage, turn your ignition to the
on
position, but do not start your vehicle.
2. Hold your hand-held garage door transmitter 1– 3 inches (2–8
centimeters) away from the HomeLink
button you want to program.
116
C-MAX (CCG) Mexico/United States of America/Canada, enUSA, CPE Review Universal Garage Door OpenerE142657 E142658
Page 123 of 455
12-volt DC power point
WARNING
Do not plug optional electrical
accessories into the cigar lighter
socket (if equipped). Improper use
of the lighter can cause damage not
covered by your warranty, and can result
in fire or serious injury. Note:
If used when the vehicle is not
running, the battery will discharge. There
may be insufficient power to restart your
vehicle.
Note: Do not insert objects other than an
accessory plug into the power point. This
will damage the outlet and blow the fuse.
Note: Do not hang any type of accessory or
accessory bracket from the plug.
Note: Do not use the power point over the
vehicle capacity of 12 volt DC 180 watts or
a fuse may blow.
Note: Do not use the power point for
operating a cigar lighter element.
Note: Improper use of the power point can
cause damage not covered by your
warranty.
Note: Always keep the power point caps
closed when not in use.
Run the vehicle for full capacity use of the
power point. To prevent the battery from
being discharged:
• Do not use the power point longer than
necessary when the vehicle is not
running.
• Do not leave devices plugged in
overnight or when the vehicle is parked
for extended periods.
Locations
Power points may be found: •
on the front of the center console
• inside the center console storage bin
• in the luggage compartment.
110-volt AC power point (If Equipped) WARNING
Do not keep electrical devices
plugged in the power point whenever
the device is not in use. Do not use
any extension cord with the 110-volt AC
power point, since it will defeat the safety
protection design. Doing so my cause the
power point to overload due to powering
multiple devices that can reach beyond
the 150-watt load limit and could result in
fire or serious injury. Note:
The power point will turn off when
the ignition is switched off or the battery
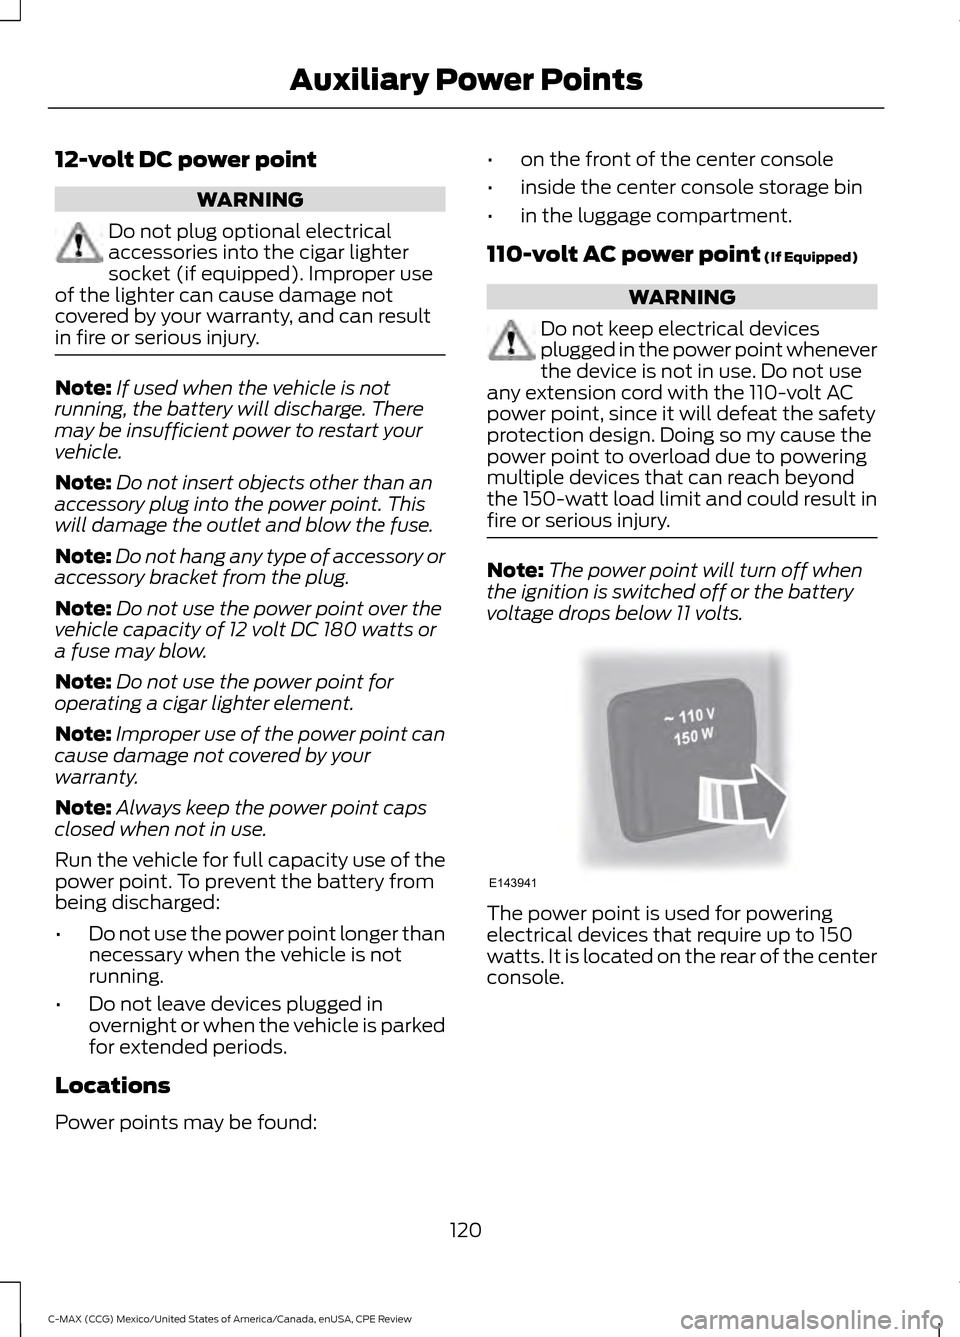
voltage drops below 11 volts. The power point is used for powering
electrical devices that require up to 150
watts. It is located on the rear of the center
console.
120
C-MAX (CCG) Mexico/United States of America/Canada, enUSA, CPE Review Auxiliary Power PointsE143941