width FORD CAPRI 1974 Workshop Manual
[x] Cancel search | Manufacturer: FORD, Model Year: 1974, Model line: CAPRI, Model: FORD CAPRI 1974Pages: 205, PDF Size: 43.75 MB
Page 7 of 205

)
"'
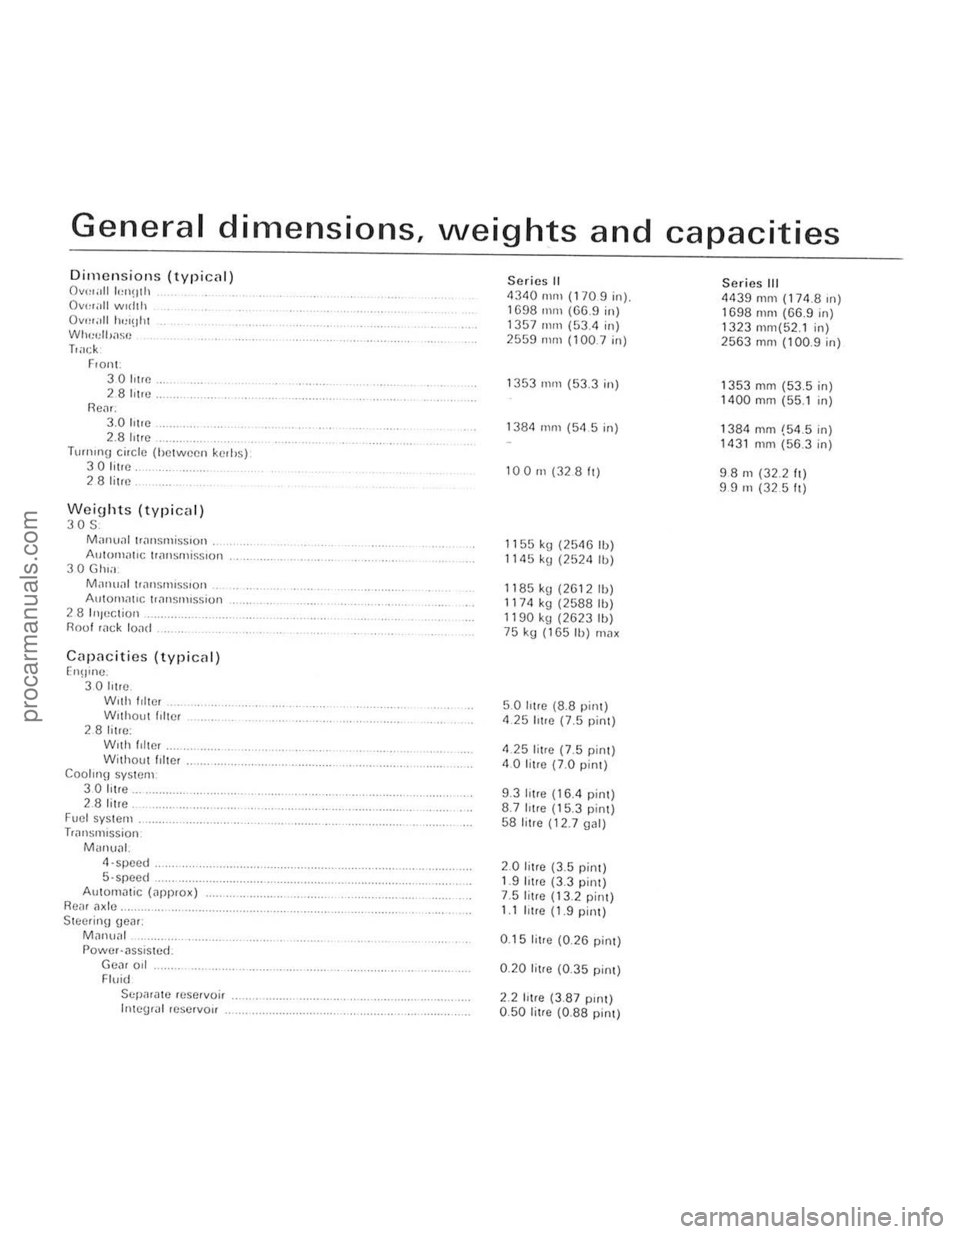
General dimensions, weights and capacities
Dimensio ns (t y pic .. )) Ov"",11 lo'I1(llh Ov,,,,,11 wIdth Ov",;,11 IlI:!!lill Wh""IIJo1S() Tlack F,on1-30 h(I(!. 28 hire. ReiH. 3.0 !olle 2 .8 litre TlJJnOll(J circle (he1wccll ke,l>s) 30 hire 28 litre
Weights (typical ) 30 S Manl!~1 IIo1I1SI11;%IOI1 . Autulll"j,{; llimsmj~s'on 30 Gill;] . Mallual 1,~nsrnISSIOll Automm,e tl""Slllission 2 8 IllJCClio 'l Roof ",d 10<1d
Ca pilcities (typiCill) EIlB"l(), 3 0 htH) . With tiller
Wrthout filter 28 litre : Wrth frller . Without frlter . COOI"l\1 system 3 0 li tre , 2 8 litre
Fuel sys tem . TrJnsrlllssion
M'III(rJI. 4·speed .
5 ·speed .
Automatic (JPprox)
Rear Jxle. Stee ring geM: MJrlU.11 Power·Jssistcd.
GeJr 001 Fluid Sr:p.lrate rese rvoir Imellr,, 1 reservoir
Series II 4340mm (1709 in). 1698 Illll) «(}(;,9 in) 1357 Ilun (53.4 in) 2559 ""11 (100.7 in)
1353 IlUll (53.3 in)
1384 mOl (54 5 in)
100m(32811)
1155 kg (2546 Ib) 11 <15 kU (2524 Ib)
1185kg (2612 11)) 1174 kg (2588 Ih) 1190 kg (2623 Ib) 75 kg (165 Ib) max
5.0 Irtre
(8.8 pint) 4.25 htre (7.5 pin1)
4.25 litre (7.5 pint) 4 .0 l i tre (7.0 pint)
9 .3 htre (16.4 pin1) 8 .7lotre (15.3 pin1) 58 litre (1 2.7 gal)
2 .0 litre (3. 5 pim) 1.9 Iotre (3.3 pim) 7 .5 litre (13 .2 pim) 1.1 litr e (1. 9 pint)
0.15 litle (0.26 pint)
0 .20 litre (0.35 p int)
2.2 litre (3 .87 Plllt) 0 .50 litre (0.88 pin1)
Series III 4439 mm (174.810) 11398 111m (66.9 in) 1323 mm(521 in) 2563 mill (1009 in)
1353 mm (53.5 in) 1400 mm (55.1 in)
1384 mm (54.5 in) 1431 mm (56.3 in)
98 m (32.2 II) 99111 (325 It)
procarmanuals.com
Page 39 of 205

i12.
38 Chapter 1 Engine
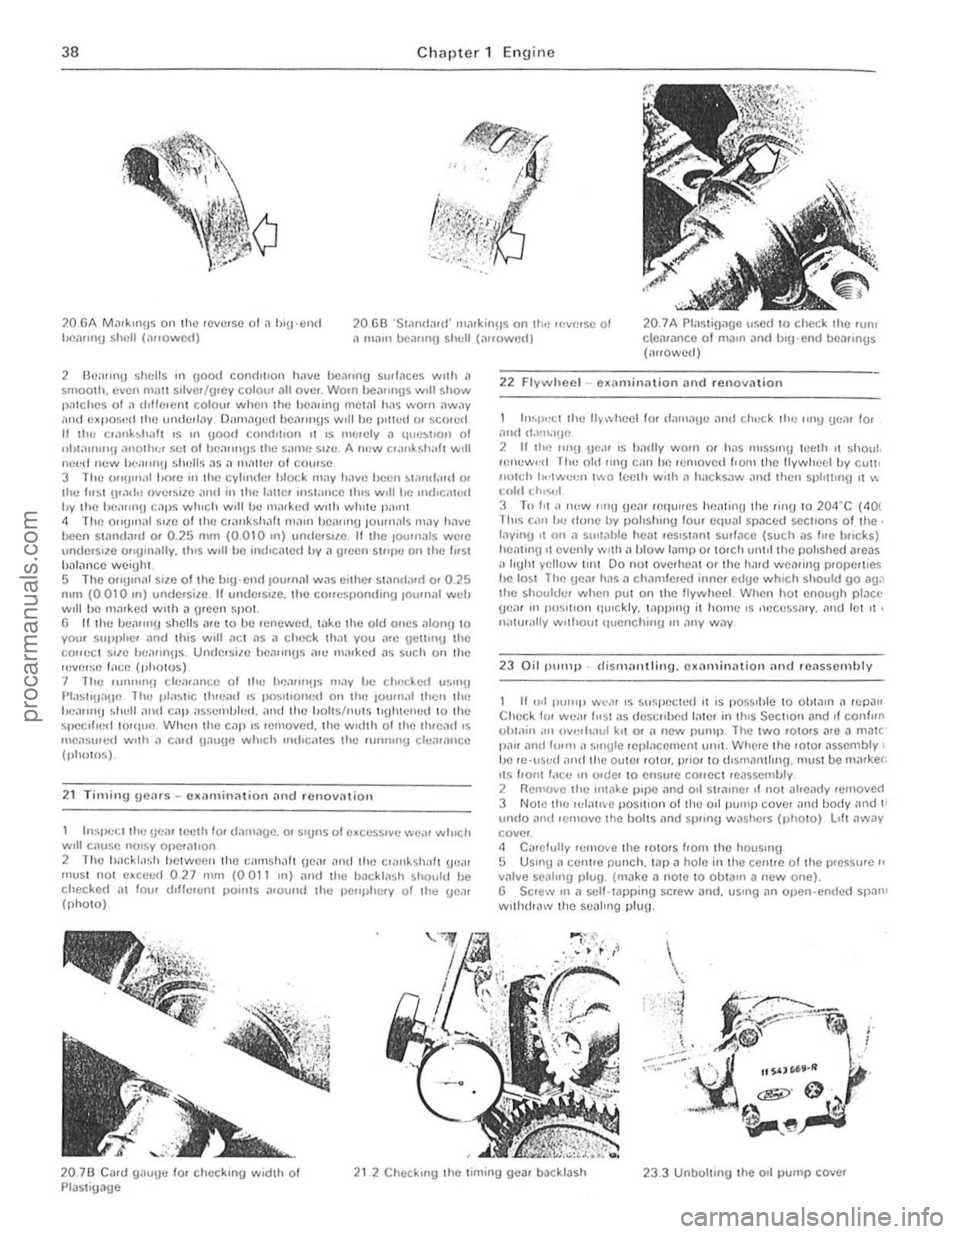
20.6A Mil,kIl1H S 011 the reverse 01 ,1 hl!1 ClI,t tlP.ilrnlH sh ell (, .... owed) 20.GEl ·S1.1n
2 BCilrll1!j shells 111 (lootl condItIon h,IVC 1)C"fU'O surfaces wllh il smooth. (lyen m.m s,tvcr /u,ey coloUI .111 ave._ Wam hCillln!IS wIll show piuches 01 il d,t(clcnt colour when the hctlring mottll h
I,,~t>(:ct Iho !)(:
hl~l)t";t Ihe lIywheel lor danln!Je and ch"ck Ih(: ling tical 10.
,1nd d.llll,I!IC 2 If th'l .1I1!1 IIC'" IS h,utiy worn Of has IllISSIl1!J It!clh II shaul. ,e!lew,·d Til" old 11111.1 call ho 'emoved Ironl tile lIywhecl by CU1\1 1l0 lc h 1I.·lwc"n two leeth With
23 Oil "ump -distl1;l!llling. cxarninntion nnd reassembly
II 011 [lU'''1> w~," IS slIspecw(l il is pOSSlhle 1 0 OOIJIIl n 'CpJII Check fVI W("" 11151 li S desc!lbed IlIte! in IhlS Sec llon ilnd II conlun vhlain ,III IIVCI "(lui kil O' il new pump_ The twO f O tors
20.7B Cil.d U
Page 112 of 205

Chapter 6 Manual gearbox and automatic transmiss ion 111
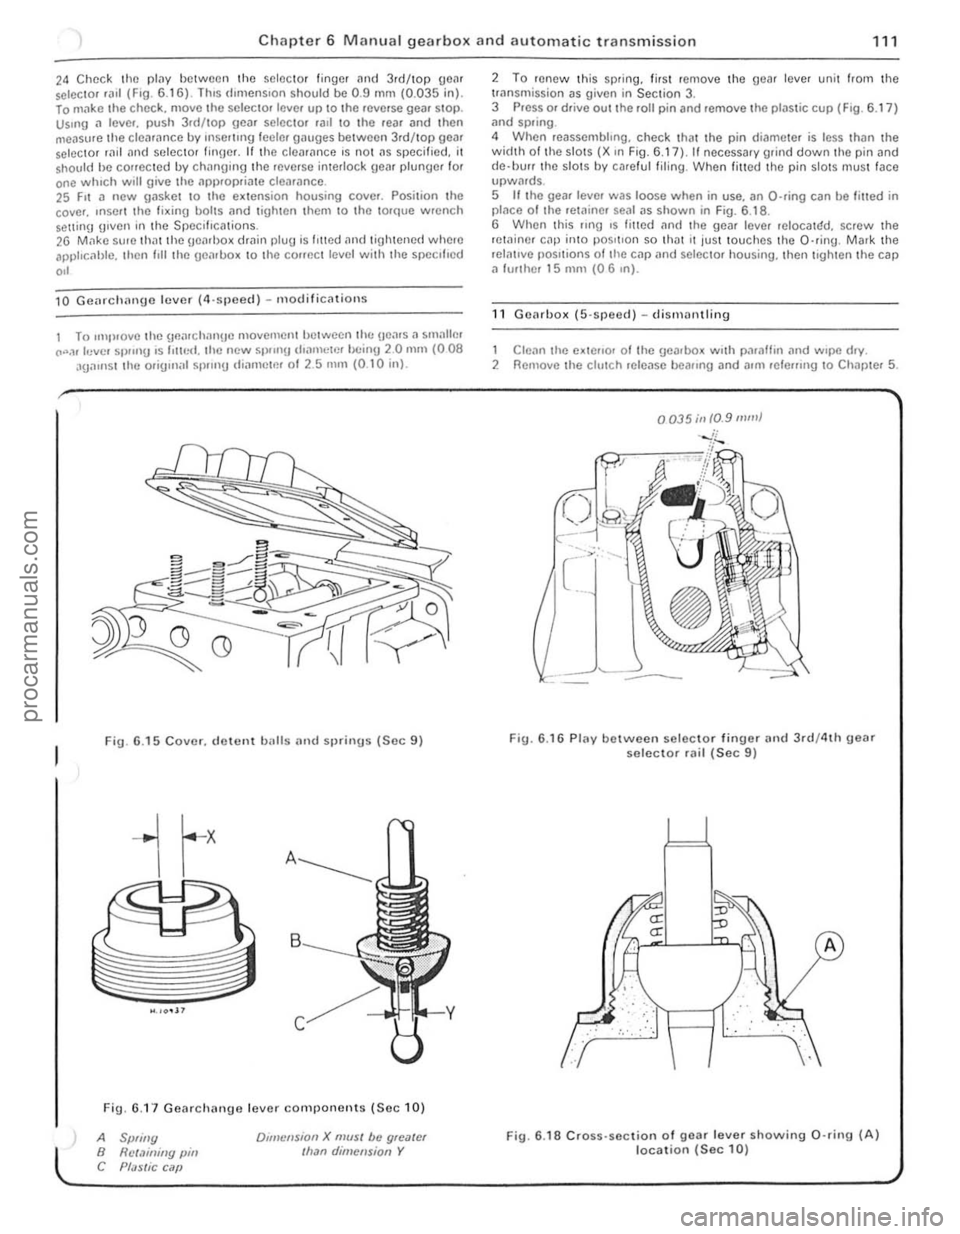
24 Chec k the plilY between the selector finger and 3.d/top geM selC{;lOr .a,1 (F,O. 6 .1 6) . lh,s d,mens,on shou ld be 0.9 mm (0.035 in). lo m"ke t he chec k. move the selec to. leve. up to the .everse gea. SlOp. Us.ng a lever. push 3.d/top gear selector .all \0 the rear and then
measure th e clea .ance by rnsel1lng leeler gauges betwee n 3rd/top gear selector rild "nd seleClOr finger. If th e cleM,mce 's no t ns specified. it shou ld he conecled by chnnging lhe .everse interlock geM plunger for one whIch will give the ,'PI).opria te clearance. 25 F,t a new gasket 10 the e~lension housing cover. Posilion the
cove •. ,nSOI I the fi~ing bolts nnd lighten Ihem 10 Ihe torque wrench Solt1inlJ g,ven in the Specifications. 26 M,1kc su, e th atthe geMl>o~ dmin plug is I,tted and tigh tened where apphc, 1hlc. then I,ll the uenlbo~ 10 the COffect level with the specl l'ed
,,'
10 Gcnrchnnge lever (4,sjleccl ) - m odificnlions
1 To ,mp,ovelhe \]flnr ch nngc movemcntlJctwecn lh(: Hea.s. , smallm CO".,r levcl Sl)!"'g ,s 1'lIr,<:I. the new 51)/,nU d,amclr'!' bc inU 20 mill (008 aga,nst the orig,n;r l sp.,n!) IIiarllctm 01 2.5 nUll (0 .1 0 inl.
Fig. 6 .15 Cover. d ewnt balls and sprinus (Sec 9)
Fig. 6.1 7 Gearchange lever components (Se c 10)
A Spliny B Rct.1illiny pin C Pf;JSlic C ilP
Dlillcnsion X mUSI be gloater Ilran dimension Y
2 To renew Ihis sp.ing. lir sl remove the gear lever unit from the trnnsmission as given in Section 3. 3 Press or drive out the roll pin and remove the plastic cup (F ig . 6.17 ) ;rnd spring .
4 When reassembhng. check that the pin di('!meter is less thiln the width 01 th e slots (X ,n Fig. 6.17), II necessary grind down the pin and
d e·llUrr the slots by ca.e ful filing . When filled the pin slotS mus t face upwMds. 5 If the gear leve. was loose when in use. an O-ring can be filled in placo o f Ihe retainer sOill as shown in Fig. 6.1 8 .
6 When this flng ,s fmed an(I the gear leve. reIOCalr:!d. screw the retainer cap inlO pos,tlon so th ilt It jus t touches th e O·ring . Mark the relntlve pOSitions of tile cap
1 Clean the e~tello. 01 Ihe gearbox w.th paraffin .,nd w.pe d.y. 2 Remove the clutch release beallng and allli lele",ng 10 Chapter 5.
0035;11 10.9 mill}
Fig. 6.16 Plav between selec to r finuer and 3rd/4th geM selector rail (Sec 9)
.. : . :,'. :", .
fLJ
··· ..
A
Fig. 6 .18 Cross· section of gear lever showing 0 ·rin9 (A) location (Sec 10)
i
i
procarmanuals.com