check engine FORD CONTOUR 1999 2.G Owner's Guide
[x] Cancel search | Manufacturer: FORD, Model Year: 1999, Model line: CONTOUR, Model: FORD CONTOUR 1999 2.GPages: 244, PDF Size: 2.26 MB
Page 142 of 244
Roadside emergencies
142
Power distribution box (engine compartment)
RelayCircuits switched
R 1
R 2
R 3
R 4
R 5
R 6
R 7
R 8
R 9
R 10
R 11
D1
D2
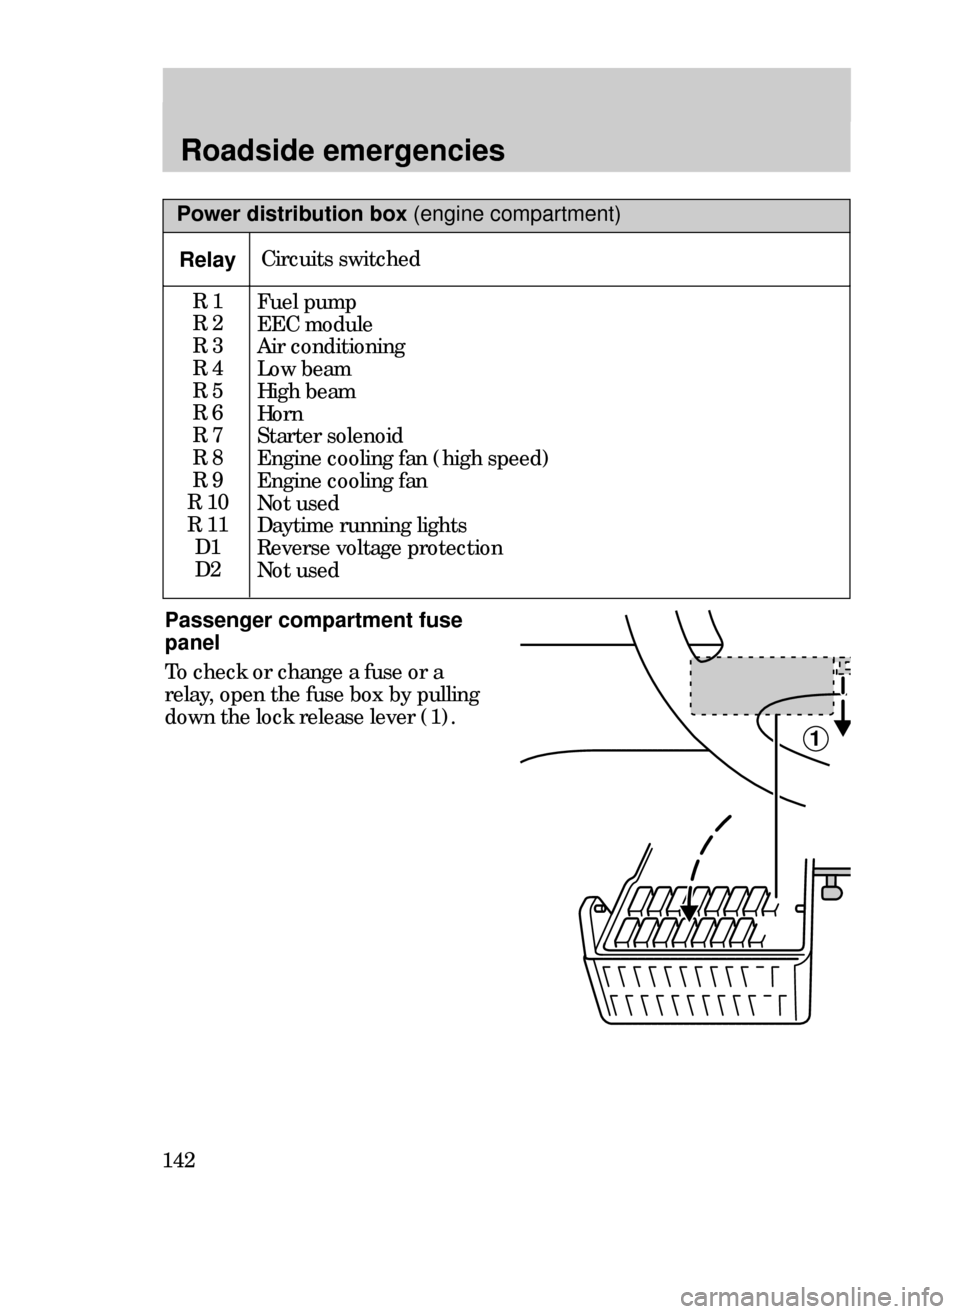
Passenger compartment fuse
panel
To check or change a fuse or a
relay, open the fuse box by pulling
down the lock release lever (1).
1
Fuel pump
EEC module
Air conditioning
Low beam
High beam
Horn
Starter solenoid
Engine cooling fan (high speed)
Engine cooling fan
Not used
Daytime running lights
Reverse voltage protection
Not used
23CREen 3/25/99 3:35 PM Page 142
Page 151 of 244
Roadside emergencies
151
3. Park the booster vehicle close to
the hood of the disabled vehicle,
making sure the two vehicles do
nottouch. Set the parking brake
on both vehicles and stay clear of
the engine cooling fan and other
moving parts.
4. Check all battery terminals and
remove any excessive corrosion
before you attach the battery
cables. Ensure that vent caps are
tight and level.
5. Turn the heater fan on in both
vehicles to protect from any
electrical surges. Turn all other
accessories off.
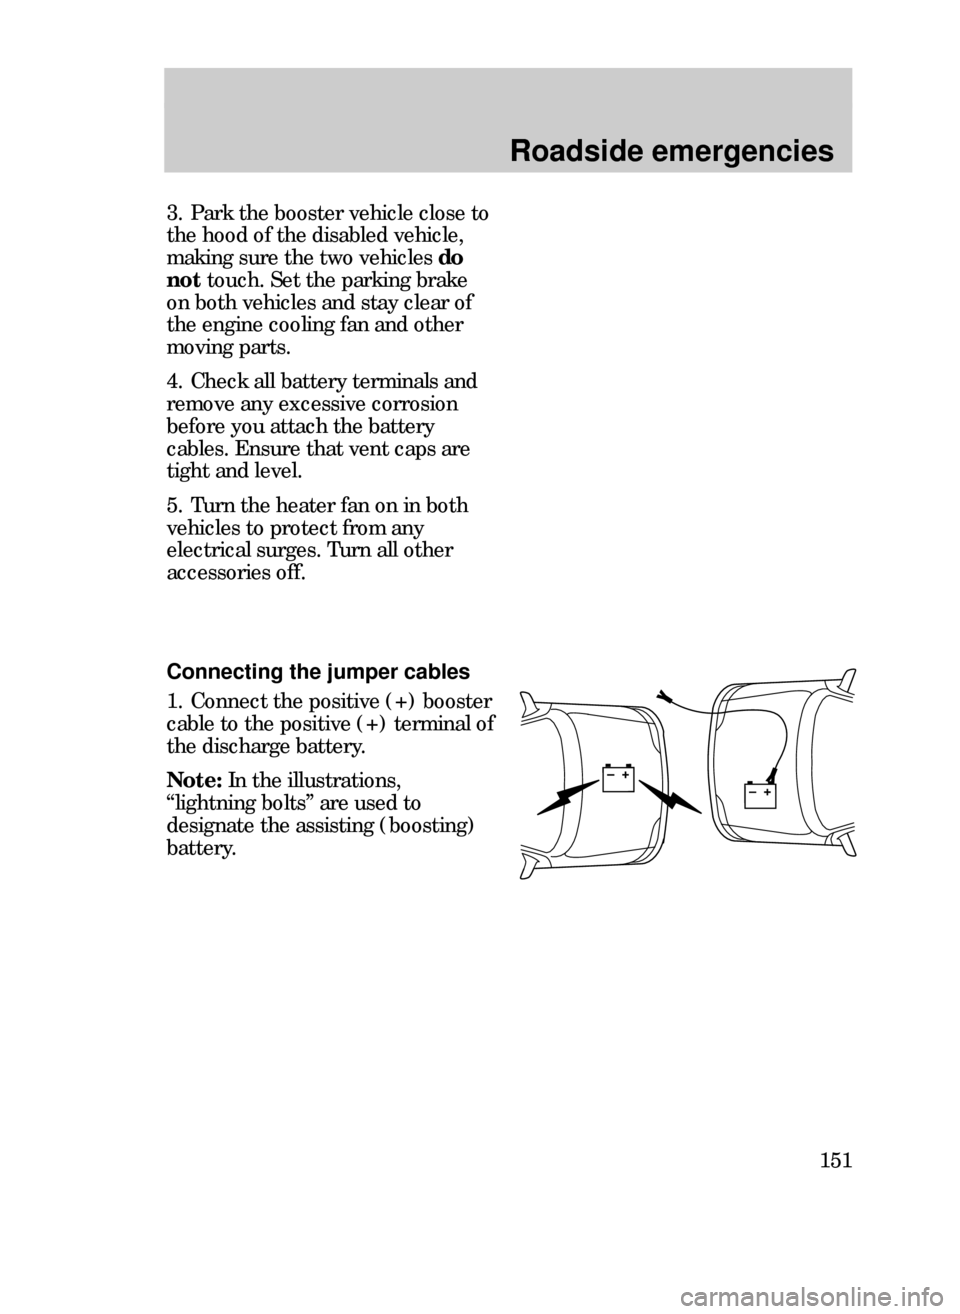
Connecting the jumper cables
1. Connect the positive (+) booster
cable to the positive (+) terminal of
the discharge battery.
Note:In the illustrations,
Òlightning boltsÓ are used to
designate the assisting (boosting)
battery.
23CREen 3/25/99 3:35 PM Page 151
Page 158 of 244
Maintenance and care
158
SERVICE RECOMMENDATIONS
¥ We highlight do-it-yourself items
in the engine compartment for easy
location.
¥ As possible, we design parts that
can be replaced without tools.
¥ We provide you with a
maintenance guide and or service
guide which makes tracking routine
service for your vehicle easy.
If your vehicle requires professional
service, your Ford dealership can
provide necessary parts and
service. Check your ÒWarranty
GuideÓ to find out which parts and
services are covered.
Use only recommended fuels,
lubricants, fluids and service parts
conforming to specifications.
Motorcraft parts are designed and
built to provide the best
performance in your vehicle.
31CMCen 3/25/99 3:45 PM Page 158
Page 162 of 244
Maintenance and care
162
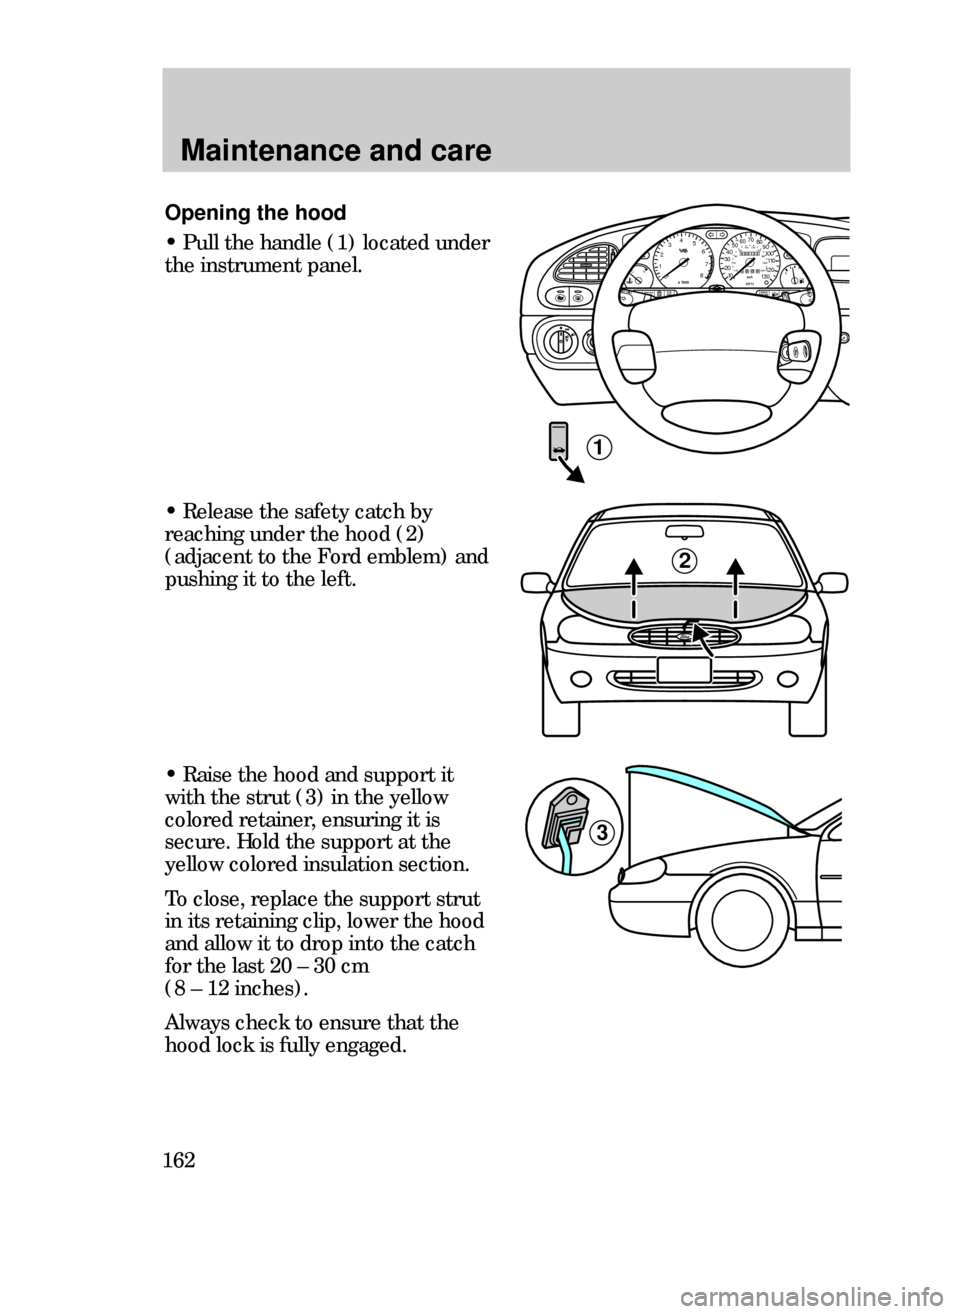
Opening the hood
¥ Pull the handle (1) located under
the instrument panel.
000123000010 20 3040506070
80
90
10 0
110
120
13 0MPH20 406055
80120 10 0
14 0
160
18 0
200EF12
03x 1000
4
5
6
7
8
CHECK
ENGINE TRACTION
CONTROLO/D
OFF
MIRRORS
1
TRACTION
TROLCH
¥ Release the safety catch by
reaching under the hood (2)
(adjacent to the Ford emblem) and
pushing it to the left.
2
3
¥ Raise the hood and support it
with the strut (3) in the yellow
colored retainer, ensuring it is
secure. Hold the support at the
yellow colored insulation section.
To close, replace the support strut
in its retaining clip, lower the hood
and allow it to drop into the catch
for the last 20 Ð 30 cm
(8 Ð 12 inches).
Always check to ensure that the
hood lock is fully engaged.
31CMCen 3/25/99 3:45 PM Page 162
Page 165 of 244
Maintenance and care
165
ADDFULL
Engine oil
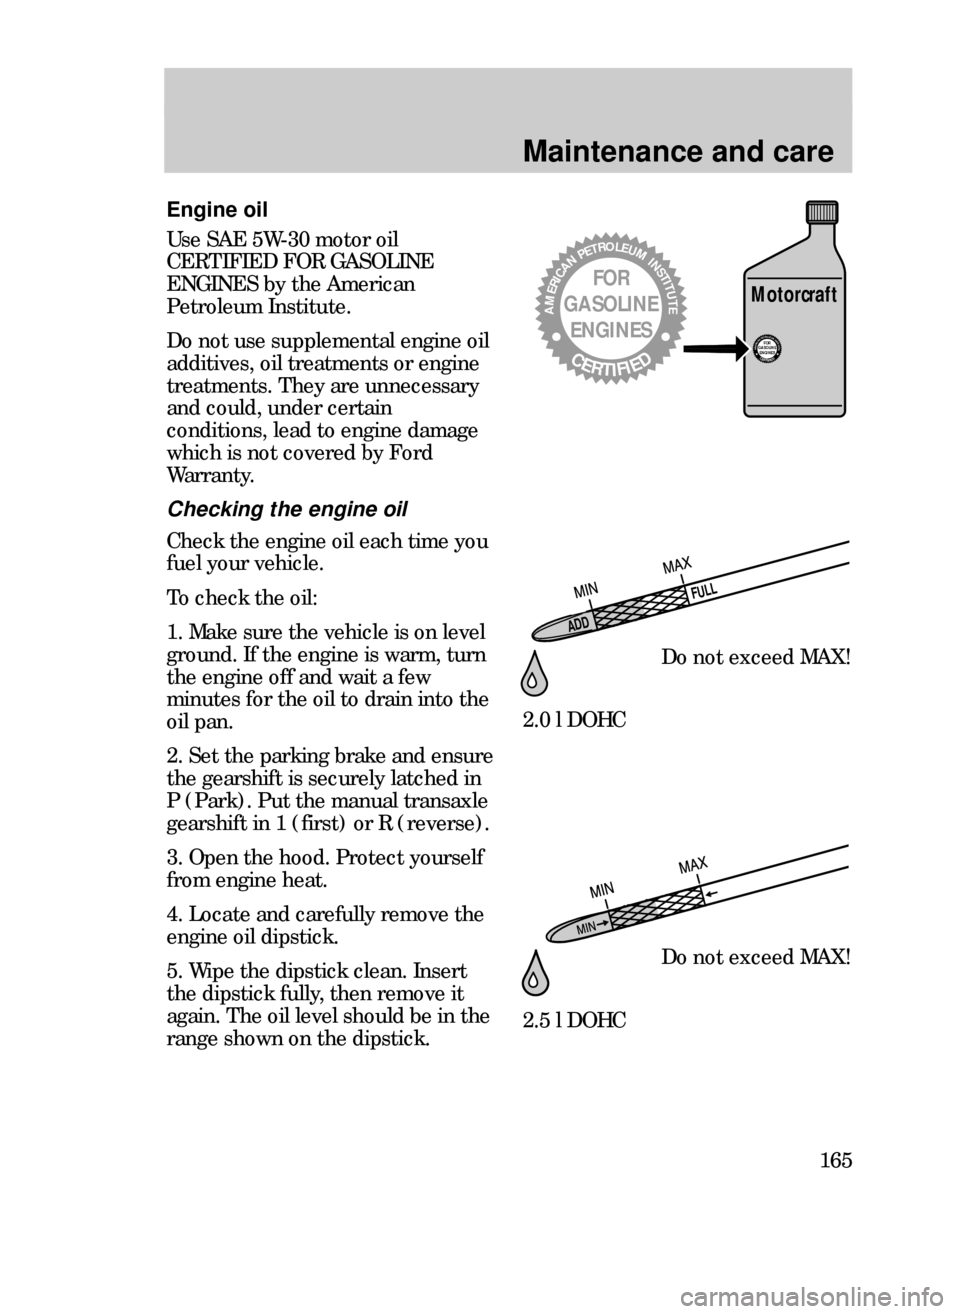
Use SAE 5W-30 motor oil
CERTIFIED FOR GASOLINE
ENGINES by the American
Petroleum Institute.
Do not use supplemental engine oil
additives, oil treatments or engine
treatments. They are unnecessary
and could, under certain
conditions, lead to engine damage
which is not covered by Ford
Warranty.
Checking the engine oil
Check the engine oil each time you
fuel your vehicle.
To check the oil:
1. Make sure the vehicle is on level
ground. If the engine is warm, turn
the engine off and wait a few
minutes for the oil to drain into the
oil pan.
2. Set the parking brake and ensure
the gearshift is securely latched in
P (Park). Put the manual transaxle
gearshift in 1 (first) or R (reverse).
3. Open the hood. Protect yourself
from engine heat.
4. Locate and carefully remove the
engine oil dipstick.
5. Wipe the dipstick clean. Insert
the dipstick fully, then remove it
again. The oil level should be in the
range shown on the dipstick.
2.0 l DOHC
2.5 l DOHC
AMERICANPETROLEUMINSTITUTE
CERTIFIED
FOR
GASOLINE
ENGINES
AMERICANPETROLEUMINSTITUTECERTIFIEDFOR
GASOLINE
ENGINES
Motorcraft
Do not exceed MAX!
Do not exceed MAX!
31CMCen 3/25/99 3:45 PM Page 165
Page 166 of 244
Maintenance and care
166
6. If the oil level is below the
minimum line, add engine oil as
necessary. If the oil level is beyond
the maximum line, engine damage
or high oil consumption may occur
and some oil must be removed
from the engine by a service
technician.
7. Put the dipstick back in and
ensure it is fully seated.
Continuous contact with
used motor oil has caused
cancer in laboratory mice.
Adding engine oil
1. Check the engine oil. For
instructions, refer to Checking the
engine oilin this chapter.
2. If the fluid level is not within the
normal range, add only certified
engine oil of the preferred
viscosity. Add engine oil through
the oil filler cap. Remove the filler
cap and use a funnel to pour oil in
the opening.
3. Recheck the oil level. Make
sure the oil level is not above
the MAX mark on the dipstick.
Change your engine oil and oil filter
according to the scheduled mileage
and time requirements, whichever
occurs first.
31CMCen 3/25/99 3:45 PM Page 166
Page 169 of 244
Maintenance and care
169
Engine coolant maintenance
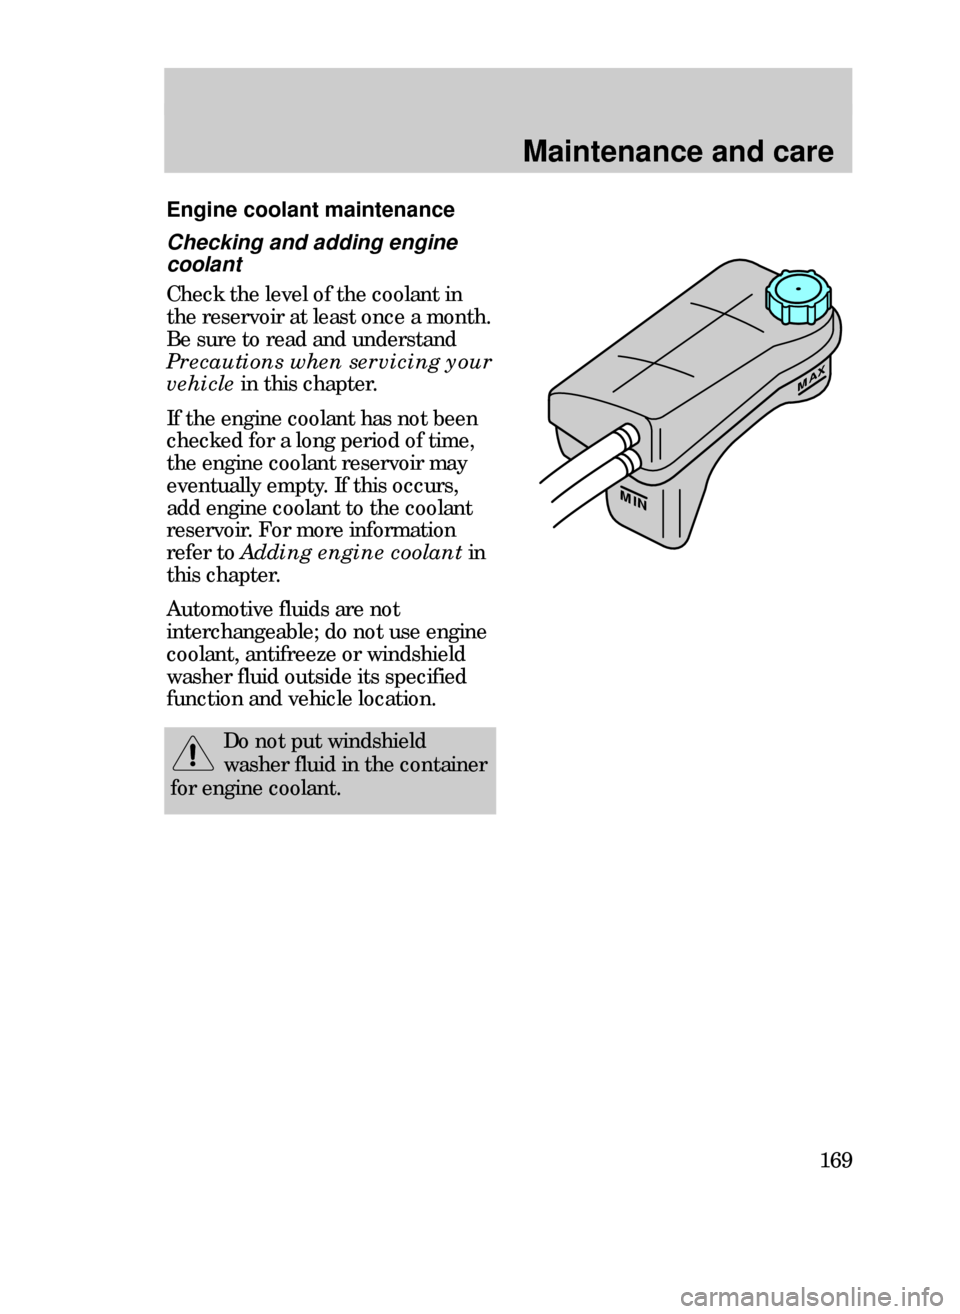
MAX
MIN
Checking and adding engine
coolant
Check the level of the coolant in
the reservoir at least once a month.
Be sure to read and understand
Precautions when servicing your
vehiclein this chapter.
If the engine coolant has not been
checked for a long period of time,
the engine coolant reservoir may
eventually empty. If this occurs,
add engine coolant to the coolant
reservoir. For more information
refer to Adding engine coolant in
this chapter.
Automotive fluids are not
interchangeable; do not use engine
coolant, antifreeze or windshield
washer fluid outside its specified
function and vehicle location.
Do not put windshield
washer fluid in the container
for engine coolant.
31CMCen 3/25/99 3:45 PM Page 169
Page 172 of 244
Maintenance and care
172
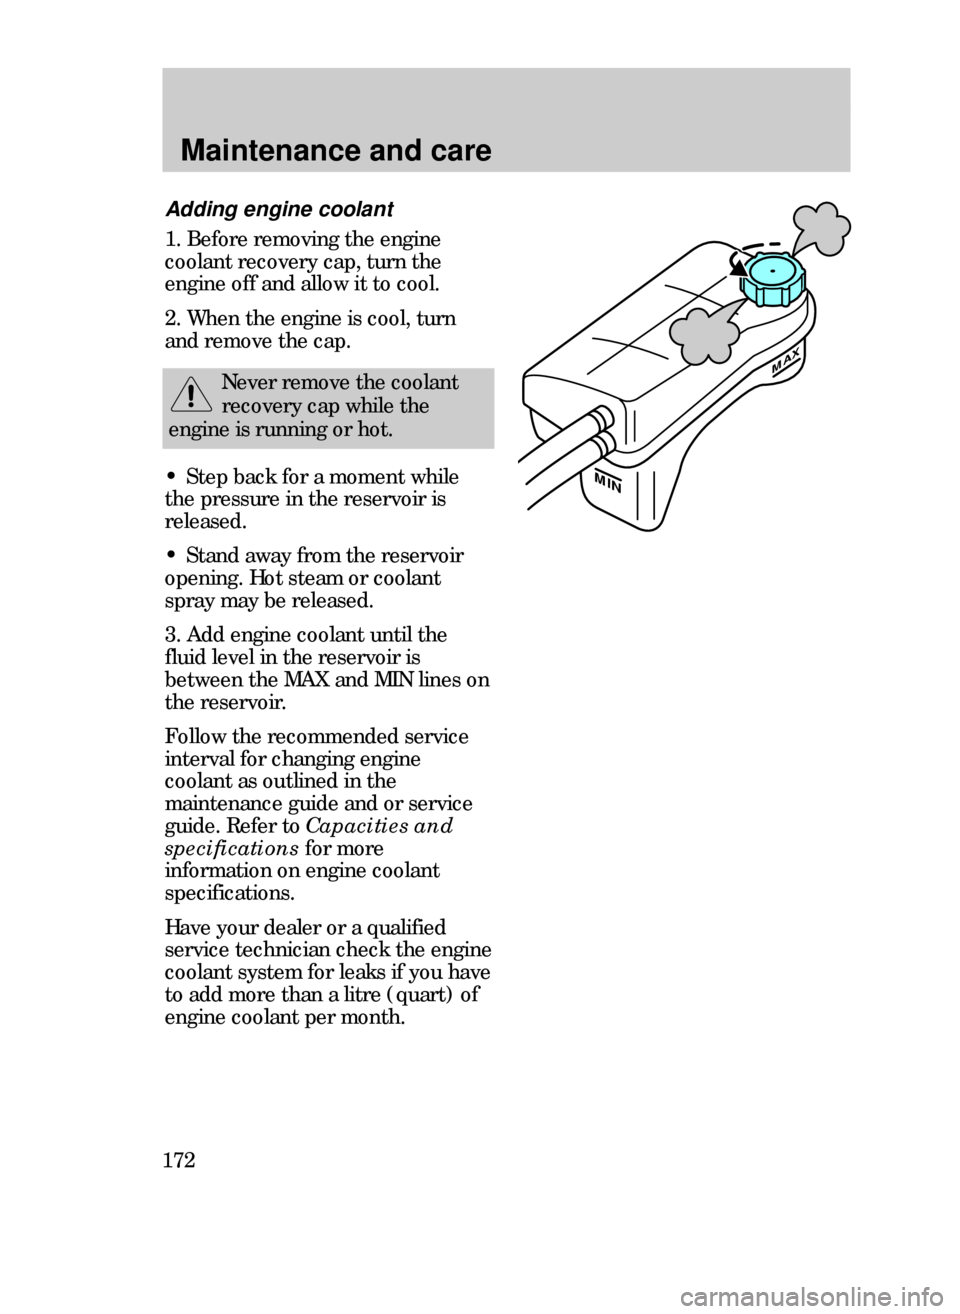
MAX
MIN
Adding engine coolant
1. Before removing the engine
coolant recovery cap, turn the
engine off and allow it to cool.
2. When the engine is cool, turn
and remove the cap.
Never remove the coolant
recovery cap while the
engine is running or hot.
¥ Step back for a moment while
the pressure in the reservoir is
released.
¥ Stand away from the reservoir
opening. Hot steam or coolant
spray may be released.
3. Add engine coolant until the
fluid level in the reservoir is
between the MAX and MIN lines on
the reservoir.
Follow the recommended service
interval for changing engine
coolant as outlined in the
maintenance guide and or service
guide. Refer to Capacities and
specifications for more
information on engine coolant
specifications.
Have your dealer or a qualified
service technician check the engine
coolant system for leaks if you have
to add more than a litre (quart) of
engine coolant per month.
31CMCen 3/25/99 3:45 PM Page 172
Page 173 of 244
Maintenance and care
173
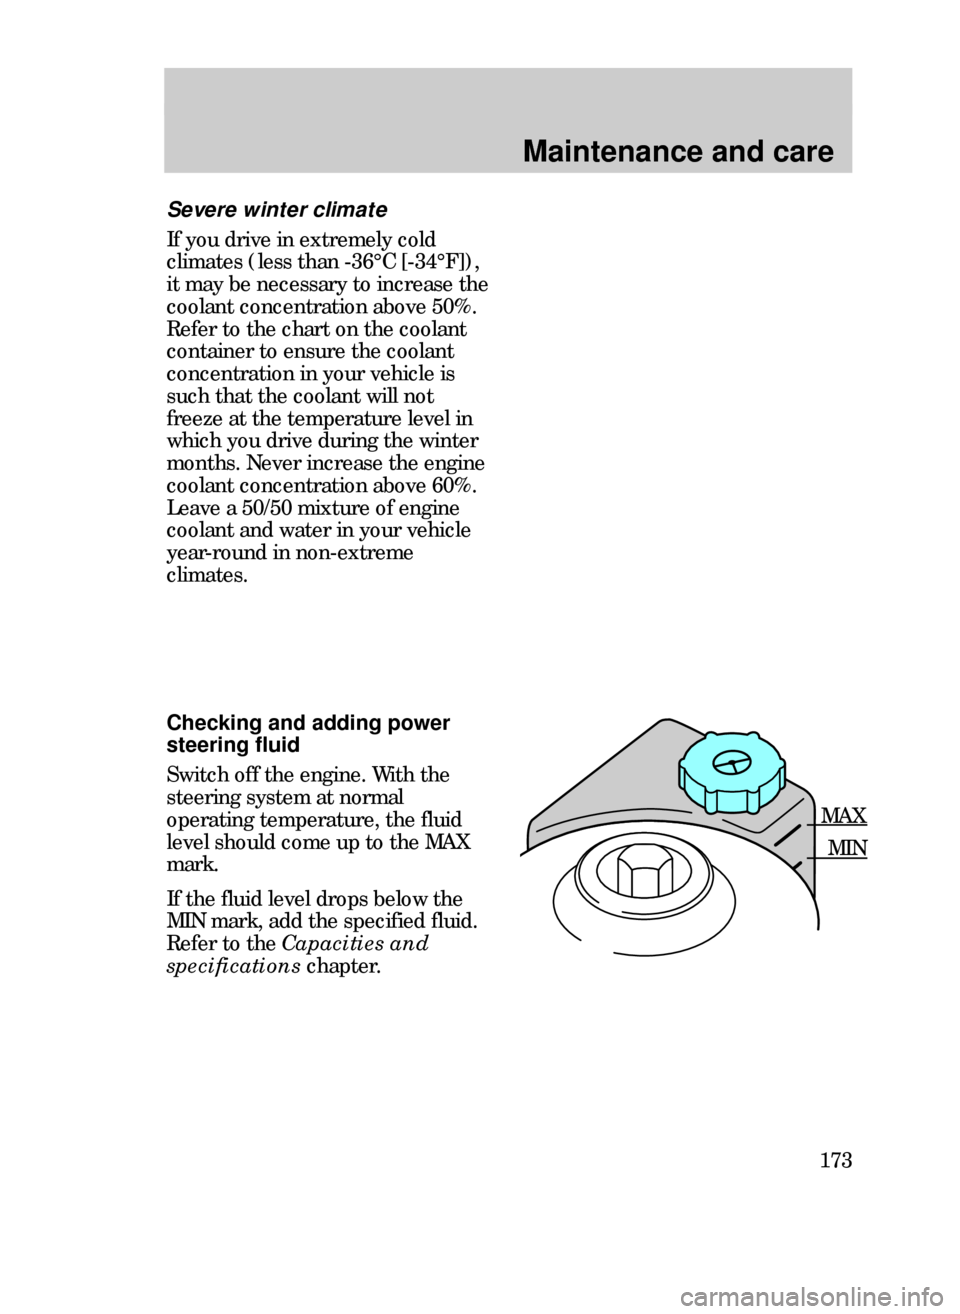
Checking and adding power
steering fluid
Switch off the engine. With the
steering system at normal
operating temperature, the fluid
level should come up to the MAX
mark.
If the fluid level drops below the
MIN mark, add the specified fluid.
Refer to the Capacities and
specificationschapter.
Severe winter climate
If you drive in extremely cold
climates (less than -36¡C [-34¡F]),
it may be necessary to increase the
coolant concentration above 50%.
Refer to the chart on the coolant
container to ensure the coolant
concentration in your vehicle is
such that the coolant will not
freeze at the temperature level in
which you drive during the winter
months. Never increase the engine
coolant concentration above 60%.
Leave a 50/50 mixture of engine
coolant and water in your vehicle
year-round in non-extreme
climates.
MAX
MIN
31CMCen 3/25/99 3:45 PM Page 173
Page 174 of 244
Maintenance and care
174
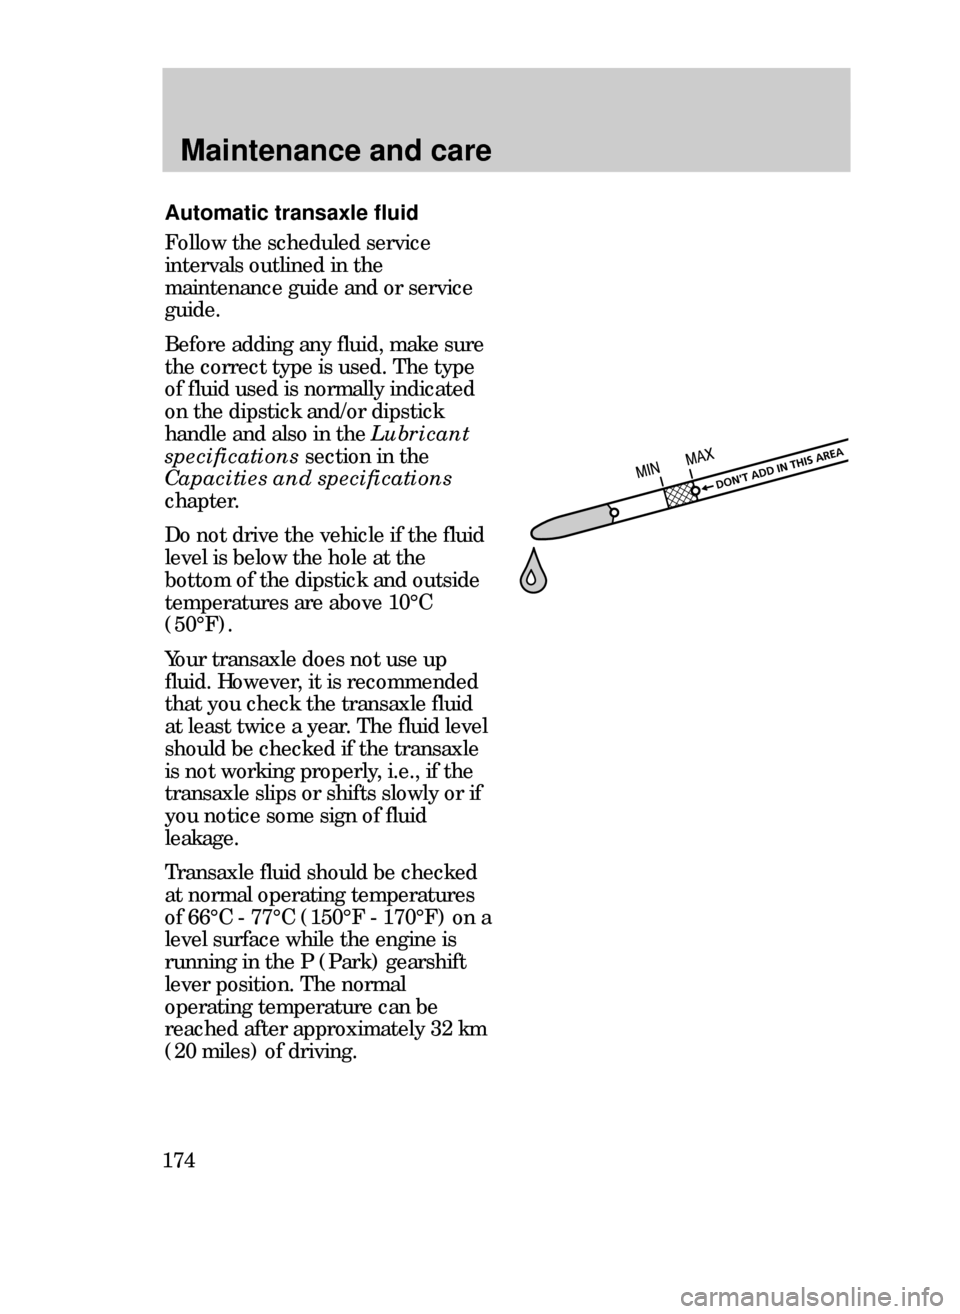
Automatic transaxle fluid
Follow the scheduled service
intervals outlined in the
maintenance guide and or service
guide.
Before adding any fluid, make sure
the correct type is used. The type
of fluid used is normally indicated
on the dipstick and/or dipstick
handle and also in the Lubricant
specifications section in the
Capacities and specifications
chapter.
Do not drive the vehicle if the fluid
level is below the hole at the
bottom of the dipstick and outside
temperatures are above 10¡C
(50¡F).
Your transaxle does not use up
fluid. However, it is recommended
that you check the transaxle fluid
at least twice a year. The fluid level
should be checked if the transaxle
is not working properly, i.e., if the
transaxle slips or shifts slowly or if
you notice some sign of fluid
leakage.
Transaxle fluid should be checked
at normal operating temperatures
of 66¡C - 77¡C (150¡F - 170¡F) on a
level surface while the engine is
running in the P (Park) gearshift
lever position. The normal
operating temperature can be
reached after approximately 32 km
(20 miles) of driving.
31CMCen 3/25/99 3:45 PM Page 174