mirror FORD CROWN VICTORIA 2001 2.G Owners Manual
[x] Cancel search | Manufacturer: FORD, Model Year: 2001, Model line: CROWN VICTORIA, Model: FORD CROWN VICTORIA 2001 2.GPages: 248, PDF Size: 1.87 MB
Page 83 of 248
3. Press and hold the hand-held transmitter button.
4. The HomeLinktindicator light will flash, first slowly and then rapidly.
When the indicator light begins to flash rapidly, release both buttons.
The previous device has now been erased and the new device can be
activated by pushing the HomeLinktbutton that has just been
programmed.
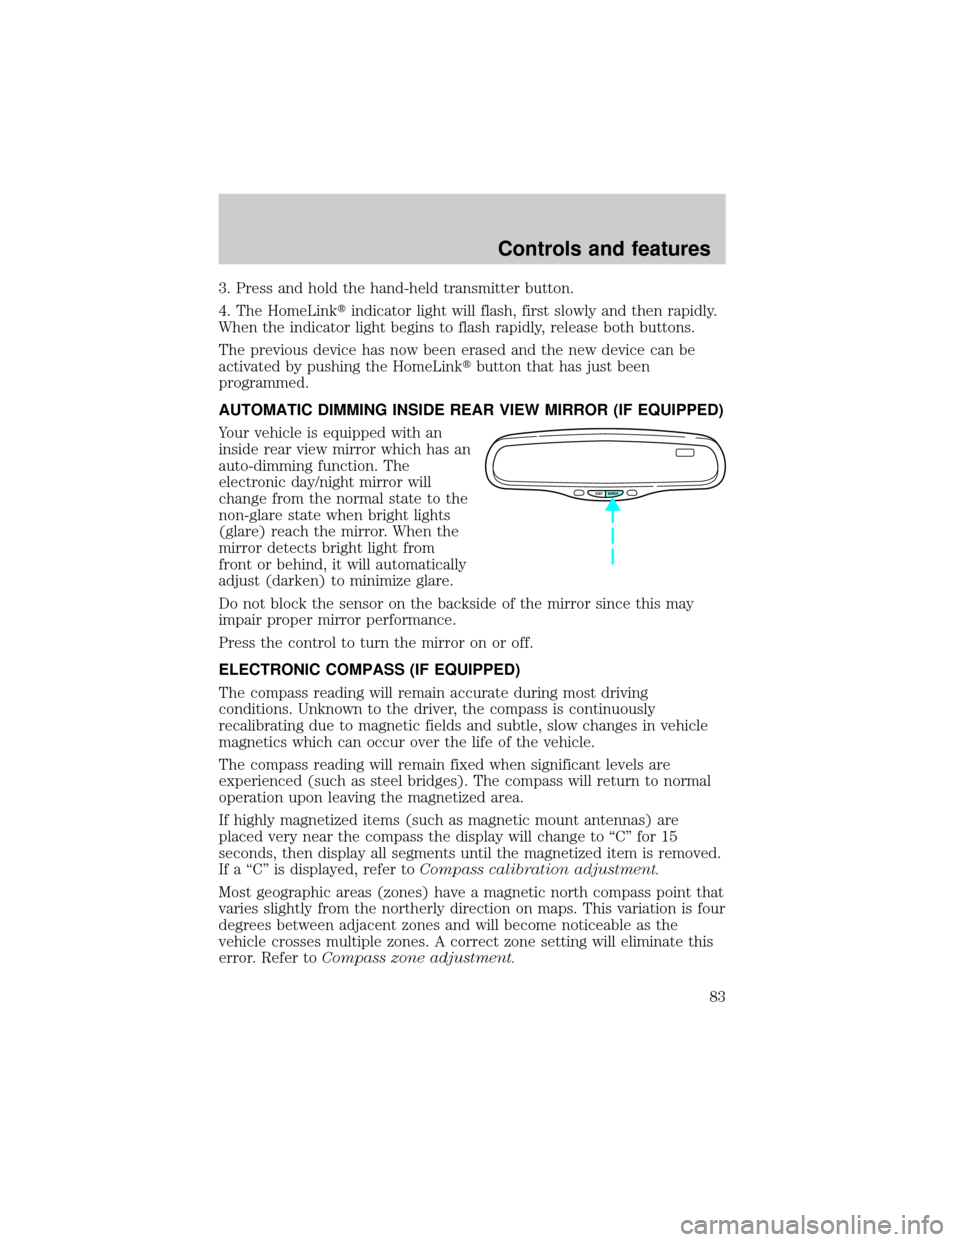
AUTOMATIC DIMMING INSIDE REAR VIEW MIRROR (IF EQUIPPED)
Your vehicle is equipped with an
inside rear view mirror which has an
auto-dimming function. The
electronic day/night mirror will
change from the normal state to the
non-glare state when bright lights
(glare) reach the mirror. When the
mirror detects bright light from
front or behind, it will automatically
adjust (darken) to minimize glare.
Do not block the sensor on the backside of the mirror since this may
impair proper mirror performance.
Press the control to turn the mirror on or off.
ELECTRONIC COMPASS (IF EQUIPPED)
The compass reading will remain accurate during most driving
conditions. Unknown to the driver, the compass is continuously
recalibrating due to magnetic fields and subtle, slow changes in vehicle
magnetics which can occur over the life of the vehicle.
The compass reading will remain fixed when significant levels are
experienced (such as steel bridges). The compass will return to normal
operation upon leaving the magnetized area.
If highly magnetized items (such as magnetic mount antennas) are
placed very near the compass the display will change to ªCº for 15
seconds, then display all segments until the magnetized item is removed.
If a ªCº is displayed, refer toCompass calibration adjustment.
Most geographic areas (zones) have a magnetic north compass point that
varies slightly from the northerly direction on maps. This variation is four
degrees between adjacent zones and will become noticeable as the
vehicle crosses multiple zones. A correct zone setting will eliminate this
error. Refer toCompass zone adjustment.
COMP MIRROR
Controls and features
83
Page 84 of 248
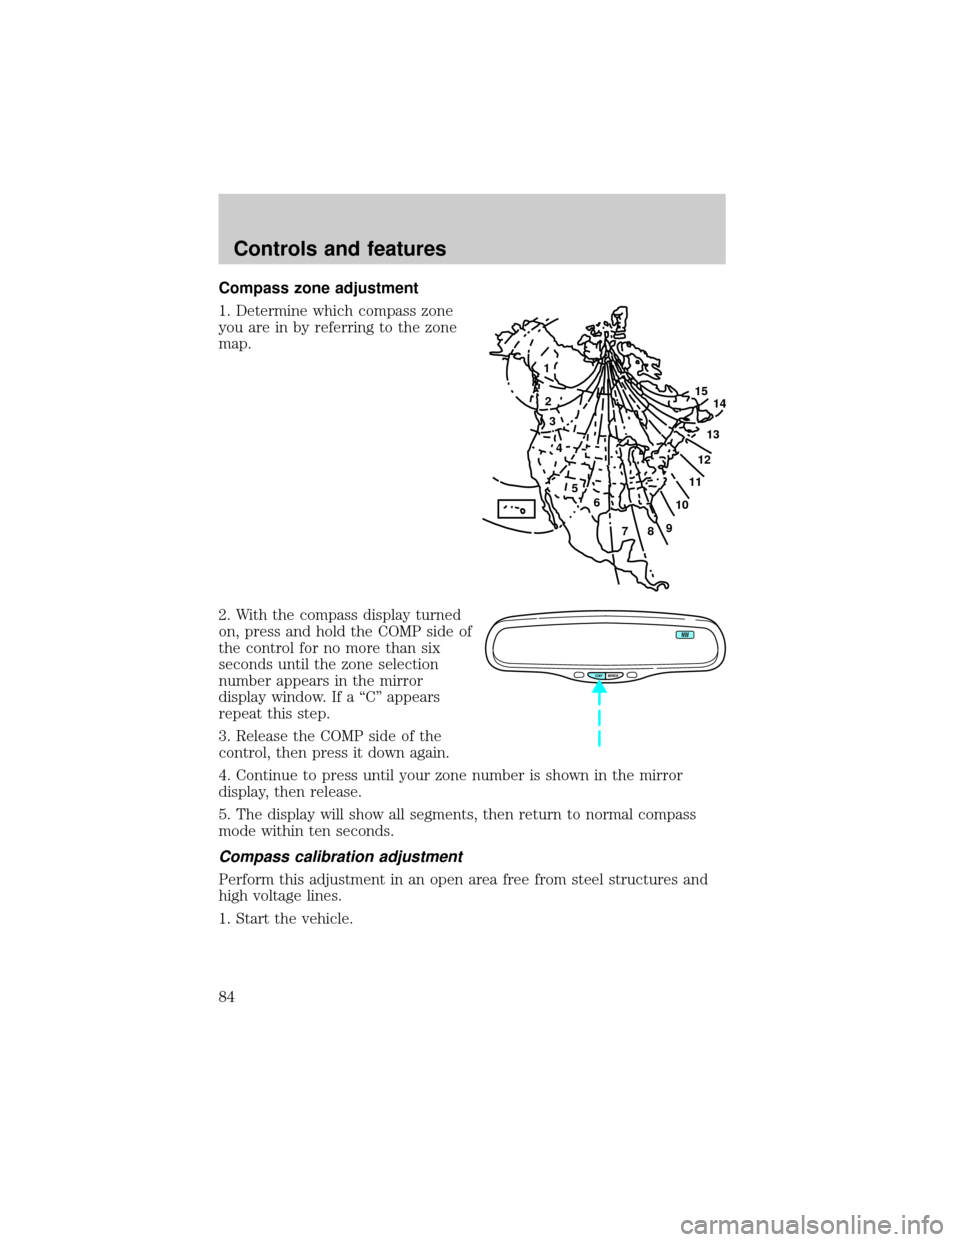
Compass zone adjustment
1. Determine which compass zone
you are in by referring to the zone
map.
2. With the compass display turned
on, press and hold the COMP side of
the control for no more than six
seconds until the zone selection
number appears in the mirror
display window. If a ªCº appears
repeat this step.
3. Release the COMP side of the
control, then press it down again.
4. Continue to press until your zone number is shown in the mirror
display, then release.
5. The display will show all segments, then return to normal compass
mode within ten seconds.
Compass calibration adjustment
Perform this adjustment in an open area free from steel structures and
high voltage lines.
1. Start the vehicle.
1
2
3
4
5
6
7891011121314 15
COMP MIRROR
NW
Controls and features
84
Page 85 of 248
![FORD CROWN VICTORIA 2001 2.G Owners Manual 2. Press and hold the COMP side of
the control for approximately six
seconds until ªCº appears in the
mirror display.
3. Drive the vehicle slowly (less
than 5 km/h [3 mph]) in circles or
on your eve FORD CROWN VICTORIA 2001 2.G Owners Manual 2. Press and hold the COMP side of
the control for approximately six
seconds until ªCº appears in the
mirror display.
3. Drive the vehicle slowly (less
than 5 km/h [3 mph]) in circles or
on your eve](/img/11/4777/w960_4777-84.png)
2. Press and hold the COMP side of
the control for approximately six
seconds until ªCº appears in the
mirror display.
3. Drive the vehicle slowly (less
than 5 km/h [3 mph]) in circles or
on your everyday routine until the
display reads a direction.
4. The compass is now calibrated.
FUEL DOOR RELEASE
Your vehicle is equipped with a
locking fuel door. To open the door,
press the control located on the
door.
Fuel filler door override release
If the remote release is inoperative,
open the trunk, then pull the
override release handle located
inside the trunk to open the fuel
filler door.
COMP MIRROR
NW
FUEL TRUNK
Controls and features
85
Page 88 of 248
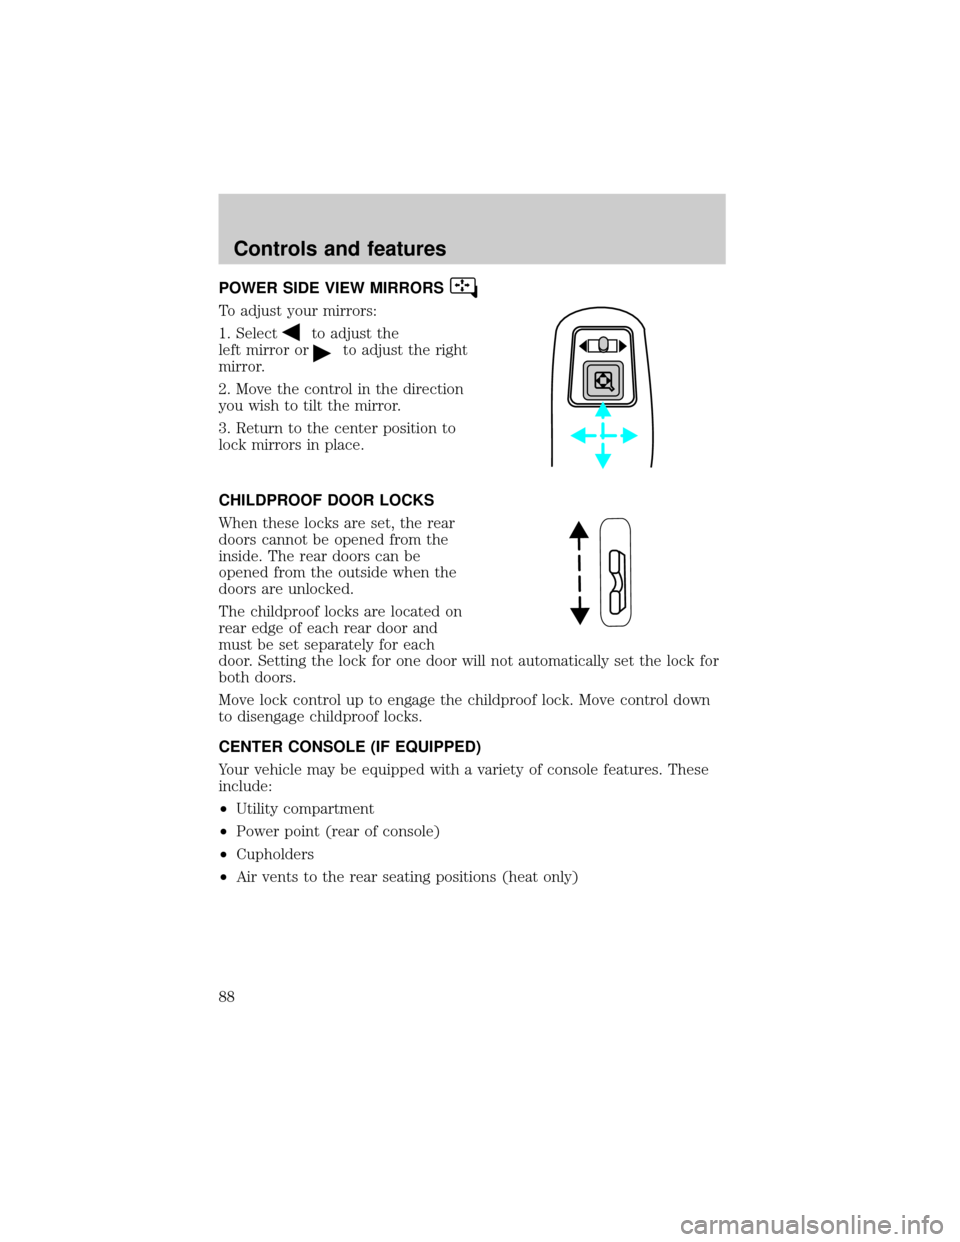
POWER SIDE VIEW MIRRORS
To adjust your mirrors:
1. Select
to adjust the
left mirror or
to adjust the right
mirror.
2. Move the control in the direction
you wish to tilt the mirror.
3. Return to the center position to
lock mirrors in place.
CHILDPROOF DOOR LOCKS
When these locks are set, the rear
doors cannot be opened from the
inside. The rear doors can be
opened from the outside when the
doors are unlocked.
The childproof locks are located on
rear edge of each rear door and
must be set separately for each
door. Setting the lock for one door will not automatically set the lock for
both doors.
Move lock control up to engage the childproof lock. Move control down
to disengage childproof locks.
CENTER CONSOLE (IF EQUIPPED)
Your vehicle may be equipped with a variety of console features. These
include:
²Utility compartment
²Power point (rear of console)
²Cupholders
²Air vents to the rear seating positions (heat only)
Controls and features
88
Page 158 of 248
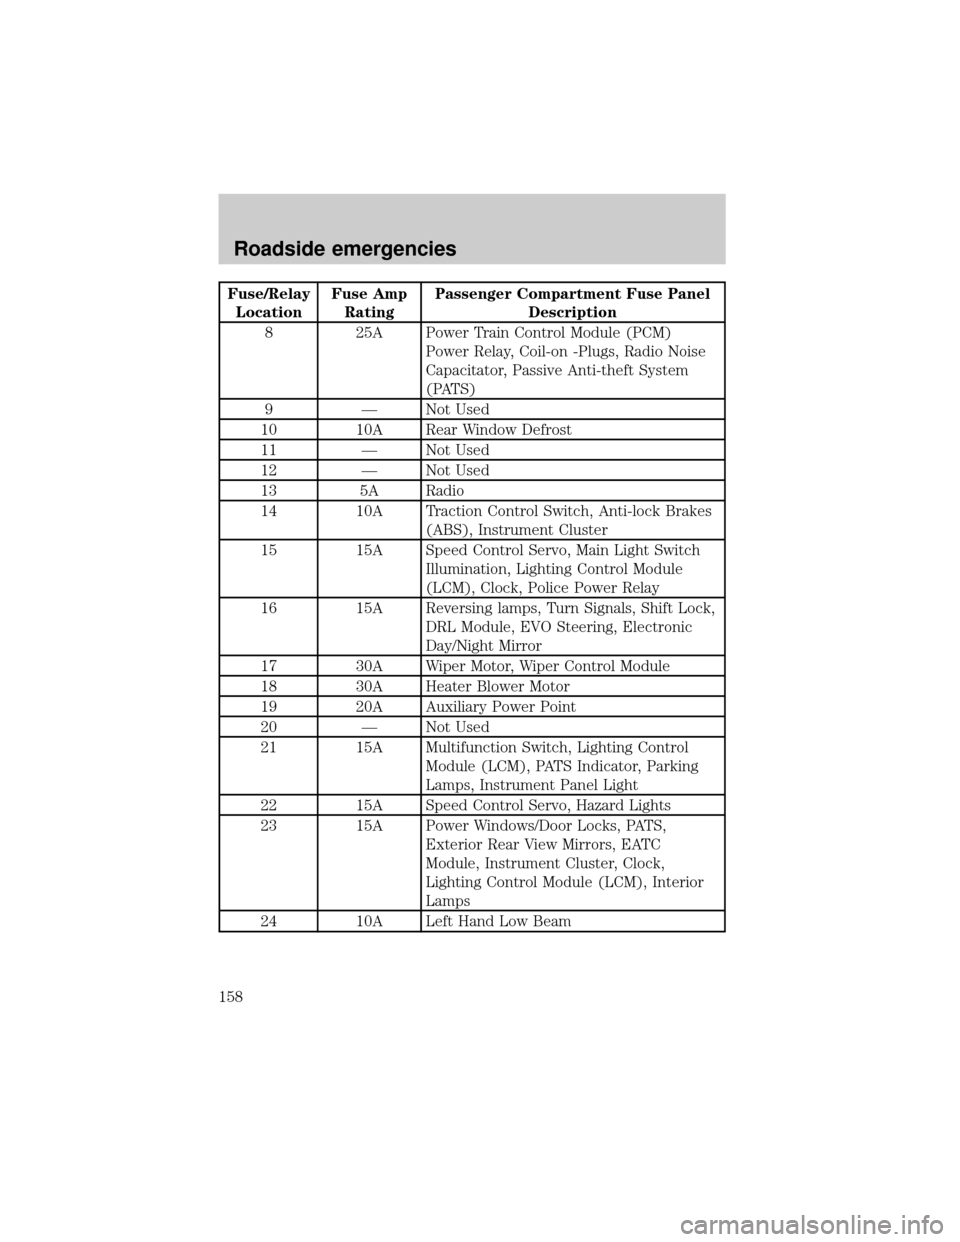
Fuse/Relay
LocationFuse Amp
RatingPassenger Compartment Fuse Panel
Description
8 25A Power Train Control Module (PCM)
Power Relay, Coil-on -Plugs, Radio Noise
Capacitator, Passive Anti-theft System
(PATS)
9 Ð Not Used
10 10A Rear Window Defrost
11 Ð Not Used
12 Ð Not Used
13 5A Radio
14 10A Traction Control Switch, Anti-lock Brakes
(ABS), Instrument Cluster
15 15A Speed Control Servo, Main Light Switch
Illumination, Lighting Control Module
(LCM), Clock, Police Power Relay
16 15A Reversing lamps, Turn Signals, Shift Lock,
DRL Module, EVO Steering, Electronic
Day/Night Mirror
17 30A Wiper Motor, Wiper Control Module
18 30A Heater Blower Motor
19 20A Auxiliary Power Point
20 Ð Not Used
21 15A Multifunction Switch, Lighting Control
Module (LCM), PATS Indicator, Parking
Lamps, Instrument Panel Light
22 15A Speed Control Servo, Hazard Lights
23 15A Power Windows/Door Locks, PATS,
Exterior Rear View Mirrors, EATC
Module, Instrument Cluster, Clock,
Lighting Control Module (LCM), Interior
Lamps
24 10A Left Hand Low Beam
Roadside emergencies
158
Page 214 of 248
Using the right bulbs
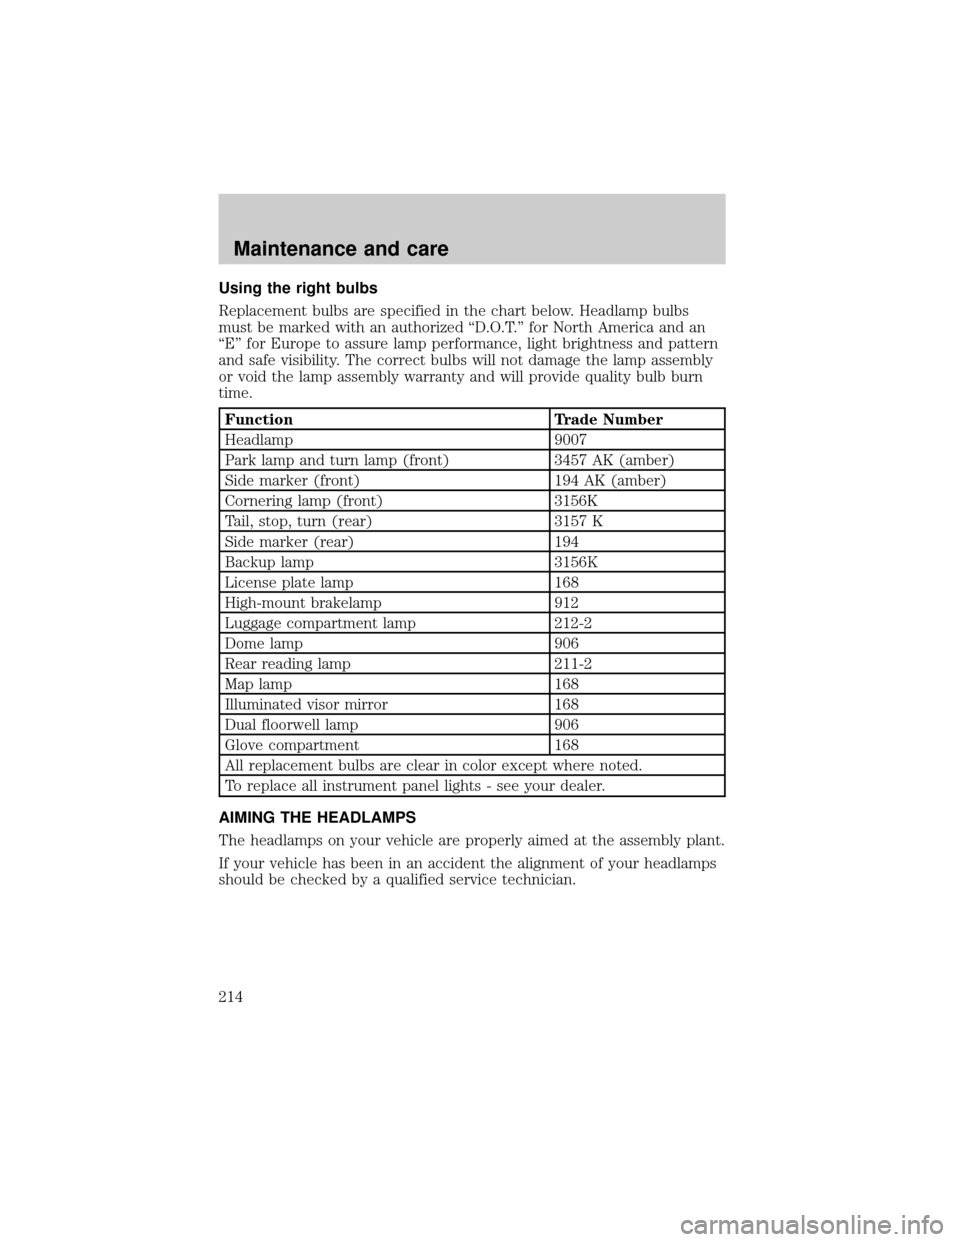
Replacement bulbs are specified in the chart below. Headlamp bulbs
must be marked with an authorized ªD.O.T.º for North America and an
ªEº for Europe to assure lamp performance, light brightness and pattern
and safe visibility. The correct bulbs will not damage the lamp assembly
or void the lamp assembly warranty and will provide quality bulb burn
time.
Function Trade Number
Headlamp 9007
Park lamp and turn lamp (front) 3457 AK (amber)
Side marker (front) 194 AK (amber)
Cornering lamp (front) 3156K
Tail, stop, turn (rear) 3157 K
Side marker (rear) 194
Backup lamp 3156K
License plate lamp 168
High-mount brakelamp 912
Luggage compartment lamp 212-2
Dome lamp 906
Rear reading lamp 211-2
Map lamp 168
Illuminated visor mirror 168
Dual floorwell lamp 906
Glove compartment 168
All replacement bulbs are clear in color except where noted.
To replace all instrument panel lights - see your dealer.
AIMING THE HEADLAMPS
The headlamps on your vehicle are properly aimed at the assembly plant.
If your vehicle has been in an accident the alignment of your headlamps
should be checked by a qualified service technician.
Maintenance and care
214
Page 216 of 248
Use only carnauba or synthetic-based waxes. Use a cleaning fluid with a
clean cloth to remove any bugs before waxing your vehicle. Use tar
remover to remove any tar spots.
Avoid getting wax on the windshield, or on any surfaces which appear
coarse or bumpy. If you have wax applied at a commercial car wash, it is
recommended that you clean the wiper blades and windshield as
described inCleaning the wiper blades and windshield.
Repairing paint chips
Minor scratches or paint damage from road debris may be repaired with
the Ultra Touch Prep and Finishing Kit (F7AZ-19K507±BA), Lacquer
Touch-up Paint (ALBZ-19500±XXXXA), or Exterior Acrylic Spray
Lacquer (ALAZ-19500±XXXXA) from the Ford Car Care Chemicals line.
Please note that the part numbers (shown as XXXX above) will vary with
your vehicle's specific coloring. Observe the application instructions on
the products.
Remove particles such as bird droppings, tree sap, insect remains, tar
spots, road salt and industrial fallout immediately.
Cleaning the wheels
Wash with the same detergent as the body of your vehicle. Do not use
acid-based or alcohol-based wheel cleaners, steel wool, fuel or strong
detergents. Never use abrasives that will damage the finish of special
wheel surfaces. Use a tar remover to remove grease and tar.
The brushes used in some automatic car washes may damage the finish
on your wheels. Before going to a car wash, find out if the brushes are
abrasive.
Cleaning non-painted plastic exterior parts
Use vinyl cleaner for routine cleaning. Clean with a tar remover if
necessary. Do not clean plastic parts with thinners, solvents or
petroleum-based cleaners.
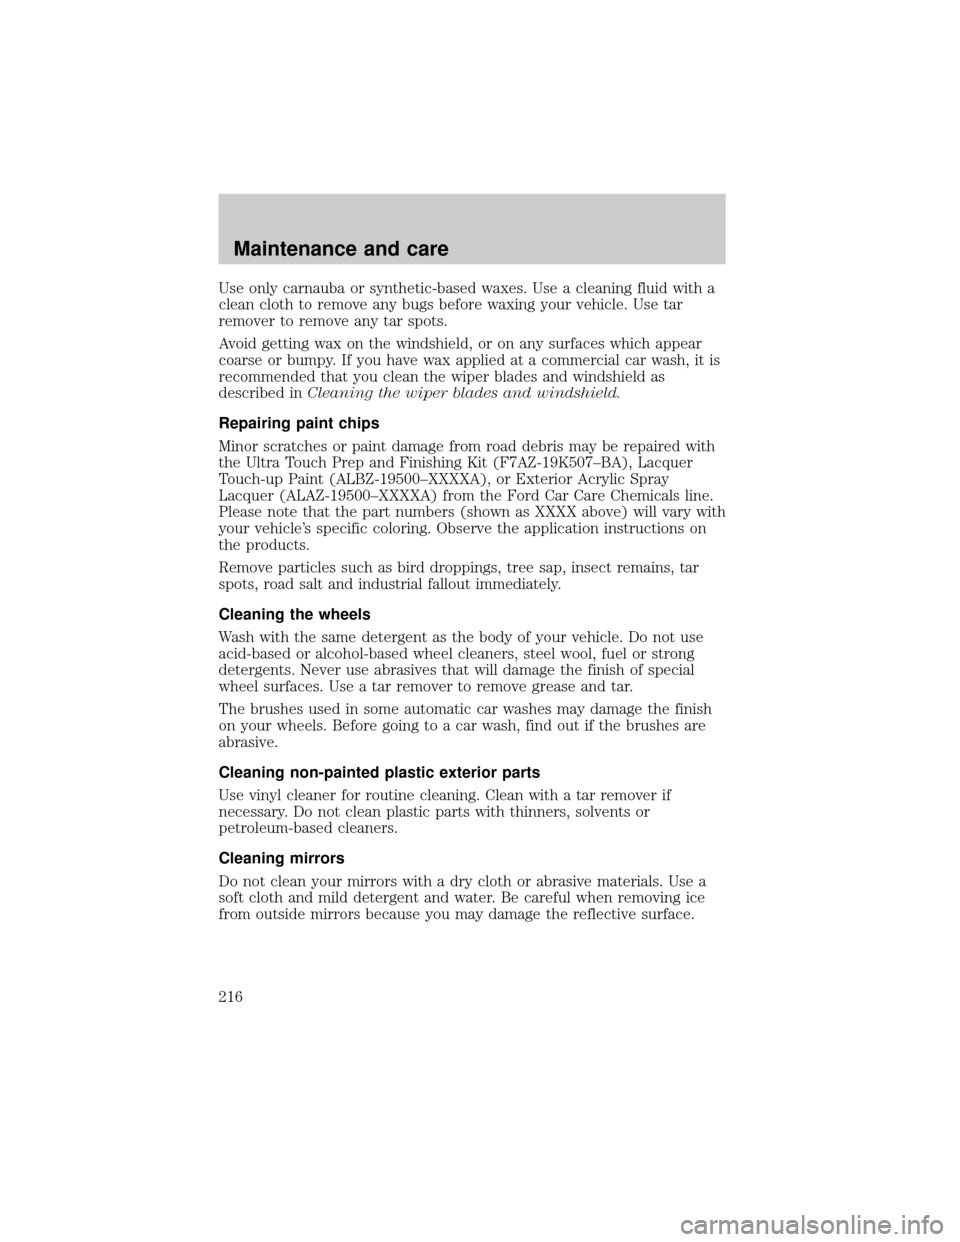
Cleaning mirrors
Do not clean your mirrors with a dry cloth or abrasive materials. Use a
soft cloth and mild detergent and water. Be careful when removing ice
from outside mirrors because you may damage the reflective surface.
Maintenance and care
216
Page 237 of 248
Vehicle Security
Keyless entry
Wheel locks for styled wheels
Vehicle security systems
Comfort and convenience
Cargo nets
Engine block heaters
Travel equipment
Daytime running lights
HomeLinkt
Rear view mirror with tire pressure sensor
Trunk organizer
Protection and appearance equipment
Air bag anti-theft locks
Carpet floor mats
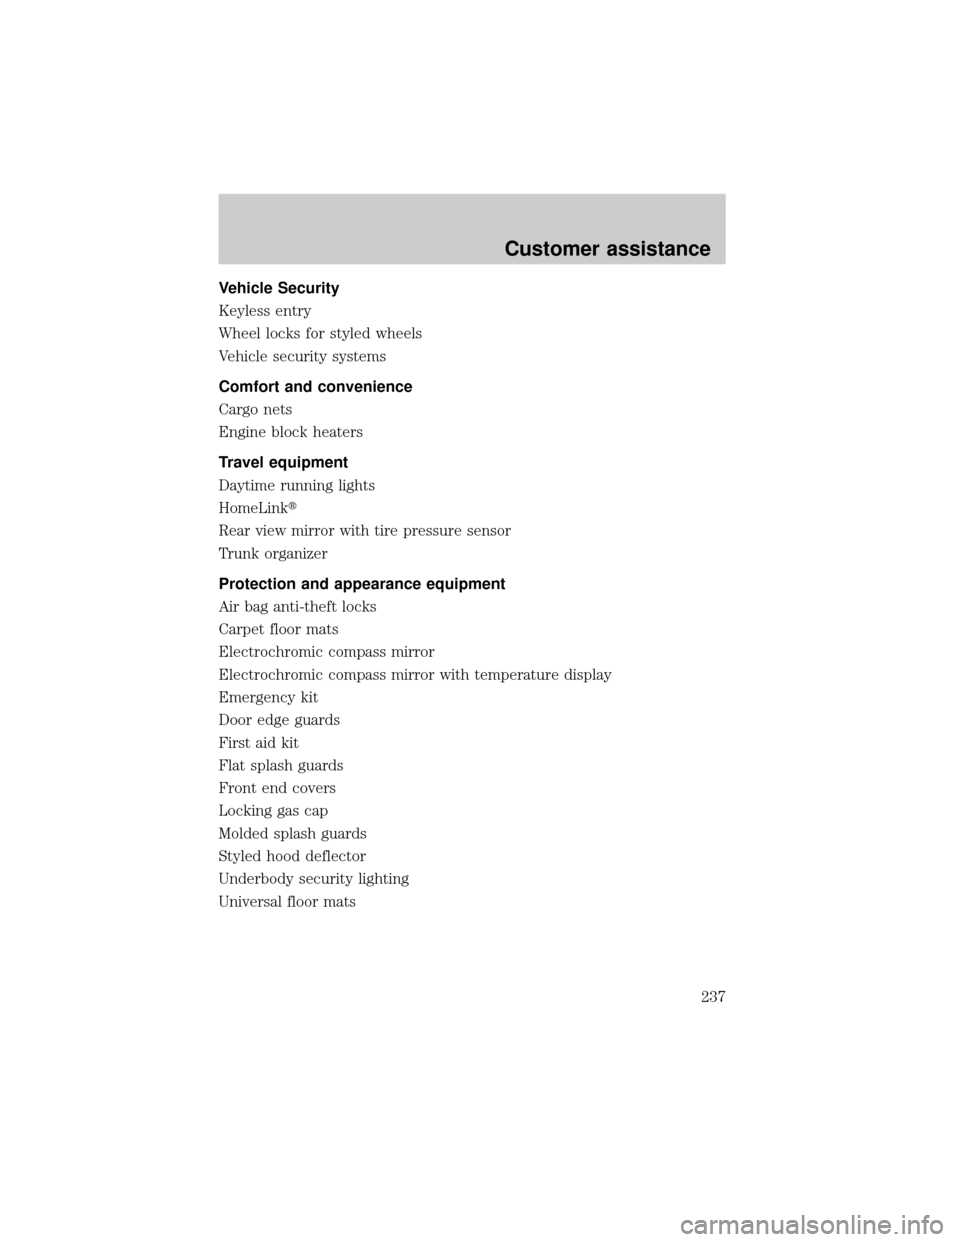
Electrochromic compass mirror
Electrochromic compass mirror with temperature display
Emergency kit
Door edge guards
First aid kit
Flat splash guards
Front end covers
Locking gas cap
Molded splash guards
Styled hood deflector
Underbody security lighting
Universal floor mats
Customer assistance
237
Page 242 of 248

Cleaning your vehicle ...............215
engine compartment ..............217
exterior ............................215±216
exterior lamps .........................217
instrument cluster lens ..........218
instrument panel ....................218
interior .....................................219
mirrors .....................................216
plastic parts ............................216
safety belts ..............................219
washing ....................................215
waxing .....................................215
wheels ......................................216
windows ..................................219
wiper blades ............................217
woodtone trim ........................219
Climate control (see Air
conditioning or Heating) ............29
Clock ..........................42, 49, 56, 66
Compass, electronic ....................83
calibration .................................84
set zone adjustment .................84
Console ........................................88
Controls
power seat .......................105±106
Coolant
checking and adding ..............179
coolant temperature light ........11
refill capacities ................183, 221
specifications ..................223±224
Cruise control (see Speed
control) ........................................75
Customer Assistance ................153
Ford accessories for your
vehicle .....................................235
Ford Extended
Service Plan ............................228
Getting assistance outside the
U.S. and Canada .....................234Getting roadside assistance ...153
Getting the service
you need .................................228
Ordering additional owner's
literature .................................238
The Dispute Settlement
Board .......................................230
Utilizing the
Mediation/Arbitration
Program ...................................234
D
Daytime running lamps (see
Lamps) .........................................27
Defrost
rear window ..............................38
Dipstick
automatic transmission
fluid ..........................................187
engine oil .................................175
Doors
lubricant specifications ..........223
Driving under special
conditions
through water .........................152
E
Electronic message center .........22
Emergencies, roadside
jump-starting ..........................165
Emission control system ..........207
Engine ................................224±225
check engine/service engine
soon light ....................................9
cleaning ...................................217
coolant .....................................179
fail-safe coolant ......................184
Index
242
Page 245 of 248

traction control active ..............14
turn signal indicator .................12
Load limits .................................147
GAWR ......................................147
GVWR ......................................147
trailer towing ..........................147
Locks
autolock .....................................91
childproof ..................................88
doors ..........................................87
Lubricant specifications ...223±224
Lumbar support, seats .............107
M
Message center ...........................22
reset button ..............................23
select button .............................23
Mirrors
automatic dimming rearview
mirror ........................................83
cleaning ...................................216
side view mirrors (power) .......88
Motorcraft parts ................203, 220
O
Octane rating ............................202
Odometer .....................................19
Oil (see Engine oil) ..................175
Overdrive .............................74, 145
P
Panic alarm feature, remote
entry system ................................93
Parking brake ............................139Parts (see Motorcraft parts) ....220
Passenger Occupant
Classification Sensor .................109
Pedals (see Power adjustable
foot pedals) .................................71
Power distribution box
(see Fuses) ...............................159
Power door locks ..................87, 91
Power steering ..........................142
fluid, checking and adding ....187
fluid, refill capacity ................221
fluid, specifications .........223±224
R
Radio ............................................38
Rear window defroster ...............38
Relays ................................156, 161
Remote entry system ...........89, 93
illuminated entry ......................93
locking/unlocking doors ...........90
opening the trunk .....................92
panic alarm ...............................93
replacement/additional
transmitters ...............................94
replacing the batteries .............93
S
Safety belts (see Safety
restraints) ............16, 107, 111±115
Safety defects, reporting ..........240
Safety restraints ........107, 111±115
belt minder .............................117
cleaning the safety belts .......120,
219
extension assembly ................116
for adults .........................112±114
Index
245