low FORD E-350 2012 Owners Manual
[x] Cancel search | Manufacturer: FORD, Model Year: 2012, Model line: E-350, Model: FORD E-350 2012Pages: 335, PDF Size: 2.63 MB
Page 160 of 335
To restore the full functionality of the tire pressure monitoring system,
have the damaged road wheel/tire repaired and remounted on your
vehicle. For additional information, refer toChanging tires with a
TPMSin this section.
When you believe your system is not operating properly
The main function of the tire pressure monitoring system is to warn you
when your tires need air. It can also warn you in the event the system is
no longer capable of functioning as intended. Please refer to the
following chart for information concerning your tire pressure monitoring
system:
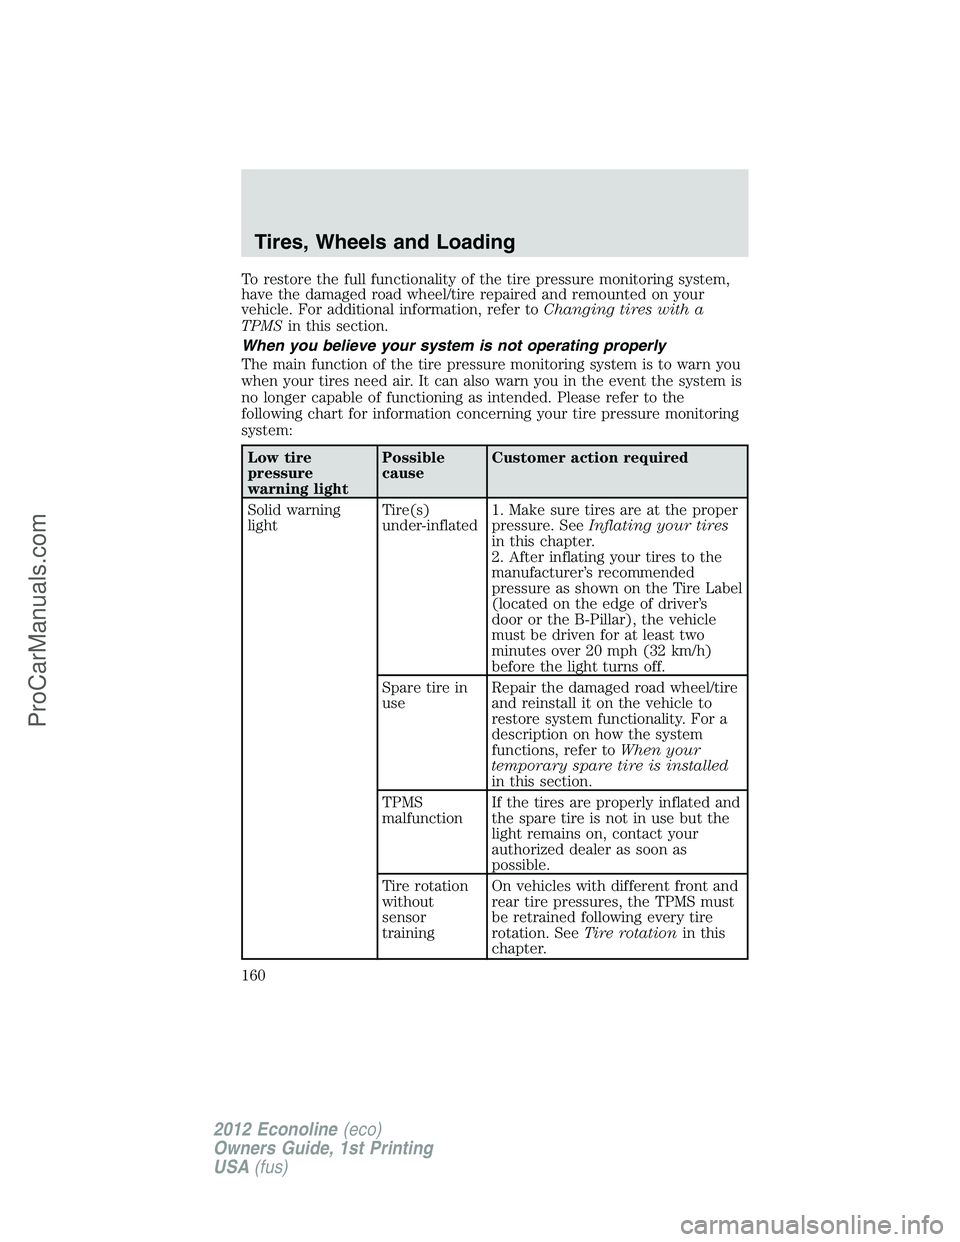
Low tire
pressure
warning lightPossible
causeCustomer action required
Solid warning
lightTire(s)
under-inflated1. Make sure tires are at the proper
pressure. SeeInflating your tires
in this chapter.
2. After inflating your tires to the
manufacturer’s recommended
pressure as shown on the Tire Label
(located on the edge of driver’s
door or the B-Pillar), the vehicle
must be driven for at least two
minutes over 20 mph (32 km/h)
before the light turns off.
Spare tire in
useRepair the damaged road wheel/tire
and reinstall it on the vehicle to
restore system functionality. For a
description on how the system
functions, refer toWhen your
temporary spare tire is installed
in this section.
TPMS
malfunctionIf the tires are properly inflated and
the spare tire is not in use but the
light remains on, contact your
authorized dealer as soon as
possible.
Tire rotation
without
sensor
trainingOn vehicles with different front and
rear tire pressures, the TPMS must
be retrained following every tire
rotation. SeeTire rotationin this
chapter.
Tires, Wheels and Loading
160
2012 Econoline(eco)
Owners Guide, 1st Printing
USA(fus)
ProCarManuals.com
Page 161 of 335
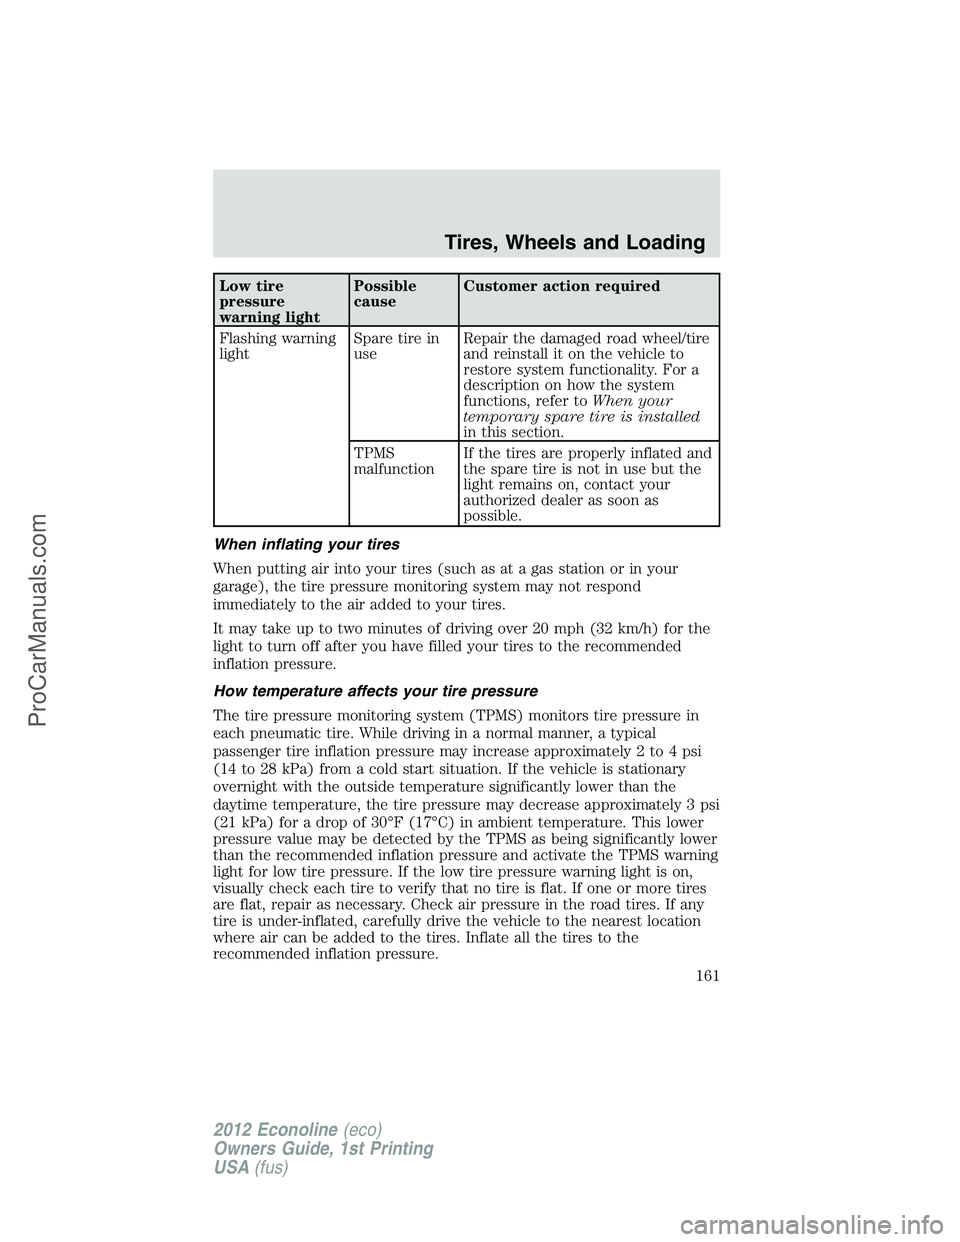
Low tire
pressure
warning lightPossible
causeCustomer action required
Flashing warning
lightSpare tire in
useRepair the damaged road wheel/tire
and reinstall it on the vehicle to
restore system functionality. For a
description on how the system
functions, refer toWhen your
temporary spare tire is installed
in this section.
TPMS
malfunctionIf the tires are properly inflated and
the spare tire is not in use but the
light remains on, contact your
authorized dealer as soon as
possible.
When inflating your tires
When putting air into your tires (such as at a gas station or in your
garage), the tire pressure monitoring system may not respond
immediately to the air added to your tires.
It may take up to two minutes of driving over 20 mph (32 km/h) for the
light to turn off after you have filled your tires to the recommended
inflation pressure.
How temperature affects your tire pressure
The tire pressure monitoring system (TPMS) monitors tire pressure in
each pneumatic tire. While driving in a normal manner, a typical
passenger tire inflation pressure may increase approximately 2 to 4 psi
(14 to 28 kPa) from a cold start situation. If the vehicle is stationary
overnight with the outside temperature significantly lower than the
daytime temperature, the tire pressure may decrease approximately 3 psi
(21 kPa) for a drop of 30°F (17°C) in ambient temperature. This lower
pressure value may be detected by the TPMS as being significantly lower
than the recommended inflation pressure and activate the TPMS warning
light for low tire pressure. If the low tire pressure warning light is on,
visually check each tire to verify that no tire is flat. If one or more tires
are flat, repair as necessary. Check air pressure in the road tires. If any
tire is under-inflated, carefully drive the vehicle to the nearest location
where air can be added to the tires. Inflate all the tires to the
recommended inflation pressure.
Tires, Wheels and Loading
161
2012 Econoline(eco)
Owners Guide, 1st Printing
USA(fus)
ProCarManuals.com
Page 162 of 335

TPMS reset procedure
The TPMS reset procedure needs to be performed after each tire
rotation on vehicles that require different recommended tire
pressures in the front tires as compared to the rear tires.
WARNING:To determine the required pressure(s) for your
vehicle, refer to the Safety Compliance Certification Label or
Tire Label located on the B-Pillar or the edge of the driver’s door. See
Vehicle loading - with and without a trailerin this chapter for more
information.
Overview
To provide the vehicle’s load carrying capability, some vehicles require
different recommended tire pressures in the front tires as compared to
the rear tires. The tire pressure monitoring system (TPMS) equipped on
these vehicles is designed to illuminate the low tire pressure warning
light at two different pressures; one for the front tires and one for the
rear tires.
Since tires need to be rotated to provide consistent performance and
maximum tire life, the tire pressure monitoring system needs to know
when the tires are rotated to determine which set of tires are on the
front and which are on the rear. With this information, the system can
detect and properly warn of low tire pressures.
TPMS reset tips:
•To reduce the chances of interference from another vehicle, the TPMS
reset procedure should be performed at least three feet (one meter)
away from another Ford Motor Company vehicle undergoing the TPMS
reset procedure at the same time.
•Do not wait more than two minutes between resetting each tire sensor
or the system will time-out and the entire procedure will have to be
repeated on all four wheels.
•A double horn chirp indicates the need to repeat the procedure.
Performing the TPMS reset procedure
It is recommended that you read the entire procedure before attempting.
1. Drive the vehicle above 20 mph (32 km/h) for at least two minutes
and then park in a safe location where you can easily get to all four tires
and have access to an air pump.
2. Place the ignition in the off position and keep the key in the ignition.
Tires, Wheels and Loading
162
2012 Econoline(eco)
Owners Guide, 1st Printing
USA(fus)
ProCarManuals.com
Page 163 of 335

3. Cycle the ignition to the on
position with the engine off.
4. Turn the hazard flashers on then
off three times. This must be
accomplished within 10 seconds.
If the reset mode has been entered successfully, the horn will sound
once, the TPMS indicator
will flash and the message center (if
equipped) will displayTRAIN LEFT FRONT TIRE. If this does not
occur, please try again starting at Step 2.
If after repeated attempts to enter the reset mode, the horn does not
sound, the TPMS indicator
does not flash and the message center (if
equipped) does not displayTRAIN LEFT FRONT TIRE, seek service
from your authorized dealer.
5. Train the TPMS sensors in the tires using the following TPMS reset
sequence starting with theleft front tirein the following clockwise
order:
•Left front (Driver’s side front tire)
•Right front (Passenger’s side front tire)
•Right rear (Passenger’s side rear tire)
•Left rear (Driver’s side rear tire)
6. Remove the valve cap from the valve stem on the left front tire;
decrease the air pressure until the horn sounds.
Note:The single horn chirp confirms that the sensor identification code
has been learned by the module for this position. If a double horn is
heard, the reset procedure was unsuccessful, and must be repeated.
7. Remove the valve cap from the valve stem on the right front tire;
decrease the air pressure until the horn sounds.
Tires, Wheels and Loading
163
2012 Econoline(eco)
Owners Guide, 1st Printing
USA(fus)
ProCarManuals.com
Page 165 of 335

Follow these guidelines when using snow tires and chains:
•If possible, avoid fully loading your vehicle.
•Use only SAE Class S chains.
•Install chains securely, verifying that the chains do not touch any
wiring, brake lines or fuel lines.
•Drive cautiously. If you hear the chains rub or bang against your
vehicle, stop and retighten the chains. If this does not work, remove
the chains to prevent damage to your vehicle.
•Remove the tire chains when they are no longer needed. Do not use
tire chains on dry roads.
VEHICLE LOADING – WITH AND WITHOUT A TRAILER
This section will guide you in the proper loading of your vehicle and/or
trailer, to keep your loaded vehicle weight within its design rating
capability, with or without a trailer. Properly loading your vehicle will
provide maximum return of vehicle design performance. Before loading
your vehicle, familiarize yourself with the following terms for determining
your vehicle’s weight ratings, with or without a trailer, from the vehicle’s
Tire Label or Safety Compliance Certification Label:
Base Curb Weight– is the weight of the vehicle including a full tank of
fuel and all standard equipment. It does not include passengers, cargo, or
optional equipment.
Vehicle Curb Weight– is the weight of your new vehicle when you
picked it up from your authorized dealer plus any aftermarket
equipment.
Tires, Wheels and Loading
165
2012 Econoline(eco)
Owners Guide, 1st Printing
USA(fus)
ProCarManuals.com
Page 168 of 335
GAWR (Gross Axle Weight Rating)– is the maximum allowable
weight that can be carried by a single axle (front or rear).These
numbers are shown on the Safety Compliance Certification Label
located on the B-Pillar or the edge of the driver’s door. The total
load on each axle must never exceed its GAWR.
Note:For trailer towing information refer toTrailer towingfound in
this chapter or theRV and Trailer Towing Guideprovided by your
authorized dealer.
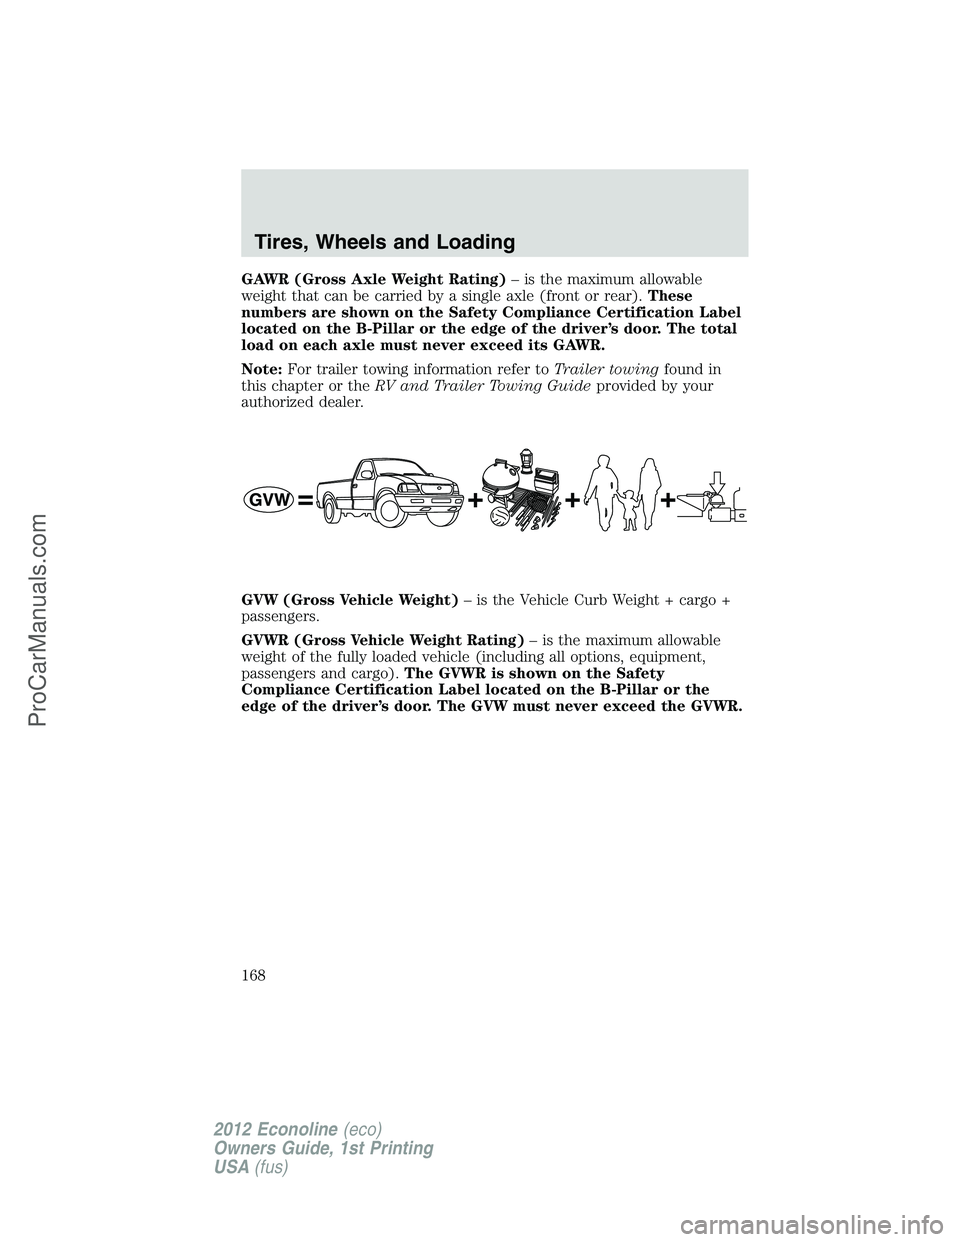
GVW (Gross Vehicle Weight)– is the Vehicle Curb Weight + cargo +
passengers.
GVWR (Gross Vehicle Weight Rating)– is the maximum allowable
weight of the fully loaded vehicle (including all options, equipment,
passengers and cargo).The GVWR is shown on the Safety
Compliance Certification Label located on the B-Pillar or the
edge of the driver’s door. The GVW must never exceed the GVWR.
Tires, Wheels and Loading
168
2012 Econoline(eco)
Owners Guide, 1st Printing
USA(fus)
ProCarManuals.com
Page 170 of 335
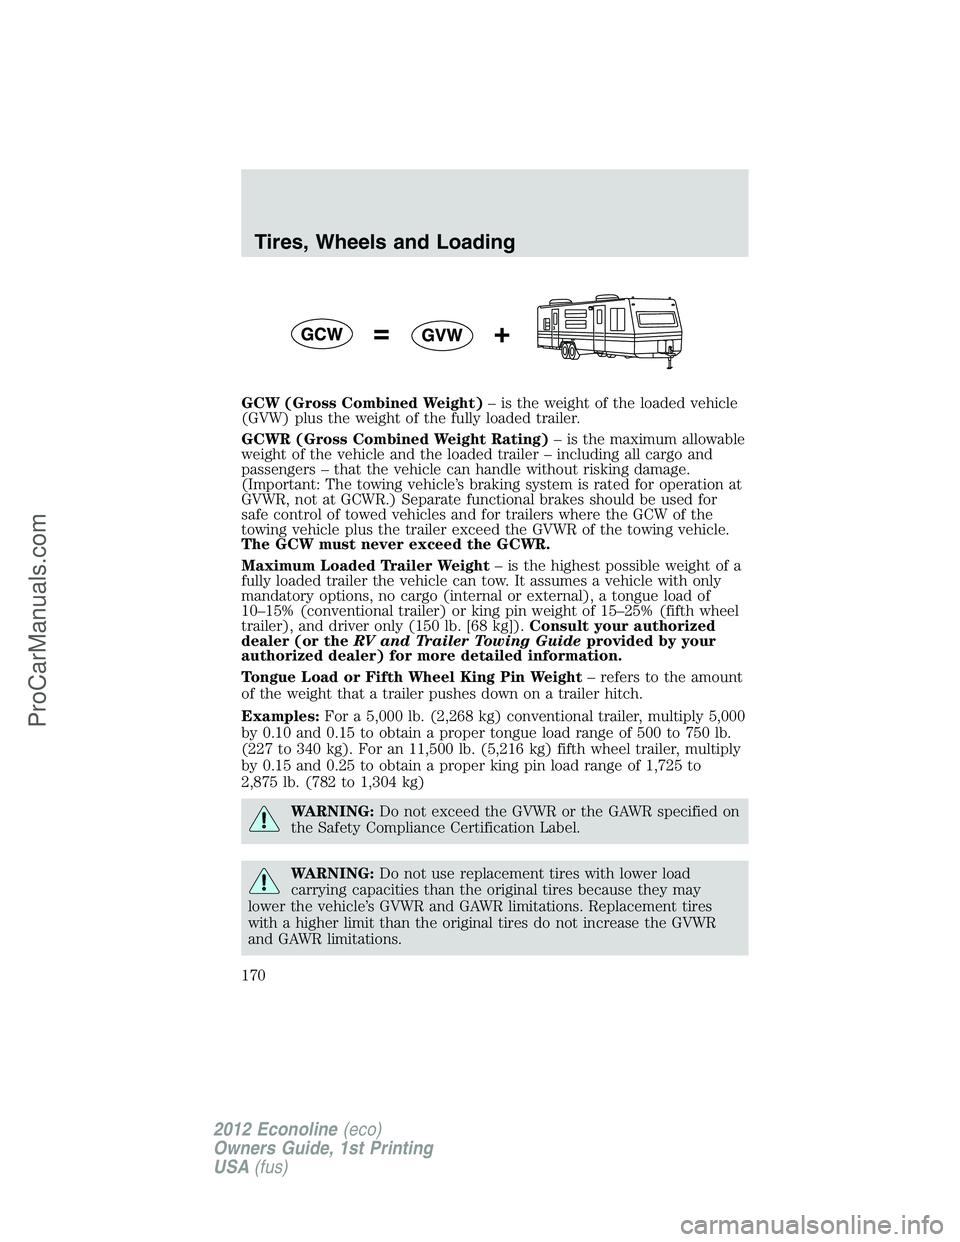
GCW (Gross Combined Weight)– is the weight of the loaded vehicle
(GVW) plus the weight of the fully loaded trailer.
GCWR (Gross Combined Weight Rating)– is the maximum allowable
weight of the vehicle and the loaded trailer – including all cargo and
passengers – that the vehicle can handle without risking damage.
(Important: The towing vehicle’s braking system is rated for operation at
GVWR, not at GCWR.) Separate functional brakes should be used for
safe control of towed vehicles and for trailers where the GCW of the
towing vehicle plus the trailer exceed the GVWR of the towing vehicle.
The GCW must never exceed the GCWR.
Maximum Loaded Trailer Weight– is the highest possible weight of a
fully loaded trailer the vehicle can tow. It assumes a vehicle with only
mandatory options, no cargo (internal or external), a tongue load of
10–15% (conventional trailer) or king pin weight of 15–25% (fifth wheel
trailer), and driver only (150 lb. [68 kg]).Consult your authorized
dealer (or theRV and Trailer Towing Guideprovided by your
authorized dealer) for more detailed information.
Tongue Load or Fifth Wheel King Pin Weight– refers to the amount
of the weight that a trailer pushes down on a trailer hitch.
Examples:For a 5,000 lb. (2,268 kg) conventional trailer, multiply 5,000
by 0.10 and 0.15 to obtain a proper tongue load range of 500 to 750 lb.
(227 to 340 kg). For an 11,500 lb. (5,216 kg) fifth wheel trailer, multiply
by 0.15 and 0.25 to obtain a proper king pin load range of 1,725 to
2,875 lb. (782 to 1,304 kg)
WARNING:Do not exceed the GVWR or the GAWR specified on
the Safety Compliance Certification Label.
WARNING:Do not use replacement tires with lower load
carrying capacities than the original tires because they may
lower the vehicle’s GVWR and GAWR limitations. Replacement tires
with a higher limit than the original tires do not increase the GVWR
and GAWR limitations.
Tires, Wheels and Loading
170
2012 Econoline(eco)
Owners Guide, 1st Printing
USA(fus)
ProCarManuals.com
Page 171 of 335
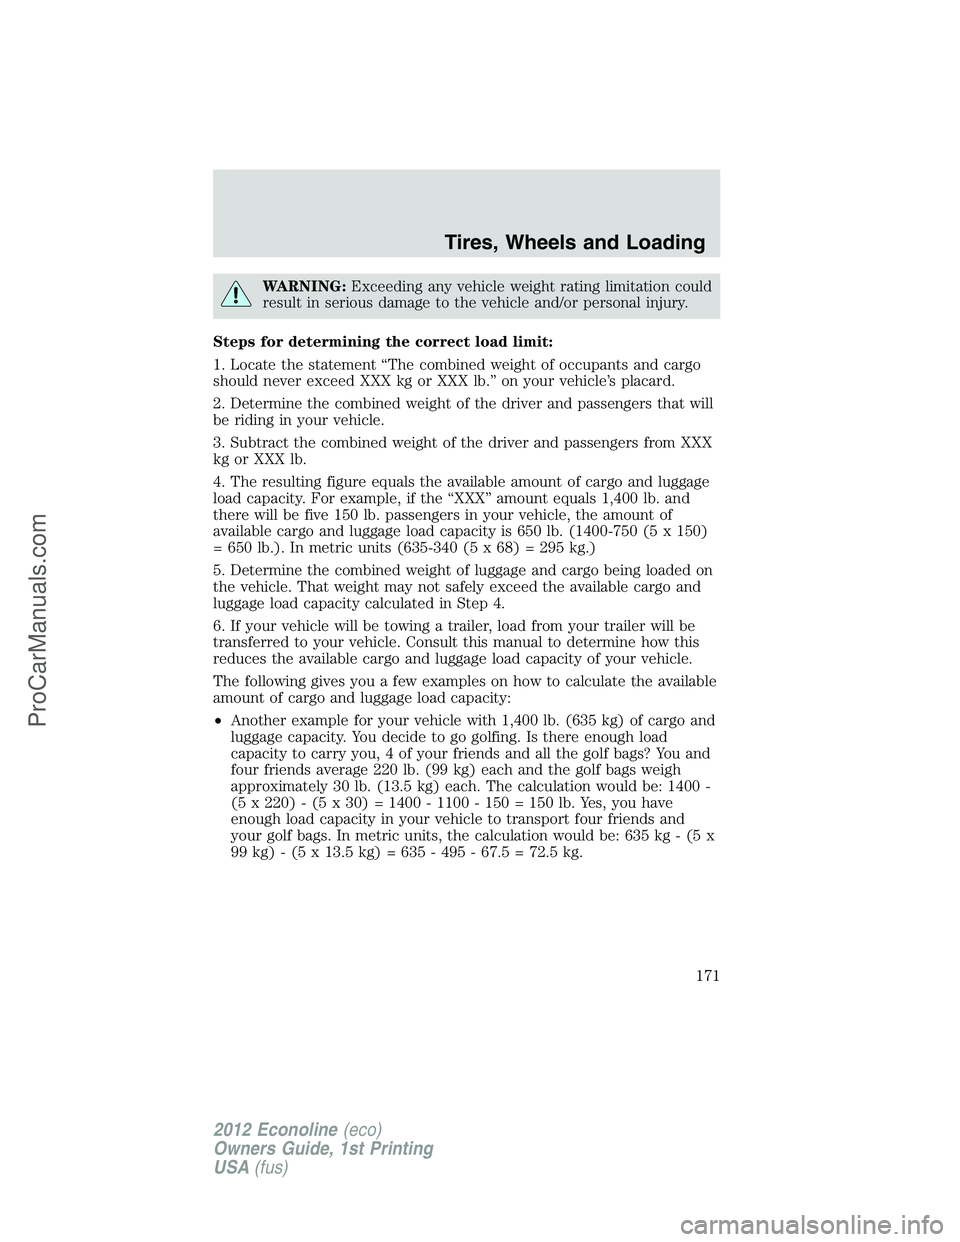
WARNING:Exceeding any vehicle weight rating limitation could
result in serious damage to the vehicle and/or personal injury.
Steps for determining the correct load limit:
1. Locate the statement “The combined weight of occupants and cargo
should never exceed XXX kg or XXX lb.” on your vehicle’s placard.
2. Determine the combined weight of the driver and passengers that will
be riding in your vehicle.
3. Subtract the combined weight of the driver and passengers from XXX
kg or XXX lb.
4. The resulting figure equals the available amount of cargo and luggage
load capacity. For example, if the “XXX” amount equals 1,400 lb. and
there will be five 150 lb. passengers in your vehicle, the amount of
available cargo and luggage load capacity is 650 lb. (1400-750 (5 x 150)
= 650 lb.). In metric units (635-340 (5 x 68) = 295 kg.)
5. Determine the combined weight of luggage and cargo being loaded on
the vehicle. That weight may not safely exceed the available cargo and
luggage load capacity calculated in Step 4.
6. If your vehicle will be towing a trailer, load from your trailer will be
transferred to your vehicle. Consult this manual to determine how this
reduces the available cargo and luggage load capacity of your vehicle.
The following gives you a few examples on how to calculate the available
amount of cargo and luggage load capacity:
•Another example for your vehicle with 1,400 lb. (635 kg) of cargo and
luggage capacity. You decide to go golfing. Is there enough load
capacity to carry you, 4 of your friends and all the golf bags? You and
four friends average 220 lb. (99 kg) each and the golf bags weigh
approximately 30 lb. (13.5 kg) each. The calculation would be: 1400 -
(5 x 220) - (5 x 30) = 1400 - 1100 - 150 = 150 lb. Yes, you have
enough load capacity in your vehicle to transport four friends and
your golf bags. In metric units, the calculation would be: 635 kg - (5 x
99 kg) - (5 x 13.5 kg) = 635 - 495 - 67.5 = 72.5 kg.
Tires, Wheels and Loading
171
2012 Econoline(eco)
Owners Guide, 1st Printing
USA(fus)
ProCarManuals.com
Page 172 of 335

•A final example for your vehicle with 1,400 lb. (635 kg) of cargo and
luggage capacity. You and one of your friends decide to pick up
cement from the local home improvement store to finish that patio
you have been planning for the past 2 years. Measuring the inside of
the vehicle with the rear seat folded down, you have room for
12-100 lb. (45 kg) bags of cement. Do you have enough load capacity
to transport the cement to your home? If you and your friend each
weigh 220 lb. (99 kg), the calculation would be: 1400 - (2 x 220) - (12
x 100) = 1400 - 440 - 1200 = - 240 lb. No, you do not have enough
cargo capacity to carry that much weight. In metric units, the
calculation would be: 635 kg - (2 x 99 kg) - (12 x 45 kg) = 635 - 198 -
540 = -103 kg. You will need to reduce the load weight by at least
240 lb. (104 kg). If you remove 3-100 lb. (45 kg) cement bags, then
the load calculation would be:
1400 - (2 x 220) - (9 x 100) = 1400 - 440 - 900 = 60 lb. Now you have
the load capacity to transport the cement and your friend home. In
metric units, the calculation would be: 635 kg - (2 x 99 kg) - (9 x
45 kg) = 635 - 198 - 405 = 32 kg.
The above calculations also assume that the loads are positioned in your
vehicle in a manner that does not overload the Front or the Rear Gross
Axle Weight Rating specified for your vehicle on the Safety Compliance
Certification Label found on the edge of the driver’s door.
Special loading instructions for owners of pick-up trucks and
utility-type vehicles
WARNING:For important information regarding safe operation
of this type of vehicle, see thePreparing to drive your vehicle
section in theDrivingchapter of this owner’s guide.
WARNING:Loaded vehicles may handle differently than
unloaded vehicles. Extra precautions, such as slower speeds and
increased stopping distance, should be taken when driving a heavily
loaded vehicle.
Your vehicle can haul more cargo and people than most passenger cars.
Depending upon the type and placement of the load, hauling cargo and
people may raise the center of gravity of the vehicle.
Tires, Wheels and Loading
172
2012 Econoline(eco)
Owners Guide, 1st Printing
USA(fus)
ProCarManuals.com
Page 173 of 335
TRAILER TOWING
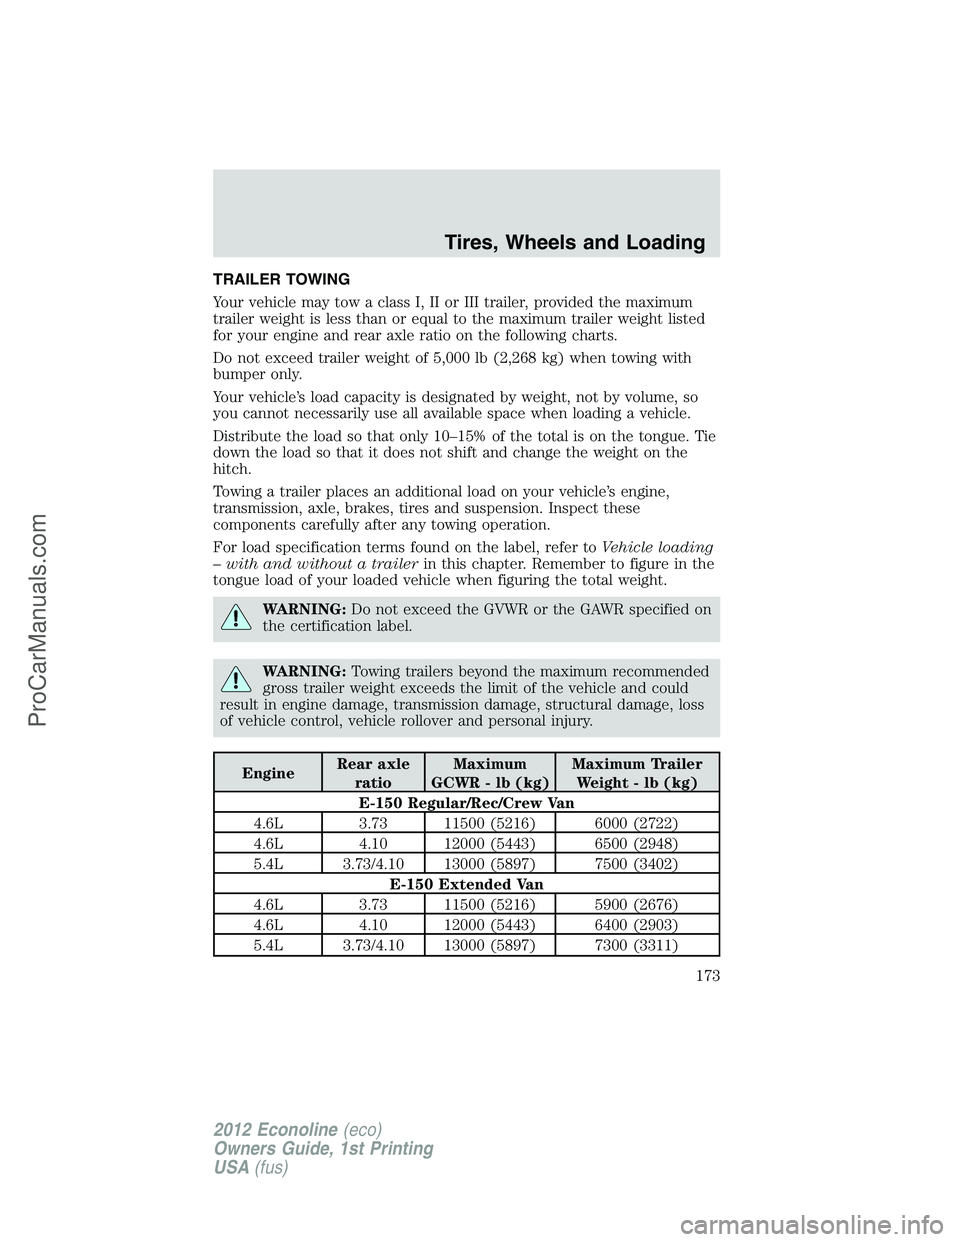
Your vehicle may tow a class I, II or III trailer, provided the maximum
trailer weight is less than or equal to the maximum trailer weight listed
for your engine and rear axle ratio on the following charts.
Do not exceed trailer weight of 5,000 lb (2,268 kg) when towing with
bumper only.
Your vehicle’s load capacity is designated by weight, not by volume, so
you cannot necessarily use all available space when loading a vehicle.
Distribute the load so that only 10–15% of the total is on the tongue. Tie
down the load so that it does not shift and change the weight on the
hitch.
Towing a trailer places an additional load on your vehicle’s engine,
transmission, axle, brakes, tires and suspension. Inspect these
components carefully after any towing operation.
For load specification terms found on the label, refer toVehicle loading
– with and without a trailerin this chapter. Remember to figure in the
tongue load of your loaded vehicle when figuring the total weight.
WARNING:Do not exceed the GVWR or the GAWR specified on
the certification label.
WARNING:Towing trailers beyond the maximum recommended
gross trailer weight exceeds the limit of the vehicle and could
result in engine damage, transmission damage, structural damage, loss
of vehicle control, vehicle rollover and personal injury.
EngineRear axle
ratioMaximum
GCWR - lb (kg)Maximum Trailer
Weight - lb (kg)
E-150 Regular/Rec/Crew Van
4.6L 3.73 11500 (5216) 6000 (2722)
4.6L 4.10 12000 (5443) 6500 (2948)
5.4L 3.73/4.10 13000 (5897) 7500 (3402)
E-150 Extended Van
4.6L 3.73 11500 (5216) 5900 (2676)
4.6L 4.10 12000 (5443) 6400 (2903)
5.4L 3.73/4.10 13000 (5897) 7300 (3311)
Tires, Wheels and Loading
173
2012 Econoline(eco)
Owners Guide, 1st Printing
USA(fus)
ProCarManuals.com