FORD E SERIES 1999 4.G Owners Manual
Manufacturer: FORD, Model Year: 1999, Model line: E SERIES, Model: FORD E SERIES 1999 4.GPages: 208, PDF Size: 1.93 MB
Page 181 of 208
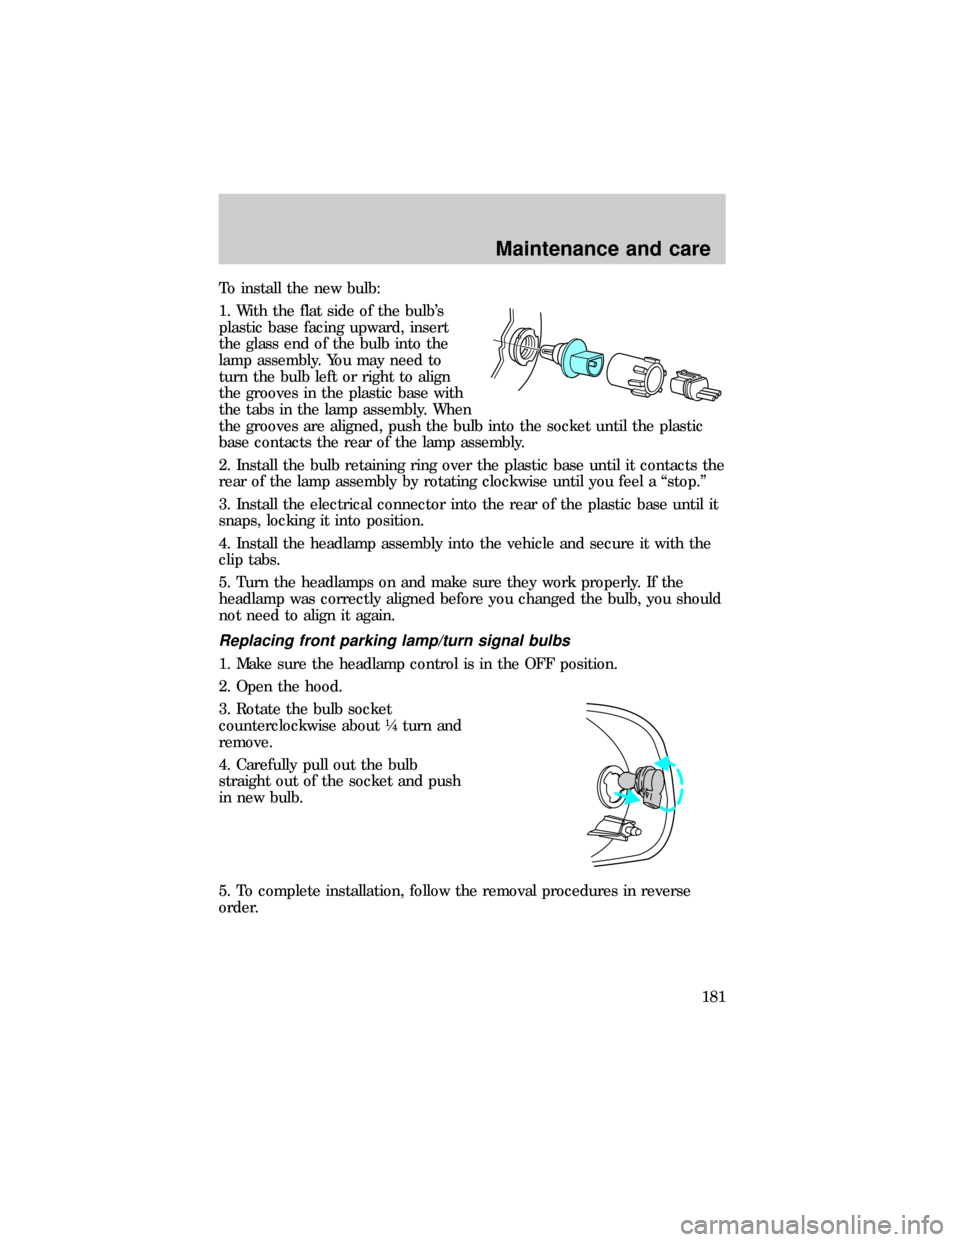
To install the new bulb:
1. With the flat side of the bulb's
plastic base facing upward, insert
the glass end of the bulb into the
lamp assembly. You may need to
turn the bulb left or right to align
the grooves in the plastic base with
the tabs in the lamp assembly. When
the grooves are aligned, push the bulb into the socket until the plastic
base contacts the rear of the lamp assembly.
2. Install the bulb retaining ring over the plastic base until it contacts the
rear of the lamp assembly by rotating clockwise until you feel a ªstop.º
3. Install the electrical connector into the rear of the plastic base until it
snaps, locking it into position.
4. Install the headlamp assembly into the vehicle and secure it with the
clip tabs.
5. Turn the headlamps on and make sure they work properly. If the
headlamp was correctly aligned before you changed the bulb, you should
not need to align it again.
Replacing front parking lamp/turn signal bulbs
1. Make sure the headlamp control is in the OFF position.
2. Open the hood.
3. Rotate the bulb socket
counterclockwise about ò turn and
remove.
4. Carefully pull out the bulb
straight out of the socket and push
in new bulb.
5. To complete installation, follow the removal procedures in reverse
order.
Maintenance and care
181
Page 182 of 208
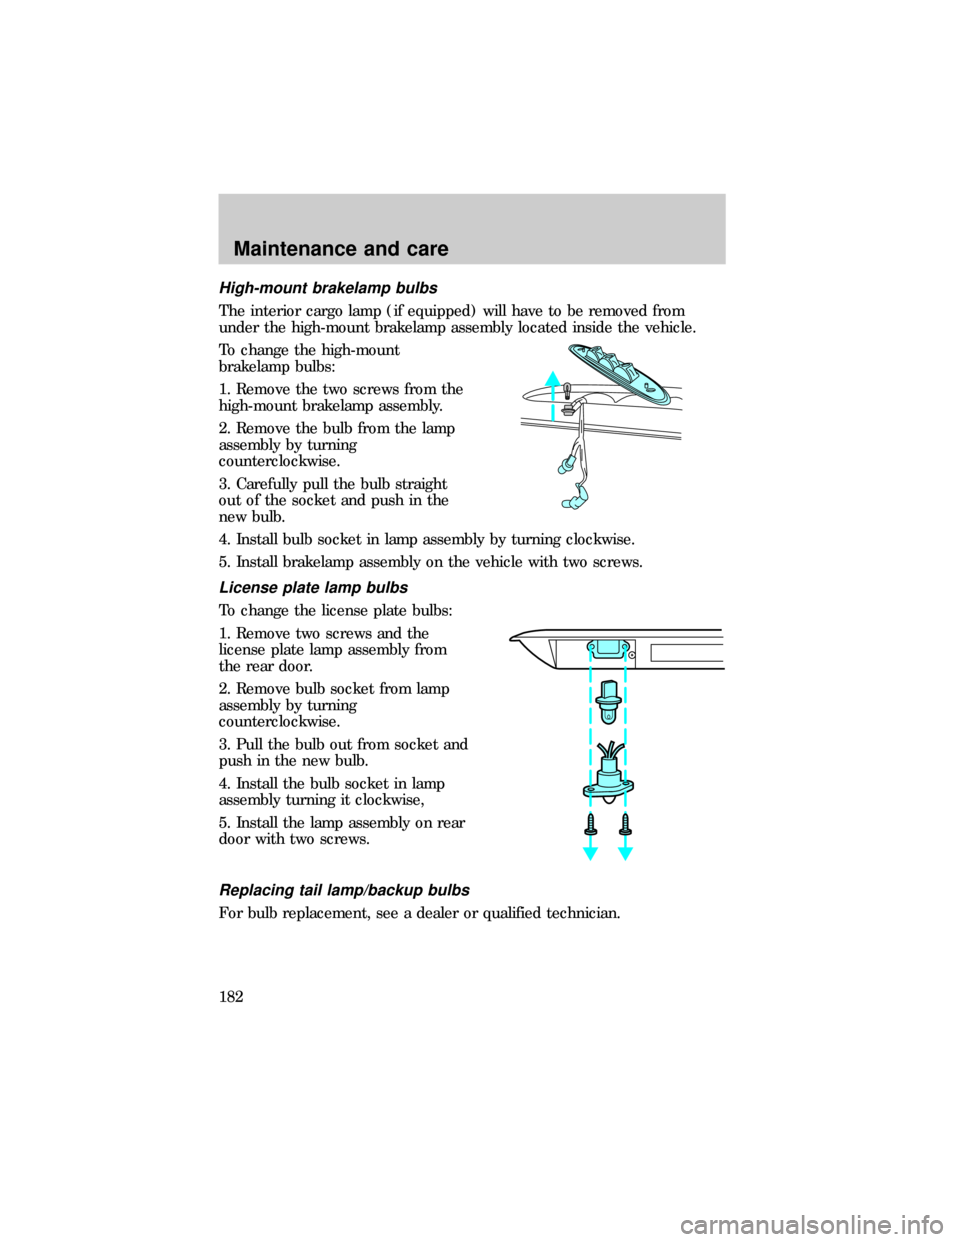
High-mount brakelamp bulbs
The interior cargo lamp (if equipped) will have to be removed from
under the high-mount brakelamp assembly located inside the vehicle.
To change the high-mount
brakelamp bulbs:
1. Remove the two screws from the
high-mount brakelamp assembly.
2. Remove the bulb from the lamp
assembly by turning
counterclockwise.
3. Carefully pull the bulb straight
out of the socket and push in the
new bulb.
4. Install bulb socket in lamp assembly by turning clockwise.
5. Install brakelamp assembly on the vehicle with two screws.
License plate lamp bulbs
To change the license plate bulbs:
1. Remove two screws and the
license plate lamp assembly from
the rear door.
2. Remove bulb socket from lamp
assembly by turning
counterclockwise.
3. Pull the bulb out from socket and
push in the new bulb.
4. Install the bulb socket in lamp
assembly turning it clockwise,
5. Install the lamp assembly on rear
door with two screws.
Replacing tail lamp/backup bulbs
For bulb replacement, see a dealer or qualified technician.
Maintenance and care
182
Page 183 of 208
Using the right bulbs
Function Number of
bulbsTrade number
Headlamps (low series) 2 H5054
Headlamps (high series) 2 9007
Park lamp and turn signal (front) 2 3157 NAK
Back-up lamps 2 3156K
License plate lamps 1 168
Stop/tail/side marker lamp 2 3357 K
Turn lamp (rear) 2 3156K
High-mount brakelamp 2 912
Cargo lamp 1 211-2
Dome lamp (standard) 1 912
Map/reading lamp 2 211-2
To replace all instrument panel lights - see your dealer
AIMING THE HEADLAMPS
The alignment of your headlamps should be checked by a qualified
service technician if:
²Oncoming motorists frequently signal you to deactivate your high
beams, and your high beams are not activated.
²The headlamps do not seem to provide enough light for clear night
vision.
²The headlamp beams are pointed substantially away from a slightly
down and to the right position.
CLEANING AND CARING FOR YOUR VEHICLE
Refer to the ªCustomer Assistance Guideº for a list of Ford-approved
cleaners, polishes and waxes.
Maintenance and care
183
Page 184 of 208
Washing your vehicle
Wash your vehicle regularly with
cold or lukewarm water. Never use
strong detergents or soap. If your
vehicle is particularly dirty, use a
quality car wash detergent. Always
use a clean sponge, washing glove
or similar device and plenty of water
for best results. To avoid spots,
avoid washing when the hood is still
warm, immediately after or during
exposure to strong sunlight.
During winter months, it is especially important to wash the vehicle on a
regular basis. Large quantities of dirt and road salt are difficult to
remove and also cause damage to the vehicle.
Remove any exterior accessories, such as antennas, before entering a car
wash. If you have wax applied to the vehicle at a commercial car wash, it
is recommended that you clean the wiper blades and windshield as
described inCleaning the wiper blades and windshield.
After washing, apply the brakes several times to dry them.
Waxing your vehicle
Wax when water stops beading on the surface. This could be every three
or four months, depending on operating conditions.
Use only carnauba or synthetic-based waxes. Use cleaning fluid or
alcohol with a clean cloth to remove any bugs and tar before waxing
vehicle. Use tar remover to remove any tar spots.
Avoid getting wax on the windshield. If you have wax applied at a
commercial car wash, it is recommended that you clean the wiper blades
and windshield as described inCleaning the wiper blades and
windshield.
Repairing paint chips
Minor scratches or paint damage from road debris may be repaired with
touch-up paint, repair foil or aerosol paint spray from the Ford accessory
line. Observe the application instructions on the products.
Remove particles such as bird droppings, tree sap, insect remains, tar
spots, road salt and industrial fallout immediately.
Maintenance and care
184
Page 185 of 208
Cleaning the wheels
Wash with the same detergent as the body of your vehicle. Do not use
acid-based or alcohol-based wheel cleaners, steel wool, fuel or strong
detergents. Never use abrasives that will damage the finish of special
wheel surfaces. Use a tar remover to remove grease and tar.
Cleaning the engine
Engines are more efficient when they are clean because grease and dirt
buildup keep the engine warmer than normal. When washing:
²Take care when using a power washer to clean the engine. The high
pressure fluid could penetrate the sealed parts and cause damage.
²Do not spray with cold water to avoid cracking the engine block or
other engine components.
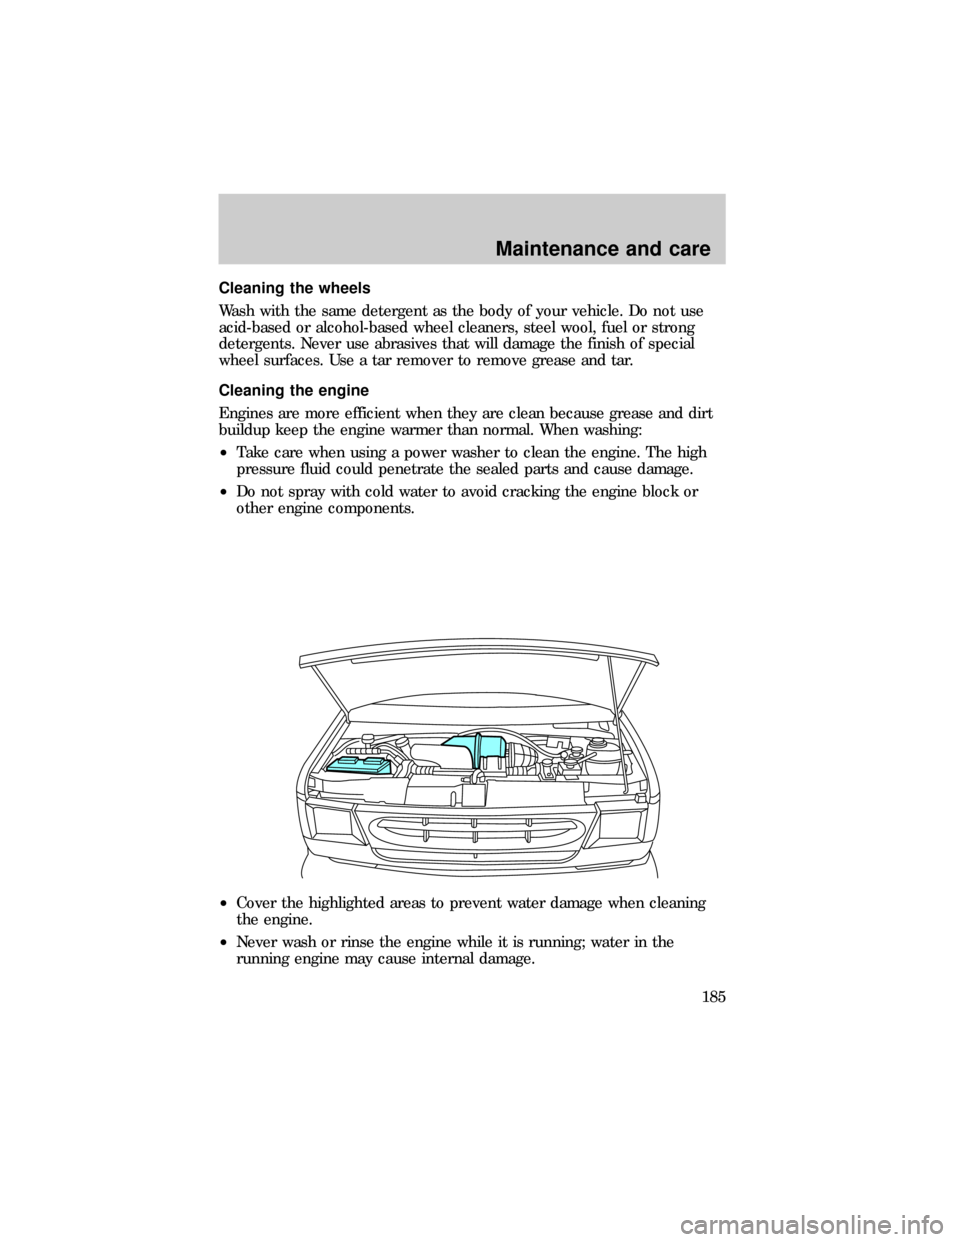
²Cover the highlighted areas to prevent water damage when cleaning
the engine.
²Never wash or rinse the engine while it is running; water in the
running engine may cause internal damage.
Maintenance and care
185
Page 186 of 208
Cleaning plastic exterior parts
Use vinyl cleaner for routine cleaning. Clean with a tar remover if
necessary. Do not clean plastic parts with thinners, solvents or
petroleum-based cleaners.
Cleaning the exterior lamps
Wash with the same detergent as the exterior of your vehicle. Use glass
cleaner or tar remover if necessary.
To avoid scratching the lamps, do not use a dry paper towel, chemical
solvents or abrasive cleaners.
Cleaning the wiper blades and windshield
If the wiper blades do not wipe properly, clean the wiper blade rubber
element with undiluted windshield washer solution or a mild detergent.
To avoid damaging the blades, do not use fuel, kerosene, paint thinner or
other solvents.
If the wiper still does not wipe properly, this could be caused by
substances on the windshield such as tree sap and some hot wax
treatments used by commercial car washes. Clean the outside of the
windshield with a non-abrasive cleanser such as the non-abrasive
Bon-Amitpowder. Rinse thoroughly with clean water.Do notuse
abrasive cleansers on glass as they may cause scratches. The windshield
is clean if beads do not form when you rinse it with water. The
windshield and wiper blades should be cleaned on a regular basis, and
blades or rubber elements replaced when worn.
Cleaning the instrument panel
Clean with a damp cloth, then dry with a dry cloth.
Avoid cleaner or polish that increases the gloss of the upper portion of
the instrument panel. The dull finish in this area helps protect the driver
from undesirable windshield reflection.
Cleaning the interior fabric
Remove dust and loose dirt with a whisk broom or a vacuum cleaner.
Remove fresh spots immediately. Do not use household or glass cleaners.
These agents can stain and discolor the fabric. Use a mild soap and
water solution if necessary.
Maintenance and care
186
Page 187 of 208
Cleaning and maintaining the safety belts
Clean the safety belts with a mild soap solution recommended for
cleaning upholstery or carpets. Do not bleach or dye the belts, because
these actions may weaken the belt webbing.
Check the safety belt system periodically to make sure there are no
nicks, wear or cuts. If your vehicle has been involved in an accident,
refer to theSafety belt maintenancesection in theSeating and safety
restraintschapter.
Underbody
Flush the complete underside of vehicle frequently. Keep body drain
holes unplugged. Inspect for road damage.
Inside windows
Use glass cleaner for the inside windows if they become fogged.
Maintenance and care
187
Page 188 of 208
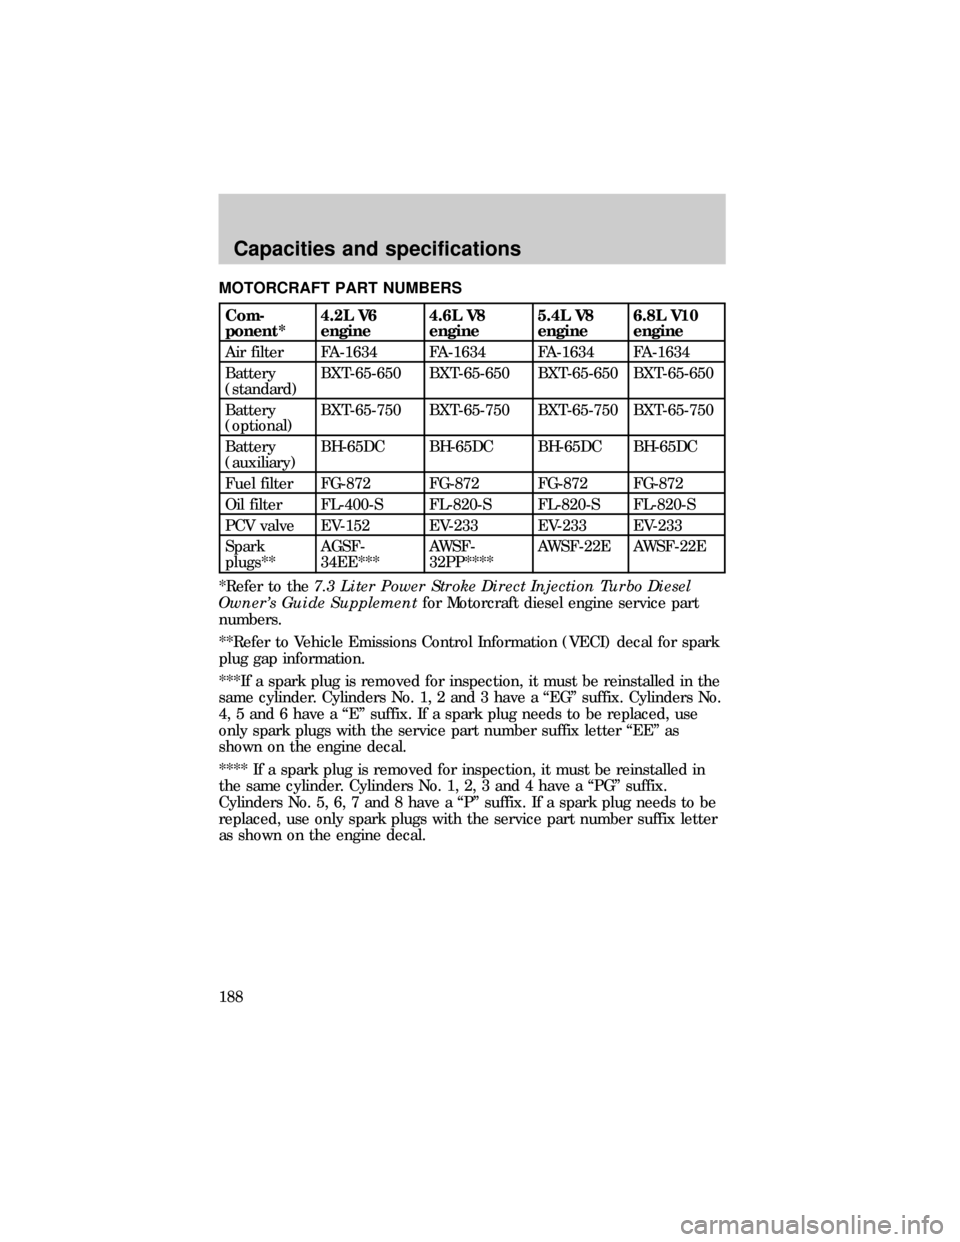
MOTORCRAFT PART NUMBERS
Com-
ponent*4.2L V6
engine4.6L V8
engine5.4L V8
engine6.8L V10
engine
Air filter FA-1634 FA-1634 FA-1634 FA-1634
Battery
(standard)BXT-65-650 BXT-65-650 BXT-65-650 BXT-65-650
Battery
(optional)BXT-65-750 BXT-65-750 BXT-65-750 BXT-65-750
Battery
(auxiliary)BH-65DC BH-65DC BH-65DC BH-65DC
Fuel filter FG-872 FG-872 FG-872 FG-872
Oil filter FL-400-S FL-820-S FL-820-S FL-820-S
PCV valve EV-152 EV-233 EV-233 EV-233
Spark
plugs**AGSF-
34EE***AWSF-
32PP****AWSF-22E AWSF-22E
*Refer to the7.3 Liter Power Stroke Direct Injection Turbo Diesel
Owner's Guide Supplementfor Motorcraft diesel engine service part
numbers.
**Refer to Vehicle Emissions Control Information (VECI) decal for spark
plug gap information.
***If a spark plug is removed for inspection, it must be reinstalled in the
same cylinder. Cylinders No. 1, 2 and 3 have a ªEGº suffix. Cylinders No.
4, 5 and 6 have a ªEº suffix. If a spark plug needs to be replaced, use
only spark plugs with the service part number suffix letter ªEEº as
shown on the engine decal.
**** If a spark plug is removed for inspection, it must be reinstalled in
the same cylinder. Cylinders No. 1, 2, 3 and 4 have a ªPGº suffix.
Cylinders No. 5, 6, 7 and 8 have a ªPº suffix. If a spark plug needs to be
replaced, use only spark plugs with the service part number suffix letter
as shown on the engine decal.
Capacities and specifications
188
Page 189 of 208
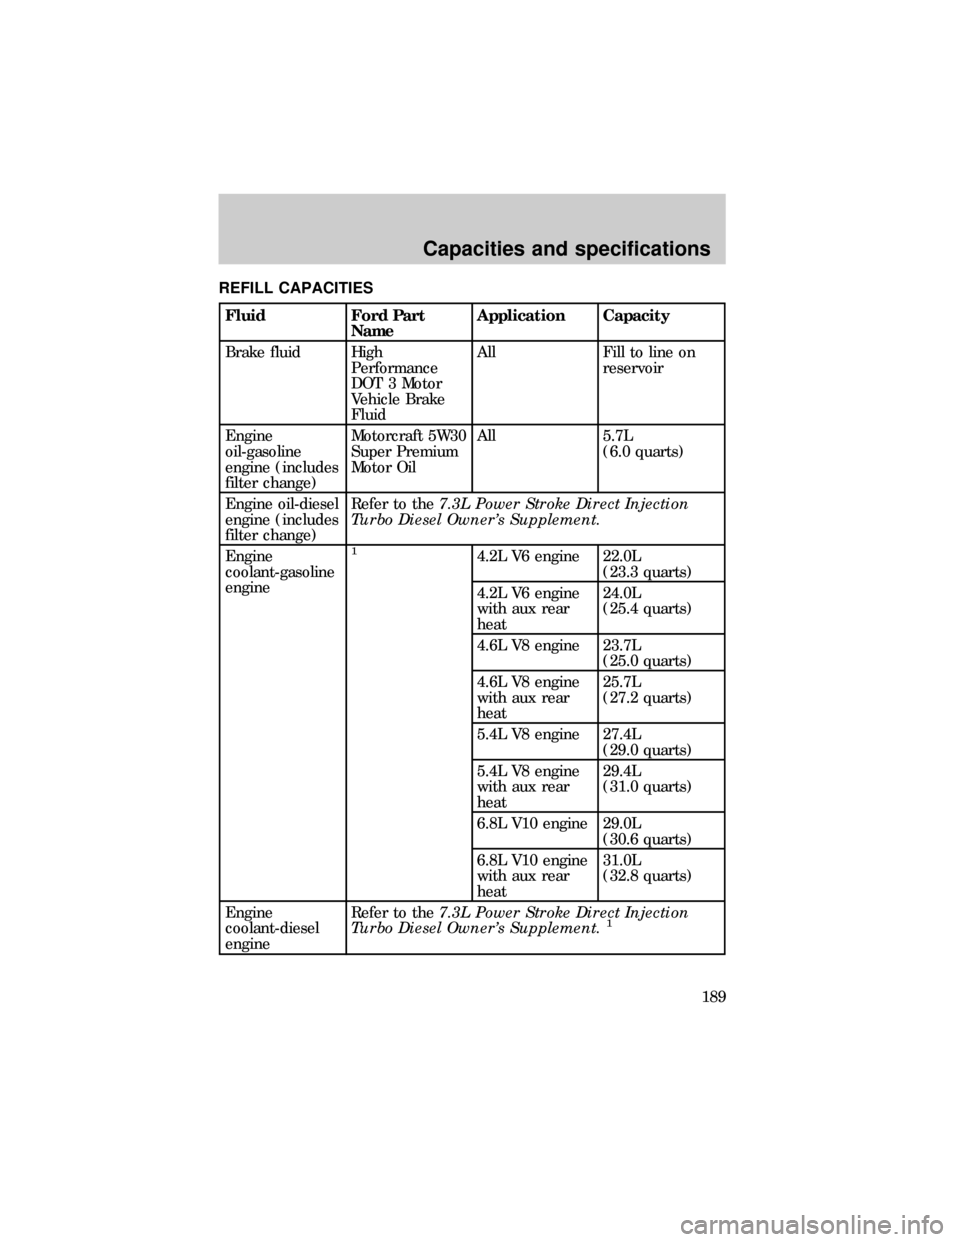
REFILL CAPACITIES
Fluid Ford Part
NameApplication Capacity
Brake fluid High
Performance
DOT 3 Motor
Vehicle Brake
FluidAll Fill to line on
reservoir
Engine
oil-gasoline
engine (includes
filter change)Motorcraft 5W30
Super Premium
Motor OilAll 5.7L
(6.0 quarts)
Engine oil-diesel
engine (includes
filter change)Refer to the7.3L Power Stroke Direct Injection
Turbo Diesel Owner's Supplement.
Engine
coolant-gasoline
engine
14.2L V6 engine 22.0L
(23.3 quarts)
4.2L V6 engine
with aux rear
heat24.0L
(25.4 quarts)
4.6L V8 engine 23.7L
(25.0 quarts)
4.6L V8 engine
with aux rear
heat25.7L
(27.2 quarts)
5.4L V8 engine 27.4L
(29.0 quarts)
5.4L V8 engine
with aux rear
heat29.4L
(31.0 quarts)
6.8L V10 engine 29.0L
(30.6 quarts)
6.8L V10 engine
with aux rear
heat31.0L
(32.8 quarts)
Engine
coolant-diesel
engineRefer to the7.3L Power Stroke Direct Injection
Turbo Diesel Owner's Supplement.
1
Capacities and specifications
189
Page 190 of 208
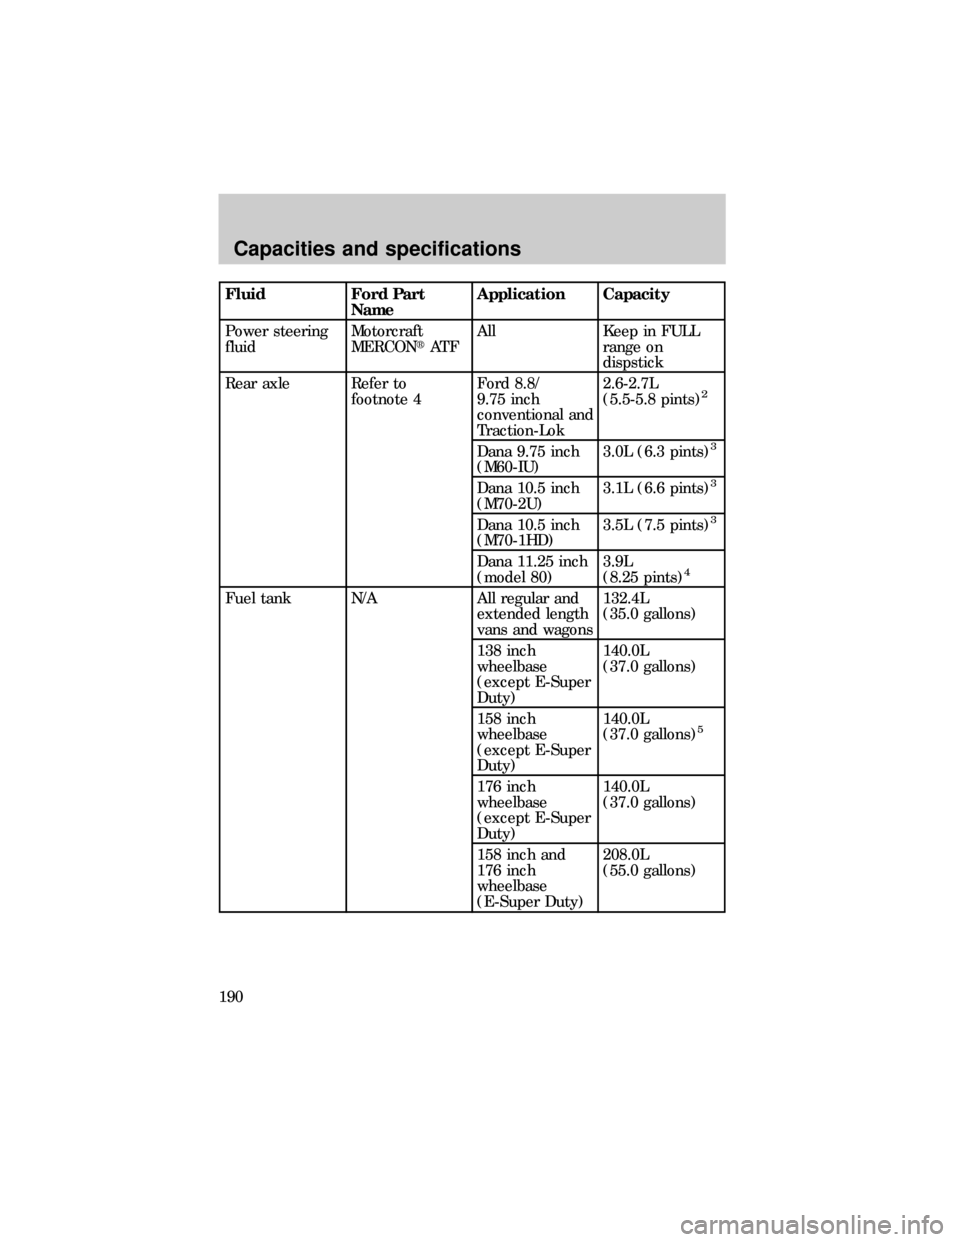
Fluid Ford Part
NameApplication Capacity
Power steering
fluidMotorcraft
MERCONtAT FAll Keep in FULL
range on
dispstick
Rear axle Refer to
footnote 4Ford 8.8/
9.75 inch
conventional and
Traction-Lok2.6-2.7L
(5.5-5.8 pints)
2
Dana 9.75 inch
(M60-IU)3.0L (6.3 pints)3
Dana 10.5 inch
(M70-2U)3.1L (6.6 pints)3
Dana 10.5 inch
(M70-1HD)3.5L (7.5 pints)3
Dana 11.25 inch
(model 80)3.9L
(8.25 pints)4
Fuel tank N/A All regular and
extended length
vans and wagons132.4L
(35.0 gallons)
138 inch
wheelbase
(except E-Super
Duty)140.0L
(37.0 gallons)
158 inch
wheelbase
(except E-Super
Duty)140.0L
(37.0 gallons)
5
176 inch
wheelbase
(except E-Super
Duty)140.0L
(37.0 gallons)
158 inch and
176 inch
wheelbase
(E-Super Duty)208.0L
(55.0 gallons)
Capacities and specifications
190