clock FORD E SERIES 2009 4.G User Guide
[x] Cancel search | Manufacturer: FORD, Model Year: 2009, Model line: E SERIES, Model: FORD E SERIES 2009 4.GPages: 321, PDF Size: 2.31 MB
Page 54 of 321
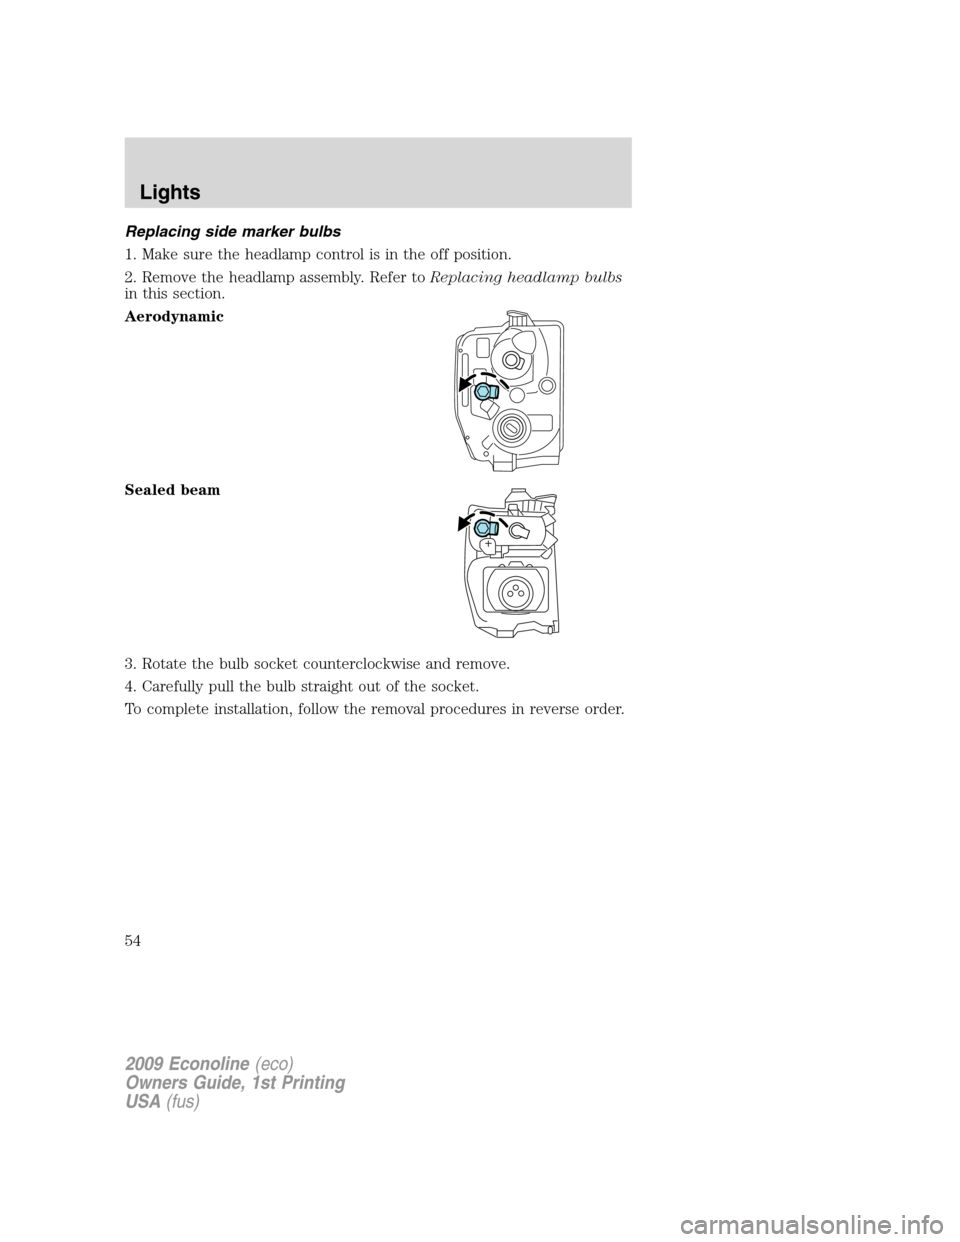
Replacing side marker bulbs
1. Make sure the headlamp control is in the off position.
2. Remove the headlamp assembly. Refer toReplacing headlamp bulbs
in this section.
Aerodynamic
Sealed beam
3. Rotate the bulb socket counterclockwise and remove.
4. Carefully pull the bulb straight out of the socket.
To complete installation, follow the removal procedures in reverse order.
2009 Econoline(eco)
Owners Guide, 1st Printing
USA(fus)
Lights
54
Page 55 of 321
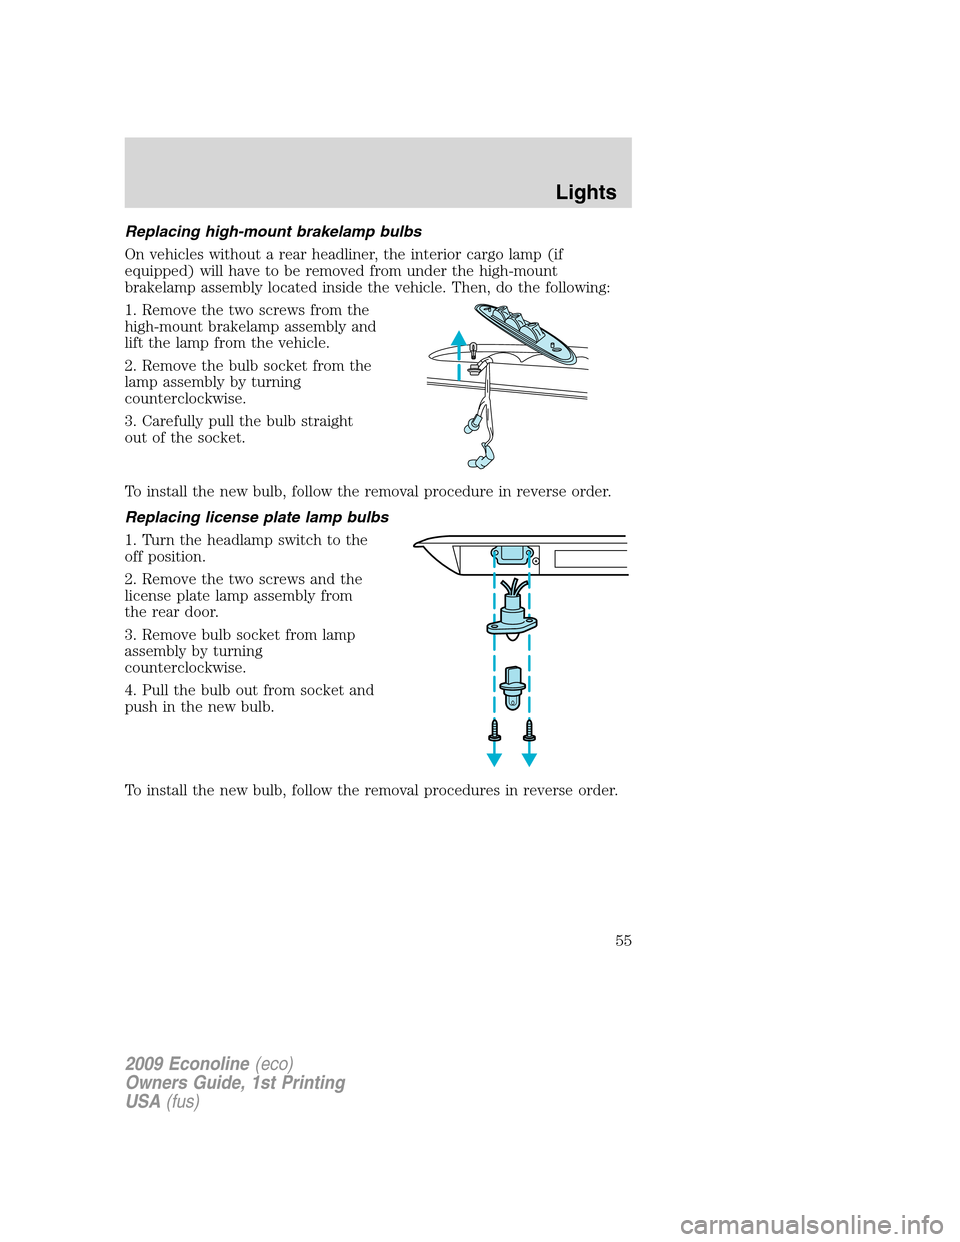
Replacing high-mount brakelamp bulbs
On vehicles without a rear headliner, the interior cargo lamp (if
equipped) will have to be removed from under the high-mount
brakelamp assembly located inside the vehicle. Then, do the following:
1. Remove the two screws from the
high-mount brakelamp assembly and
lift the lamp from the vehicle.
2. Remove the bulb socket from the
lamp assembly by turning
counterclockwise.
3. Carefully pull the bulb straight
out of the socket.
To install the new bulb, follow the removal procedure in reverse order.
Replacing license plate lamp bulbs
1. Turn the headlamp switch to the
off position.
2. Remove the two screws and the
license plate lamp assembly from
the rear door.
3. Remove bulb socket from lamp
assembly by turning
counterclockwise.
4. Pull the bulb out from socket and
push in the new bulb.
To install the new bulb, follow the removal procedures in reverse order.
2009 Econoline(eco)
Owners Guide, 1st Printing
USA(fus)
Lights
55
Page 56 of 321
Replacing stop/turn/tail/side marker/backup lamp bulbs
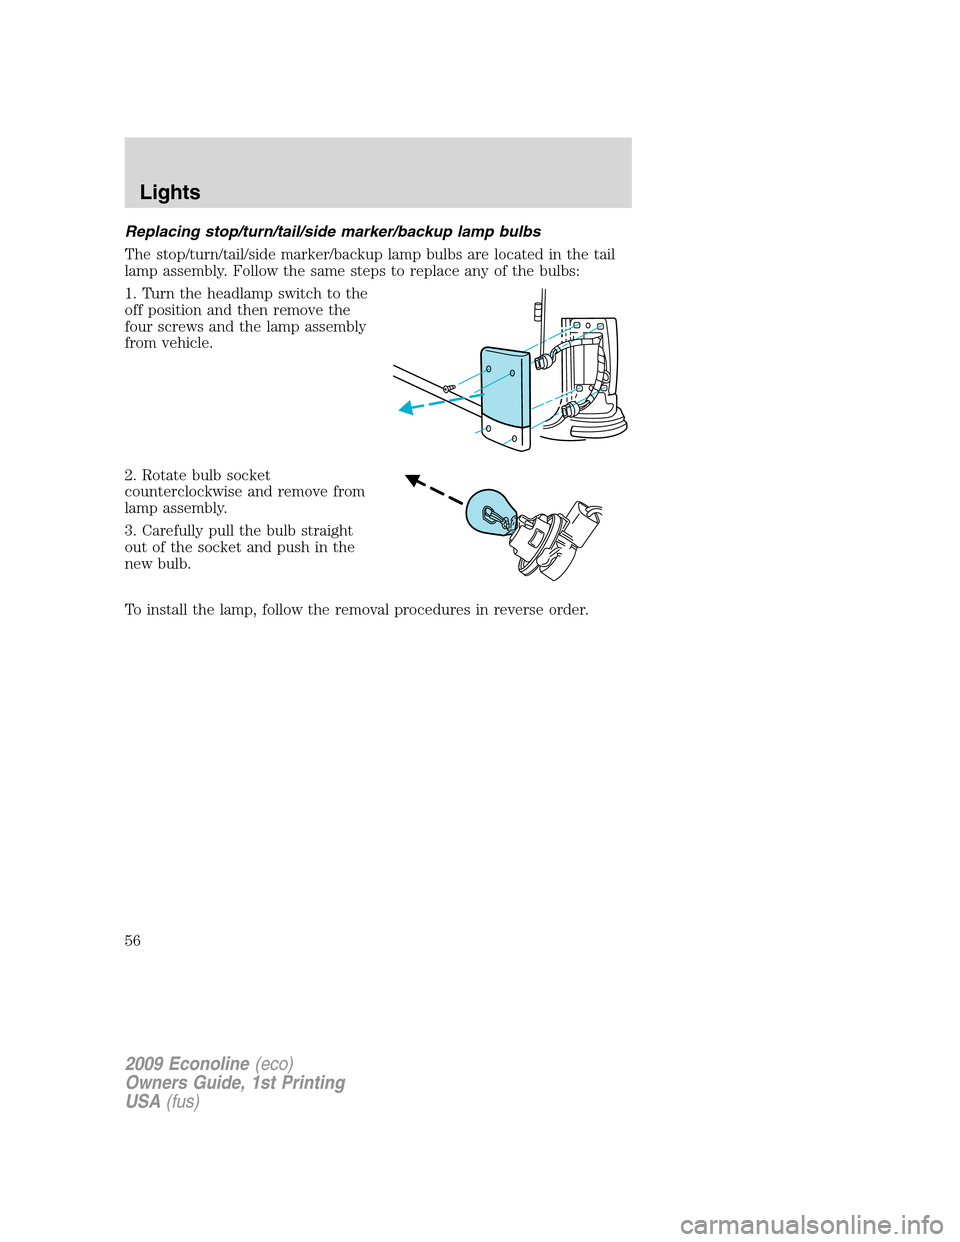
The stop/turn/tail/side marker/backup lamp bulbs are located in the tail
lamp assembly. Follow the same steps to replace any of the bulbs:
1. Turn the headlamp switch to the
off position and then remove the
four screws and the lamp assembly
from vehicle.
2. Rotate bulb socket
counterclockwise and remove from
lamp assembly.
3. Carefully pull the bulb straight
out of the socket and push in the
new bulb.
To install the lamp, follow the removal procedures in reverse order.
2009 Econoline(eco)
Owners Guide, 1st Printing
USA(fus)
Lights
56
Page 64 of 321
The mirror will automatically return to the normal state whenever the
vehicle is placed in R (Reverse) to ensure a bright clear view when
backing up.
Do not block the sensors on the front and back of the interior
rear view mirror since this may impair proper mirror
performance.
Do not clean the housing or glass of any mirror with harsh
abrasives, fuel or other petroleum-based cleaning products.
Note:If equipped with a reverse camera system, a video image will
display in the mirror or the Navigation system display (if equipped)
when the vehicle is put in R (Reverse). As you shift into any other gear
from R (Reverse), the image will remain for a few seconds and then turn
off. Refer toReverse camera systemin theDrivingchapter.
EXTERIOR MIRRORS
Power side view mirrors (if equipped)
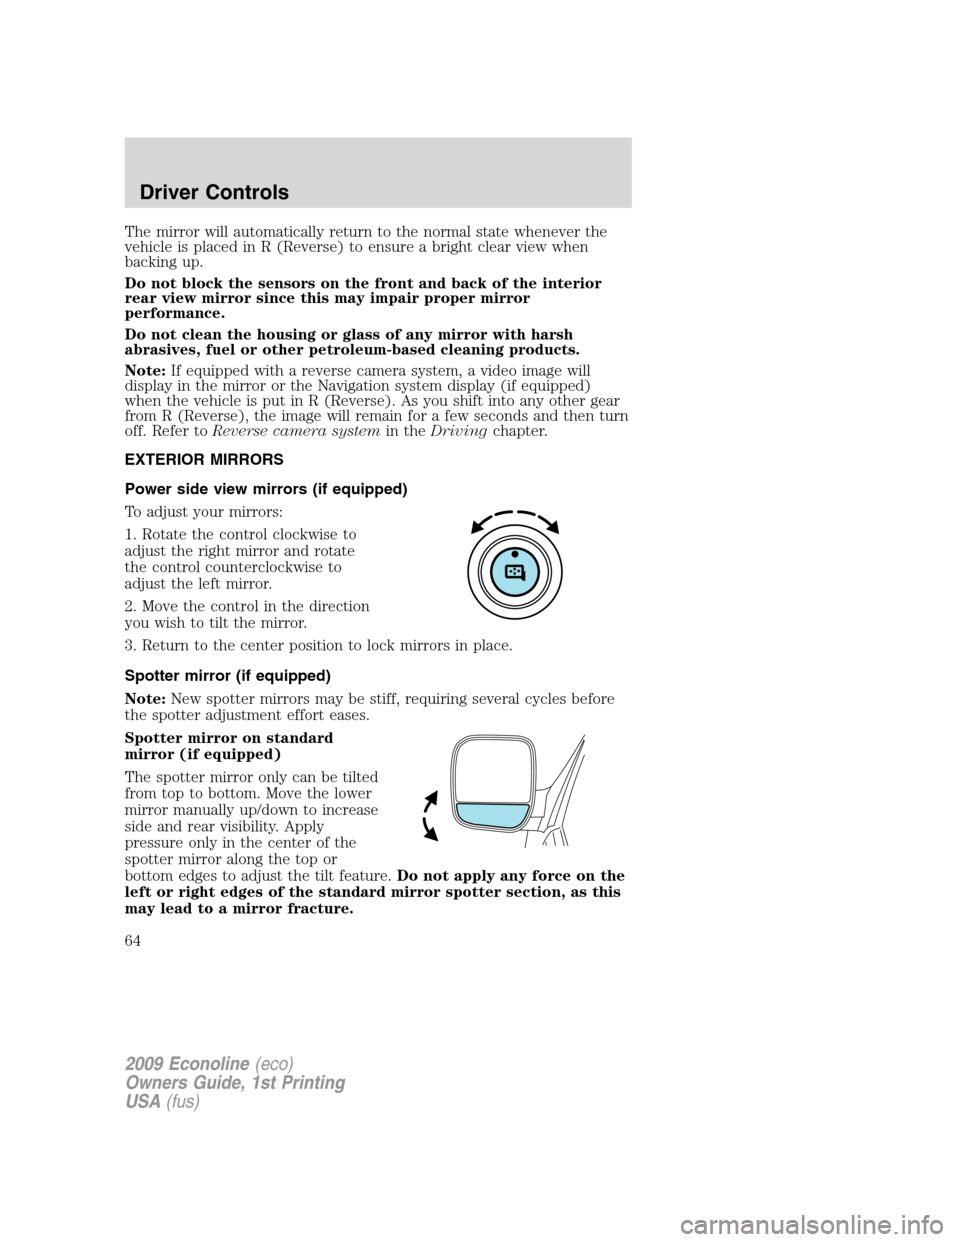
To adjust your mirrors:
1. Rotate the control clockwise to
adjust the right mirror and rotate
the control counterclockwise to
adjust the left mirror.
2. Move the control in the direction
you wish to tilt the mirror.
3. Return to the center position to lock mirrors in place.
Spotter mirror (if equipped)
Note:New spotter mirrors may be stiff, requiring several cycles before
the spotter adjustment effort eases.
Spotter mirror on standard
mirror (if equipped)
The spotter mirror only can be tilted
from top to bottom. Move the lower
mirror manually up/down to increase
side and rear visibility. Apply
pressure only in the center of the
spotter mirror along the top or
bottom edges to adjust the tilt feature.Do not apply any force on the
left or right edges of the standard mirror spotter section, as this
may lead to a mirror fracture.
2009 Econoline(eco)
Owners Guide, 1st Printing
USA(fus)
Driver Controls
64
Page 92 of 321
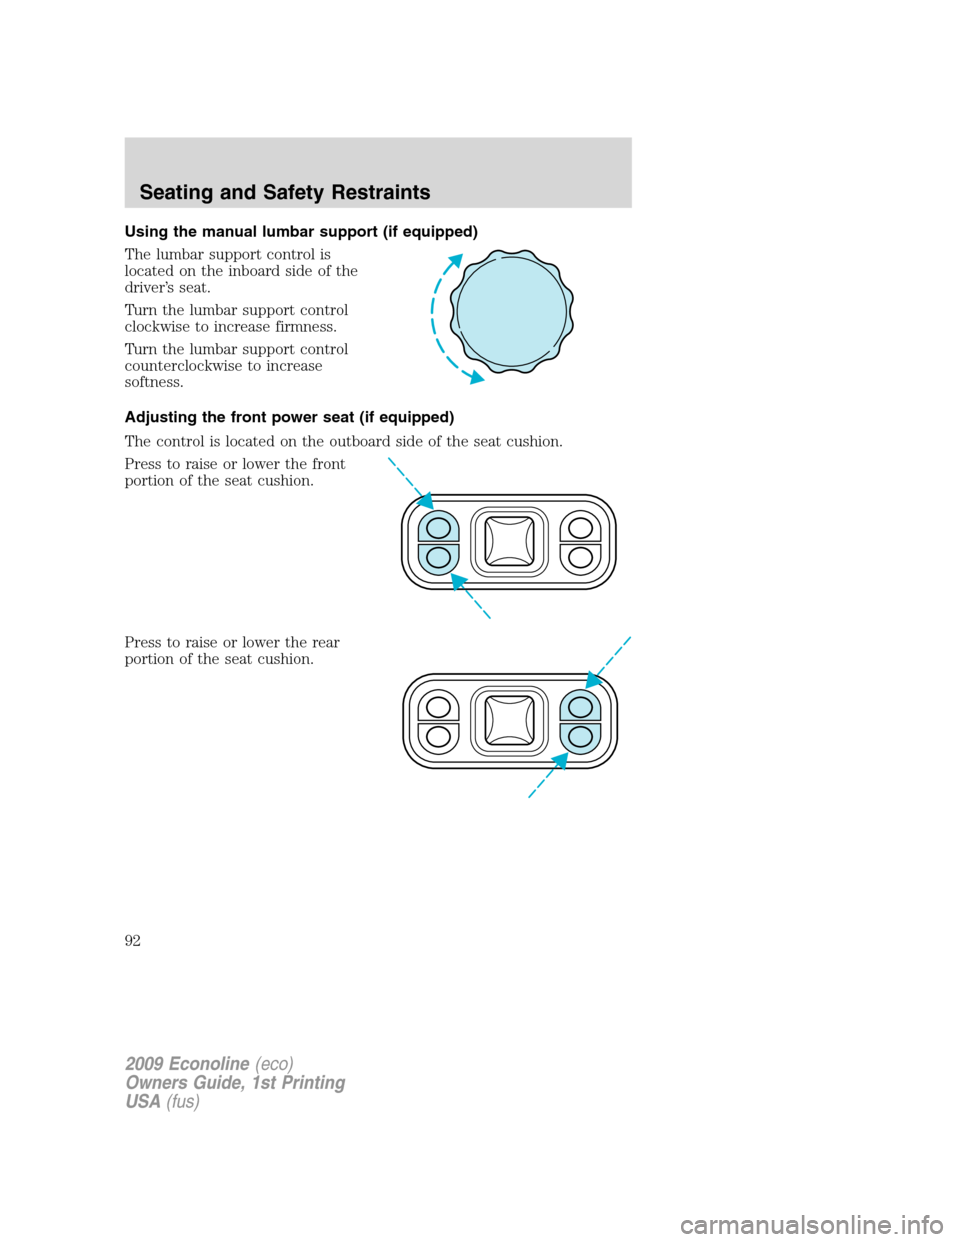
Using the manual lumbar support (if equipped)
The lumbar support control is
located on the inboard side of the
driver’s seat.
Turn the lumbar support control
clockwise to increase firmness.
Turn the lumbar support control
counterclockwise to increase
softness.
Adjusting the front power seat (if equipped)
The control is located on the outboard side of the seat cushion.
Press to raise or lower the front
portion of the seat cushion.
Press to raise or lower the rear
portion of the seat cushion.
2009 Econoline(eco)
Owners Guide, 1st Printing
USA(fus)
Seating and Safety Restraints
92
Page 165 of 321
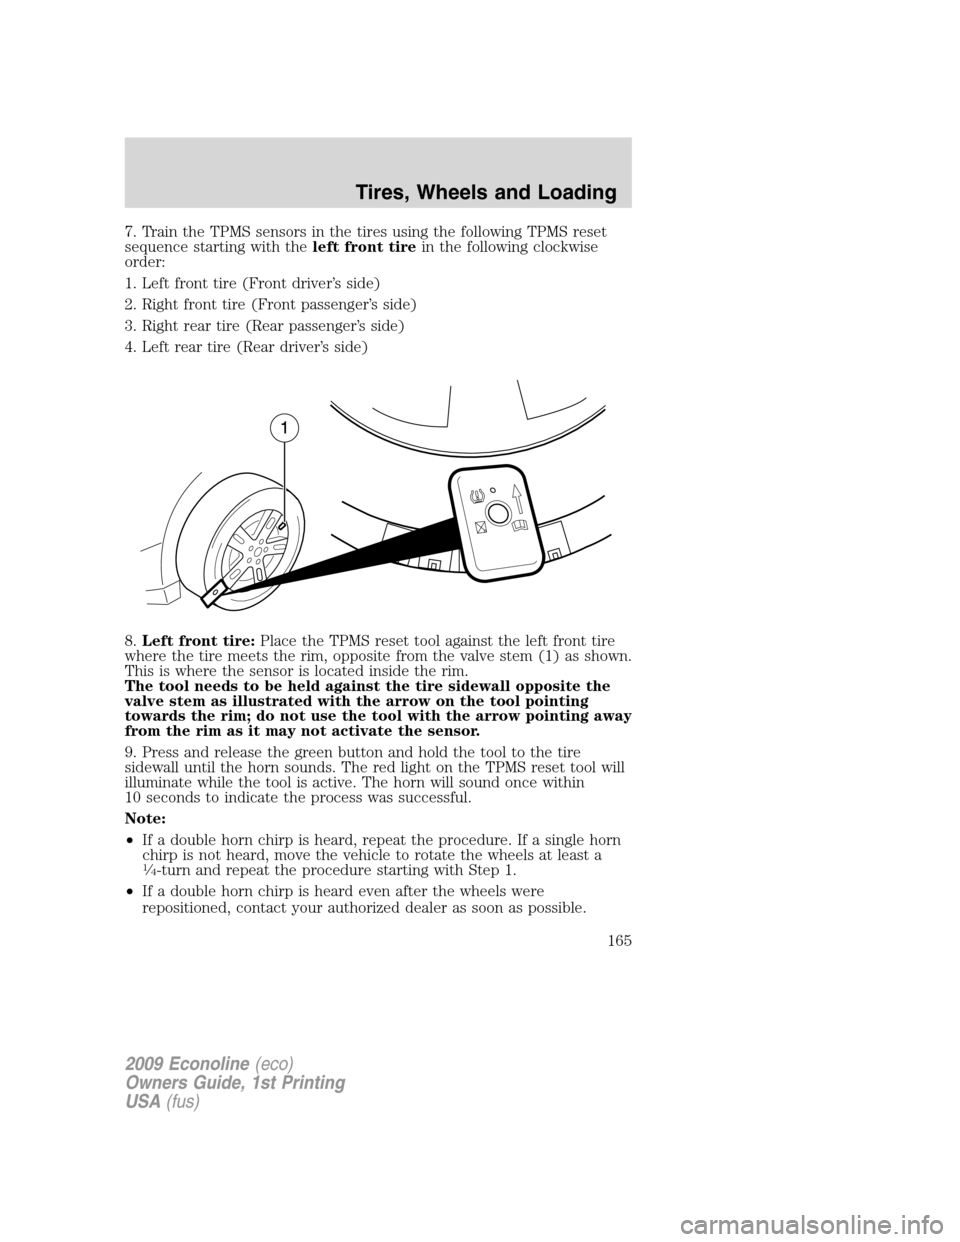
7. Train the TPMS sensors in the tires using the following TPMS reset
sequence starting with theleft front tirein the following clockwise
order:
1. Left front tire (Front driver’s side)
2. Right front tire (Front passenger’s side)
3. Right rear tire (Rear passenger’s side)
4. Left rear tire (Rear driver’s side)
8.Left front tire:Place the TPMS reset tool against the left front tire
where the tire meets the rim, opposite from the valve stem (1) as shown.
This is where the sensor is located inside the rim.
The tool needs to be held against the tire sidewall opposite the
valve stem as illustrated with the arrow on the tool pointing
towards the rim; do not use the tool with the arrow pointing away
from the rim as it may not activate the sensor.
9. Press and release the green button and hold the tool to the tire
sidewall until the horn sounds. The red light on the TPMS reset tool will
illuminate while the tool is active. The horn will sound once within
10 seconds to indicate the process was successful.
Note:
•If a double horn chirp is heard, repeat the procedure. If a single horn
chirp is not heard, move the vehicle to rotate the wheels at least a
1�4-turn and repeat the procedure starting with Step 1.
•If a double horn chirp is heard even after the wheels were
repositioned, contact your authorized dealer as soon as possible.
2009 Econoline(eco)
Owners Guide, 1st Printing
USA(fus)
Tires, Wheels and Loading
165
Page 236 of 321

3. Remove the jack handle from the
right side compartment and insert
the tip of the jack handle through
the access hole and into the tube.
4. Turn the jack handle
counterclockwise until the cable is
slack and the tire can be slid from
under the vehicle.
5. Remove the retainer from the
spare tire.
To stow the cable retainer with the spare removed, turn the jack handle
clockwise until all slack is removed.
Tire change procedure
WARNING:To help prevent the vehicle from moving when you
change a tire, be sure the parking brake is set, then block (in
both directions) the wheel that is diagonally opposite (other side and
end of the vehicle) to the tire being changed.
WARNING:If the vehicle slips off the jack, you or someone else
could be seriously injured.
WARNING:Do not attempt to change a tire on the side of the
vehicle close to moving traffic. Pull far enough off the road to
avoid the danger of being hit when operating the jack or changing the
wheel.
1. Block the wheel that is diagonally opposite the tire you are changing.
On E-450 vehicles, the parking brake is on the transmission. Therefore,
the vehicle will not be prevented from moving when a rear wheel is
lifted, even if the parking brake is applied. Be sure to block both
directions of the wheel that is diagonally opposite to the wheel that is
being lifted.
2. Remove the spare tire and jack from the storage location.
2009 Econoline(eco)
Owners Guide, 1st Printing
USA(fus)
Roadside Emergencies
236
Page 237 of 321
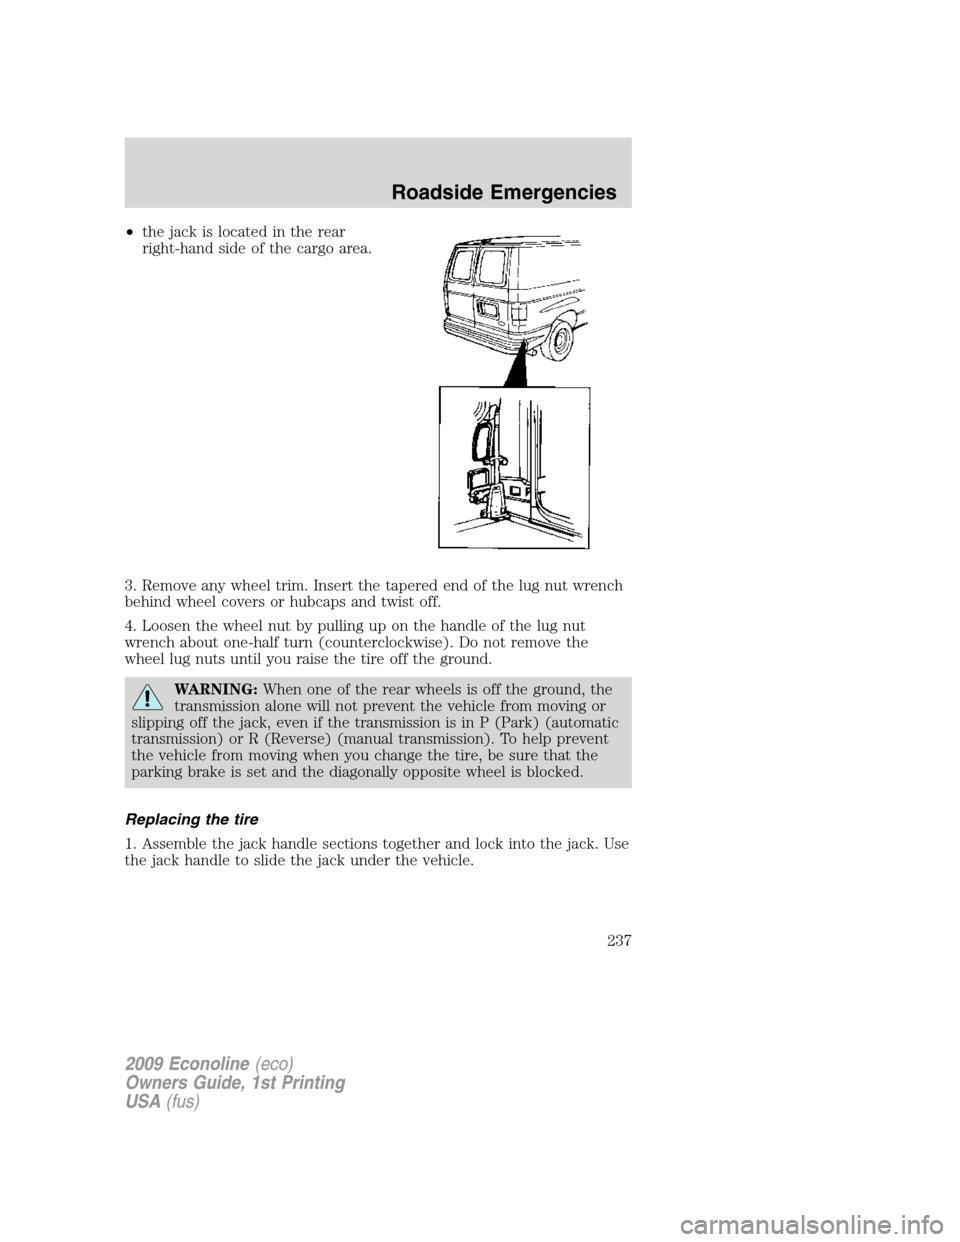
•the jack is located in the rear
right-hand side of the cargo area.
3. Remove any wheel trim. Insert the tapered end of the lug nut wrench
behind wheel covers or hubcaps and twist off.
4. Loosen the wheel nut by pulling up on the handle of the lug nut
wrench about one-half turn (counterclockwise). Do not remove the
wheel lug nuts until you raise the tire off the ground.
WARNING:When one of the rear wheels is off the ground, the
transmission alone will not prevent the vehicle from moving or
slipping off the jack, even if the transmission is in P (Park) (automatic
transmission) or R (Reverse) (manual transmission). To help prevent
the vehicle from moving when you change the tire, be sure that the
parking brake is set and the diagonally opposite wheel is blocked.
Replacing the tire
1. Assemble the jack handle sections together and lock into the jack. Use
the jack handle to slide the jack under the vehicle.
2009 Econoline(eco)
Owners Guide, 1st Printing
USA(fus)
Roadside Emergencies
237
Page 239 of 321
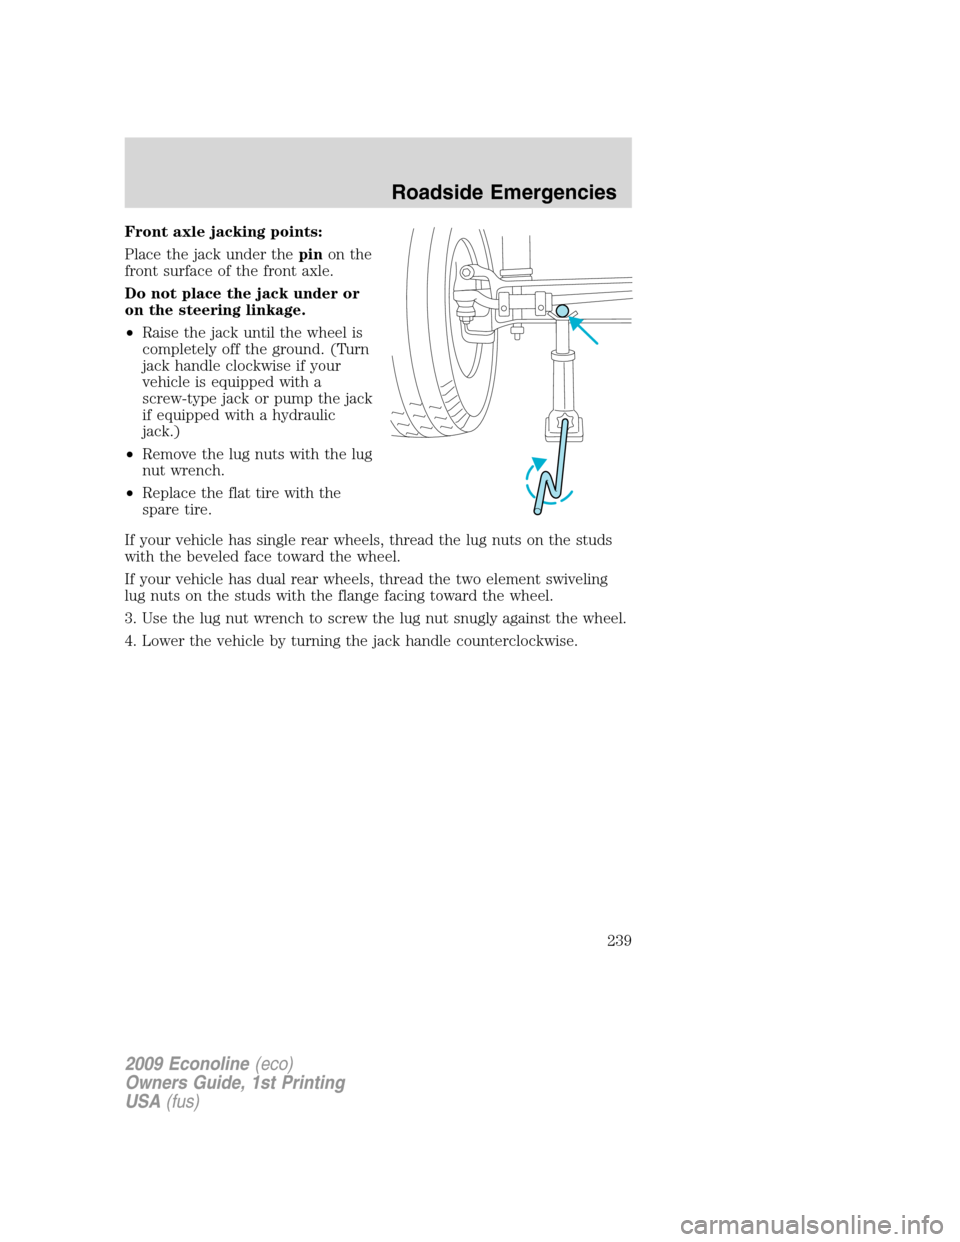
Front axle jacking points:
Place the jack under thepinon the
front surface of the front axle.
Do not place the jack under or
on the steering linkage.
•Raise the jack until the wheel is
completely off the ground. (Turn
jack handle clockwise if your
vehicle is equipped with a
screw-type jack or pump the jack
if equipped with a hydraulic
jack.)
•Remove the lug nuts with the lug
nut wrench.
•Replace the flat tire with the
spare tire.
If your vehicle has single rear wheels, thread the lug nuts on the studs
with the beveled face toward the wheel.
If your vehicle has dual rear wheels, thread the two element swiveling
lug nuts on the studs with the flange facing toward the wheel.
3. Use the lug nut wrench to screw the lug nut snugly against the wheel.
4. Lower the vehicle by turning the jack handle counterclockwise.
2009 Econoline(eco)
Owners Guide, 1st Printing
USA(fus)
Roadside Emergencies
239
Page 240 of 321
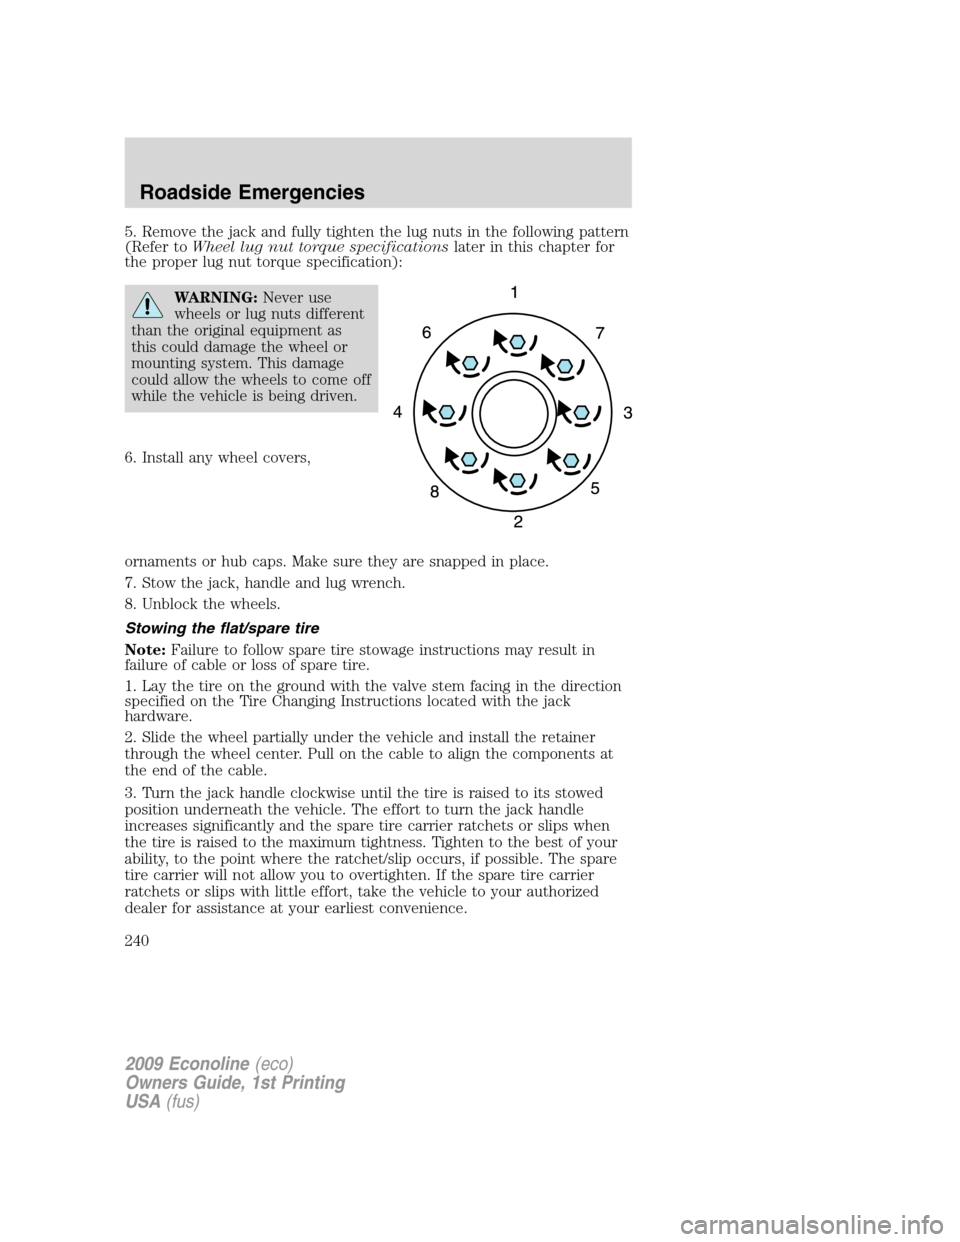
5. Remove the jack and fully tighten the lug nuts in the following pattern
(Refer toWheel lug nut torque specificationslater in this chapter for
the proper lug nut torque specification):
WARNING:Never use
wheels or lug nuts different
than the original equipment as
this could damage the wheel or
mounting system. This damage
could allow the wheels to come off
while the vehicle is being driven.
6. Install any wheel covers,
ornaments or hub caps. Make sure they are snapped in place.
7. Stow the jack, handle and lug wrench.
8. Unblock the wheels.
Stowing the flat/spare tire
Note:Failure to follow spare tire stowage instructions may result in
failure of cable or loss of spare tire.
1. Lay the tire on the ground with the valve stem facing in the direction
specified on the Tire Changing Instructions located with the jack
hardware.
2. Slide the wheel partially under the vehicle and install the retainer
through the wheel center. Pull on the cable to align the components at
the end of the cable.
3. Turn the jack handle clockwise until the tire is raised to its stowed
position underneath the vehicle. The effort to turn the jack handle
increases significantly and the spare tire carrier ratchets or slips when
the tire is raised to the maximum tightness. Tighten to the best of your
ability, to the point where the ratchet/slip occurs, if possible. The spare
tire carrier will not allow you to overtighten. If the spare tire carrier
ratchets or slips with little effort, take the vehicle to your authorized
dealer for assistance at your earliest convenience.
2009 Econoline(eco)
Owners Guide, 1st Printing
USA(fus)
Roadside Emergencies
240