display FORD E SERIES 2015 4.G User Guide
[x] Cancel search | Manufacturer: FORD, Model Year: 2015, Model line: E SERIES, Model: FORD E SERIES 2015 4.GPages: 360, PDF Size: 3.28 MB
Page 77 of 360
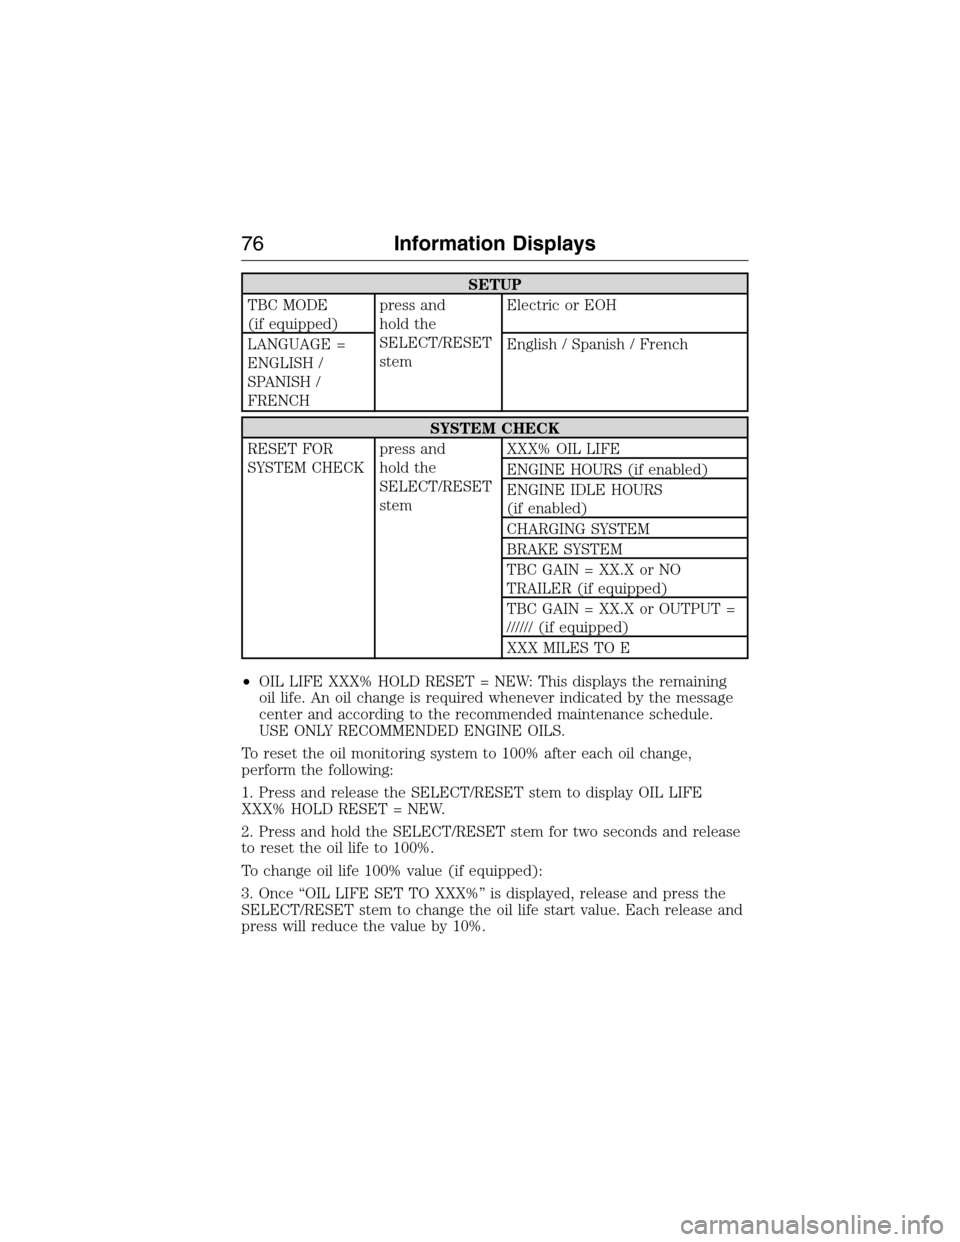
SETUP
TBC MODE
(if equipped)press and
hold the
SELECT/RESET
stemElectric or EOH
LANGUAGE =
ENGLISH /
SPANISH /
FRENCHEnglish / Spanish / French
SYSTEM CHECK
RESET FOR
SYSTEM CHECKpress and
hold the
SELECT/RESET
stemXXX% OIL LIFE
ENGINE HOURS (if enabled)
ENGINE IDLE HOURS
(if enabled)
CHARGING SYSTEM
BRAKE SYSTEM
TBC GAIN = XX.X or NO
TRAILER (if equipped)
TBC GAIN = XX.X or OUTPUT =
////// (if equipped)
XXX MILES TO E
•OIL LIFE XXX% HOLD RESET = NEW: This displays the remaining
oil life. An oil change is required whenever indicated by the message
center and according to the recommended maintenance schedule.
USE ONLY RECOMMENDED ENGINE OILS.
To reset the oil monitoring system to 100% after each oil change,
perform the following:
1. Press and release the SELECT/RESET stem to display OIL LIFE
XXX% HOLD RESET = NEW.
2. Press and hold the SELECT/RESET stem for two seconds and release
to reset the oil life to 100%.
To change oil life 100% value (if equipped):
3. Once “OIL LIFE SET TO XXX%” is displayed, release and press the
SELECT/RESET stem to change the oil life start value. Each release and
press will reduce the value by 10%.
76Information Displays
2015 Econoline(eco)
Owners Guide gf, 1st Printing, June 2014
USA(fus)
Page 78 of 360
•UNITS ENG / METRIC: Displays the current units in English or Metric.
•AUTOLOCK: This feature automatically locks all vehicle doors when
the vehicle is shifted into any gear, putting the vehicle in motion.
•AUTOUNLOCK: This feature automatically unlocks all vehicle doors
when the driver’s door is opened within 10 minutes of the ignition
being turned off.
•COMPASS (if equipped): Displays the vehicle’s heading direction.
The compass reading may be affected when you drive near large
buildings, bridges, power lines and powerful broadcast antenna. Magnetic
or metallic objects placed in, on or near the vehicle may also affect
compass accuracy. If the compass appears to be inaccurate, a manual
calibration may be necessary. Refer toCompass zone adjustment
Compass zone adjustment
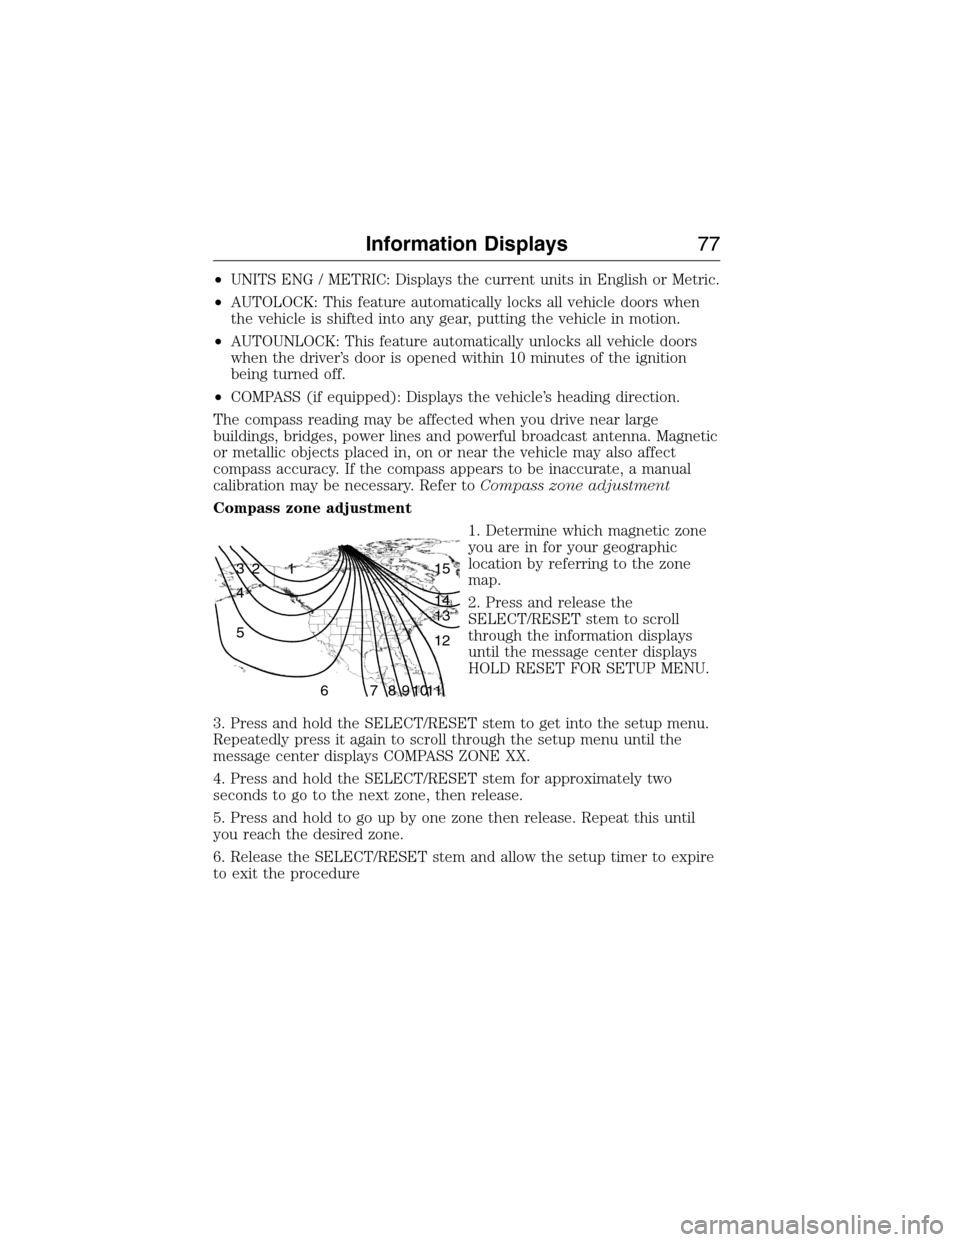
1. Determine which magnetic zone
you are in for your geographic
location by referring to the zone
map.
2. Press and release the
SELECT/RESET stem to scroll
through the information displays
until the message center displays
HOLD RESET FOR SETUP MENU.
3. Press and hold the SELECT/RESET stem to get into the setup menu.
Repeatedly press it again to scroll through the setup menu until the
message center displays COMPASS ZONE XX.
4. Press and hold the SELECT/RESET stem for approximately two
seconds to go to the next zone, then release.
5. Press and hold to go up by one zone then release. Repeat this until
you reach the desired zone.
6. Release the SELECT/RESET stem and allow the setup timer to expire
to exit the procedure
1 2 3
4
5
6 7 8 9 101112 13 14 15
Information Displays77
2015 Econoline(eco)
Owners Guide gf, 1st Printing, June 2014
USA(fus)
Page 79 of 360
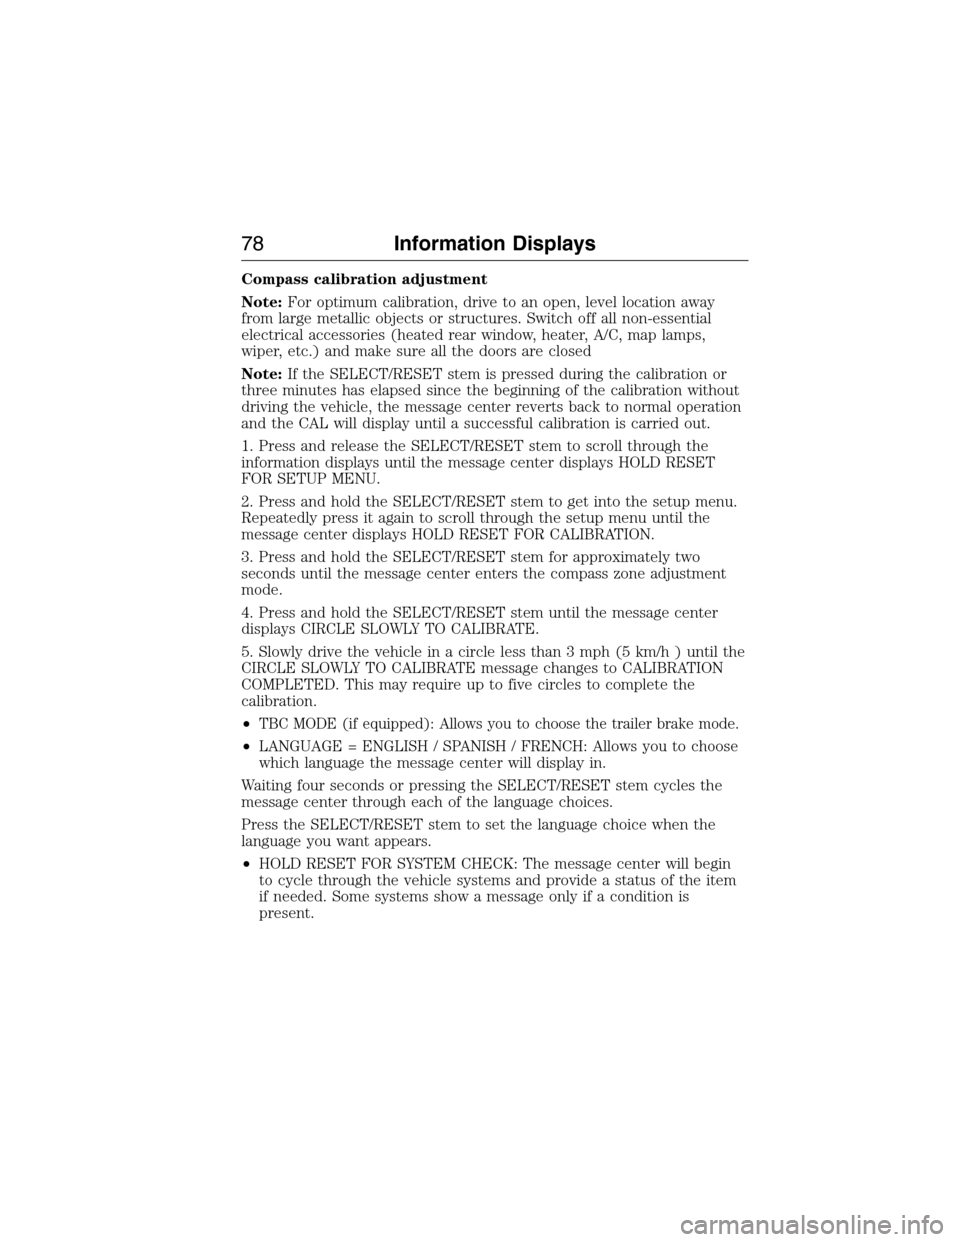
Compass calibration adjustment
Note:For optimum calibration, drive to an open, level location away
from large metallic objects or structures. Switch off all non-essential
electrical accessories (heated rear window, heater, A/C, map lamps,
wiper, etc.) and make sure all the doors are closed
Note:If the SELECT/RESET stem is pressed during the calibration or
three minutes has elapsed since the beginning of the calibration without
driving the vehicle, the message center reverts back to normal operation
and the CAL will display until a successful calibration is carried out.
1. Press and release the SELECT/RESET stem to scroll through the
information displays until the message center displays HOLD RESET
FOR SETUP MENU.
2. Press and hold the SELECT/RESET stem to get into the setup menu.
Repeatedly press it again to scroll through the setup menu until the
message center displays HOLD RESET FOR CALIBRATION.
3. Press and hold the SELECT/RESET stem for approximately two
seconds until the message center enters the compass zone adjustment
mode.
4. Press and hold the SELECT/RESET stem until the message center
displays CIRCLE SLOWLY TO CALIBRATE.
5. Slowly drive the vehicle in a circle less than 3 mph (5 km/h ) until the
CIRCLE SLOWLY TO CALIBRATE message changes to CALIBRATION
COMPLETED. This may require up to five circles to complete the
calibration.
•
TBC MODE (if equipped): Allows you to choose the trailer brake mode.
•LANGUAGE = ENGLISH / SPANISH / FRENCH: Allows you to choose
which language the message center will display in.
Waiting four seconds or pressing the SELECT/RESET stem cycles the
message center through each of the language choices.
Press the SELECT/RESET stem to set the language choice when the
language you want appears.
•HOLD RESET FOR SYSTEM CHECK: The message center will begin
to cycle through the vehicle systems and provide a status of the item
if needed. Some systems show a message only if a condition is
present.
78Information Displays
2015 Econoline(eco)
Owners Guide gf, 1st Printing, June 2014
USA(fus)
Page 80 of 360
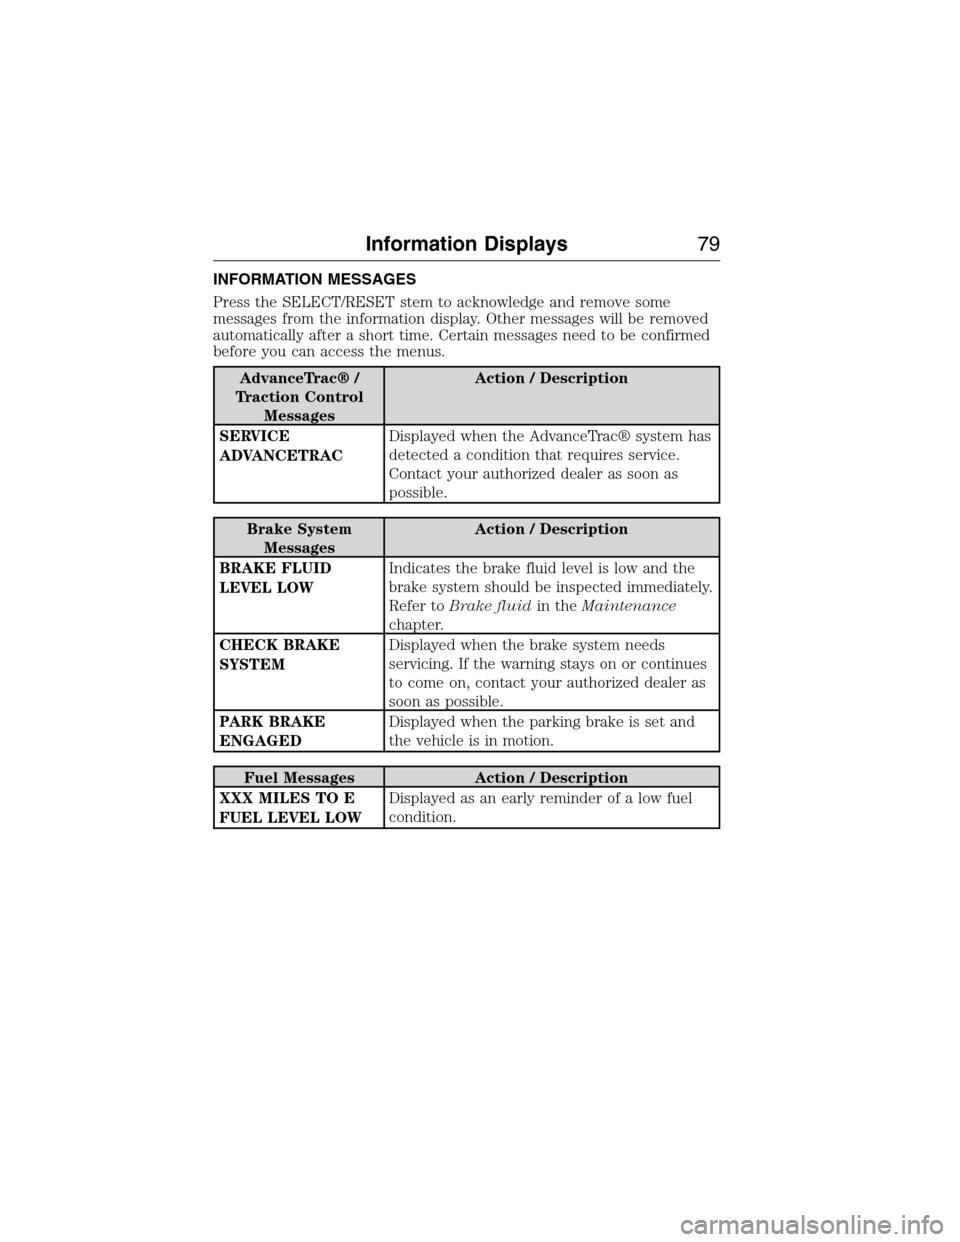
INFORMATION MESSAGES
Press the SELECT/RESET stem to acknowledge and remove some
messages from the information display. Other messages will be removed
automatically after a short time. Certain messages need to be confirmed
before you can access the menus.
AdvanceTrac® /
Traction Control
MessagesAction / Description
SERVICE
ADVANCETRACDisplayed when the AdvanceTrac® system has
detected a condition that requires service.
Contact your authorized dealer as soon as
possible.
Brake System
MessagesAction / Description
BRAKE FLUID
LEVEL LOWIndicates the brake fluid level is low and the
brake system should be inspected immediately.
Refer toBrake fluidin theMaintenance
chapter.
CHECK BRAKE
SYSTEMDisplayed when the brake system needs
servicing. If the warning stays on or continues
to come on, contact your authorized dealer as
soon as possible.
PARK BRAKE
ENGAGEDDisplayed when the parking brake is set and
the vehicle is in motion.
Fuel Messages Action / Description
XXX MILES TO E
FUEL LEVEL LOWDisplayed as an early reminder of a low fuel
condition.
Information Displays79
2015 Econoline(eco)
Owners Guide gf, 1st Printing, June 2014
USA(fus)
Page 81 of 360
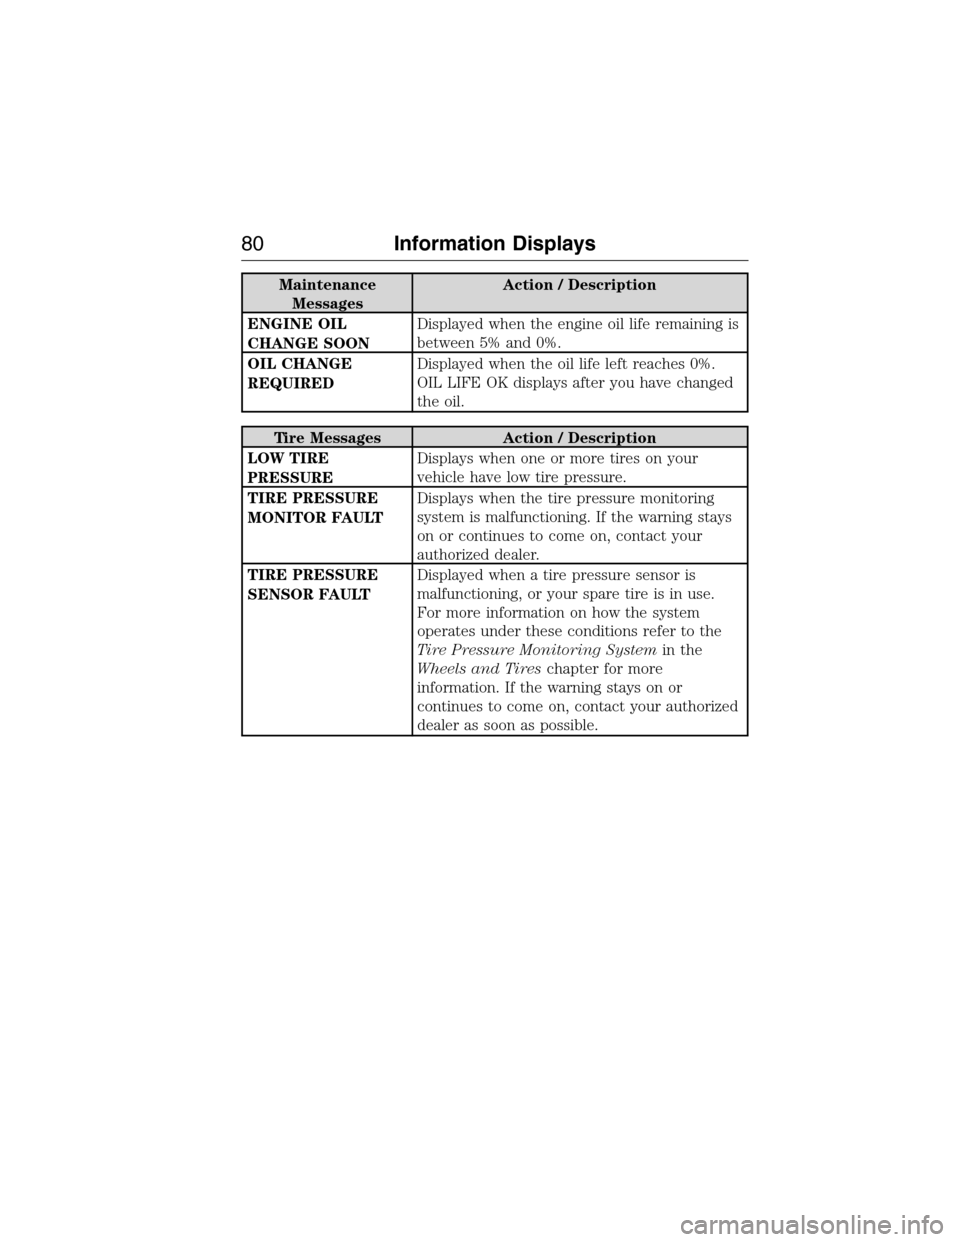
Maintenance
MessagesAction / Description
ENGINE OIL
CHANGE SOONDisplayed when the engine oil life remaining is
between 5% and 0%.
OIL CHANGE
REQUIREDDisplayed when the oil life left reaches 0%.
OIL LIFE OK displays after you have changed
the oil.
Tire Messages Action / Description
LOW TIRE
PRESSUREDisplays when one or more tires on your
vehicle have low tire pressure.
TIRE PRESSURE
MONITOR FAULTDisplays when the tire pressure monitoring
system is malfunctioning. If the warning stays
on or continues to come on, contact your
authorized dealer.
TIRE PRESSURE
SENSOR FAULTDisplayed when a tire pressure sensor is
malfunctioning, or your spare tire is in use.
For more information on how the system
operates under these conditions refer to the
Tire Pressure Monitoring Systemin the
Wheels and Tireschapter for more
information. If the warning stays on or
continues to come on, contact your authorized
dealer as soon as possible.
80Information Displays
2015 Econoline(eco)
Owners Guide gf, 1st Printing, June 2014
USA(fus)
Page 82 of 360
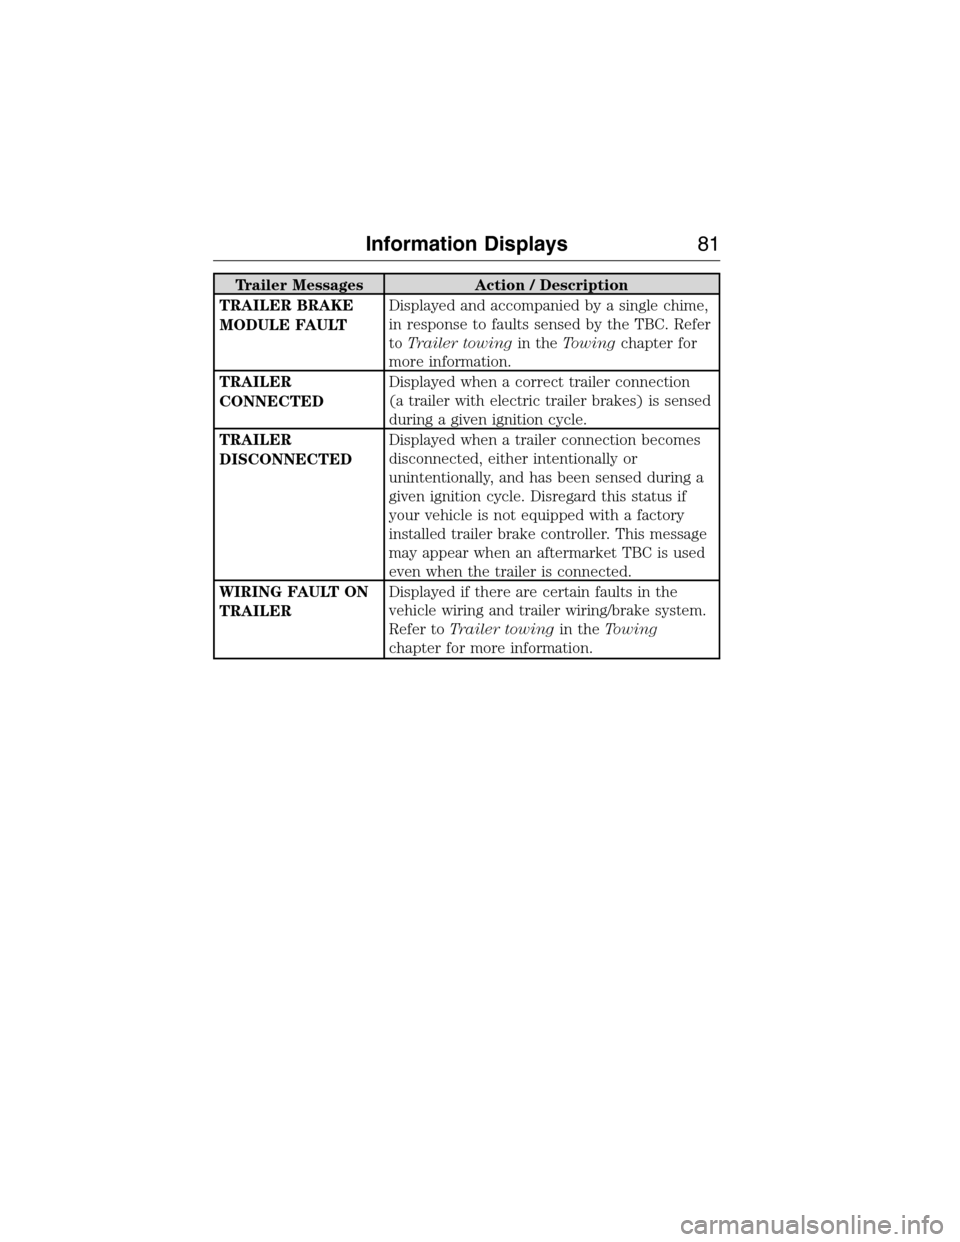
Trailer Messages Action / Description
TRAILER BRAKE
MODULE FAULTDisplayed and accompanied by a single chime,
in response to faults sensed by the TBC. Refer
toTrailer towingin theTowingchapter for
more information.
TRAILER
CONNECTEDDisplayed when a correct trailer connection
(a trailer with electric trailer brakes) is sensed
during a given ignition cycle.
TRAILER
DISCONNECTEDDisplayed when a trailer connection becomes
disconnected, either intentionally or
unintentionally, and has been sensed during a
given ignition cycle. Disregard this status if
your vehicle is not equipped with a factory
installed trailer brake controller. This message
may appear when an aftermarket TBC is used
even when the trailer is connected.
WIRING FAULT ON
TRAILERDisplayed if there are certain faults in the
vehicle wiring and trailer wiring/brake system.
Refer toTrailer towingin theTowing
chapter for more information.
Information Displays81
2015 Econoline(eco)
Owners Guide gf, 1st Printing, June 2014
USA(fus)
Page 132 of 360
Separate functioning brake systems are required for safe control
of towed vehicles and trailers weighing more than 1500 pounds
(680 kilograms) when loaded.
Integrated Trailer Brake Controller (If Equipped)
WARNING:The Ford TBC has only been verified to be
compatible with trailers having electric-actuated drum brakes
(one to four axles) and some electric-over-hydraulic (EOH) brakes. It
will not activate hydraulic surge-style trailer brakes. It is the
responsibility of the customer to ensure that the trailer brakes are
adjusted appropriately, functioning normally and all electric connections
are properly made. Failure to do so may result in loss of vehicle
control, crash or serious injury.
When used properly, the trailer brake controller assists in smooth and
effective trailer braking by powering the trailer’s electric or
electric-over-hydraulic brakes with a proportional output based on the
towing vehicle’s brake pressure.
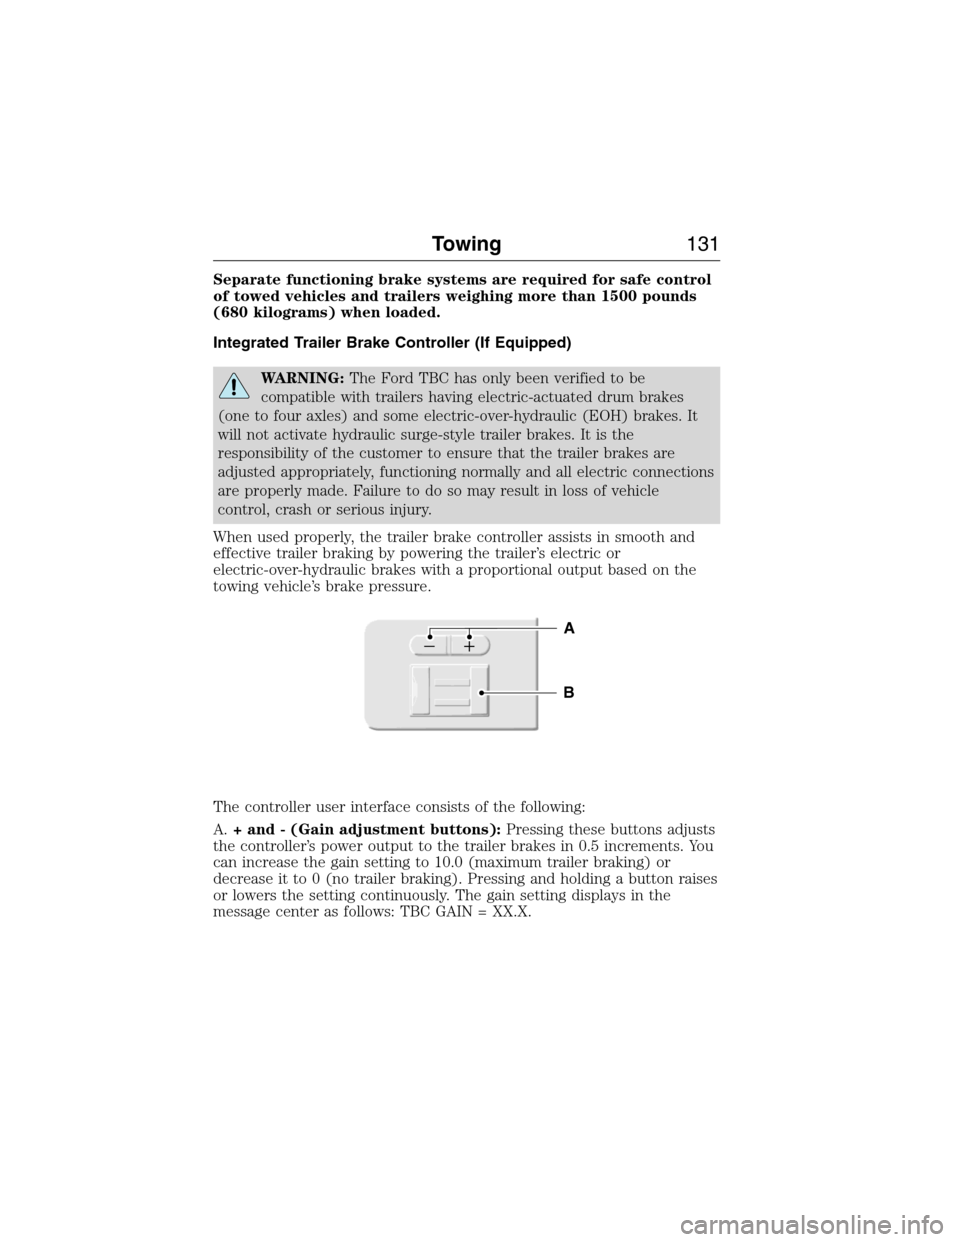
The controller user interface consists of the following:
A.+ and - (Gain adjustment buttons):Pressing these buttons adjusts
the controller’s power output to the trailer brakes in 0.5 increments. You
can increase the gain setting to 10.0 (maximum trailer braking) or
decrease it to 0 (no trailer braking). Pressing and holding a button raises
or lowers the setting continuously. The gain setting displays in the
message center as follows: TBC GAIN = XX.X.
B
A
Towing131
2015 Econoline(eco)
Owners Guide gf, 1st Printing, June 2014
USA(fus)
Page 133 of 360

The controller shows gain setting, output bar graph, and trailer
connectivity status in the information display. They appear in the
information display as follows:
•TBC GAIN = XX.X NO TRAILER:Shows the current gain setting
during a given ignition cycle and when adjusting the gain. This also
displays if you use the manual control lever or make gain adjustments
with no trailer connected.
•TBC GAIN = XX.X OUTPUT=//////:Displays when you push
your vehicle’s brake pedal, or when you use the manual control. Bar
indicators illuminate in the information display to indicate the amount
of power going to the trailer brakes relative to the brake pedal or
manual control input. One bar indicates the least amount of output;
six bars indicate maximum output.
•TRAILER CONNECTED:Displays when the system senses a
correct trailer wiring connection (a trailer with electric trailer brakes)
during a given ignition cycle.
•TRAILER DISCONNECTED:Displays, accompanied by a single
audible chime, when the system senses a trailer connection and then
a disconnection, either intentional or unintentional, during a given
ignition cycle. It also displays if a truck or trailer-wiring fault occurs
causing the trailer to appear disconnected. This message can also
display if you use the manual control lever without a trailer
connected.
B.Manual control lever:Slide the control lever to the left to turn on
the trailer’s electric brakes independent of the tow vehicle’s brakes. See
the followingProcedure for adjusting gainsection for instructions on
proper use of this feature. If you use the manual control while the brake
is also applied, the greater of the two inputs determines the power sent
to the trailer brakes.
•Stop lamps:Using the manual control lever illuminates both the
trailer brake lamps and your vehicle brake lamps except the center
high-mount stop lamp, if you make the proper electrical connection
to the trailer. Pressing your vehicle brake pedal also illuminates both
trailer and vehicle brake lamps.
132Towing
2015 Econoline(eco)
Owners Guide gf, 1st Printing, June 2014
USA(fus)
Page 134 of 360
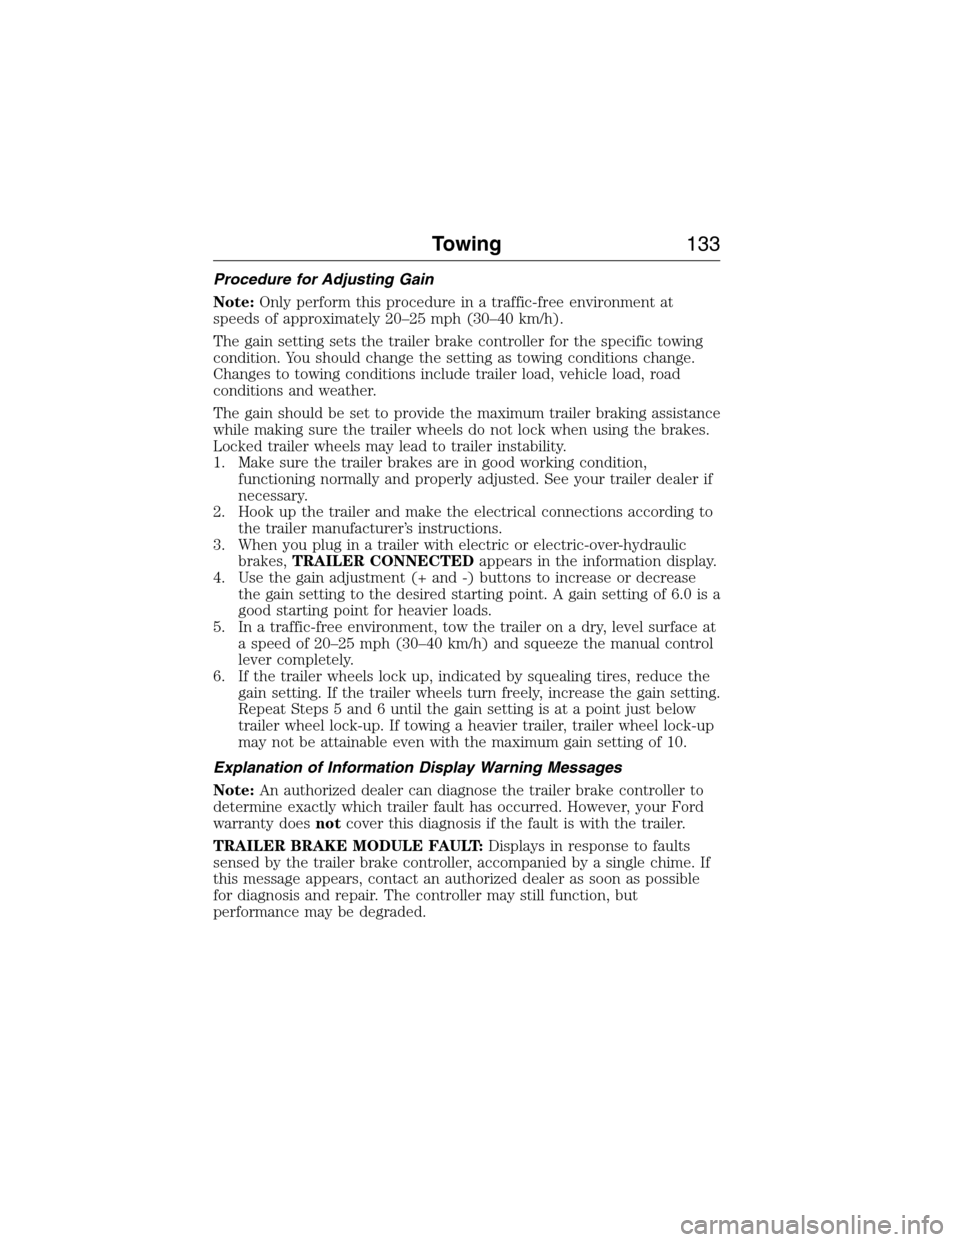
Procedure for Adjusting Gain
Note:Only perform this procedure in a traffic-free environment at
speeds of approximately 20–25 mph (30–40 km/h).
The gain setting sets the trailer brake controller for the specific towing
condition. You should change the setting as towing conditions change.
Changes to towing conditions include trailer load, vehicle load, road
conditions and weather.
The gain should be set to provide the maximum trailer braking assistance
while making sure the trailer wheels do not lock when using the brakes.
Locked trailer wheels may lead to trailer instability.
1. Make sure the trailer brakes are in good working condition,
functioning normally and properly adjusted. See your trailer dealer if
necessary.
2. Hook up the trailer and make the electrical connections according to
the trailer manufacturer’s instructions.
3. When you plug in a trailer with electric or electric-over-hydraulic
brakes,TRAILER CONNECTEDappears in the information display.
4. Use the gain adjustment (+ and -) buttons to increase or decrease
the gain setting to the desired starting point. A gain setting of 6.0 is a
good starting point for heavier loads.
5. In a traffic-free environment, tow the trailer on a dry, level surface at
a speed of 20–25 mph (30–40 km/h) and squeeze the manual control
lever completely.
6. If the trailer wheels lock up, indicated by squealing tires, reduce the
gain setting. If the trailer wheels turn freely, increase the gain setting.
Repeat Steps 5 and 6 until the gain setting is at a point just below
trailer wheel lock-up. If towing a heavier trailer, trailer wheel lock-up
may not be attainable even with the maximum gain setting of 10.
Explanation of Information Display Warning Messages
Note:An authorized dealer can diagnose the trailer brake controller to
determine exactly which trailer fault has occurred. However, your Ford
warranty doesnotcover this diagnosis if the fault is with the trailer.
TRAILER BRAKE MODULE FAULT:Displays in response to faults
sensed by the trailer brake controller, accompanied by a single chime. If
this message appears, contact an authorized dealer as soon as possible
for diagnosis and repair. The controller may still function, but
performance may be degraded.
Towing133
2015 Econoline(eco)
Owners Guide gf, 1st Printing, June 2014
USA(fus)
Page 135 of 360
WIRING FAULT ON TRAILER:Displays when there is a short circuit
on the electric brake output wire. If theWIRING FAULT ON TRAILER
message displays, accompanied by a single chime, with no trailer
connected, the problem is with your vehicle wiring between the trailer
brake controller and the 7–pin connector at the bumper. If the message
only displays with a trailer connected, the problem is with the trailer
wiring. Consult your trailer dealer for assistance. This can be a short to
ground (such as a chaffed wire), short to voltage (such as a pulled pin
on trailer emergency breakaway battery) or the trailer brakes may be
drawing too much current.
Points to Remember
Note:Do not attempt removal of the trailer brake controller without
consulting theWorkshop Manual.Damage to the unit may result.
•Adjust gain setting before using the trailer brake controller for the
first time.
•Adjust gain setting, using the procedure above, whenever road,
weather and trailer or vehicle loading conditions change from when
the gain was initially set.
•Only use the manual control lever for proper adjustment of the gain
during trailer setup. Misuse, such as application during trailer sway,
could cause instability of trailer or tow vehicle.
•Avoid towing in adverse weather conditions. The trailer brake
controller does not provide anti-lock control of the trailer wheels.
Trailer wheels can lock up on slippery surfaces, resulting in reduced
stability of trailer and tow vehicle.
•The trailer brake controller is equipped with a feature that reduces
output at vehicle speeds below 11 mph (18 km/h) so trailer and
vehicle braking is not jerky or harsh. This feature is only available
when applying the brakes using your vehicle’s brake pedal, not the
controller.
•The controller interacts with the brake control system and powertrain
control system of your vehicle to provide the best performance on
different road conditions.
•Your vehicle’s brake system and the trailer brake system work
independently of each other. Changing the gain setting on the
controller does not affect the operation of your vehicle’s brakes
whether you attach a trailer or not.
•When you turn the engine off, the controller output is disabled and
the display and module shut down. The controller module and display
turn on when you turn the ignition on.
•The trailer brake controller is only a factory-installed or
dealer-installed item. Ford is not responsible for warranty or
performance of the controller due to misuse or customer installation.
134Towing
2015 Econoline(eco)
Owners Guide gf, 1st Printing, June 2014
USA(fus)