FORD E SERIES 2015 4.G Owners Manual
Manufacturer: FORD, Model Year: 2015, Model line: E SERIES, Model: FORD E SERIES 2015 4.GPages: 360, PDF Size: 3.28 MB
Page 191 of 360
CHANGING THE WIPER BLADES
Replace wiper blades at least once per year for optimum performance.
To replace the wiper blades:
1. Fold back the wiper arm and
position the wiper blade at a right
angle to the wiper arm.
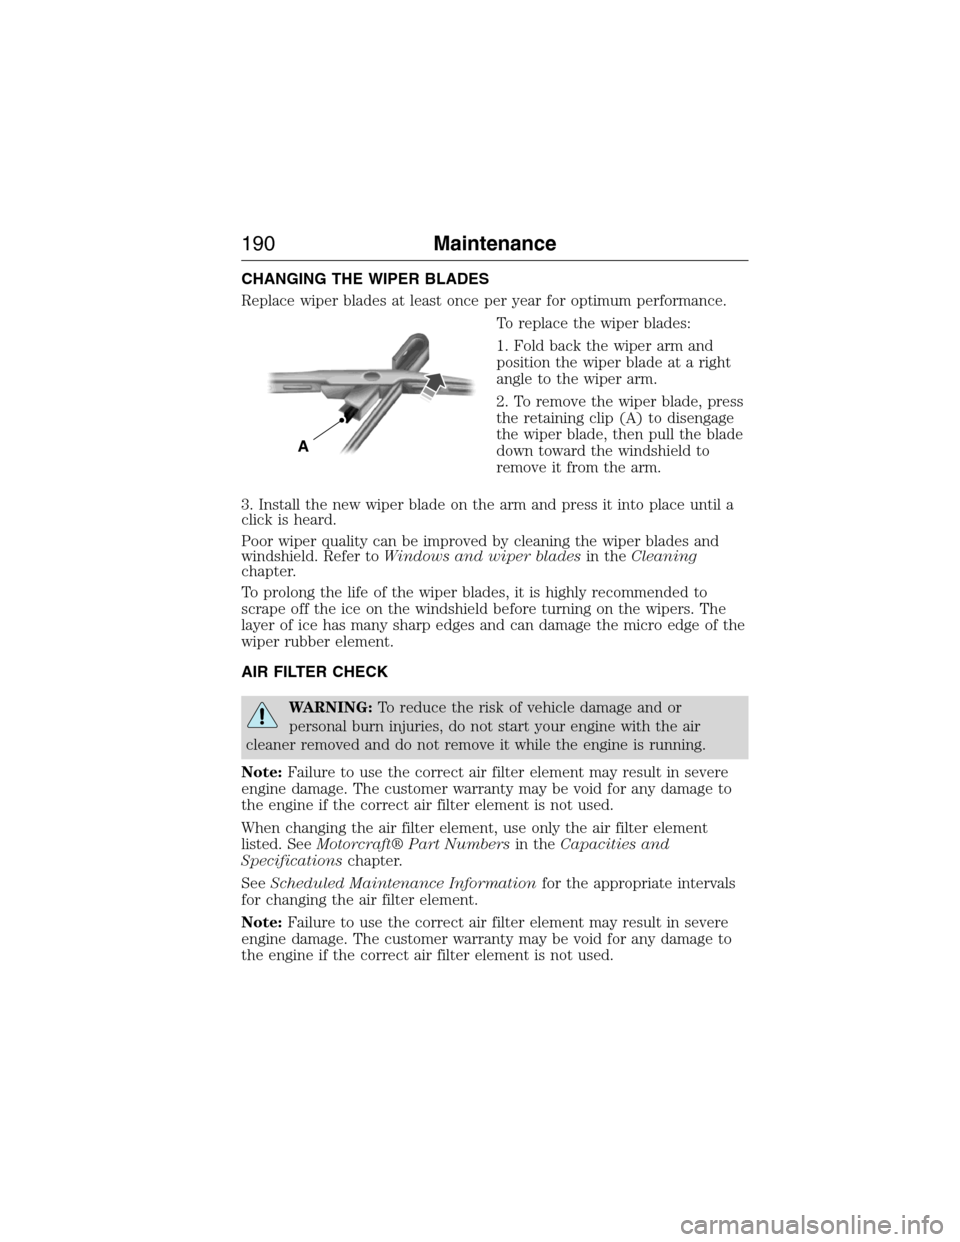
2. To remove the wiper blade, press
the retaining clip (A) to disengage
the wiper blade, then pull the blade
down toward the windshield to
remove it from the arm.
3. Install the new wiper blade on the arm and press it into place until a
click is heard.
Poor wiper quality can be improved by cleaning the wiper blades and
windshield. Refer toWindows and wiper bladesin theCleaning
chapter.
To prolong the life of the wiper blades, it is highly recommended to
scrape off the ice on the windshield before turning on the wipers. The
layer of ice has many sharp edges and can damage the micro edge of the
wiper rubber element.
AIR FILTER CHECK
WARNING:To reduce the risk of vehicle damage and or
personal burn injuries, do not start your engine with the air
cleaner removed and do not remove it while the engine is running.
Note:Failure to use the correct air filter element may result in severe
engine damage. The customer warranty may be void for any damage to
the engine if the correct air filter element is not used.
When changing the air filter element, use only the air filter element
listed. SeeMotorcraft® Part Numbersin theCapacities and
Specificationschapter.
SeeScheduled Maintenance Informationfor the appropriate intervals
for changing the air filter element.
Note:Failure to use the correct air filter element may result in severe
engine damage. The customer warranty may be void for any damage to
the engine if the correct air filter element is not used.
A
190Maintenance
2015 Econoline(eco)
Owners Guide gf, 1st Printing, June 2014
USA(fus)
Page 192 of 360
Changing the Air Filter Element
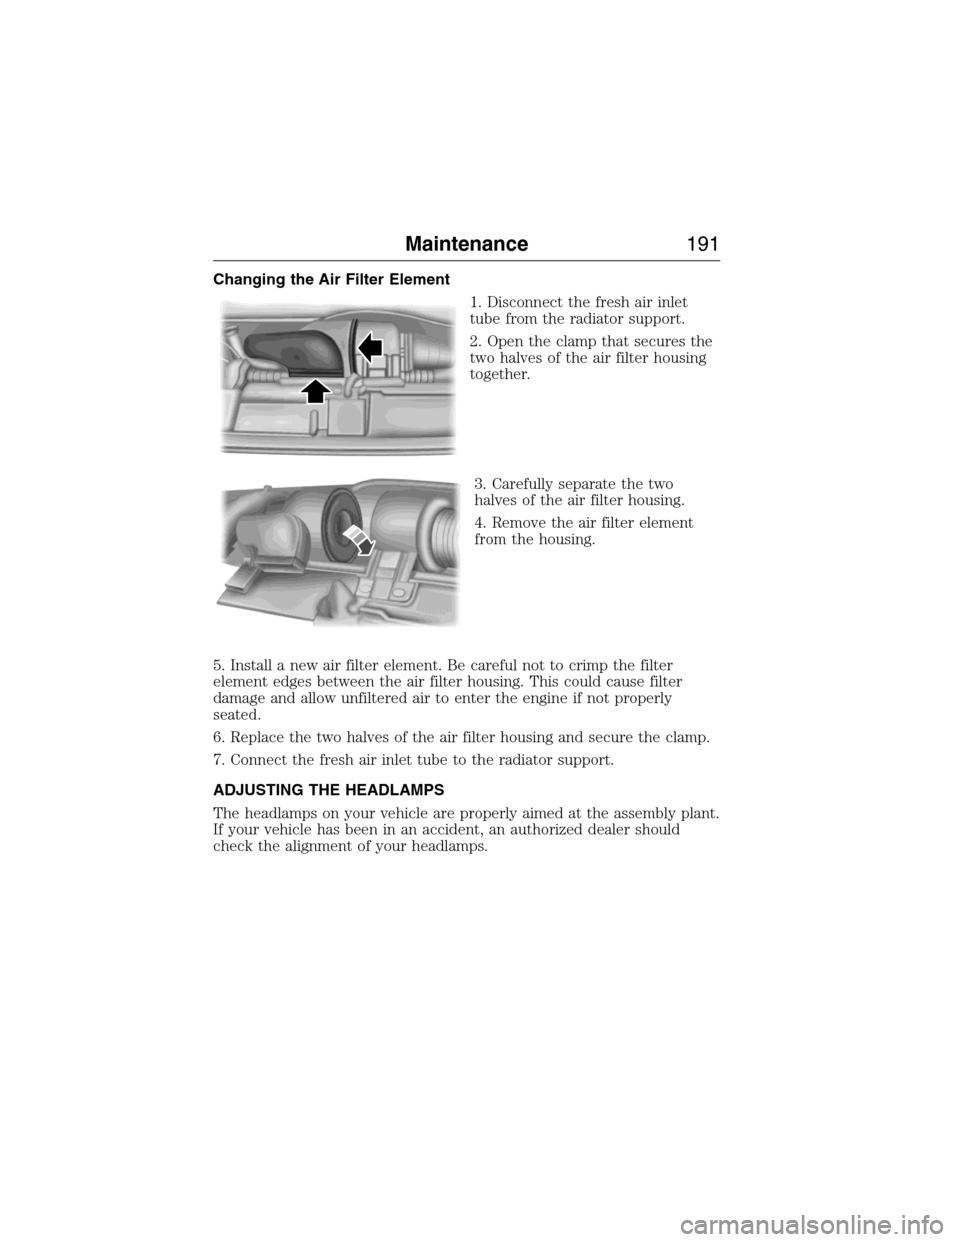
1. Disconnect the fresh air inlet
tube from the radiator support.
2. Open the clamp that secures the
two halves of the air filter housing
together.
3. Carefully separate the two
halves of the air filter housing.
4. Remove the air filter element
from the housing.
5. Install a new air filter element. Be careful not to crimp the filter
element edges between the air filter housing. This could cause filter
damage and allow unfiltered air to enter the engine if not properly
seated.
6. Replace the two halves of the air filter housing and secure the clamp.
7. Connect the fresh air inlet tube to the radiator support.
ADJUSTING THE HEADLAMPS
The headlamps on your vehicle are properly aimed at the assembly plant.
If your vehicle has been in an accident, an authorized dealer should
check the alignment of your headlamps.
Maintenance191
2015 Econoline(eco)
Owners Guide gf, 1st Printing, June 2014
USA(fus)
Page 193 of 360
Vertical and Horizontal Aim Adjustment (Sealed Beam Headlamps)
The headlamps on your vehicle are intended to be aimed using
mechanical aimers. If mechanical aimers are used and the cross-car sight
line is in any way blocked, set the legs of the universal adaptor all to the
same setting, such that the cross-car sight line is no longer blocked, per
the instructions for the brand of mechanical aimer used. You can also
aim the headlamps visually using the procedure below.
To adjust the headlamps:
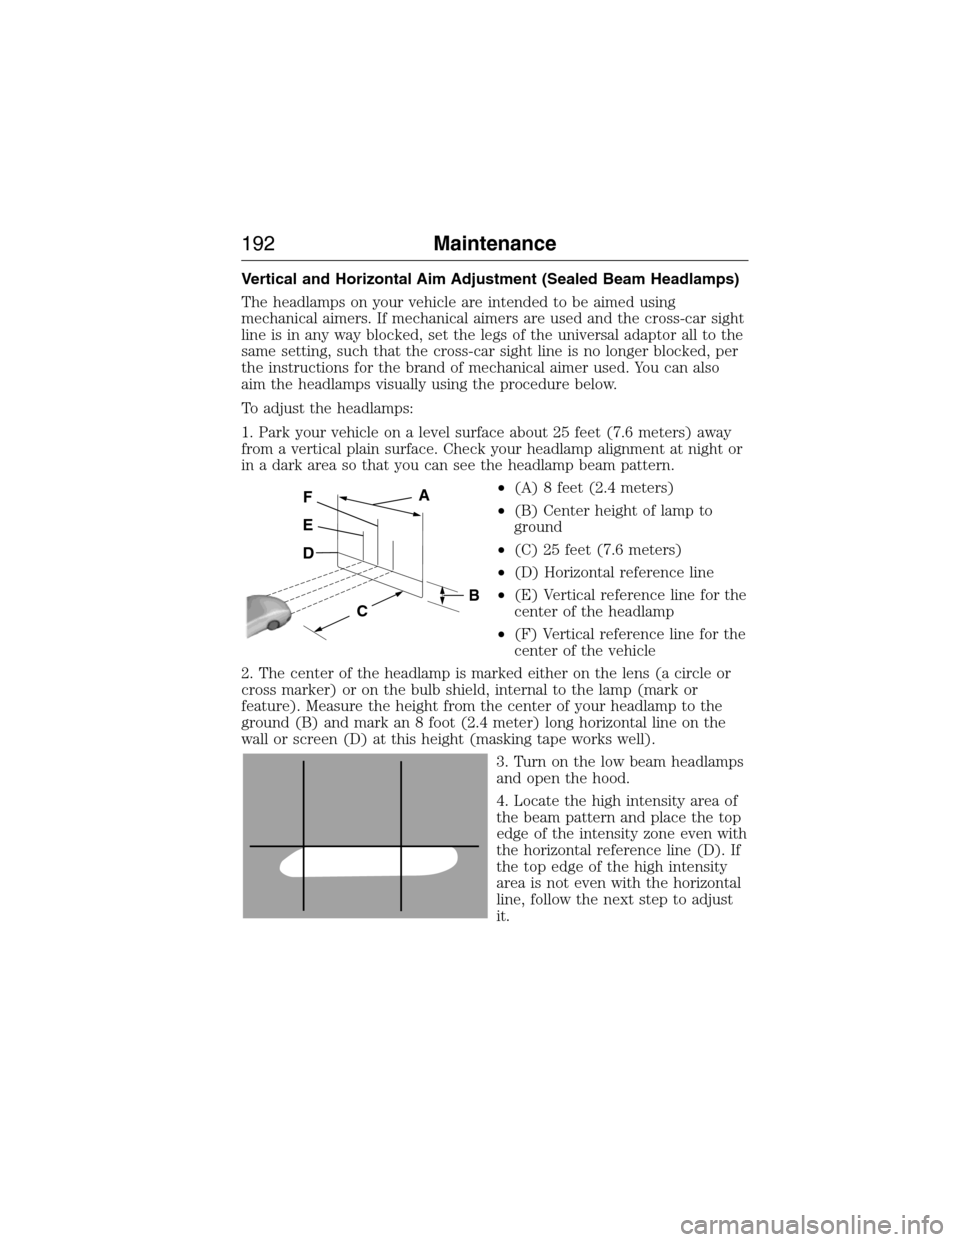
1. Park your vehicle on a level surface about 25 feet (7.6 meters) away
from a vertical plain surface. Check your headlamp alignment at night or
in a dark area so that you can see the headlamp beam pattern.
•(A) 8 feet (2.4 meters)
•(B) Center height of lamp to
ground
•(C) 25 feet (7.6 meters)
•(D) Horizontal reference line
•(E) Vertical reference line for the
center of the headlamp
•(F) Vertical reference line for the
center of the vehicle
2. The center of the headlamp is marked either on the lens (a circle or
cross marker) or on the bulb shield, internal to the lamp (mark or
feature). Measure the height from the center of your headlamp to the
ground (B) and mark an 8 foot (2.4 meter) long horizontal line on the
wall or screen (D) at this height (masking tape works well).
3. Turn on the low beam headlamps
and open the hood.
4. Locate the high intensity area of
the beam pattern and place the top
edge of the intensity zone even with
the horizontal reference line (D). If
the top edge of the high intensity
area is not even with the horizontal
line, follow the next step to adjust
it.
B
D
E
FA
C
192Maintenance
2015 Econoline(eco)
Owners Guide gf, 1st Printing, June 2014
USA(fus)
Page 194 of 360
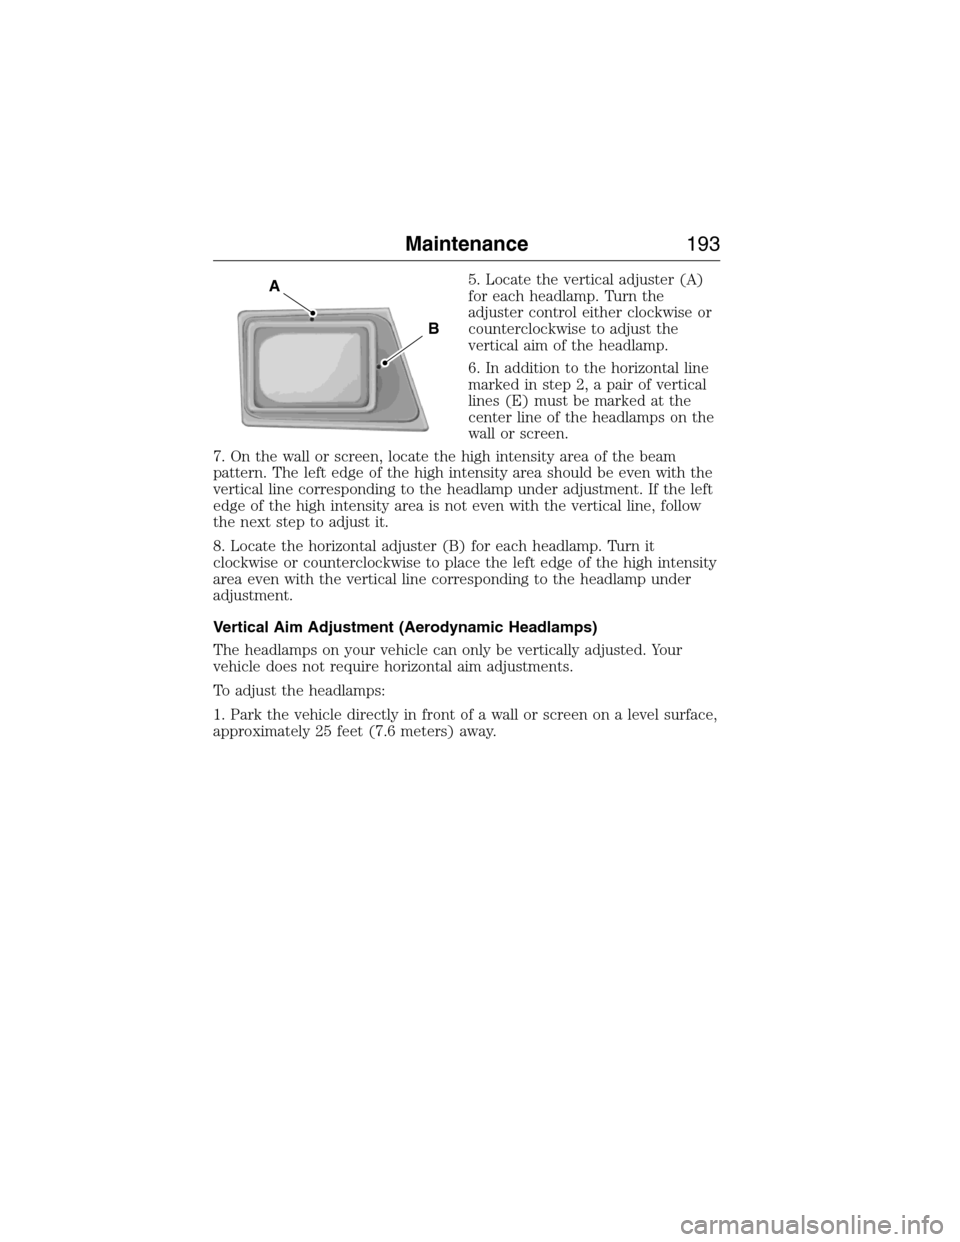
5. Locate the vertical adjuster (A)
for each headlamp. Turn the
adjuster control either clockwise or
counterclockwise to adjust the
vertical aim of the headlamp.
6. In addition to the horizontal line
marked in step 2, a pair of vertical
lines (E) must be marked at the
center line of the headlamps on the
wall or screen.
7. On the wall or screen, locate the high intensity area of the beam
pattern. The left edge of the high intensity area should be even with the
vertical line corresponding to the headlamp under adjustment. If the left
edge of the high intensity area is not even with the vertical line, follow
the next step to adjust it.
8. Locate the horizontal adjuster (B) for each headlamp. Turn it
clockwise or counterclockwise to place the left edge of the high intensity
area even with the vertical line corresponding to the headlamp under
adjustment.
Vertical Aim Adjustment (Aerodynamic Headlamps)
The headlamps on your vehicle can only be vertically adjusted. Your
vehicle does not require horizontal aim adjustments.
To adjust the headlamps:
1. Park the vehicle directly in front of a wall or screen on a level surface,
approximately 25 feet (7.6 meters) away.A
B
Maintenance193
2015 Econoline(eco)
Owners Guide gf, 1st Printing, June 2014
USA(fus)
Page 195 of 360
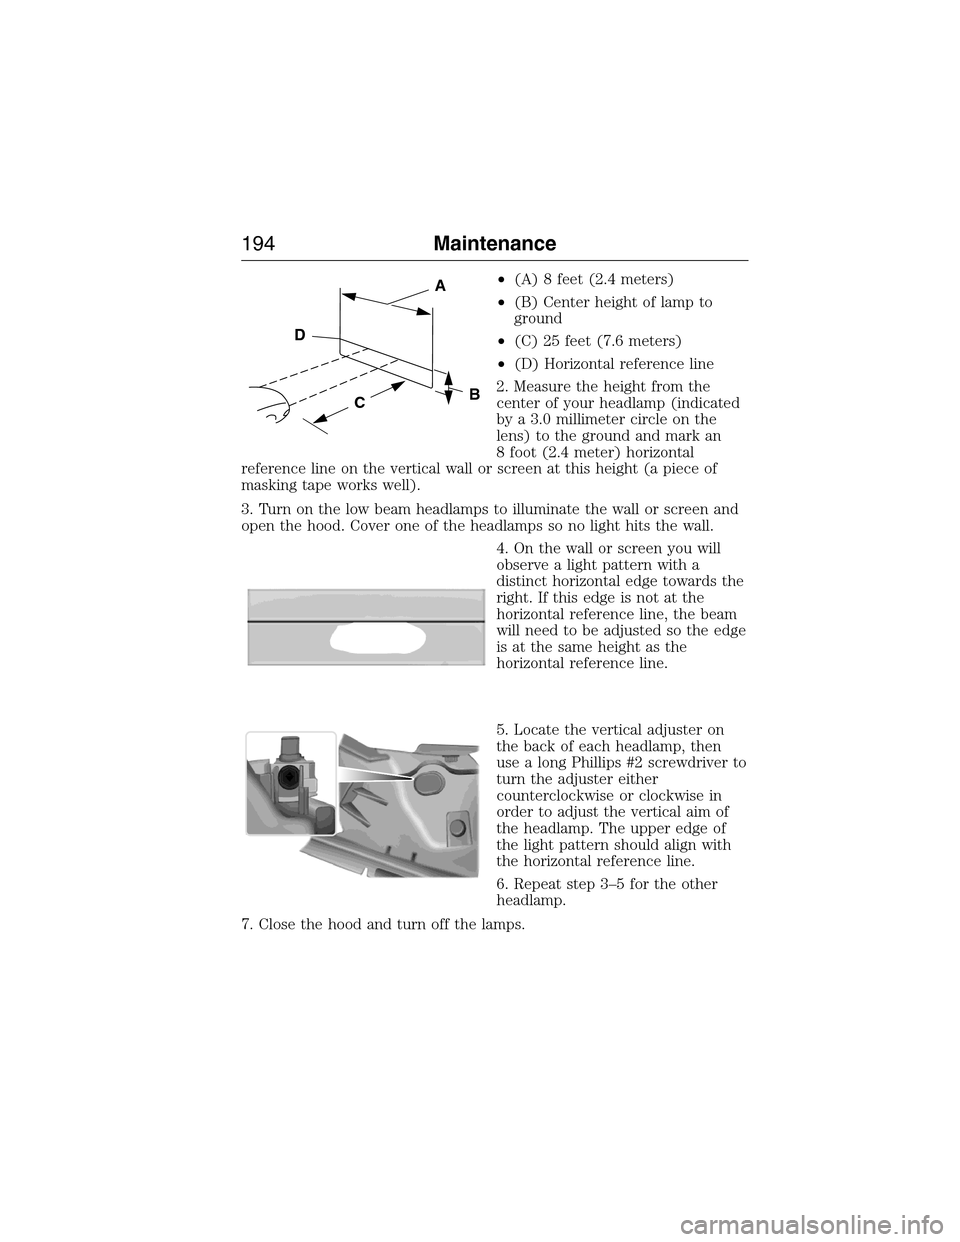
•(A) 8 feet (2.4 meters)
•(B) Center height of lamp to
ground
•(C) 25 feet (7.6 meters)
•(D) Horizontal reference line
2. Measure the height from the
center of your headlamp (indicated
by a 3.0 millimeter circle on the
lens) to the ground and mark an
8 foot (2.4 meter) horizontal
reference line on the vertical wall or screen at this height (a piece of
masking tape works well).
3. Turn on the low beam headlamps to illuminate the wall or screen and
open the hood. Cover one of the headlamps so no light hits the wall.
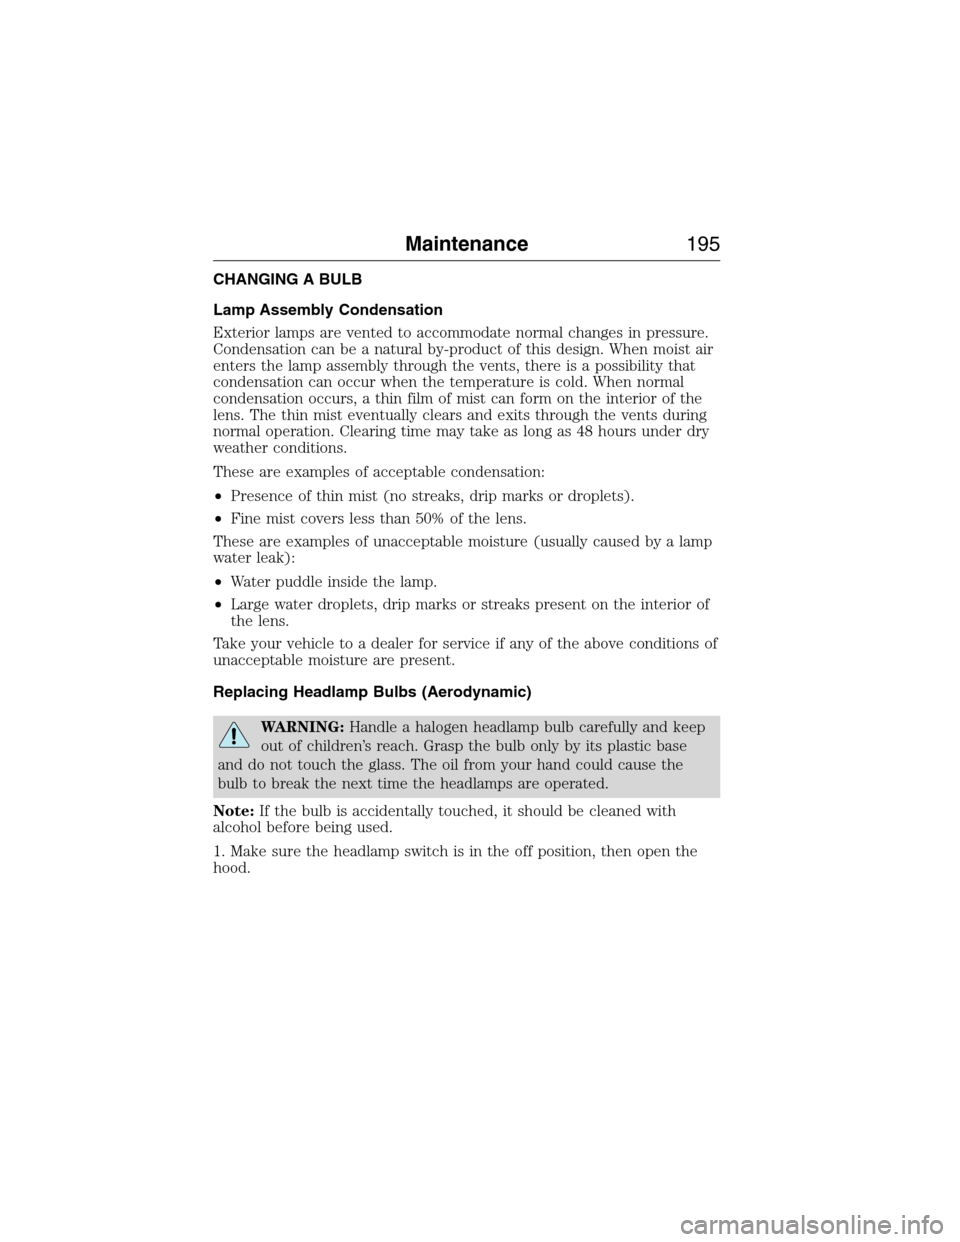
4. On the wall or screen you will
observe a light pattern with a
distinct horizontal edge towards the
right. If this edge is not at the
horizontal reference line, the beam
will need to be adjusted so the edge
is at the same height as the
horizontal reference line.
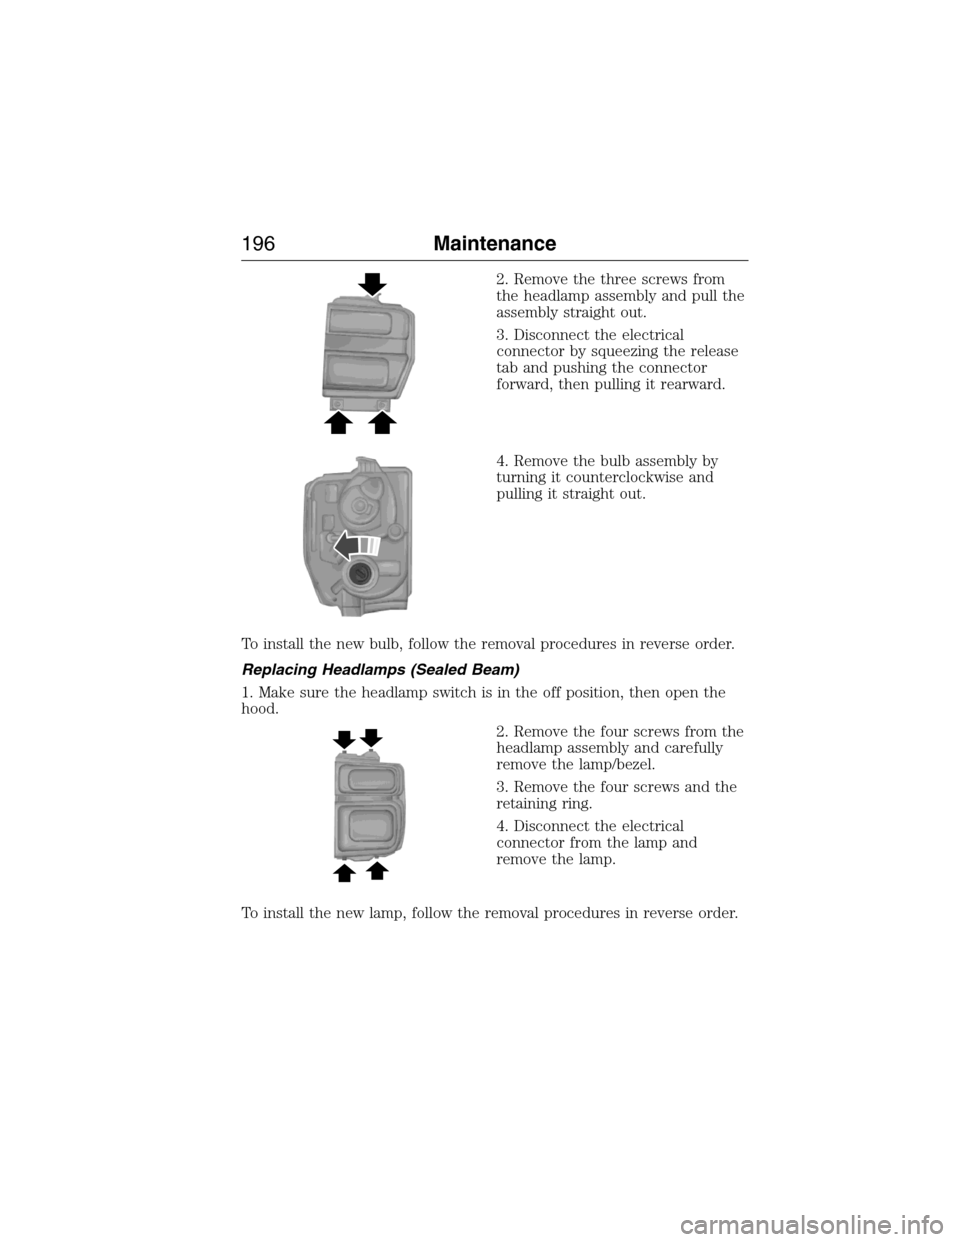
5. Locate the vertical adjuster on
the back of each headlamp, then
use a long Phillips #2 screwdriver to
turn the adjuster either
counterclockwise or clockwise in
order to adjust the vertical aim of
the headlamp. The upper edge of
the light pattern should align with
the horizontal reference line.
6. Repeat step 3–5 for the other
headlamp.
7. Close the hood and turn off the lamps.
C
A
B
D
194Maintenance
2015 Econoline(eco)
Owners Guide gf, 1st Printing, June 2014
USA(fus)
Page 196 of 360
CHANGING A BULB
Lamp Assembly Condensation
Exterior lamps are vented to accommodate normal changes in pressure.
Condensation can be a natural by-product of this design. When moist air
enters the lamp assembly through the vents, there is a possibility that
condensation can occur when the temperature is cold. When normal
condensation occurs, a thin film of mist can form on the interior of the
lens. The thin mist eventually clears and exits through the vents during
normal operation. Clearing time may take as long as 48 hours under dry
weather conditions.
These are examples of acceptable condensation:
•Presence of thin mist (no streaks, drip marks or droplets).
•Fine mist covers less than 50% of the lens.
These are examples of unacceptable moisture (usually caused by a lamp
water leak):
•Water puddle inside the lamp.
•Large water droplets, drip marks or streaks present on the interior of
the lens.
Take your vehicle to a dealer for service if any of the above conditions of
unacceptable moisture are present.
Replacing Headlamp Bulbs (Aerodynamic)
WARNING:Handle a halogen headlamp bulb carefully and keep
out of children’s reach. Grasp the bulb only by its plastic base
and do not touch the glass. The oil from your hand could cause the
bulb to break the next time the headlamps are operated.
Note:If the bulb is accidentally touched, it should be cleaned with
alcohol before being used.
1. Make sure the headlamp switch is in the off position, then open the
hood.
Maintenance195
2015 Econoline(eco)
Owners Guide gf, 1st Printing, June 2014
USA(fus)
Page 197 of 360
2. Remove the three screws from
the headlamp assembly and pull the
assembly straight out.
3. Disconnect the electrical
connector by squeezing the release
tab and pushing the connector
forward, then pulling it rearward.
4. Remove the bulb assembly by
turning it counterclockwise and
pulling it straight out.
To install the new bulb, follow the removal procedures in reverse order.
Replacing Headlamps (Sealed Beam)
1. Make sure the headlamp switch is in the off position, then open the
hood.
2. Remove the four screws from the
headlamp assembly and carefully
remove the lamp/bezel.
3. Remove the four screws and the
retaining ring.
4. Disconnect the electrical
connector from the lamp and
remove the lamp.
To install the new lamp, follow the removal procedures in reverse order.
196Maintenance
2015 Econoline(eco)
Owners Guide gf, 1st Printing, June 2014
USA(fus)
Page 198 of 360
Replacing Front Parking Lamp and Turn Signal Bulbs
1. Make sure the headlamp control is in the off position.
2. Remove the headlamp assembly. Refer toReplacing headlamp bulbs
in this section.
Aerodynamic
Sealed Beam
3. Rotate the bulb socket counterclockwise and remove.
4. Carefully pull the bulb straight out of the socket.
To complete installation, follow the removal procedures in reverse order.
Replacing Side Marker Bulbs
1. Make sure the headlamp control is in the off position.
2. Remove the headlamp assembly. Refer toReplacing headlamp bulbs
in this section.
Maintenance197
2015 Econoline(eco)
Owners Guide gf, 1st Printing, June 2014
USA(fus)
Page 199 of 360
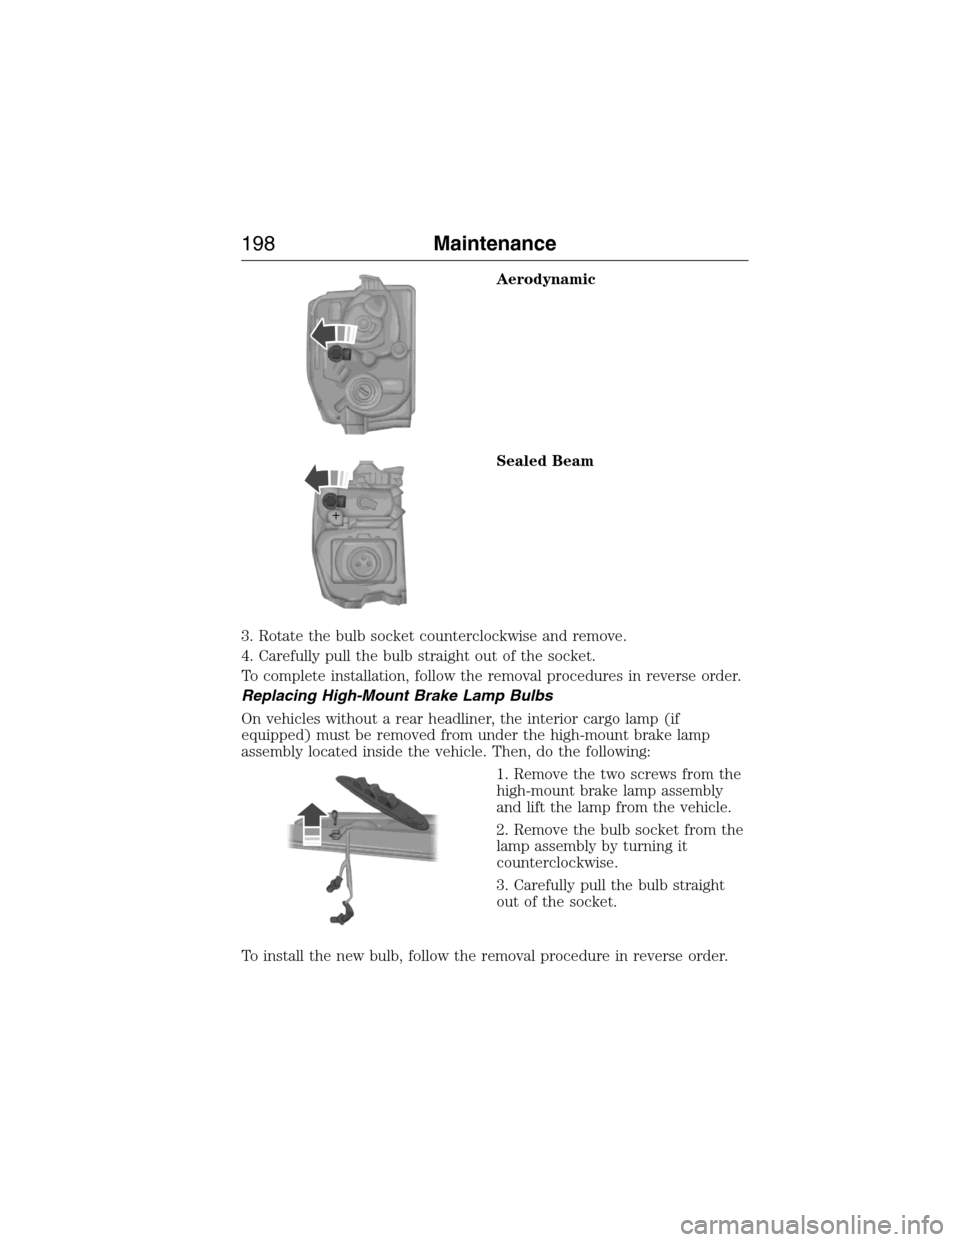
Aerodynamic
Sealed Beam
3. Rotate the bulb socket counterclockwise and remove.
4. Carefully pull the bulb straight out of the socket.
To complete installation, follow the removal procedures in reverse order.
Replacing High-Mount Brake Lamp Bulbs
On vehicles without a rear headliner, the interior cargo lamp (if
equipped) must be removed from under the high-mount brake lamp
assembly located inside the vehicle. Then, do the following:
1. Remove the two screws from the
high-mount brake lamp assembly
and lift the lamp from the vehicle.
2. Remove the bulb socket from the
lamp assembly by turning it
counterclockwise.
3. Carefully pull the bulb straight
out of the socket.
To install the new bulb, follow the removal procedure in reverse order.
198Maintenance
2015 Econoline(eco)
Owners Guide gf, 1st Printing, June 2014
USA(fus)
Page 200 of 360
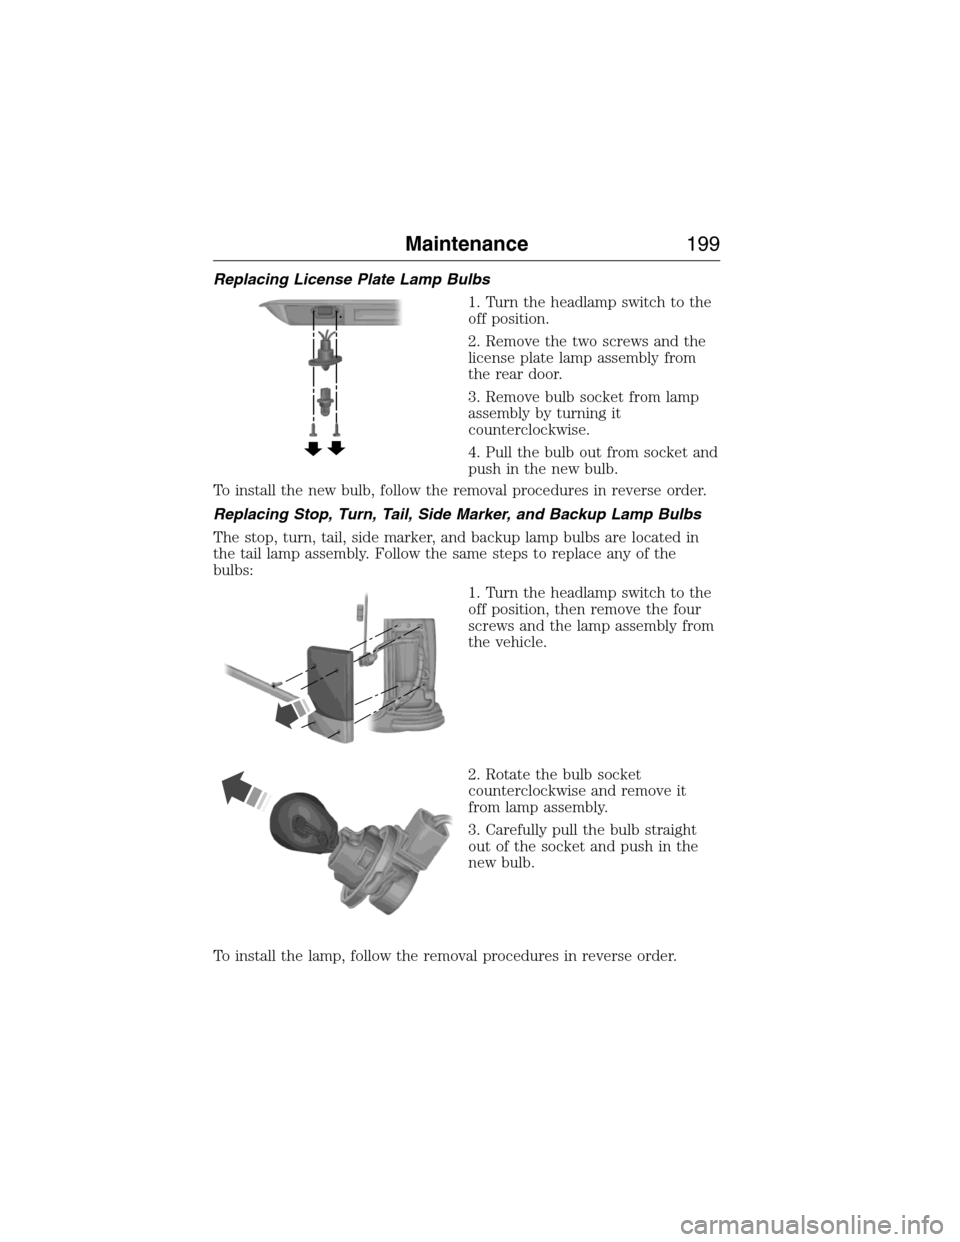
Replacing License Plate Lamp Bulbs
1. Turn the headlamp switch to the
off position.
2. Remove the two screws and the
license plate lamp assembly from
the rear door.
3. Remove bulb socket from lamp
assembly by turning it
counterclockwise.
4. Pull the bulb out from socket and
push in the new bulb.
To install the new bulb, follow the removal procedures in reverse order.
Replacing Stop, Turn, Tail, Side Marker, and Backup Lamp Bulbs
The stop, turn, tail, side marker, and backup lamp bulbs are located in
the tail lamp assembly. Follow the same steps to replace any of the
bulbs:
1. Turn the headlamp switch to the
off position, then remove the four
screws and the lamp assembly from
the vehicle.
2. Rotate the bulb socket
counterclockwise and remove it
from lamp assembly.
3. Carefully pull the bulb straight
out of the socket and push in the
new bulb.
To install the lamp, follow the removal procedures in reverse order.
Maintenance199
2015 Econoline(eco)
Owners Guide gf, 1st Printing, June 2014
USA(fus)