ECU FORD E SERIES 2018 Owner's Manual
[x] Cancel search | Manufacturer: FORD, Model Year: 2018, Model line: E SERIES, Model: FORD E SERIES 2018Pages: 323, PDF Size: 7.09 MB
Page 131 of 323
Transport Canada Contact Information
http://www.tc.gc.ca/eng/motorvehiclesafety/reporting-defects-motor-vehicles.html (English)Website
http://www.tc.gc.ca/fra/securiteautomobile/signaler-defauts-vehicules-automobiles.html (French)Website
1–800–333–0510Phone
Ford of Canada Contact Information
www.ford.caWebsite
1–800–565-3673Phone
128
E-Series (TE4) Canada/United States of America, enUSA, Edition date: 201712, Second Printing
Customer Assistance
Page 142 of 323
GENERAL INFORMATION
Have your vehicle serviced regularly to helpmaintain its roadworthiness and resalevalue. There is a large network ofauthorized dealers that are there to helpyou with their professional servicingexpertise. We believe that their speciallytrained technicians are best qualified toservice your vehicle properly and expertly.They are supported by a wide range ofhighly specialized tools developedspecifically for servicing your vehicle.
If your vehicle requires professional service,an authorized dealer can provide thenecessary parts and service. Check yourwarranty information to find out whichparts and services are covered.
Use only recommended fuels, lubricants,fluids and service parts conforming tospecifications. Motorcraft® parts aredesigned and built to provide the bestperformance in your vehicle.
Precautions
•Do not work on a hot engine.
•Make sure that nothing gets caught inmoving parts.
•Do not work on a vehicle with theengine running in an enclosed space,unless you are sure you have enoughventilation.
•Keep all open flames and other burningmaterial (such as cigarettes) awayfrom the battery and all fuel relatedparts.
Working with the Engine Off
1.Set the parking brake and shift to park(P).
2. Switch off the engine.
3. Block the wheels.
Working with the Engine On
WARNING
To reduce the risk of vehicle damageand/or personal burn injuries, do notstart your engine with the air cleanerremoved and do not remove it while theengine is running.
1.Set the parking brake and shift to park(P).
2. Block the wheels.
OPENING AND CLOSING THE
HOOD
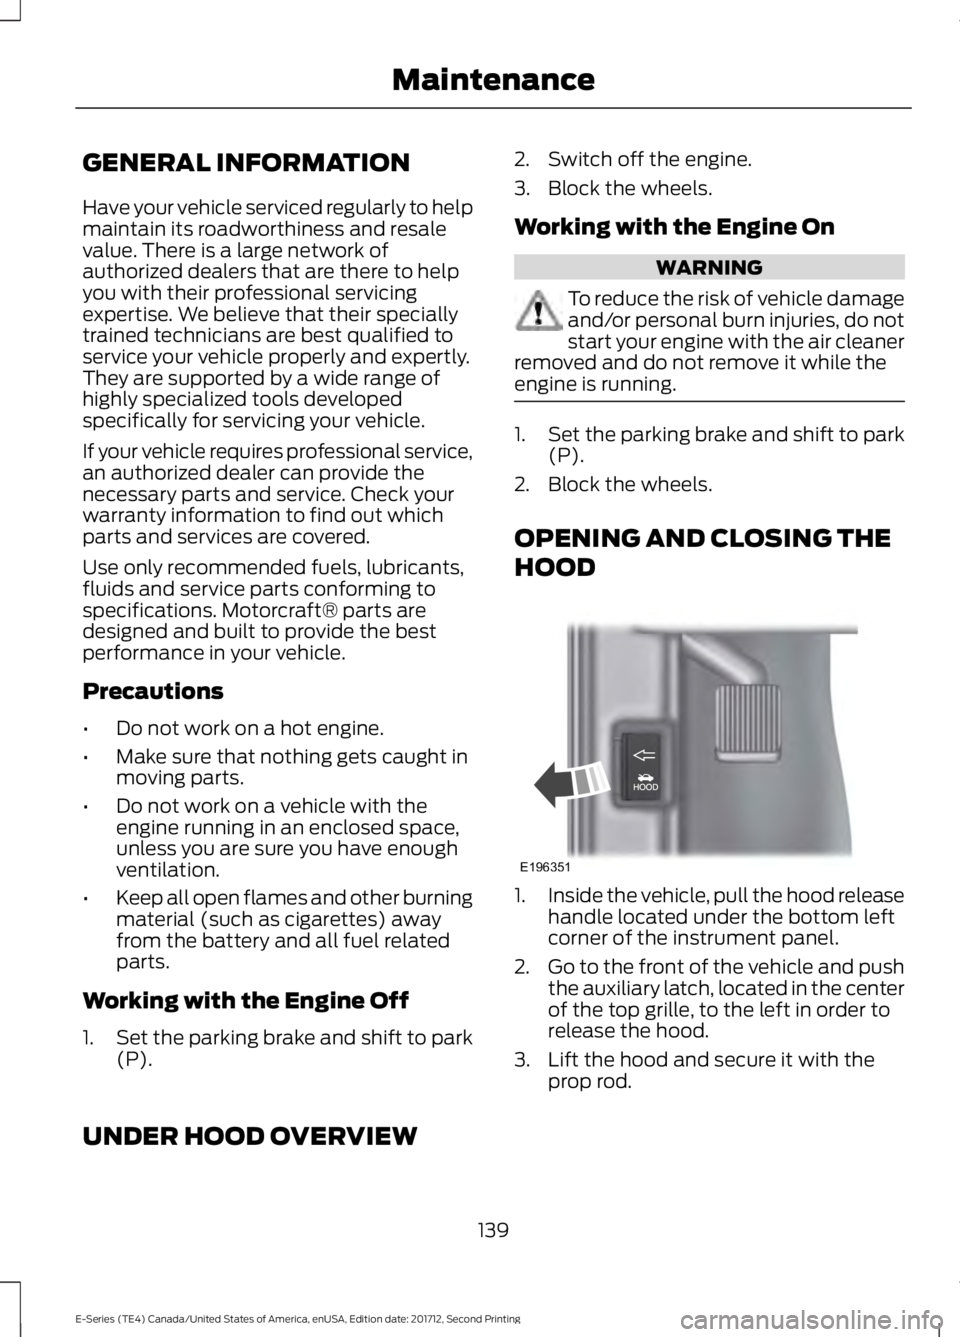
1.Inside the vehicle, pull the hood releasehandle located under the bottom leftcorner of the instrument panel.
2.Go to the front of the vehicle and pushthe auxiliary latch, located in the centerof the top grille, to the left in order torelease the hood.
3. Lift the hood and secure it with theprop rod.
UNDER HOOD OVERVIEW
139
E-Series (TE4) Canada/United States of America, enUSA, Edition date: 201712, Second Printing
MaintenanceE196351
Page 161 of 323
CHANGING THE ENGINE AIR
FILTER
WARNING
To reduce the risk of vehicle damageor personal injury, do not start theengine with the air filter removed anddo not remove it while the engine isrunning.
Note:Failure to use the correct air filterelement may result in severe enginedamage. The customer warranty may bevoid for any damage to the engine if thecorrect air filter element is not used.
When changing the air filter element, useonly the air filter element listed. SeeMotorcraft Parts (page 195). The air filterelement should be replaced at theappropriate intervals. See NormalScheduled Maintenance (page 273).
Note:Failure to use the correct air filterelement may result in severe enginedamage. Resulting component damage maynot be covered by the vehicle Warranty.
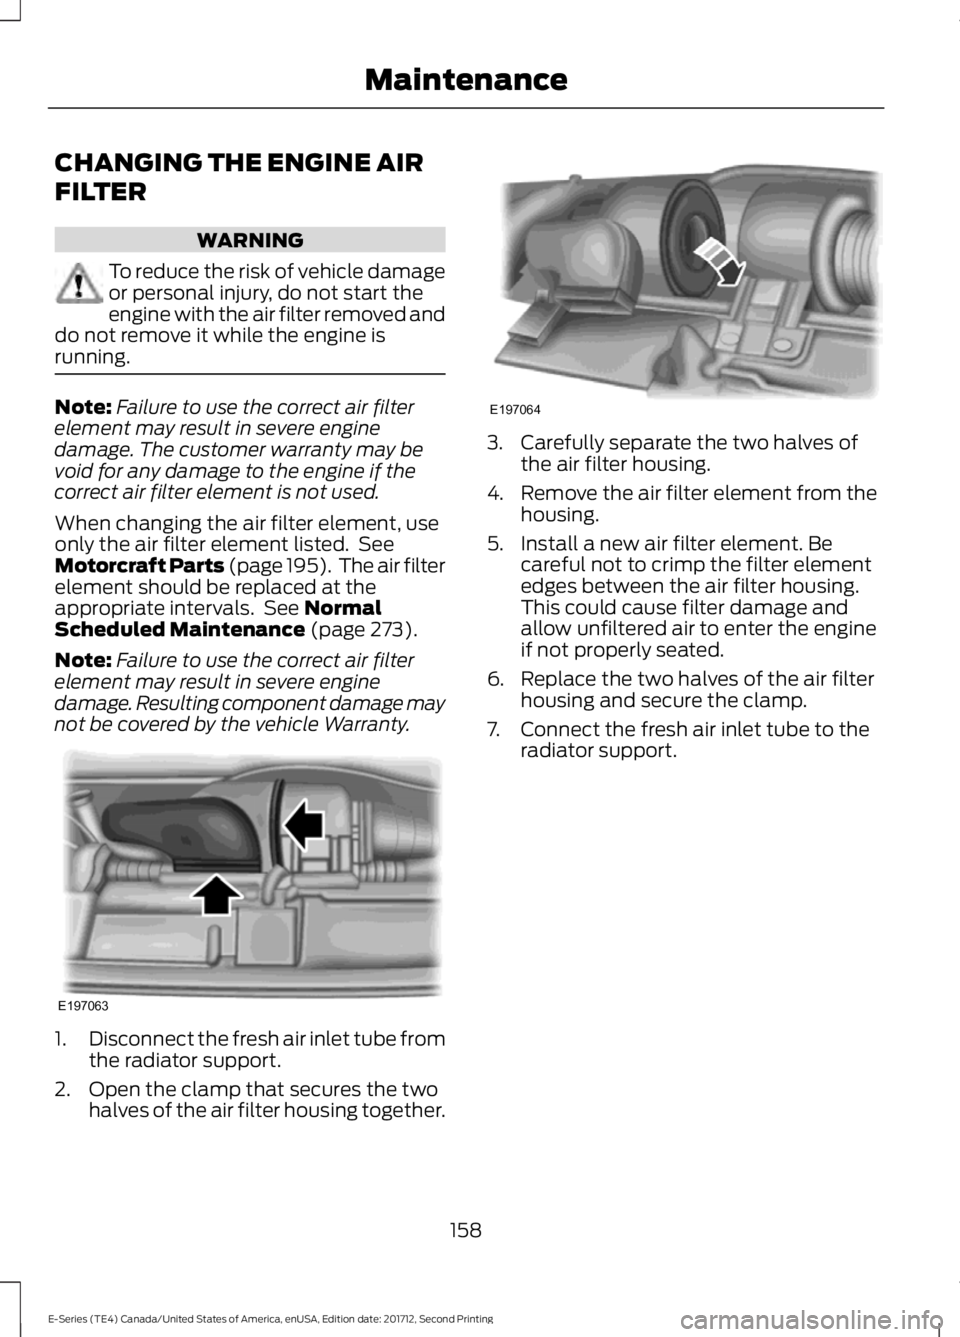
1.Disconnect the fresh air inlet tube fromthe radiator support.
2. Open the clamp that secures the twohalves of the air filter housing together.
3. Carefully separate the two halves ofthe air filter housing.
4.Remove the air filter element from thehousing.
5. Install a new air filter element. Becareful not to crimp the filter elementedges between the air filter housing.This could cause filter damage andallow unfiltered air to enter the engineif not properly seated.
6. Replace the two halves of the air filterhousing and secure the clamp.
7. Connect the fresh air inlet tube to theradiator support.
158
E-Series (TE4) Canada/United States of America, enUSA, Edition date: 201712, Second Printing
MaintenanceE197063 E197064
Page 188 of 323
If your vehicle is equipped withdual rear wheels it isrecommended that the front andrear tires (in pairs) be rotated onlyside to side. We do notrecommend splitting up the dualrear wheels. Rotate them side toside as a set. After tire rotation,inflation pressures must beadjusted for the tires newpositions in accordance withvehicle requirements.
USING SNOW CHAINS
WARNING
Snow tires must be the same size,load index, and speed rating as thoseoriginally provided by Ford. Use ofany tire or wheel not recommended byFord can affect the safety andperformance of your vehicle, which couldresult in an increased risk of loss of vehiclecontrol, vehicle rollover, personal injury,and death. Additionally, the use ofnon-recommended tires and wheels couldcause steering, suspension, axle, transfercase, or power transfer unit failure. It is alsostrongly advised to follow the Fordrecommended tire inflation pressure foundon the Safety Compliance CertificationLabel (affixed to either the door hingepillar, door-latch post, or the door edgethat meets the door-latch post, next to thedriver’s seating position), or Tire Labelwhich is located on the B-Pillar or the edgeof the driver door. Failure to follow the tirepressure recommendations can causeuneven treadwear patterns and adverselyaffect the way your vehicle handles.
The tires on your vehicle have all-weathertreads to provide traction in rain and snow.However, in some climates, you may needto use snow tires and cables. If you needto use cables, it is recommended that steelwheels (of the same size andspecifications) be used, as cables may chipaluminum wheels.
Note:The suspension insulation andbumpers help prevent vehicle damage. Donot remove these components from yourvehicle when using snow tires and chains.
Follow these guidelines when using snowtires and chains:
•If possible, avoid fully loading yourvehicle.
•Use only SAE Class S chains.
•Install chains securely, verifying thatthe chains do not touch any wiring,brake lines or fuel lines.
•Drive cautiously. If you hear the chainsrub or bang against your vehicle, stopand retighten the chains. If this doesnot work, remove the chains to preventdamage to your vehicle.
•Remove the tire chains when they areno longer needed. Do not use tirechains on dry roads.
If you have any questions regarding snowchains or cables, please contact yourauthorized dealer.
185
E-Series (TE4) Canada/United States of America, enUSA, Edition date: 201712, Second Printing
Wheels and Tires
Page 194 of 323
WARNINGS
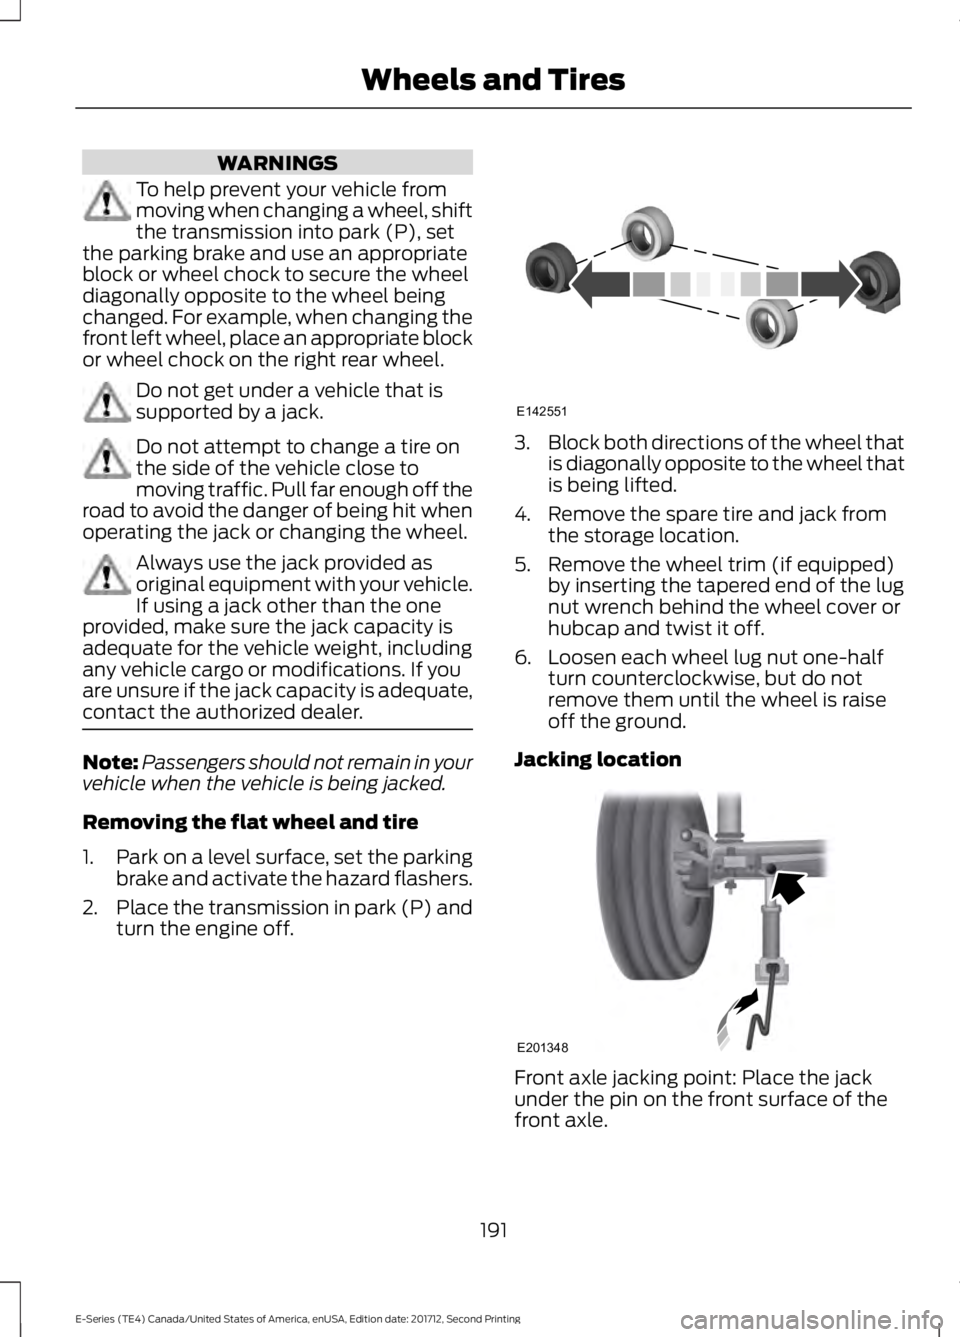
To help prevent your vehicle frommoving when changing a wheel, shiftthe transmission into park (P), setthe parking brake and use an appropriateblock or wheel chock to secure the wheeldiagonally opposite to the wheel beingchanged. For example, when changing thefront left wheel, place an appropriate blockor wheel chock on the right rear wheel.
Do not get under a vehicle that issupported by a jack.
Do not attempt to change a tire onthe side of the vehicle close tomoving traffic. Pull far enough off theroad to avoid the danger of being hit whenoperating the jack or changing the wheel.
Always use the jack provided asoriginal equipment with your vehicle.If using a jack other than the oneprovided, make sure the jack capacity isadequate for the vehicle weight, includingany vehicle cargo or modifications. If youare unsure if the jack capacity is adequate,contact the authorized dealer.
Note:Passengers should not remain in yourvehicle when the vehicle is being jacked.
Removing the flat wheel and tire
1.Park on a level surface, set the parkingbrake and activate the hazard flashers.
2.Place the transmission in park (P) andturn the engine off.
3.Block both directions of the wheel thatis diagonally opposite to the wheel thatis being lifted.
4. Remove the spare tire and jack fromthe storage location.
5. Remove the wheel trim (if equipped)by inserting the tapered end of the lugnut wrench behind the wheel cover orhubcap and twist it off.
6. Loosen each wheel lug nut one-halfturn counterclockwise, but do notremove them until the wheel is raiseoff the ground.
Jacking location
Front axle jacking point: Place the jackunder the pin on the front surface of thefront axle.
191
E-Series (TE4) Canada/United States of America, enUSA, Edition date: 201712, Second Printing
Wheels and TiresE142551 E201348
Page 196 of 323
Wheel Lug Nut Torque Specifications
WARNING
When you install a wheel, always remove any corrosion, dirt or foreign materialspresent on the mounting surfaces of the wheel or the surface of the wheel hub,brake drum or brake disc that contacts the wheel. Make sure to secure any fastenersthat attach the rotor to the hub so they do not interfere with the mounting surfaces ofthe wheel. Installing wheels without correct metal-to-metal contact at the wheel mountingsurfaces can cause the wheel nuts to loosen and the wheel to come off while your vehicleis in motion, resulting in loss of vehicle control, personal injury or death.
lb.ft (Nm)Bolt size
140 lb.ft (190 Nm)9/16 x 18 two-piece lug nut
On vehicles equipped with single rear wheels, retighten the lug nuts to the specified torqueat 100 miles (160 kilometers) after any wheel disturbance (such as tire rotation, changinga flat tire, wheel removal).
On vehicles equipped with dual rear wheels, retighten the wheel lug nuts to the specifiedtorque at 100 miles (160 kilometers), and again at 500 miles (800 kilometers) of newvehicle operation and after any wheel disturbance (such as tire rotation, changing a flattire, wheel removal).
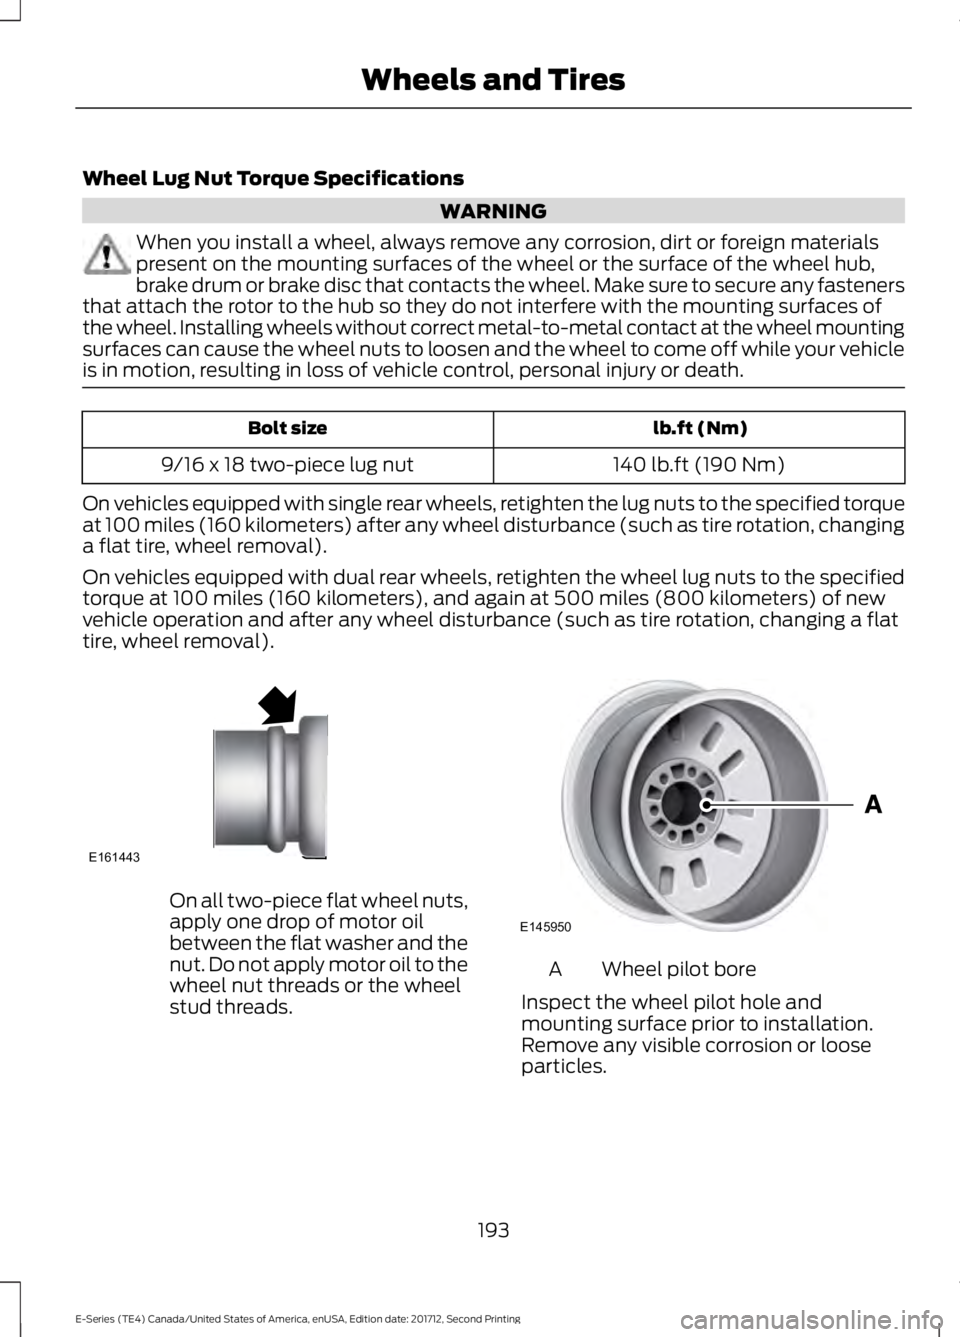
On all two-piece flat wheel nuts,apply one drop of motor oilbetween the flat washer and thenut. Do not apply motor oil to thewheel nut threads or the wheelstud threads.
Wheel pilot boreA
Inspect the wheel pilot hole andmounting surface prior to installation.Remove any visible corrosion or looseparticles.
193
E-Series (TE4) Canada/United States of America, enUSA, Edition date: 201712, Second Printing
Wheels and TiresE161443 E145950
Page 215 of 323
Note: COMPRESS is onlyavailable in CD and MP3 modes.Switching on compression bringsthe soft and loud passagestogether for a more consistentlistening level.
To switch compression on andoff, press SEEK and the up anddown arrow.
AUX: Press to access the mediafeatures of the SYNC system.See your SYNC information.
F
Seek, Fast Forward andReverse: In radio mode, pressand release to go to the next orprevious preset radio station ordisc track. In CD and MP3 modes,press to move forward orbackward through the tracks.Press and hold to move quicklyforward or backward through thecurrent track.
G
Play, Pause: Allows you to playor pause a track when listeningto a CD.
H
SHUFFLE: Play music on theselected CD or MP3 folder inrandom order.
I
FOLDER >: Press to access thenext folder on an MP3 disc.J
< FOLDER: Press to access theprevious folder on an MP3 disc.K
FF: Press to fast forward a CDtrack or MP3 file.L
REW: Press to rewind a CD trackor MP3 file.M
Memory presets: Store yourfavorite radio stations. To storea radio station, tune to thestation, then press and hold apreset button until soundreturns.
N
TEXT/SCAN: In radio, CD andMP3 modes, press and hold tohear a brief sampling of radiostations, CD tracks or MP3 files.In CD and MP3 modes, press andrelease to display track title,
O
artist name and disc title. In textmode, the display may requireadditional text to show. Whenthe < / > indicator is on, pressTEXT and then press SEEK toview the additional display text.
AM/FM: Press to select afrequency band.P
VOL-PUSH: Turn to adjust thevolume. Press to switch thesystem on and off.
Q
CD: Press to enter CD or MP3mode.R
AUDIO UNIT - VEHICLES WITH:
AM/FM
WARNING
Driving while distracted can result inloss of vehicle control, crash andinjury. We strongly recommend thatyou use extreme caution when using anydevice that may take your focus off theroad. Your primary responsibility is the safeoperation of your vehicle. We recommendagainst the use of any hand-held devicewhile driving and encourage the use ofvoice-operated systems when possible.Make sure you are aware of all applicablelocal laws that may affect the use ofelectronic devices while driving.
212
E-Series (TE4) Canada/United States of America, enUSA, Edition date: 201712, Second Printing
Audio System
Page 228 of 323
Depending on your cell phone's capabilityand your market, the system may promptyou with questions, such as setting thecurrent cell phone as the primary cellphone (the cell phone SYNC automaticallytries to connect with first upon vehiclestart-up) and downloading yourphonebook.
Pairing Subsequent Cell Phones
Note:To scroll through the menus, pressthe up and down arrows on your audiosystem.
Note:Make sure to switch on the ignitionand the radio. Put the transmission inposition park (P) (automatic transmission)or neutral with the parking brake applied(manual transmission).
Press the phone button, then scroll to:
ActionMessage
Press the OK button.PHONE SETNGS
Press the OK button.BT DEVICES
Press the OK button. When the following message appearsin the display.ADD DEVICE
FIND SYNC1. Press the OK button.
2. Put your cell phone into Bluetooth discovery mode. Seeyour device's manual if necessary.
3. When prompted on your cell phone's display, enter thesix-digit PIN provided by SYNC in the radio display. Thedisplay indicates when the pairing is successful.
The system then prompts with questions, such as if you would like to set the current cellphone as the primary cell phone (the cell phone SYNC automatically tries to connectwith first upon vehicle start-up) or download your phonebook.
Phone Voice Commands
Press the voice icon and say:
Voice Commands
Phone
You can then say any of the followingcommands.
Call History Incoming
Call History Missed
Call History Outgoing
Voice Commands
Phonebook ___
Phonebook ___ at Home
Phonebook ___ at Work
Phonebook ___ in Office
Phonebook ___ on Cell
___ is a dynamic listing that should be thename of a contact in your phonebook. Forexample you could say "Call Mom".
225
E-Series (TE4) Canada/United States of America, enUSA, Edition date: 201712, Second Printing
SYNC™ (If Equipped)
Page 239 of 323
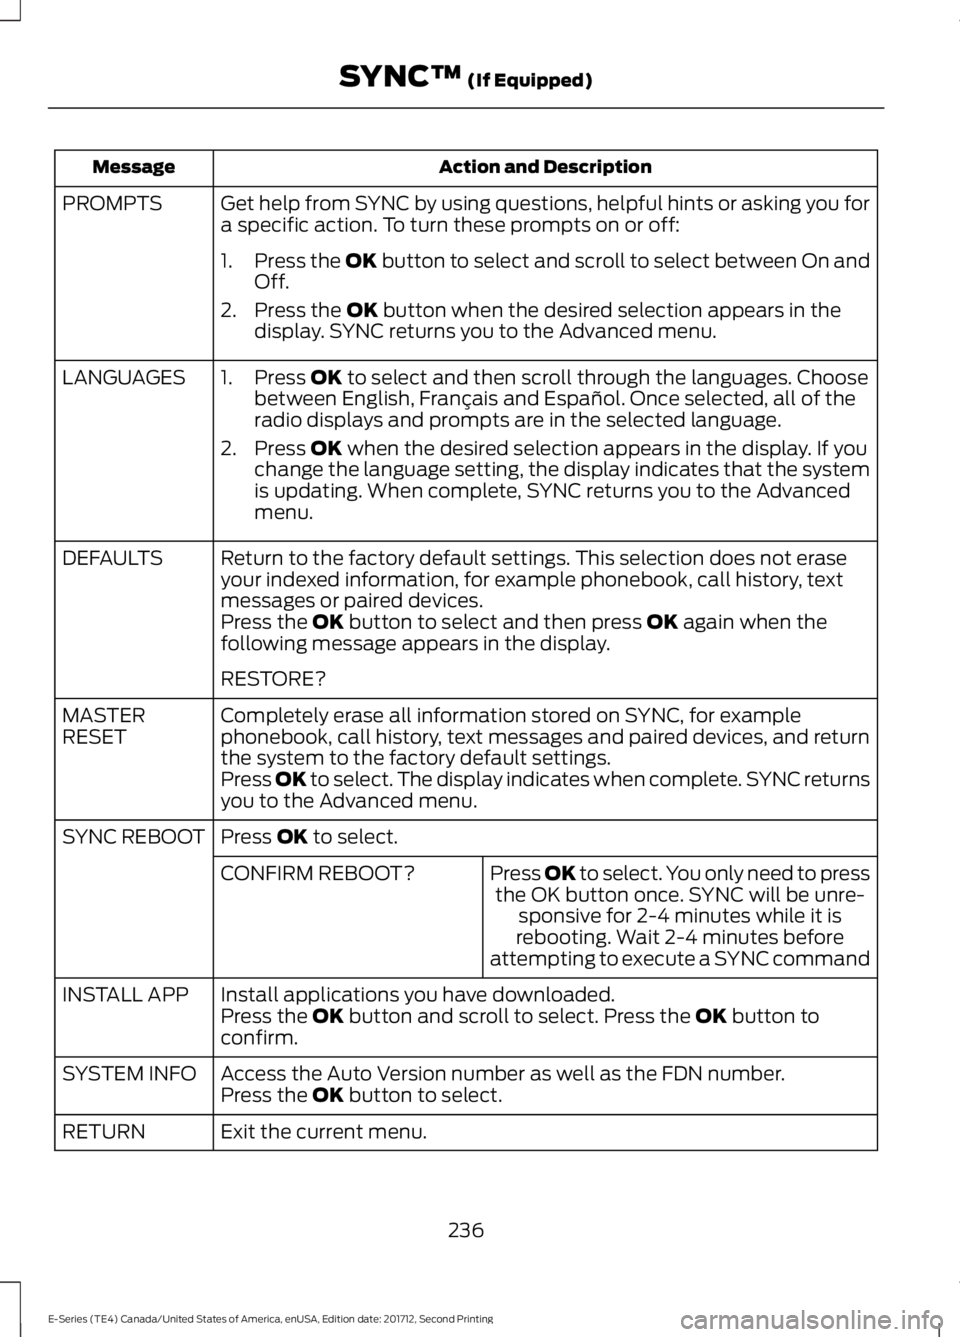
Action and DescriptionMessage
Get help from SYNC by using questions, helpful hints or asking you fora specific action. To turn these prompts on or off:PROMPTS
1.Press the OK button to select and scroll to select between On andOff.
2. Press the OK button when the desired selection appears in thedisplay. SYNC returns you to the Advanced menu.
1. Press OK to select and then scroll through the languages. Choosebetween English, Français and Español. Once selected, all of theradio displays and prompts are in the selected language.
2. Press OK when the desired selection appears in the display. If youchange the language setting, the display indicates that the systemis updating. When complete, SYNC returns you to the Advancedmenu.
LANGUAGES
Return to the factory default settings. This selection does not eraseyour indexed information, for example phonebook, call history, textmessages or paired devices.
DEFAULTS
Press the OK button to select and then press OK again when thefollowing message appears in the display.
RESTORE?
Completely erase all information stored on SYNC, for examplephonebook, call history, text messages and paired devices, and returnthe system to the factory default settings.
MASTERRESET
Press OK to select. The display indicates when complete. SYNC returnsyou to the Advanced menu.
Press OK to select.SYNC REBOOT
Press OK to select. You only need to pressthe OK button once. SYNC will be unre-sponsive for 2-4 minutes while it isrebooting. Wait 2-4 minutes beforeattempting to execute a SYNC command
CONFIRM REBOOT?
Install applications you have downloaded.INSTALL APPPress the OK button and scroll to select. Press the OK button toconfirm.
Access the Auto Version number as well as the FDN number.SYSTEM INFOPress the OK button to select.
Exit the current menu.RETURN
236
E-Series (TE4) Canada/United States of America, enUSA, Edition date: 201712, Second Printing
SYNC™ (If Equipped)
Page 240 of 323
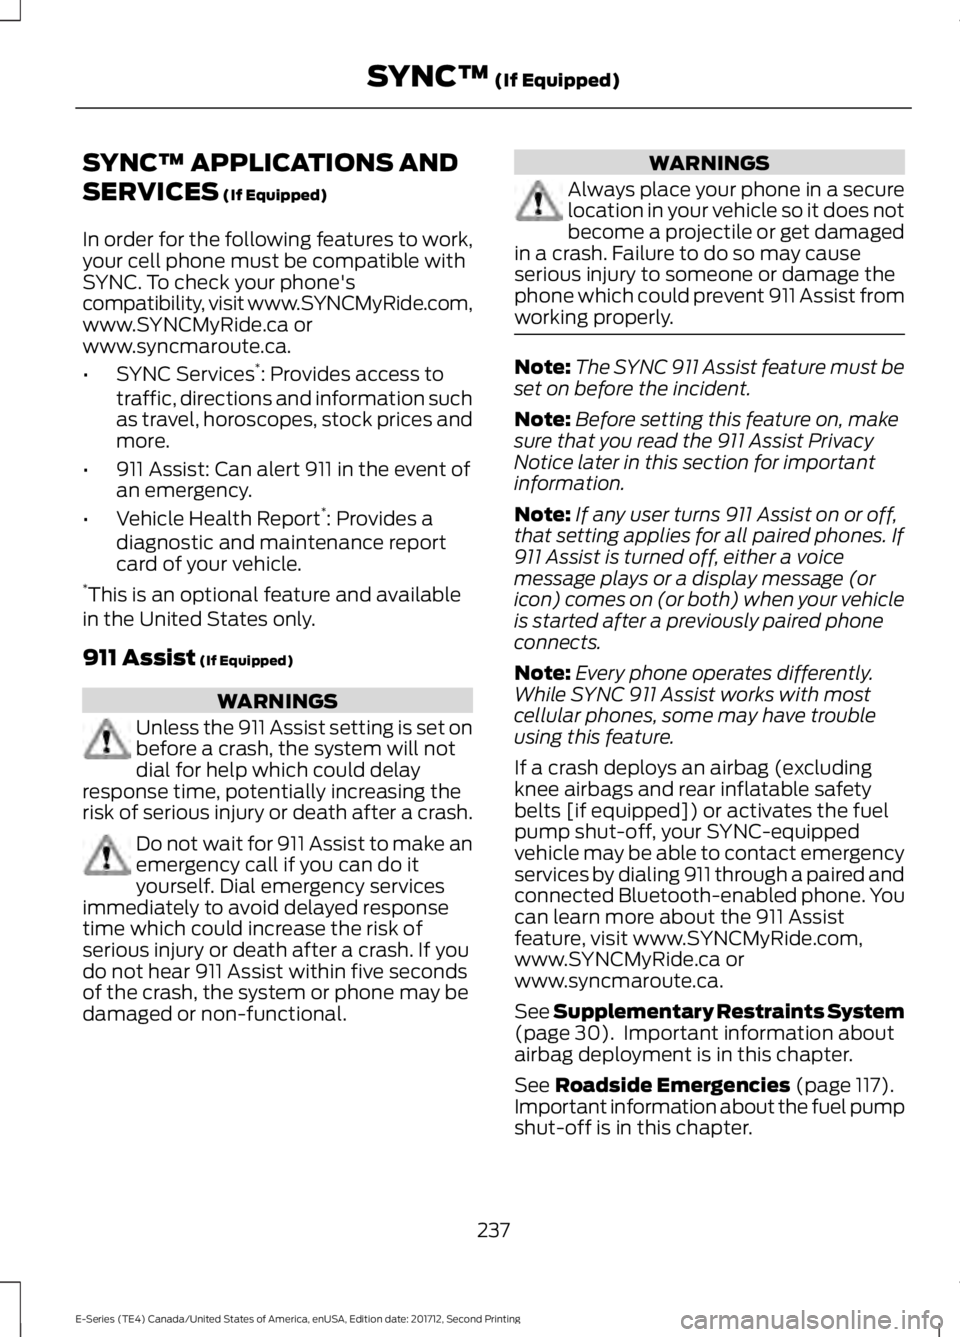
SYNC™ APPLICATIONS AND
SERVICES (If Equipped)
In order for the following features to work,your cell phone must be compatible withSYNC. To check your phone'scompatibility, visit www.SYNCMyRide.com,www.SYNCMyRide.ca orwww.syncmaroute.ca.
•SYNC Services*: Provides access totraffic, directions and information suchas travel, horoscopes, stock prices andmore.
•911 Assist: Can alert 911 in the event ofan emergency.
•Vehicle Health Report*: Provides adiagnostic and maintenance reportcard of your vehicle.*This is an optional feature and availablein the United States only.
911 Assist (If Equipped)
WARNINGS
Unless the 911 Assist setting is set onbefore a crash, the system will notdial for help which could delayresponse time, potentially increasing therisk of serious injury or death after a crash.
Do not wait for 911 Assist to make anemergency call if you can do ityourself. Dial emergency servicesimmediately to avoid delayed responsetime which could increase the risk ofserious injury or death after a crash. If youdo not hear 911 Assist within five secondsof the crash, the system or phone may bedamaged or non-functional.
WARNINGS
Always place your phone in a securelocation in your vehicle so it does notbecome a projectile or get damagedin a crash. Failure to do so may causeserious injury to someone or damage thephone which could prevent 911 Assist fromworking properly.
Note:The SYNC 911 Assist feature must beset on before the incident.
Note:Before setting this feature on, makesure that you read the 911 Assist PrivacyNotice later in this section for importantinformation.
Note:If any user turns 911 Assist on or off,that setting applies for all paired phones. If911 Assist is turned off, either a voicemessage plays or a display message (oricon) comes on (or both) when your vehicleis started after a previously paired phoneconnects.
Note:Every phone operates differently.While SYNC 911 Assist works with mostcellular phones, some may have troubleusing this feature.
If a crash deploys an airbag (excludingknee airbags and rear inflatable safetybelts [if equipped]) or activates the fuelpump shut-off, your SYNC-equippedvehicle may be able to contact emergencyservices by dialing 911 through a paired andconnected Bluetooth-enabled phone. Youcan learn more about the 911 Assistfeature, visit www.SYNCMyRide.com,www.SYNCMyRide.ca orwww.syncmaroute.ca.
See Supplementary Restraints System(page 30). Important information aboutairbag deployment is in this chapter.
See Roadside Emergencies (page 117).Important information about the fuel pumpshut-off is in this chapter.
237
E-Series (TE4) Canada/United States of America, enUSA, Edition date: 201712, Second Printing
SYNC™ (If Equipped)