load FORD E SERIES 2019 User Guide
[x] Cancel search | Manufacturer: FORD, Model Year: 2019, Model line: E SERIES, Model: FORD E SERIES 2019Pages: 329, PDF Size: 2.92 MB
Page 107 of 329
TOWING A TRAILER
WARNING: Do not exceedthe GVWR or the GAWRspecified on the certificationlabel.
WARNING: Towing trailersbeyond the maximumrecommended gross trailerweight exceeds the limit of yourvehicle and could result in enginedamage, transmission damage,structural damage, loss ofvehicle control, vehicle rolloverand personal injury.
Your vehicle may have electricalitems, for example fuses or relays,related to towing. See Fuses(page 131).
Your vehicle's load capacitydesignation is by weight, not byvolume, so you cannot necessarilyuse all available space whenloading your vehicle.
Towing a trailer places an extraload on your vehicle's engine,transmission, axle, brakes, tiresand suspension. Inspect thesecomponents periodically during,and after, any towing operation.
Load Placement
To help minimize how trailermovement affects your vehiclewhen driving:
•Load the heaviest items closestto the trailer floor.
•Load the heaviest itemscentered between the left andright side trailer tires.
•Load the heaviest items abovethe trailer axles or just slightlyforward toward the trailertongue. Do not allow the finaltrailer tongue weight to goabove or below 10-15% of theloaded trailer weight.
•Select a draw bar with thecorrect rise or drop. When boththe loaded vehicle and trailerare connected, the trailer frameshould be level, or slightlyangled down toward yourvehicle, when viewed from theside.
When driving with a trailer orpayload, a slight takeoff vibrationor shudder may be present due tothe increased payload weight.Additional information regardingcorrect trailer loading and settingyour vehicle up for towing islocated in another chapter of thisOwner's Manual. See Load Limit(page 99). You can also find theinformation in the RV & TrailerTowing Guide. See an authorizeddealer.
104
E-Series (TE4) Canada/United States of America, enUSA, Edition date: 201804, Second-Printing
Towing
Page 108 of 329
RECOMMENDED TOWING
WEIGHTS
Note:Make sure to take intoconsideration trailer frontal area.Vehicles equipped with the TrailerTow Package or the Heavy DutyPayload Package should notexceed 60 ft² (5.6 m²) trailerfrontal area.
Note:Exceeding this limitationmay significantly reduce theperformance of your towingvehicle. Selecting a trailer with alow aerodynamic drag and roundedfront design helps optimizeperformance and fuel economy.
Note:For high altitude operation,reduce the gross combined weightby 2% per 1,000 ft (300 m)starting at the 1,000 ft (300 m)elevation point.
Note:Certain states requireelectric trailer brakes for trailersover a specified weight. Be sure tocheck state regulations for thisspecified weight. The maximumtrailer weights listed may be limitedto this specified weight, as yourvehicle's electrical system may notinclude the wiring connectorneeded to use electric trailerbrakes.
E-350 Cutaway
MaximumGCWRRear AxleRatioWheelbaseRear AxleOptionEngine
13,000 lb(5,897 kg)
4.10138 in (3.5 m)Single RearWheel6.2L4.56
18,500 lb(8,391 kg)
4.10138 in (3.5 m)Single RearWheel6.8L4.56
13,000 lb(5,897 kg)4.10
138 in (3.5 m)Dual RearWheel6.2L17,000 lb
(7,711 kg)4.56
18,500 lb(8,391 kg)
4.10138 in (3.5 m)Dual RearWheel6.8L4.56
13,000 lb(5,897 kg)
4.10158 in (4.01 m)Single RearWheel6.2L4.56
105
E-Series (TE4) Canada/United States of America, enUSA, Edition date: 201804, Second-Printing
Towing
Page 111 of 329
E-450 Stripped Chassis
MaximumGCWRRear AxleRatioWheelbaseLengthRear AxleOptionEngine
18,000 lb(8,165 kg)4.56158 in (4.01 m)Dual RearWheel6.2L
22,000 lb(9,979 kg)4.56158 in (4.01 m)Dual RearWheel6.8L
18,000 lb(8,165 kg)4.56176 in (4.47 m)Dual RearWheel6.2L
22,000 lb(9,979 kg)4.56176 in (4.47 m)Dual RearWheel6.8L
Calculating the MaximumLoaded Trailer Weight for YourVehicle
1. Start with the gross combinedweight rating for your vehiclemodel and axle ratio. See theprevious charts.
2.Subtract all of the followingthat apply to your vehicle:
•Vehicle curb weight.
•Hitch hardware weight, such asa draw bar, ball, locks or weightdistributing hardware.
•Driver weight.
•Passenger(s) weight.
•Payload, cargo and luggageweight.
•Aftermarket equipment weight.
The maximum loaded trailer
weight is this value or 10,000 lb(4,536 kg), whichever is less.
Note:The trailer tongue load isconsidered part of the payload foryour vehicle. Reduce the totalpayload by the final trailer tongueweight.
Note:Consult an authorized dealerto determine the maximum trailerweight allowed for your vehicle ifyou are not sure.
ESSENTIAL TOWING CHECKS
Follow these guidelines for safe towing:
•Do not tow a trailer until you drive yourvehicle at least 1,000 mi (1,600 km).
•Consult your local motor vehicle lawsfor towing a trailer.
•See the instructions included withtowing accessories for the properinstallation and adjustmentspecifications.
108
E-Series (TE4) Canada/United States of America, enUSA, Edition date: 201804, Second-Printing
Towing
Page 112 of 329
•Service your vehicle more frequently ifyou tow a trailer. See your scheduledmaintenance information. SeeScheduled Maintenance (page 276).
•If you use a rental trailer, follow theinstructions the rental agency givesyou.
See Load limits in the Load Carryingchapter for load specification terms foundon the tire label and Safety Compliancelabel and instructions on calculating yourvehicle's load.
Remember to account for the trailertongue weight as part of your vehicle loadwhen calculating the total vehicle weight.
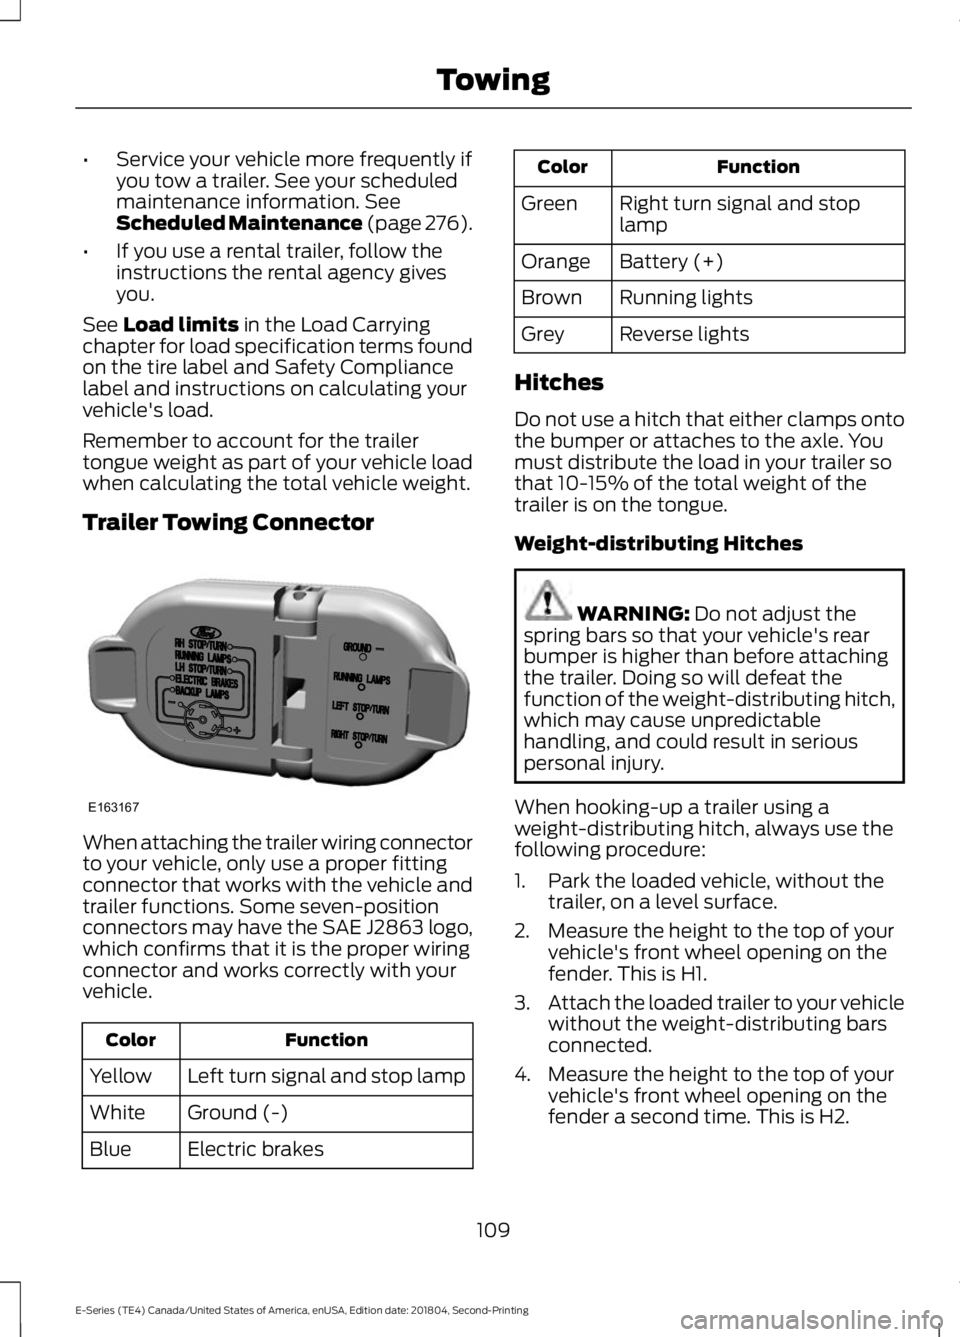
Trailer Towing Connector
When attaching the trailer wiring connectorto your vehicle, only use a proper fittingconnector that works with the vehicle andtrailer functions. Some seven-positionconnectors may have the SAE J2863 logo,which confirms that it is the proper wiringconnector and works correctly with yourvehicle.
FunctionColor
Left turn signal and stop lampYellow
Ground (-)White
Electric brakesBlue
FunctionColor
Right turn signal and stoplampGreen
Battery (+)Orange
Running lightsBrown
Reverse lightsGrey
Hitches
Do not use a hitch that either clamps ontothe bumper or attaches to the axle. Youmust distribute the load in your trailer sothat 10-15% of the total weight of thetrailer is on the tongue.
Weight-distributing Hitches
WARNING: Do not adjust thespring bars so that your vehicle's rearbumper is higher than before attachingthe trailer. Doing so will defeat thefunction of the weight-distributing hitch,which may cause unpredictablehandling, and could result in seriouspersonal injury.
When hooking-up a trailer using aweight-distributing hitch, always use thefollowing procedure:
1. Park the loaded vehicle, without thetrailer, on a level surface.
2. Measure the height to the top of yourvehicle's front wheel opening on thefender. This is H1.
3.Attach the loaded trailer to your vehiclewithout the weight-distributing barsconnected.
4. Measure the height to the top of yourvehicle's front wheel opening on thefender a second time. This is H2.
109
E-Series (TE4) Canada/United States of America, enUSA, Edition date: 201804, Second-Printing
TowingE163167
Page 113 of 329
5. Install and adjust the tension in theweight-distributing bars so that theheight of your vehicle's front wheelopening on the fender is approximatelyhalf the way down from H2, toward H1.
6.Check that the trailer is level or slightlynose down toward your vehicle. If not,adjust the ball height accordingly andrepeat Steps 2-6.
When the trailer is level or slightly nosedown toward the vehicle:
•Lock the bar tension adjuster in place.
•Check that the trailer tongue securelyattaches and locks onto the hitch.
•Install safety chains, lighting, and trailerbrake controls as required by law or thetrailer manufacturer.
Safety Chains
Note:Do not attach safety chains to thebumper.
Always connect the safety chains to theframe or hook retainers of your vehiclehitch.
To connect the safety chains, cross thechains under the trailer tongue and allowenough slack for turning tight corners. Donot allow the chains to drag on the ground.
Trailer Brakes
WARNING: Do not connect atrailer's hydraulic brake system directlyto your vehicle's brake system. Yourvehicle may not have enough brakingpower and your chances of having acollision greatly increase.
Electric brakes and manual, automatic orsurge-type trailer brakes are safe if youinstall them properly and adjust them tothe manufacturer's specifications. Thetrailer brakes must meet local and federalregulations.
The rating for the tow vehicle's brakingsystem operation is at the gross vehicleweight rating, not the gross combinedweight rating.
Separate functioning brake systemsare required for safe control of towedvehicles and trailers weighing morethan 1500 lb (680 kg) when loaded.
Integrated Trailer Brake Controller (IfEquipped)
WARNING: Use the integratedtrailer brake controller to properly adjustthe trailer brakes and check allconnections before towing a trailer.Failure to follow this instruction couldresult in the loss of control of yourvehicle, personal injury or death.
Note:The Ford trailer brake controller hasbeen verified to be compatible with trailershaving electric-actuated drum brakes (oneto four axles) and electric-over-hydraulicbrakes. It will not activate hydraulicsurge-style trailer brakes. It is theresponsibility of the customer to ensure thatthe trailer brakes are adjusted appropriately,functioning normally and all electricconnections are properly made.
110
E-Series (TE4) Canada/United States of America, enUSA, Edition date: 201804, Second-Printing
Towing
Page 115 of 329
•Stop lamps: Using the manual controllever illuminates both the trailer brakelamps and your vehicle brake lampsexcept the center high-mount stoplamp, if you make the proper electricalconnection to the trailer. Pressing yourvehicle brake pedal also illuminatesboth trailer and vehicle brake lamps.
Procedure for Adjusting Gain
Note:Only perform this procedure in atraffic-free environment at speeds ofapproximately 20-25 mph (30-40 km/h).
The gain setting sets the trailer brakecontroller for the specific towing condition.You should change the setting as towingconditions change. Changes to towingconditions include trailer load, vehicle load,road conditions and weather.
The gain should be set to provide themaximum trailer braking assistance whilemaking sure the trailer wheels do not lockwhen using the brakes. Locked trailerwheels may lead to trailer instability.
1.Make sure the trailer brakes are in goodworking condition, functioning normallyand properly adjusted. See your trailerdealer if necessary.
2. Hook up the trailer and make theelectrical connections according to thetrailer manufacturer's instructions.
3. When you plug in a trailer with electricor electric-over-hydraulic brakes, amessage confirming connectionappears in the information display.
4. Use the gain adjustment (+ and -)buttons to increase or decrease thegain setting to the desired startingpoint. A gain setting of 6.0 is a goodstarting point for heavier loads.
5. In a traffic-free environment, tow thetrailer on a dry, level surface at a speedof 20-25 mph (30-40 km/h) andsqueeze the manual control levercompletely.
6. If the trailer wheels lock up, indicatedby squealing tires, reduce the gainsetting. If the trailer wheels turn freely,increase the gain setting. Repeat Steps5 and 6 until the gain setting is at apoint just below trailer wheel lock-up.If towing a heavier trailer, trailer wheellock-up may not be attainable evenwith the maximum gain setting of 10.
Explanation of Information DisplayWarning Messages
Note:An authorized dealer can diagnosethe trailer brake controller to determineexactly which trailer fault has occurred.However, your Ford warranty does not coverthis diagnosis if the fault is with the trailer.
A message indicating a trailer brakemodule fault may display in response tofaults sensed by the trailer brake controller,accompanied by a single tone. If thismessage appears, contact an authorizeddealer as soon as possible for diagnosisand repair. The controller may stillfunction, but performance may bedegraded.
A message indicating a trailer wiring faultmay display when there is a short circuiton the electric brake output wire. If thismessage displays, accompanied by asingle tone, with no trailer connected, theproblem is with your vehicle wiringbetween the trailer brake controller andthe 7-pin connector at the bumper. If themessage only displays with a trailerconnected, the problem is with the trailerwiring. Consult your trailer dealer forassistance. This can be a short to ground(such as a chaffed wire), short to voltage(such as a pulled pin on trailer emergencybreakaway battery) or the trailer brakesmay be drawing too much current.
112
E-Series (TE4) Canada/United States of America, enUSA, Edition date: 201804, Second-Printing
Towing
Page 116 of 329
Points to Remember
Note:Do not attempt removal of the trailerbrake controller without consulting theWorkshop Manual. Damage to the unit mayresult.
•Adjust gain setting before using thetrailer brake controller for the first time.
•Adjust gain setting, using the procedureabove, whenever road, weather andtrailer or vehicle loading conditionschange from when the gain was initiallyset.
•Only use the manual control lever forproper adjustment of the gain duringtrailer setup. Misuse, such asapplication during trailer sway, couldcause instability of trailer or towvehicle.
•Avoid towing in adverse weatherconditions. The trailer brake controllerdoes not provide anti-lock control ofthe trailer wheels. Trailer wheels canlock up on slippery surfaces, resultingin reduced stability of trailer and towvehicle.
•The trailer brake controller is equippedwith a feature that reduces output atvehicle speeds below 11 mph (18 km/h)so trailer and vehicle braking is not jerkyor harsh. This feature is only availablewhen applying the brakes using yourvehicle's brake pedal, not thecontroller.
•The controller interacts with the brakecontrol system and powertrain controlsystem of your vehicle to provide thebest performance on different roadconditions.
•Your vehicle's brake system and thetrailer brake system workindependently of each other. Changingthe gain setting on the controller doesnot affect the operation of yourvehicle's brakes whether you attach atrailer or not.
•When you switch the engine off, thecontroller output is disabled and thedisplay and module shut down. Thecontroller module and display turn onwhen you switch the ignition on.
•The trailer brake controller is only afactory-installed or dealer-installeditem. Ford is not responsible forwarranty or performance of thecontroller due to misuse or customerinstallation.
Trailer Lamps
WARNING: Never connect anytrailer lamp wiring to the vehicle's taillamp wiring; this may damage theelectrical system resulting in fire. Contactyour authorized dealer as soon aspossible for assistance in proper trailertow wiring installation. Additionalelectrical equipment may be required.
Trailer lamps are required on most towedvehicles. Make sure all running lights, brakelights, direction indicators and hazard lightsare working.
Before Towing a Trailer
Practice turning, stopping and backing upto get the feel of your vehicle-trailercombination before starting on a trip.When turning, make wider turns so thetrailer wheels clear curbs and otherobstacles.
When Towing a Trailer
•Do not drive faster than 70 mph(113 km/h) during the first 500 mi(800 km).
•Do not make full-throttle starts.
•Check your hitch, electrical connectionsand trailer wheel lug nuts thoroughlyafter you have traveled 50 mi (80 km).
113
E-Series (TE4) Canada/United States of America, enUSA, Edition date: 201804, Second-Printing
Towing
Page 117 of 329
•When stopped in congested or heavytraffic during hot weather, place thegearshift in position P to aid engine andtransmission cooling and to help A/Cperformance.
•Switch off the speed control withheavy loads or in hilly terrain. Thespeed control may turn offautomatically when you are towing onlong, steep grades.
•Shift to a lower gear when driving downa long or steep hill. Do not apply thebrakes continuously, as they mayoverheat and become less effective.
•If your transmission is equipped with aGrade Assist or Tow/Haul feature, usethis feature when towing. This providesengine braking and helps eliminateexcessive transmission shifting foroptimum fuel economy andtransmission cooling.
•If your vehicle is equipped withAdvanceTrac with RSC, this systemmay turn on during typical corneringmaneuvers with a heavily loaded trailer.This is normal. Turning the corner at aslower speed while towing may reducethis tendency.
•If you are towing a trailer frequently inhot weather, hilly conditions, at thegross combined weight rating (or anycombination of these factors), considerrefilling your rear axle with syntheticgear lubricant. See Capacities andSpecifications (page 198).
•Allow more distance for stopping witha trailer attached. Anticipate stops andbrake gradually.
•Avoid parking on a grade. However, ifyou must park on a grade:
1. Turn the steering wheel to point yourvehicle tires away from traffic flow.
2. Set your vehicle parking brake.
3. Place the automatic transmission inposition P.
4. Place wheel chocks in front and backof the trailer wheels. (Chocks notincluded with vehicle.)
Your vehicle may be equipped with atemporary or conventional spare tire. A"temporary" spare tire is different in size(diameter or width), tread-type(All-Season or All Terrain) or is from adifferent manufacturer than the road tireson your vehicle. Consult information on thetire label or Safety Compliance label forlimitations when using.
Launching or Retrieving a Boat orPersonal Watercraft (PWC)
Note:Disconnect the wiring to the trailerbefore backing the trailer into the water.
Note:Reconnect the wiring to the trailerafter removing the trailer from the water.
When backing down a ramp during boatlaunching or retrieval:
•Do not allow the static water level torise above the bottom edge of the rearbumper.
•Do not allow waves to break higherthan 6 in (15 cm) above the bottomedge of the rear bumper.
Exceeding these limits may allow water toenter vehicle components:
•Causing internal damage to thecomponents.
•Affecting driveability, emissions andreliability.
Replace the rear axle lubricant anytimethe rear axle has been submerged in water.Water may have contaminated the rearaxle lubricant, which is not normallychecked or changed unless a leak issuspected or other axle repair is required.
114
E-Series (TE4) Canada/United States of America, enUSA, Edition date: 201804, Second-Printing
Towing
Page 119 of 329
BREAKING-IN
You need to break in new tires forapproximately 300 mi (480 km). Duringthis time, your vehicle may exhibit someunusual driving characteristics.
Avoid driving too fast during the first1,000 mi (1,600 km). Vary your speedfrequently and change up through thegears early. Do not labor the engine.
Do not tow during the first 1,000 mi(1,600 km).
REDUCED ENGINE
PERFORMANCE
WARNING: If you continue to driveyour vehicle when the engine isoverheating, the engine could stopwithout warning. Failure to follow thisinstruction could result in the loss ofcontrol of your vehicle.
If the engine coolant temperature gaugeneedle moves to the upper limit position,the engine is overheating. See Gauges(page 53).
You must only drive your vehicle for a shortdistance if the engine overheats. Thedistance you can travel depends onambient temperature, vehicle load andterrain. The engine continues to operatewith limited power for a short period oftime.
If the engine temperature continues to rise,the fuel supply to the engine reduces. Theair conditioning switches off and the enginecooling fan operates continually.
1. Gradually reduce your speed and stopyour vehicle as soon as it is safe to doso.
2. Immediately switch the engine off toprevent severe engine damage.
3. Wait for the engine to cool down.
4. Check the coolant level. See EngineCoolant Check (page 144).
5. Have your vehicle checked as soon aspossible.
ECONOMICAL DRIVING
Fuel economy is affected by several thingssuch as how you drive, the conditions youdrive under and how you maintain yourvehicle.
There are some things to keep in mind thatmay improve your fuel economy:
•Accelerate and slow down in a smooth,moderate fashion.
•Drive at steady speeds.
•Anticipate stops; slowing down mayeliminate the need to stop.
•Combine errands and minimizestop-and-go driving (When runningerrands, go to the furthest destinationfirst and then work your way backhome).
•Close the windows for high-speeddriving.
•Drive at reasonable speeds.
•Keep the tires properly inflated and useonly the recommended size.
•Use the recommended engine oil.
•Perform all regularly scheduledmaintenance.
There are also some things you may wantto avoid doing because they reduce yourfuel economy:
•Avoid sudden or hard accelerations.
•Avoid revving the engine before turningoff the car.
•Avoid long idle periods.
116
E-Series (TE4) Canada/United States of America, enUSA, Edition date: 201804, Second-Printing
Driving Hints
Page 134 of 329
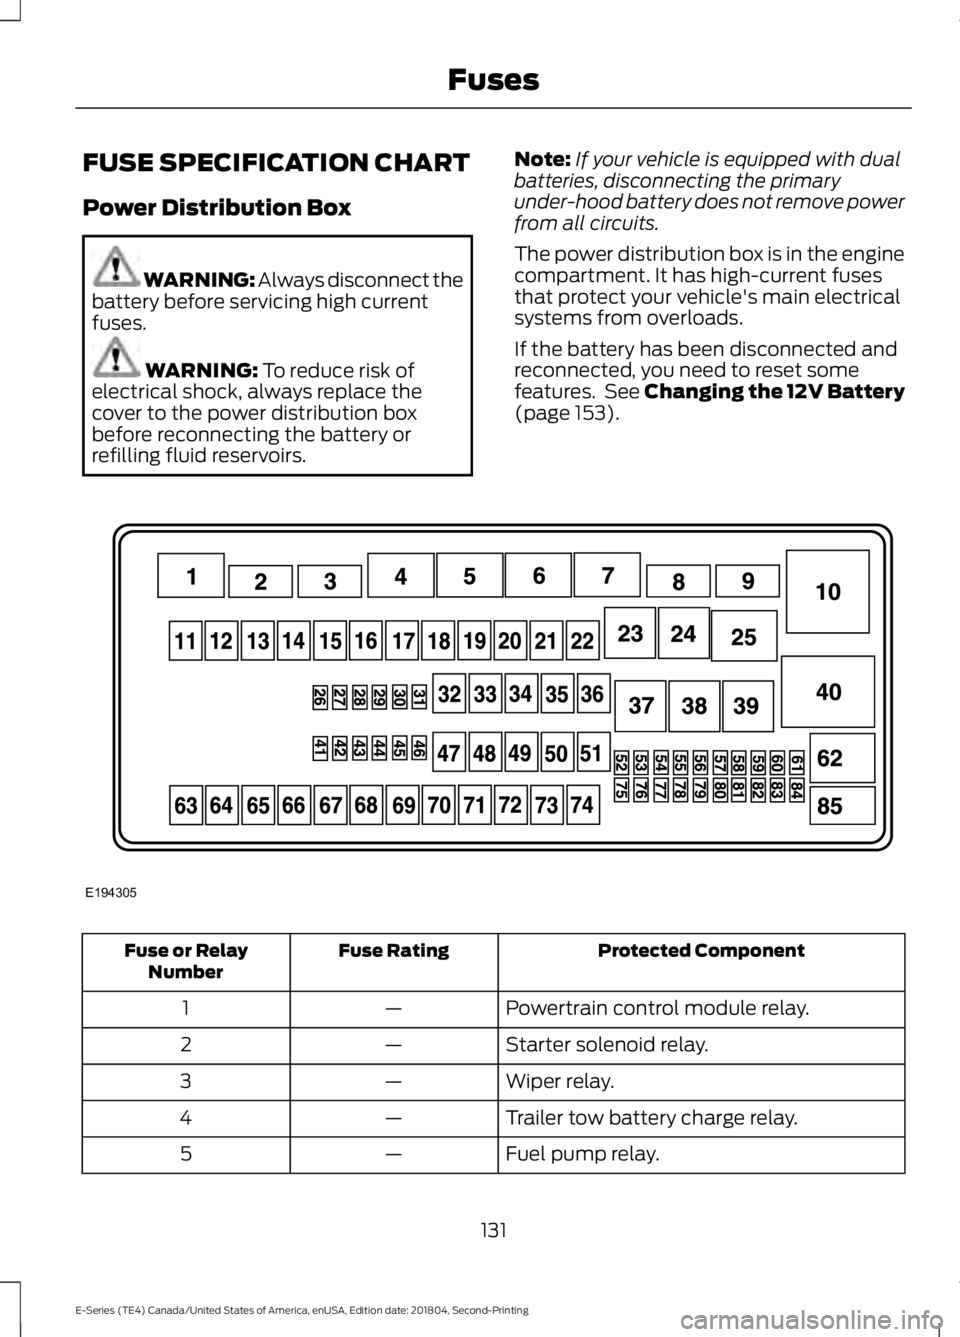
FUSE SPECIFICATION CHART
Power Distribution Box
WARNING: Always disconnect thebattery before servicing high currentfuses.
WARNING: To reduce risk ofelectrical shock, always replace thecover to the power distribution boxbefore reconnecting the battery orrefilling fluid reservoirs.
Note:If your vehicle is equipped with dualbatteries, disconnecting the primaryunder-hood battery does not remove powerfrom all circuits.
The power distribution box is in the enginecompartment. It has high-current fusesthat protect your vehicle's main electricalsystems from overloads.
If the battery has been disconnected andreconnected, you need to reset somefeatures. See Changing the 12V Battery(page 153).
Protected ComponentFuse RatingFuse or RelayNumber
Powertrain control module relay.—1
Starter solenoid relay.—2
Wiper relay.—3
Trailer tow battery charge relay.—4
Fuel pump relay.—5
131
E-Series (TE4) Canada/United States of America, enUSA, Edition date: 201804, Second-Printing
FusesE194305