ignition FORD E SERIES 2021 User Guide
[x] Cancel search | Manufacturer: FORD, Model Year: 2021, Model line: E SERIES, Model: FORD E SERIES 2021Pages: 301, PDF Size: 3.05 MB
Page 48 of 301
PASSIVE ANTI-THEFT
SYSTEM
Note:
The system is not compatible with
non-Ford aftermarket remote start systems.
Use of these systems may result in vehicle
starting problems and a loss of security
protection.
Note: Metallic objects, electronic devices
or a second coded key on the same key
chain may cause vehicle starting problems
if they are too close to the key when starting
the engine. Prevent these objects from
touching the coded key while starting the
engine. Switch the ignition off, move all
objects on the key chain away from the
coded key and restart the engine if a
problem occurs.
Note: Do not leave a duplicate coded key
in the vehicle. Always take your keys and
lock all doors when leaving the vehicle.
SecuriLock®
The system is an engine immobilization
system designed to prevent someone from
starting the engine unless they use a
correctly coded key for your vehicle. Using
an incorrectly coded key may prevent the
engine from starting. A message may
appear in the information display. If you
are unable to start the engine with a
correctly coded key, a malfunction has
happened and a message may appear in
the information display.
Automatic Arming
The engine immobilization system arms
immediately after you switch the ignition
off.
Automatic Disarming
Switching the ignition on with a correctly
coded key disarms the engine
immobilization system. Replacement Keys
If your keys become lost or stolen and you
do not have a spare correctly coded key,
you need to have your vehicle towed to an
authorized dealer. You need to erase the
coded keys from your vehicle and program
new coded keys.
Store an extra correctly coded key away
from the vehicle in a safe place to help
prevent any inconveniences. See an
authorized dealer to purchase additional
spare or replacement keys.
Note:
Your vehicle comes with two
integrated keyhead transmitters.
Programming a Spare Integrated
Keyhead Transmitter
You can program your own integrated
keyhead transmitter or standard
SecuriLock coded keys to your vehicle.
This procedure programs both the engine
immobilizer keycode and the remote entry
portion of the remote control to your
vehicle
Only use integrated keyhead transmitters
or standard SecuriLock keys.
You must have two previously
programmed correctly coded keys and the
new unprogrammed key readily accessible.
See an authorized dealer to have the spare
key programmed if two previously
programmed correctly coded keys are not
available.
Read and understand the entire procedure
before you begin.
1. Insert the first previously programmed
correctly coded key into the ignition.
2. Switch the ignition from off to on. Keep
the ignition on for at least three
seconds, but no more than 10 seconds.
3. Switch the ignition off and remove the
first correctly coded key from the
ignition.
45
E-Series (TE4) Canada/United States of America, enUSA, Edition date: 201910, First-Printing Security
Page 49 of 301
4. After three seconds but within 10
seconds of switching the ignition off,
insert the second previously correctly
coded key into the ignition.
5. Switch the ignition from off to on. Keep
the ignition on for at least three
seconds, but no more than 10 seconds.
6. Switch the ignition off and remove the
second previously programmed
correctly coded key from the ignition.
7. After three seconds but within 10 seconds of switching the ignition off
and removing the previously
programmed correctly coded key,
insert the new unprogrammed key into
the ignition.
8. Switch the ignition from off to on. Keep
the ignition on for at least six seconds.
9. Remove the newly programmed correctly coded key from the ignition.
If you successfully program the key, it
starts the engine and operates the remote
entry system, if the new key is an
integrated keyhead transmitter.
If you did not successfully program the key,
wait 10 seconds and repeat Steps 1 through
8. If you are still unsuccessful, take your
vehicle to an authorized dealer.
Note: You can program a maximum of
eight coded keys to your vehicle. All eight
can be integrated keyhead transmitters.
46
E-Series (TE4) Canada/United States of America, enUSA, Edition date: 201910, First-Printing Security
Page 54 of 301
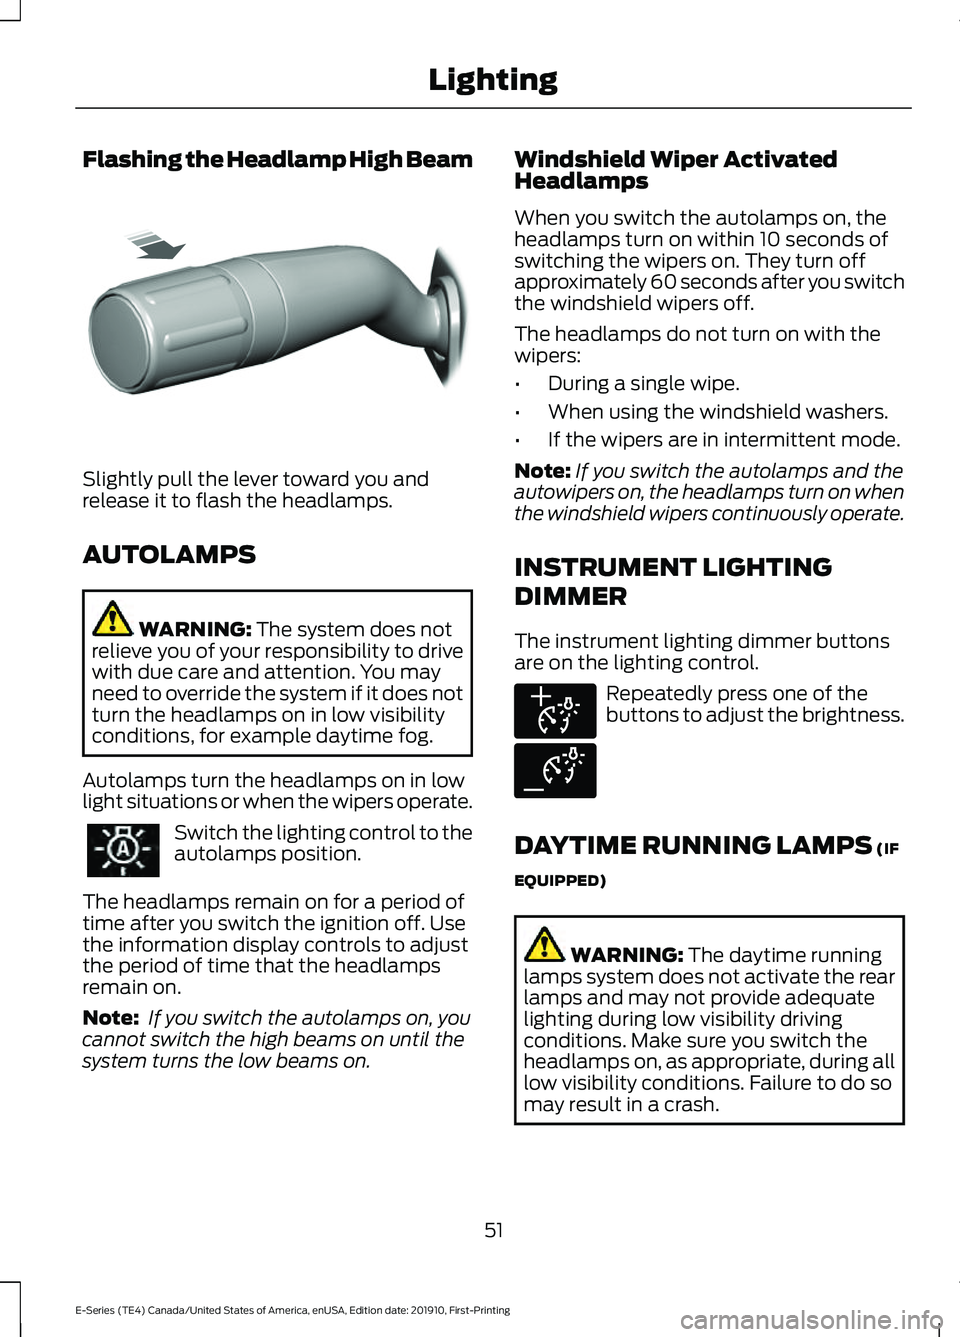
Flashing the Headlamp High Beam
Slightly pull the lever toward you and
release it to flash the headlamps.
AUTOLAMPS
WARNING: The system does not
relieve you of your responsibility to drive
with due care and attention. You may
need to override the system if it does not
turn the headlamps on in low visibility
conditions, for example daytime fog.
Autolamps turn the headlamps on in low
light situations or when the wipers operate. Switch the lighting control to the
autolamps position.
The headlamps remain on for a period of
time after you switch the ignition off. Use
the information display controls to adjust
the period of time that the headlamps
remain on.
Note: If you switch the autolamps on, you
cannot switch the high beams on until the
system turns the low beams on. Windshield Wiper Activated
Headlamps
When you switch the autolamps on, the
headlamps turn on within 10 seconds of
switching the wipers on. They turn off
approximately 60 seconds after you switch
the windshield wipers off.
The headlamps do not turn on with the
wipers:
•
During a single wipe.
• When using the windshield washers.
• If the wipers are in intermittent mode.
Note: If you switch the autolamps and the
autowipers on, the headlamps turn on when
the windshield wipers continuously operate.
INSTRUMENT LIGHTING
DIMMER
The instrument lighting dimmer buttons
are on the lighting control. Repeatedly press one of the
buttons to adjust the brightness.
DAYTIME RUNNING LAMPS
(IF
EQUIPPED) WARNING:
The daytime running
lamps system does not activate the rear
lamps and may not provide adequate
lighting during low visibility driving
conditions. Make sure you switch the
headlamps on, as appropriate, during all
low visibility conditions. Failure to do so
may result in a crash.
51
E-Series (TE4) Canada/United States of America, enUSA, Edition date: 201910, First-Printing LightingE311233 E291299 E291298
Page 58 of 301
POWER WINDOWS (IF EQUIPPED)
WARNING:
Do not leave children
unattended in your vehicle and do not
let them play with the power windows.
They may seriously injure themselves. WARNING:
When closing the
power windows, you should verify they
are free of obstructions and make sure
that children and pets are not in the
proximity of the window openings. Note:
You may hear a pulsing noise when
just one of the windows is open. Lower the
opposite window slightly to reduce this
noise.
Press the switch to open the window.
Lift the switch to close the window.
One-Touch Down
Press the switch fully and release it. Press
again or lift it to stop the window.
Accessory Delay
You can use the window switches for
several minutes when you switch the
ignition off or until you open either front
door. EXTERIOR MIRRORS
(IF EQUIPPED)
Power Exterior Mirrors
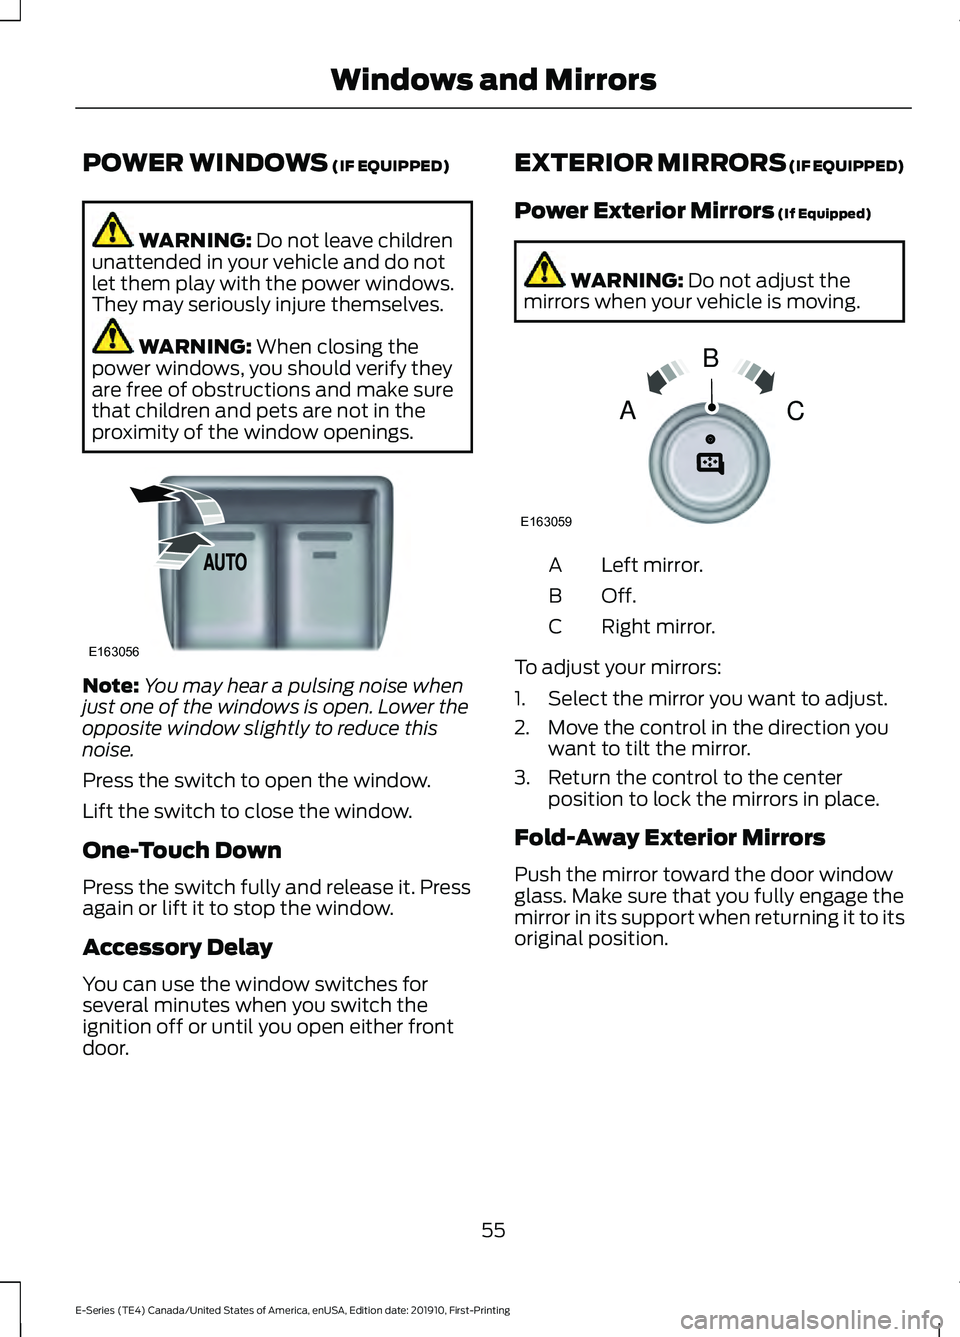
(If Equipped) WARNING:
Do not adjust the
mirrors when your vehicle is moving. Left mirror.
A
Off.B
Right mirror.
C
To adjust your mirrors:
1. Select the mirror you want to adjust.
2. Move the control in the direction you want to tilt the mirror.
3. Return the control to the center position to lock the mirrors in place.
Fold-Away Exterior Mirrors
Push the mirror toward the door window
glass. Make sure that you fully engage the
mirror in its support when returning it to its
original position.
55
E-Series (TE4) Canada/United States of America, enUSA, Edition date: 201910, First-Printing Windows and MirrorsE163056 E163059
B
AC
Page 63 of 301
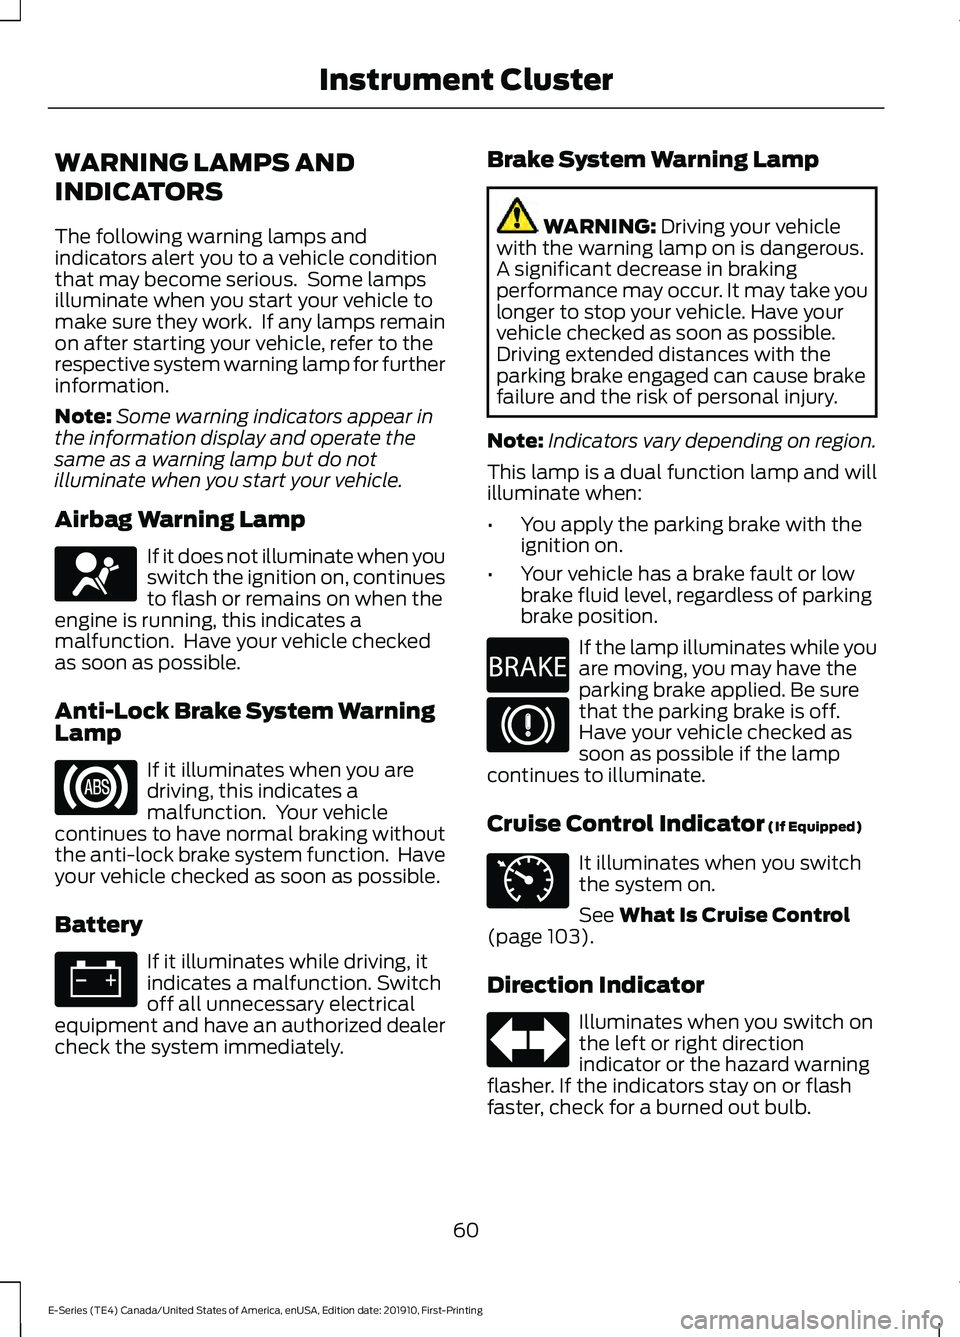
WARNING LAMPS AND
INDICATORS
The following warning lamps and
indicators alert you to a vehicle condition
that may become serious. Some lamps
illuminate when you start your vehicle to
make sure they work. If any lamps remain
on after starting your vehicle, refer to the
respective system warning lamp for further
information.
Note:
Some warning indicators appear in
the information display and operate the
same as a warning lamp but do not
illuminate when you start your vehicle.
Airbag Warning Lamp If it does not illuminate when you
switch the ignition on, continues
to flash or remains on when the
engine is running, this indicates a
malfunction. Have your vehicle checked
as soon as possible.
Anti-Lock Brake System Warning
Lamp If it illuminates when you are
driving, this indicates a
malfunction. Your vehicle
continues to have normal braking without
the anti-lock brake system function. Have
your vehicle checked as soon as possible.
Battery If it illuminates while driving, it
indicates a malfunction. Switch
off all unnecessary electrical
equipment and have an authorized dealer
check the system immediately. Brake System Warning Lamp WARNING: Driving your vehicle
with the warning lamp on is dangerous.
A significant decrease in braking
performance may occur. It may take you
longer to stop your vehicle. Have your
vehicle checked as soon as possible.
Driving extended distances with the
parking brake engaged can cause brake
failure and the risk of personal injury.
Note: Indicators vary depending on region.
This lamp is a dual function lamp and will
illuminate when:
• You apply the parking brake with the
ignition on.
• Your vehicle has a brake fault or low
brake fluid level, regardless of parking
brake position. If the lamp illuminates while you
are moving, you may have the
parking brake applied. Be sure
that the parking brake is off.
Have your vehicle checked as
soon as possible if the lamp
continues to illuminate.
Cruise Control Indicator
(If Equipped) It illuminates when you switch
the system on.
See
What Is Cruise Control
(page 103).
Direction Indicator Illuminates when you switch on
the left or right direction
indicator or the hazard warning
flasher. If the indicators stay on or flash
faster, check for a burned out bulb.
60
E-Series (TE4) Canada/United States of America, enUSA, Edition date: 201910, First-Printing Instrument ClusterE67017 E270480 E71340
Page 64 of 301
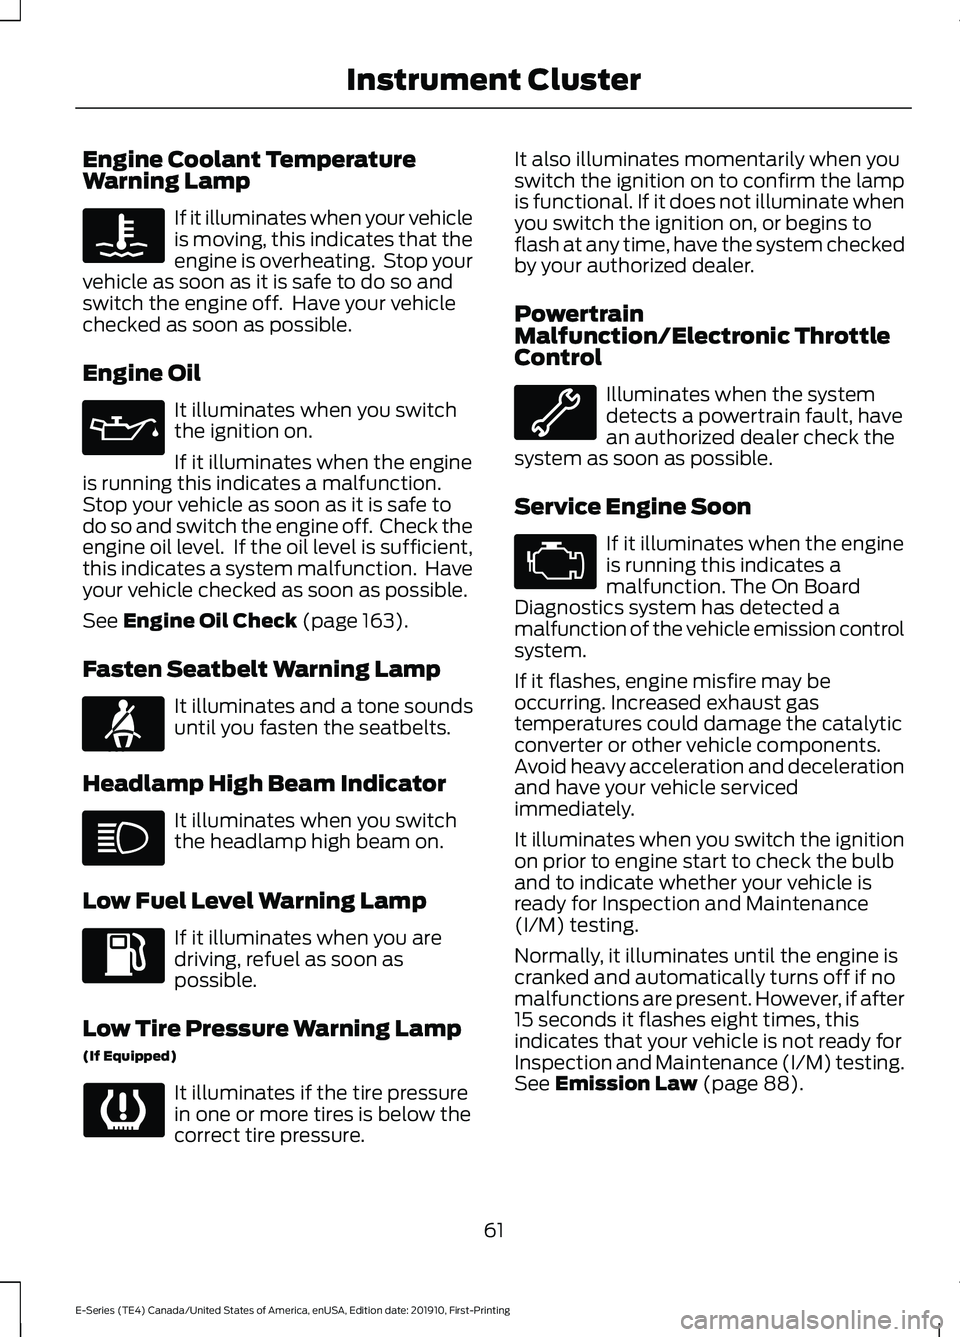
Engine Coolant Temperature
Warning Lamp
If it illuminates when your vehicle
is moving, this indicates that the
engine is overheating. Stop your
vehicle as soon as it is safe to do so and
switch the engine off. Have your vehicle
checked as soon as possible.
Engine Oil It illuminates when you switch
the ignition on.
If it illuminates when the engine
is running this indicates a malfunction.
Stop your vehicle as soon as it is safe to
do so and switch the engine off. Check the
engine oil level. If the oil level is sufficient,
this indicates a system malfunction. Have
your vehicle checked as soon as possible.
See Engine Oil Check (page 163).
Fasten Seatbelt Warning Lamp It illuminates and a tone sounds
until you fasten the seatbelts.
Headlamp High Beam Indicator It illuminates when you switch
the headlamp high beam on.
Low Fuel Level Warning Lamp If it illuminates when you are
driving, refuel as soon as
possible.
Low Tire Pressure Warning Lamp
(If Equipped) It illuminates if the tire pressure
in one or more tires is below the
correct tire pressure. It also illuminates momentarily when you
switch the ignition on to confirm the lamp
is functional. If it does not illuminate when
you switch the ignition on, or begins to
flash at any time, have the system checked
by your authorized dealer.
Powertrain
Malfunction/Electronic Throttle
Control
Illuminates when the system
detects a powertrain fault, have
an authorized dealer check the
system as soon as possible.
Service Engine Soon If it illuminates when the engine
is running this indicates a
malfunction. The On Board
Diagnostics system has detected a
malfunction of the vehicle emission control
system.
If it flashes, engine misfire may be
occurring. Increased exhaust gas
temperatures could damage the catalytic
converter or other vehicle components.
Avoid heavy acceleration and deceleration
and have your vehicle serviced
immediately.
It illuminates when you switch the ignition
on prior to engine start to check the bulb
and to indicate whether your vehicle is
ready for Inspection and Maintenance
(I/M) testing.
Normally, it illuminates until the engine is
cranked and automatically turns off if no
malfunctions are present. However, if after
15 seconds it flashes eight times, this
indicates that your vehicle is not ready for
Inspection and Maintenance (I/M) testing.
See
Emission Law (page 88).
61
E-Series (TE4) Canada/United States of America, enUSA, Edition date: 201910, First-Printing Instrument Cluster E71880
Page 65 of 301
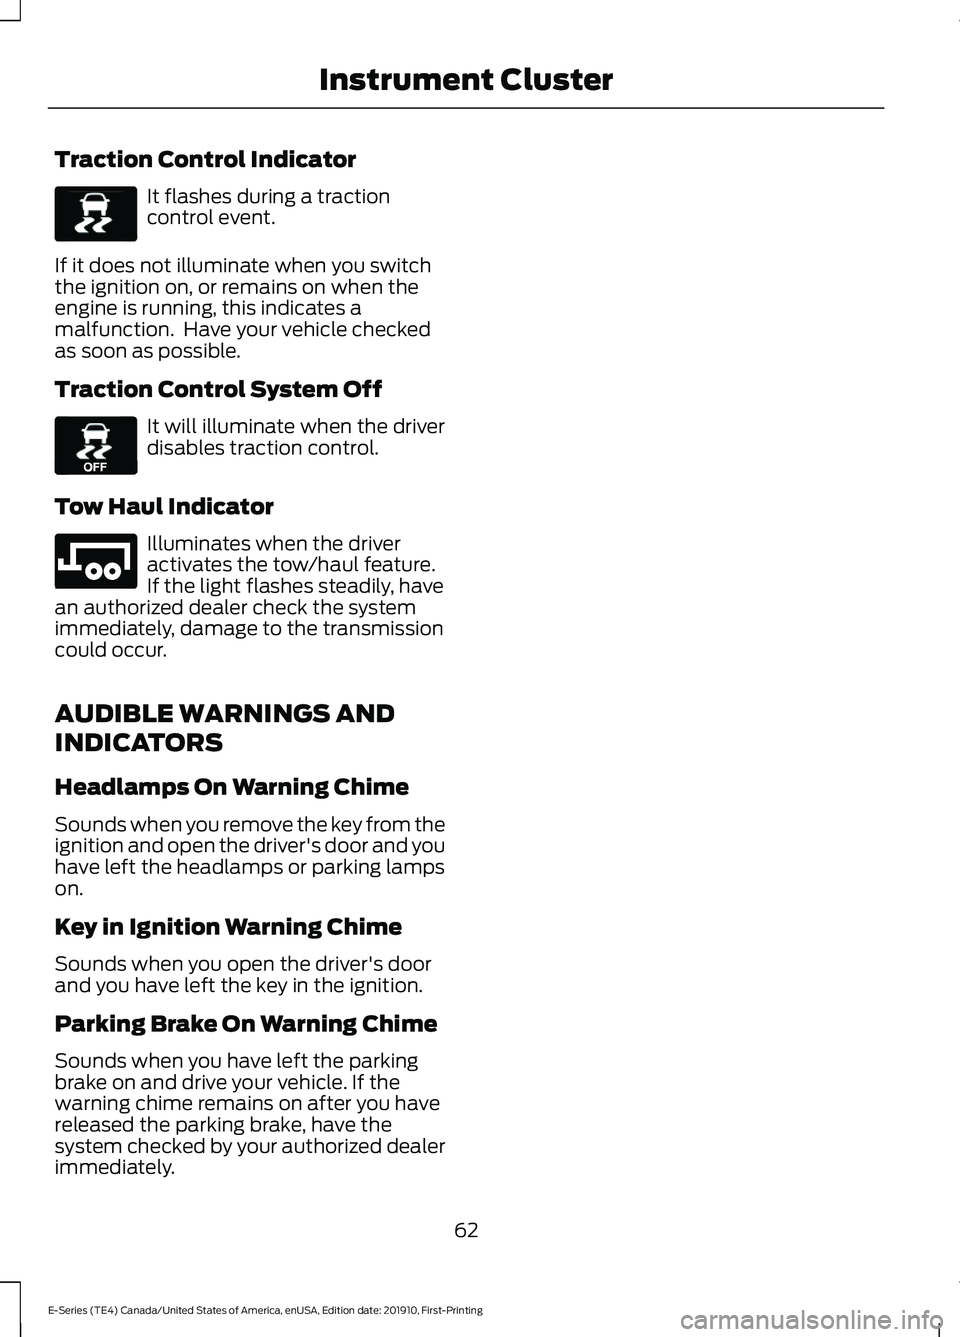
Traction Control Indicator
It flashes during a traction
control event.
If it does not illuminate when you switch
the ignition on, or remains on when the
engine is running, this indicates a
malfunction. Have your vehicle checked
as soon as possible.
Traction Control System Off It will illuminate when the driver
disables traction control.
Tow Haul Indicator Illuminates when the driver
activates the tow/haul feature.
If the light flashes steadily, have
an authorized dealer check the system
immediately, damage to the transmission
could occur.
AUDIBLE WARNINGS AND
INDICATORS
Headlamps On Warning Chime
Sounds when you remove the key from the
ignition and open the driver's door and you
have left the headlamps or parking lamps
on.
Key in Ignition Warning Chime
Sounds when you open the driver's door
and you have left the key in the ignition.
Parking Brake On Warning Chime
Sounds when you have left the parking
brake on and drive your vehicle. If the
warning chime remains on after you have
released the parking brake, have the
system checked by your authorized dealer
immediately.
62
E-Series (TE4) Canada/United States of America, enUSA, Edition date: 201910, First-Printing Instrument ClusterE138639 E130458 E246592
Page 70 of 301
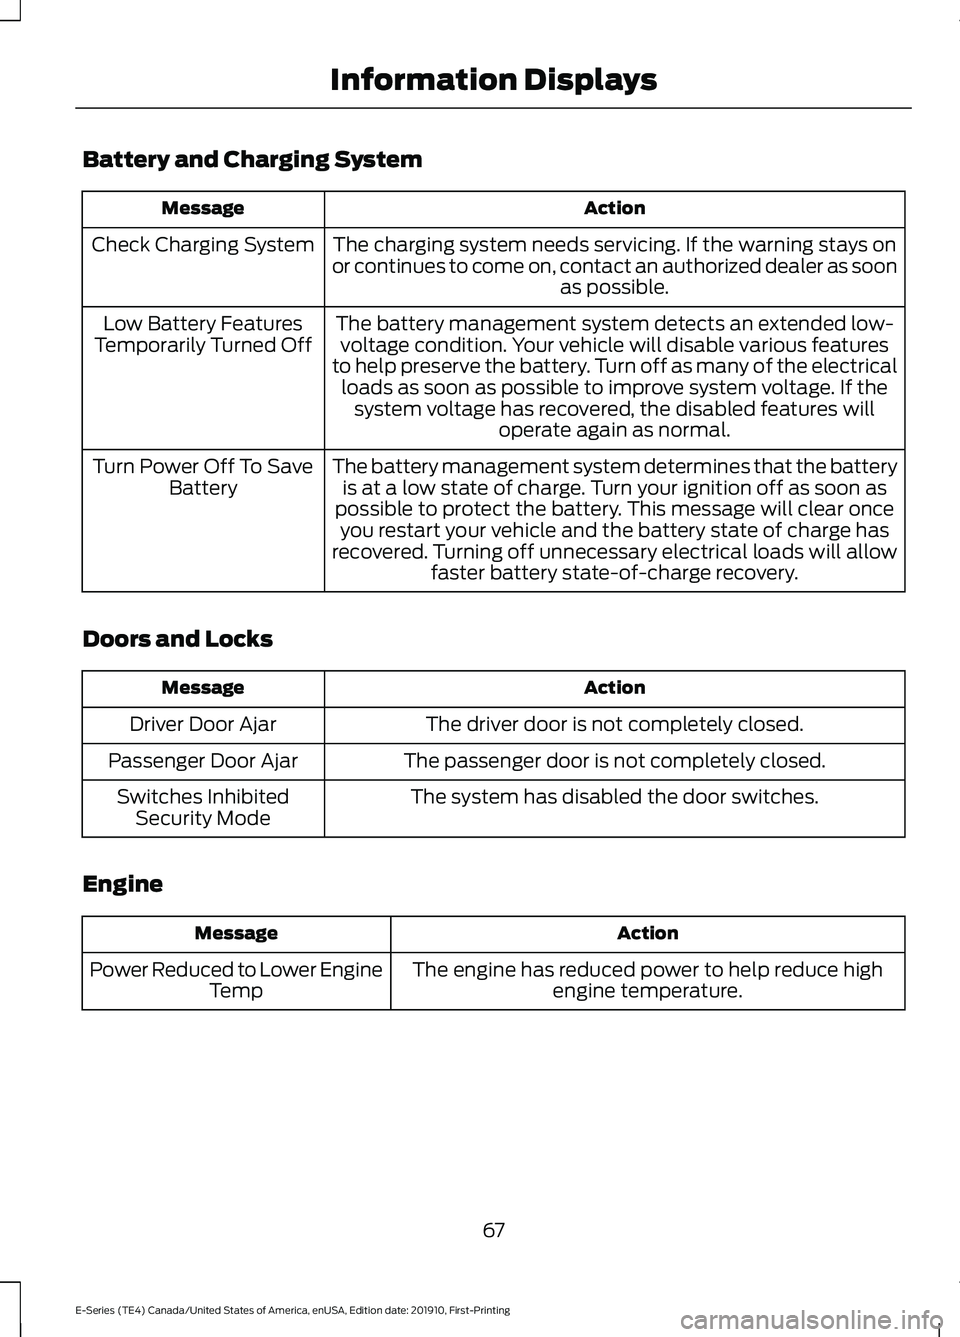
Battery and Charging System
Action
Message
The charging system needs servicing. If the warning stays on
or continues to come on, contact an authorized dealer as soon as possible.
Check Charging System
The battery management system detects an extended low-voltage condition. Your vehicle will disable various features
to help preserve the battery. Turn off as many of the electrical loads as soon as possible to improve system voltage. If the system voltage has recovered, the disabled features will operate again as normal.
Low Battery Features
Temporarily Turned Off
The battery management system determines that the batteryis at a low state of charge. Turn your ignition off as soon as
possible to protect the battery. This message will clear once you restart your vehicle and the battery state of charge has
recovered. Turning off unnecessary electrical loads will allow faster battery state-of-charge recovery.
Turn Power Off To Save
Battery
Doors and Locks Action
Message
The driver door is not completely closed.
Driver Door Ajar
The passenger door is not completely closed.
Passenger Door Ajar
The system has disabled the door switches.
Switches Inhibited
Security Mode
Engine Action
Message
The engine has reduced power to help reduce highengine temperature.
Power Reduced to Lower Engine
Temp
67
E-Series (TE4) Canada/United States of America, enUSA, Edition date: 201910, First-Printing Information Displays
Page 72 of 301
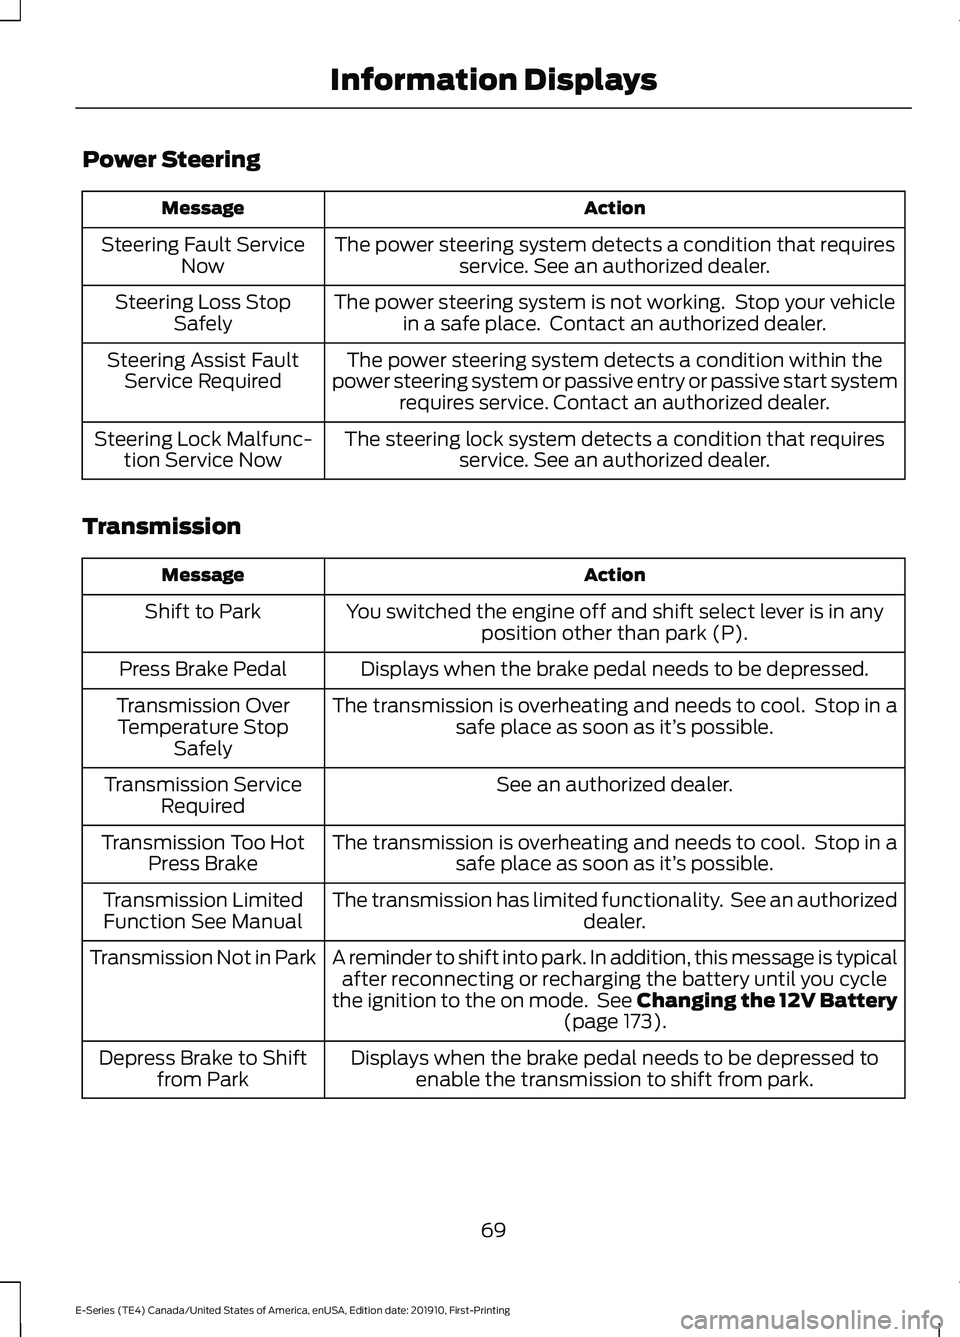
Power Steering
Action
Message
The power steering system detects a condition that requiresservice. See an authorized dealer.
Steering Fault Service
Now
The power steering system is not working. Stop your vehiclein a safe place. Contact an authorized dealer.
Steering Loss Stop
Safely
The power steering system detects a condition within the
power steering system or passive entry or passive start system requires service. Contact an authorized dealer.
Steering Assist Fault
Service Required
The steering lock system detects a condition that requiresservice. See an authorized dealer.
Steering Lock Malfunc-
tion Service Now
Transmission Action
Message
You switched the engine off and shift select lever is in anyposition other than park (P).
Shift to Park
Displays when the brake pedal needs to be depressed.
Press Brake Pedal
The transmission is overheating and needs to cool. Stop in asafe place as soon as it’ s possible.
Transmission Over
Temperature Stop Safely
See an authorized dealer.
Transmission Service
Required
The transmission is overheating and needs to cool. Stop in asafe place as soon as it’ s possible.
Transmission Too Hot
Press Brake
The transmission has limited functionality. See an authorized dealer.
Transmission Limited
Function See Manual
A reminder to shift into park. In addition, this message is typicalafter reconnecting or recharging the battery until you cycle
the ignition to the on mode. See Changing the 12V Battery (page 173).
Transmission Not in Park
Displays when the brake pedal needs to be depressed toenable the transmission to shift from park.
Depress Brake to Shift
from Park
69
E-Series (TE4) Canada/United States of America, enUSA, Edition date: 201910, First-Printing Information Displays
Page 79 of 301
12 Volt DC Power Point
WARNING: Do not plug optional
electrical accessories into the cigar
lighter socket. Incorrect use of the cigar
lighter can cause damage not covered
by the vehicle warranty, and can result
in fire or serious injury.
Note: When you switch the ignition on, you
can use the socket to power 12 volt
appliances with a maximum current rating
of 15 amps.
If the power supply does not work after you
switch the ignition off, switch the ignition
on.
Note: Do not hang any accessory from the
accessory plug.
Note: Do not use the power point over the
vehicle capacity of 12 volt DC 180 watts or
a fuse may blow.
Note: Always keep the power point caps
closed when not in use.
Do not insert objects other than an
accessory plug into the power point. This
damages the power point and may blow
the fuse.
Run the vehicle for full capacity use of the
power point.
To prevent the battery from running out of
charge:
• Do not use the power point longer than
necessary when the vehicle is not
running.
• Do not leave devices plugged in
overnight or when you park your vehicle
for extended periods. Locations
Power points may be in the following
locations:
•
On the instrument panel.
• Inside the glove box.
• Behind the driver's seat, upper trim
panel.
110 Volt AC Power Point
(If Equipped) WARNING:
Do not keep electrical
devices plugged in the power point
whenever the device is not in use. Do not
use any extension cord with the 110 volt
AC power point, since it will defeat the
safety protection design. Doing so may
cause the power point to overload due
to powering multiple devices that can
reach beyond the 150 watt load limit and
could result in fire or serious injury.
Note: The power point turns off when you
switch the ignition off, or when the battery
voltage drops below 11 volts.
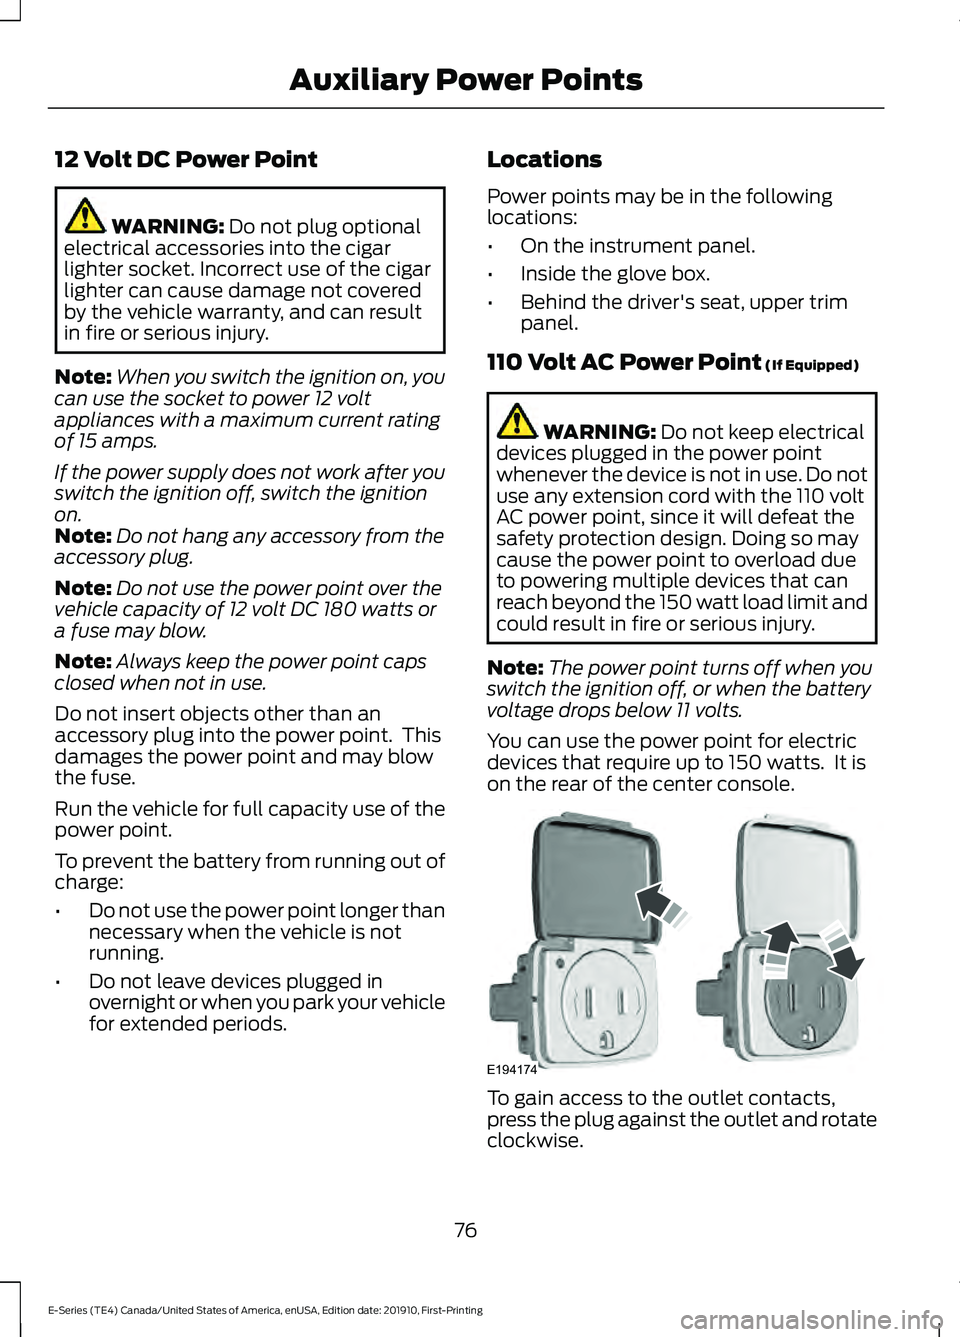
You can use the power point for electric
devices that require up to 150 watts. It is
on the rear of the center console. To gain access to the outlet contacts,
press the plug against the outlet and rotate
clockwise.
76
E-Series (TE4) Canada/United States of America, enUSA, Edition date: 201910, First-Printing Auxiliary Power PointsE194174