engine FORD EDGE 2015 2.G Quick Reference Guide
[x] Cancel search | Manufacturer: FORD, Model Year: 2015, Model line: EDGE, Model: FORD EDGE 2015 2.GPages: 10, PDF Size: 4.54 MB
Page 3 of 10

INSTRUMENT PANEL
61
2
2
4
5
5
7
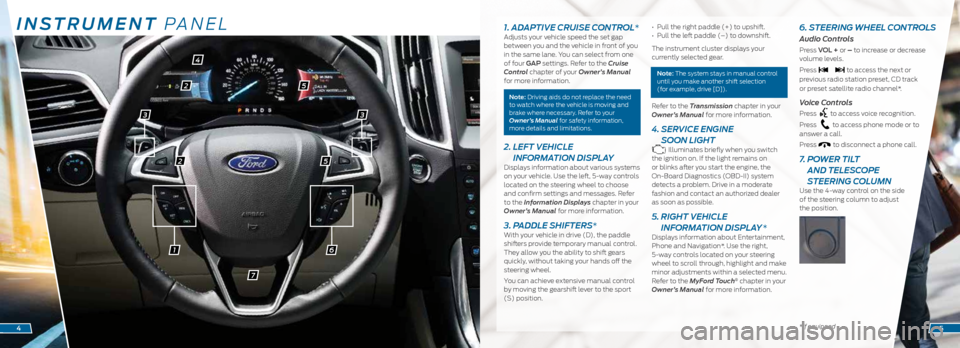
1. ADAPTIVE CRUISE CONTROL*Adjusts your vehicle speed the set gap
between you and the vehicle in front of you
in the same lane. You can select from one
of four GAP settings. Refer to the Cruise
Control chapter of your Owner’s Manual
for more information.
Note: Driving aids do not replace the need
to watch where the vehicle is moving and
brake where necessary. Refer to your
Owner’s Manual for safety information,
more details and limitations.
2. LEFT VEHICLE
INFORMATION DISPLAY
Displays information about various systems
on your vehicle. Use the left, 5-way controls
located on the steering wheel to choose
and confirm settings and messages. Refer
to the Information Displays chapter in your
Owner’s Manual for more information.
3. PADDLE SHIFTERS*With your vehicle in drive (D), the paddle
shifters provide temporary manual control.
They allow you the ability to shift gears
quickly, without taking your hands off the
steering wheel.
You can achieve extensive manual control
by moving the gearshift lever to the sport
(S) position. • Pull the right paddle (+) to upshift.
•
Pull the left paddle (–) to downshift.
The instrument cluster displays your
currently selected gear.
Note: The system stays in manual control
until you make another shift selection
(for example, drive [D]).
Refer to the Transmission chapter in your
Owner’s Manual for more information.
4. SERVICE ENGINE
SOON LIGHT
Illuminates briefly when you switch
the ignition on. If the light remains on
or blinks after you start the engine, the
On-Board Diagnostics (OBD-II) system
detects a problem. Drive in a moderate
fashion and contact an authorized dealer
as soon as possible.
5. RIGHT VEHICLE
INFORMATION DISPLAY *
Displays information about Entertainment,
Phone and Navigation*. Use the right,
5-way controls located on your steering
wheel to scroll through, highlight and make
minor adjustments within a selected menu.
Refer to the MyFord Touch
® chapter in your
Owner’s Manual for more information.
6. STEERING WHEEL CONTROLS
Audio Controls
Press VOL + or – to increase or decrease
volume levels.
Press
to access the next or
previous radio station preset, CD track
or preset satellite radio channel*.
Voice Controls
Press to access voice recognition.
Press
to access phone mode or to
answer a call.
Press
to disconnect a phone call.
7. POWER TILT
AND TELESCOPE
STEERING COLUMN
Use the 4-way control on the side
of the steering column to adjust
the position.
*if equipped45
33
Page 4 of 10

INSTRUMENT PANEL
98
10
11*if equipped6
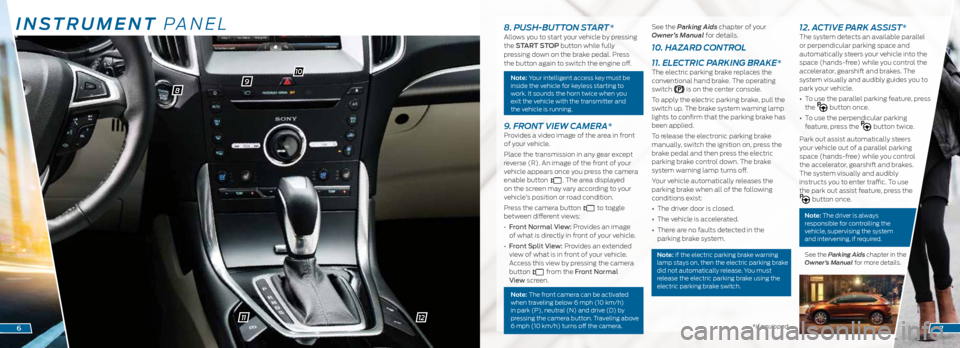
8. PUSH-BUTTON START *Allows you to start your vehicle by pressing
the START STOP button while fully
pressing down on the brake pedal. Press
the button again to switch the engine off.
Note: Your intelligent access key must be
inside the vehicle for keyless starting to
work. It sounds the horn twice when you
exit the vehicle with the transmitter and
the vehicle is running.
9. FRONT VIEW CAMERA*Provides a video image of the area in front
of your vehicle.
Place the transmission in any gear except
reverse (R). An image of the front of your
vehicle appears once you press the camera
enable button
. The area displayed
on the screen may vary according to your
vehicle’s position or road condition.
Press the camera button
to toggle
between different views:
• Front Normal View: Provides an image
of what is directly in front of your vehicle.
• Front Split View: Provides an extended
view of what is in front of your vehicle.
Access this view by pressing the camera
button
from the Front Normal
View screen.
Note: The front camera can be activated
when traveling below 6 mph (10 km/h)
in park (P), neutral (N) and drive (D) by
pressing the camera button. Traveling above
6 mph (10 km/h) turns off the camera.
See the Parking Aids chapter of your
Owner’s Manual for details.
10. HAZARD CONTROL
11. ELECTRIC PARKING BRAKE*
The electric parking brake replaces the
conventional hand brake. The operating
switch
is on the center console.
To apply the electric parking brake, pull the
switch up. The brake system warning lamp
lights to confirm that the parking brake has
been applied.
To release the electronic parking brake
manually, switch the ignition on, press the
brake pedal and then press the electric
parking brake control down. The brake
system warning lamp turns off.
Your vehicle automatically releases the
parking brake when all of the following
conditions exist:
• The driver door is closed.
• The vehicle is accelerated.
• There are no faults detected in the
parking brake system.
Note: If the electric parking brake warning
lamp stays on, then the electric parking brake
did not automatically release. You must
release the electric parking brake using the
electric parking brake switch.
12. ACTIVE PARK ASSIST*The system detects an available parallel
or perpendicular parking space and
automatically steers your vehicle into the
space (hands-free) while you control the
accelerator, gearshift and brakes. The
system visually and audibly guides you to
park your vehicle.
• To use the parallel parking feature, press
the
button once.
• To use the perpendicular parking
feature, press the
button twice.
Park out assist automatically steers
your vehicle out of a parallel parking
space (hands-free) while you control
the accelerator, gearshift and brakes.
The system visually and audibly
instructs you to enter traffic. To use
the park out assist feature, press the
button once.
Note: The driver is always
responsible for controlling the
vehicle, supervising the system
and intervening, if required.
See the Parking Aids chapter in the
Owner’s Manual for more details.
7
12
Page 8 of 10

*if equipped *if equipped*if equipped
AUTOWIPERS* To switch this feature on, move the
wiper controls to intermittent wipe. The
autowiper system turns the wipers on
only when moisture is present on the
windshield. The wiper speed depends on
how much moisture the system detects
and the sensitivity setting.
• A low sensitivity means the wipers turn
on when the system detects a large
amount of moisture on the windshield.
• A high sensitivity means the wipers turn
on when the rain sensor detects a small
amount of moisture on the windshield.
• To switch this feature off, use your
wiper controls. To change this feature
to intermittent wipe every time you use
your wipers, use the information display.
• To switch intermittent wipe back to
autowipers, use the information display.
Note: Make sure you switch off this
feature before entering a car wash.
REMOTE START*Remote start allows you to start your
vehicle from outside your vehicle using
your remote transmitter. To start, press
and then press twice within three
seconds. Once inside, apply the brake while pressing the START STOP button.
Shift into drive (D) and go. If you have an
integrated keyhead transmitter, insert the
key into the ignition and switch the ignition
on as you normally would before driving.
To switch the engine off from outside your
vehicle after using your remote start,
press
once.
You can personalize your settings within
the information display. For complete
information, refer to the Information
Display chapter in your Owner’s Manual.
INTELLIGENT ACCESS*To unlock and open a door, pull an exterior
door handle. Make sure not to touch the
lock sensor area on the front of the handle.
Touch the top of the door handle to lock
your vehicle. To unlock and open the
liftgate, press the exterior liftgate release
button on the top of the liftgate pull-cup
handle. The intelligent access transmitter
also contains a mechanical key blade that
can be used to unlock the driver door,
if necessary.
Note: Your intelligent access key must
be inside the vehicle for keyless starting
to work. It sounds the horn twice when
you exit the vehicle with the transmitter
and the vehicle is running.
INTEGRATED KEYHEAD
TRANSMITTER AND
INTELLIGENT ACCESS*
REMOTE ENTRY ICONS
• Press once to lock all doors. Press
again within three seconds to confirm
you locked all doors.
• Press
once to unlock the driver’s door.
Press again within three seconds to
unlock all doors.
• Press
to activate the panic alarm.
Press again or switch on the ignition
to deactivate.
• Press
twice within three seconds to
open the liftgate.
• Car finder: Press
twice within three
seconds to locate your vehicle. The
horn sounds and the direction
indicators flash.
CONVENIENCE
15
DUAL ZONE AUTOMATIC CLIMATE CONTROLS*Press the AUTO button to turn on automatic operation, and
set your preferred temperature by using the left-hand side
TEMP (+) or (–) button. The system adjusts fan speed, air
distribution, air conditioning operation, and selects outside air or
recirculated air to heat or cool the vehicle in order to maintain the
desired temperature.
A front passenger can adjust the temperature on the passenger
side by pressing the right-hand side TEMP (+) or (-) button.
To return back to single zone: Press and hold the AUTO button for
more than two seconds.
EASYFOLD® REAR
FOLDING SEATS*
The controls are on the left-hand
side (accessible from the liftgate
area). Press and hold the top
control to lower the left seatback,
or the bottom control to lower
the right seatback. To unfold the
seatbacks, rotate each seatback
up until it latches in the upright
position. The seatback clicks
when it locks into position.
Note: This feature is operational when the vehicle is in park (P) and the liftgate has been open for less than 10 minutes.
110-VOLT POWER OUTLET*The power outlet is on the rear of the center console. You can use it
to power electrical devices that require up to 150 watts.
POWER LIFTGATE*You can use the power feature to open or close your liftgate.
• Press the
button on the instrument panel.
• Press the remote control
button twice within three seconds.
HANDS-FREE POWER LIFTGATE OPERATION*
To Open Your Liftgate Hands-Free While You Are
at the Liftgate
1. Make sure you have an intelligent access transmitter* within
3 feet (1 meter) of the liftgate.
2. Move your foot under and away from the center rear bumper
in a single-kick motion. Do not move your foot sideways or the
sensors may not detect the motion.
Note: Allow the power system to open the liftgate after pressing the
control. Manually pushing or pulling the liftgate may activate the
system’s obstacle detection feature and stops the power operation.
14
Page 10 of 10

EASY FUEL® SYSTEM
When Fueling Your Vehicle
1. Put the vehicle in park (P) and switch
off the ignition.
2. Press the center-rear edge of the fuel
filler door and release to open.
3. Slowly insert the fuel filler nozzle fully
into the fuel system to open both doors.
Leave the nozzle fully inserted until
you have stopped pumping fuel. Allow
about 5-10 seconds after pumping fuel
before removing the fuel filler nozzle.
This allows residual fuel to drain back
into the fuel tank and not spill onto
the vehicle.
4. Slowly remove the fuel filler nozzle and
close the fuel filler door.
REFUELING WITH A PORTABLE
FUEL CONTAINER
When using a portable fuel container,
slowly insert the fuel funnel (located in
the spare wheel storage tray) and pour
the fuel into the funnel. When done, clean
the funnel or properly dispose of it. You
can purchase extra funnels from your
authorized dealer. Do not use aftermarket
funnels as they do not work with the Easy
Fuel system and may cause damage.
FUEL TANK CAPACITY
AND FUEL INFO
Depending on your drive type, your vehicle’s
fuel tank capacity can vary. All-wheel drive
vehicles have an 18.5 gallon (70.0L) fuel
tank capacity. Front-wheel drive vehicles
have an 18.4 gallon (69.5L) fuel tank
capacity. Use only “Regular” unleaded
gasoline with a minimum octane rating of
87 or higher. Do not use E85 fuels because
your vehicle was not designed to run on
fuels with more than 15% ethanol.
MYKEY®
MyKey allows you to program certain
driving restrictions in order to promote
good driving habits. You can program
things like speed restrictions, limited volume levels and safety belt reminders.
For complete information, refer to the
MyKey chapter in your Owner’s Manual.
AUTO-START-STOP* The system helps reduce fuel consumption
by automatically shutting off and restarting
the engine when your vehicle is stopped.
The engine restarts automatically when
you release the brake pedal.
To switch this feature off, press the
auto-start-stop button on the center
console. The button lights. Press the button
again to restart, or restart the vehicle. See
the Unique Driving Characteristics chapter
in your Owner’s Manual for more details.
CONFIGURABLE DAYTIME
RUNNING LAMPS*
When you switch the feature on in the
information display, daytime running lamps
turn on when you are driving, the lighting
control is in the autolamps position
and the headlamps are off.
You can switch the Configurable Daytime
Running Lamps feature ON or OFF using
the information display controls. See the
Lighting chapter in your Owner’s Manual
for complete information.
* if equipped *
if equipped
ESSENTIAL INFORMATION
TIRE PRESSURE MONITORING SYSTEM Your vehicle has a tire pressure monitoring system that lights a low
tire pressure warning light in your instrument cluster when one
or more of your tires are significantly under-inflated. If this happens,
stop and check your tires as soon as possible. Inflate them to the
proper pressure.
Refer to the Tire Pressure Monitoring System section in the
Wheels and Tires chapter of your Owner’s Manual for
more information.
LOCATION OF SPARE TIRE AND TOOLS Your spare tire and tools are beneath the carpeted floor panel in
the rear of your vehicle. The spare tire is designed for emergency
use only and should be replaced as soon as possible. For complete
details on changing your tire, refer to the Changing a Road Wheel
section in the Wheels and Tires chapter in your Owner’s Manual.
OPEN WINDOW BUFFETING You may hear a pulsing noise when just one of the windows is
open. Lower the opposite window slightly to reduce this noise.
ROADSIDE ASSISTANCE Your new Ford vehicle comes with the assurance and support of
24-hour emergency roadside assistance.
To receive roadside assistance in the United States, call
1-800-241-3673. In Canada, call 1-800-665-2006.
PRE-COLLISION ASSIST SYSTEM* This system alerts you of certain collision risks. The system’s
sensor detects your vehicle’s rapid approach to other vehicles
traveling in the same direction as your vehicle.
When your vehicle rapidly approaches another vehicle, a red
warning light flashes and a tone sounds. The brake support
system assists you in reducing any collision speed by
pre-charging the brakes. If the risk of collision continues to
increases after the audio-visual warning, the brake support
prepares the brake system for rapid braking. The system does
not automatically activate the brakes, but if the brake pedal
is pressed even lightly, the brakes apply full stopping power.
TOWING YOUR VEHICLE Towing your vehicle behind an RV or any other vehicle may
be limited. Refer to Towing the Vehicle on Four Wheels
in the Towing chapter of your Owner’s Manual.
1819