clock FORD EDGE 2023 User Guide
[x] Cancel search | Manufacturer: FORD, Model Year: 2023, Model line: EDGE, Model: FORD EDGE 2023Pages: 504, PDF Size: 14.96 MB
Page 298 of 504
Note:Before reconnecting the battery,make sure the ignition remains switched off.
Note:Make sure the battery cable terminalsare fully tightened.
Note:After cleaning or replacing thebattery, make sure you reinstall the batterycover or shield.
If you disconnect or replace the vehiclebattery, you must reset the followingfeatures:
•Window bounce-back. See Windows(page 107).
•Clock Settings.
•Pre-set radio stations.
•Steering Angle Sensor.
Note:To calibrate the steering anglesensor, drive the vehicle above 30 mph(50 km/h) for a minimum of 1.2 mi (2 km).Make sure to drive straight ahead for aminimum of 30 seconds. Several vehiclefunctions are disabled and a warning lightcould appear until the sensor is calibrated.
Note:The battery sensor must be resetwhen a new battery is installed. Install onlya battery approved by Ford for use in thevehicle. Use the following procedure toperform the battery sensor reset:
1.1. Turn ignition to on and leave engineoff. Steps 2 and 3 must be completedwithin 10 seconds.
2.2. Flash the high beams 5 times, endingwith the high beams off.
3.3. Press and release the brake pedal 3times.
The battery warning light on the clusterwill flash 3 times to confirm that the resetwas successful.
Battery Management System
The battery management system monitorsbattery conditions and takes actions toextend battery life. If excessive batterydrain is detected, the system temporarilydisables some of the following features:
•Heated rear window.
•Heated seats.
•Climate control.
•Heated steering wheel.
•Audio unit.
•Navigation system.
A message may appear in the informationdisplay to alert you that battery protectionactions are active.
After battery replacement, or in somecases after charging the battery with anexternal charger, the battery managementsystem requires eight hours of vehicle sleeptime to relearn the battery state of charge.During this time your vehicle must remainfully locked with the ignition off.
Note:If you add electrical accessories orcomponents to the vehicle, it may adverselyaffect battery performance and durability.This may also affect the performance ofother electrical systems in the vehicle.
Battery Disposal
Make sure that you dispose ofold batteries in anenvironmentally friendly way.Seek advice from your local authorityabout recycling old batteries.
294
2023 Edge (CDQ) Canada/United States of America, enUSA, Edition date: 202207, DOMMaintenanceE107998
Page 300 of 504
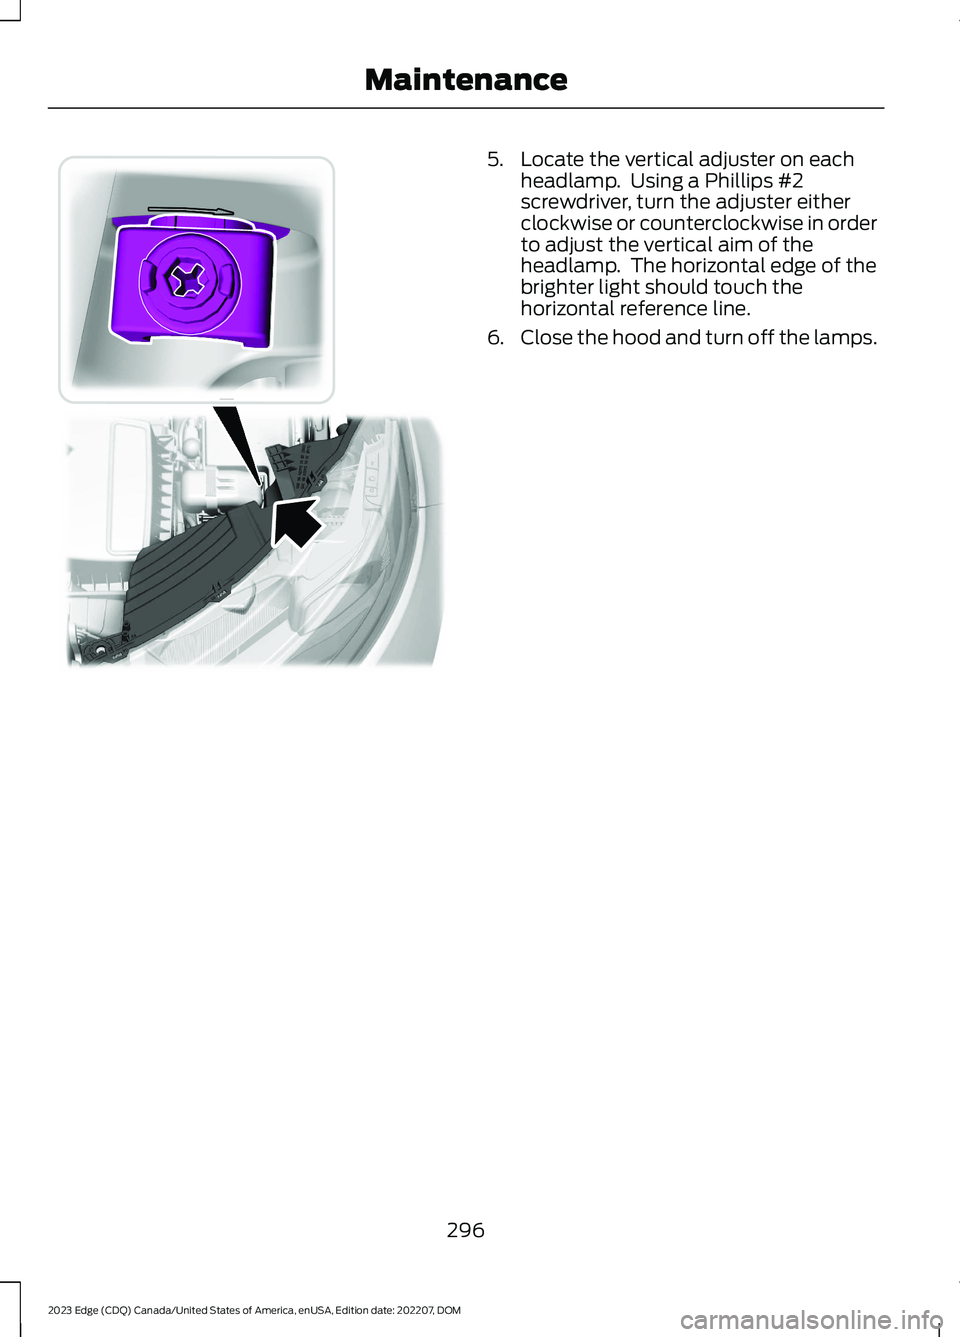
5.Locate the vertical adjuster on eachheadlamp. Using a Phillips #2screwdriver, turn the adjuster eitherclockwise or counterclockwise in orderto adjust the vertical aim of theheadlamp. The horizontal edge of thebrighter light should touch thehorizontal reference line.
6.Close the hood and turn off the lamps.
296
2023 Edge (CDQ) Canada/United States of America, enUSA, Edition date: 202207, DOMMaintenance E194757
Page 303 of 504
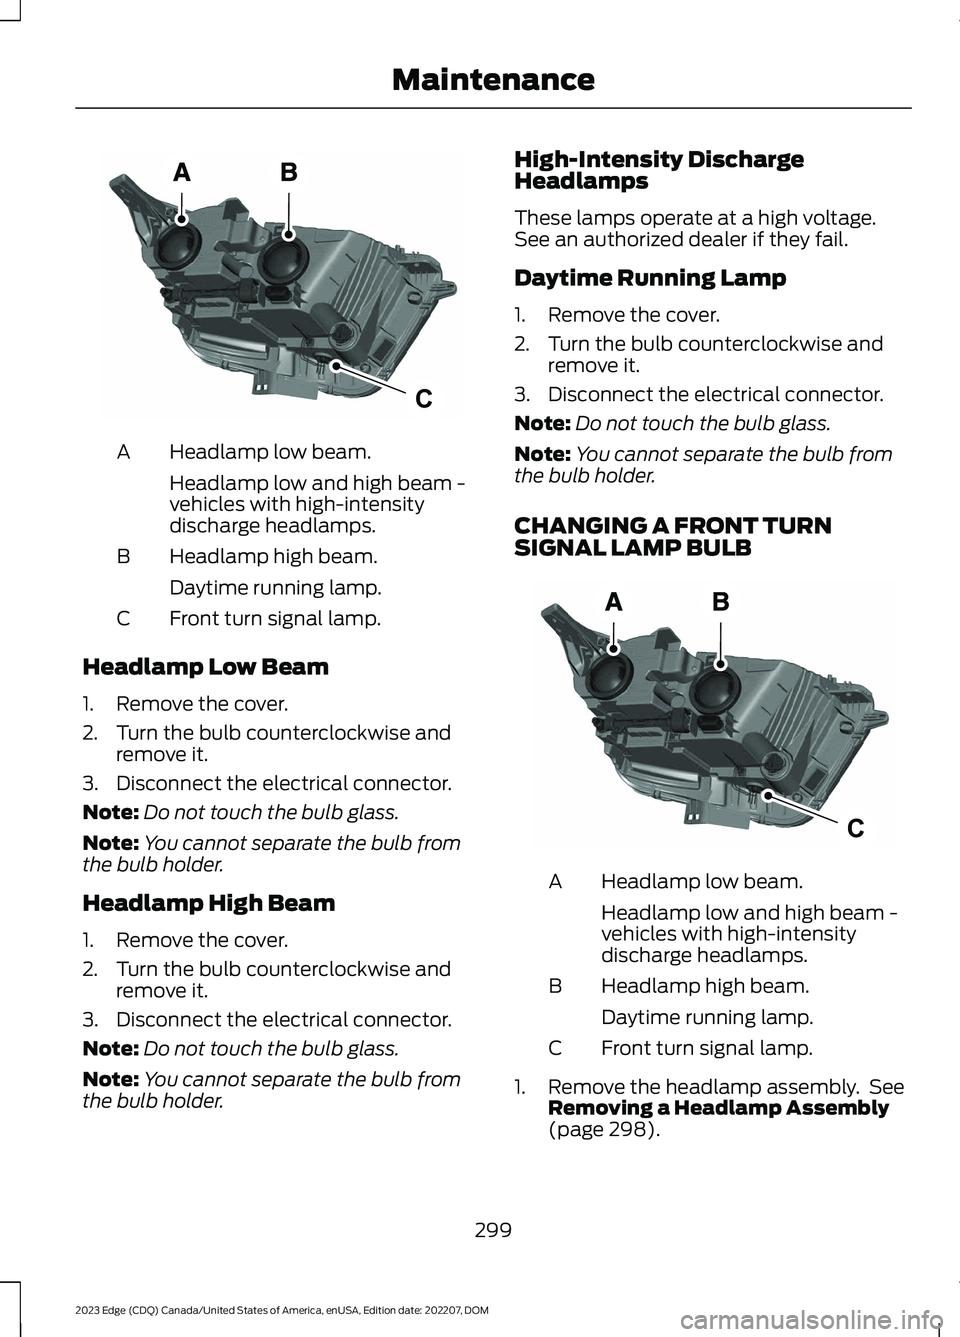
Headlamp low beam.A
Headlamp low and high beam -vehicles with high-intensitydischarge headlamps.
Headlamp high beam.B
Daytime running lamp.
Front turn signal lamp.C
Headlamp Low Beam
1.Remove the cover.
2.Turn the bulb counterclockwise andremove it.
3.Disconnect the electrical connector.
Note:Do not touch the bulb glass.
Note:You cannot separate the bulb fromthe bulb holder.
Headlamp High Beam
1.Remove the cover.
2.Turn the bulb counterclockwise andremove it.
3.Disconnect the electrical connector.
Note:Do not touch the bulb glass.
Note:You cannot separate the bulb fromthe bulb holder.
High-Intensity DischargeHeadlamps
These lamps operate at a high voltage.See an authorized dealer if they fail.
Daytime Running Lamp
1.Remove the cover.
2.Turn the bulb counterclockwise andremove it.
3.Disconnect the electrical connector.
Note:Do not touch the bulb glass.
Note:You cannot separate the bulb fromthe bulb holder.
CHANGING A FRONT TURNSIGNAL LAMP BULB
Headlamp low beam.A
Headlamp low and high beam -vehicles with high-intensitydischarge headlamps.
Headlamp high beam.B
Daytime running lamp.
Front turn signal lamp.C
1.Remove the headlamp assembly. SeeRemoving a Headlamp Assembly(page 298).
299
2023 Edge (CDQ) Canada/United States of America, enUSA, Edition date: 202207, DOMMaintenanceCE188959 CE188959
Page 304 of 504
2.Turn the bulb holder counterclockwiseand remove it.
3.Remove the bulb by pulling it straightout.
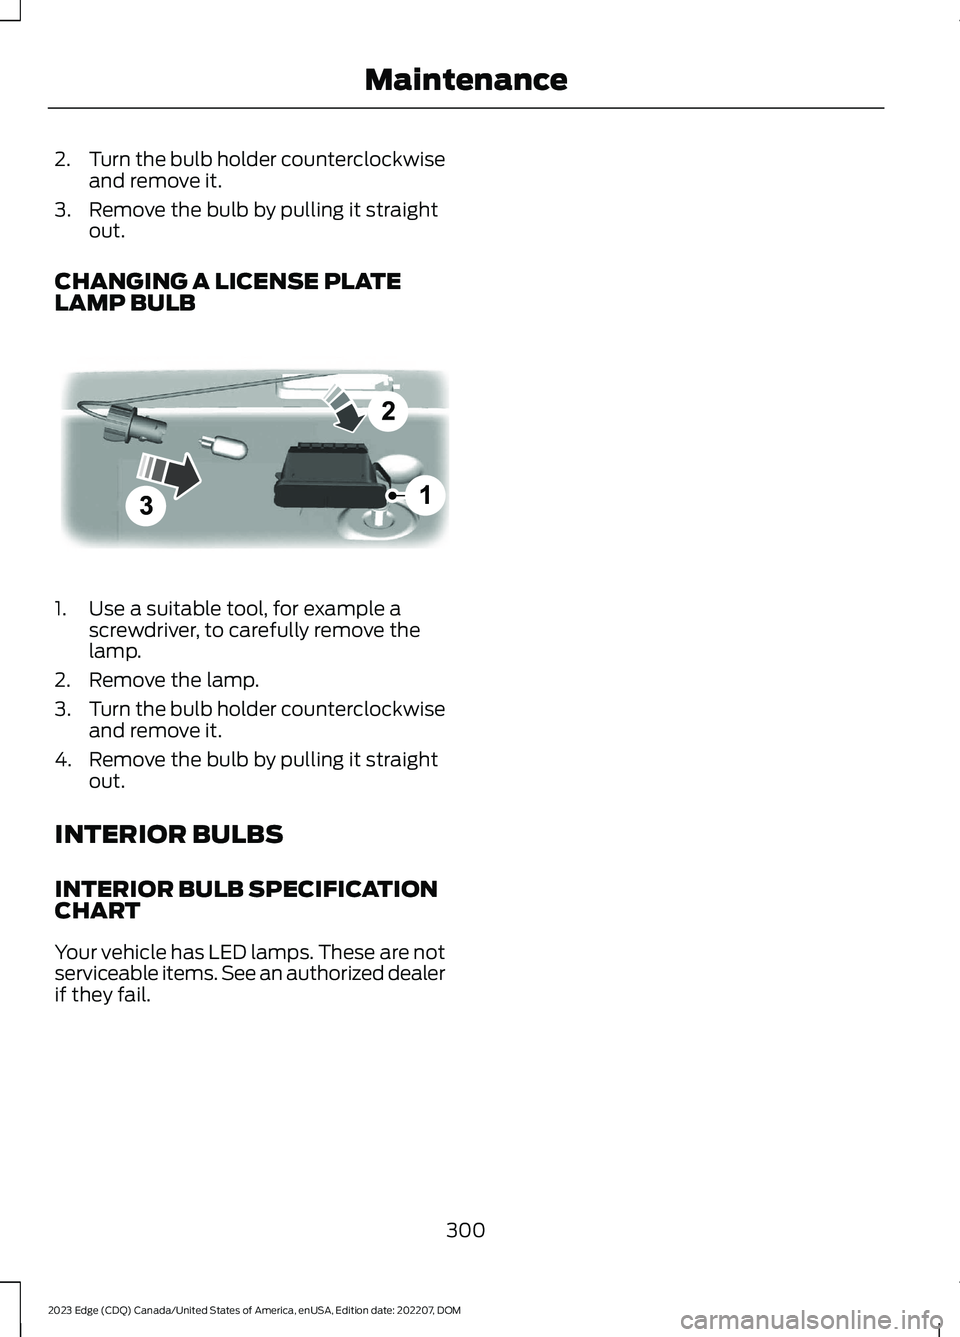
CHANGING A LICENSE PLATELAMP BULB
1.Use a suitable tool, for example ascrewdriver, to carefully remove thelamp.
2.Remove the lamp.
3.Turn the bulb holder counterclockwiseand remove it.
4.Remove the bulb by pulling it straightout.
INTERIOR BULBS
INTERIOR BULB SPECIFICATIONCHART
Your vehicle has LED lamps. These are notserviceable items. See an authorized dealerif they fail.
300
2023 Edge (CDQ) Canada/United States of America, enUSA, Edition date: 202207, DOMMaintenance E72789
Page 331 of 504
•In the first stage, the tire is reinflatedwith a sealing compound and air. Afterthe tire has been inflated, drive thevehicle a short distance approximately4 mi (6 km) to distribute the sealant inthe tire.
•In the second stage, check the tirepressure and adjust, if necessary, to thevehicle's specified tire inflationpressure.
First Stage: Reinflating the Tirewith sealing compound and air
WARNING: Do not stand directlyover the kit while inflating the tire. If younotice any unusual bulges ordeformations in the tire's sidewall duringinflation, stop and call roadsideassistance.
WARNING: If the tire does notinflate to the recommended tire pressurewithin 15 minutes, stop and call roadsideassistance.
Park the vehicle in a safe, level and securearea, away from moving traffic.
Turn the hazard lights on. Apply the parkingbrake and power off the vehicle. Inspectthe flat tire for visible damage.
If a puncture is located in the tire sidewall,stop and call roadside assistance.
1.Remove the valve cap from the tirevalve.
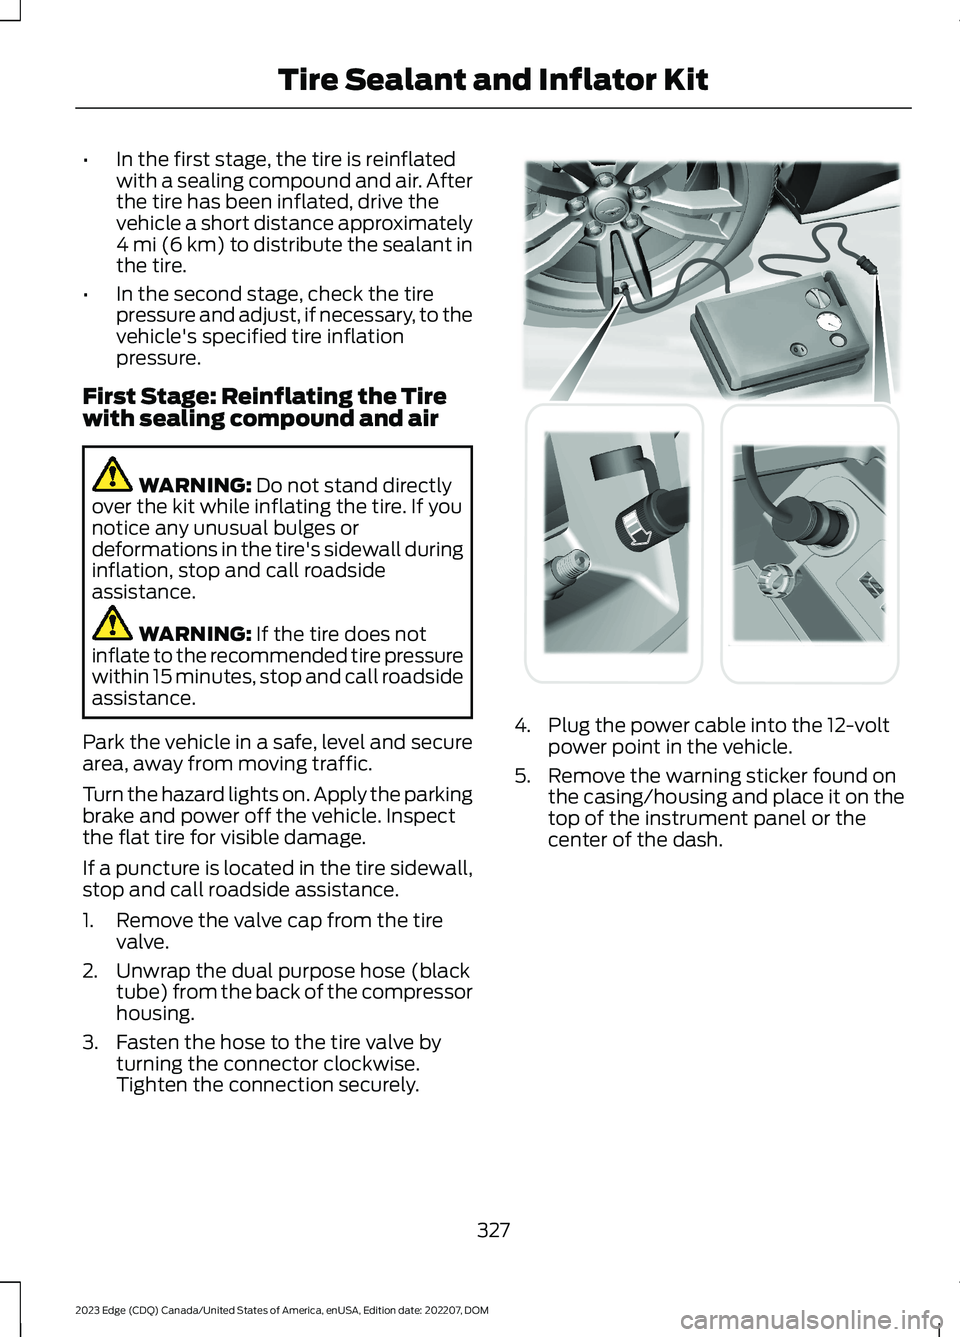
2.Unwrap the dual purpose hose (blacktube) from the back of the compressorhousing.
3.Fasten the hose to the tire valve byturning the connector clockwise.Tighten the connection securely.
4.Plug the power cable into the 12-voltpower point in the vehicle.
5.Remove the warning sticker found onthe casing/housing and place it on thetop of the instrument panel or thecenter of the dash.
327
2023 Edge (CDQ) Canada/United States of America, enUSA, Edition date: 202207, DOMTire Sealant and Inflator Kit E175979
Page 332 of 504
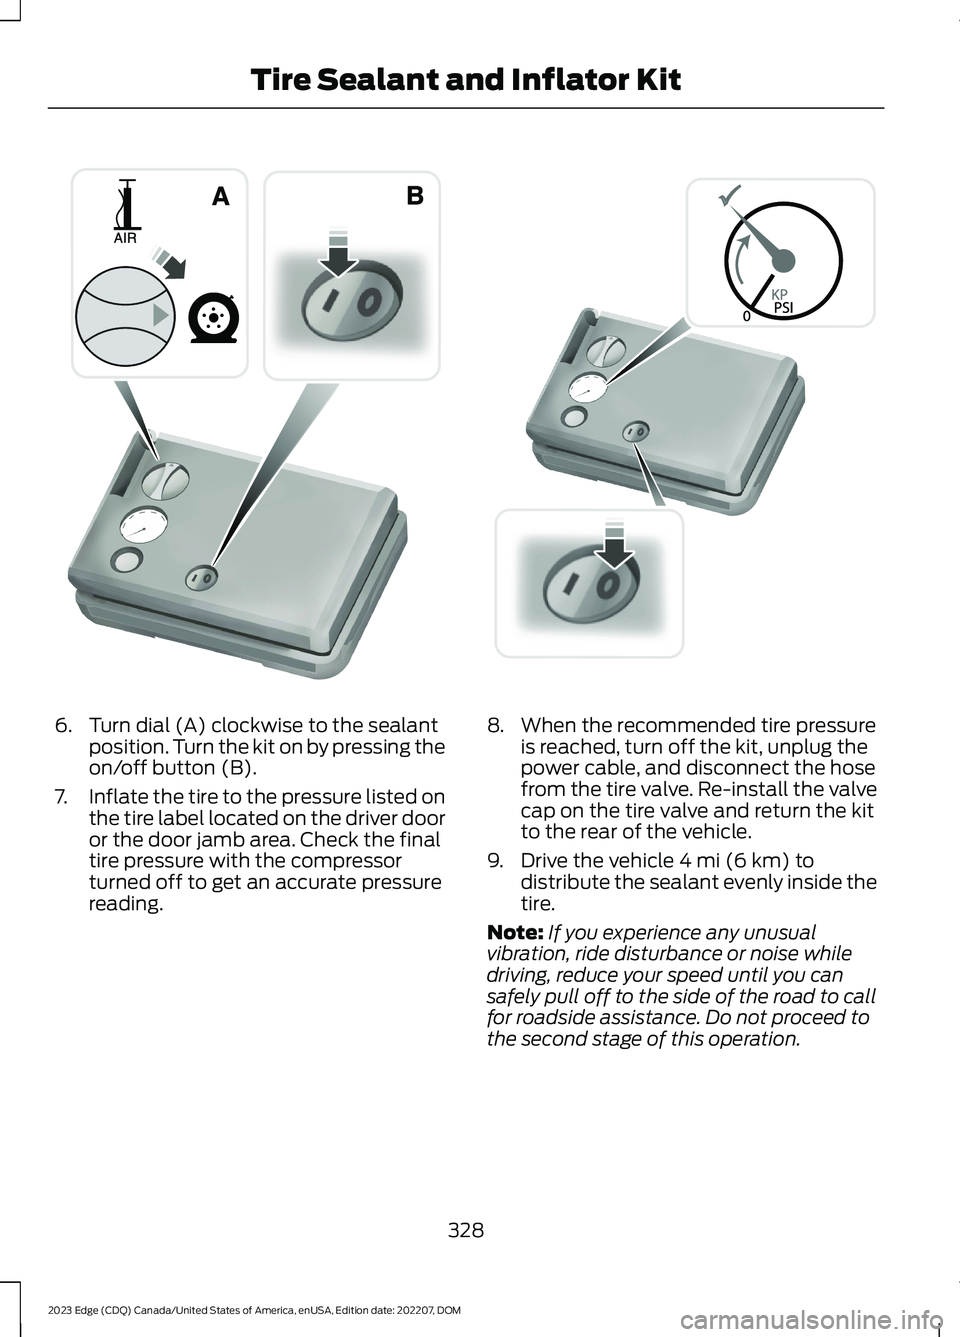
6.Turn dial (A) clockwise to the sealantposition. Turn the kit on by pressing theon/off button (B).
7.Inflate the tire to the pressure listed onthe tire label located on the driver dooror the door jamb area. Check the finaltire pressure with the compressorturned off to get an accurate pressurereading.
8.When the recommended tire pressureis reached, turn off the kit, unplug thepower cable, and disconnect the hosefrom the tire valve. Re-install the valvecap on the tire valve and return the kitto the rear of the vehicle.
9.Drive the vehicle 4 mi (6 km) todistribute the sealant evenly inside thetire.
Note:If you experience any unusualvibration, ride disturbance or noise whiledriving, reduce your speed until you cansafely pull off to the side of the road to callfor roadside assistance. Do not proceed tothe second stage of this operation.
328
2023 Edge (CDQ) Canada/United States of America, enUSA, Edition date: 202207, DOMTire Sealant and Inflator KitE175981 E175982
Page 333 of 504
Second Stage: Checking the tirepressure with the inflator kit
WARNING: If the tire does notinflate to the recommended tire pressurewithin 15 minutes, stop and call roadsideassistance.
WARNING: The power plug mayget hot after use and should be handledcarefully when unplugging.
Check the air pressure of your tires asfollows:
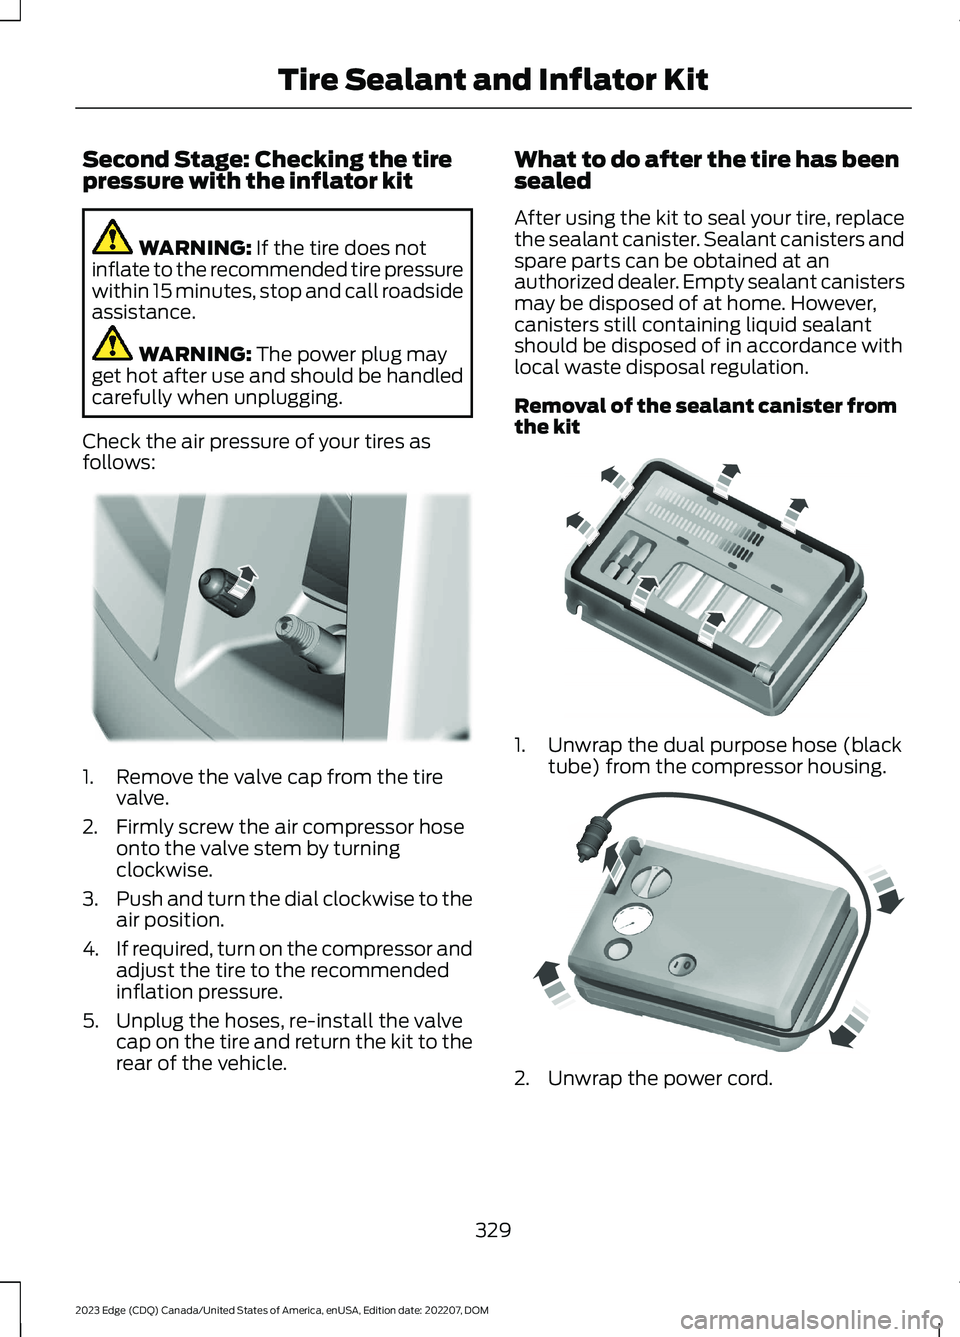
1.Remove the valve cap from the tirevalve.
2.Firmly screw the air compressor hoseonto the valve stem by turningclockwise.
3.Push and turn the dial clockwise to theair position.
4.If required, turn on the compressor andadjust the tire to the recommendedinflation pressure.
5.Unplug the hoses, re-install the valvecap on the tire and return the kit to therear of the vehicle.
What to do after the tire has beensealed
After using the kit to seal your tire, replacethe sealant canister. Sealant canisters andspare parts can be obtained at anauthorized dealer. Empty sealant canistersmay be disposed of at home. However,canisters still containing liquid sealantshould be disposed of in accordance withlocal waste disposal regulation.
Removal of the sealant canister fromthe kit
1.Unwrap the dual purpose hose (blacktube) from the compressor housing.
2.Unwrap the power cord.
329
2023 Edge (CDQ) Canada/United States of America, enUSA, Edition date: 202207, DOMTire Sealant and Inflator KitE175983 E175984 E175985
Page 341 of 504
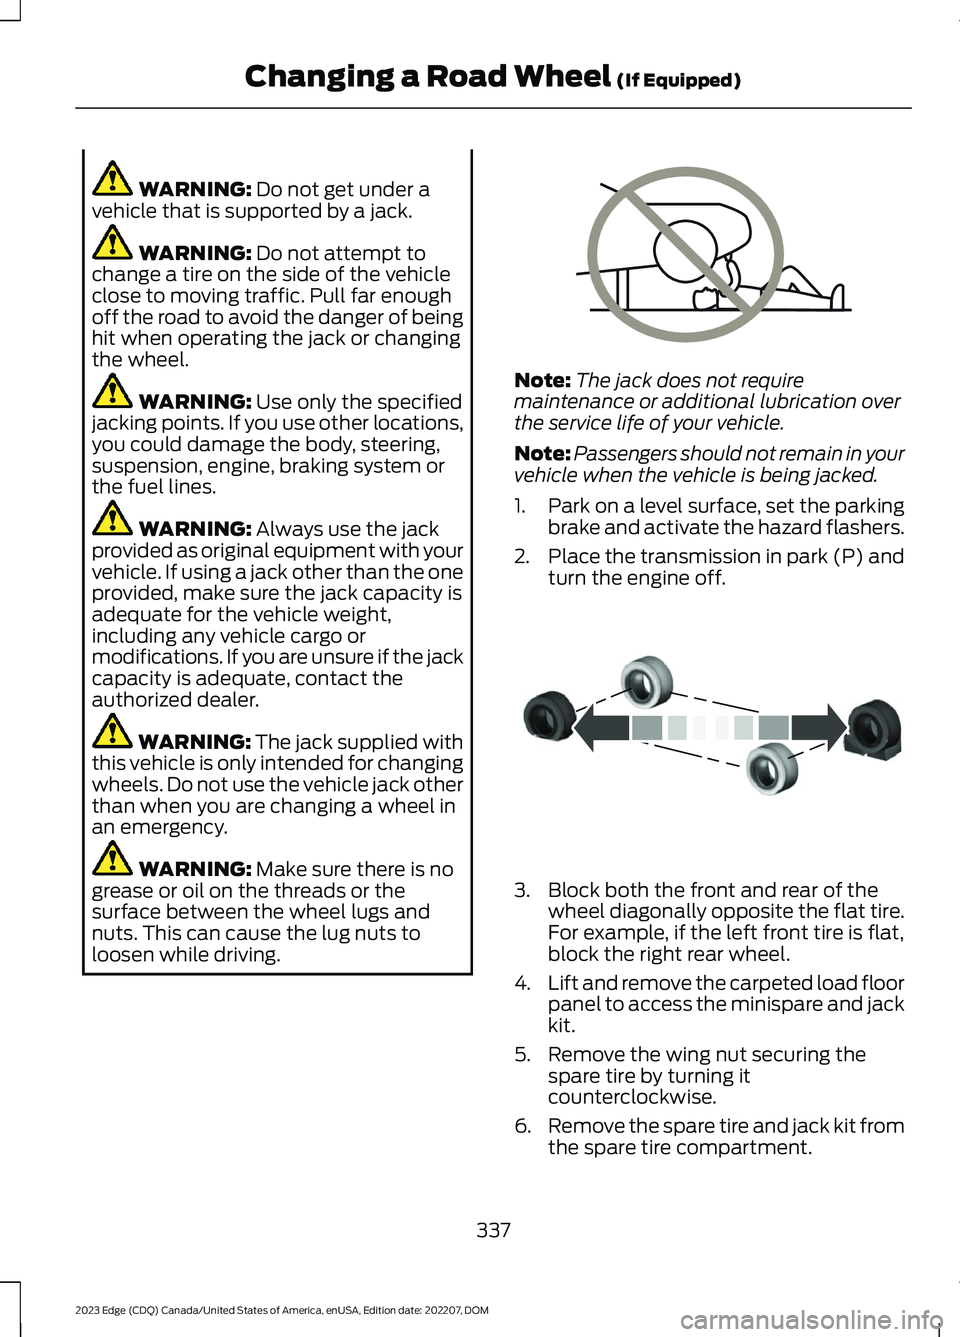
WARNING: Do not get under avehicle that is supported by a jack.
WARNING: Do not attempt tochange a tire on the side of the vehicleclose to moving traffic. Pull far enoughoff the road to avoid the danger of beinghit when operating the jack or changingthe wheel.
WARNING: Use only the specifiedjacking points. If you use other locations,you could damage the body, steering,suspension, engine, braking system orthe fuel lines.
WARNING: Always use the jackprovided as original equipment with yourvehicle. If using a jack other than the oneprovided, make sure the jack capacity isadequate for the vehicle weight,including any vehicle cargo ormodifications. If you are unsure if the jackcapacity is adequate, contact theauthorized dealer.
WARNING: The jack supplied withthis vehicle is only intended for changingwheels. Do not use the vehicle jack otherthan when you are changing a wheel inan emergency.
WARNING: Make sure there is nogrease or oil on the threads or thesurface between the wheel lugs andnuts. This can cause the lug nuts toloosen while driving.
Note:The jack does not requiremaintenance or additional lubrication overthe service life of your vehicle.
Note:Passengers should not remain in yourvehicle when the vehicle is being jacked.
1.Park on a level surface, set the parkingbrake and activate the hazard flashers.
2.Place the transmission in park (P) andturn the engine off.
3.Block both the front and rear of thewheel diagonally opposite the flat tire.For example, if the left front tire is flat,block the right rear wheel.
4.Lift and remove the carpeted load floorpanel to access the minispare and jackkit.
5.Remove the wing nut securing thespare tire by turning itcounterclockwise.
6.Remove the spare tire and jack kit fromthe spare tire compartment.
337
2023 Edge (CDQ) Canada/United States of America, enUSA, Edition date: 202207, DOMChanging a Road Wheel (If Equipped)E166722 E175447
Page 342 of 504
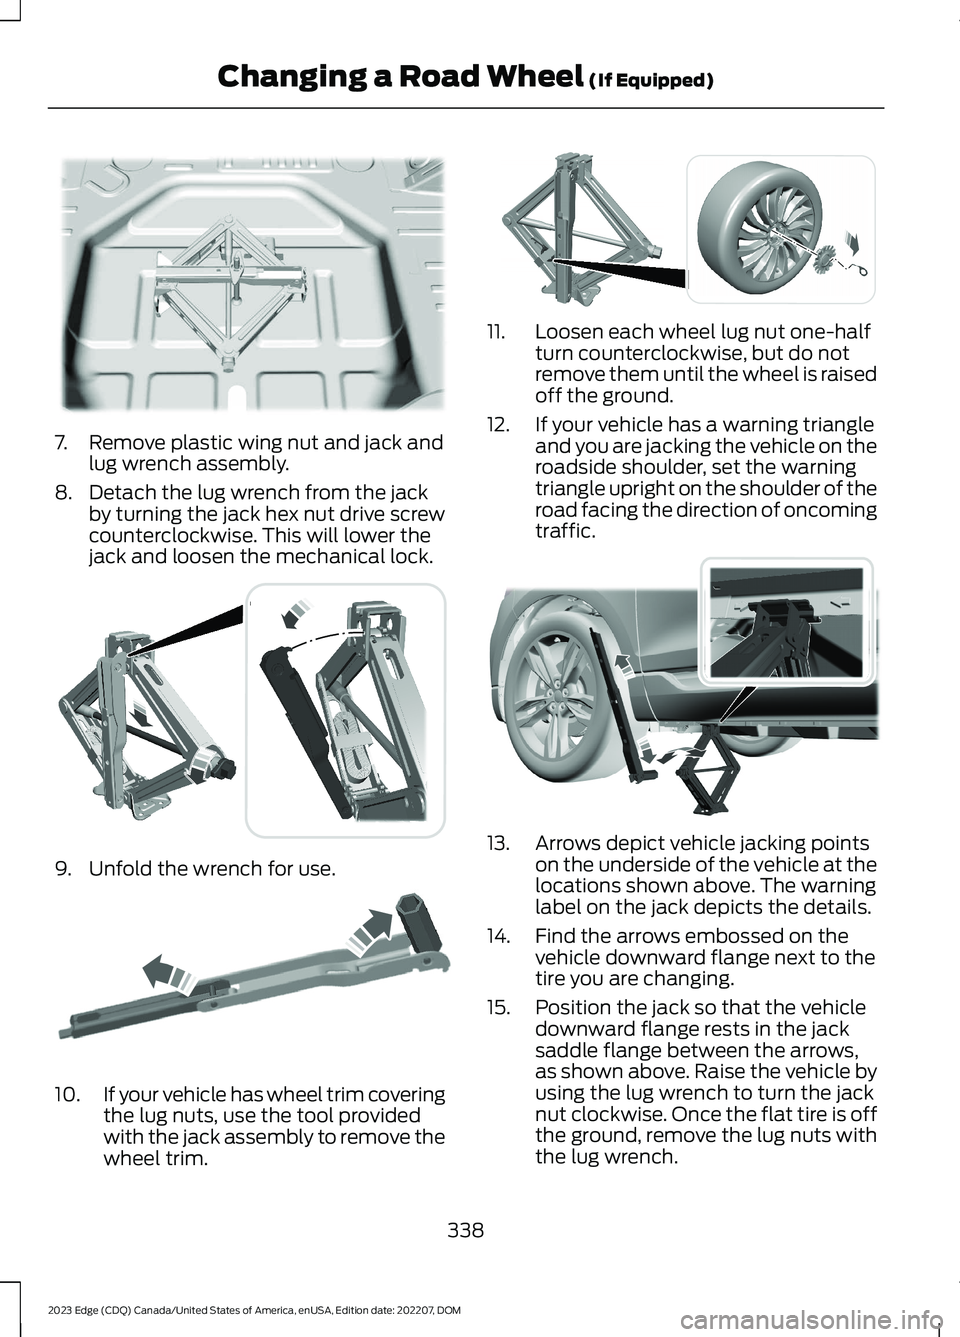
7.Remove plastic wing nut and jack andlug wrench assembly.
8.Detach the lug wrench from the jackby turning the jack hex nut drive screwcounterclockwise. This will lower thejack and loosen the mechanical lock.
9.Unfold the wrench for use.
10.If your vehicle has wheel trim coveringthe lug nuts, use the tool providedwith the jack assembly to remove thewheel trim.
11.Loosen each wheel lug nut one-halfturn counterclockwise, but do notremove them until the wheel is raisedoff the ground.
12.If your vehicle has a warning triangleand you are jacking the vehicle on theroadside shoulder, set the warningtriangle upright on the shoulder of theroad facing the direction of oncomingtraffic.
13.Arrows depict vehicle jacking pointson the underside of the vehicle at thelocations shown above. The warninglabel on the jack depicts the details.
14.Find the arrows embossed on thevehicle downward flange next to thetire you are changing.
15.Position the jack so that the vehicledownward flange rests in the jacksaddle flange between the arrows,as shown above. Raise the vehicle byusing the lug wrench to turn the jacknut clockwise. Once the flat tire is offthe ground, remove the lug nuts withthe lug wrench.
338
2023 Edge (CDQ) Canada/United States of America, enUSA, Edition date: 202207, DOMChanging a Road Wheel (If Equipped)E178186 E294117 E181744 E294584 E336095
Page 343 of 504
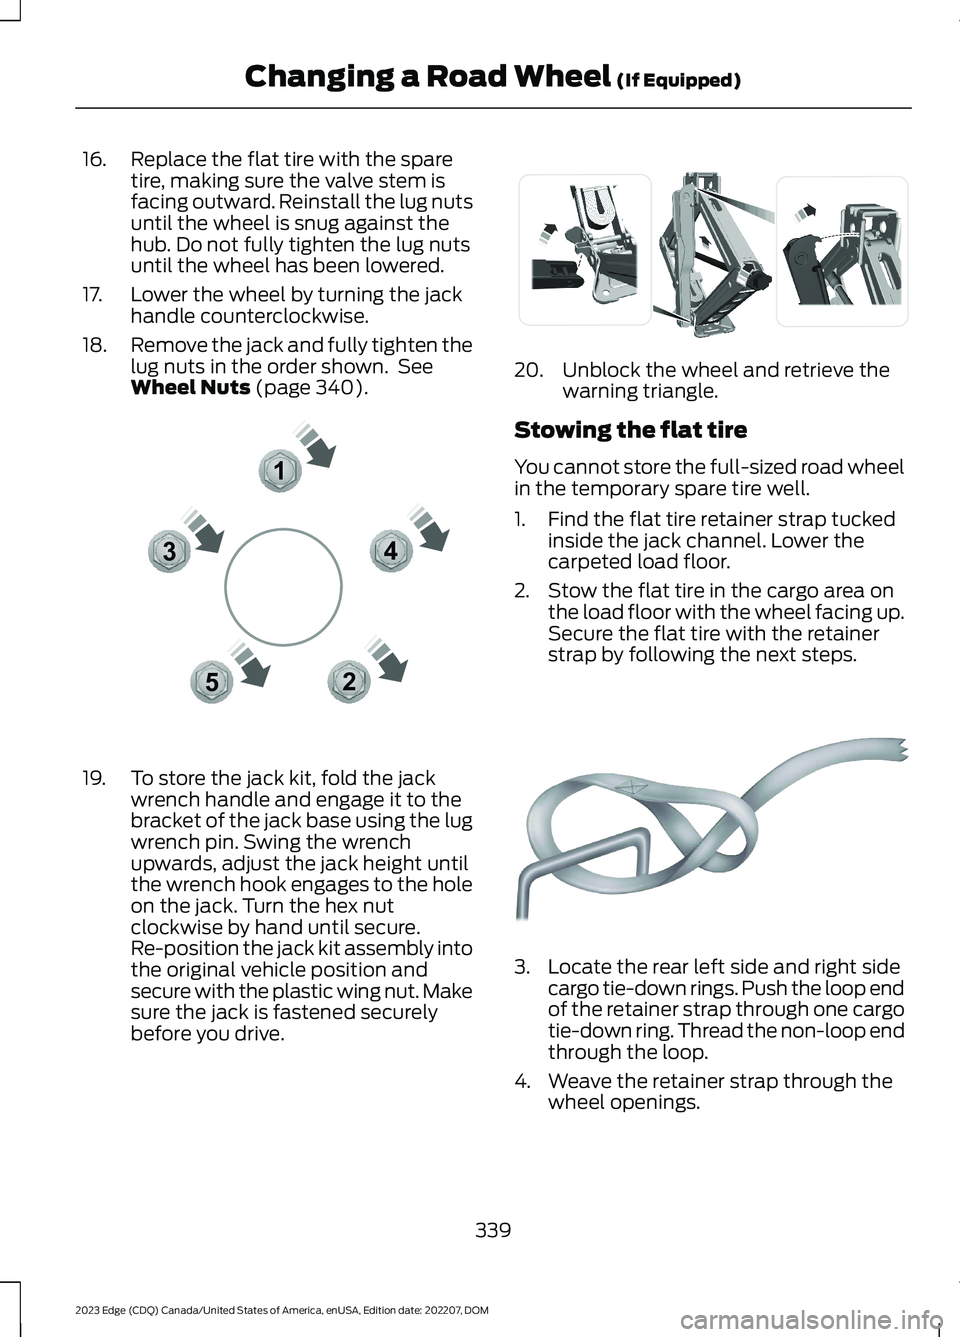
16.Replace the flat tire with the sparetire, making sure the valve stem isfacing outward. Reinstall the lug nutsuntil the wheel is snug against thehub. Do not fully tighten the lug nutsuntil the wheel has been lowered.
17.Lower the wheel by turning the jackhandle counterclockwise.
18.Remove the jack and fully tighten thelug nuts in the order shown. SeeWheel Nuts (page 340).
19.To store the jack kit, fold the jackwrench handle and engage it to thebracket of the jack base using the lugwrench pin. Swing the wrenchupwards, adjust the jack height untilthe wrench hook engages to the holeon the jack. Turn the hex nutclockwise by hand until secure.Re-position the jack kit assembly intothe original vehicle position andsecure with the plastic wing nut. Makesure the jack is fastened securelybefore you drive.
20.Unblock the wheel and retrieve thewarning triangle.
Stowing the flat tire
You cannot store the full-sized road wheelin the temporary spare tire well.
1.Find the flat tire retainer strap tuckedinside the jack channel. Lower thecarpeted load floor.
2.Stow the flat tire in the cargo area onthe load floor with the wheel facing up.Secure the flat tire with the retainerstrap by following the next steps.
3.Locate the rear left side and right sidecargo tie-down rings. Push the loop endof the retainer strap through one cargotie-down ring. Thread the non-loop endthrough the loop.
4.Weave the retainer strap through thewheel openings.
339
2023 Edge (CDQ) Canada/United States of America, enUSA, Edition date: 202207, DOMChanging a Road Wheel (If Equipped)12345E306781 E294121 E142906